Ecm SUZUKI SWIFT 2000 1.G RG413 Service Workshop Manual
[x] Cancel search | Manufacturer: SUZUKI, Model Year: 2000, Model line: SWIFT, Model: SUZUKI SWIFT 2000 1.GPages: 698, PDF Size: 16.01 MB
Page 492 of 698
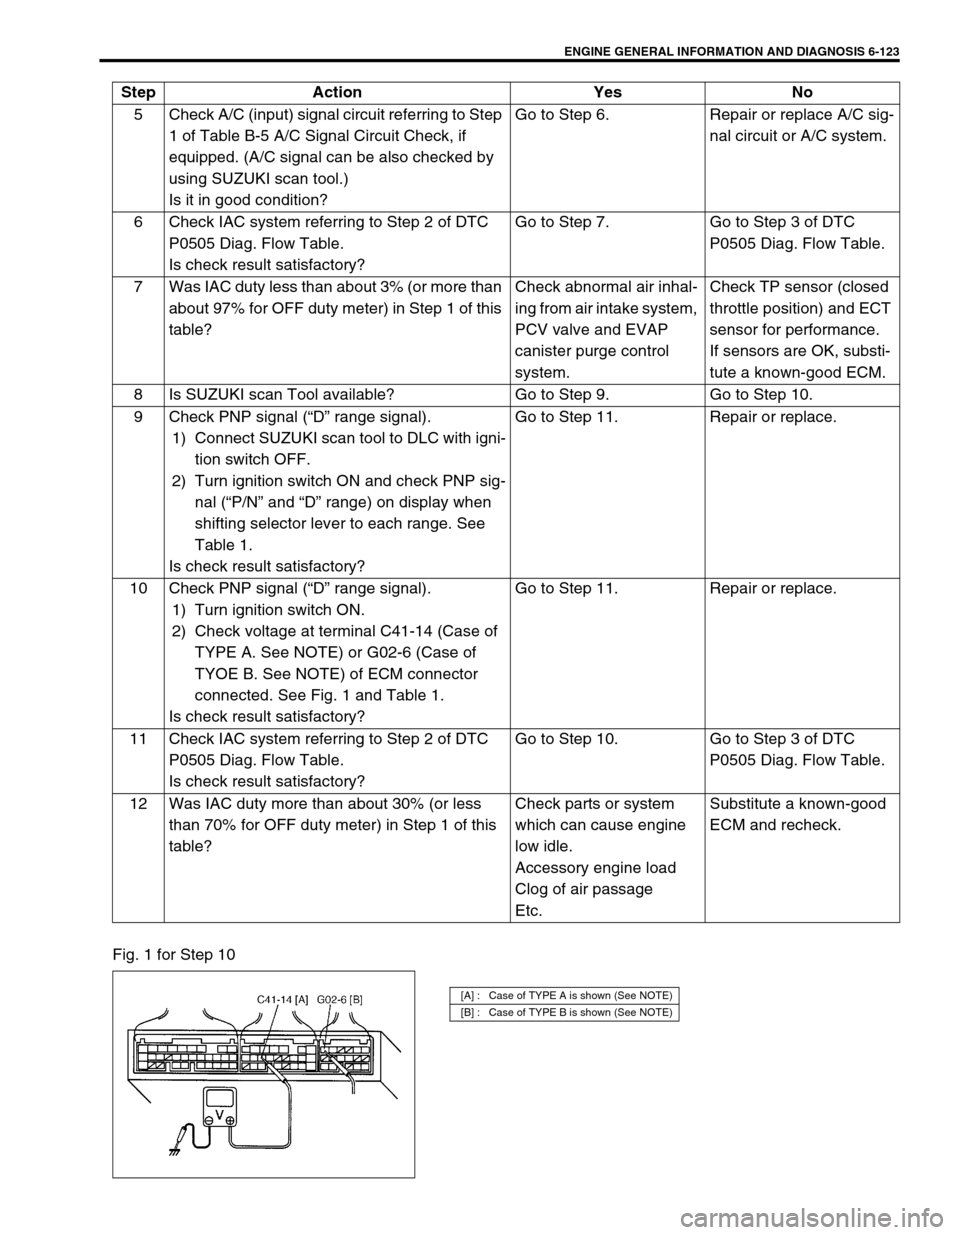
ENGINE GENERAL INFORMATION AND DIAGNOSIS 6-123
Fig. 1 for Step 105 Check A/C (input) signal circuit referring to Step
1 of Table B-5 A/C Signal Circuit Check, if
equipped. (A/C signal can be also checked by
using SUZUKI scan tool.)
Is it in good condition?Go to Step 6. Repair or replace A/C sig-
nal circuit or A/C system.
6 Check IAC system referring to Step 2 of DTC
P0505 Diag. Flow Table.
Is check result satisfactory?Go to Step 7. Go to Step 3 of DTC
P0505 Diag. Flow Table.
7 Was IAC duty less than about 3% (or more than
about 97% for OFF duty meter) in Step 1 of this
table?Check abnormal air inhal-
ing from air intake system,
PCV valve and EVAP
canister purge control
system.Check TP sensor (closed
throttle position) and ECT
sensor for performance.
If sensors are OK, substi-
tute a known-good ECM.
8 Is SUZUKI scan Tool available? Go to Step 9. Go to Step 10.
9 Check PNP signal (“D” range signal).
1) Connect SUZUKI scan tool to DLC with igni-
tion switch OFF.
2) Turn ignition switch ON and check PNP sig-
nal (“P/N” and “D” range) on display when
shifting selector lever to each range. See
Table 1.
Is check result satisfactory?Go to Step 11. Repair or replace.
10 Check PNP signal (“D” range signal).
1) Turn ignition switch ON.
2) Check voltage at terminal C41-14 (Case of
TYPE A. See NOTE) or G02-6 (Case of
TYOE B. See NOTE) of ECM connector
connected. See Fig. 1 and Table 1.
Is check result satisfactory?Go to Step 11. Repair or replace.
11 Check IAC system referring to Step 2 of DTC
P0505 Diag. Flow Table.
Is check result satisfactory?Go to Step 10. Go to Step 3 of DTC
P0505 Diag. Flow Table.
12 Was IAC duty more than about 30% (or less
than 70% for OFF duty meter) in Step 1 of this
table?Check parts or system
which can cause engine
low idle.
Accessory engine load
Clog of air passage
Etc.Substitute a known-good
ECM and recheck. Step Action Yes No
[A] : Case of TYPE A is shown (See NOTE)
[B] : Case of TYPE B is shown (See NOTE)
Page 493 of 698
6-124 ENGINE GENERAL INFORMATION AND DIAGNOSIS
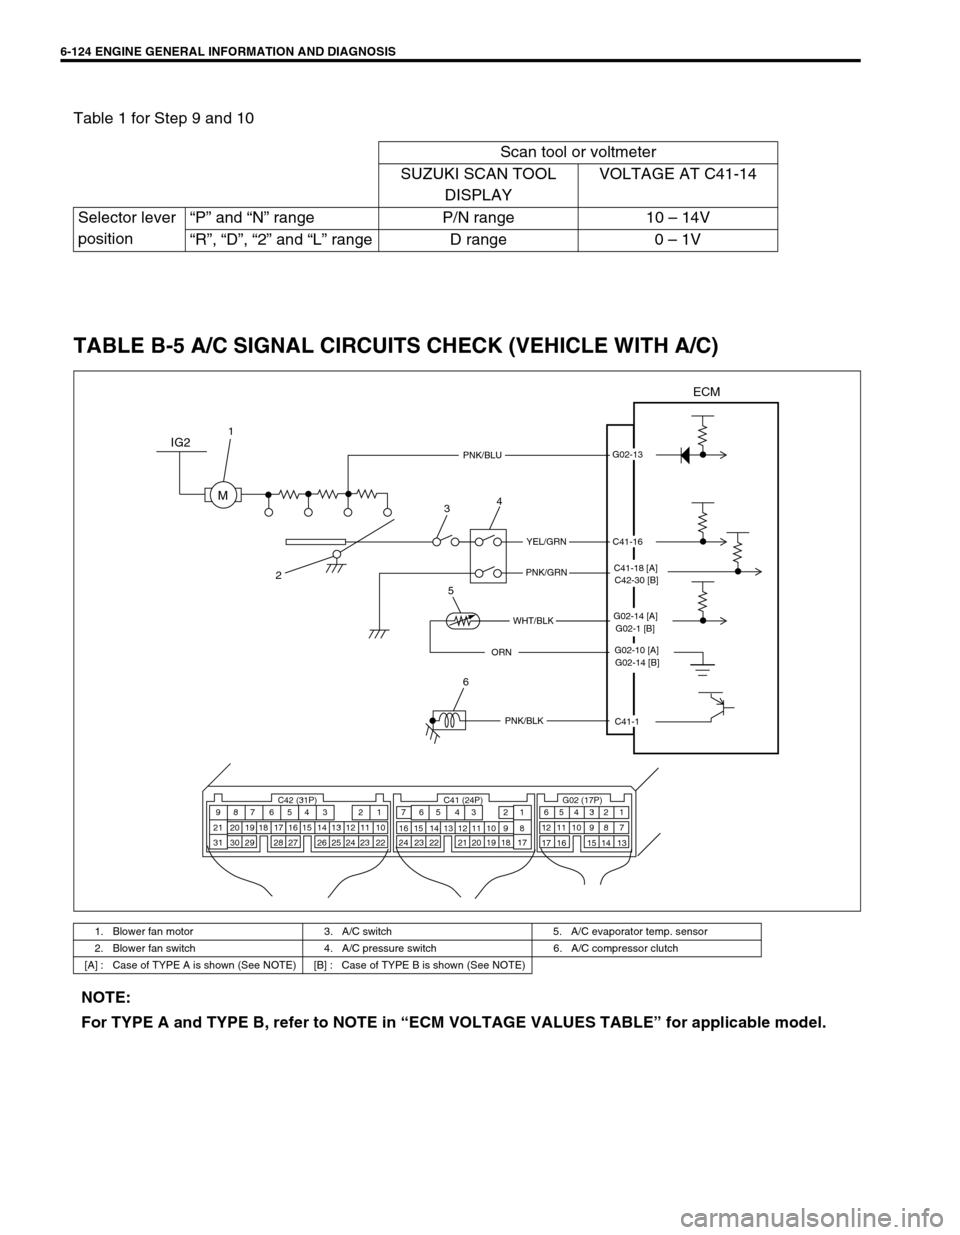
Table 1 for Step 9 and 10
TABLE B-5 A/C SIGNAL CIRCUITS CHECK (VEHICLE WITH A/C)
Scan tool or voltmeter
SUZUKI SCAN TOOL
DISPLAYVOLTAGE AT C41-14
Selector lever
position“P” and “N” range P/N range 10 – 14V
“R”, “D”, “2” and “L” range D range 0 – 1V
1. Blower fan motor 3. A/C switch 5. A/C evaporator temp. sensor
2. Blower fan switch 4. A/C pressure switch 6. A/C compressor clutch
[A] : Case of TYPE A is shown (See NOTE) [B] : Case of TYPE B is shown (See NOTE)
IG2
M
ECM
PNK/BLU
YEL/GRN
PNK/GRN
WHT/BLK
ORN
PNK/BLK
G02-13
C41-16
C41-1
C42 (31P) C41 (24P) G02 (17P)1 2 3 4 5 6 7 8 9
10 11 12 13 14 15 16 17 18 19 20 21
22 23 24 25 26 28 27 29 30 315 6
1 2 3 4 5 6 7
11 12
9 10 11 13 12 14 15 16
16 171 2
7 8
13 14 3 4
9 10
15 17 188
19 20 21 22 23 24
1
234
5
6
C41-18 [A]
C42-30 [B]
G02-14 [A]
G02-1 [B]
G02-14 [B] G02-10 [A]
NOTE:
For TYPE A and TYPE B, refer to NOTE in “ECM VOLTAGE VALUES TABLE” for applicable model.
Page 494 of 698
ENGINE GENERAL INFORMATION AND DIAGNOSIS 6-125
INSPECTION
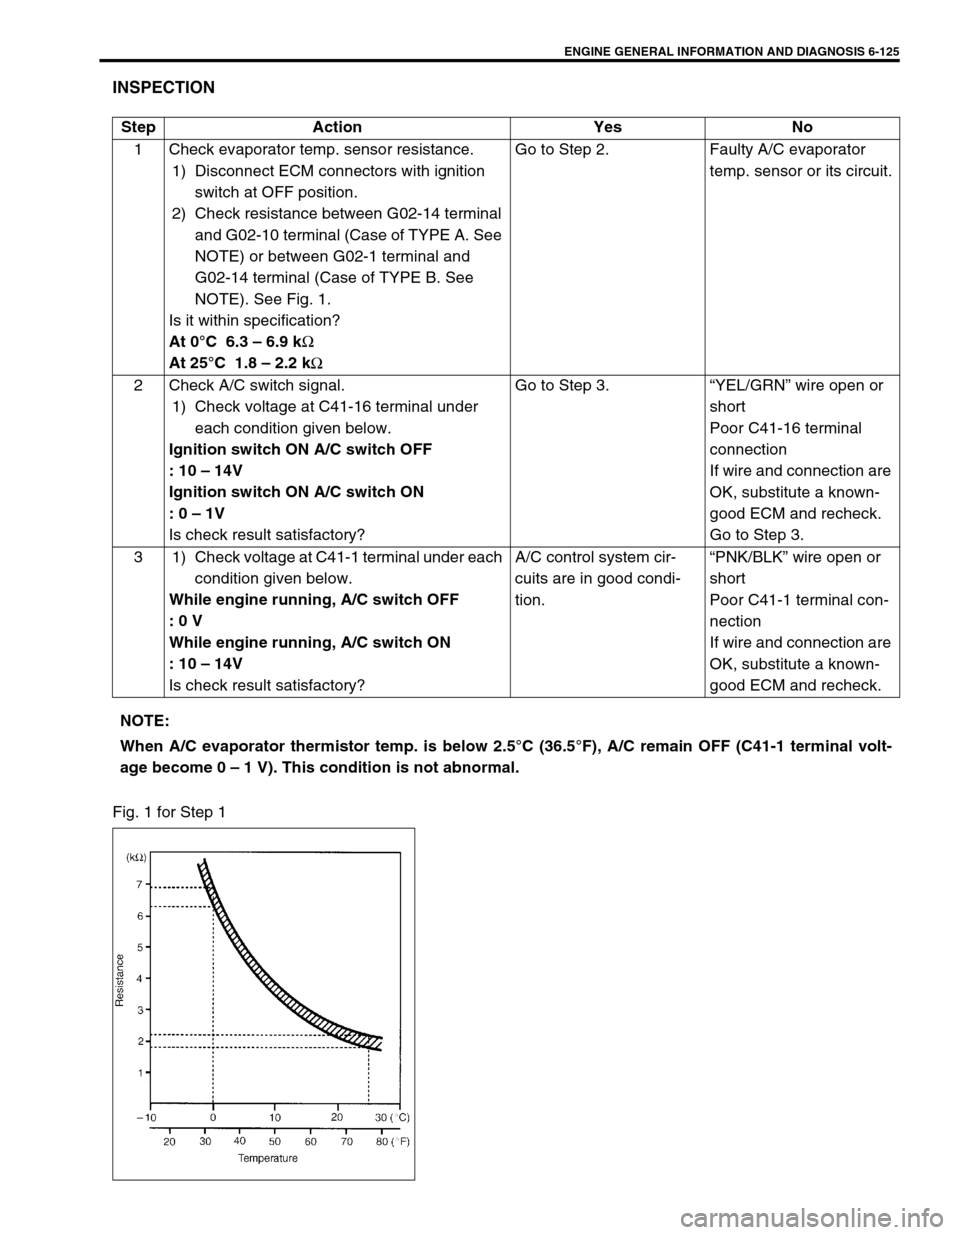
Fig. 1 for Step 1Step Action Yes No
1 Check evaporator temp. sensor resistance.
1) Disconnect ECM connectors with ignition
switch at OFF position.
2) Check resistance between G02-14 terminal
and G02-10 terminal (Case of TYPE A. See
NOTE) or between G02-1 terminal and
G02-14 terminal (Case of TYPE B. See
NOTE). See Fig. 1.
Is it within specification?
At 0°C 6.3 – 6.9 k
Ω
At 25°C 1.8 – 2.2 k
ΩGo to Step 2. Faulty A/C evaporator
temp. sensor or its circuit.
2 Check A/C switch signal.
1) Check voltage at C41-16 terminal under
each condition given below.
Ignition switch ON A/C switch OFF
: 10 – 14V
Ignition switch ON A/C switch ON
: 0 – 1V
Is check result satisfactory?Go to Step 3.“YEL/GRN” wire open or
short
Poor C41-16 terminal
connection
If wire and connection are
OK, substitute a known-
good ECM and recheck.
Go to Step 3.
3 1) Check voltage at C41-1 terminal under each
condition given below.
While engine running, A/C switch OFF
: 0 V
While engine running, A/C switch ON
: 10 – 14V
Is check result satisfactory?A/C control system cir-
cuits are in good condi-
tion.“PNK/BLK” wire open or
short
Poor C41-1 terminal con-
nection
If wire and connection are
OK, substitute a known-
good ECM and recheck.
NOTE:
When A/C evaporator thermistor temp. is below 2.5°C (36.5°F), A/C remain OFF (C41-1 terminal volt-
age become 0 – 1 V). This condition is not abnormal.
Page 495 of 698
![SUZUKI SWIFT 2000 1.G RG413 Service Workshop Manual 6-126 ENGINE GENERAL INFORMATION AND DIAGNOSIS
TABLE B-6 ELECTRIC LOAD SIGNAL CIRCUIT CHECK
INSPECTION
1. Blower fan motor 3. Rear defogger 5. To A/C switch
2. Blower fan switch 4. Position lamp
[A] : SUZUKI SWIFT 2000 1.G RG413 Service Workshop Manual 6-126 ENGINE GENERAL INFORMATION AND DIAGNOSIS
TABLE B-6 ELECTRIC LOAD SIGNAL CIRCUIT CHECK
INSPECTION
1. Blower fan motor 3. Rear defogger 5. To A/C switch
2. Blower fan switch 4. Position lamp
[A] :](/img/20/7606/w960_7606-494.png)
6-126 ENGINE GENERAL INFORMATION AND DIAGNOSIS
TABLE B-6 ELECTRIC LOAD SIGNAL CIRCUIT CHECK
INSPECTION
1. Blower fan motor 3. Rear defogger 5. To A/C switch
2. Blower fan switch 4. Position lamp
[A] : Case of TYPE A is shown (See NOTE) [B] : Case of TYPE B is shown (See NOTE)
IG2
M
ECM
PNK/BLUG02-13
C42 (31P) C41 (24P) G02 (17P)1 2 3 4 5 6 7 8 9
10 11 12 13 14 15 16 17 18 19 20 21
22 23 24 25 26 28 27 29 30 315 6
1 2 3 4 5 6 7
11 12
9 10 11 13 12 14 15 16
16 171 2
7 8
13 14 3 4
9 10
15 17 188
19 20 21 22 23 24
RED/BLK [A]
IG11
+BB
43 25 1
C42-17 [A]
C41-17 [B] RED/YEL [B]
NOTE:
For TYPE A and TYPE B, refer to NOTE in “ECM VOLTAGE VALUES TABLE” for applicable model.
Step Action Yes No
1 Is SUZUKI scan tool available? Go to Step 2. Go to Step 3.
2 Check Electric Load Signal Circuit.
1) Connect SUZUKI scan tool to DLC with igni-
tion switch OFF.
2) Start engine and select “DATA LIST” mode
on scan tool.
3) Check electric load signal under following
each condition. See Fig. 1 and Table 1.
Is check result satisfactory?Electric load signal circuit
is in good condition.“RED/BLK” (Case of
TYPE A. See NOTE) or
C41-17 (Case of TYPE B.
See NOTE) and/or “PNK/
BLU” circuit open or short,
Electric load diodes mal-
function or Each electric
load circuit malfunction.
3 Check Electric Load Signal Circuit.
1) Turn ignition switch ON.
2) Check voltage at each terminals C42-17
(Case of TYPE A. See NOTE) or C41-17
(Case of TYPE B. See NOTE) and G02-13
of ECM connector connected, under above
each condition. See Fig. 2 and Table 1.
Is each voltage as specified?Electric load signal circuit
is in good condition.“RED/BLK” (Case of
TYPE A. See NOTE) or
C41-17 (Case of TYPE B.
See NOTE) and/or “PNK/
BLU” circuit open or short,
Electric load diodes mal-
function or Each electric
load circuit malfunction.
Page 497 of 698
![SUZUKI SWIFT 2000 1.G RG413 Service Workshop Manual 6-128 ENGINE GENERAL INFORMATION AND DIAGNOSIS
TABLE B-7 RADIATOR FAN CONTROL SYSTEM CHECK
INSPECTION
1. Radiator fan relay No.1 3. Radiator fan relay No.3 [A] : Case of TYPE A is shown (See NOTE)
2. SUZUKI SWIFT 2000 1.G RG413 Service Workshop Manual 6-128 ENGINE GENERAL INFORMATION AND DIAGNOSIS
TABLE B-7 RADIATOR FAN CONTROL SYSTEM CHECK
INSPECTION
1. Radiator fan relay No.1 3. Radiator fan relay No.3 [A] : Case of TYPE A is shown (See NOTE)
2.](/img/20/7606/w960_7606-496.png)
6-128 ENGINE GENERAL INFORMATION AND DIAGNOSIS
TABLE B-7 RADIATOR FAN CONTROL SYSTEM CHECK
INSPECTION
1. Radiator fan relay No.1 3. Radiator fan relay No.3 [A] : Case of TYPE A is shown (See NOTE)
2. Radiator fan relay No.2 4. Radiator fan [B] : Case of TYPE B is shown (See NOTE)
BATT
80A30A
15A
BLKBLU/WHT
ECM
BLK/ORN
BLK/ORNC42-1
C42-3
L+
L–
H– H+
BLU
C42 (31P) C41 (24P) G02 (17P)1 2 3 4 5 6 7 8 9
10 11 12 13 14 15 16 17 18 19 20 21
22 23 24 25 26 28 27 29 30 315 6
1 2 3 4 5 6 7
11 12
9 10 11 13 12 14 15 16
16 171 2
7 8
13 14 3 4
9 10
15 17 188
19 20 21 22 23 24
C41-18
GRN/RED [B]PPL/YEL [A]
BLK/RED
BLU/WHT
BLU/RED
BLK
BLU
BLU/BLK
PPL/YEL
BLU/REDBLK/YEL
BRN/WHT
1
2
34
G02-3 [A]
C41-9 [B]
NOTE:
For TYPE A and TYPE B, refer to NOTE in “ECM VOLTAGE VALUES TABLE” for applicable model.
Step Action Yes No
1 Check Fan Control System.
1) Connect scan tool to DLC with ignition switch OFF.
2) Start engine and select “DATA LIST” mode on scan
tool.
3) Warm up engine until coolant temp. is 97.5°C, 208°F or
higher and A/C switch turn OFF. (If engine coolant
temp. does not rise, check engine cooling system or
ECT sensor.) See Fig. 1.
Is radiator cooling fan started when engine coolant temp.
reached above temp.?Radiator cooling fan
control system is in
good condition.Go to Step 2.
2 Check Radiator Fan Relay and Its Circuit.
1) Check DTC and pending DTC with scan tool.
Is DTC P0480 displayed?Go to DTC P0480 Diag.
Flow Table.Go to Step 3.
3 Check Radiator Fan Relays.
1) Turn ignition switch OFF and remove radiator cooling
fan relays. (No.1 – No.3)
2) Check for proper connection to relay at terminals “c”
and “d”.
3) If OK, check that there is continuity between “c” and “d”
when battery is connected to terminals “a” and “b”. See
Fig. 2.
Is check result satisfactory?Go to Step 4. Replace radia-
tor fan relay(s).
Page 593 of 698
6B-4 ENGINE COOLING
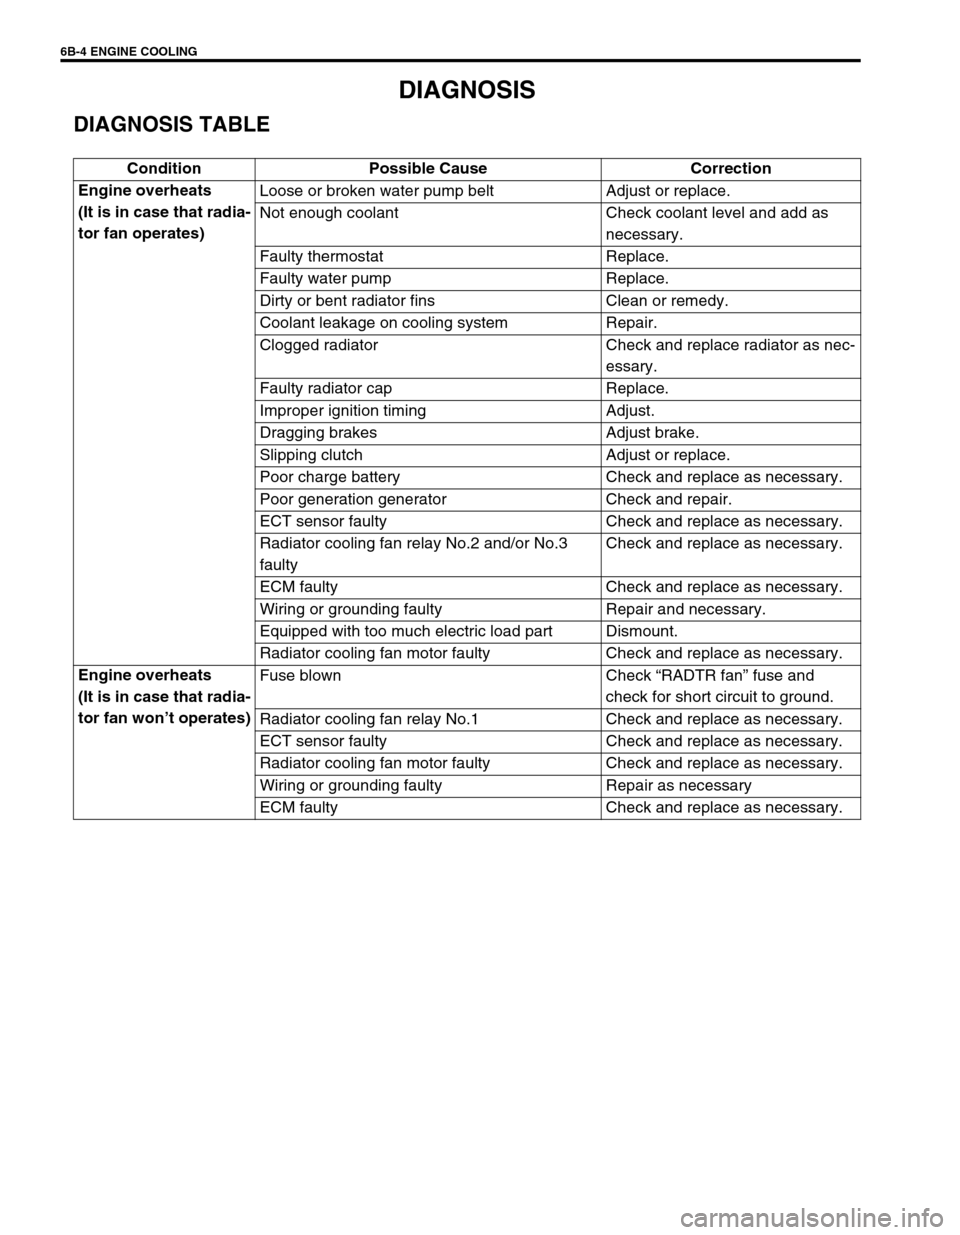
DIAGNOSIS
DIAGNOSIS TABLE
Condition Possible Cause Correction
Engine overheats
(It is in case that radia-
tor fan operates)Loose or broken water pump belt Adjust or replace.
Not enough coolant Check coolant level and add as
necessary.
Faulty thermostat Replace.
Faulty water pump Replace.
Dirty or bent radiator fins Clean or remedy.
Coolant leakage on cooling system Repair.
Clogged radiator Check and replace radiator as nec-
essary.
Faulty radiator cap Replace.
Improper ignition timing Adjust.
Dragging brakes Adjust brake.
Slipping clutch Adjust or replace.
Poor charge battery Check and replace as necessary.
Poor generation generator Check and repair.
ECT sensor faulty Check and replace as necessary.
Radiator cooling fan relay No.2 and/or No.3
faultyCheck and replace as necessary.
ECM faulty Check and replace as necessary.
Wiring or grounding faulty Repair and necessary.
Equipped with too much electric load part Dismount.
Radiator cooling fan motor faulty Check and replace as necessary.
Engine overheats
(It is in case that radia-
tor fan won’t operates)Fuse blown Check “RADTR fan” fuse and
check for short circuit to ground.
Radiator cooling fan relay No.1 Check and replace as necessary.
ECT sensor faulty Check and replace as necessary.
Radiator cooling fan motor faulty Check and replace as necessary.
Wiring or grounding faulty Repair as necessary
ECM faulty Check and replace as necessary.
Page 594 of 698
ENGINE COOLING 6B-5
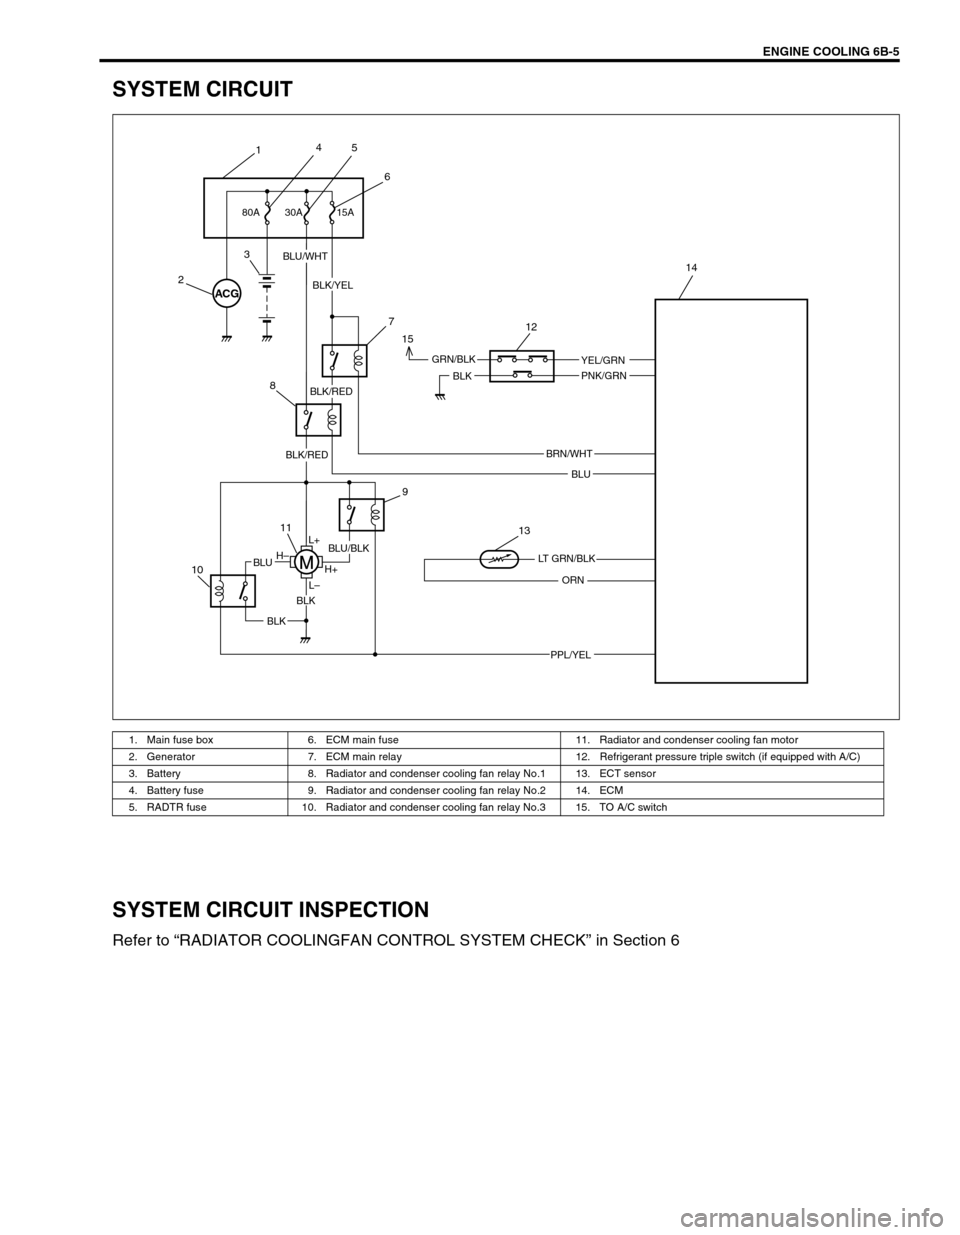
SYSTEM CIRCUIT
SYSTEM CIRCUIT INSPECTION
Refer to “RADIATOR COOLINGFAN CONTROL SYSTEM CHECK” in Section 6
1. Main fuse box 6. ECM main fuse 11. Radiator and condenser cooling fan motor
2. Generator 7. ECM main relay 12. Refrigerant pressure triple switch (if equipped with A/C)
3. Battery 8. Radiator and condenser cooling fan relay No.1 13. ECT sensor
4. Battery fuse 9. Radiator and condenser cooling fan relay No.2 14. ECM
5. RADTR fuse 10. Radiator and condenser cooling fan relay No.3 15. TO A/C switch
ACG
15A 30A
BLU/WHT
BLK/YEL
BLK
BLU
ORN
BLK
BLK
BLUH–
H+
L– L+
GRN/BLK
BLU/BLK
BRN/WHT
YEL/GRN
PNK/GRN
PPL/YEL
LT GRN/BLK
BLK/RED
BLK/RED 80A
145
6
2
3
7
8
9
11
10
13 15
12
14
Page 622 of 698
ENGINE AND EMISSION CONTROL SYSTEM 6E1-1
6F1
6F2
6G
6H
6E1
7A
7A1
7B1
7C1
7D
7E
7F
8A
8B
8C
8D
8E
9
10
10A
10B
SECTION 6E1
ENGINE AND EMISSION CONTROL SYSTEM
CONTENTS
GENERAL DESCRIPTION ............................ 6E1-2
AIR INTAKE SYSTEM ............................... 6E1-5
FUEL DELIVERY SYSTEM ....................... 6E1-6
FUEL PUMP ........................................... 6E1-6
ELECTRONIC CONTROL SYSTEM .......... 6E1-7
ENGINE & EMISSION CONTROL
INPUT/OUTPUT TABLE ........................ 6E1-8
ECM INPUT/OUTPUT CIRCUIT
DIAGRAM............................................... 6E1-9
ECM TERMINAL ARRANGEMENT
TABLE .................................................. 6E1-13
ON-VEHICLE SERVICE .............................. 6E1-15
ACCELERATOR CABLE
ADJUSTMENT ..................................... 6E1-15
IDLE SPEED/IDLE AIR CONTROL
(IAC) DUTY INSPECTION ................... 6E1-15
IDLE MIXTURE INSPECTION /
ADJUSTMENT (VEHICLE WITHOUT
HEATED OXYGEN SENSOR) ............. 6E1-17
AIR INTAKE SYSTEM ............................. 6E1-18
THROTTLE BODY ............................... 6E1-18IDLE AIR CONTROL VALVE (IAC
VALVE) ................................................ 6E1-20
FUEL DELIVERY SYSTEM ..................... 6E1-21
FUEL PRESSURE INSPECTION ........ 6E1-21
FUEL PUMP WITH PRESSURE
REGULATOR ....................................... 6E1-22
FUEL INJECTOR ................................. 6E1-23
ELECTRONIC CONTROL SYSTEM ....... 6E1-27
ENGINE CONTROL MODULE
(ECM) ................................................... 6E1-27
MANIFOLD ABSOLUTE PRESSURE
SENSOR (MAP SENSOR)................... 6E1-27
THROTTLE POSITION SENSOR (TP
SENSOR) ............................................. 6E1-28
INTAKE AIR TEMPERATURE
SENSOR (IAT SENSOR) ..................... 6E1-29
ENGINE COOLANT TEMPERATURE
SENSOR (ECT SENSOR) ................... 6E1-30
HEATED OXYGEN SENSOR (HO2S-1
AND HO2S-2) ...................................... 6E1-31
CAMSHAFT POSITION SENSOR ....... 6E1-32 WARNING:
For vehicles equipped with Supplemental Restraint (Air Bag) System :
Service on and around the air bag system components or wiring must be performed only by an
authorized SUZUKI dealer. Refer to “Air Bag System Components and Wiring Location View” under
“General Description” in air bag system section in order to confirm whether you are performing ser-
vice on or near the air bag system components or wiring. Please observe all WARNINGS and “Ser-
vice Precautions” under “On-Vehicle Service” in air bag system section before performing service
on or around the air bag system components or wiring. Failure to follow WARNINGS could result in
unintentional activation of the system or could render the system inoperative. Either of these two
conditions may result in severe injury.
Technical service work must be started at least 90 seconds after the ignition switch is turned to the
“LOCK” position and the negative cable is disconnected from the battery. Otherwise, the system
may be activated by reserve energy in the Sensing and Diagnostic Module (SDM).
NOTE:
Whether the following system (parts) are used in the particular vehicle or not depends on vehicle
specifications. Be sure to bear this in mind when performing service work.
EGR valve
Heated oxygen sensor(s) or CO adjusting resistor
Three way catalytic converter
Immobilizer indicator lamp
Knock sensor
Page 623 of 698
6E1-2 ENGINE AND EMISSION CONTROL SYSTEM
CRANKSHAFT POSITION SENSOR .. 6E1-32
VEHICLE SPEED SENSOR (VSS) ...... 6E1-33
FUEL LEVEL SENSOR (GAUGE) ....... 6E1-33
KNOCK SENSOR (IF EQUIPPED) ...... 6E1-33
MAIN RELAY, FUEL PUMP RELAY
AND RADIATOR FAN RELAY NO.1.... 6E1-33
FUEL CUT OPERATION ..................... 6E1-34
RADIATOR FAN CONTROL
SYSTEM .............................................. 6E1-34
RADIATOR FAN RELAY NO. 2 AND
NO.3 ..................................................... 6E1-34OUTPUT SIGNALS OF THROTTLE
VALVE OPENING AND ENGINE
COOLANT TEMP. (VEHICLE WITH
A/T ONLY) ........................................... 6E1-36
EMISSION CONTROL SYSTEM ............. 6E1-36
EGR SYSTEM ..................................... 6E1-36
EVAPORATIVE EMISSION CONTROL
SYSTEM .............................................. 6E1-37
PCV SYSTEM ...................................... 6E1-39
SPECIAL TOOL .......................................... 6E1-40
TIGHTENING TORQUE SPECIFICATION . 6E1-41
GENERAL DESCRIPTION
The engine and emission control system is divided into 4 major sub-systems : air intake system, fuel delivery
system, electronic control system and emission control system.
Air intake system includes air cleaner, throttle body, IAC valve and intake manifold.
Fuel delivery system includes fuel pump, delivery pipe, fuel pressure regulator, etc. Electronic control system
includes ECM, various sensors and controlled devices.
Emission control system includes EGR, EVAP and PCV system.
Page 626 of 698
ENGINE AND EMISSION CONTROL SYSTEM 6E1-5
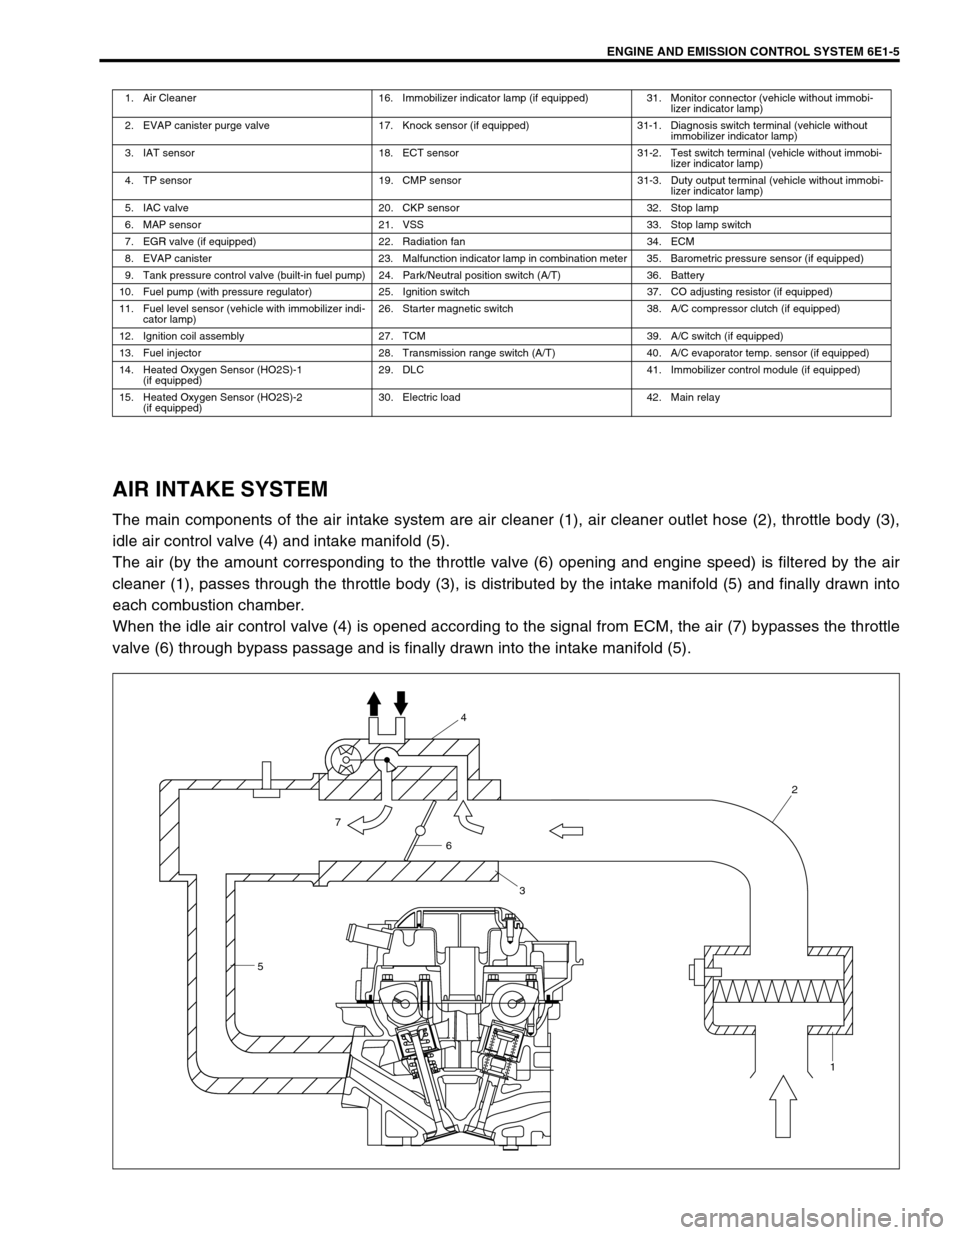
AIR INTAKE SYSTEM
The main components of the air intake system are air cleaner (1), air cleaner outlet hose (2), throttle body (3),
idle air control valve (4) and intake manifold (5).
The air (by the amount corresponding to the throttle valve (6) opening and engine speed) is filtered by the air
cleaner (1), passes through the throttle body (3), is distributed by the intake manifold (5) and finally drawn into
each combustion chamber.
When the idle air control valve (4) is opened according to the signal from ECM, the air (7) bypasses the throttle
valve (6) through bypass passage and is finally drawn into the intake manifold (5).
1. Air Cleaner 16. Immobilizer indicator lamp (if equipped) 31. Monitor connector (vehicle without immobi-
lizer indicator lamp)
2. EVAP canister purge valve 17. Knock sensor (if equipped) 31-1. Diagnosis switch terminal (vehicle without
immobilizer indicator lamp)
3. IAT sensor 18. ECT sensor 31-2. Test switch terminal (vehicle without immobi-
lizer indicator lamp)
4. TP sensor 19. CMP sensor 31-3. Duty output terminal (vehicle without immobi-
lizer indicator lamp)
5. IAC valve 20. CKP sensor 32. Stop lamp
6. MAP sensor 21. VSS 33. Stop lamp switch
7. EGR valve (if equipped) 22. Radiation fan 34. ECM
8. EVAP canister 23. Malfunction indicator lamp in combination meter 35. Barometric pressure sensor (if equipped)
9. Tank pressure control valve (built-in fuel pump) 24. Park/Neutral position switch (A/T) 36. Battery
10. Fuel pump (with pressure regulator) 25. Ignition switch 37. CO adjusting resistor (if equipped)
11. Fuel level sensor (vehicle with immobilizer indi-
cator lamp)26. Starter magnetic switch 38. A/C compressor clutch (if equipped)
12. Ignition coil assembly 27. TCM 39. A/C switch (if equipped)
13. Fuel injector 28. Transmission range switch (A/T) 40. A/C evaporator temp. sensor (if equipped)
14. Heated Oxygen Sensor (HO2S)-1
(if equipped)29. DLC 41. Immobilizer control module (if equipped)
15. Heated Oxygen Sensor (HO2S)-2
(if equipped)30. Electric load 42. Main relay
54
2
1
6
3
7