SUZUKI SWIFT 2000 1.G Transmission Service Workshop Manual
SWIFT 2000 1.G
SUZUKI
SUZUKI
https://www.carmanualsonline.info/img/20/7605/w960_7605-0.png
SUZUKI SWIFT 2000 1.G Transmission Service Workshop Manual
Trending: wheel bolt torque, wiper fluid, ABS, door lock, fuel pump, change time, oil viscosity
Page 191 of 447
CLUTCH 7C-9
3) Pull out input shaft bearing (1) by using special tool (B), and
wrench.
Special tool
(B) : 09921-26020
09930-30104
INSPECTION
Input Shaft Bearing
Check bearing (1) for smooth rotation and replace it if abnormality
is found.
Clutch Disc
Measure depth of rivet head depression, i.e. distance between
rivet head and facing surface. If depression is found to have
reached service limit at any of holes, replace disc assembly.
Rivet head depth
Standard : 1.65 – 2.25 mm (0.06 – 0.09 in.)
Service limit : 0.5 mm (0.02 in.)
Clutch Cover
1) Check diaphragm spring (1) for abnormal wear or damage.
2) Inspect pressure plate (2) for wear or heat spots.
3) If abnormality is found, replace it as assembly. Do not disas-
semble it into diaphragm and pressure plate.
Flywheel
Check surface contacting clutch disc for abnormal wear or heat
spots. Replace or repair as required.
Page 192 of 447
7C-10 CLUTCH
INSTALLATION
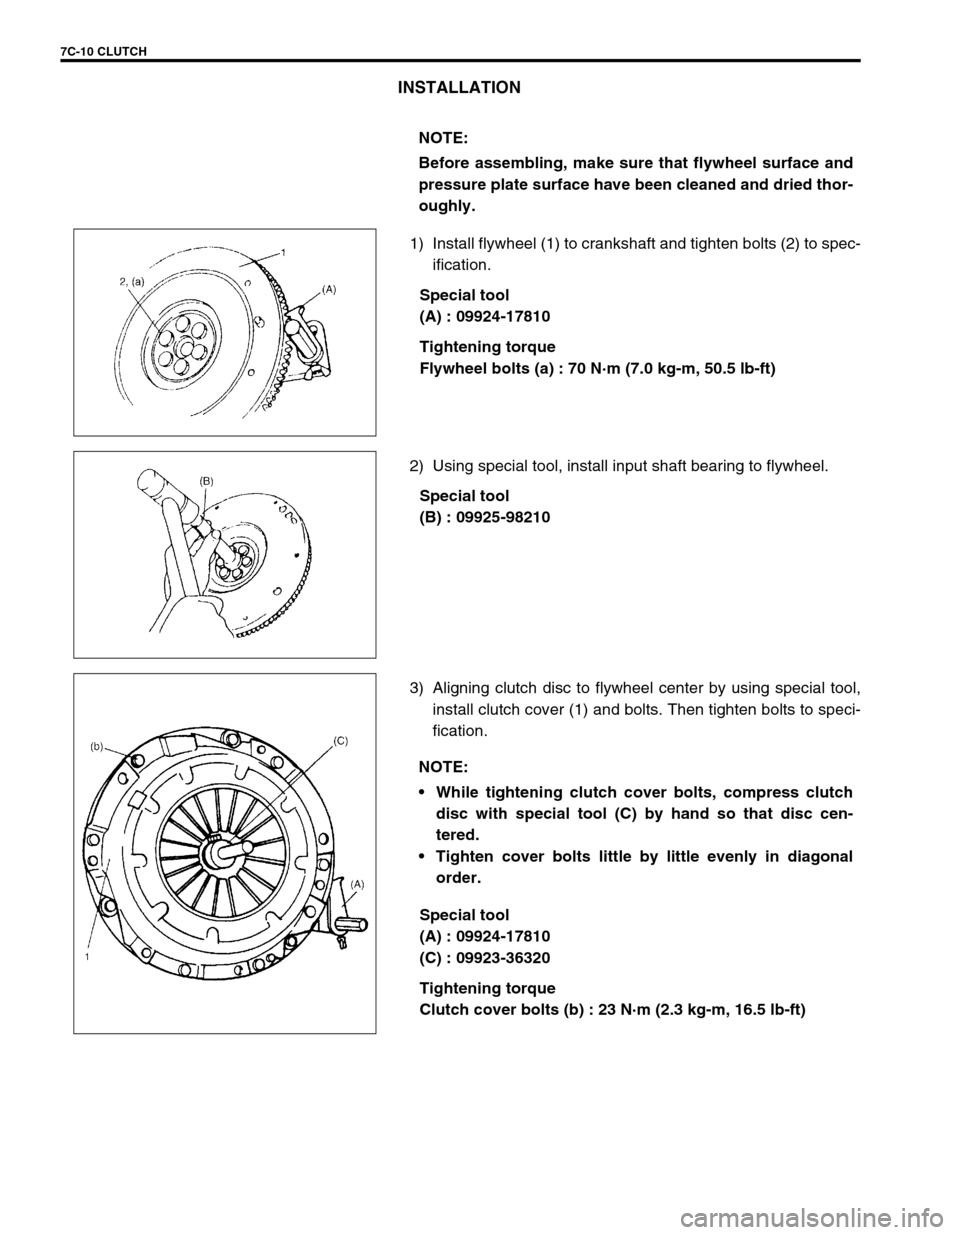
1) Install flywheel (1) to crankshaft and tighten bolts (2) to spec-
ification.
Special tool
(A) : 09924-17810
Tightening torque
Flywheel bolts (a) : 70 N·m (7.0 kg-m, 50.5 lb-ft)
2) Using special tool, install input shaft bearing to flywheel.
Special tool
(B) : 09925-98210
3) Aligning clutch disc to flywheel center by using special tool,
install clutch cover (1) and bolts. Then tighten bolts to speci-
fication.
Special tool
(A) : 09924-17810
(C) : 09923-36320
Tightening torque
Clutch cover bolts (b) : 23 N·m (2.3 kg-m, 16.5 lb-ft) NOTE:
Before assembling, make sure that flywheel surface and
pressure plate surface have been cleaned and dried thor-
oughly.
NOTE:
While tightening clutch cover bolts, compress clutch
disc with special tool (C) by hand so that disc cen-
tered.
Tighten cover bolts little by little evenly in diagonal
order.
Page 193 of 447
CLUTCH 7C-11
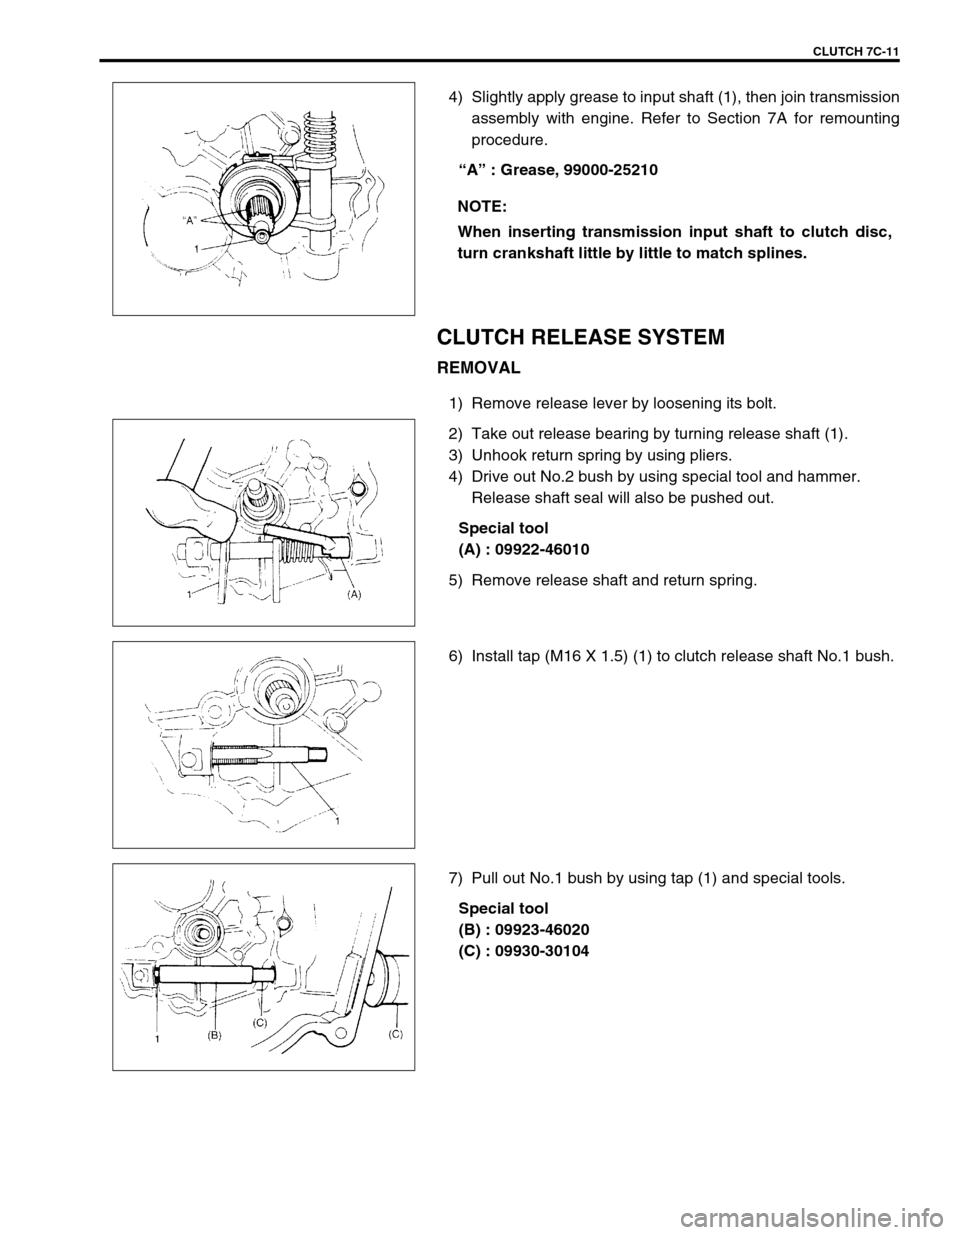
4) Slightly apply grease to input shaft (1), then join transmission
assembly with engine. Refer to Section 7A for remounting
procedure.
“A” : Grease, 99000-25210
CLUTCH RELEASE SYSTEM
REMOVAL
1) Remove release lever by loosening its bolt.
2) Take out release bearing by turning release shaft (1).
3) Unhook return spring by using pliers.
4) Drive out No.2 bush by using special tool and hammer.
Release shaft seal will also be pushed out.
Special tool
(A) : 09922-46010
5) Remove release shaft and return spring.
6) Install tap (M16 X 1.5) (1) to clutch release shaft No.1 bush.
7) Pull out No.1 bush by using tap (1) and special tools.
Special tool
(B) : 09923-46020
(C) : 09930-30104 NOTE:
When inserting transmission input shaft to clutch disc,
turn crankshaft little by little to match splines.
Page 194 of 447
7C-12 CLUTCH
INSPECTION
Clutch release bearing
Check clutch release bearing for smooth rotation.
If abnormality is found, replace it.
Clutch release shaft
Check clutch release shaft and its pin for deflection or damage.
If abnormality is found, replace it.
INSTALLATION
1) Drive in a new No.1 bush by using special tools and then
apply grease to bush inside.
Special tool
(A) : 09930-30104
(B) : 09923-46030
“A” : Grease 99000-25010
2) Install release shaft with return spring applied to it.CAUTION:
Do not wash release bearing. Washing may cause grease
leakage and consequential bearing damage.
Page 195 of 447
CLUTCH 7C-13
3) Apply grease to No.2 bush (1) inside and press-fit it by using
the same special tool as in removal.
“A” : Grease 99000-25010
Special tool
(C) : 09922-46010
4) Coat grease to shaft seal (2) lip and then install it till it is flush
with case surface. Use special tool for this installation and
face seal lip downward (inside).
“A” : Grease 99000-25010
Special tool
(D) : 09925-98221
5) Caulk seal at A by using caulking tool and hammer.
6) Hook return spring.
7) Apply grease to release bearing (1) inside and release shaft
arm (2), then set bearing.
“A” : Grease 99000-25010
8) Apply small amount of grease to input shaft (3) spline (0.3 g)
and front end (0.15 g) as well.
“B” : Grease 99000-25210
9) Set release lever to release shaft aligning their punch marks
(1), then tighten bolt.
Tightening torque
Release lever bolt (a) : 23 N·m (2.3 kg-m, 16.5 lb-ft)
Page 196 of 447
7C-14 CLUTCH
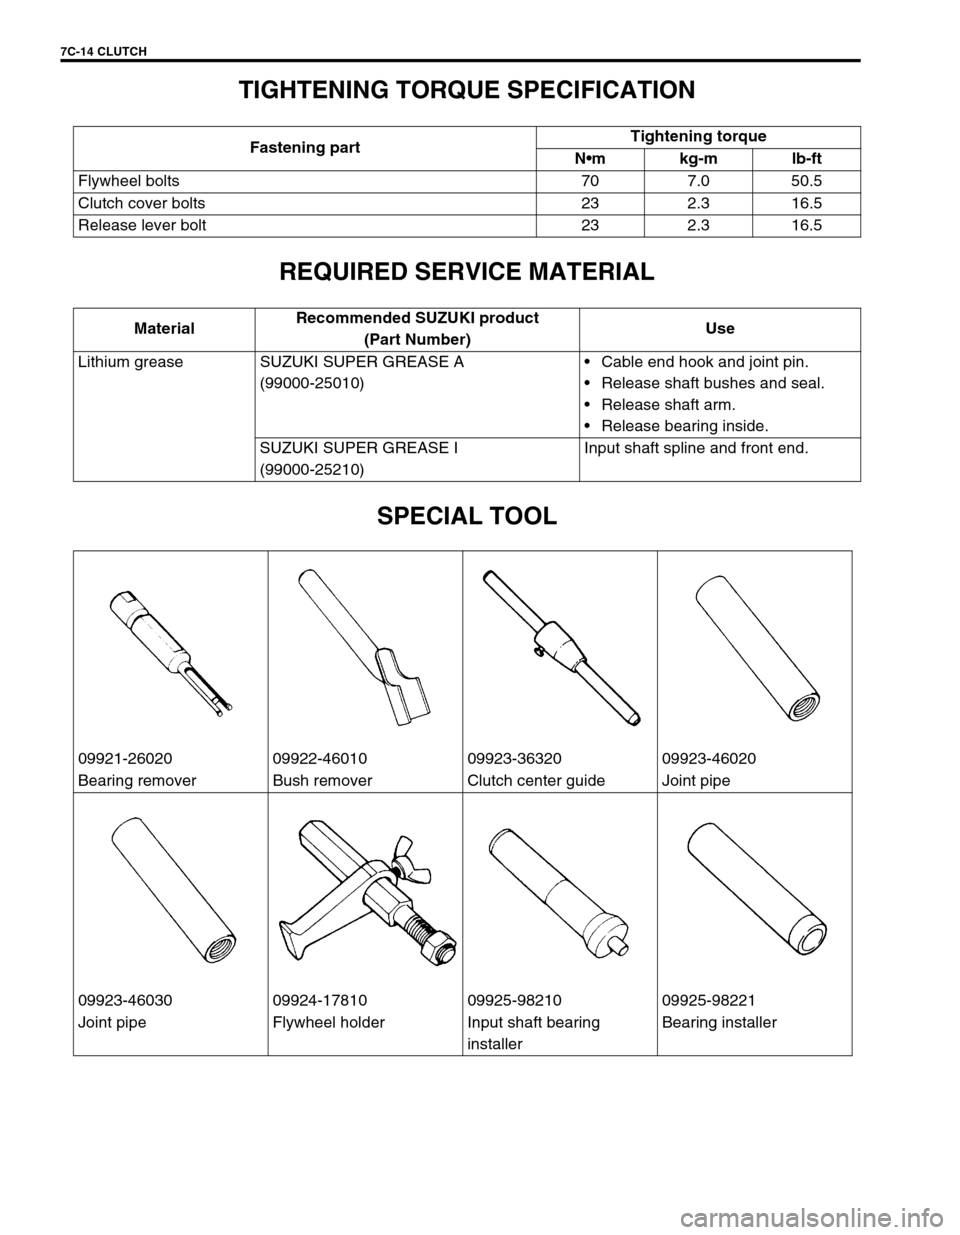
TIGHTENING TORQUE SPECIFICATION
REQUIRED SERVICE MATERIAL
SPECIAL TOOL
Fastening partTightening torque
Nm kg-m lb-ft
Flywheel bolts 70 7.0 50.5
Clutch cover bolts 23 2.3 16.5
Release lever bolt 23 2.3 16.5
MaterialRecommended SUZUKI product
(Part Number)Use
Lithium grease SUZUKI SUPER GREASE A
(99000-25010)Cable end hook and joint pin.
Release shaft bushes and seal.
Release shaft arm.
Release bearing inside.
SUZUKI SUPER GREASE I
(99000-25210)Input shaft spline and front end.
09921-26020 09922-46010 09923-36320 09923-46020
Bearing remover Bush remover Clutch center guide Joint pipe
09923-46030 09924-17810 09925-98210 09925-98221
Joint pipe Flywheel holder Input shaft bearing
installerBearing installer
Page 197 of 447
CLUTCH 7C-15
09930-30104
Sliding shaft
Page 198 of 447
Page 199 of 447

TRANSFER 7D-1
6F1
6F2
6G
6H
6K
7A
7A1
7B1
7C1
7E
7F
7D
8A
8B
8C
8D
8E
9
10
10A
10B
SECTION 7D
TRANSFER
CONTENTS
GENERAL DESCRIPTION ...............................7D-2
DIAGNOSIS ......................................................7D-2
ON-VEHICLE SERVICE ...................................7D-3
UNIT REPAIR OVERHAUL ..............................7D-4
UNIT DISMOUNTING ...................................7D-5
UNIT DISASSEMBLY ...................................7D-6
TRANSFER ASSEMBLY...........................7D-6
REDUCTION DRIVEN GEAR ...................7D-7
INTERMEDIATE SHAFT ...........................7D-8
TRANSFER OUTPUT RETAINER ............7D-9
COMPONENT INSPECTION ......................7D-10
UNIT ASSEMBLY .......................................7D-10REDUCTION DRIVEN GEAR ................. 7D-10
BEVEL GEAR SHIM ............................... 7D-11
TRANSFER OUTPUT RETAINER .......... 7D-12
RIGHT CASE .......................................... 7D-16
LEFT CASE............................................. 7D-17
TRANSFER ASSEMBLY ........................ 7D-17
BEVEL GEAR BACK LASH .................... 7D-18
UNIT INSTALLATION ................................. 7D-20
TIGHTENING TORQUE SPECIFICATION..... 7D-22
REQUIRED SERVICE MATERIAL................. 7D-22
SPECIAL TOOL ............................................. 7D-22
Page 200 of 447
7D-2 TRANSFER
GENERAL DESCRIPTION
The transfer consists of parts as shown in figure.
DIAGNOSIS
1. Intermediate shaft 6. Shim 11. Transfer output retainer
2. Left case 7. Reduction driven gear 12. Flange
3. Reduction drive gear 8. Bevel gear✱
:Forward
4. Circlip 9. Bevel pinion shaft
5. Right case 10. Pinion shaft spacer
Condition Possible Cause Correction
Noise
Inadequate or insufficient lubricant Replenish.
Damaged or worn bearing(s) Replace.
Damaged or worn gear(s) Replace.
Damaged or worn chamfered tooth on sleeve or
gearReplace.
Preload of taper roller bearing is reduced Adjust.
Trending: steering wheel, wheel, sensor, fuel pump, lug pattern, window, drain bolt


