SUZUKI SWIFT 2000 1.G Transmission Service Workshop Manual
Manufacturer: SUZUKI, Model Year: 2000, Model line: SWIFT, Model: SUZUKI SWIFT 2000 1.GPages: 447, PDF Size: 10.54 MB
Page 231 of 447
REAR DIFFERENTIAL 7F-9
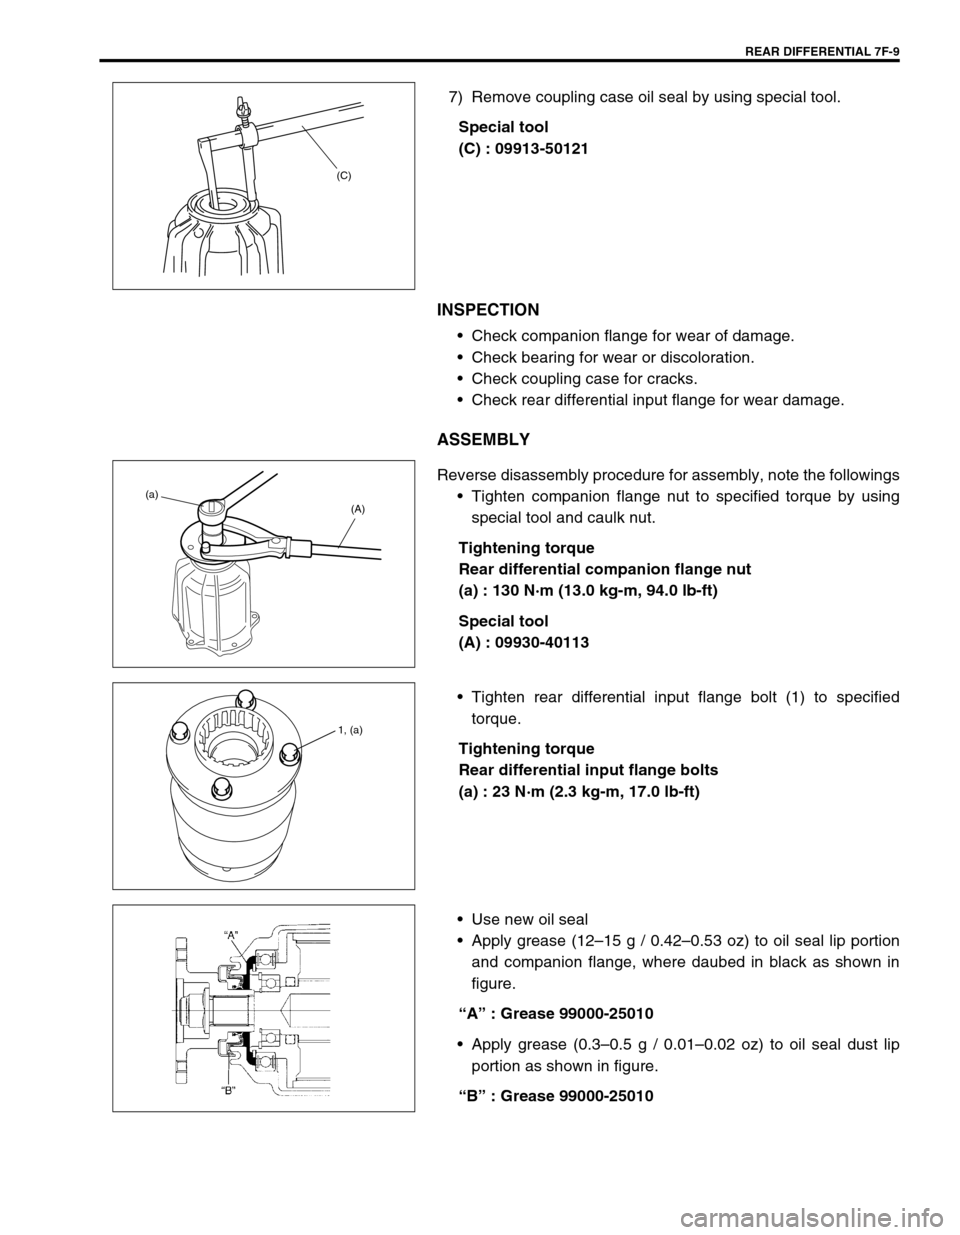
7) Remove coupling case oil seal by using special tool.
Special tool
(C) : 09913-50121
INSPECTION
Check companion flange for wear of damage.
Check bearing for wear or discoloration.
Check coupling case for cracks.
Check rear differential input flange for wear damage.
ASSEMBLY
Reverse disassembly procedure for assembly, note the followings
Tighten companion flange nut to specified torque by using
special tool and caulk nut.
Tightening torque
Rear differential companion flange nut
(a) : 130 N·m (13.0 kg-m, 94.0 lb-ft)
Special tool
(A) : 09930-40113
Tighten rear differential input flange bolt (1) to specified
torque.
Tightening torque
Rear differential input flange bolts
(a) : 23 N·m (2.3 kg-m, 17.0 lb-ft)
Use new oil seal
Apply grease (12–15 g / 0.42–0.53 oz) to oil seal lip portion
and companion flange, where daubed in black as shown in
figure.
“A” : Grease 99000-25010
Apply grease (0.3–0.5 g / 0.01–0.02 oz) to oil seal dust lip
portion as shown in figure.
“B” : Grease 99000-25010
(C)
(a)
(A)
1, (a)
Page 232 of 447
7F-10 REAR DIFFERENTIAL
REAR DIFFERENTIAL
DISASSEMBLY
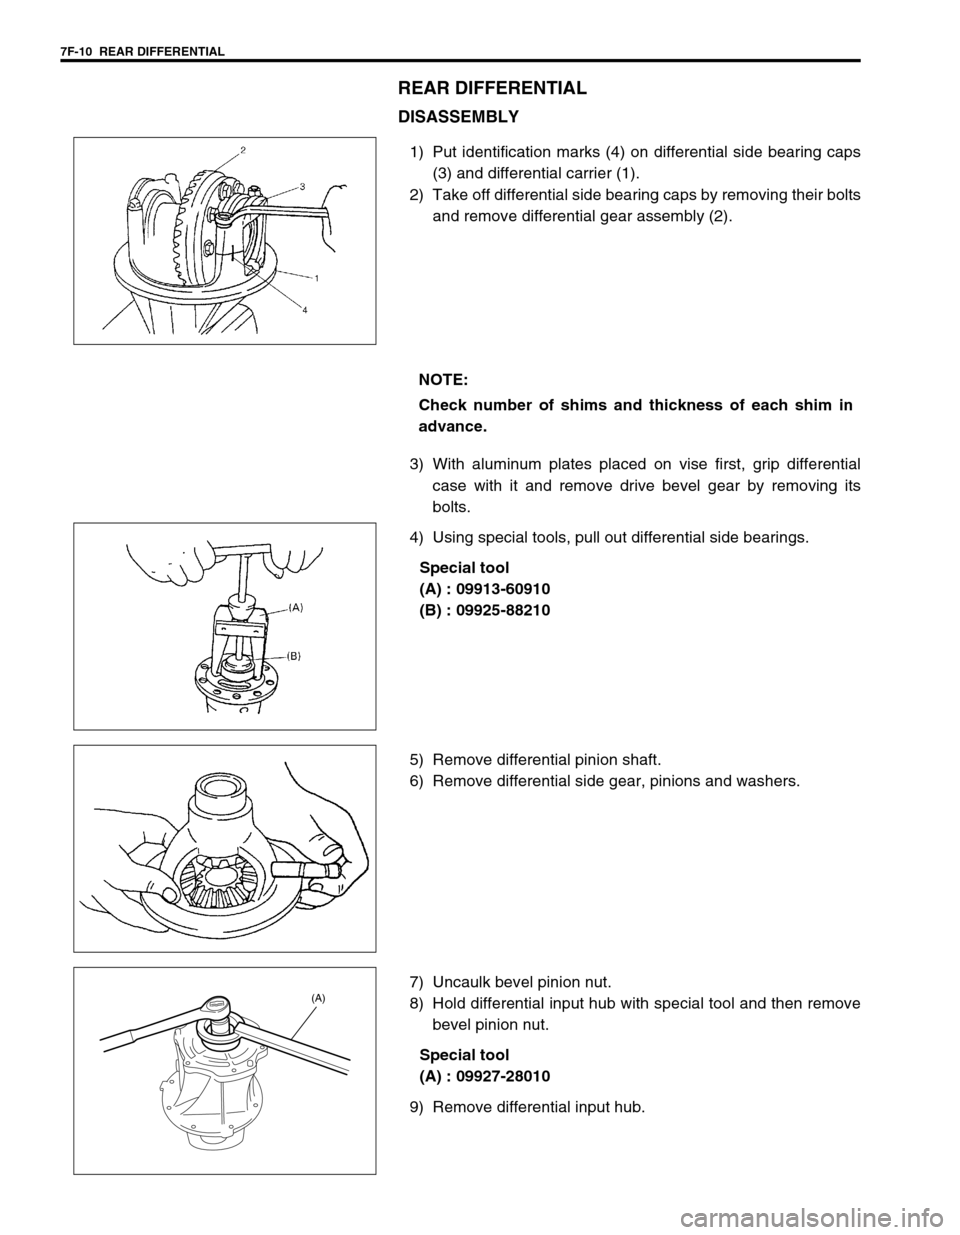
1) Put identification marks (4) on differential side bearing caps
(3) and differential carrier (1).
2) Take off differential side bearing caps by removing their bolts
and remove differential gear assembly (2).
3) With aluminum plates placed on vise first, grip differential
case with it and remove drive bevel gear by removing its
bolts.
4) Using special tools, pull out differential side bearings.
Special tool
(A) : 09913-60910
(B) : 09925-88210
5) Remove differential pinion shaft.
6) Remove differential side gear, pinions and washers.
7) Uncaulk bevel pinion nut.
8) Hold differential input hub with special tool and then remove
bevel pinion nut.
Special tool
(A) : 09927-28010
9) Remove differential input hub.
NOTE:
Check number of shims and thickness of each shim in
advance.
(A)
Page 233 of 447
REAR DIFFERENTIAL 7F-11
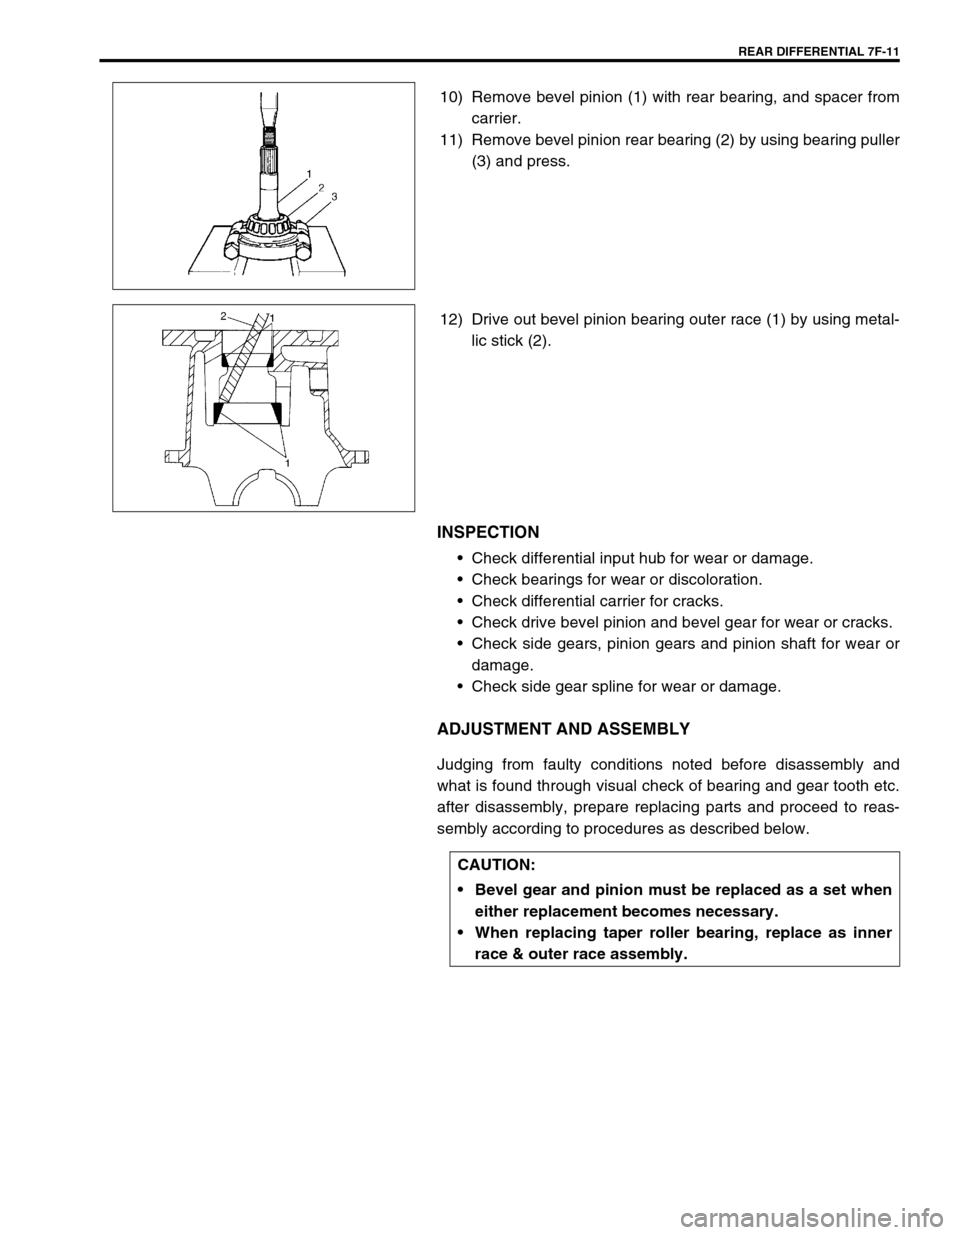
10) Remove bevel pinion (1) with rear bearing, and spacer from
carrier.
11) Remove bevel pinion rear bearing (2) by using bearing puller
(3) and press.
12) Drive out bevel pinion bearing outer race (1) by using metal-
lic stick (2).
INSPECTION
Check differential input hub for wear or damage.
Check bearings for wear or discoloration.
Check differential carrier for cracks.
Check drive bevel pinion and bevel gear for wear or cracks.
Check side gears, pinion gears and pinion shaft for wear or
damage.
Check side gear spline for wear or damage.
ADJUSTMENT AND ASSEMBLY
Judging from faulty conditions noted before disassembly and
what is found through visual check of bearing and gear tooth etc.
after disassembly, prepare replacing parts and proceed to reas-
sembly according to procedures as described below.
CAUTION:
Bevel gear and pinion must be replaced as a set when
either replacement becomes necessary.
When replacing taper roller bearing, replace as inner
race & outer race assembly.
Page 234 of 447
7F-12 REAR DIFFERENTIAL
Bevel Pinion Bearing Outer Race
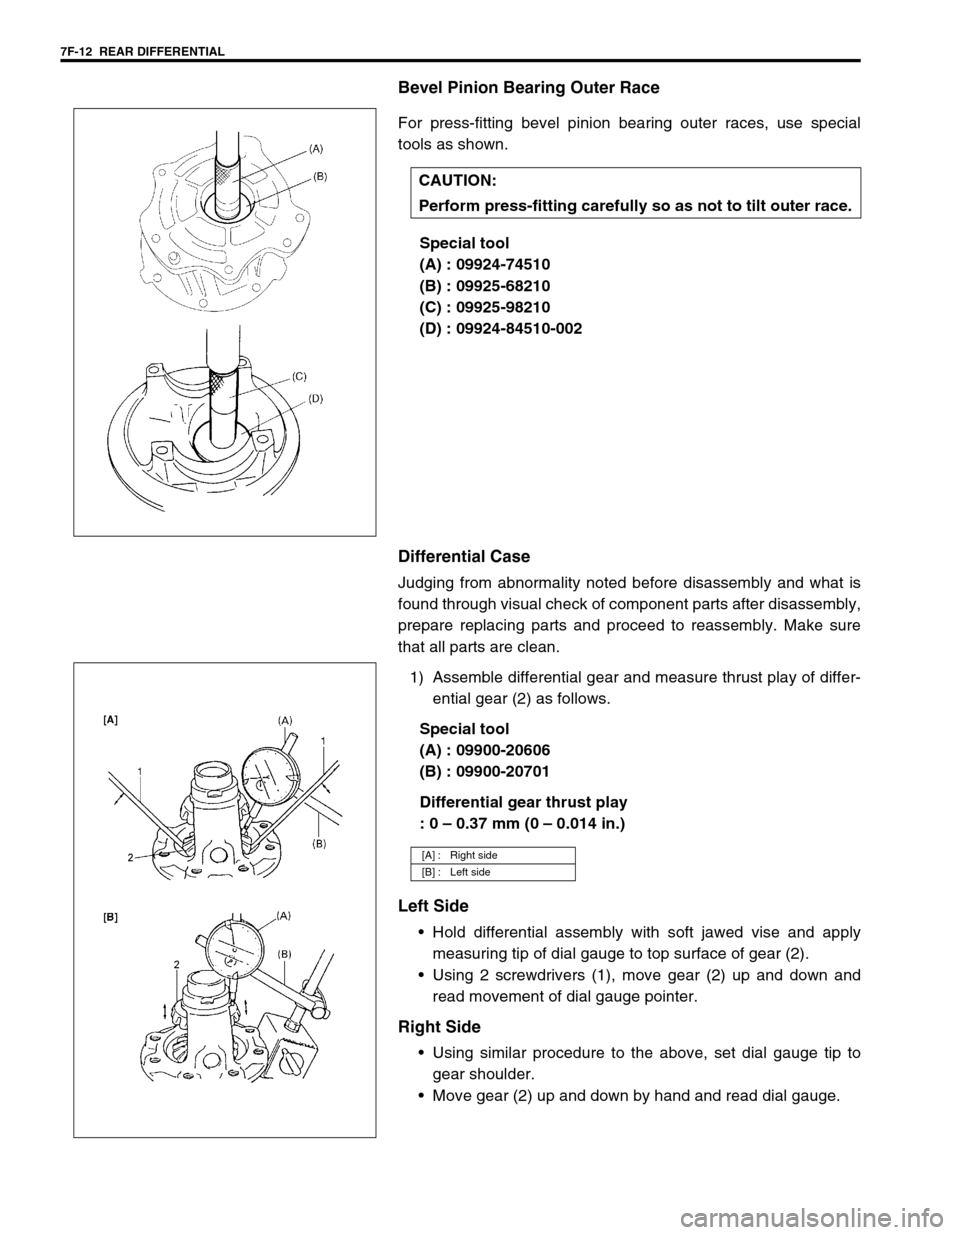
For press-fitting bevel pinion bearing outer races, use special
tools as shown.
Special tool
(A) : 09924-74510
(B) : 09925-68210
(C) : 09925-98210
(D) : 09924-84510-002
Differential Case
Judging from abnormality noted before disassembly and what is
found through visual check of component parts after disassembly,
prepare replacing parts and proceed to reassembly. Make sure
that all parts are clean.
1) Assemble differential gear and measure thrust play of differ-
ential gear (2) as follows.
Special tool
(A) : 09900-20606
(B) : 09900-20701
Differential gear thrust play
: 0 – 0.37 mm (0 – 0.014 in.)
Left Side
Hold differential assembly with soft jawed vise and apply
measuring tip of dial gauge to top surface of gear (2).
Using 2 screwdrivers (1), move gear (2) up and down and
read movement of dial gauge pointer.
Right Side
Using similar procedure to the above, set dial gauge tip to
gear shoulder.
Move gear (2) up and down by hand and read dial gauge. CAUTION:
Perform press-fitting carefully so as not to tilt outer race.
[A] : Right side
[B] : Left side
Page 235 of 447
REAR DIFFERENTIAL 7F-13
2) If thrust play is out of specification, select suitable side
washer from among following available size, install it and
check again that specified gear play is obtained.
Available side washer thickness
0.90, 1.00 and 1.10 mm (0.035, 0.039 and 0.043 in.)
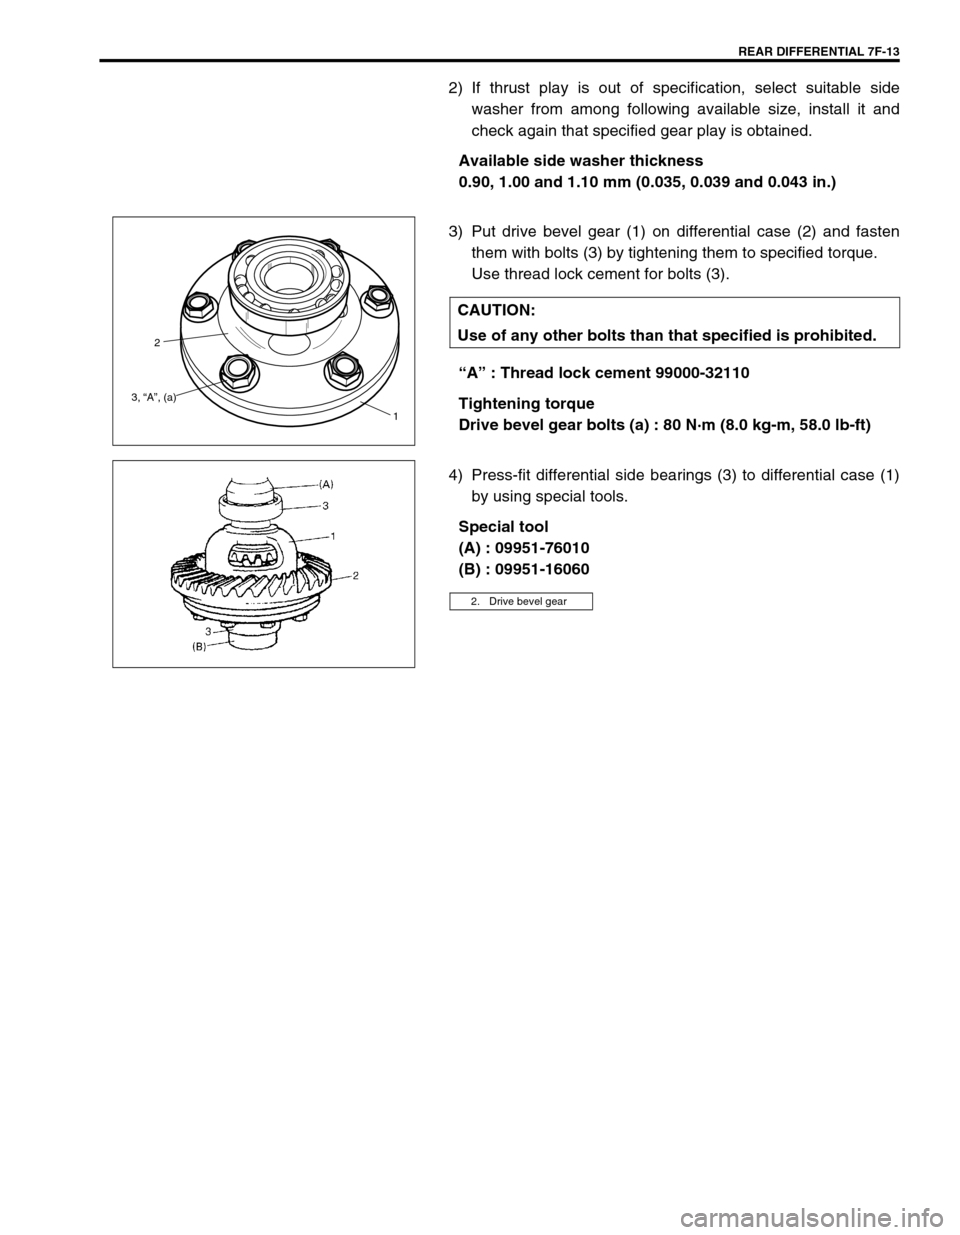
3) Put drive bevel gear (1) on differential case (2) and fasten
them with bolts (3) by tightening them to specified torque.
Use thread lock cement for bolts (3).
“A” : Thread lock cement 99000-32110
Tightening torque
Drive bevel gear bolts (a) : 80 N·m (8.0 kg-m, 58.0 lb-ft)
4) Press-fit differential side bearings (3) to differential case (1)
by using special tools.
Special tool
(A) : 09951-76010
(B) : 09951-16060 CAUTION:
Use of any other bolts than that specified is prohibited.
2
1 3, “A”, (a)
2. Drive bevel gear
Page 236 of 447
7F-14 REAR DIFFERENTIAL
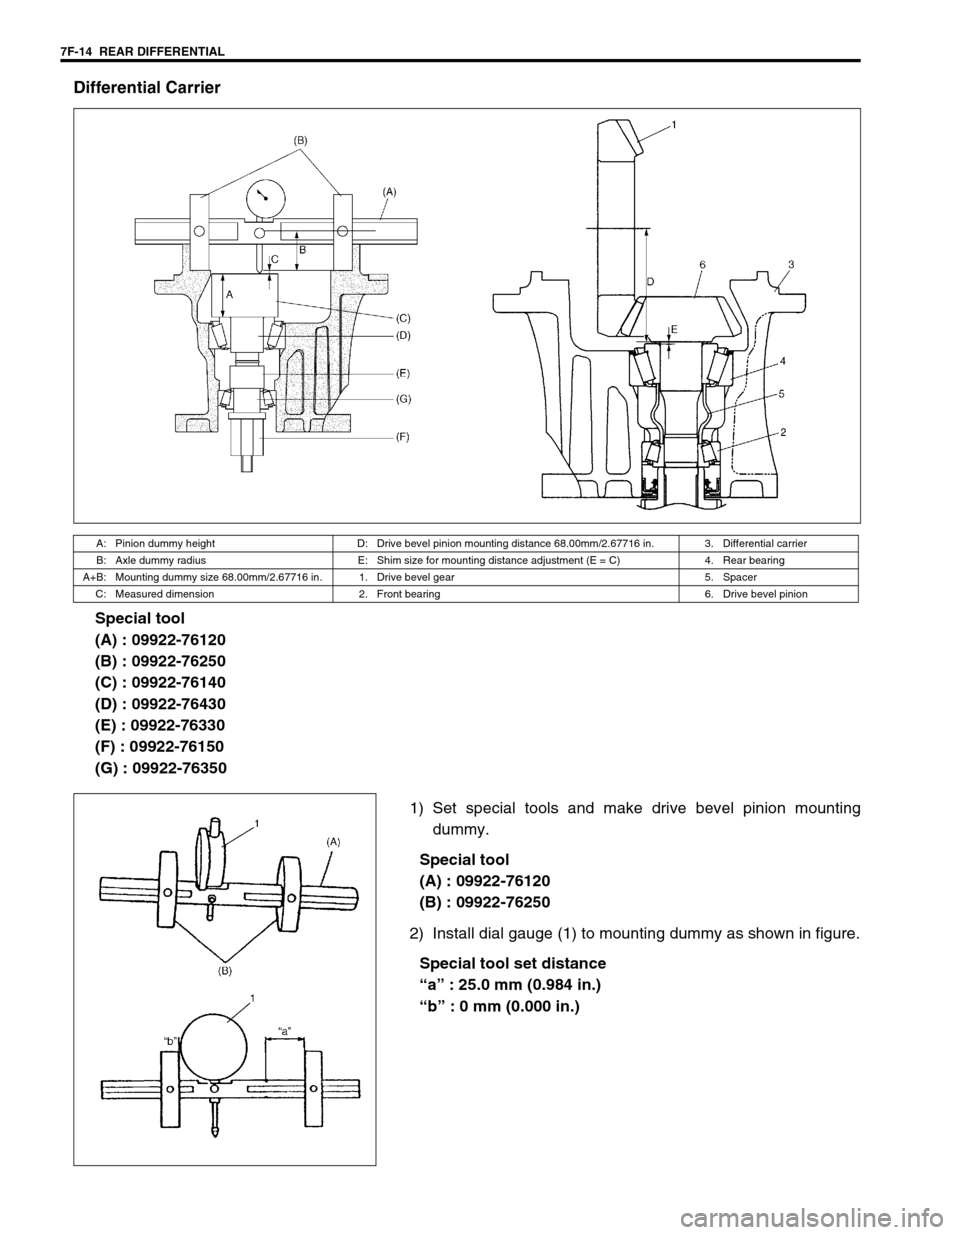
Differential Carrier
Special tool
(A) : 09922-76120
(B) : 09922-76250
(C) : 09922-76140
(D) : 09922-76430
(E) : 09922-76330
(F) : 09922-76150
(G) : 09922-76350
1) Set special tools and make drive bevel pinion mounting
dummy.
Special tool
(A) : 09922-76120
(B) : 09922-76250
2) Install dial gauge (1) to mounting dummy as shown in figure.
Special tool set distance
“a” : 25.0 mm (0.984 in.)
“b” : 0 mm (0.000 in.)
A: Pinion dummy height D: Drive bevel pinion mounting distance 68.00mm/2.67716 in. 3. Differential carrier
B: Axle dummy radius E: Shim size for mounting distance adjustment (E = C) 4. Rear bearing
A+B: Mounting dummy size 68.00mm/2.67716 in. 1. Drive bevel gear 5. Spacer
C: Measured dimension 2. Front bearing 6. Drive bevel pinion
Page 237 of 447
REAR DIFFERENTIAL 7F-15
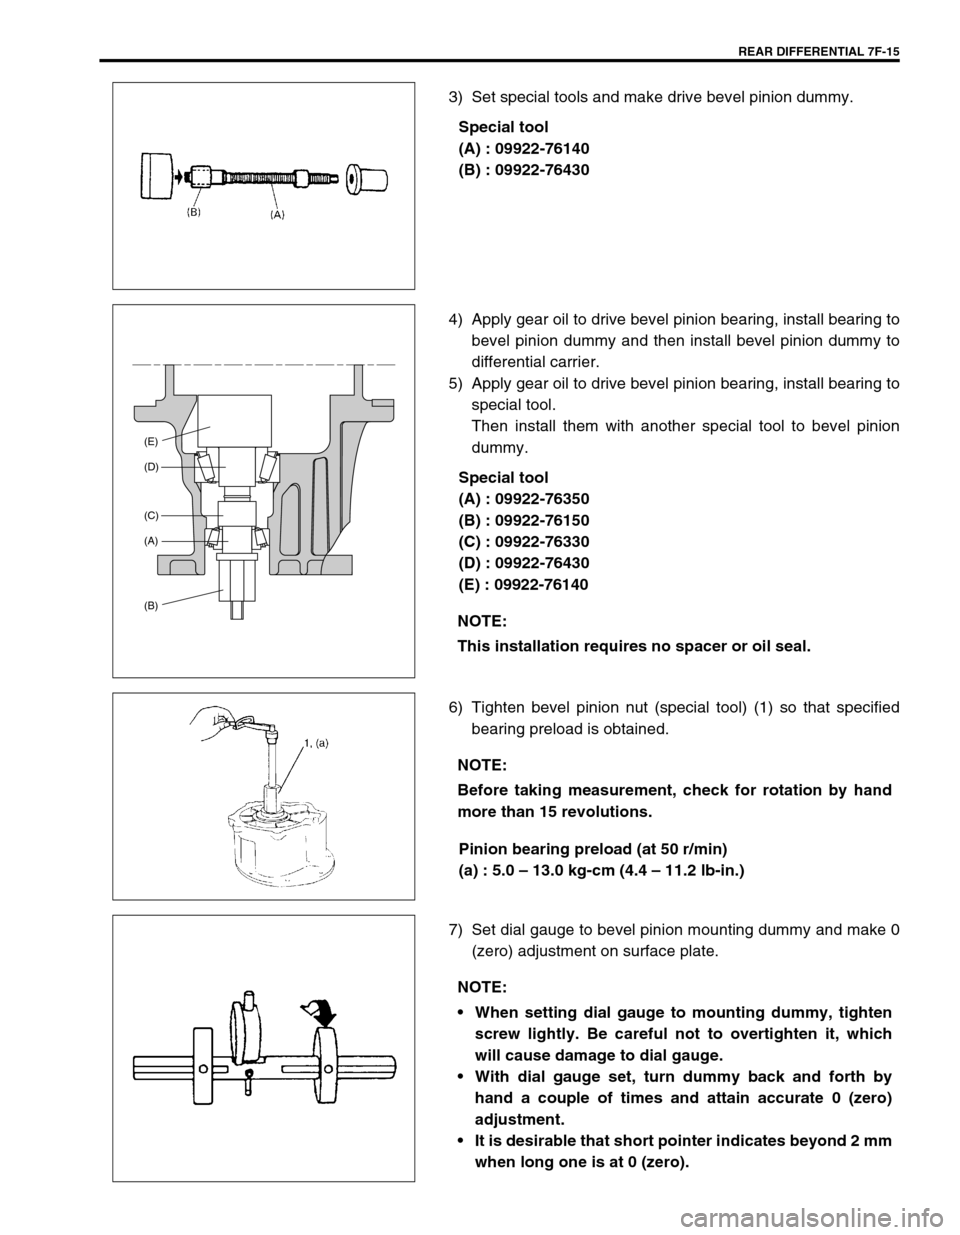
3) Set special tools and make drive bevel pinion dummy.
Special tool
(A) : 09922-76140
(B) : 09922-76430
4) Apply gear oil to drive bevel pinion bearing, install bearing to
bevel pinion dummy and then install bevel pinion dummy to
differential carrier.
5) Apply gear oil to drive bevel pinion bearing, install bearing to
special tool.
Then install them with another special tool to bevel pinion
dummy.
Special tool
(A) : 09922-76350
(B) : 09922-76150
(C) : 09922-76330
(D) : 09922-76430
(E) : 09922-76140
6) Tighten bevel pinion nut (special tool) (1) so that specified
bearing preload is obtained.
Pinion bearing preload (at 50 r/min)
(a) : 5.0 – 13.0 kg-cm (4.4 – 11.2 lb-in.)
7) Set dial gauge to bevel pinion mounting dummy and make 0
(zero) adjustment on surface plate.
NOTE:
This installation requires no spacer or oil seal.
(E)
(D)
(C)
(A)
(B)
NOTE:
Before taking measurement, check for rotation by hand
more than 15 revolutions.
NOTE:
When setting dial gauge to mounting dummy, tighten
screw lightly. Be careful not to overtighten it, which
will cause damage to dial gauge.
With dial gauge set, turn dummy back and forth by
hand a couple of times and attain accurate 0 (zero)
adjustment.
It is desirable that short pointer indicates beyond 2 mm
when long one is at 0 (zero).
Page 238 of 447
7F-16 REAR DIFFERENTIAL
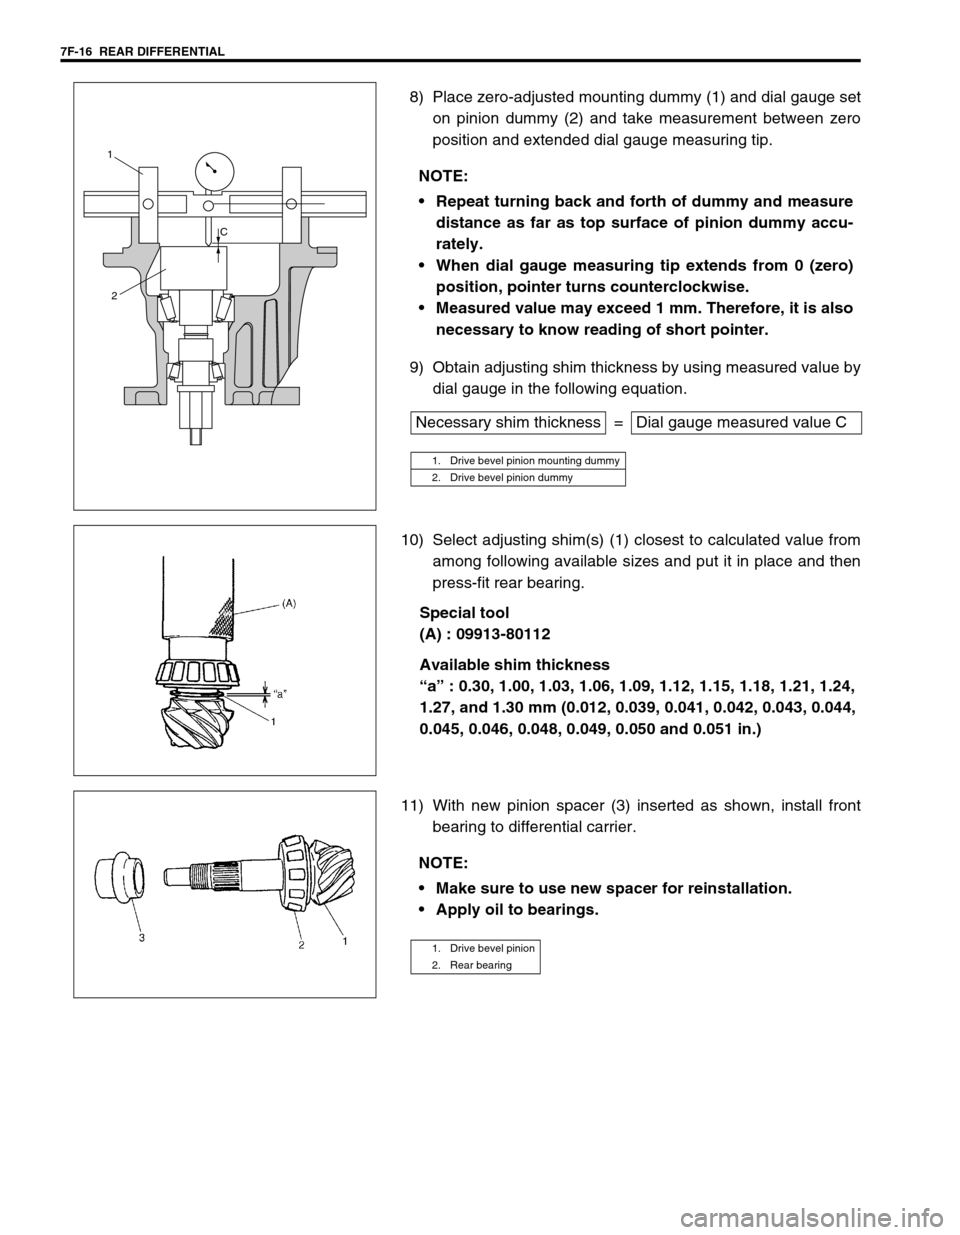
8) Place zero-adjusted mounting dummy (1) and dial gauge set
on pinion dummy (2) and take measurement between zero
position and extended dial gauge measuring tip.
9) Obtain adjusting shim thickness by using measured value by
dial gauge in the following equation.
10) Select adjusting shim(s) (1) closest to calculated value from
among following available sizes and put it in place and then
press-fit rear bearing.
Special tool
(A) : 09913-80112
Available shim thickness
“a” : 0.30, 1.00, 1.03, 1.06, 1.09, 1.12, 1.15, 1.18, 1.21, 1.24,
1.27, and 1.30 mm (0.012, 0.039, 0.041, 0.042, 0.043, 0.044,
0.045, 0.046, 0.048, 0.049, 0.050 and 0.051 in.)
11) With new pinion spacer (3) inserted as shown, install front
bearing to differential carrier. NOTE:
Repeat turning back and forth of dummy and measure
distance as far as top surface of pinion dummy accu-
rately.
When dial gauge measuring tip extends from 0 (zero)
position, pointer turns counterclockwise.
Measured value may exceed 1 mm. Therefore, it is also
necessary to know reading of short pointer.
Necessary shim thickness = Dial gauge measured value C
1. Drive bevel pinion mounting dummy
2. Drive bevel pinion dummy
C
1
2
NOTE:
Make sure to use new spacer for reinstallation.
Apply oil to bearings.
1. Drive bevel pinion
2. Rear bearing
Page 239 of 447
REAR DIFFERENTIAL 7F-17
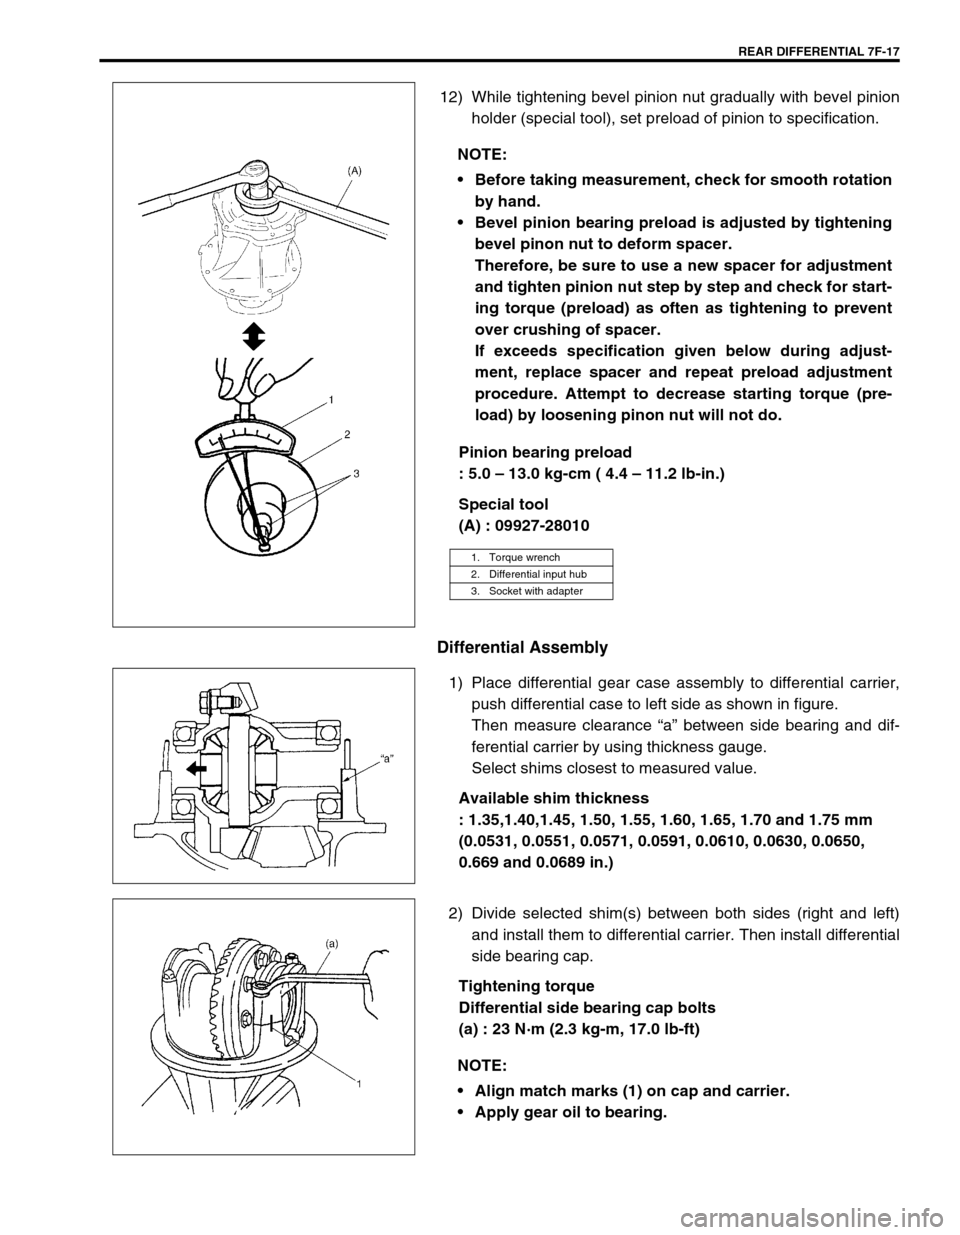
12) While tightening bevel pinion nut gradually with bevel pinion
holder (special tool), set preload of pinion to specification.
Pinion bearing preload
: 5.0 – 13.0 kg-cm ( 4.4 – 11.2 lb-in.)
Special tool
(A) : 09927-28010
Differential Assembly
1) Place differential gear case assembly to differential carrier,
push differential case to left side as shown in figure.
Then measure clearance “a” between side bearing and dif-
ferential carrier by using thickness gauge.
Select shims closest to measured value.
Available shim thickness
: 1.35,1.40,1.45, 1.50, 1.55, 1.60, 1.65, 1.70 and 1.75 mm
(0.0531, 0.0551, 0.0571, 0.0591, 0.0610, 0.0630, 0.0650,
0.669 and 0.0689 in.)
2) Divide selected shim(s) between both sides (right and left)
and install them to differential carrier. Then install differential
side bearing cap.
Tightening torque
Differential side bearing cap bolts
(a) : 23 N·m (2.3 kg-m, 17.0 lb-ft) NOTE:
Before taking measurement, check for smooth rotation
by hand.
Bevel pinion bearing preload is adjusted by tightening
bevel pinon nut to deform spacer.
Therefore, be sure to use a new spacer for adjustment
and tighten pinion nut step by step and check for start-
ing torque (preload) as often as tightening to prevent
over crushing of spacer.
If exceeds specification given below during adjust-
ment, replace spacer and repeat preload adjustment
procedure. Attempt to decrease starting torque (pre-
load) by loosening pinon nut will not do.
1. Torque wrench
2. Differential input hub
3. Socket with adapter
NOTE:
Align match marks (1) on cap and carrier.
Apply gear oil to bearing.
Page 240 of 447
7F-18 REAR DIFFERENTIAL
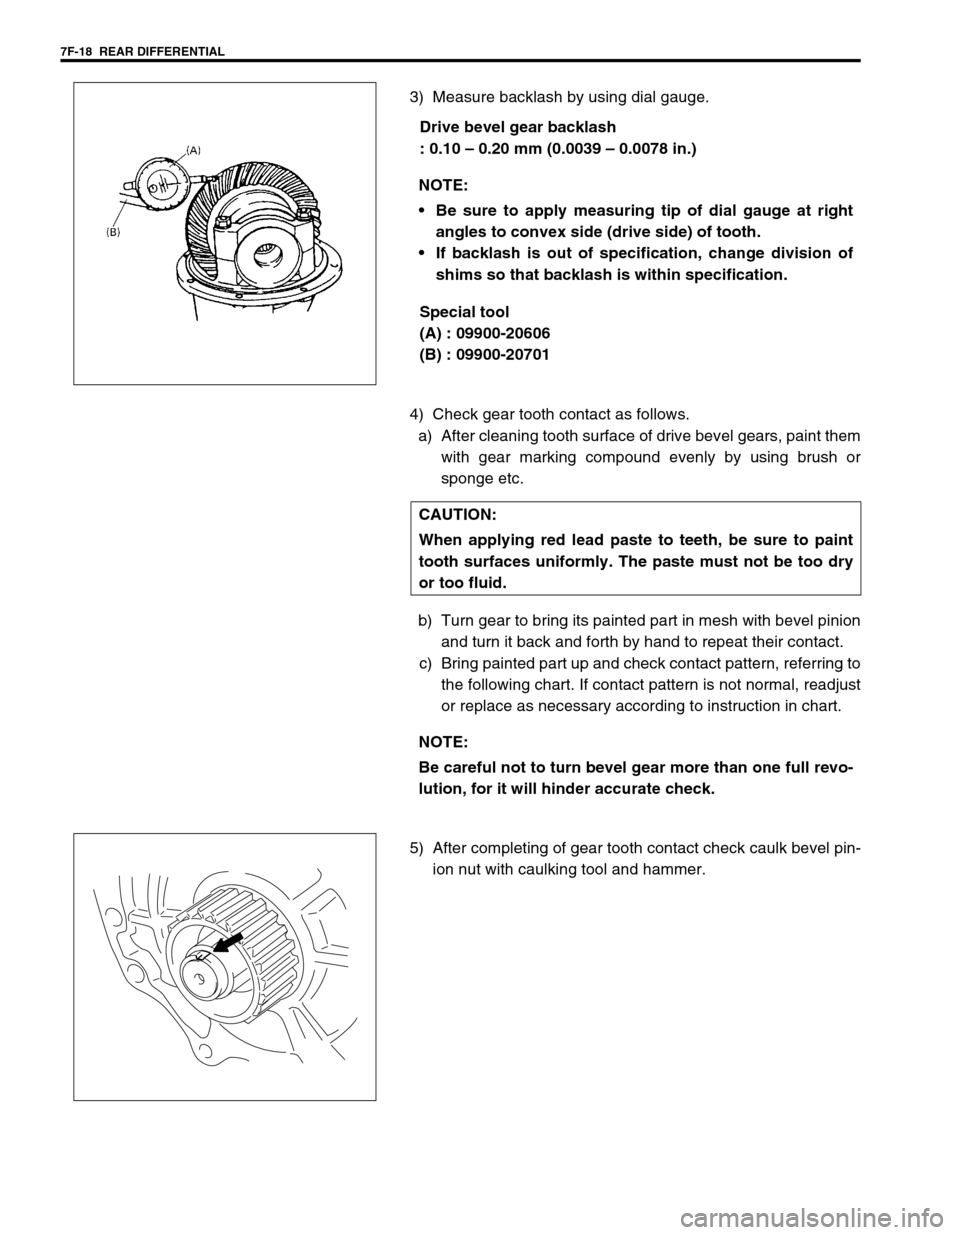
3) Measure backlash by using dial gauge.
Drive bevel gear backlash
: 0.10 – 0.20 mm (0.0039 – 0.0078 in.)
Special tool
(A) : 09900-20606
(B) : 09900-20701
4) Check gear tooth contact as follows.
a) After cleaning tooth surface of drive bevel gears, paint them
with gear marking compound evenly by using brush or
sponge etc.
b) Turn gear to bring its painted part in mesh with bevel pinion
and turn it back and forth by hand to repeat their contact.
c) Bring painted part up and check contact pattern, referring to
the following chart. If contact pattern is not normal, readjust
or replace as necessary according to instruction in chart.
5) After completing of gear tooth contact check caulk bevel pin-
ion nut with caulking tool and hammer. NOTE:
Be sure to apply measuring tip of dial gauge at right
angles to convex side (drive side) of tooth.
If backlash is out of specification, change division of
shims so that backlash is within specification.
CAUTION:
When applying red lead paste to teeth, be sure to paint
tooth surfaces uniformly. The paste must not be too dry
or too fluid.
NOTE:
Be careful not to turn bevel gear more than one full revo-
lution, for it will hinder accurate check.