Air SUZUKI SWIFT 2000 1.G Transmission Service Service Manual
[x] Cancel search | Manufacturer: SUZUKI, Model Year: 2000, Model line: SWIFT, Model: SUZUKI SWIFT 2000 1.GPages: 447, PDF Size: 10.54 MB
Page 169 of 447
AUTOMATIC TRANSMISSION (4 A/T) 7B-127
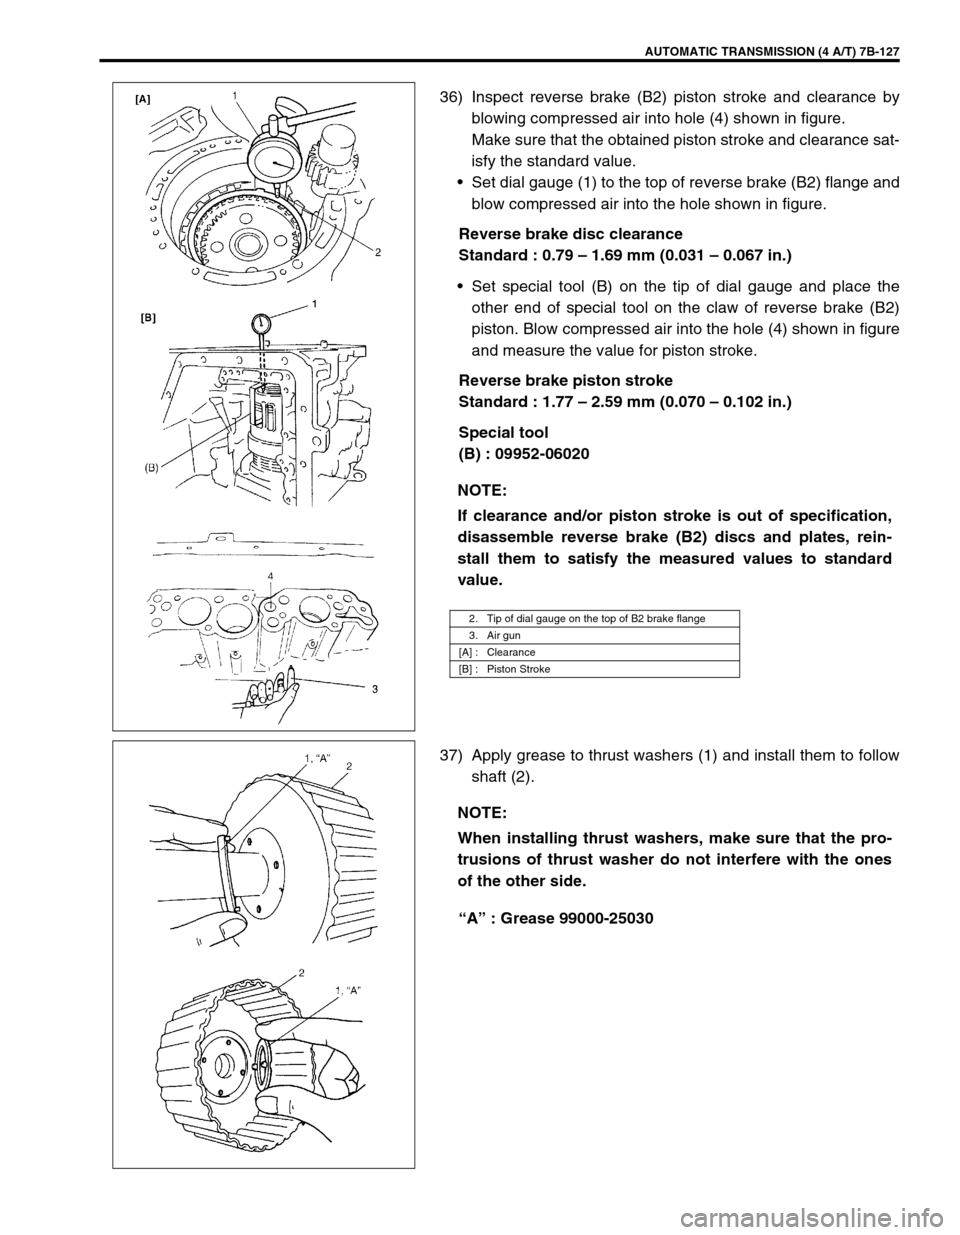
36) Inspect reverse brake (B2) piston stroke and clearance by
blowing compressed air into hole (4) shown in figure.
Make sure that the obtained piston stroke and clearance sat-
isfy the standard value.
Set dial gauge (1) to the top of reverse brake (B2) flange and
blow compressed air into the hole shown in figure.
Reverse brake disc clearance
Standard : 0.79 – 1.69 mm (0.031 – 0.067 in.)
Set special tool (B) on the tip of dial gauge and place the
other end of special tool on the claw of reverse brake (B2)
piston. Blow compressed air into the hole (4) shown in figure
and measure the value for piston stroke.
Reverse brake piston stroke
Standard : 1.77 – 2.59 mm (0.070 – 0.102 in.)
Special tool
(B) : 09952-06020
37) Apply grease to thrust washers (1) and install them to follow
shaft (2).
“A” : Grease 99000-25030 NOTE:
If clearance and/or piston stroke is out of specification,
disassemble reverse brake (B2) discs and plates, rein-
stall them to satisfy the measured values to standard
value.
2. Tip of dial gauge on the top of B2 brake flange
3. Air gun
[A] : Clearance
[B] : Piston Stroke
NOTE:
When installing thrust washers, make sure that the pro-
trusions of thrust washer do not interfere with the ones
of the other side.
Page 179 of 447
AUTOMATIC TRANSMISSION (4 A/T) 7B-137
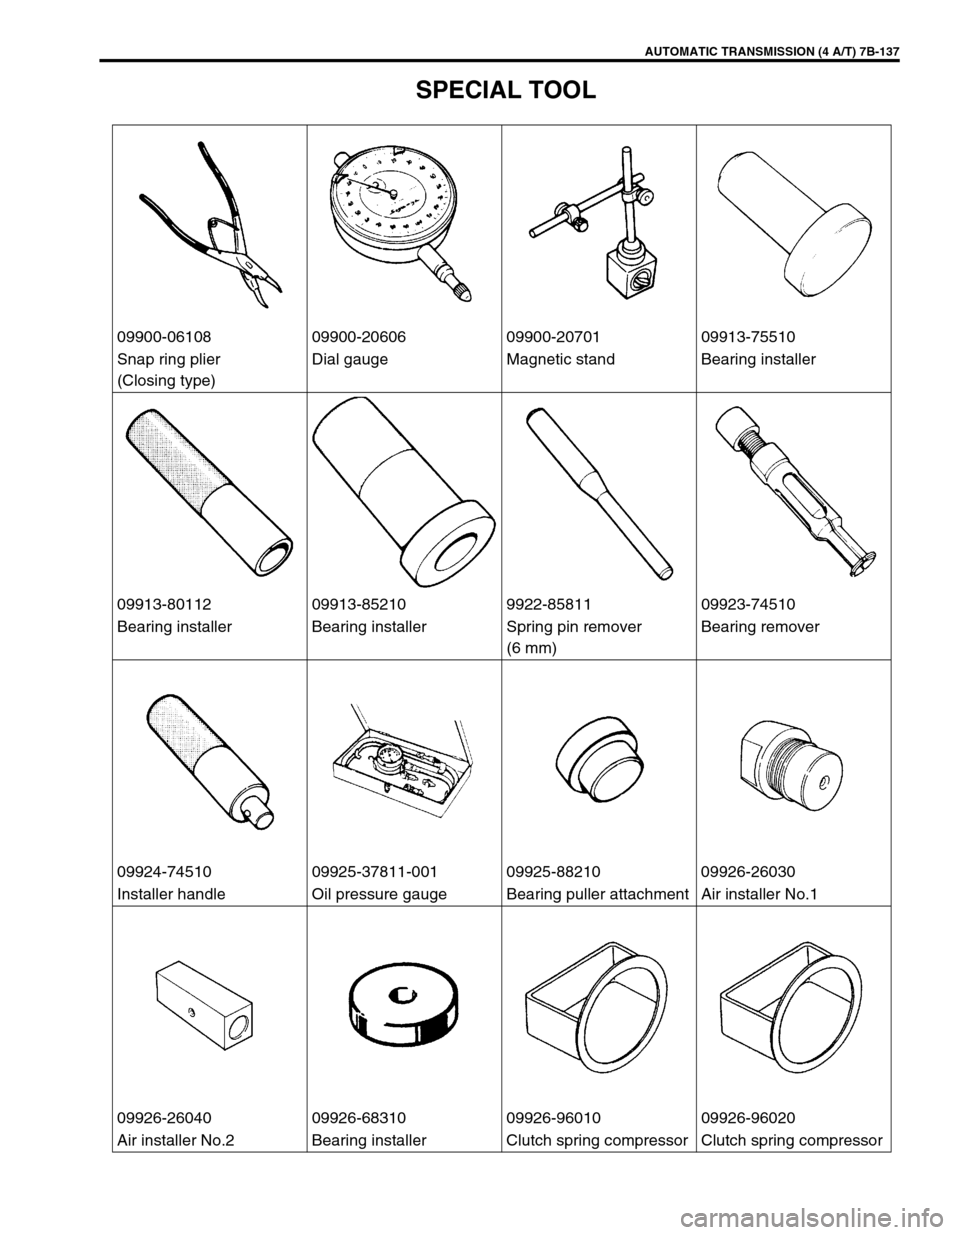
SPECIAL TOOL
09900-06108 09900-20606 09900-20701 09913-75510
Snap ring plier
(Closing type)Dial gauge Magnetic stand Bearing installer
09913-80112 09913-85210 9922-85811 09923-74510
Bearing installer Bearing installer Spring pin remover
(6 mm)Bearing remover
09924-74510 09925-37811-001 09925-88210 09926-26030
Installer handle Oil pressure gauge Bearing puller attachment Air installer No.1
09926-26040 09926-68310 09926-96010 09926-96020
Air installer No.2 Bearing installer Clutch spring compressor Clutch spring compressor
Page 180 of 447
7B-138 AUTOMATIC TRANSMISSION (4 A/T)
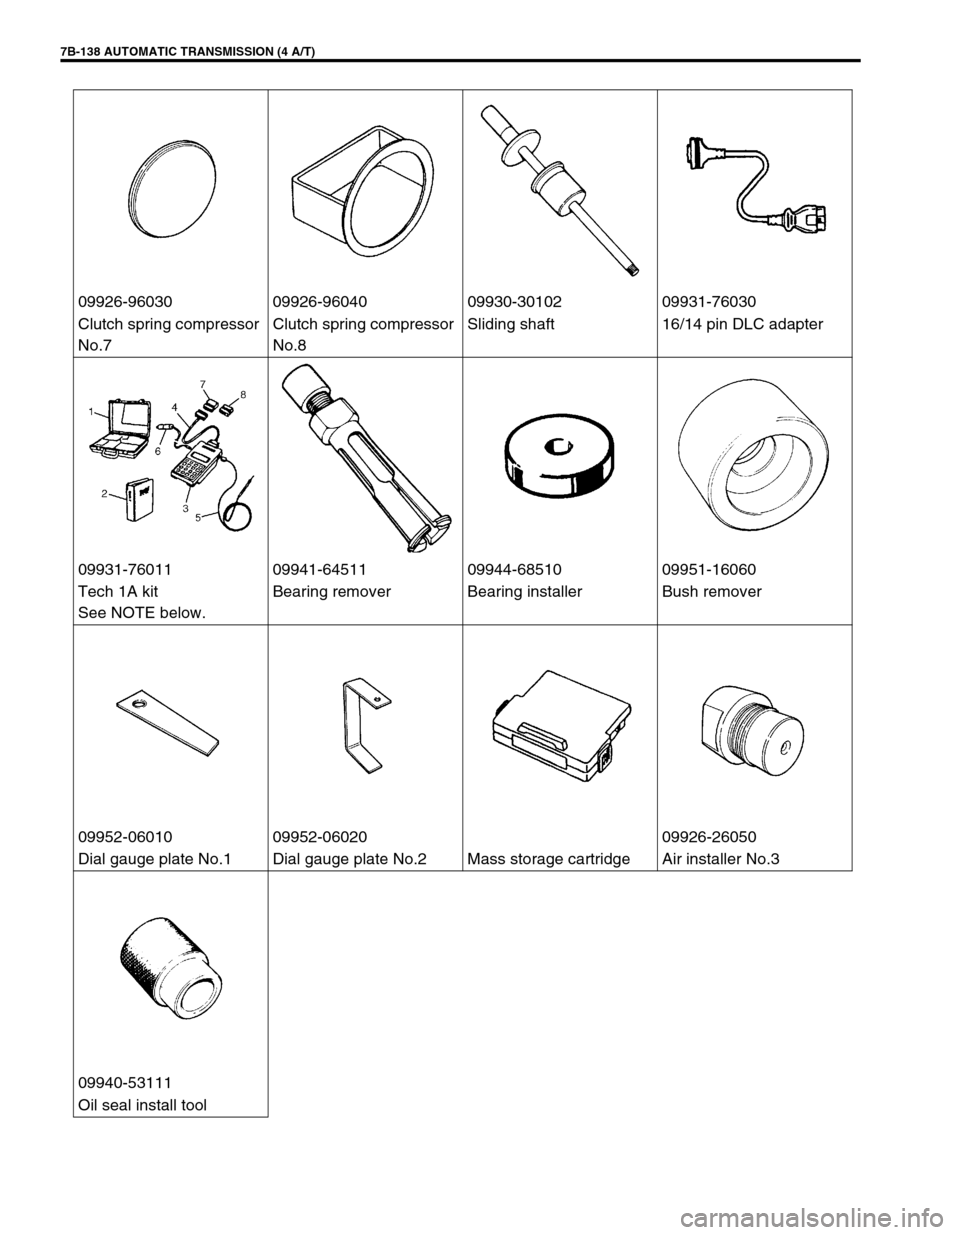
09926-96030 09926-96040 09930-30102 09931-76030
Clutch spring compressor
No.7Clutch spring compressor
No.8Sliding shaft 16/14 pin DLC adapter
09931-76011 09941-64511 09944-68510 09951-16060
Tech 1A kit
See NOTE below.Bearing remover Bearing installer Bush remover
09952-06010 09952-06020 09926-26050
Dial gauge plate No.1 Dial gauge plate No.2 Mass storage cartridge Air installer No.3
09940-53111
Oil seal install tool
Page 183 of 447

CLUTCH 7C-1
6F1
6F2
6G
6H
6K
7A1
7B1
7C1
7D
7E
7C
8A
8B
8C
8D
8E
9
10
10A
10B
SECTION 7C
CLUTCH
CONTENTS
GENERAL DESCRIPTION .............................. 7C-2
DIAGNOSIS ..................................................... 7C-3
ON-VEHICLE SERVICE .................................. 7C-4
CLUTCH CABLE .......................................... 7C-4
CLUTCH PEDAL AND CLUTCH PEDAL
BRACKET .................................................... 7C-6
CLUTCH PEDAL HEIGHT ....................... 7C-7
CLUTCH PEDAL FREE TRAVEL ............ 7C-7UNIT REPAIR OVERHAUL ............................. 7C-8
CLUTCH COVER, CLUTCH DISC AND
FLYWHEEL.................................................. 7C-8
CLUTCH RELEASE SYSTEM ................... 7C-11
TIGHTENING TORQUE SPECIFICATION.... 7C-14
REQUIRED SERVICE MATERIAL................ 7C-14
SPECIAL TOOL ............................................ 7C-14
WARNING:
For vehicles equipped with Supplemental Restraint (Air Bag) System:
Service on and around the air bag system components or wiring must be performed only by an
authorized SUZUKI dealer. Refer to “Air Bag System Components and Wiring Location View” under
“General Description” in air bag system section in order to confirm whether you are performing ser-
vice on or near the air bag system components or wiring. Please observe all WARNINGS and “Ser-
vice Precautions” under “On-Vehicle Service” in air bag system section before performing service
on or around the air bag system components or wiring. Failure to follow WARNINGS could result in
unintentional activation of the system or could render the system inoperative. Either of these two
conditions may result in severe injury.
Technical service work must be started at least 90 seconds after the ignition switch is turned to the
“LOCK” position and the negative cable is disconnected from the battery. Otherwise, the system
may be activated by reserve energy in the Sensing and Diagnostic Module (SDM).
Page 185 of 447
CLUTCH 7C-3
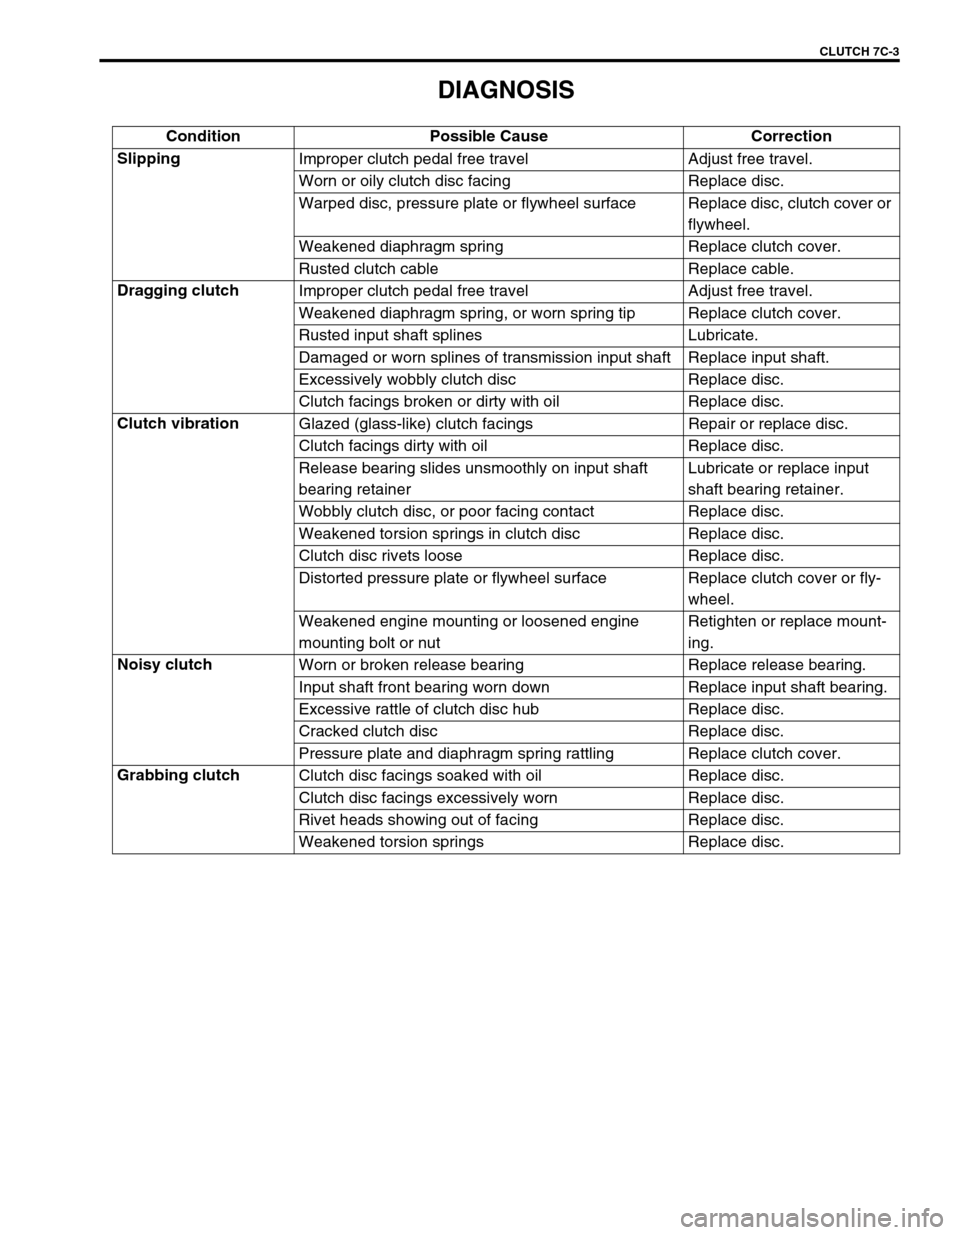
DIAGNOSIS
Condition Possible Cause Correction
Slipping
Improper clutch pedal free travel Adjust free travel.
Worn or oily clutch disc facing Replace disc.
Warped disc, pressure plate or flywheel surface Replace disc, clutch cover or
flywheel.
Weakened diaphragm spring Replace clutch cover.
Rusted clutch cable Replace cable.
Dragging clutch
Improper clutch pedal free travel Adjust free travel.
Weakened diaphragm spring, or worn spring tip Replace clutch cover.
Rusted input shaft splines Lubricate.
Damaged or worn splines of transmission input shaft Replace input shaft.
Excessively wobbly clutch disc Replace disc.
Clutch facings broken or dirty with oil Replace disc.
Clutch vibration
Glazed (glass-like) clutch facings Repair or replace disc.
Clutch facings dirty with oil Replace disc.
Release bearing slides unsmoothly on input shaft
bearing retainerLubricate or replace input
shaft bearing retainer.
Wobbly clutch disc, or poor facing contact Replace disc.
Weakened torsion springs in clutch disc Replace disc.
Clutch disc rivets loose Replace disc.
Distorted pressure plate or flywheel surface Replace clutch cover or fly-
wheel.
Weakened engine mounting or loosened engine
mounting bolt or nutRetighten or replace mount-
ing.
Noisy clutch
Worn or broken release bearing Replace release bearing.
Input shaft front bearing worn down Replace input shaft bearing.
Excessive rattle of clutch disc hub Replace disc.
Cracked clutch disc Replace disc.
Pressure plate and diaphragm spring rattling Replace clutch cover.
Grabbing clutch
Clutch disc facings soaked with oil Replace disc.
Clutch disc facings excessively worn Replace disc.
Rivet heads showing out of facing Replace disc.
Weakened torsion springs Replace disc.
Page 190 of 447
7C-8 CLUTCH
UNIT REPAIR OVERHAUL
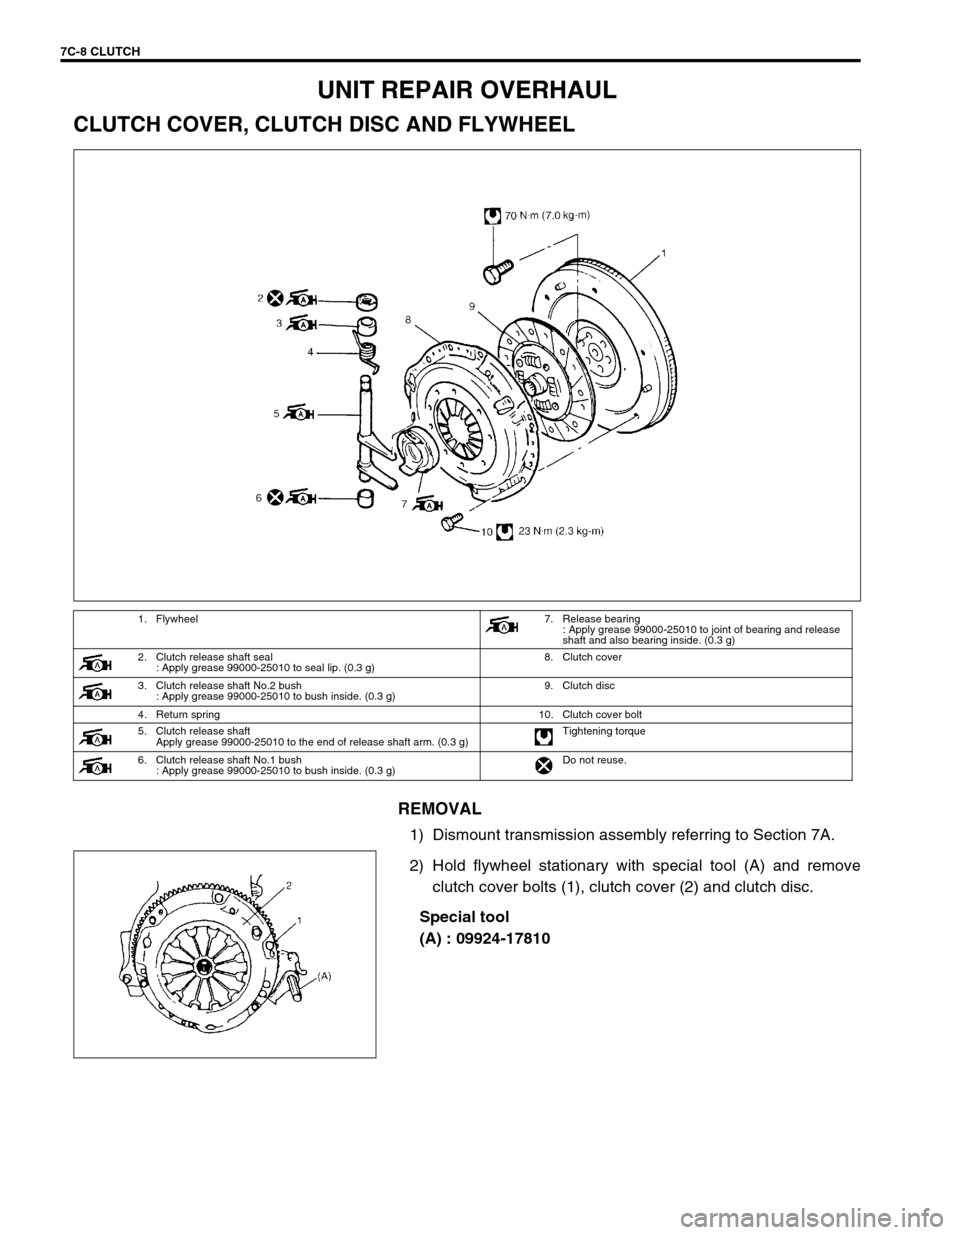
CLUTCH COVER, CLUTCH DISC AND FLYWHEEL
REMOVAL
1) Dismount transmission assembly referring to Section 7A.
2) Hold flywheel stationary with special tool (A) and remove
clutch cover bolts (1), clutch cover (2) and clutch disc.
Special tool
(A) : 09924-17810
1. Flywheel7. Release bearing
: Apply grease 99000-25010 to joint of bearing and release
shaft and also bearing inside. (0.3 g)
2. Clutch release shaft seal
: Apply grease 99000-25010 to seal lip. (0.3 g)8. Clutch cover
3. Clutch release shaft No.2 bush
: Apply grease 99000-25010 to bush inside. (0.3 g)9. Clutch disc
4. Return spring 10. Clutch cover bolt
5. Clutch release shaft
Apply grease 99000-25010 to the end of release shaft arm. (0.3 g)Tightening torque
6. Clutch release shaft No.1 bush
: Apply grease 99000-25010 to bush inside. (0.3 g)Do not reuse.
Page 191 of 447

CLUTCH 7C-9
3) Pull out input shaft bearing (1) by using special tool (B), and
wrench.
Special tool
(B) : 09921-26020
09930-30104
INSPECTION
Input Shaft Bearing
Check bearing (1) for smooth rotation and replace it if abnormality
is found.
Clutch Disc
Measure depth of rivet head depression, i.e. distance between
rivet head and facing surface. If depression is found to have
reached service limit at any of holes, replace disc assembly.
Rivet head depth
Standard : 1.65 – 2.25 mm (0.06 – 0.09 in.)
Service limit : 0.5 mm (0.02 in.)
Clutch Cover
1) Check diaphragm spring (1) for abnormal wear or damage.
2) Inspect pressure plate (2) for wear or heat spots.
3) If abnormality is found, replace it as assembly. Do not disas-
semble it into diaphragm and pressure plate.
Flywheel
Check surface contacting clutch disc for abnormal wear or heat
spots. Replace or repair as required.
Page 199 of 447

TRANSFER 7D-1
6F1
6F2
6G
6H
6K
7A
7A1
7B1
7C1
7E
7F
7D
8A
8B
8C
8D
8E
9
10
10A
10B
SECTION 7D
TRANSFER
CONTENTS
GENERAL DESCRIPTION ...............................7D-2
DIAGNOSIS ......................................................7D-2
ON-VEHICLE SERVICE ...................................7D-3
UNIT REPAIR OVERHAUL ..............................7D-4
UNIT DISMOUNTING ...................................7D-5
UNIT DISASSEMBLY ...................................7D-6
TRANSFER ASSEMBLY...........................7D-6
REDUCTION DRIVEN GEAR ...................7D-7
INTERMEDIATE SHAFT ...........................7D-8
TRANSFER OUTPUT RETAINER ............7D-9
COMPONENT INSPECTION ......................7D-10
UNIT ASSEMBLY .......................................7D-10REDUCTION DRIVEN GEAR ................. 7D-10
BEVEL GEAR SHIM ............................... 7D-11
TRANSFER OUTPUT RETAINER .......... 7D-12
RIGHT CASE .......................................... 7D-16
LEFT CASE............................................. 7D-17
TRANSFER ASSEMBLY ........................ 7D-17
BEVEL GEAR BACK LASH .................... 7D-18
UNIT INSTALLATION ................................. 7D-20
TIGHTENING TORQUE SPECIFICATION..... 7D-22
REQUIRED SERVICE MATERIAL................. 7D-22
SPECIAL TOOL ............................................. 7D-22
Page 201 of 447
TRANSFER 7D-3
ON-VEHICLE SERVICE
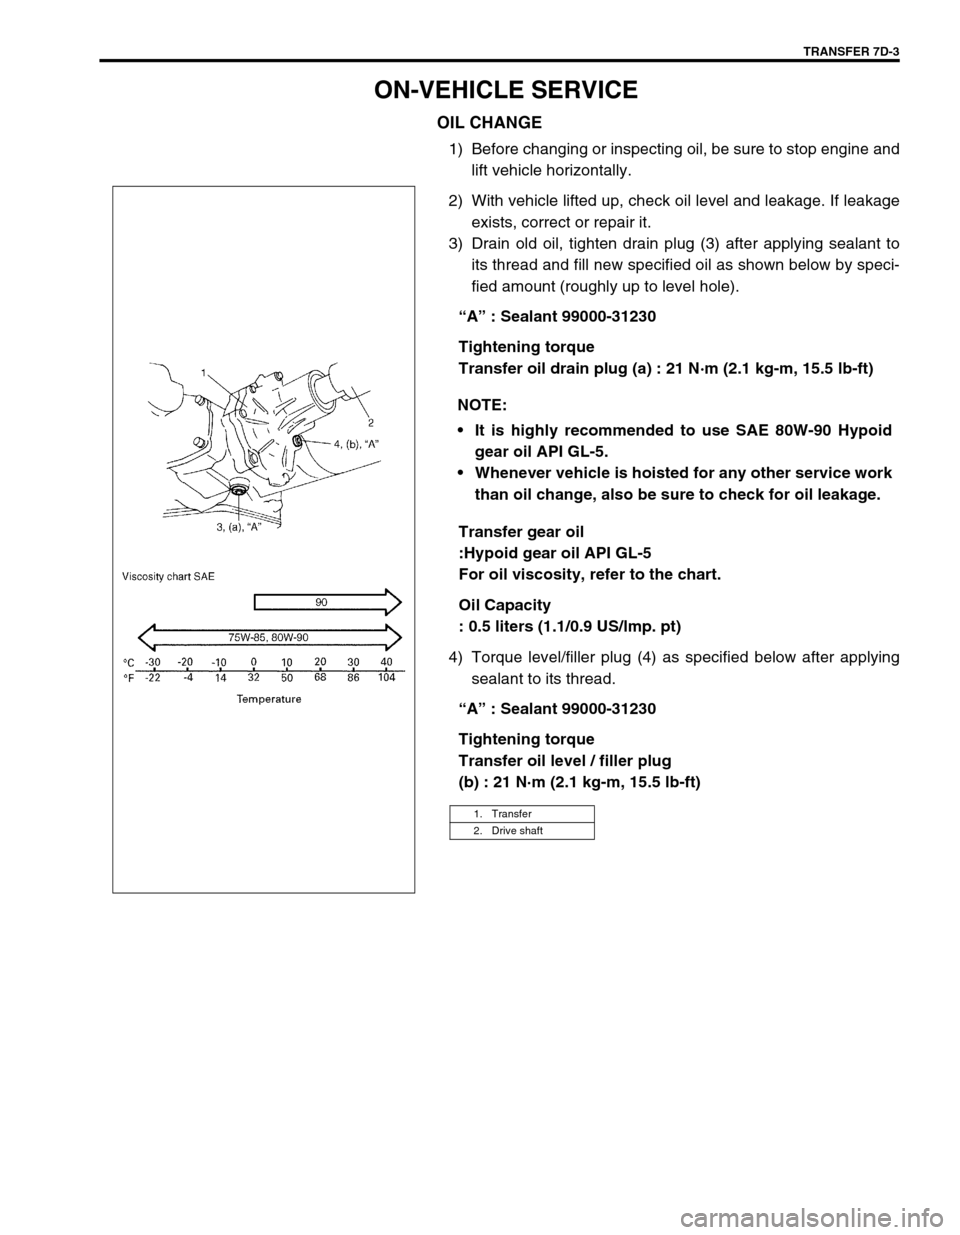
OIL CHANGE
1) Before changing or inspecting oil, be sure to stop engine and
lift vehicle horizontally.
2) With vehicle lifted up, check oil level and leakage. If leakage
exists, correct or repair it.
3) Drain old oil, tighten drain plug (3) after applying sealant to
its thread and fill new specified oil as shown below by speci-
fied amount (roughly up to level hole).
“A” : Sealant 99000-31230
Tightening torque
Transfer oil drain plug (a) : 21 N·m (2.1 kg-m, 15.5 lb-ft)
Transfer gear oil
:Hypoid gear oil API GL-5
For oil viscosity, refer to the chart.
Oil Capacity
: 0.5 liters (1.1/0.9 US/lmp. pt)
4) Torque level/filler plug (4) as specified below after applying
sealant to its thread.
“A” : Sealant 99000-31230
Tightening torque
Transfer oil level / filler plug
(b) : 21 N·m (2.1 kg-m, 15.5 lb-ft) NOTE:
It is highly recommended to use SAE 80W-90 Hypoid
gear oil API GL-5.
Whenever vehicle is hoisted for any other service work
than oil change, also be sure to check for oil leakage.
1. Transfer
2. Drive shaft
Page 202 of 447
7D-4 TRANSFER
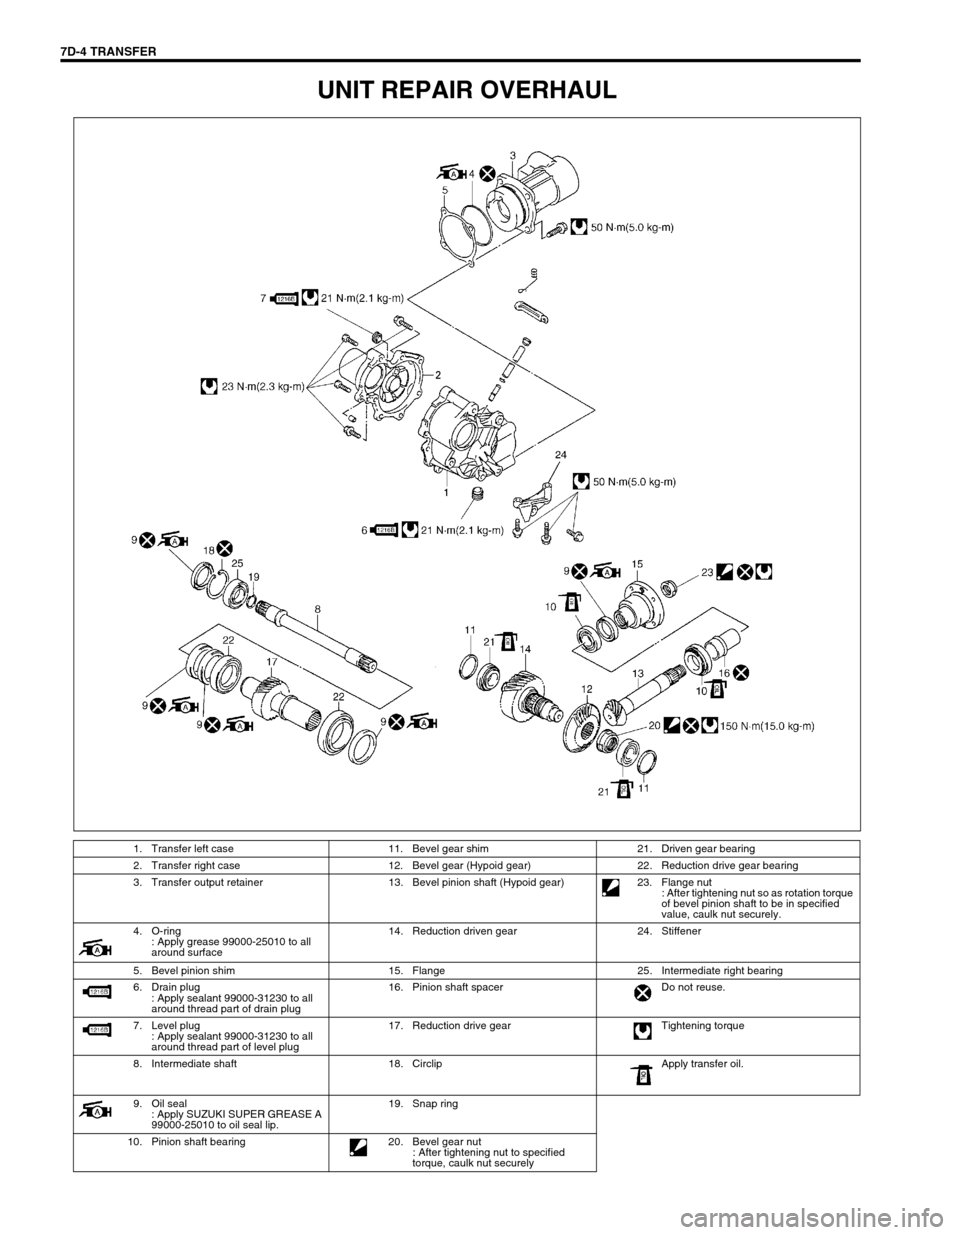
UNIT REPAIR OVERHAUL
1. Transfer left case 11. Bevel gear shim 21. Driven gear bearing
2. Transfer right case 12. Bevel gear (Hypoid gear) 22. Reduction drive gear bearing
3. Transfer output retainer 13. Bevel pinion shaft (Hypoid gear) 23. Flange nut
: After tightening nut so as rotation torque
of bevel pinion shaft to be in specified
value, caulk nut securely.
4. O-ring
: Apply grease 99000-25010 to all
around surface14. Reduction driven gear 24. Stiffener
5. Bevel pinion shim 15. Flange 25. Intermediate right bearing
6. Drain plug
: Apply sealant 99000-31230 to all
around thread part of drain plug16. Pinion shaft spacer Do not reuse.
7. Level plug
: Apply sealant 99000-31230 to all
around thread part of level plug17. Reduction drive gear Tightening torque
8. Intermediate shaft 18. Circlip Apply transfer oil.
9. Oil seal
: Apply SUZUKI SUPER GREASE A
99000-25010 to oil seal lip.19. Snap ring
10. Pinion shaft bearing 20. Bevel gear nut
: After tightening nut to specified
torque, caulk nut securely