relay SUZUKI SX4 2006 1.G Service Repair Manual
[x] Cancel search | Manufacturer: SUZUKI, Model Year: 2006, Model line: SX4, Model: SUZUKI SX4 2006 1.GPages: 1556, PDF Size: 37.31 MB
Page 255 of 1556
Downloaded from www.Manualslib.com manuals search engine Engine General Information and Diagnosis: 1A-205
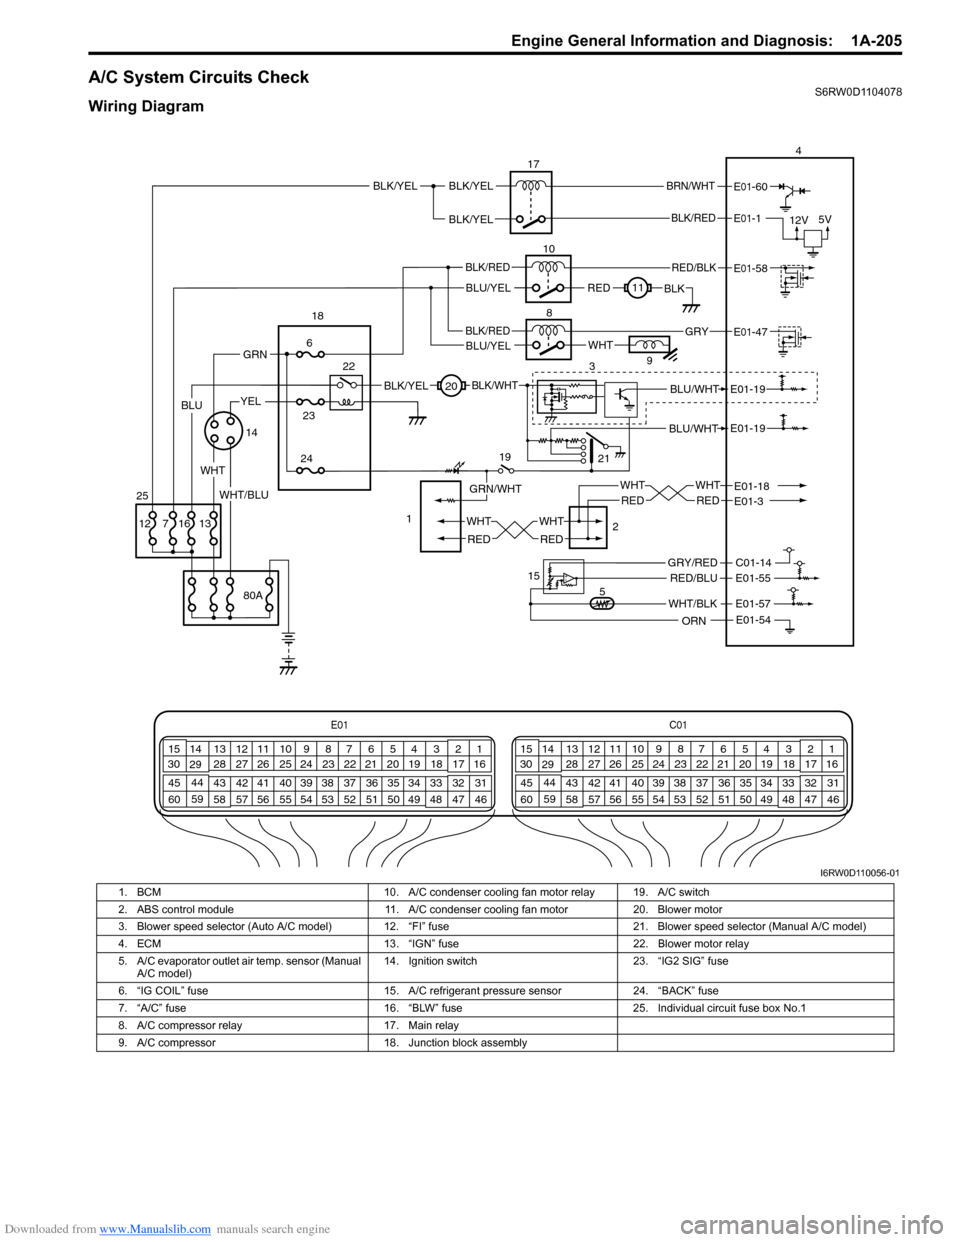
A/C System Circuits CheckS6RW0D1104078
Wiring Diagram
BLU/WHT
BLU/WHTE01-19
E01-19
21
E01C01
3 4
18 19 5 6 7 10 11
17 20
47 46 49 50 51 21 22
5216 259
24 14
29
55 57 54 53 59
60 582
26 27 28 15
30
56 4832 31 34 35 36 37 40 42 39 38 44
45 43 41 331 12 13
238 3 4
18 19 5 6 7 10 11
17 20
47 46 49 50 51 21 22
5216 259
24 14
29
55 57 54 53 59
60 582
26 27 28 15
30
56 4832 31 34 35 36 37 40 42 39 38 44
45 43 41 331 12 13
238
BLK/RED
BRN/WHT
12V5V
17
10
8
E01-1
E01-60
BLK/YEL
REDBLK11
WHT9
34
RED/BLK
BLK/REDE01-47
E01-58
BLU/YELGRY
19
2 1
20
5 15
WHT
RED
WHT
RED
WHT
RED
WHT
RED
E01-18E01-3
WHT/BLK
C01-14
E01-57
E01-54
E01-55RED/BLU
ORN
GRY/RED
BLK/YEL
GRN/WHT
BLK/WHT
WHT
1423
24
6
22 18
80A
1316 7 12
GRN
25
BLK/RED
BLU/YEL
YEL
WHT/BLU
BLK/YELBLK/YEL
BLU
I6RW0D110056-01
1. BCM 10. A/C condenser cooling fan motor relay 19. A/C switch
2. ABS control module 11. A/C condenser cooling fan motor 20. Blower motor
3. Blower speed selector (Auto A/C model) 12. “FI” fuse 21. Blower speed selector (Manual A/C model)
4. ECM 13. “IGN” fuse 22. Blower motor relay
5. A/C evaporator outlet air temp. sensor (Manual
A/C model)14. Ignition switch 23. “IG2 SIG” fuse
6. “IG COIL” fuse 15. A/C refrigerant pressure sensor 24. “BACK” fuse
7. “A/C” fuse 16. “BLW” fuse 25. Individual circuit fuse box No.1
8. A/C compressor relay 17. Main relay
9. A/C compressor 18. Junction block assembly
Page 258 of 1556
Downloaded from www.Manualslib.com manuals search engine 1A-208 Engine General Information and Diagnosis:
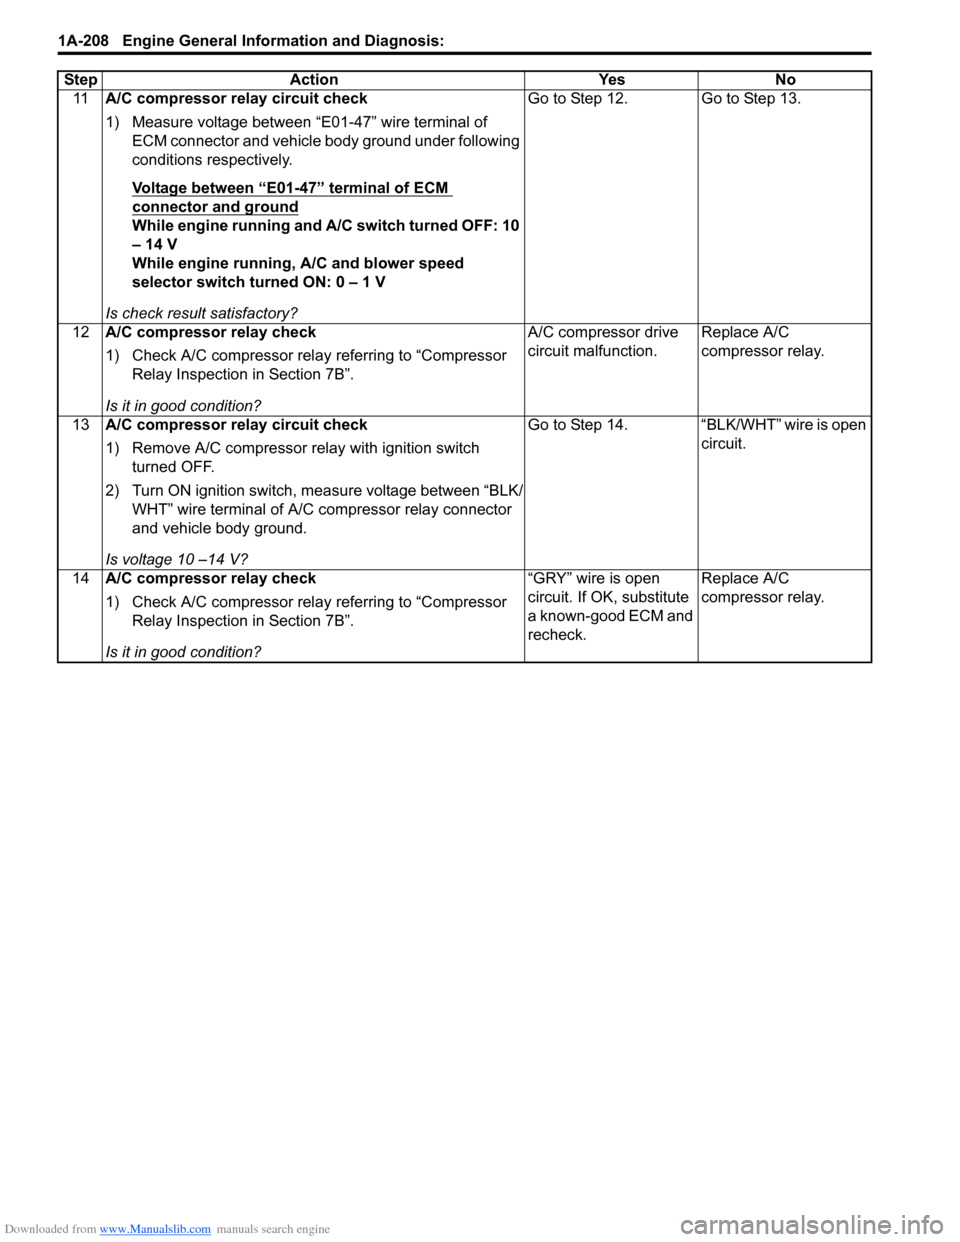
11A/C compressor relay circuit check
1) Measure voltage between “E01-47” wire terminal of
ECM connector and vehicle body ground under following
conditions respectively.
Voltage between “E01-47” terminal of ECM
connector and ground
While engine running and A/C switch turned OFF: 10
– 14 V
While engine running, A/C and blower speed
selector switch turned ON: 0 – 1 V
Is check result satisfactory?Go to Step 12. Go to Step 13.
12A/C compressor relay check
1) Check A/C compressor relay referring to “Compressor
Relay Inspection in Section 7B”.
Is it in good condition?A/C compressor drive
circuit malfunction.Replace A/C
compressor relay.
13A/C compressor relay circuit check
1) Remove A/C compressor relay with ignition switch
turned OFF.
2) Turn ON ignition switch, measure voltage between “BLK/
WHT” wire terminal of A/C compressor relay connector
and vehicle body ground.
Is voltage 10 –14 V?Go to Step 14. “BLK/WHT” wire is open
circuit.
14A/C compressor relay check
1) Check A/C compressor relay referring to “Compressor
Relay Inspection in Section 7B”.
Is it in good condition?“GRY” wire is open
circuit. If OK, substitute
a known-good ECM and
recheck.Replace A/C
compressor relay. Step Action Yes No
Page 259 of 1556
Downloaded from www.Manualslib.com manuals search engine Engine General Information and Diagnosis: 1A-209
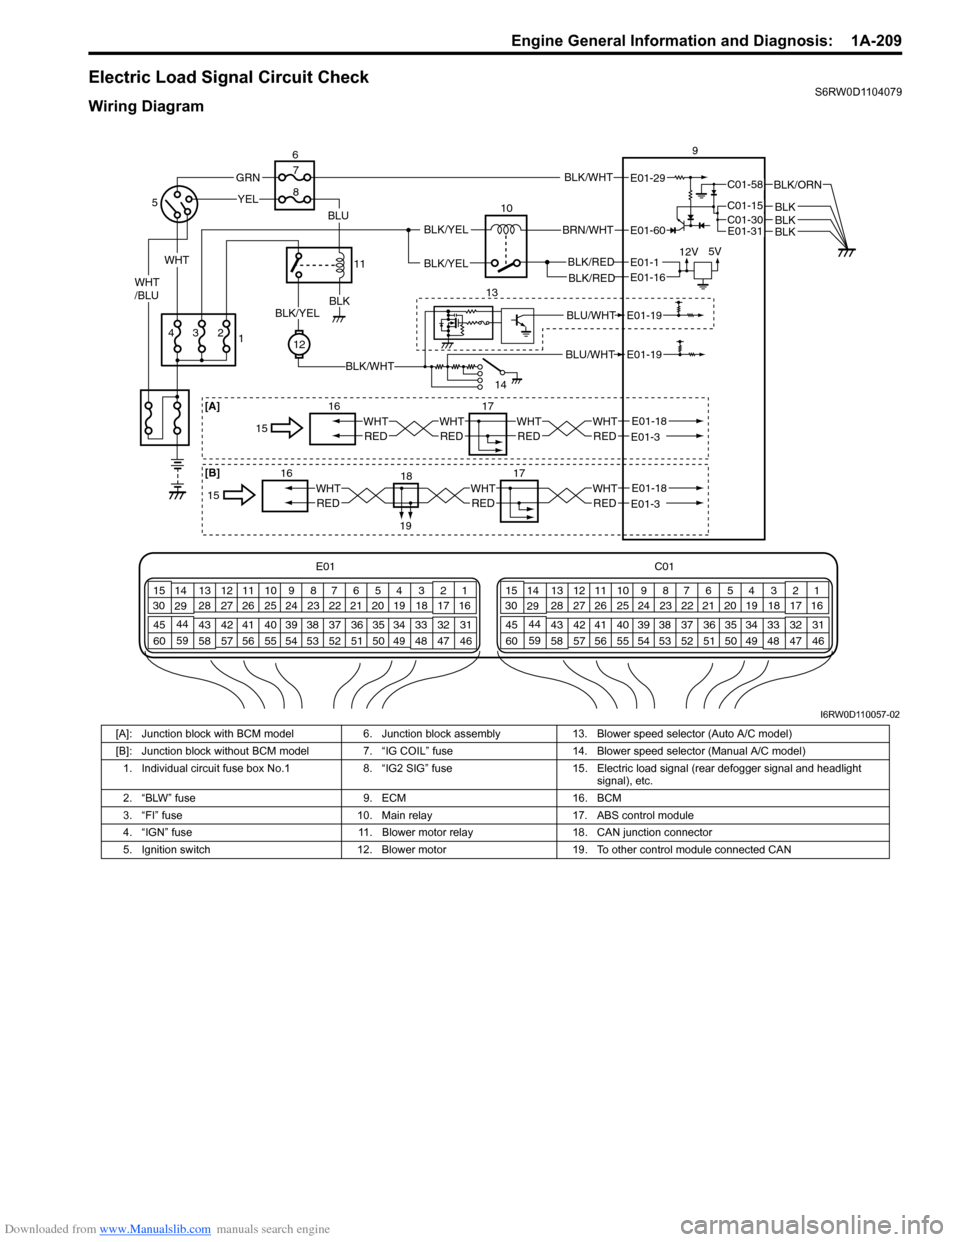
Electric Load Signal Circuit CheckS6RW0D1104079
Wiring Diagram
E01 C01
3 4
18 19 5 6 7 10 11
17 20
47 46 49 50 51 21 22
5216 259
24 14
29
55 57 54 53 59
60 582
26 27 28 15
30
56 4832 31 34 35 36 37 40 42 39 38 44
45 43 41 331 12 13
238 3 4
18 19 5 6 7 10 11
17 20
47 46 49 50 51 21 22
5216 259
24 14
29
55 57 54 53 59
60 582
26 27 28 15
30
56 4832 31 34 35 36 37 40 42 39 38 44
45 43 41 331 12 13
238
BLK/WHT
BLK/RED
WHT
BRN/WHT
12V5V
10
E01-29
E01-1
E01-60BLK/YEL
BLK/YEL
139BLK/REDE01-16
BLU/WHT
BLU/WHTE01-19
E01-19
14
3 4
YEL
2
12
BLK/WHT
BLKBLK/YEL
GRN
WHT/BLU
BLU
1 56
11 7
8
C01-58
C01-15C01-30
BLK/ORN
BLKBLKE01-31BLK
17 16
WHTREDE01-18E01-3 15WHTREDWHTREDWHTRED [A]
17
WHTRED
18E01-18E01-3 1615WHTREDWHTRED
[B]
19
I6RW0D110057-02
[A]: Junction block with BCM model 6. Junction block assembly 13. Blower speed selector (Auto A/C model)
[B]: Junction block without BCM model 7. “IG COIL” fuse 14. Blower speed selector (Manual A/C model)
1. Individual circuit fuse box No.1 8. “IG2 SIG” fuse 15. Electric load signal (rear defogger signal and headlight
signal), etc.
2. “BLW” fuse 9. ECM 16. BCM
3. “FI” fuse 10. Main relay 17. ABS control module
4. “IGN” fuse 11. Blower motor relay 18. CAN junction connector
5. Ignition switch 12. Blower motor 19. To other control module connected CAN
Page 261 of 1556
Downloaded from www.Manualslib.com manuals search engine Engine General Information and Diagnosis: 1A-211
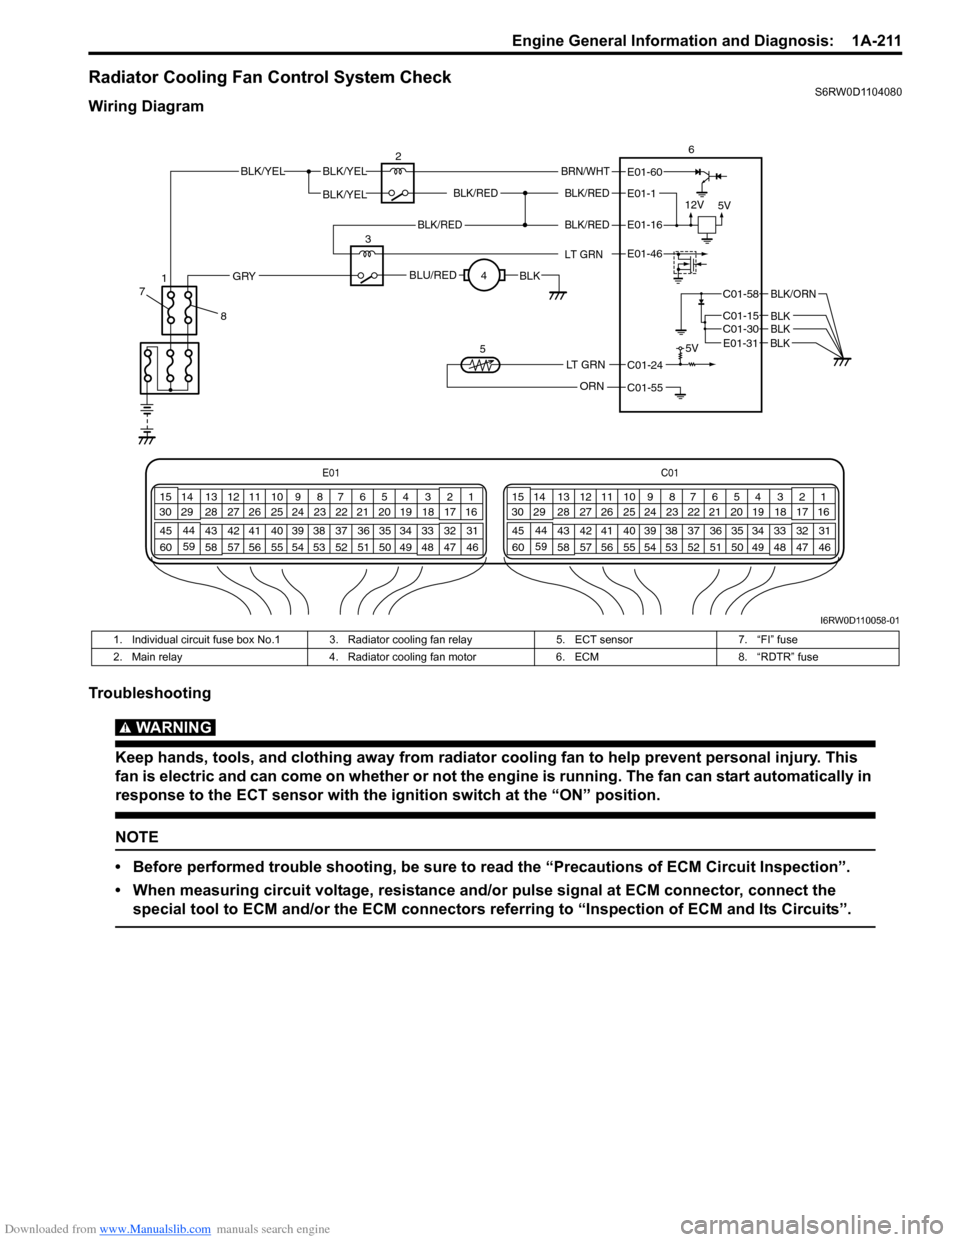
Radiator Cooling Fan Control System CheckS6RW0D1104080
Wiring Diagram
Troubleshooting
WARNING!
Keep hands, tools, and clothing away from radiator cooling fan to help prevent personal injury. This
fan is electric and can come on whether or not the engine is running. The fan can start automatically in
response to the ECT sensor with the ignition switch at the “ON” position.
NOTE
• Before performed trouble shooting, be sure to read the “Precautions of ECM Circuit Inspection”.
• When measuring circuit voltage, resistance and/or pulse signal at ECM connector, connect the
special tool to ECM and/or the ECM connectors referring to “Inspection of ECM and Its Circuits”.
E01C01
3 4
18 19 5 6 7 10 11
17 20
47 46 49 50 51 21 22
5216 259
24 14
29
55 57 54 53 59
60 582
26 27 28 15
30
56 4832 31 34 35 36 37 40 42 39 38 44
45 43 41 331 12 13
238 3 4
18 19 5 6 7 10 11
17 20
47 46 49 50 51 21 22
5216 259
24 14
29
55 57 54 53 59
60 582
26 27 28 15
30
56 4832 31 34 35 36 37 40 42 39 38 44
45 43 41 331 12 13
238
BLK/REDBLK/RED
BLK/YELBLK/YEL
BLK/YEL
BRN/WHT
12V
5V5V
26
E01-1
E01-60
C01-58
C01-15 C01-30
BLK/ORN
BLKBLK
BLK/RED
LT GRN
BLK/REDE01-16
E01-46
BLU/REDBLKGRY
LT GRN
ORN
C01-24
C01-55 3
4
5
E01-31 BLK
8 71
I6RW0D110058-01
1. Individual circuit fuse box No.1 3. Radiator cooling fan relay 5. ECT sensor 7. “FI” fuse
2. Main relay 4. Radiator cooling fan motor 6. ECM 8. “RDTR” fuse
Page 280 of 1556
Downloaded from www.Manualslib.com manuals search engine 1C-12 Engine Electrical Devices:
Main Relay, Fuel Pump Relay, Starting Motor
Control Relay, Throttle Actuator Control Relay
and Radiator Cooling Fan Relay Inspection
S6RW0D1306017
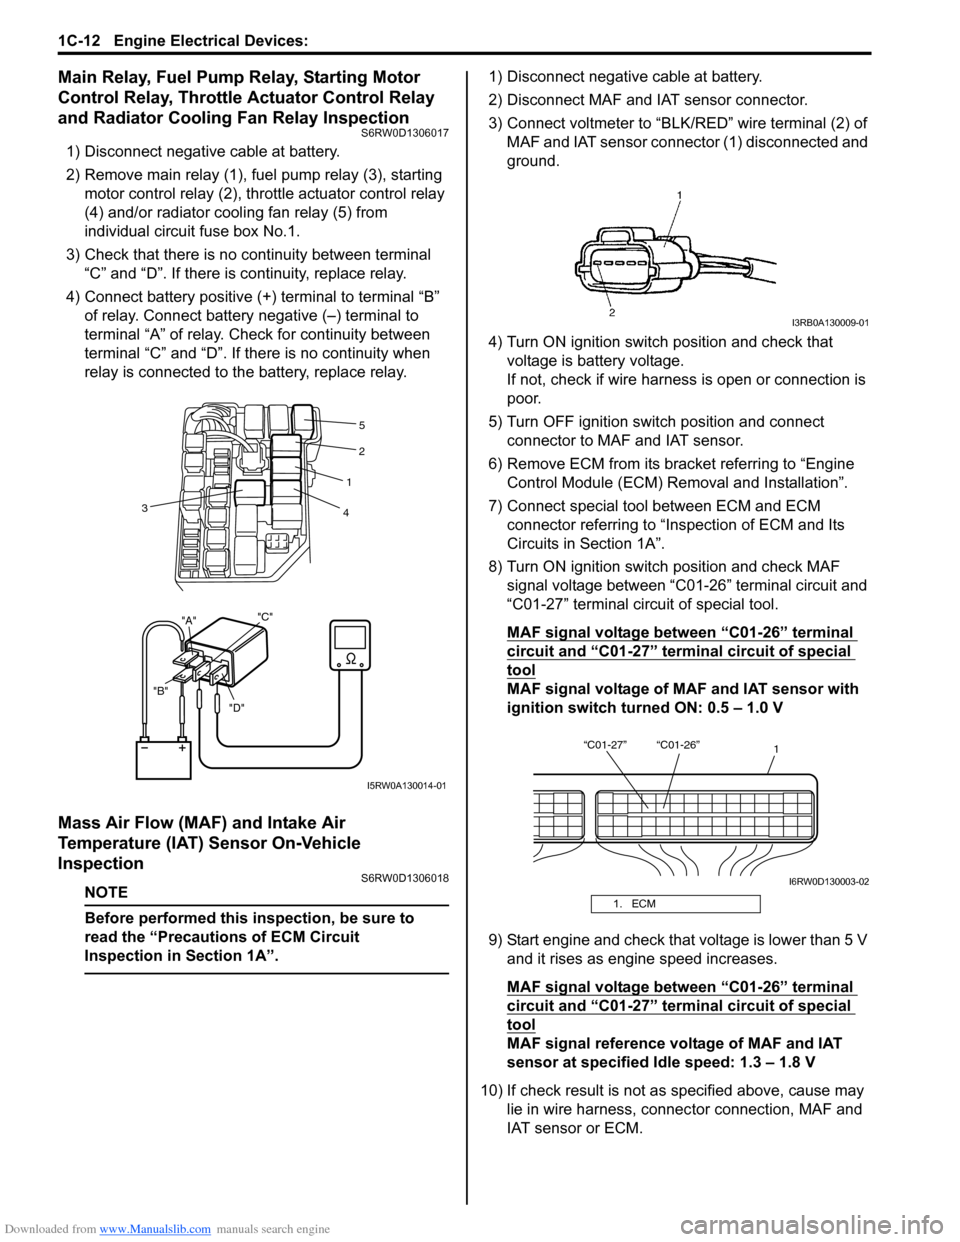
1) Disconnect negative cable at battery.
2) Remove main relay (1), fuel pump relay (3), starting
motor control relay (2), throttle actuator control relay
(4) and/or radiator cooling fan relay (5) from
individual circuit fuse box No.1.
3) Check that there is no continuity between terminal
“C” and “D”. If there is continuity, replace relay.
4) Connect battery positive (+) terminal to terminal “B”
of relay. Connect battery negative (–) terminal to
terminal “A” of relay. Check for continuity between
terminal “C” and “D”. If there is no continuity when
relay is connected to the battery, replace relay.
Mass Air Flow (MAF) and Intake Air
Temperature (IAT) Sensor On-Vehicle
Inspection
S6RW0D1306018
NOTE
Before performed this inspection, be sure to
read the “Precautions of ECM Circuit
Inspection in Section 1A”.
1) Disconnect negative cable at battery.
2) Disconnect MAF and IAT sensor connector.
3) Connect voltmeter to “BLK/RED” wire terminal (2) of
MAF and IAT sensor connector (1) disconnected and
ground.
4) Turn ON ignition switch position and check that
voltage is battery voltage.
If not, check if wire harness is open or connection is
poor.
5) Turn OFF ignition switch position and connect
connector to MAF and IAT sensor.
6) Remove ECM from its bracket referring to “Engine
Control Module (ECM) Removal and Installation”.
7) Connect special tool between ECM and ECM
connector referring to “Inspection of ECM and Its
Circuits in Section 1A”.
8) Turn ON ignition switch position and check MAF
signal voltage between “C01-26” terminal circuit and
“C01-27” terminal circuit of special tool.
MAF signal voltage between “C01-26” terminal
circuit and “C01-27” terminal circuit of special
tool
MAF signal voltage of MAF and IAT sensor with
ignition switch turned ON: 0.5 – 1.0 V
9) Start engine and check that voltage is lower than 5 V
and it rises as engine speed increases.
MAF signal voltage between “C01-26” terminal
circuit and “C01-27” terminal circuit of special
tool
MAF signal reference voltage of MAF and IAT
sensor at specified Idle speed: 1.3 – 1.8 V
10) If check result is not as specified above, cause may
lie in wire harness, connector connection, MAF and
IAT sensor or ECM.
"D" "B""A""C"
2
1
4 3
5
I5RW0A130014-01
1. ECM
I3RB0A130009-01
“C01-27” “C01-26”
1
I6RW0D130003-02
Page 368 of 1556
Downloaded from www.Manualslib.com manuals search engine 1F-3 Engine Cooling System:
Diagnostic Information and Procedures
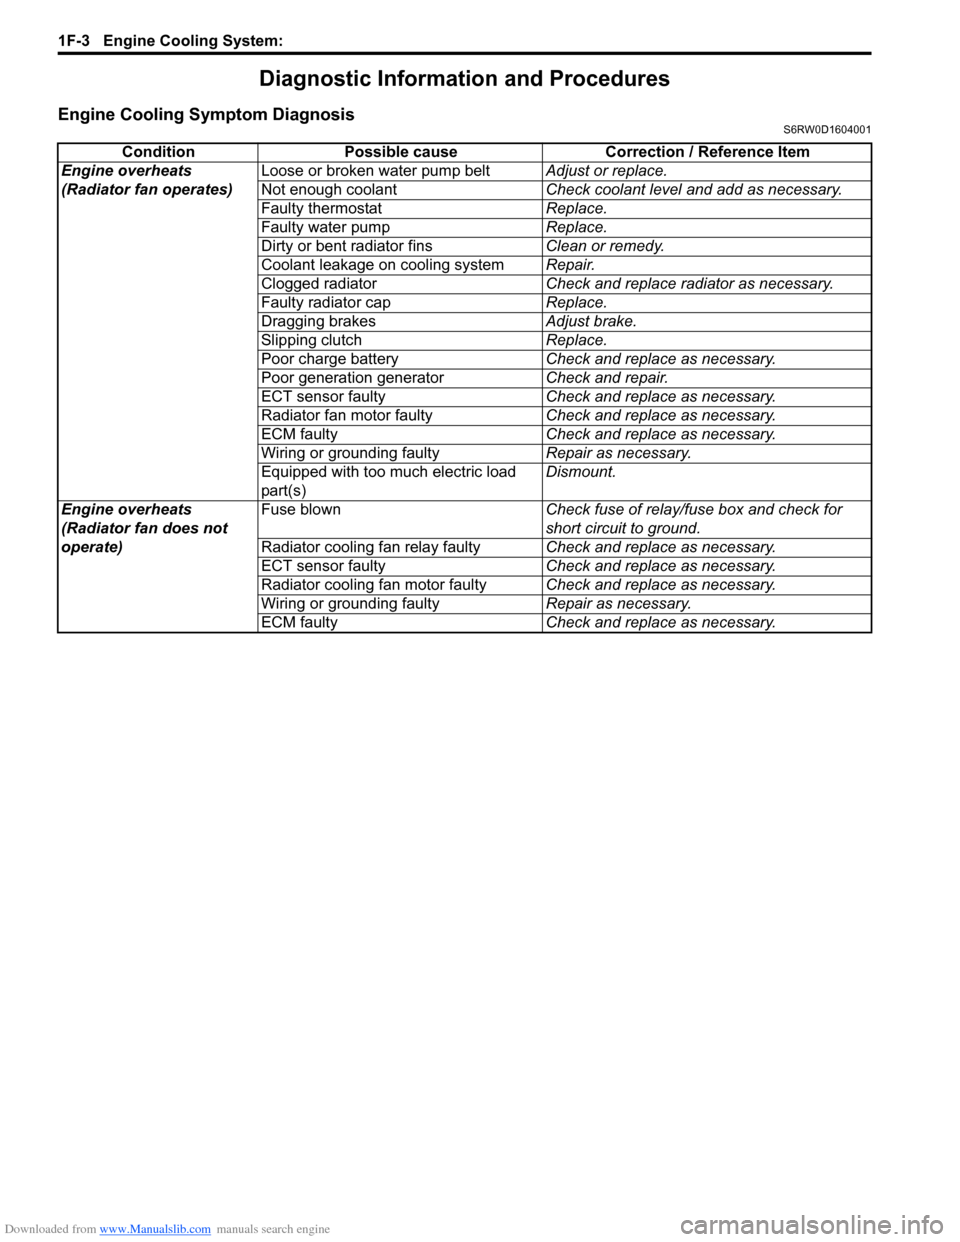
Engine Cooling Symptom DiagnosisS6RW0D1604001
Condition Possible cause Correction / Reference Item
Engine overheats
(Radiator fan operates)Loose or broken water pump beltAdjust or replace.
Not enough coolantCheck coolant level and add as necessary.
Faulty thermostatReplace.
Faulty water pumpReplace.
Dirty or bent radiator finsClean or remedy.
Coolant leakage on cooling systemRepair.
Clogged radiatorCheck and replace radiator as necessary.
Faulty radiator capReplace.
Dragging brakesAdjust brake.
Slipping clutchReplace.
Poor charge batteryCheck and replace as necessary.
Poor generation generatorCheck and repair.
ECT sensor faultyCheck and replace as necessary.
Radiator fan motor faultyCheck and replace as necessary.
ECM faultyCheck and replace as necessary.
Wiring or grounding faultyRepair as necessary.
Equipped with too much electric load
part(s)Dismount.
Engine overheats
(Radiator fan does not
operate)Fuse blownCheck fuse of relay/fuse box and check for
short circuit to ground.
Radiator cooling fan relay faultyCheck and replace as necessary.
ECT sensor faultyCheck and replace as necessary.
Radiator cooling fan motor faultyCheck and replace as necessary.
Wiring or grounding faultyRepair as necessary.
ECM faultyCheck and replace as necessary.
Page 373 of 1556
Downloaded from www.Manualslib.com manuals search engine Engine Cooling System: 1F-8
Radiator Cooling Fan Assembly On-Vehicle
Inspection
S6RW0D1606009
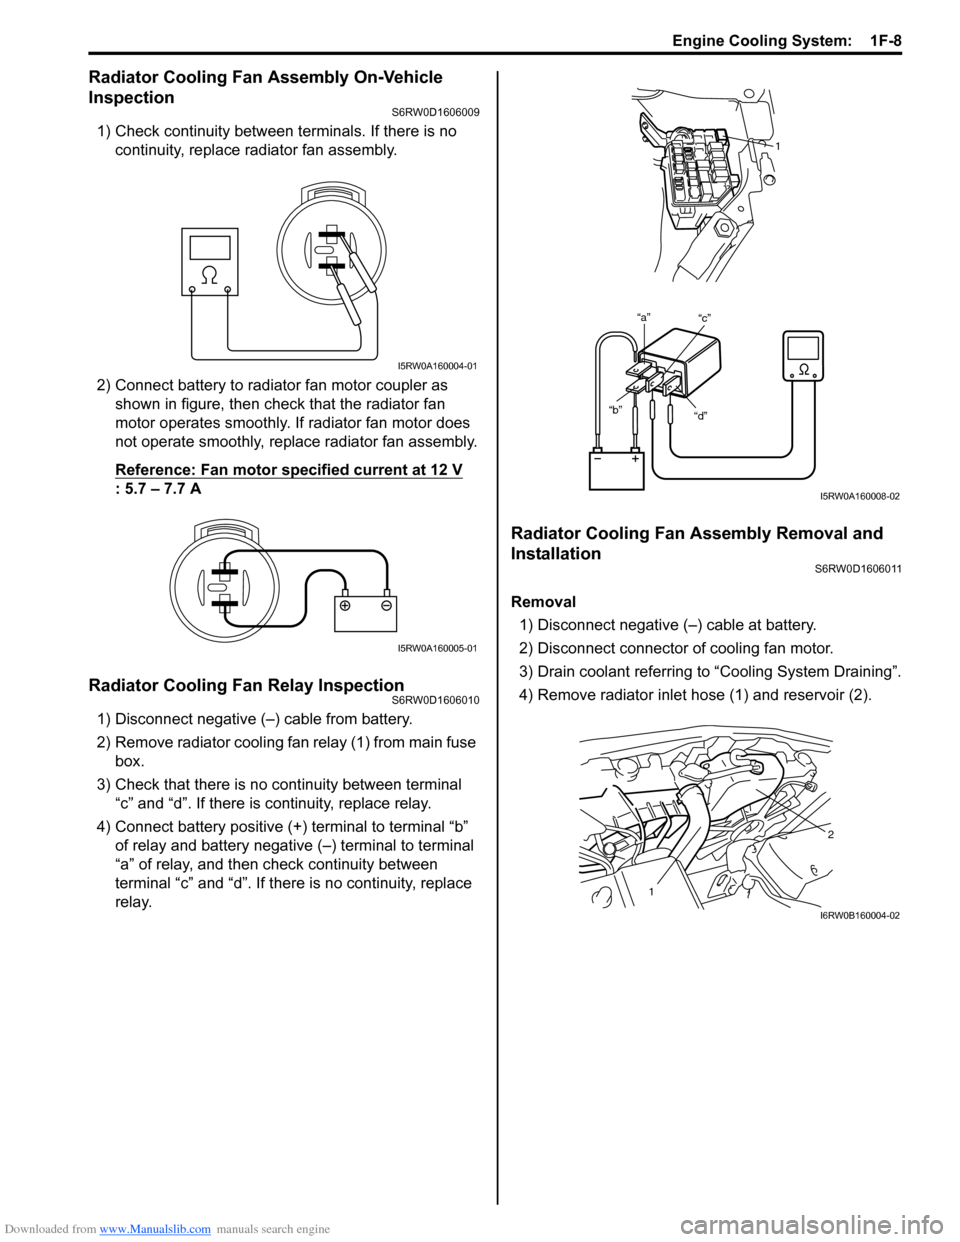
1) Check continuity between terminals. If there is no
continuity, replace radiator fan assembly.
2) Connect battery to radiator fan motor coupler as
shown in figure, then check that the radiator fan
motor operates smoothly. If radiator fan motor does
not operate smoothly, replace radiator fan assembly.
Reference: Fan motor specified current at 12 V
: 5.7 – 7.7 A
Radiator Cooling Fan Relay InspectionS6RW0D1606010
1) Disconnect negative (–) cable from battery.
2) Remove radiator cooling fan relay (1) from main fuse
box.
3) Check that there is no continuity between terminal
“c” and “d”. If there is continuity, replace relay.
4) Connect battery positive (+) terminal to terminal “b”
of relay and battery negative (–) terminal to terminal
“a” of relay, and then check continuity between
terminal “c” and “d”. If there is no continuity, replace
relay.
Radiator Cooling Fan Assembly Removal and
Installation
S6RW0D1606011
Removal
1) Disconnect negative (–) cable at battery.
2) Disconnect connector of cooling fan motor.
3) Drain coolant referring to “Cooling System Draining”.
4) Remove radiator inlet hose (1) and reservoir (2).
I5RW0A160004-01
I5RW0A160005-01
“d” “b”“
a”
“c”
1
I5RW0A160008-02
1
2
I6RW0B160004-02
Page 378 of 1556
Downloaded from www.Manualslib.com manuals search engine 1G-1 Fuel System:
Engine
Fuel System
Precautions
Precautions on Fuel System ServiceS6RW0D1700001
WARNING!
Before attempting service of any type on fuel system, the following should be always observed in
order to reduce the risk of fire and personal injury.
• Disconnect negative cable at battery.
• Do not smoke, and place no smoking signs near work area.
• Be sure to have CO
2 fire extinguisher handy.
• Be sure to perform work in a well-ventilated area and away from any open flames (such as gas hot
heater).
• Wear safety glasses.
• To relieve fuel vapor pressure in fuel tank, remove fuel filler cap from fuel filler neck and then
reinstall it.
• As fuel feed line is still under high fuel pressure even after stopping engine, loosening or
disconnecting fuel feed line directly may cause dangerous spout of fuel. Before loosening or
disconnecting fuel feed line, make sure to relieve fuel pressure referring to “Fuel Pressure Relief
Procedure”.
• A small amount of fuel may be released when the fuel line is disconnected. In order to reduce the
risk of personal injury, cover a shop cloth to the fitting to be disconnected. Be sure to put that cloth
in an approved container after disconnecting.
• Never run engine with fuel pump relay disconnected when engine and exhaust system are hot.
• Note that fuel hose connection varies with each type of pipe. Be sure to connect and clamp each
hose correctly referring to “Fuel Hose Disconnecting and Reconnecting”.
After connecting, make sure that it has no twist or kink.
• When installing injector or fuel feed pipe, lubricate its O-ring with gasoline.
• When servicing the fuel tank, it should be treated with respect, with no contact with sharp edges or
hot surfaces. In addition, the fuel tank should not be dropped since fuel tank, fuel pump and other
components can be damaged by the impact. If dropped, all components should be replaced because
there is a risk of damage.
• The fuel tank is made of resin.
Be sure not to allow solvent (chemical article such as grease and sealant) to attach to the fuel tank
as some chemical reaction may occur, causing the fuel tank to be swollen, hardened or distorted
leakage and resulting in fuel leakage from the fuel tank.
Page 384 of 1556
Downloaded from www.Manualslib.com manuals search engine 1G-7 Fuel System:
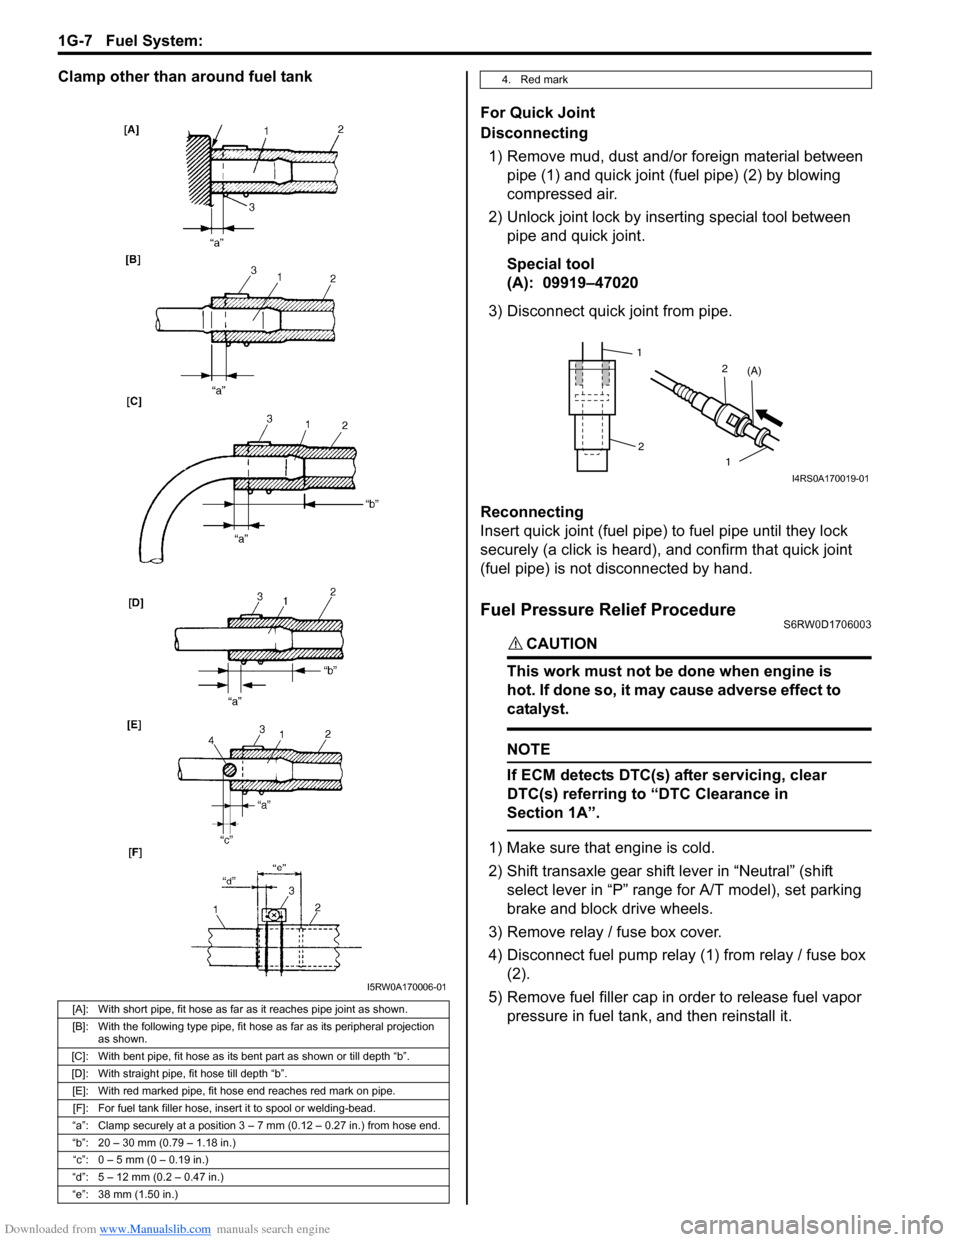
Clamp other than around fuel tank
For Quick Joint
Disconnecting
1) Remove mud, dust and/or foreign material between
pipe (1) and quick joint (fuel pipe) (2) by blowing
compressed air.
2) Unlock joint lock by inserting special tool between
pipe and quick joint.
Special tool
(A): 09919–47020
3) Disconnect quick joint from pipe.
Reconnecting
Insert quick joint (fuel pipe) to fuel pipe until they lock
securely (a click is heard), and confirm that quick joint
(fuel pipe) is not disconnected by hand.
Fuel Pressure Relief ProcedureS6RW0D1706003
CAUTION!
This work must not be done when engine is
hot. If done so, it may cause adverse effect to
catalyst.
NOTE
If ECM detects DTC(s) after servicing, clear
DTC(s) referring to “DTC Clearance in
Section 1A”.
1) Make sure that engine is cold.
2) Shift transaxle gear shift lever in “Neutral” (shift
select lever in “P” range for A/T model), set parking
brake and block drive wheels.
3) Remove relay / fuse box cover.
4) Disconnect fuel pump relay (1) from relay / fuse box
(2).
5) Remove fuel filler cap in order to release fuel vapor
pressure in fuel tank, and then reinstall it.
[A]: With short pipe, fit hose as far as it reaches pipe joint as shown.
[B]: With the following type pipe, fit hose as far as its peripheral projection
as shown.
[C]: With bent pipe, fit hose as its bent part as shown or till depth “b”.
[D]: With straight pipe, fit hose till depth “b”.
[E]: With red marked pipe, fit hose end reaches red mark on pipe.
[F]: For fuel tank filler hose, insert it to spool or welding-bead.
“a”: Clamp securely at a position 3 – 7 mm (0.12 – 0.27 in.) from hose end.
“b”: 20 – 30 mm (0.79 – 1.18 in.)
“c”: 0 – 5 mm (0 – 0.19 in.)
“d”: 5 – 12 mm (0.2 – 0.47 in.)
“e”: 38 mm (1.50 in.)
I5RW0A170006-01
4. Red mark
1
2
1 2
(A)
I4RS0A170019-01
Page 385 of 1556
Downloaded from www.Manualslib.com manuals search engine Fuel System: 1G-8
6) Start engine and run it until engine stops for lack of
fuel. Repeat cranking engine 2 – 3 times for about 3
seconds each time in order to dissipate fuel pressure
in lines. Fuel connections are now safe for servicing.
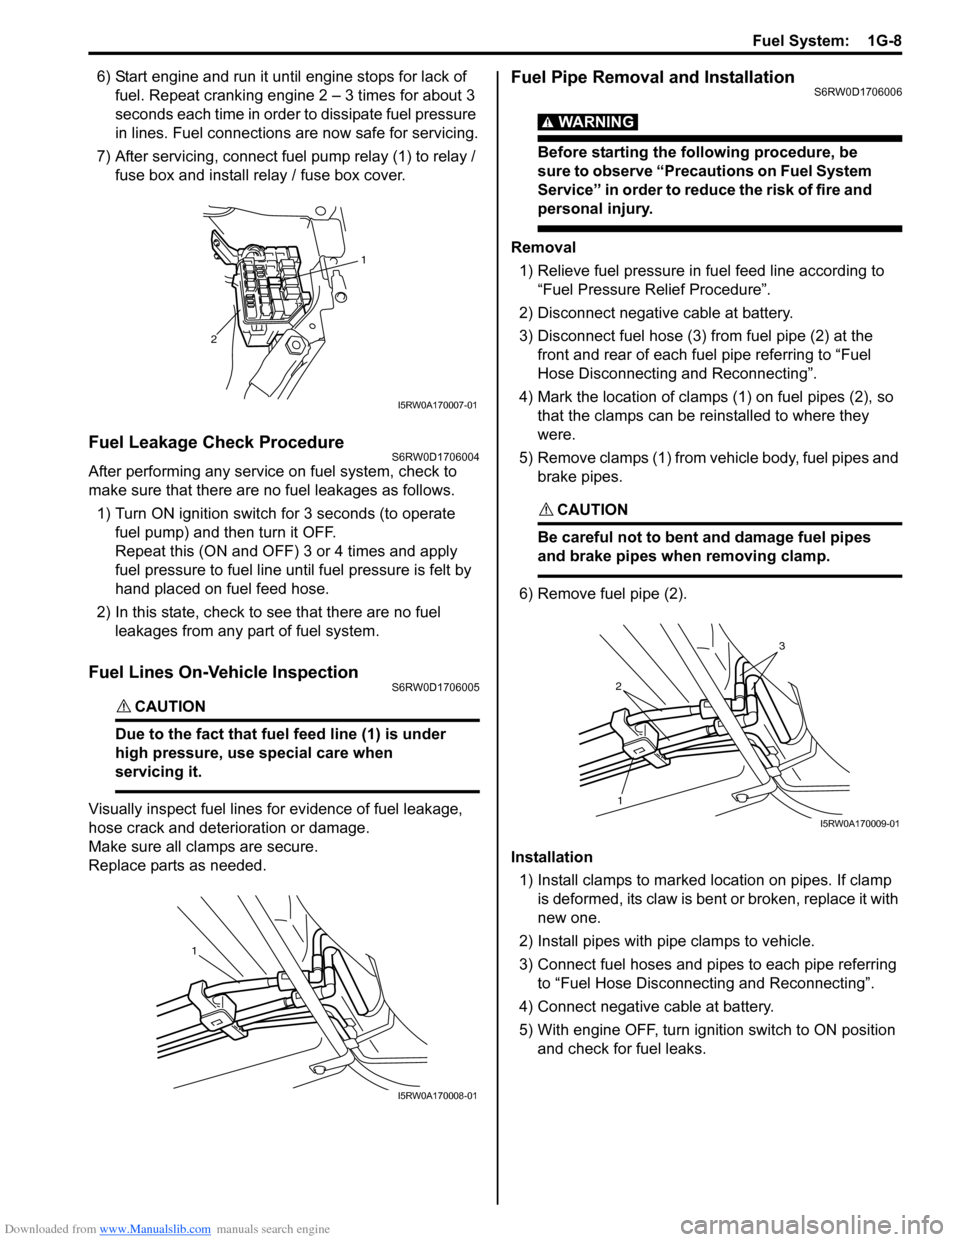
7) After servicing, connect fuel pump relay (1) to relay /
fuse box and install relay / fuse box cover.
Fuel Leakage Check ProcedureS6RW0D1706004
After performing any service on fuel system, check to
make sure that there are no fuel leakages as follows.
1) Turn ON ignition switch for 3 seconds (to operate
fuel pump) and then turn it OFF.
Repeat this (ON and OFF) 3 or 4 times and apply
fuel pressure to fuel line until fuel pressure is felt by
hand placed on fuel feed hose.
2) In this state, check to see that there are no fuel
leakages from any part of fuel system.
Fuel Lines On-Vehicle InspectionS6RW0D1706005
CAUTION!
Due to the fact that fuel feed line (1) is under
high pressure, use special care when
servicing it.
Visually inspect fuel lines for evidence of fuel leakage,
hose crack and deterioration or damage.
Make sure all clamps are secure.
Replace parts as needed.
Fuel Pipe Removal and InstallationS6RW0D1706006
WARNING!
Before starting the following procedure, be
sure to observe “Precautions on Fuel System
Service” in order to reduce the risk of fire and
personal injury.
Removal
1) Relieve fuel pressure in fuel feed line according to
“Fuel Pressure Relief Procedure”.
2) Disconnect negative cable at battery.
3) Disconnect fuel hose (3) from fuel pipe (2) at the
front and rear of each fuel pipe referring to “Fuel
Hose Disconnecting and Reconnecting”.
4) Mark the location of clamps (1) on fuel pipes (2), so
that the clamps can be reinstalled to where they
were.
5) Remove clamps (1) from vehicle body, fuel pipes and
brake pipes.
CAUTION!
Be careful not to bent and damage fuel pipes
and brake pipes when removing clamp.
6) Remove fuel pipe (2).
Installation
1) Install clamps to marked location on pipes. If clamp
is deformed, its claw is bent or broken, replace it with
new one.
2) Install pipes with pipe clamps to vehicle.
3) Connect fuel hoses and pipes to each pipe referring
to “Fuel Hose Disconnecting and Reconnecting”.
4) Connect negative cable at battery.
5) With engine OFF, turn ignition switch to ON position
and check for fuel leaks.
1
2
I5RW0A170007-01
1
I5RW0A170008-01
2
3
1
I5RW0A170009-01