display TOYOTA AYGO 2020 Owners Manual (in English)
[x] Cancel search | Manufacturer: TOYOTA, Model Year: 2020, Model line: AYGO, Model: TOYOTA AYGO 2020Pages: 32, PDF Size: 2.64 MB
Page 6 of 32
NAVIGATION SYSTEM OWNER’S MANUAL - 5
Warnings
LIMITATIONS OF THE NAVIGATION SYSTEM
This navigation system calculates the current vehicle position using satellite signals,
various vehicle signals, map data, etc.
However, the accurate position may not be shown depending on the satellite condition,
road configuration, vehicle condition or other circumstances.NOTICE
Once turned on, the system requires
some time to find satellite signals and
navigation data so it can calculate
a solution for the position of your
vehicle.
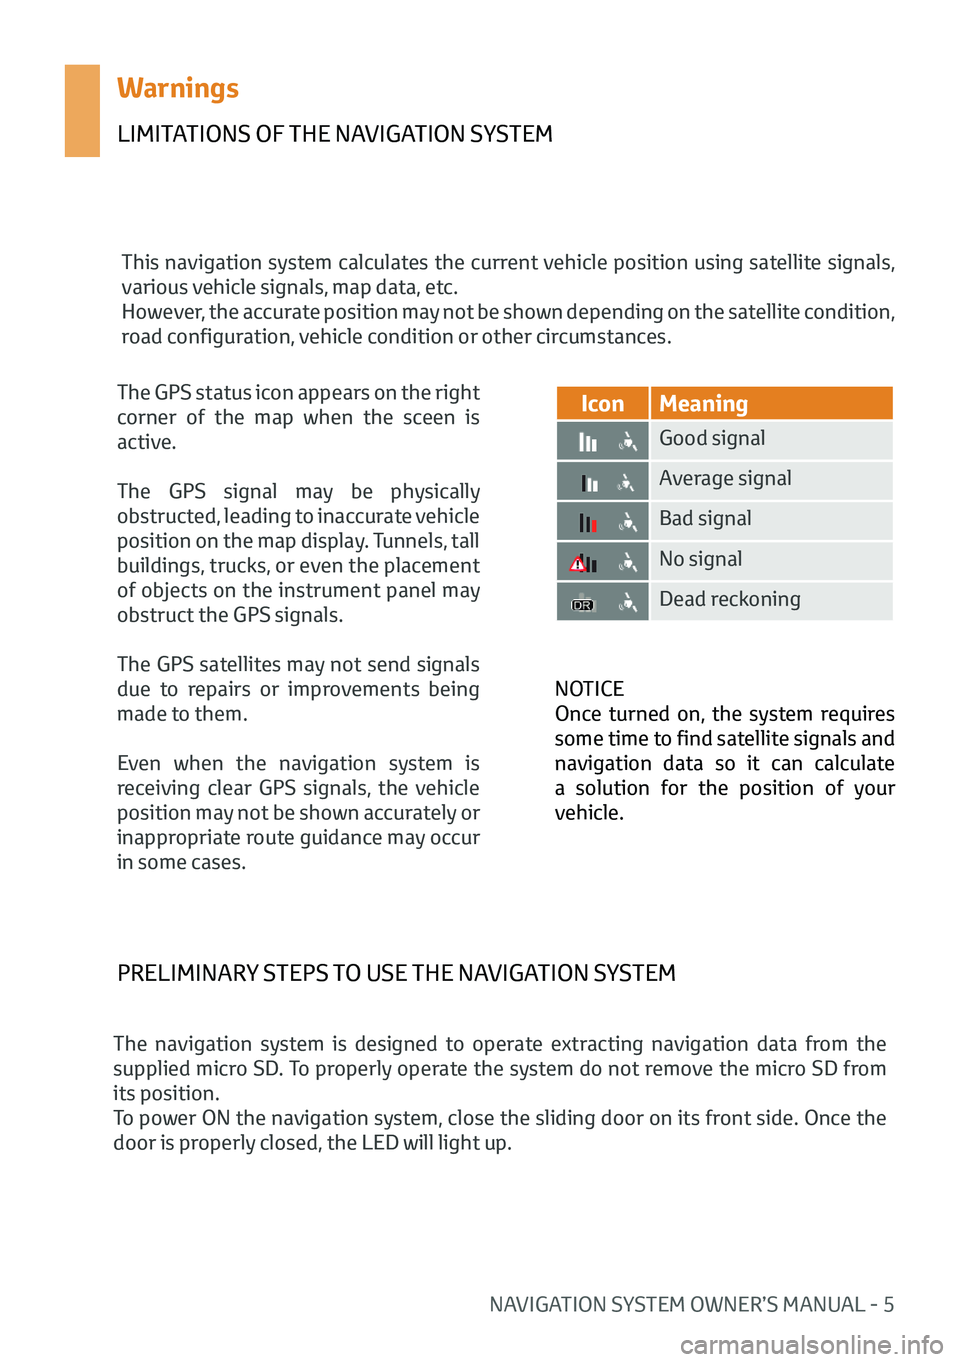
IconMeaning
Good signal
Average signal
Bad signal
No signal
Dead reckoning
The GPS status icon appears on the right
corner of the map when the sceen is
active.
The GPS signal may be physically
obstructed, leading to inaccurate vehicle
position on the map display. Tunnels, tall
buildings, trucks, or even the placement
of objects on the instrument panel may
obstruct the GPS signals.
The GPS satellites may not send signals
due to repairs or improvements being
made to them.
Even when the navigation system is
receiving clear GPS signals, the vehicle
position may not be shown accurately or
inappropriate route guidance may occur
in some cases.
PRELIMINARY STEPS TO USE THE NAVIGATION SYSTEM
The navigation system is designed to operate extracting navigation data from the
supplied micro SD. To properly operate the system do not remove the micro SD from
its position.
To power ON the navigation system, close the sliding door on its front side. Once the
door is properly closed, the LED will light up.
Page 9 of 32
8 - NAVIGATION SYSTEM OWNER’S MANUAL
1.1 NAVIGATION MENU SCREEN
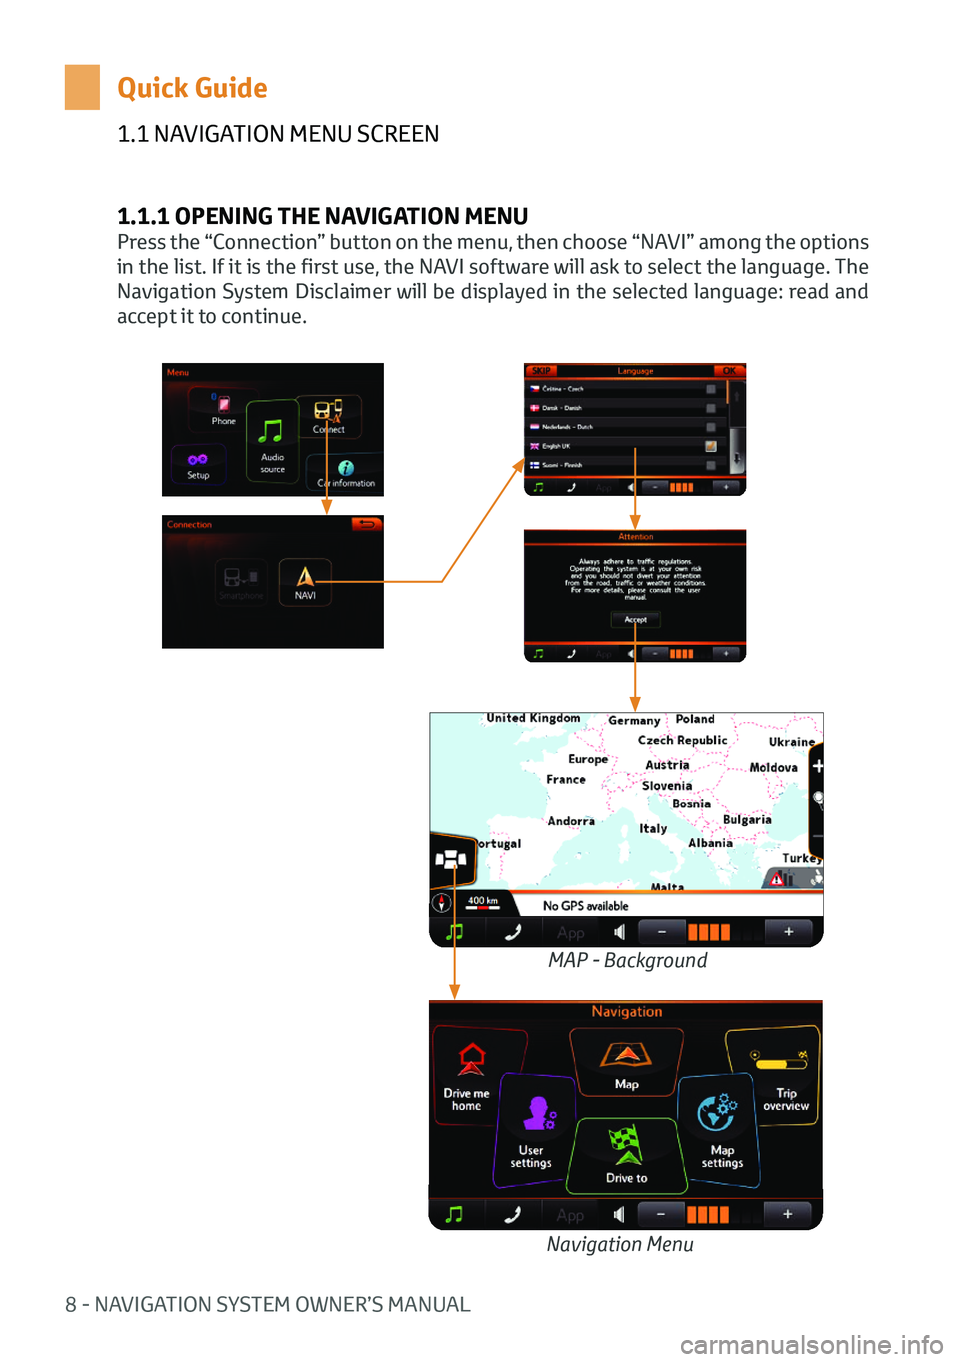
1.1.1 OPENING THE NAVIGATION MENU
Press the “Connection” button on the menu, then choose “NAVI” among the options
in the list. If it is the first use, the NAVI software will ask to select the language. The
Navigation System Disclaimer will be displayed in the selected language: read and
accept it to continue.
Quick Guide
MAP - Background
Navigation Menu
Page 11 of 32
10 - NAVIGATION SYSTEM OWNER’S MANUAL
1.2 MAP LAYOUT OVERVIEW
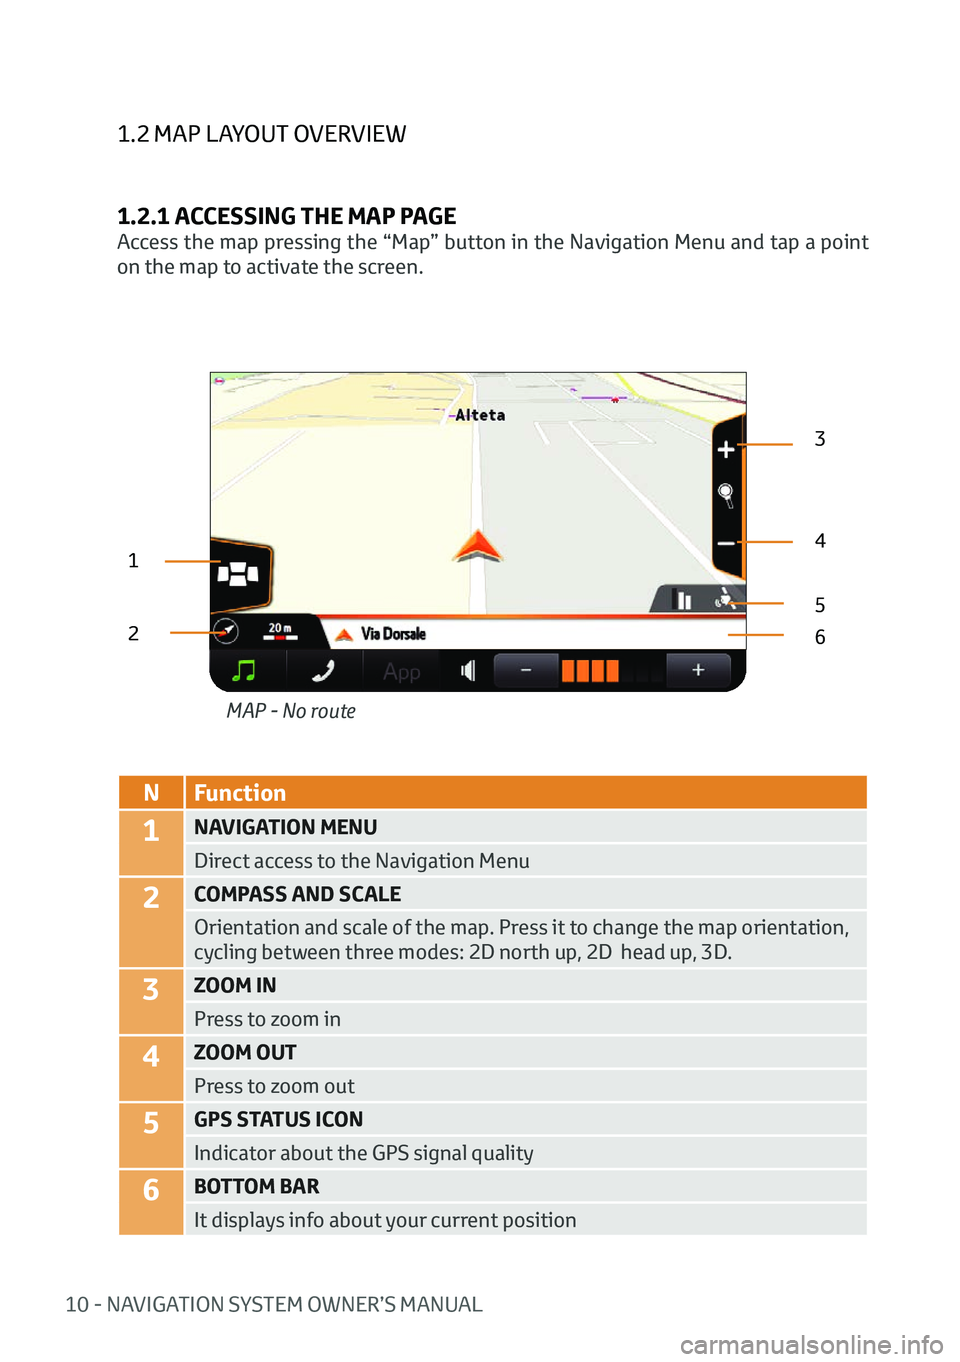
1.2.1 ACCESSING THE MAP PAGE
Access the map pressing the “Map” button in the Navigation Menu and tap a point
on the map to activate the screen.
1
23
4
6
5
N
Function
1NAVIGATION MENU
Direct access to the Navigation Menu
2COMPASS AND SCALE
Orientation and scale of the map. Press it to change the map orientation,
cycling between three modes: 2D north up, 2D head up, 3D.
3ZOOM IN
Press to zoom in
4ZOOM OUT
Press to zoom out
5GPS STATUS ICON
Indicator about the GPS signal quality
6BOTTOM BAR
It displays info about your current positionMAP - No route
Page 12 of 32
NAVIGATION SYSTEM OWNER’S MANUAL - 11
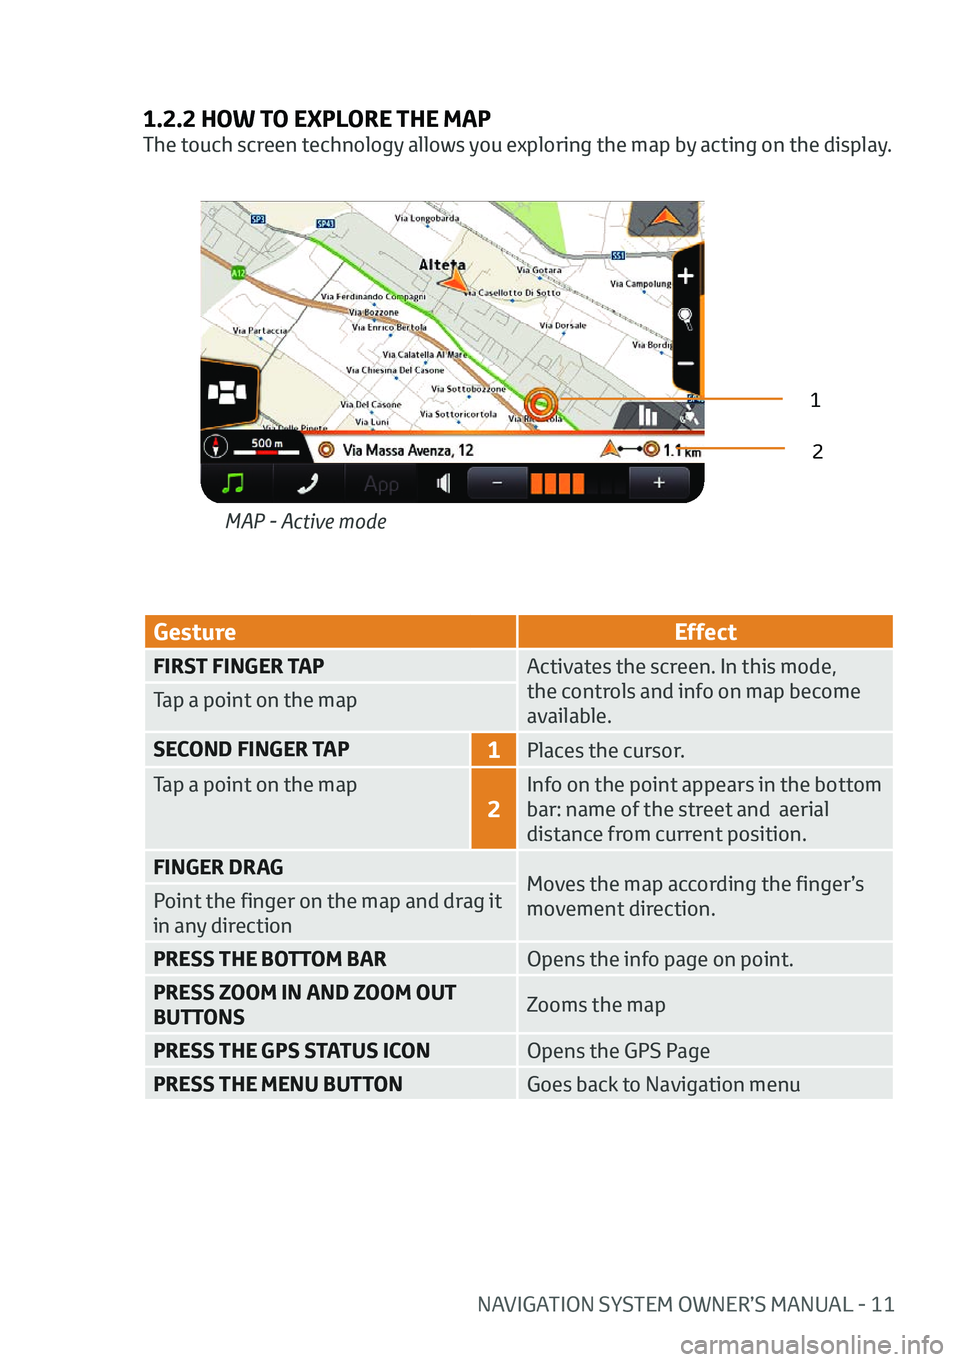
1.2.2 HOW TO EXPLORE THE MAP
The touch screen technology allows you exploring the map by acting on the display.
GestureEffect
FIRST FINGER TAPActivates the screen. In this mode,
the controls and info on map become
available.
Tap a point on the map
SECOND FINGER TAP
1Places the cursor.
Tap a point on the map
2
Info on the point appears in the bottom
bar: name of the street and aerial
distance from current position.
FINGER DRAG Moves the map according the finger’s
movement direction.
Point the finger on the map and drag it
in any direction
PRESS THE BOTTOM BAR
Opens the info page on point.
PRESS ZOOM IN AND ZOOM OUT
BUTTONS Zooms the map
PRESS THE GPS STATUS ICON Opens the GPS Page
PRESS THE MENU BUTTON Goes back to Navigation menu
MAP - Active mode
1
2
Page 14 of 32
NAVIGATION SYSTEM OWNER’S MANUAL - 13
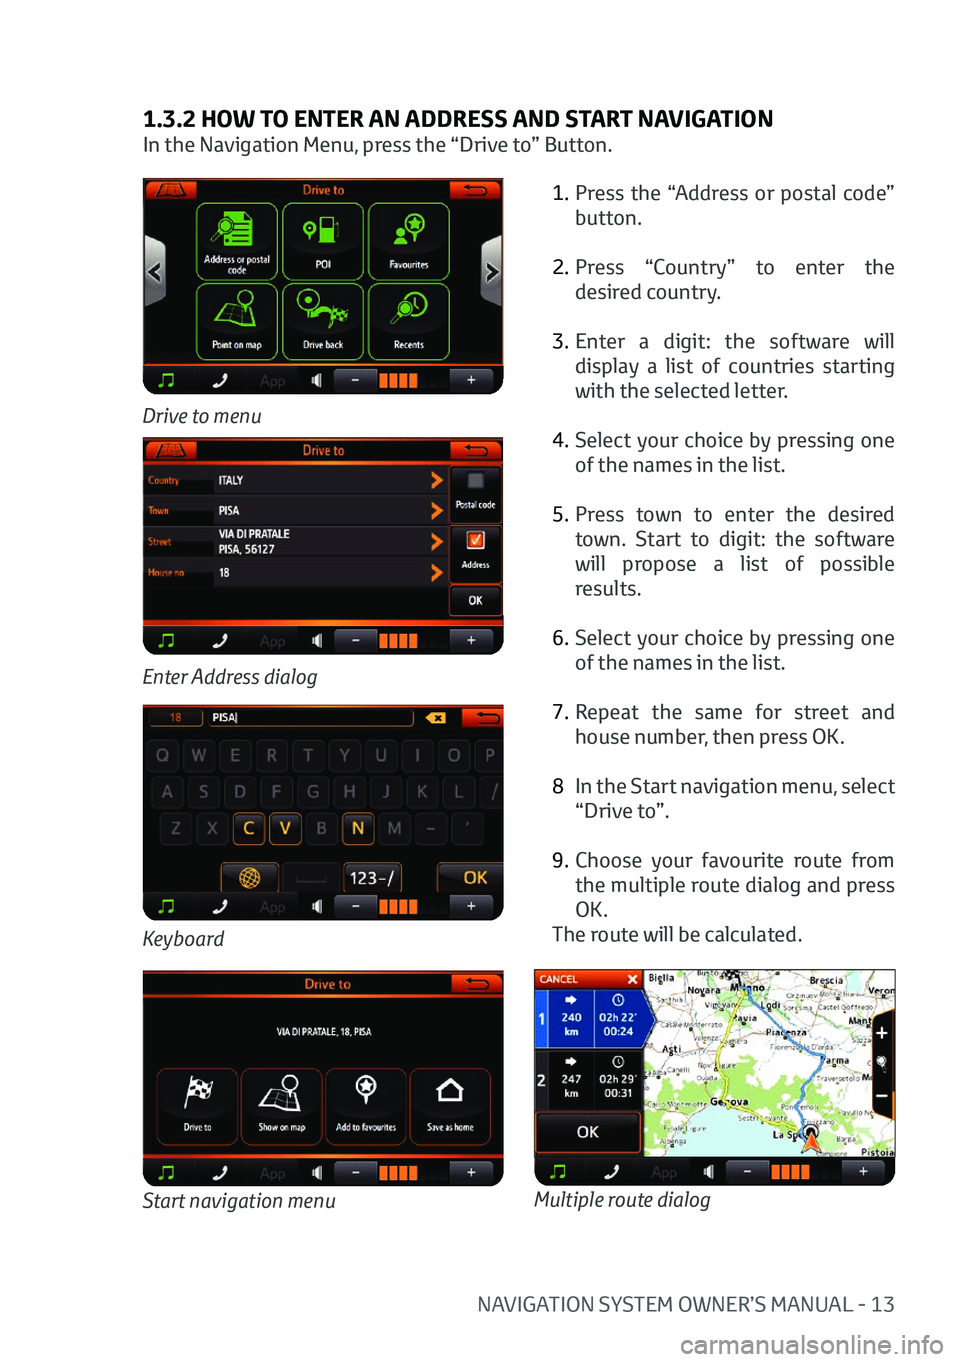
1.3.2 HOW TO ENTER AN ADDRESS AND START NAVIGATION
In the Navigation Menu, press the “Drive to” Button.1. Press the “Address or postal code”
button.
2. Press “Country” to enter the
desired country.
3. Enter a digit: the software will
display a list of countries starting
with the selected letter.
4. Select your choice by pressing one
of the names in the list.
5. Press town to enter the desired
town. Start to digit: the software
will propose a list of possible
results.
6. Select your choice by pressing one
of the names in the list.
7. Repeat the same for street and
house number, then press OK.
8 In the Start navigation menu, select
“Drive to”.
9. Choose your favourite route from
the multiple route dialog and press
OK.
The route will be calculated.
Drive to menu
Keyboard
Enter Address dialog
Start navigation menuMultiple route dialog
Page 16 of 32
NAVIGATION SYSTEM OWNER’S MANUAL - 15
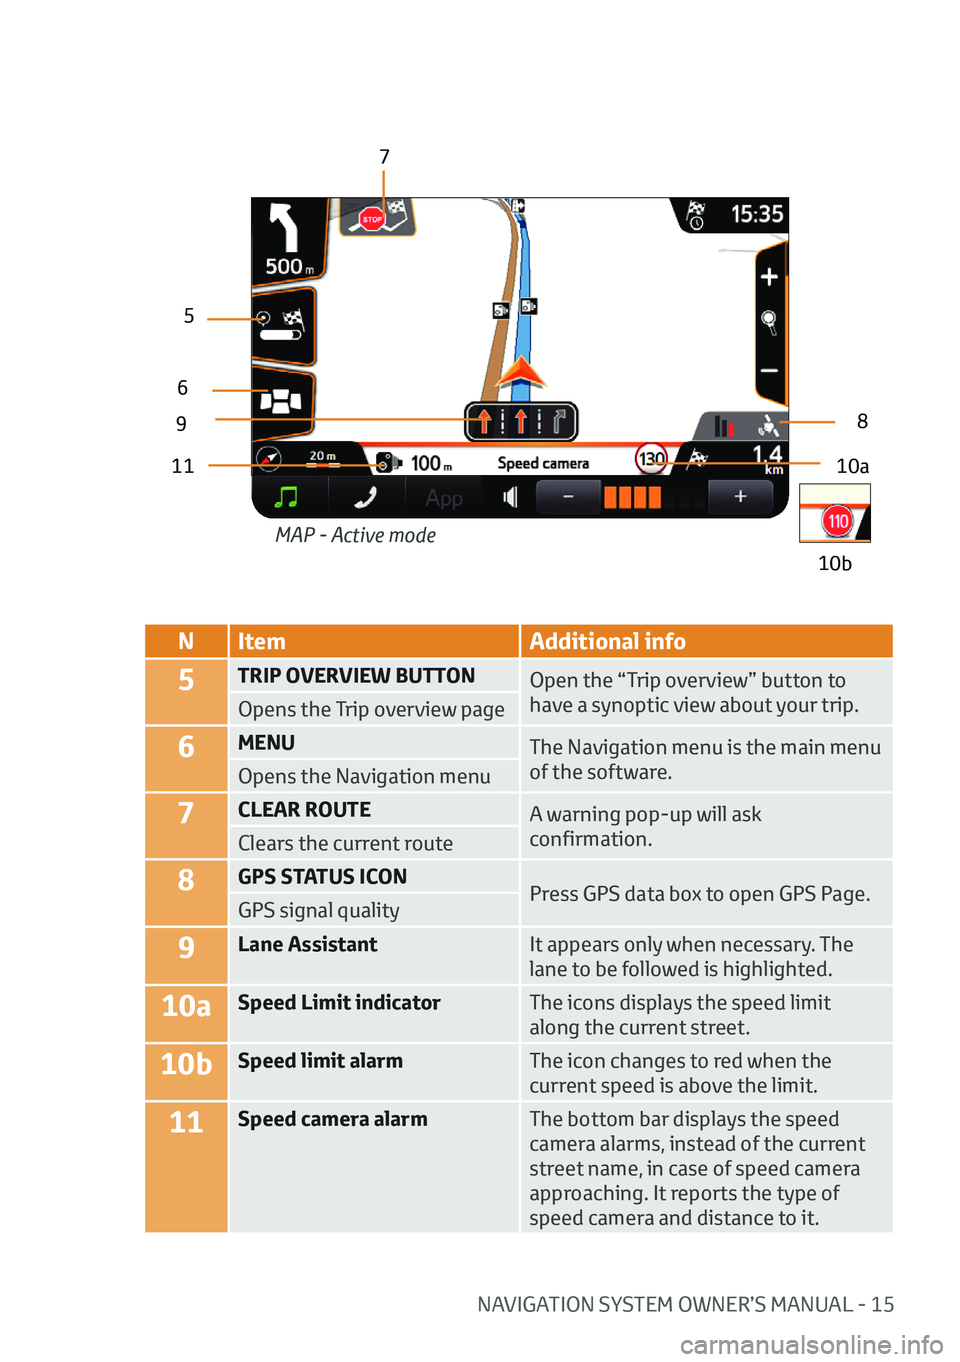
NItem Additional info
5TRIP OVERVIEW BUTTON
Open the “Trip overview” button to
have a synoptic view about your trip.
Opens the Trip overview page
6MENU The Navigation menu is the main menu
of the software.
Opens the Navigation menu
7CLEAR ROUTE A warning pop-up will ask
confirmation.
Clears the current route
8GPS STATUS ICON
Press GPS data box to open GPS Page.
GPS signal quality
9Lane Assistant It appears only when necessary. The
lane to be followed is highlighted.
10aSpeed Limit indicatorThe icons displays the speed limit
along the current street.
10bSpeed limit alarmThe icon changes to red when the
current speed is above the limit.
11Speed camera alarmThe bottom bar displays the speed
camera alarms, instead of the current
street name, in case of speed camera
approaching. It reports the type of
speed camera and distance to it.
10a
9
5
6
7
8
11
10b
MAP - Active mode
Page 17 of 32
16 - NAVIGATION SYSTEM OWNER’S MANUAL
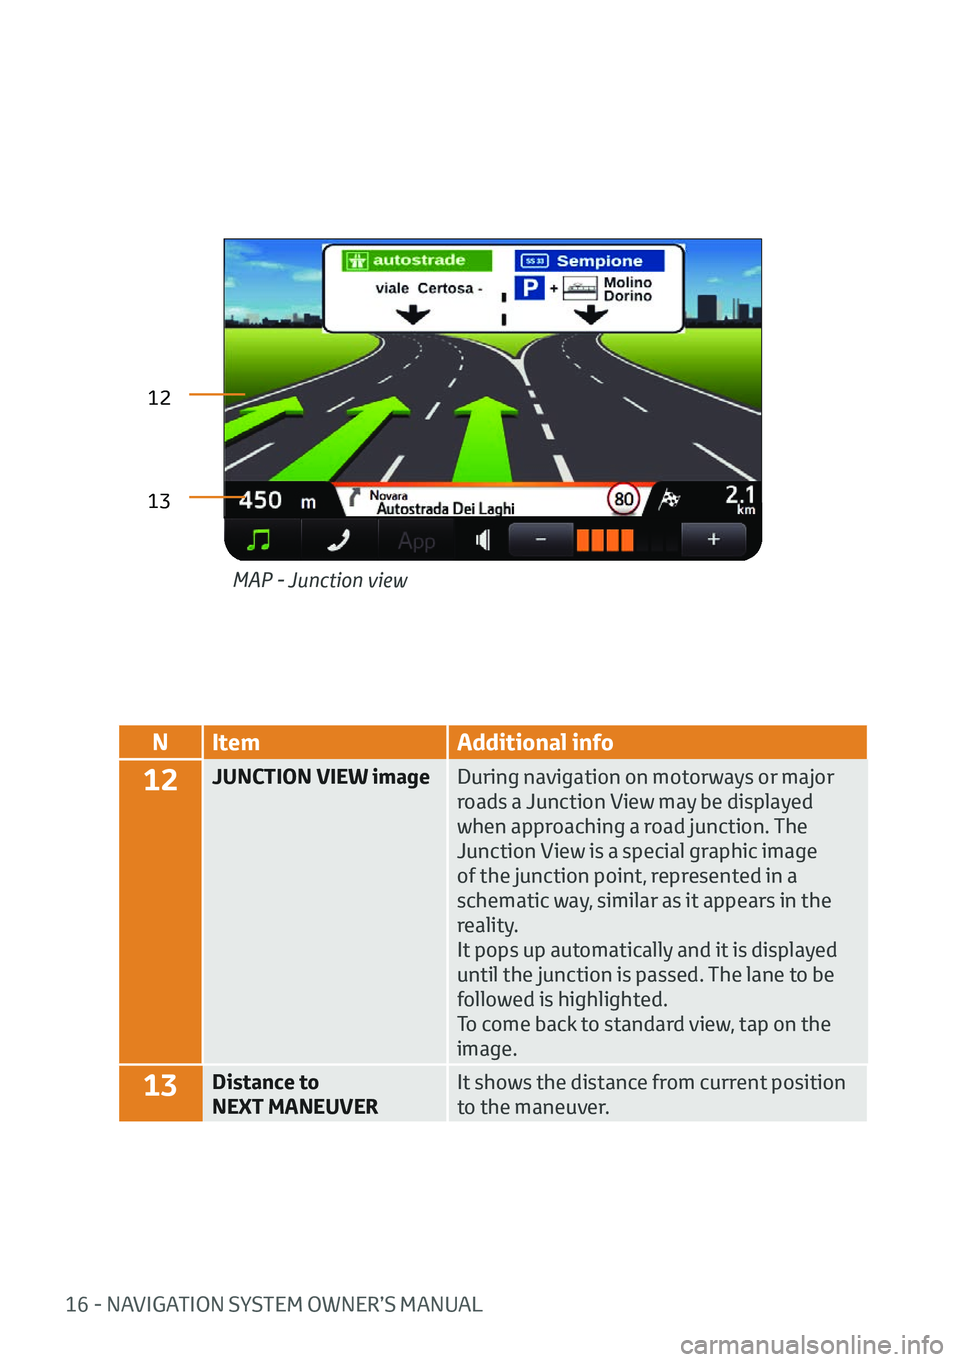
NItem Additional info
12JUNCTION VIEW image During navigation on motorways or major
roads a Junction View may be displayed
when approaching a road junction. The
Junction View is a special graphic image
of the junction point, represented in a
schematic way, similar as it appears in the
reality.
It pops up automatically and it is displayed
until the junction is passed. The lane to be
followed is highlighted.
To come back to standard view, tap on the
image.
13Distance to
NEXT MANEUVERIt shows the distance from current position
to the maneuver.
MAP - Junction view
12
13
Page 28 of 32
NAVIGATION SYSTEM OWNER’S MANUAL - 27
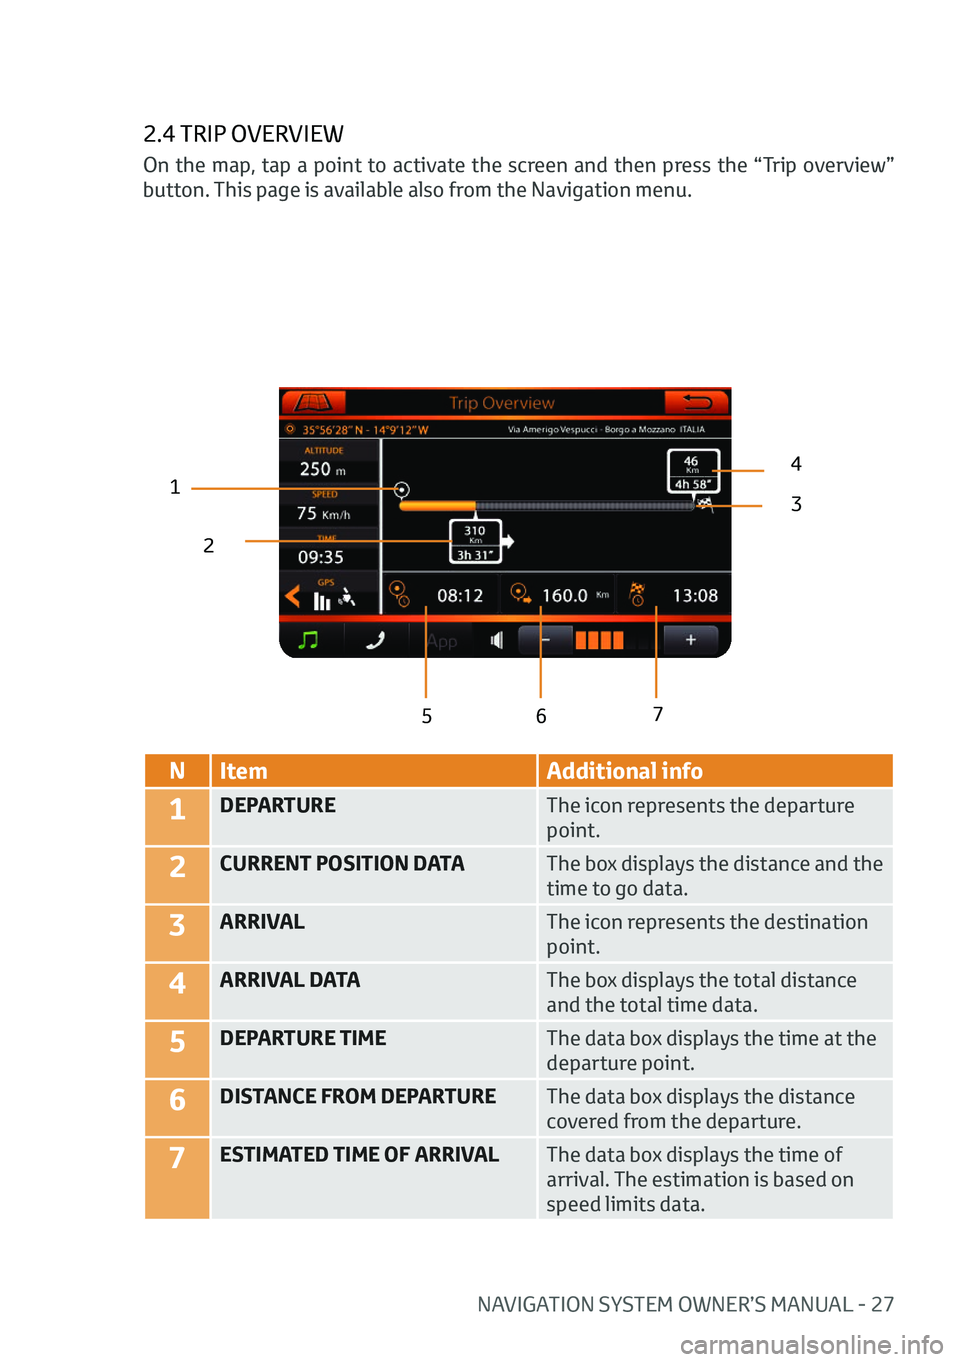
2.4 TRIP OVERVIEW
12
43
5 6 7
N
Item Additional info
1DEPARTURE The icon represents the departure
point.
2CURRENT POSITION DATAThe box displays the distance and the
time to go data.
3ARRIVALThe icon represents the destination
point.
4ARRIVAL DATAThe box displays the total distance
and the total time data.
5DEPARTURE TIMEThe data box displays the time at the
departure point.
6DISTANCE FROM DEPARTUREThe data box displays the distance
covered from the departure.
7ESTIMATED TIME OF ARRIVALThe data box displays the time of
arrival. The estimation is based on
speed limits data.
On the map, tap a point to activate the screen and then press the “Trip overview”
button. This page is available also from the Navigation menu.