TOYOTA AYGO 2021 Owners Manual
AYGO 2021
TOYOTA
TOYOTA
https://www.carmanualsonline.info/img/14/59674/w960_59674-0.png
TOYOTA AYGO 2021 Owners Manual
Trending: lights, fold seats, instrument cluster, radio antenna, fuel cap, reset, air filter
Page 431 of 546
4297-3. Do-it-yourself maintenance
7
Maintenance and care
AYGO_OM_Europe_OM9A012E■
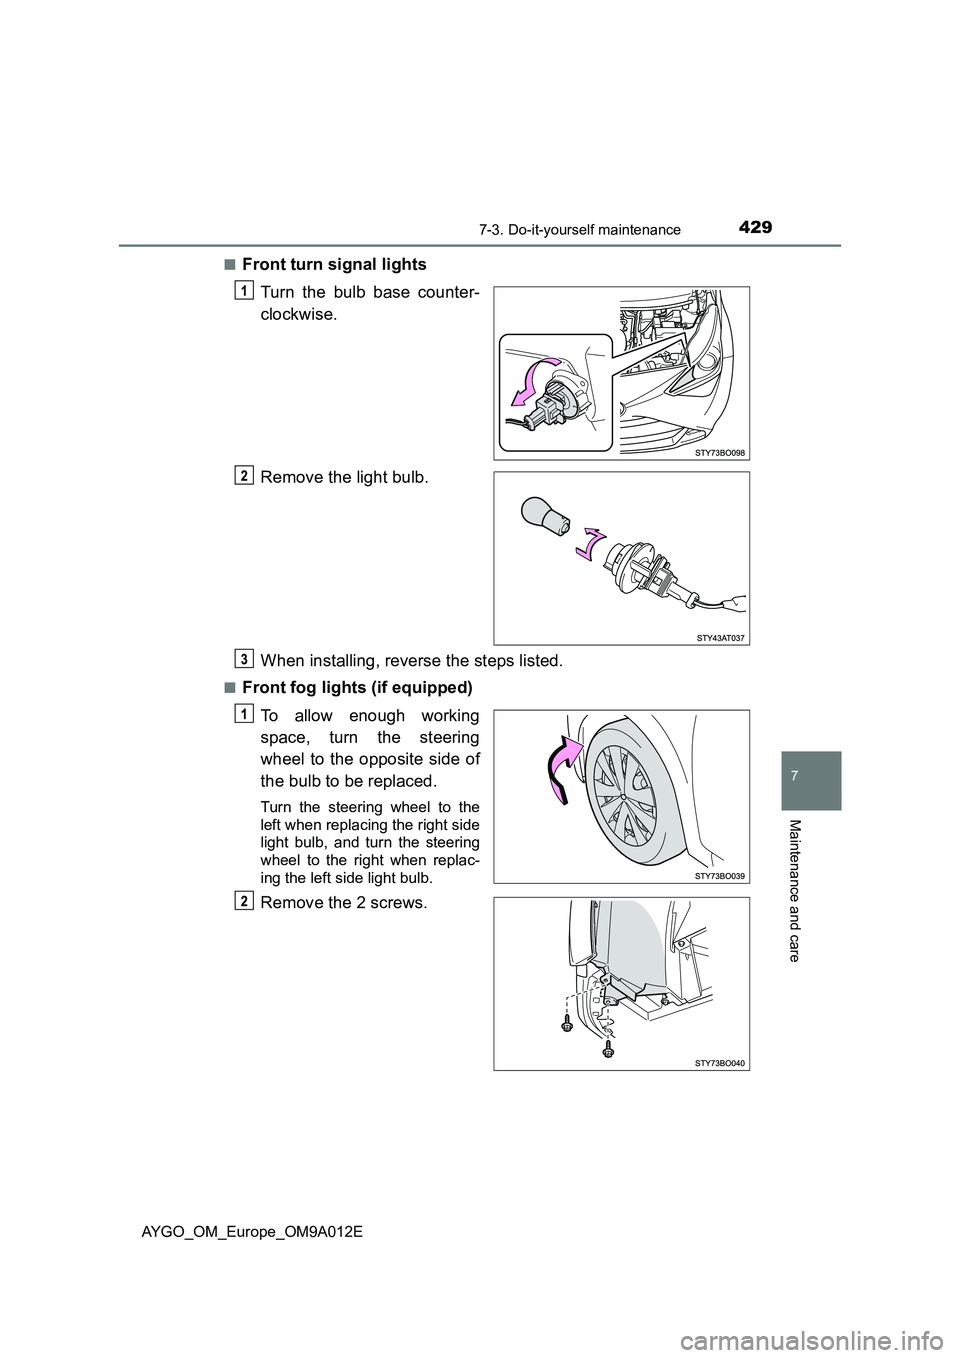
Front turn signal lights
Turn the bulb base counter-
clockwise.
Remove the light bulb.
When installing, reverse the steps listed.
■Front fog lights (if equipped)
To allow enough working
space, turn the steering
wheel to the opposite side of
the bulb to be replaced.
Turn the steering wheel to the
left when replacing the right side
light bulb, and turn the steering
wheel to the right when replac-
ing the left side light bulb.
Remove the 2 screws.
Page 432 of 546
4307-3. Do-it-yourself maintenance
AYGO_OM_Europe_OM9A012E
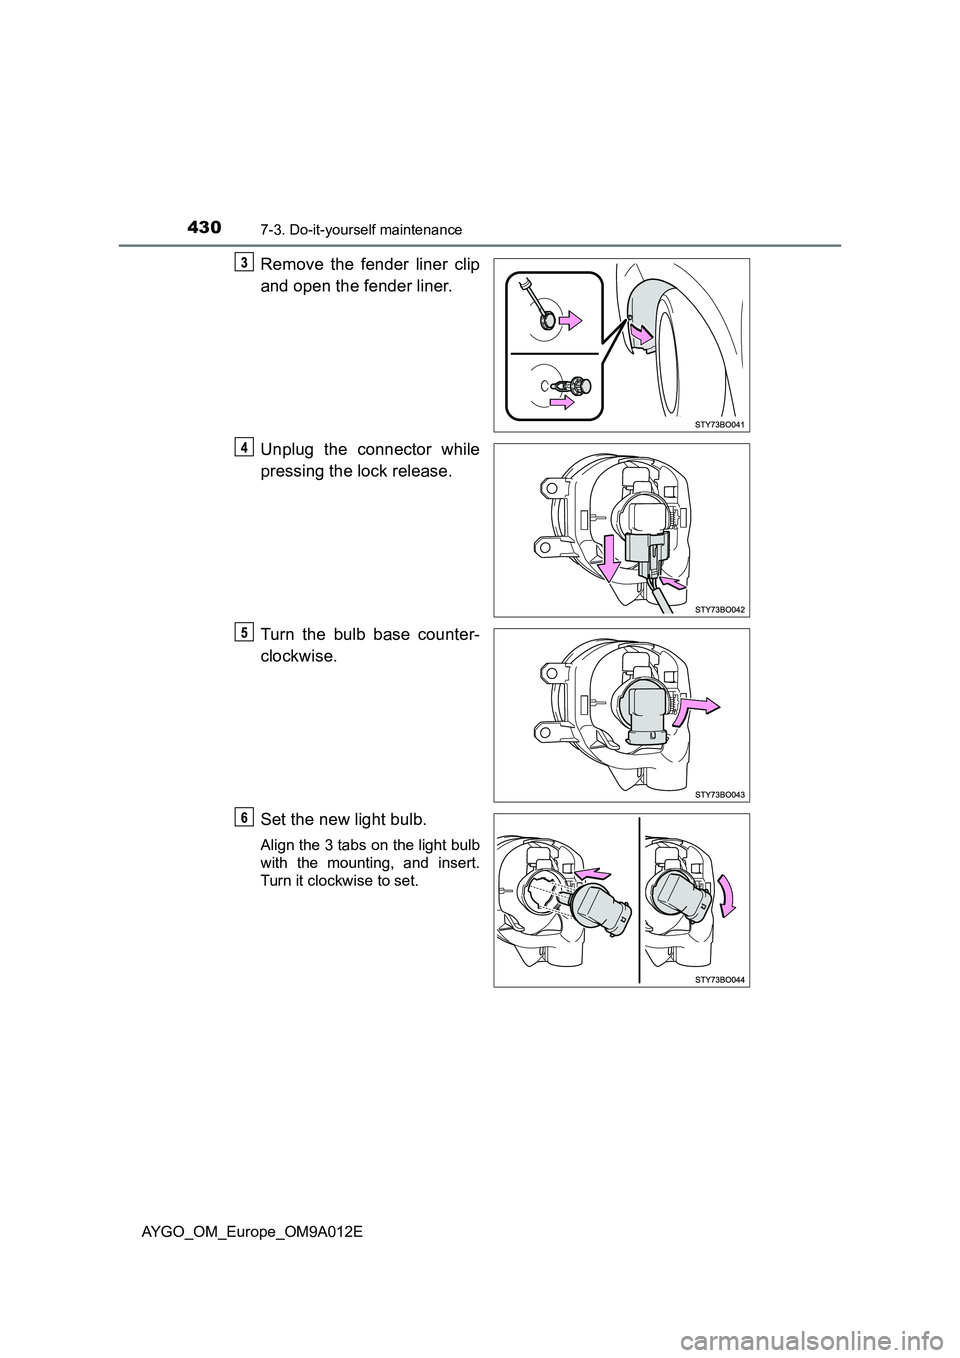
Remove the fender liner clip
and open the fender liner.
Unplug the connector while
pressing the lock release.
Turn the bulb base counter-
clockwise.
Set the new light bulb.
Align the 3 tabs on the light bulb
with the mounting, and insert.
Turn it clockwise to set.
Page 433 of 546
4317-3. Do-it-yourself maintenance
7
Maintenance and care
AYGO_OM_Europe_OM9A012E
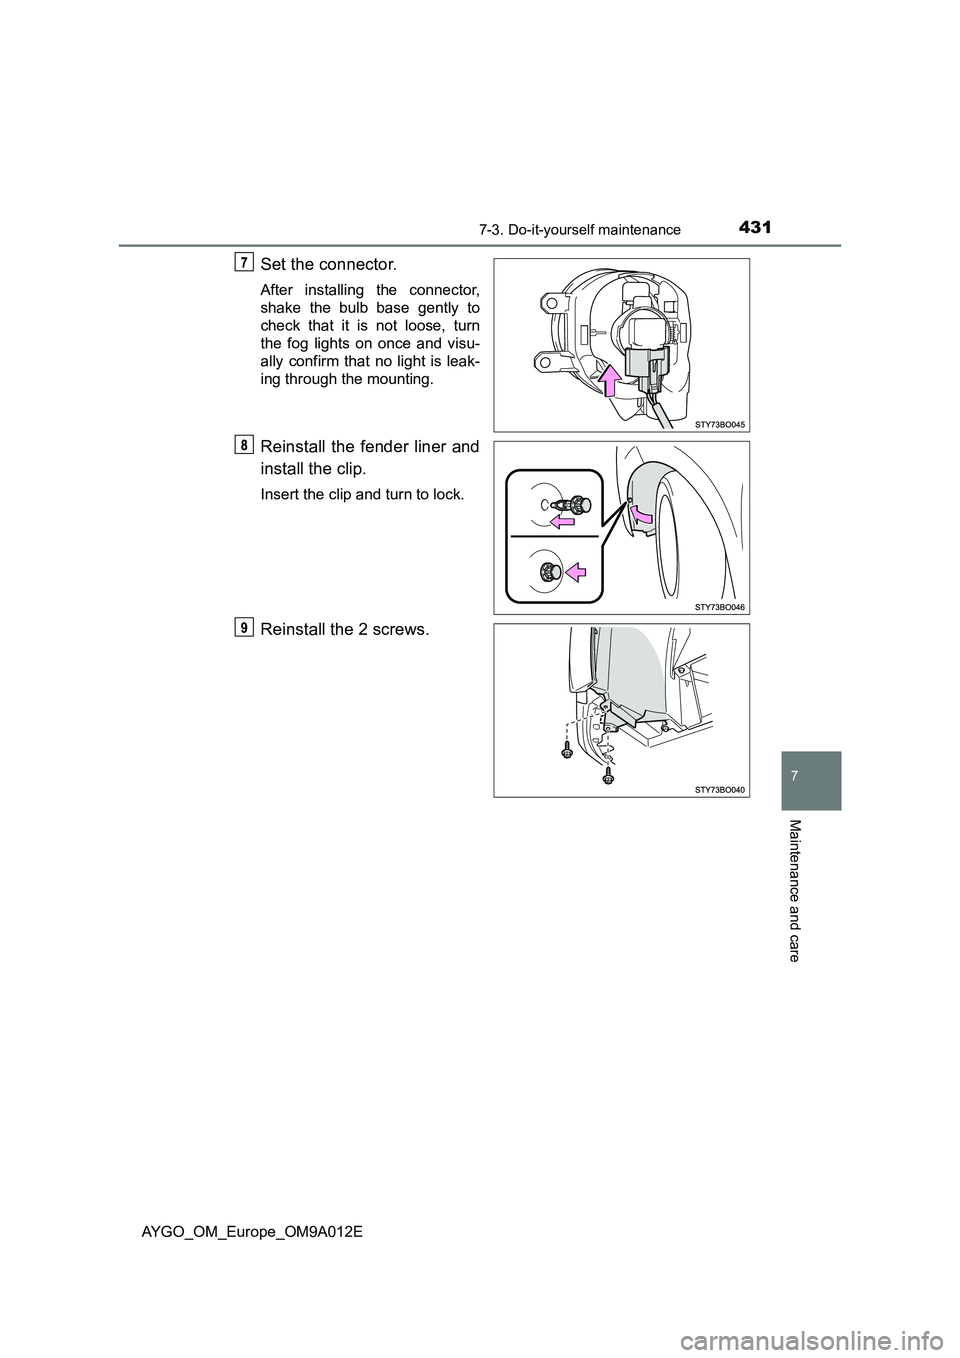
Set the connector.
After installing the connector,
shake the bulb base gently to
check that it is not loose, turn
the fog lights on once and visu-
ally confirm that no light is leak-
ing through the mounting.
Reinstall the fender liner and
install the clip.
Insert the clip and turn to lock.
Reinstall the 2 screws.
Page 434 of 546
4327-3. Do-it-yourself maintenance
AYGO_OM_Europe_OM9A012E■
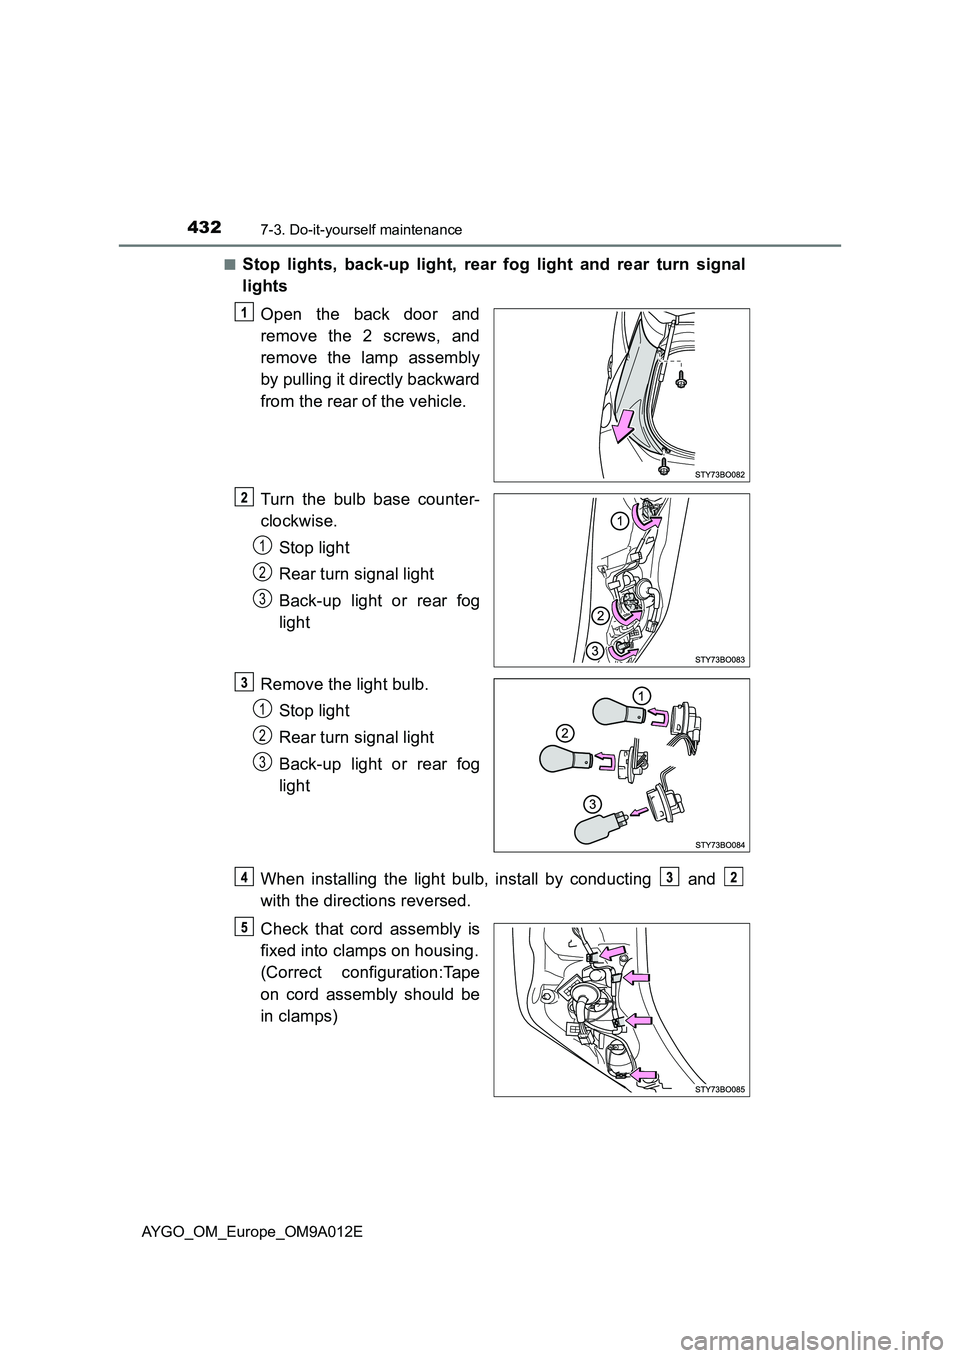
Stop lights, back-up light, rear fog light and rear turn signal
lights
Open the back door and
remove the 2 screws, and
remove the lamp assembly
by pulling it directly backward
from the rear of the vehicle.
Turn the bulb base counter-
clockwise.
Stop light
Rear turn signal light
Back-up light or rear fog
light
Remove the light bulb.
Stop light
Rear turn signal light
Back-up light or rear fog
light
When installing the light bulb, install by conducting and
with the directions reversed.
Check that cord assembly is
fixed into clamps on housing.
(Correct configuration:Tape
on cord assembly should be
in clamps)
1
2
3
1
2
3
Page 435 of 546
4337-3. Do-it-yourself maintenance
7
Maintenance and care
AYGO_OM_Europe_OM9A012E
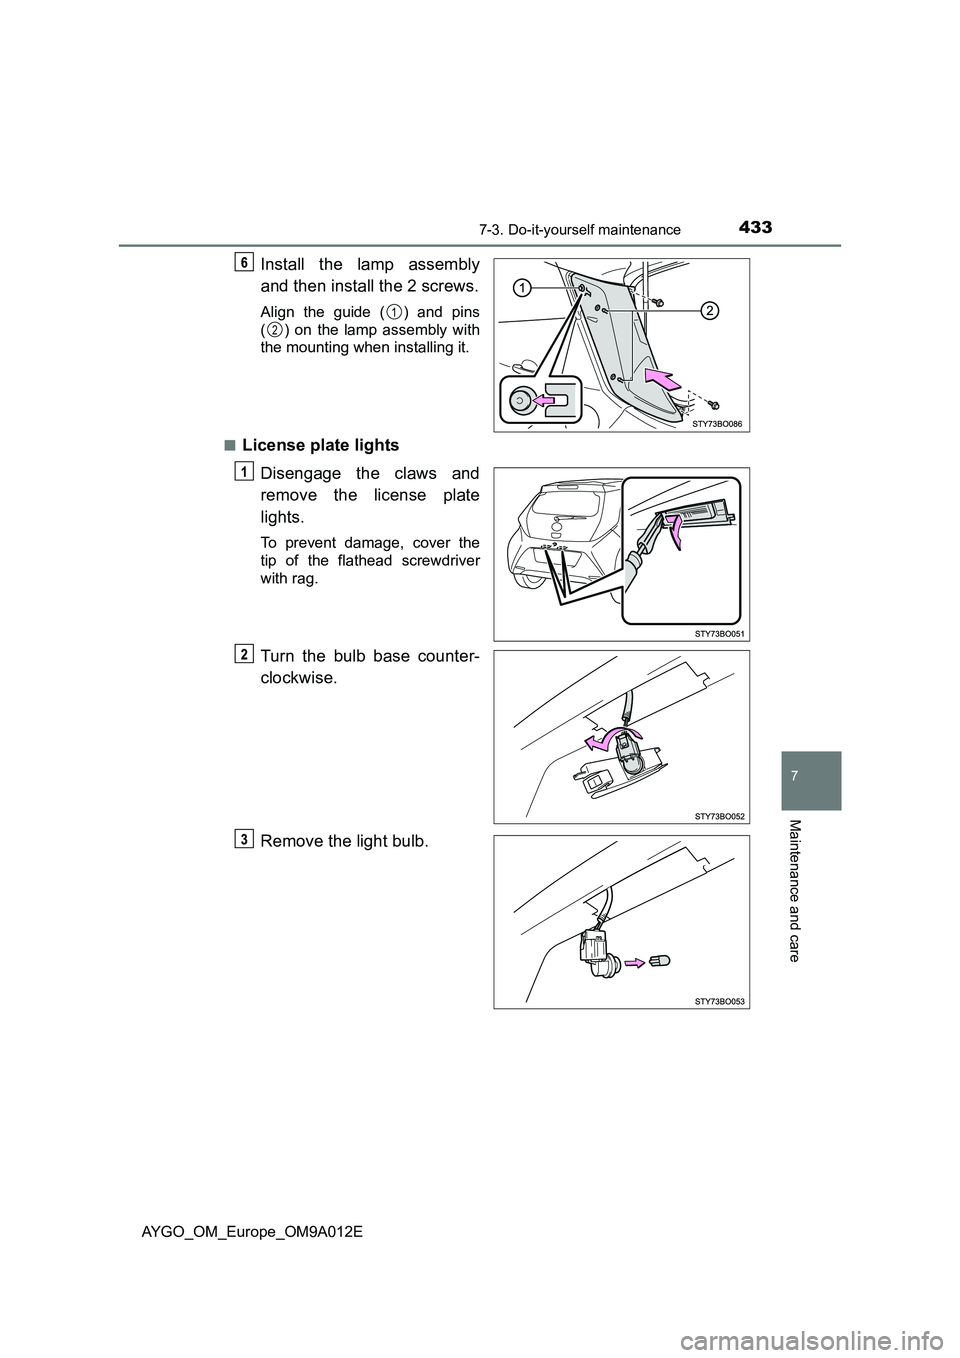
Install the lamp assembly
and then install the 2 screws.
Align the guide ( ) and pins
( ) on the lamp assembly with
the mounting when installing it.
■
License plate lights
Disengage the claws and
remove the license plate
lights.
To prevent damage, cover the
tip of the flathead screwdriver
with rag.
Turn the bulb base counter-
clockwise.
Remove the light bulb.
1
2
Page 436 of 546
4347-3. Do-it-yourself maintenance
AYGO_OM_Europe_OM9A012E
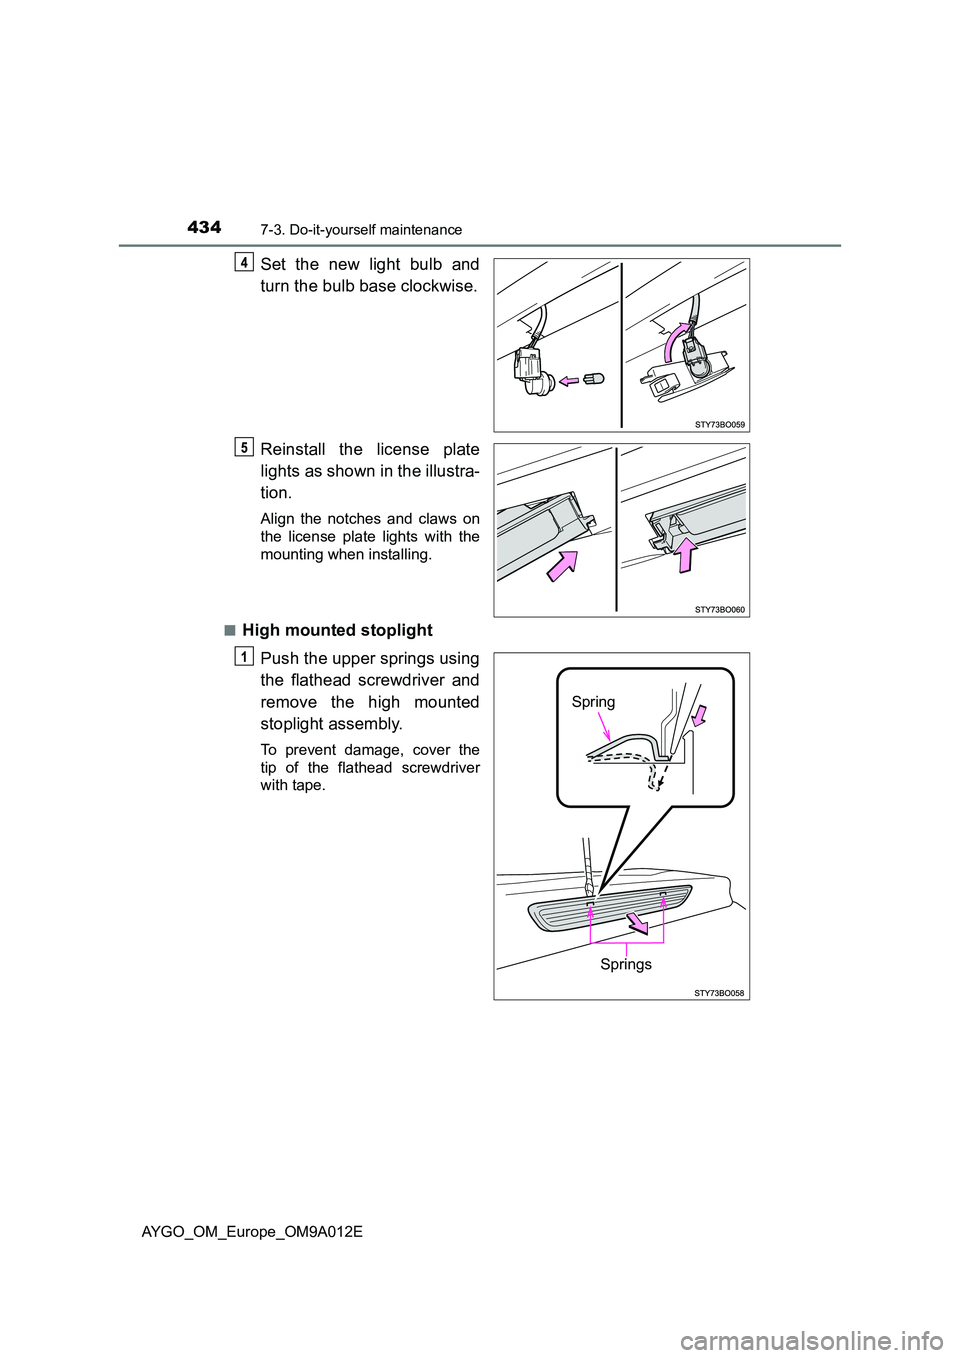
Set the new light bulb and
turn the bulb base clockwise.
Reinstall the license plate
lights as shown in the illustra-
tion.
Align the notches and claws on
the license plate lights with the
mounting when installing.
■High mounted stoplight
Push the upper springs using
the flathead screwdriver and
remove the high mounted
stoplight assembly.
To prevent damage, cover the
tip of the flathead screwdriver
with tape.
Spring
Springs
Page 437 of 546
4357-3. Do-it-yourself maintenance
7
Maintenance and care
AYGO_OM_Europe_OM9A012E
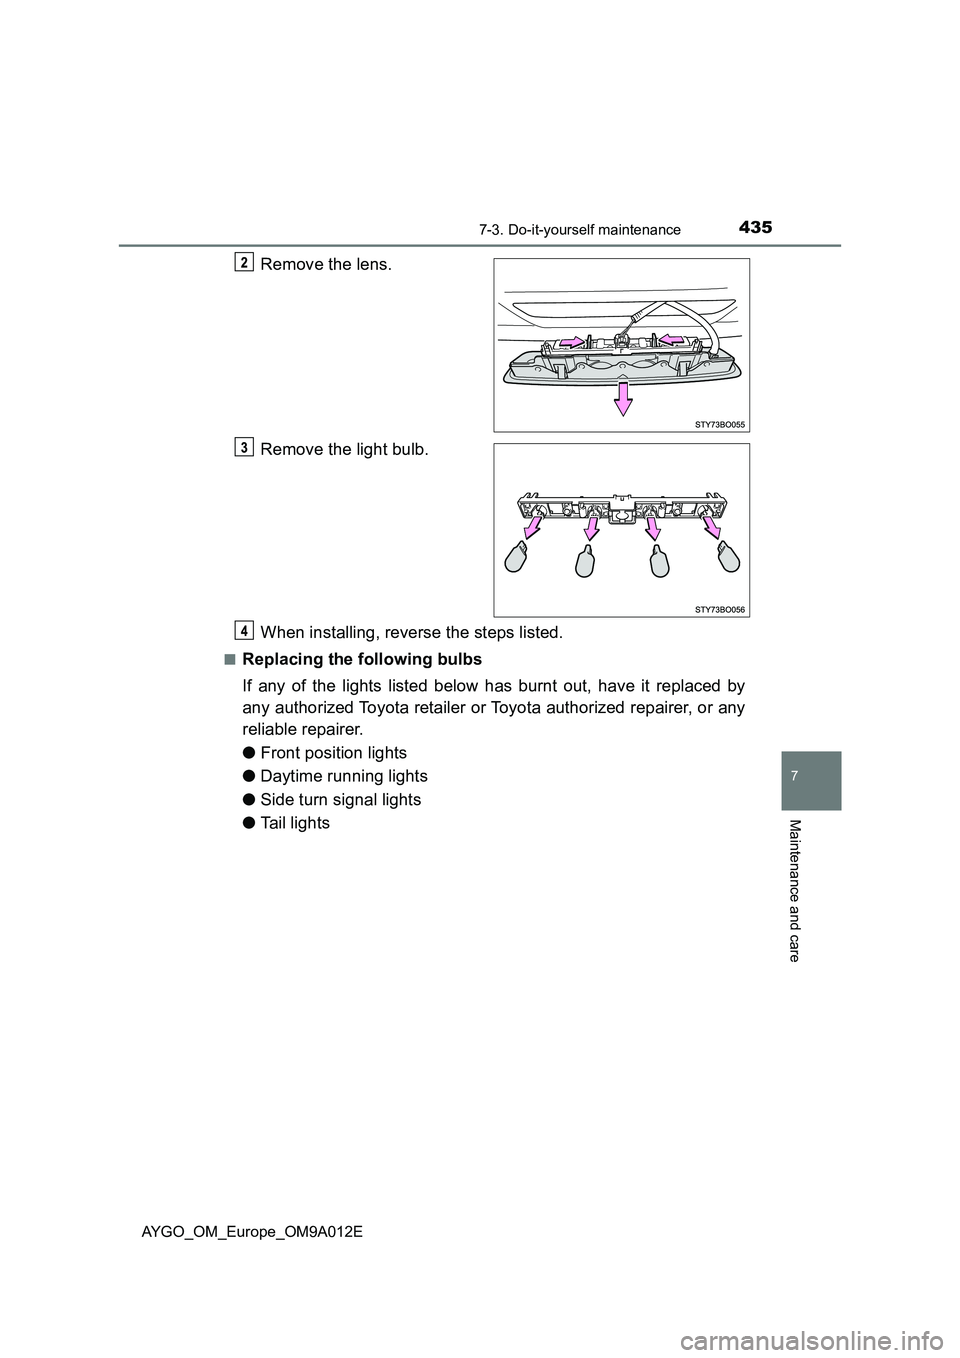
Remove the lens.
Remove the light bulb.
When installing, reverse the steps listed.
■Replacing the following bulbs
If any of the lights listed below has burnt out, have it replaced by
any authorized Toyota retailer or Toyota authorized repairer, or any
reliable repairer.
●Front position lights
●Daytime running lights
●Side turn signal lights
●Tail lights
Page 438 of 546
4367-3. Do-it-yourself maintenance
AYGO_OM_Europe_OM9A012E
■LED Lights
The front position lights, daytime running lights and tail lights consist of a
number of LEDs. If any of the LEDs burn out, take your vehicle to any autho-
rized Toyota retailer or Toyota author ized repairer, or any reliable repairer to
have the light replaced.
■ Condensation build-up on the inside of the lens
Temporary condensation build-up on the inside of the headlight lens does not
indicate a malfunction. Contact any authorized Toyota retailer or Toyota
authorized repairer, or any reliable repairer for more information in the follow-
ing situations:
● Large drops of water have built up on the inside of the lens.
● Water has built up inside the headlight.
WARNING
■Replacing light bulbs
● Turn off the lights. Do not attempt to replace the bulb immediately after
turning off the lights.
The bulbs become very hot and may cause burns.
● Do not touch the glass portion of the light bulb with bare hands. When it is
unavoidable to hold the glass portion, use and hold with a clean dry cloth
to avoid getting moisture and oils on the bulb.
Also, if the bulb is scratched or dropped, it may blow out or crack.
● Fully install light bulbs and any parts used to secure them. Failure to do so
may result in heat damage, fire, or water entering the headlight unit. This
may damage the headlights or cause condensation to build up on the lens.
■ To prevent damage or fire
● Make sure bulbs are fully seated and locked.
● Check the wattage of the bulb before installing to prevent heat damage.
Page 439 of 546
437
8When trouble arises
AYGO_OM_Europe_OM9A012E
8-1. Essential information
Emergency flashers ........... 438
If your vehicle has to
be stopped in an
emergency ....................... 439
If the vehicle is trapped in
rising water ...................... 441
8-2. Steps to take in
an emergency
If your vehicle needs
to be towed ...................... 442
If you think
something is wrong.......... 447
Fuel pump shut off
system ............................ 448
If a warning light turns
on or a warning buzzer
sounds ............................. 449
If you have a flat tire
(vehicles without
a spare tire) ..................... 459
If you have a flat tire
(vehicles with
a spare tire) ..................... 481
If the engine
will not start...................... 494
If the shift lever cannot
be shifted (vehicles
with a multi-mode
manual transmission) ...... 496
If the electronic key does
not operate properly
(vehicles with a smart
entry & start system)........ 497
If the vehicle battery
is discharged ................... 500
If your vehicle overheats .... 504
If the vehicle becomes
stuck ................................ 507
Page 440 of 546
4388-1. Essential information
AYGO_OM_Europe_OM9A012E
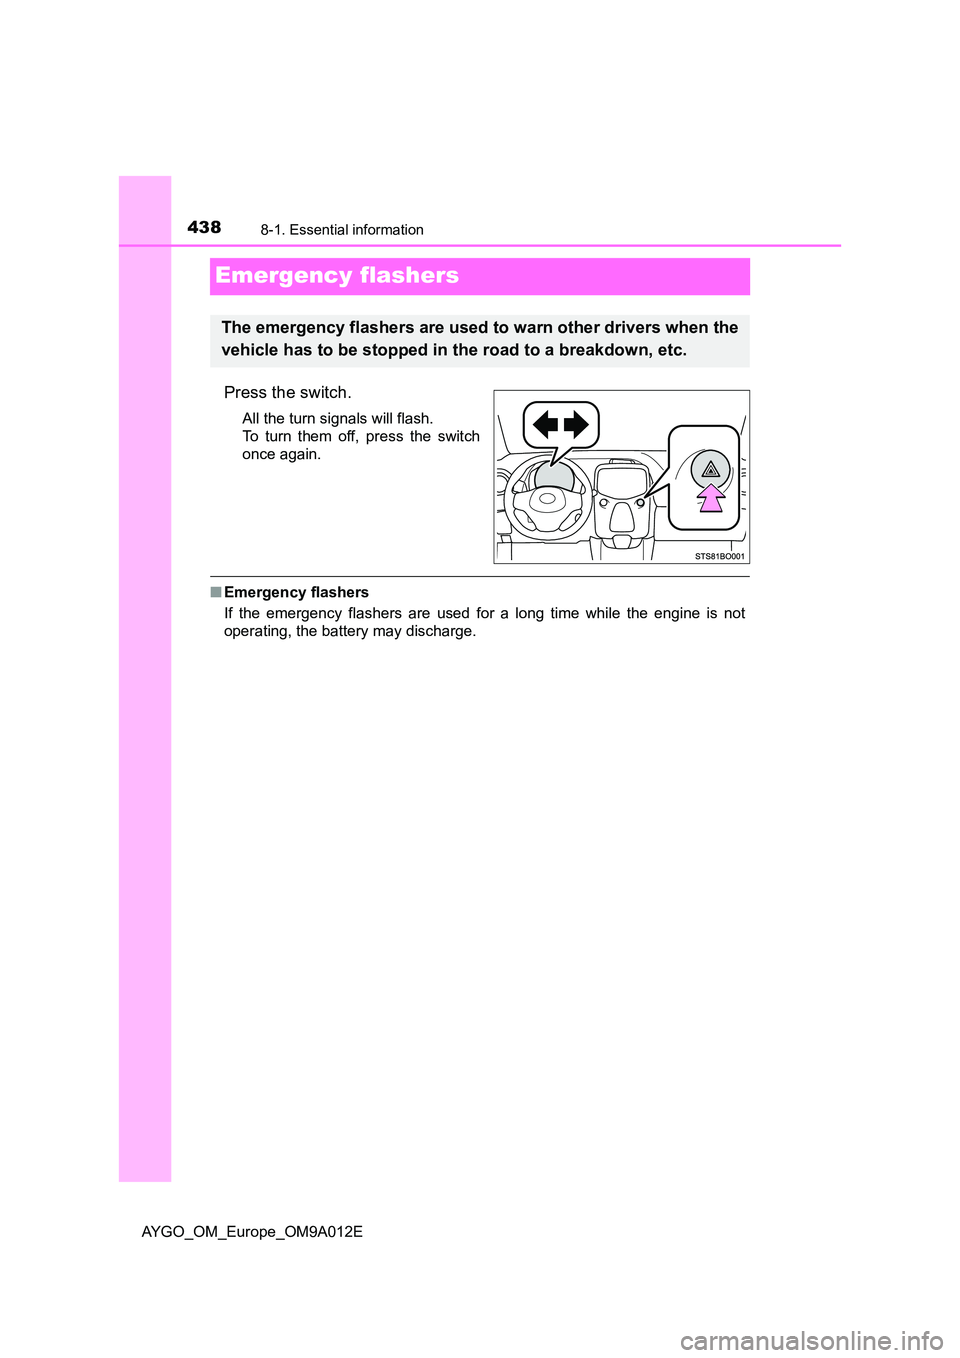
Emergency flashers
Press the switch.
All the turn signals will flash.
To turn them off, press the switch
once again.
■ Emergency flashers
If the emergency flashers are used for a long time while the engine is not
operating, the battery may discharge.
The emergency flashers are used to warn other drivers when the
vehicle has to be stopped in the road to a breakdown, etc.
Trending: belt, service interval, oil temperature, maintenance schedule, wheel, wiper blades, charging
