side TOYOTA AYGO X 2022 (in English) Owner's Guide
[x] Cancel search | Manufacturer: TOYOTA, Model Year: 2022, Model line: AYGO X, Model: TOYOTA AYGO X 2022Pages: 494, PDF Size: 92.53 MB
Page 76 of 494
74
Owner's Manual_Europe_M99V08_en
1-4. Theft deterrent system
1-4.Theft de terre nt sys te m
Vehicles without smart entry &
start system
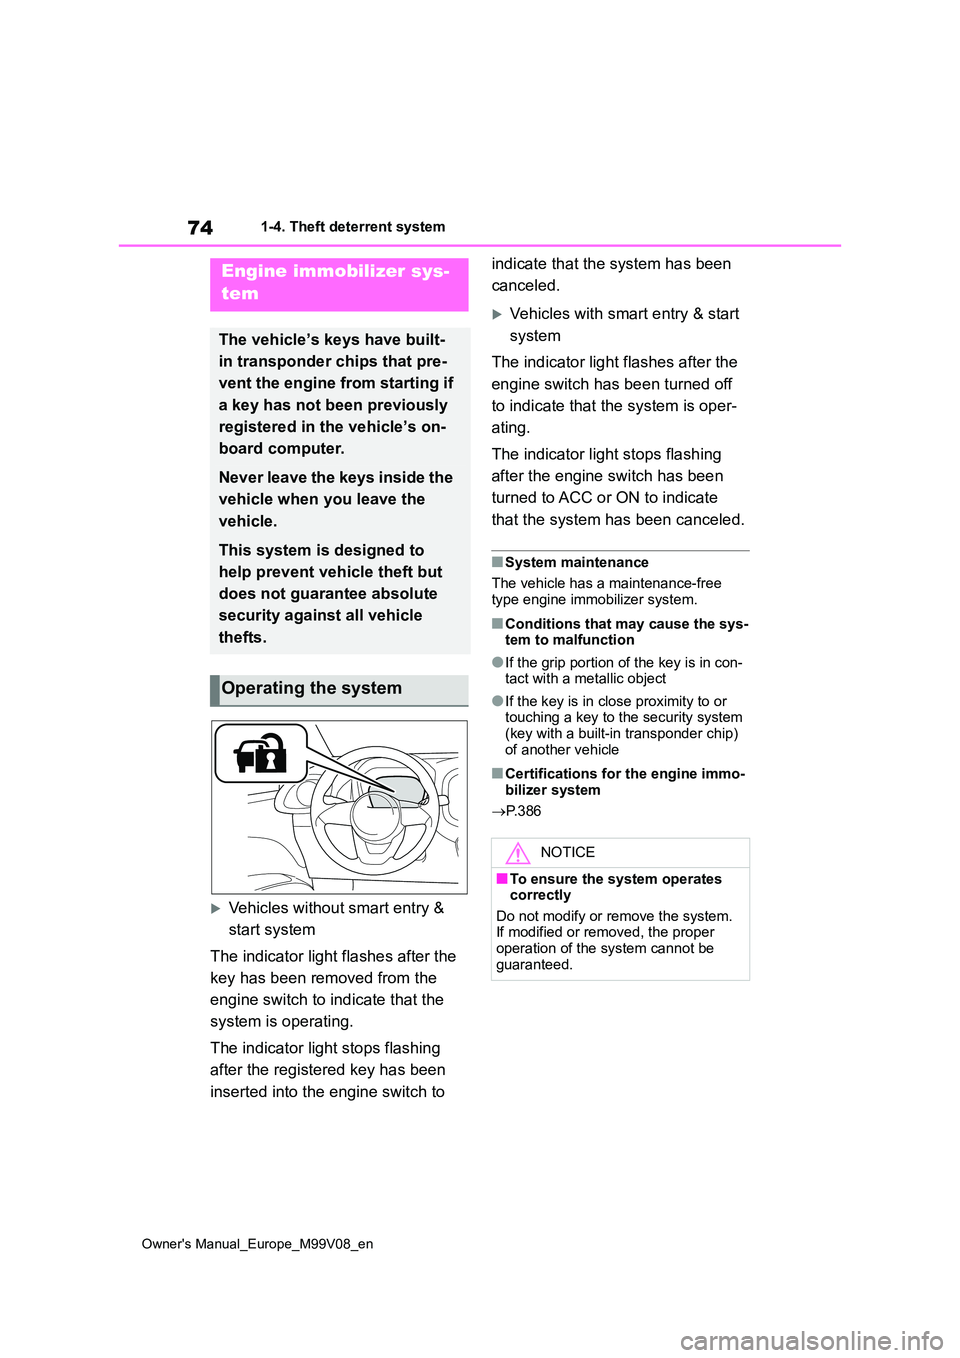
The indicator light flashes after the
key has been removed from the
engine switch to indicate that the
system is operating.
The indicator light stops flashing
after the registered key has been
inserted into the engine switch to
indicate that the system has been
canceled.
Vehicles with smart entry & start
system
The indicator light flashes after the
engine switch has been turned off
to indicate that the system is oper-
ating.
The indicator light stops flashing
after the engine switch has been
turned to ACC or ON to indicate
that the system has been canceled.
■System maintenance
The vehicle has a maintenance-free
type engine immobilizer system.
■Conditions that may cause the sys- tem to malfunction
●If the grip portion of the key is in con-tact with a metallic object
●If the key is in close proximity to or touching a key to the security system (key with a built-in transponder chip)
of another vehicle
■Certifications for the engine immo- bilizer system
P. 3 8 6
Engine immobilizer sys-
tem
The vehicle’s keys have built-
in transponder chips that pre-
vent the engine from starting if
a key has not been previously
registered in the vehicle’s on-
board computer.
Never leave the keys inside the
vehicle when you leave the
vehicle.
This system is designed to
help prevent vehicle theft but
does not guarantee absolute
security against all vehicle
thefts.
Operating the system
NOTICE
■To ensure the system operates correctly
Do not modify or remove the system. If modified or removed, the proper operation of the system cannot be
guaranteed.
Page 78 of 494
76
Owner's Manual_Europe_M99V08_en
2-1. Instrument cluster
2-1.In strument clu ste r
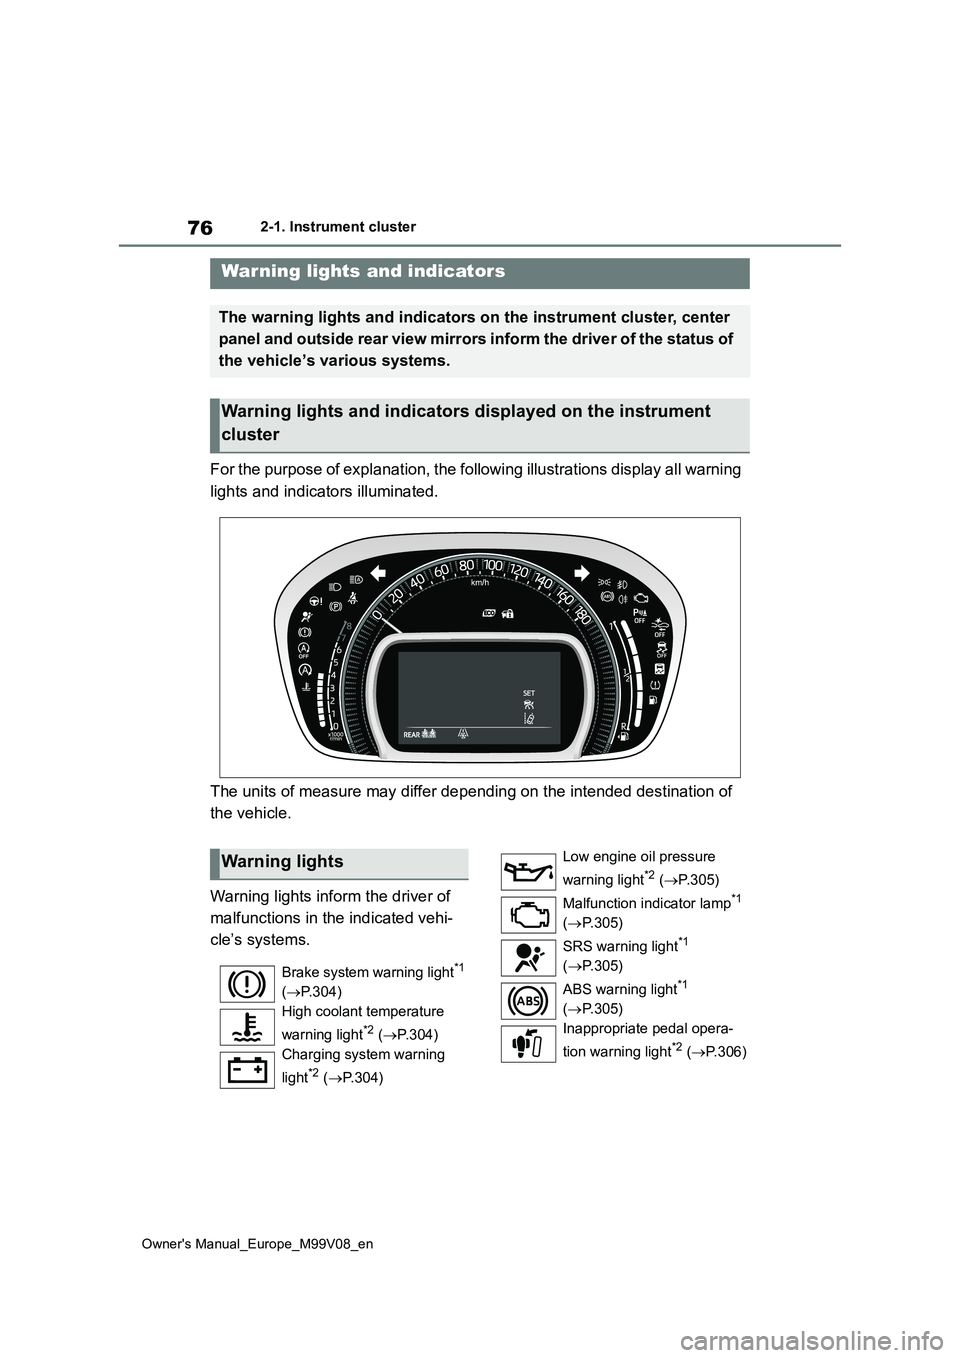
For the purpose of explanation, the following illustrations display all warning
lights and indicators illuminated.
The units of measure may differ depending on the intended desti nation of
the vehicle.
Warning lights inform the driver of
malfunctions in the indicated vehi-
cle’s systems.
Warning lights and indicators
The warning lights and indicators on the instrument cluster, center
panel and outside rear view mirrors inform the driver of the st atus of
the vehicle’s various systems.
Warning lights and indicators displayed on the instrument
cluster
Warning lights
Brake system warning light*1
( P.304)
High coolant temperature
warning light*2 ( P.304)
Charging system warning
light*2 ( P.304)
Low engine oil pressure
warning light*2 ( P. 3 0 5 )
Malfunction indicator lamp*1
( P.305)
SRS warning light*1
( P.305)
ABS warning light*1
( P.305)
Inappropriate pedal opera-
tion warning light*2 ( P. 3 0 6 )
Page 80 of 494
78
Owner's Manual_Europe_M99V08_en
2-1. Instrument cluster
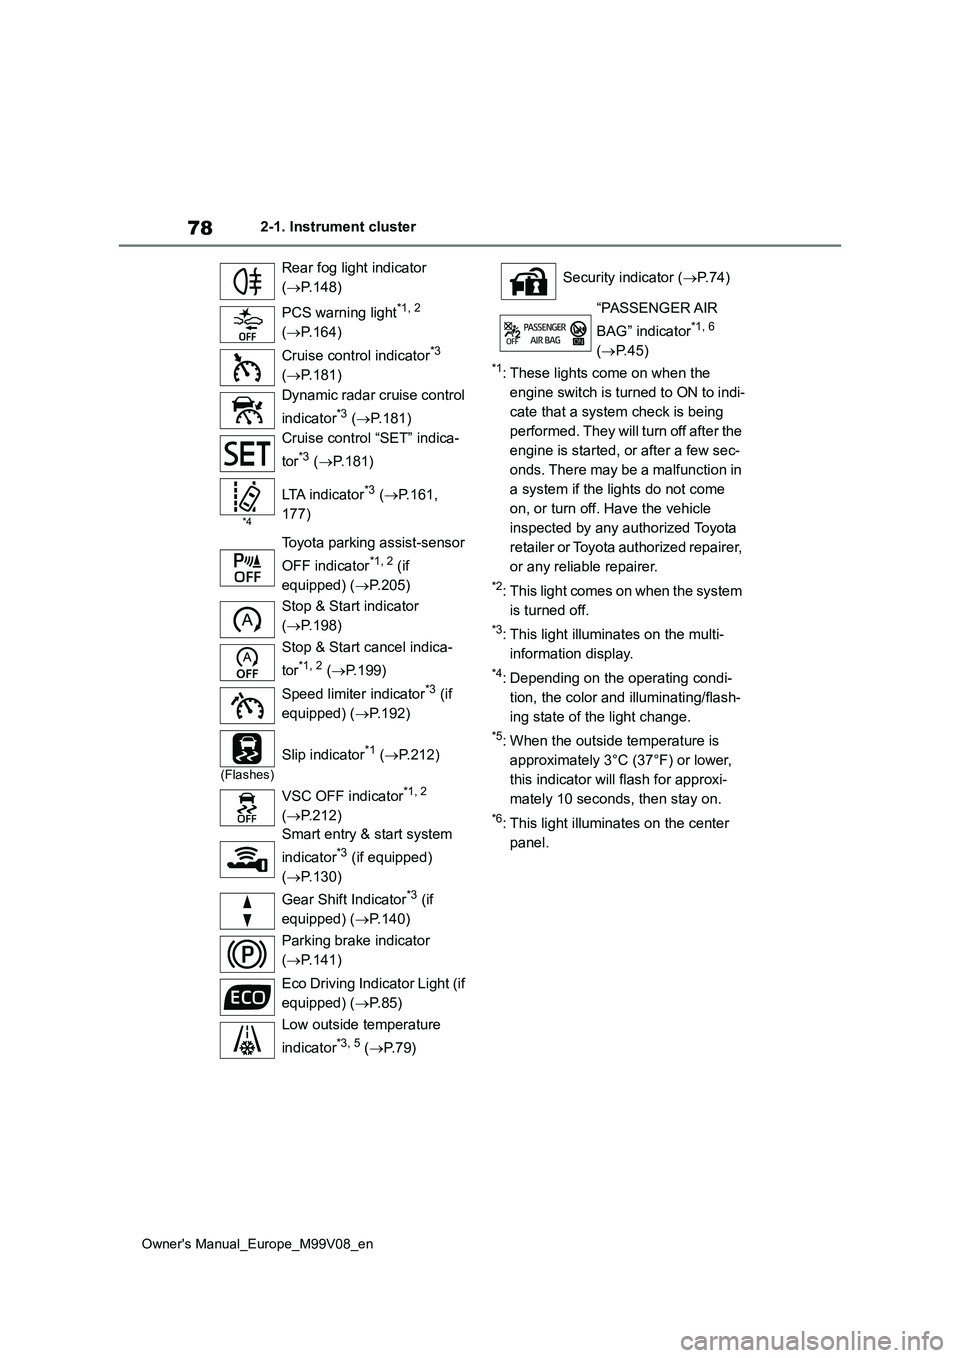
*1: These lights come on when the
engine switch is turned to ON to indi-
cate that a system check is being
performed. They will turn off after the
engine is started, or after a few sec-
onds. There may be a malfunction in
a system if the lights do not come
on, or turn off. Have the vehicle
inspected by any authorized Toyota
retailer or Toyota authorized repairer,
or any reliable repairer.
*2: This light comes on when the system
is turned off.
*3: This light illuminates on the multi-
information display.
*4: Depending on the operating condi-
tion, the color and illuminating/flash-
ing state of the light change.
*5: When the outside temperature is
approximately 3°C (37°F) or lower,
this indicator will flash for approxi-
mately 10 seconds, then stay on.
*6: This light illuminates on the center
panel.
Rear fog light indicator
( P.148)
PCS warning light*1, 2
( P.164)
Cruise control indicator*3
( P.181)
Dynamic radar cruise control
indicator*3 ( P.181)
Cruise control “SET” indica-
tor*3 ( P.181)
*4
LTA indicator*3 (P.161,
177)
Toyota parking assist-sensor
OFF indicator*1, 2 (if
equipped) ( P.205)
Stop & Start indicator
( P.198)
Stop & Start cancel indica-
tor*1, 2 ( P.199)
Speed limiter indicator*3 (if
equipped) ( P.192)
(Flashes)
Slip indicator*1 (P.212)
VSC OFF indicator*1, 2
( P.212)
Smart entry & start system
indicator*3 (if equipped)
( P.130)
Gear Shift Indicator*3 (if
equipped) ( P.140)
Parking brake indicator
( P.141)
Eco Driving Indicator Light (if
equipped) ( P. 8 5 )
Low outside temperature
indicator*3, 5 ( P. 7 9 )
Security indicator (P. 7 4 )
“PASSENGER AIR
BAG” indicator*1, 6
( P.45)
Page 82 of 494
80
Owner's Manual_Europe_M99V08_en
2-1. Instrument cluster
Outside temperature
Displays the outside temperature within the range of -40°C (-40°F) to 60°C (140°F)
■Outside temperature display
●In the following situations, the correct outside temperature may not be dis-
played, or the display may take longer than normal to change:• When stopped, or driving at low
speeds (less than 25 km/h [16 mph]) • When the outside temperature has changed suddenly (at the
entrance/exit of a garage, tunnel, etc.)
●When “--” is displayed, the system
may be malfunctioning. Take your vehicle to any authorized Toyota retailer or Toyota authorized repairer,
or any reliable repairer.
■Fuel gauge and driving range dis- play
The fuel gauge and driving range dis-
play are linked. If the fuel gauge and driving range display do not update after refueling a small amount, they can be
updated by performing the following pro- cedure:
1 Stop the vehicle on a level surface.
Wait until the fuel in the fuel tank stabi- lizes.
2 Press or to select of the
multi-information display.
3 Press or to select .
4 Press to change the odometer
and trip meter display to the odome-
ter.
5 Turn the engine switch off.
6 While pressing and holding the
meter control switch, turn the engine
switch to ON.
7 Continue holding the meter
control switch for approximately 5
seconds.
Release the button when the odometer begins blinking.
Updating will be complete when the odometer blinks for approximately 5 seconds and then returns to the normal
display.
■Liquid crystal display
P. 8 3
■Customization
The gauges and meters can be custom-
ized in of the multi-information dis-
play. ( P.355)
WARNING
■The information display at low temperatures
Allow the interior of the vehicle to warm up before using the liquid crys-tal information display. At extremely
low temperatures, the information dis- play monitor may respond slowly, and display changes may be delayed.
For example, there is a lag between the driver’s shifting and the new gear
number appearing on the display. This lag could cause the driver to downshift again, causing rapid and
excessive engine braking and possi- bly an accident resulting in death or injury.
NOTICE
■To prevent damage to the engine
and its components
Do not let the indicator of the tachom- eter enter the red zone, which indi-
cates the maximum engine speed.
Page 87 of 494
85
2
Owner's Manual_Europe_M99V08_en
2-1. Instrument cluster
Vehicle status information and indicators
Displays driving range with remaining
fuel.
This distance is computed based on
your average fuel consumption. As a
result, the actual distance that can be
driven may differ from that displayed.
When only a small amount of fuel is
added to the tank, the display may not
be updated.
When refueling, turn the engine switch
off. If the vehicle is refueled without
turning the engine switch off, the dis-
play may not be updated.
The average fuel economy display
can be changed in . ( P. 8 6 )
Average fuel economy (after
start)
Displays the average fuel consumption
since engine start.
Average fuel economy (after
refuel)
Displays the average fuel consumption
since the vehicle was refueled.
■Eco Driving Indicator/Driving
range (if equipped)
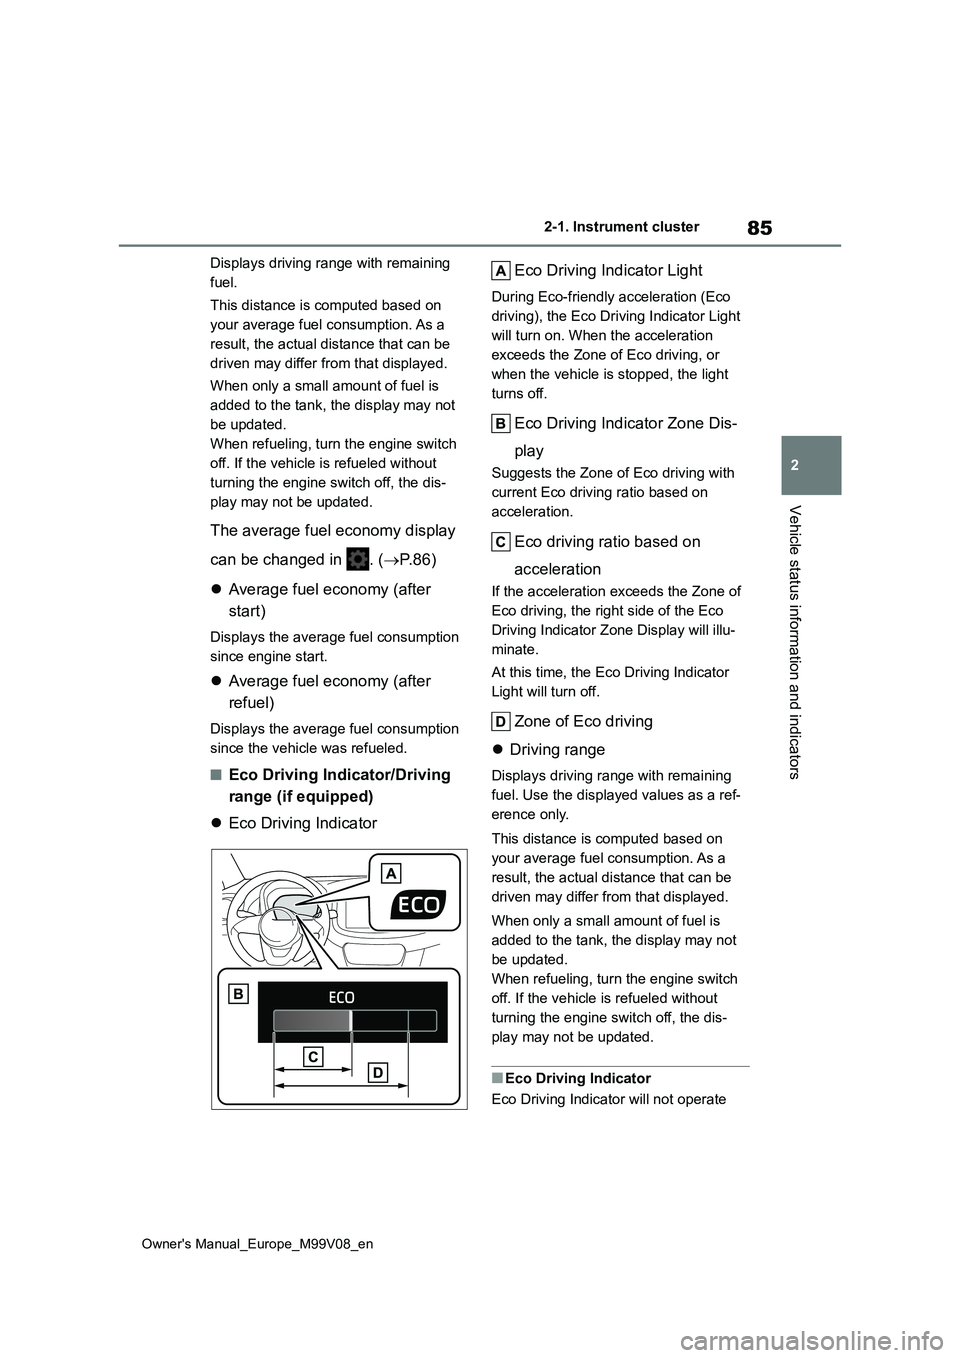
Eco Driving Indicator
Eco Driving Indicator Light
During Eco-friendly acceleration (Eco
driving), the Eco Driving Indicator Light
will turn on. When the acceleration
exceeds the Zone of Eco driving, or
when the vehicle is stopped, the light
turns off.
Eco Driving Indicator Zone Dis-
play
Suggests the Zone of Eco driving with
current Eco driving ratio based on
acceleration.
Eco driving ratio based on
acceleration
If the acceleration exceeds the Zone of
Eco driving, the right side of the Eco
Driving Indicator Zone Display will illu-
minate.
At this time, the Eco Driving Indicator
Light will turn off.
Zone of Eco driving
Driving range
Displays driving range with remaining
fuel. Use the displayed values as a ref-
erence only.
This distance is computed based on
your average fuel consumption. As a
result, the actual distance that can be
driven may differ from that displayed.
When only a small amount of fuel is
added to the tank, the display may not
be updated.
When refueling, turn the engine switch
off. If the vehicle is refueled without
turning the engine switch off, the dis-
play may not be updated.
■Eco Driving Indicator
Eco Driving Indicator will not operate
Page 93 of 494
3
91
Owner's Manual_Europe_M99V08_en
3
Before driving
Before driving
3-1. Key information
Keys.................................... 92
3-2. Opening, closing and locking
the doors
Side doors .......................... 96
Back door ........................... 99
Smart entry & start system 102
3-3. Adjusting the seats
Front seats........................ 106
Rear seats ........................ 107
Head restraints ................. 108
3-4. Adjusting the steering wheel
and mirrors
Steering wheel .................. 110
Inside rear view mirror ...... 111
Outside rear view mirrors . 112
3-5. Opening, closing the win-
dows and canvas top
Power windows................. 114
Rear side windows ........... 115
Canvas top ....................... 116
Page 94 of 494
92
Owner's Manual_Europe_M99V08_en
3-1. Key information
3-1.Key info rmation
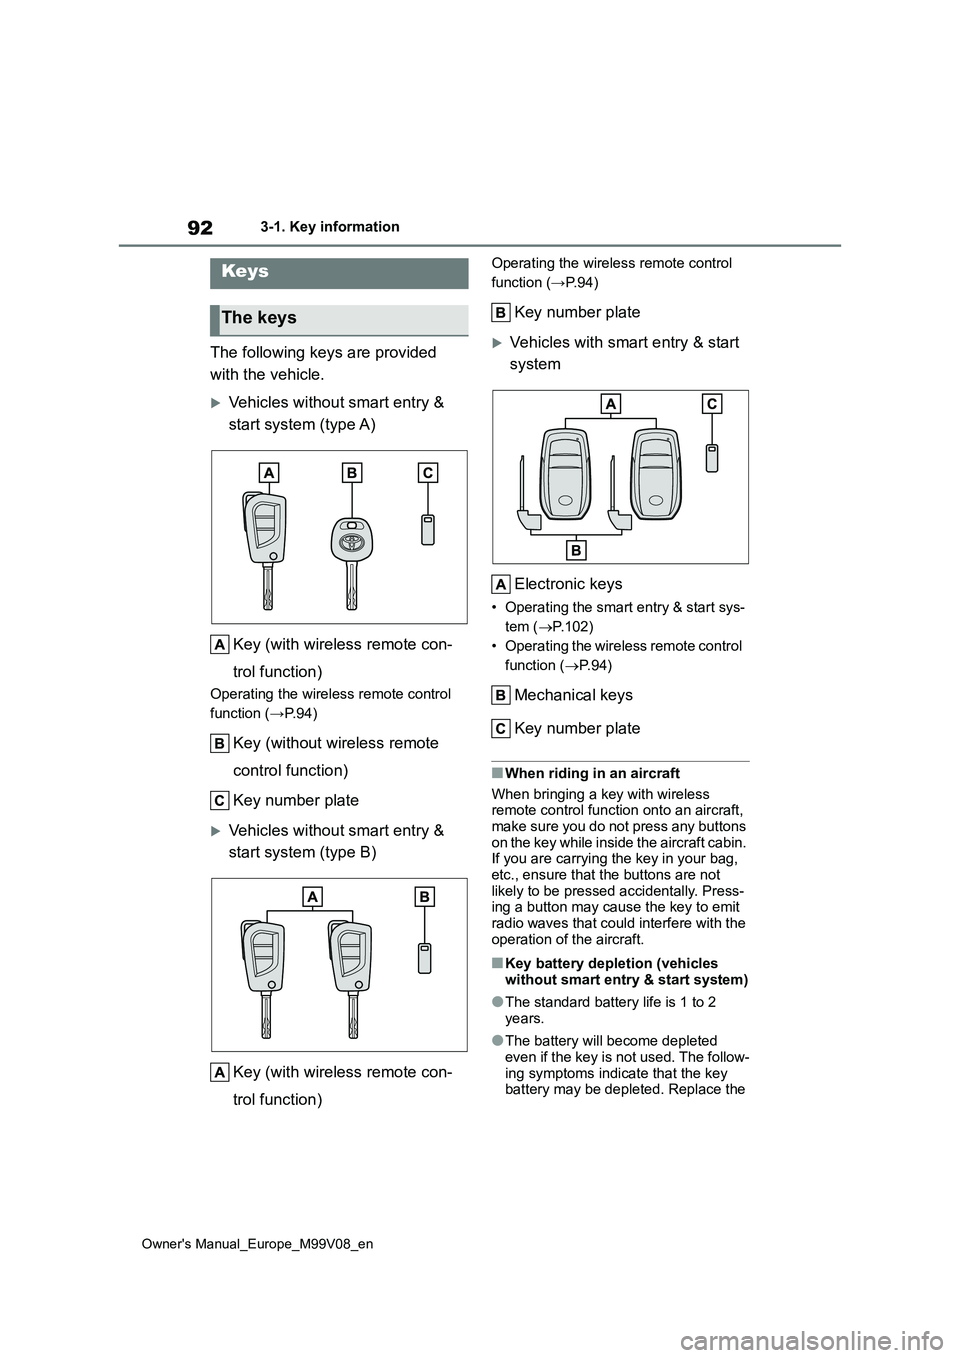
The following keys are provided
with the vehicle.
Vehicles without smart entry &
start system (type A)
Key (with wireless remote con-
trol function)
Operating the wireless remote control
function (→P.94)
Key (without wireless remote
control function)
Key number plate
Vehicles without smart entry &
start system (type B)
Key (with wireless remote con-
trol function)
Operating the wireless remote control
function (→P.94)
Key number plate
Vehicles with smart entry & start
system
Electronic keys
• Operating the smart entry & start sys-
tem ( P.102)
• Operating the wireless remote control
function ( P. 9 4 )
Mechanical keys
Key number plate
■When riding in an aircraft
When bringing a key with wireless remote control function onto an aircraft,
make sure you do not press any buttons on the key while inside the aircraft cabin. If you are carrying the key in your bag,
etc., ensure that the buttons are not likely to be pressed accidentally. Press-ing a button may cause the key to emit
radio waves that could interfere with the operation of the aircraft.
■Key battery depletion (vehicles without smart entry & start system)
●The standard battery life is 1 to 2 years.
●The battery will become depleted even if the key is not used. The follow-
ing symptoms indicate that the key battery may be depleted. Replace the
Keys
The keys
Page 95 of 494
93
3
Owner's Manual_Europe_M99V08_en
3-1. Key information
Before driving
battery when necessary. (P.275)
• The wireless remote control does not operate.• The detection area becomes smaller.
■Key battery depletion (vehicles
with smart entry & start system)
●The standard battery life is 1 to 2
years.
●If the battery becomes low, an alarm
will sound in the cabin and a message will be shown on the multi-information display when the engine is stopped.
●To reduce key battery depletion when the electronic key is to not be used for
long periods of time, set the electronic key to the battery-saving mode. ( P.103)
●As the electronic key always receives radio waves, the battery will become
depleted even if the electronic key is not used. The following symptoms indicate that the electronic key battery
may be depleted. Replace the battery when necessary. ( P.275) • The smart entry & start system or the
wireless remote control does not oper- ate.• The detection area becomes smaller.
• The LED indicator on the key surface does not turn on.
●To avoid serious deterioration, do not leave the electronic key within 1 m (3 ft.) of the following electrical appli-
ances that produce a magnetic field: •TVs• Personal computers
• Cellular phones, cordless phones and battery chargers• Recharging cellular phones or cord-
less phones • Table lamps• Induction cookers
●If the electronic key is near the vehicle for longer than necessary, even if the
smart entry & start system is not oper- ated, the key battery may become depleted faster than normal.
■Replacing the battery
P. 2 7 5
■If “A New Key has been Registered
Contact Your Dealer for Details” is shown on the multi-information display (vehicles with smart entry &
start system)
This message will be displayed each time the driver’s door is opened when
the doors are unlocked from the outside for approximately 10 days after a new electronic key has been registered.
If this message is displayed but you have not had a new electronic key regis-tered, ask any authorized Toyota retailer
or Toyota authorized repairer, or any reli- able repairer to check if an unknown electronic key (other than those in your
possession) has been registered.
■If a wrong key is used (on some models)
The key cylinder rotates freely, isolated
from the internal mechanism.
NOTICE
■To prevent key damage
●Do not drop the keys, subject them
to strong shocks or bend them.
●Do not expose the keys to high
temperatures for long periods of time.
●Do not get the keys wet or wash them in an ultrasonic washer etc.
●Vehicles with smart entry & start system: Do not attach metallic or magnetic materials to the keys or
place the keys close to such materi- als.
●Do not disassemble the keys.
●Do not attach a sticker or anything
else to the surface of the key.
Page 97 of 494
95
3
Owner's Manual_Europe_M99V08_en
3-1. Key information
Before driving
noise
●When carrying a portable radio, cellu- lar phone or other wireless communi-
cation devices
●When the wireless key is in contact
with, or is covered by a metallic object
●When another wireless key (that emits
radio waves) is being used nearby
●If window tint with a metallic content or
metallic objects are attached to the rear window
■Conditions affecting the operation of the smart entry & start system or
wireless remote control (vehicles with smart entry & start system)
P. 1 0 3
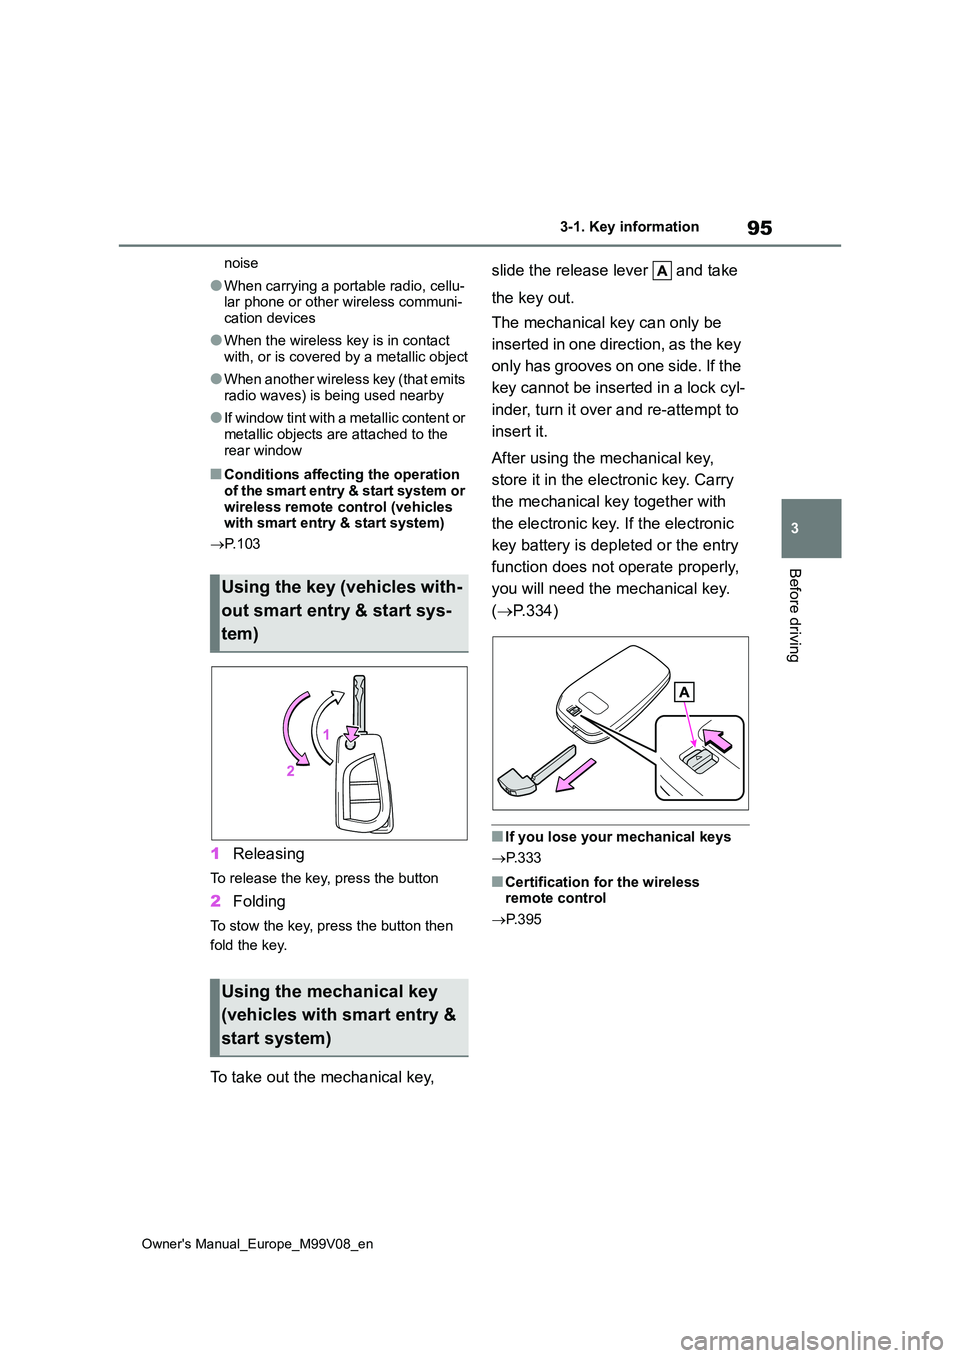
1Releasing
To release the key, press the button
2Folding
To stow the key, press the button then
fold the key.
To take out the mechanical key,
slide the release lever and take
the key out.
The mechanical key can only be
inserted in one direction, as the key
only has grooves on one side. If the
key cannot be inserted in a lock cyl-
inder, turn it over and re-attempt to
insert it.
After using the mechanical key,
store it in the electronic key. Carry
the mechanical key together with
the electronic key. If the electronic
key battery is depleted or the entry
function does not operate properly,
you will need the mechanical key.
( P.334)
■If you lose your mechanical keys
P. 3 3 3
■Certification for the wireless remote control
P. 3 9 5
Using the key (vehicles with-
out smart entry & start sys-
tem)
Using the mechanical key
(vehicles with smart entry &
start system)
Page 98 of 494
96
Owner's Manual_Europe_M99V08_en
3-2. Opening, closing and locking the doors
3-2.Opening, closing and lo cking th e d oors
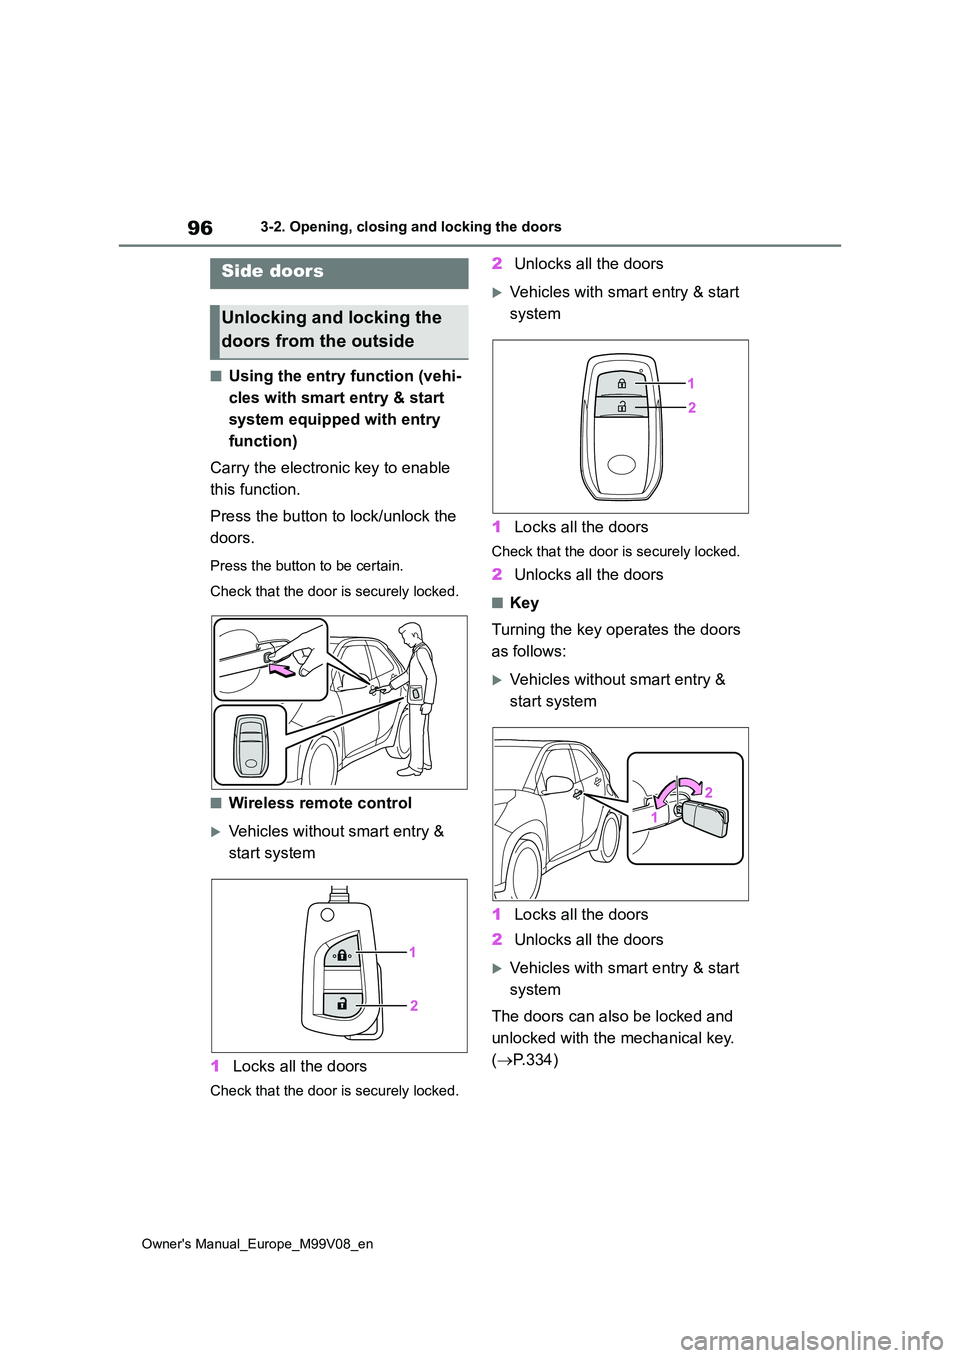
■Using the entry function (vehi-
cles with smart entry & start
system equipped with entry
function)
Carry the electronic key to enable
this function.
Press the button to lock/unlock the
doors.
Press the button to be certain.
Check that the door is securely locked.
■Wireless remote control
Vehicles without smart entry &
start system
1 Locks all the doors
Check that the door is securely locked.
2Unlocks all the doors
Vehicles with smart entry & start
system
1 Locks all the doors
Check that the door is securely locked.
2Unlocks all the doors
■Key
Turning the key operates the doors
as follows:
Vehicles without smart entry &
start system
1 Locks all the doors
2 Unlocks all the doors
Vehicles with smart entry & start
system
The doors can also be locked and
unlocked with the mechanical key.
( P.334)
Side doors
Unlocking and locking the
doors from the outside