window TOYOTA AYGO X 2022 (in English) Owner's Guide
[x] Cancel search | Manufacturer: TOYOTA, Model Year: 2022, Model line: AYGO X, Model: TOYOTA AYGO X 2022Pages: 494, PDF Size: 92.53 MB
Page 226 of 494
224
Owner's Manual_Europe_M99V08_en
5-1. Using the air conditioning system and defogger
*: If equipped
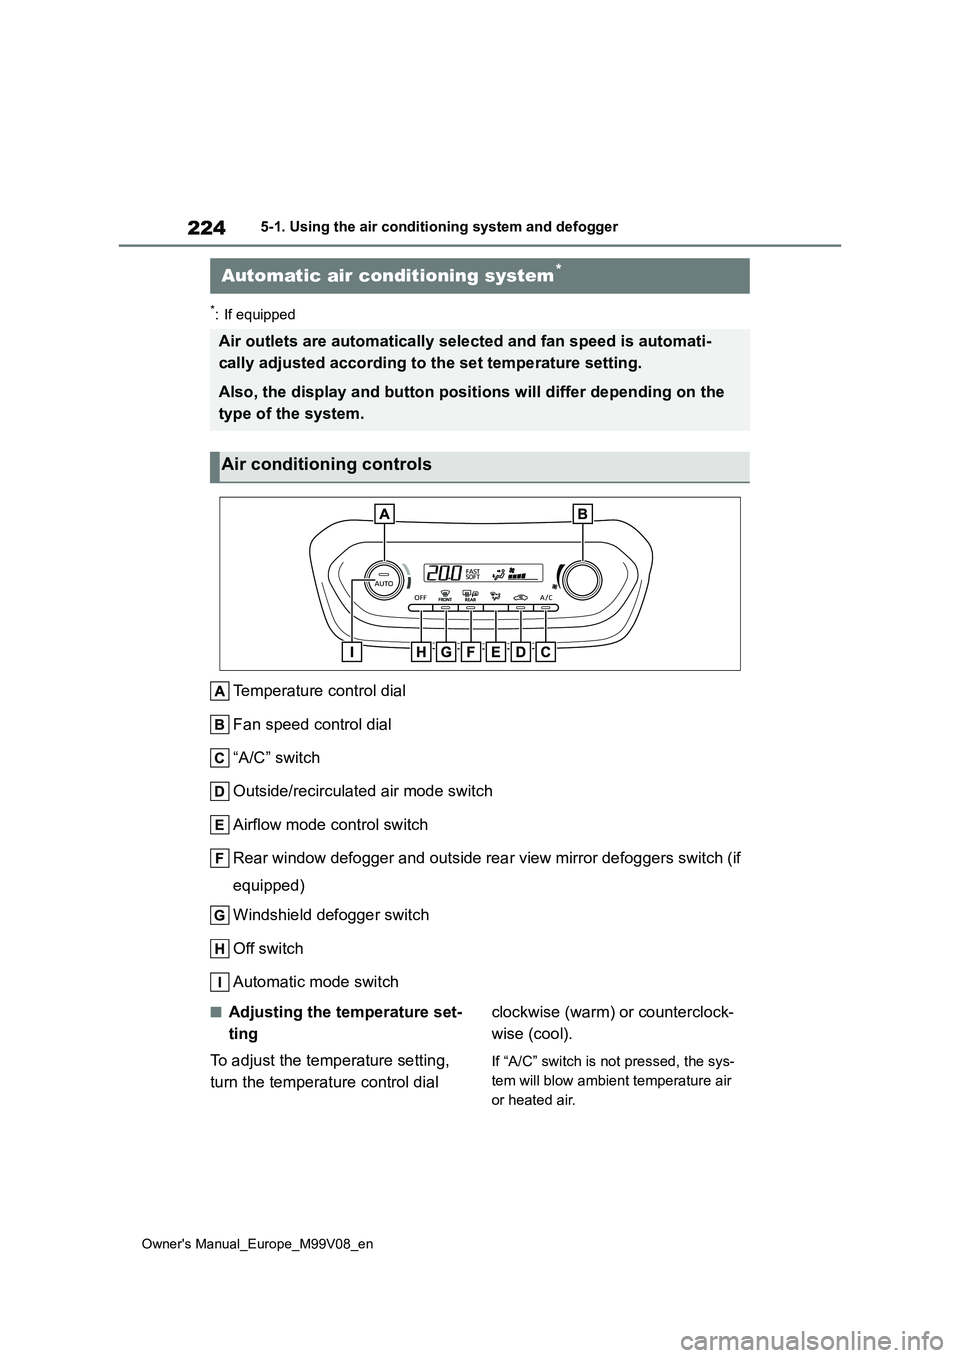
Temperature control dial
Fan speed control dial
“A/C” switch
Outside/recirculated air mode switch
Airflow mode control switch
Rear window defogger and outside rear view mirror defoggers swi tch (if
equipped)
Windshield defogger switch
Off switch
Automatic mode switch
■Adjusting the temperature set-
ting
To adjust the temperature setting,
turn the temperature control dial
clockwise (warm) or counterclock-
wise (cool).
If “A/C” switch is not pressed, the sys-
tem will blow ambient temperature air
or heated air.
Automatic air conditioning system*
Air outlets are automatically selected and fan speed is automat i-
cally adjusted according to the set temperature setting.
Also, the display and button positions will differ depending on the
type of the system.
Air conditioning controls
Page 227 of 494
225
5
Owner's Manual_Europe_M99V08_en
5-1. Using the air conditioning system and defogger
Interior features
■Setting the fan speed
To adjust the fan speed, turn the
fan speed control dial clockwise
(increase) or counterclockwise
(decrease).
■Change the airflow mode
Press the airflow mode control
switch.
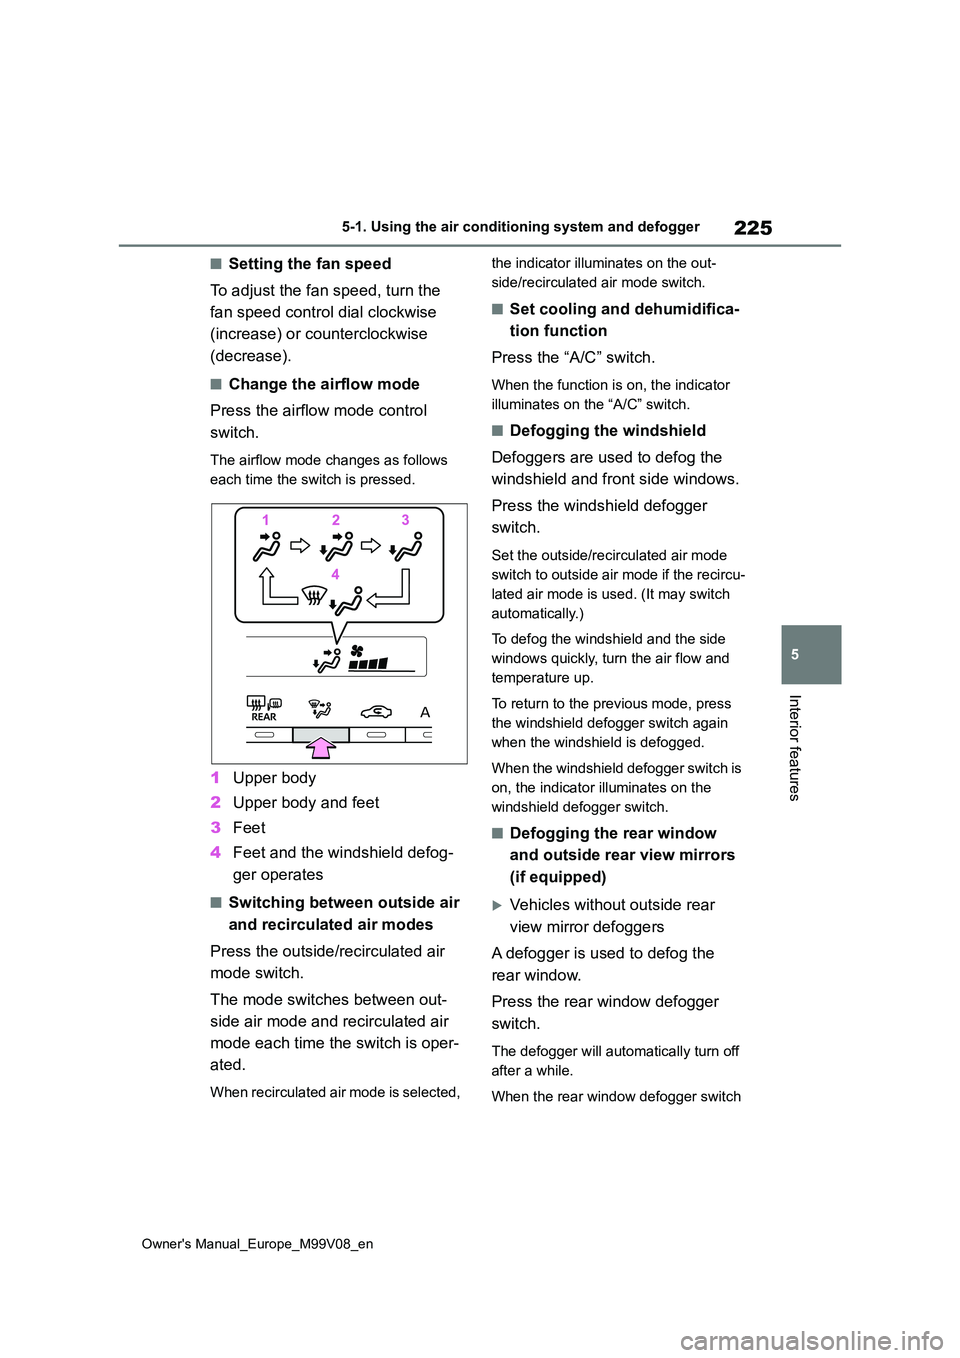
The airflow mode changes as follows
each time the switch is pressed.
1 Upper body
2 Upper body and feet
3 Feet
4 Feet and the windshield defog-
ger operates
■Switching between outside air
and recirculated air modes
Press the outside/recirculated air
mode switch.
The mode switches between out-
side air mode and recirculated air
mode each time the switch is oper-
ated.
When recirculated air mode is selected,
the indicator illuminates on the out-
side/recirculated air mode switch.
■Set cooling and dehumidifica-
tion function
Press the “A/C” switch.
When the function is on, the indicator
illuminates on the “A/C” switch.
■Defogging the windshield
Defoggers are used to defog the
windshield and front side windows.
Press the windshield defogger
switch.
Set the outside/recirculated air mode
switch to outside air mode if the recircu-
lated air mode is used. (It may switch
automatically.)
To defog the windshield and the side
windows quickly, turn the air flow and
temperature up.
To return to the previous mode, press
the windshield defogger switch again
when the windshield is defogged.
When the windshield defogger switch is
on, the indicator illuminates on the
windshield defogger switch.
■Defogging the rear window
and outside rear view mirrors
(if equipped)
Vehicles without outside rear
view mirror defoggers
A defogger is used to defog the
rear window.
Press the rear window defogger
switch.
The defogger will automatically turn off
after a while.
When the rear window defogger switch
Page 228 of 494
226
Owner's Manual_Europe_M99V08_en
5-1. Using the air conditioning system and defogger
is on, the indicator illuminates on the
rear window defogger switch.
Vehicles with outside rear view
mirror defoggers
Defoggers are used to defog the
rear window, and to remove rain-
drops, dew and frost from the out-
side rear view mirrors.
Press the rear window and outside
rear view mirror defoggers switch.
The defoggers will automatically turn off
after a while.
When the rear window and outside rear
view mirror defoggers switch is on, the
indicator illuminates on the rear window
and outside rear view mirror defoggers
switch.
■Fogging up of the windows
●The windows will easily fog up when
the humidity in the vehicle is high. Turning “A/C” on will dehumidify the air from the outlets and defog the
windshield effectively.
●If you turn “A/C” off, the windows may
fog up more easily.
●The windows may fog up if the recir-
culated air mode is used.
■When driving on dusty roads
Close all windows. If dust thrown up by
the vehicle is still drawn into the vehicle after closing the windows, it is recom-mended that the air intake mode be set
to outside air mode and the fan speed to any setting except off.
■Outside/recirculated air mode
●Setting to the recirculated air mode temporarily is recommended in pre-venting dirty air from entering the
vehicle interior and helping to cool the vehicle when the outside air tempera-ture is high.
●Outside/recirculated air mode may
automatically switch depending on the
temperature setting or the inside tem- perature.
■When the outside temperature falls to nearly 0°C (32°F)
The dehumidification function may not operate even when “A/C” switch is pressed.
■Ventilation and air conditioning
odors
●To let fresh air in, set the air condition-
ing system to the outside air mode.
●During use, various odors from inside
and outside the vehicle may enter into and accumulate in the air conditioning system. This may then cause odor to
be emitted from the vents.
●To reduce potential odors from occur-
ring: • It is recommended that the air condi-tioning system be set to outside air
mode prior to turning the vehicle off. • The start timing of the blower may be delayed for a short period of time
immediately after the air conditioning system is started in automatic mode.
●When parking, the system automati-cally switches to outside air mode to encourage better air circulation
throughout the vehicle, helping to reduce odors that occur when starting the vehicle.
■Air conditioning filter
P. 2 7 3
■Customization
Some functions can be customized. ( P.354)
Page 246 of 494
244
Owner's Manual_Europe_M99V08_en
6-1. Maintenance and care
6-1.Mainte nance a nd care
Working from top to bottom, lib-
erally apply water to the vehicle
body, wheel wells and underside
of the vehicle to remove any dirt
and dust.
Wash the vehicle body using a
sponge or soft cloth, such as a
chamois.
For hard-to-remove marks, use
car wash soap and rinse thor-
oughly with water.
Wipe away any water.
Wax the vehicle when the water-
proof coating deteriorates.
If water does not bead on a clean sur-
face, apply wax when the vehicle body
is cool.
Vehicles with a canvas top:
Vacuuming of outer canvas before
washing is helpful in removing dust and
other foreign particles.
Follow the procedure shown below:
• Brush off any loose dirt and rinse off
with a hose.
• Using a sponge, wash with a mild
solution of soap (hand soap) in luke-
warm water.
• Rinse thoroughly to remove soap.
■Automatic car washes
●Vehicles with a canvas top: Do not use the automatic car washes.
●Before washing the vehicle:• Fold the mirrors.• Remove the pole antenna
Start washing from the front of the vehi-
cle. Extend the mirrors and pole
antenna before driving.
●Brushes used in automatic car washes may scratch the vehicle sur-
face, parts (wheel, etc.) and harm your vehicle’s paint.
■High pressure car washes
●Vehicles with a canvas top: Do not use the high pressure car washes.
●As water may enter the cabin, do not bring the nozzle tip near the gaps around the doors or perimeter of the
windows, or spray these areas contin- uously.
■When using a car wash (vehicles with smart entry & start system)
If the door handle becomes wet while the electronic key is within the effective range, the door may lock and unlock
repeatedly. In that case, follow the fol- lowing correction procedures to wash the vehicle:
●Place the key in a position 2 m (6 ft.)
or more separate from the vehicle while the vehicle is being washed. (Take care to ensure that the key is
not stolen.)
●Set the electronic key to battery-sav-
ing mode to disable the smart entry & start system. ( P.103)
■Wheels and wheel ornaments (vehi- cles without matte black painted
wheels)
●Remove any dirt immediately by using
a neutral detergent.
●Wash detergent off with water immedi-
ately after use.
●To protect the paint from damage,
Cleaning and protecting
the vehicle exterior
Perform cleaning in a manner
appropriate to each compo-
nent and its material.
Cleaning instructions
Page 251 of 494
249
6
Owner's Manual_Europe_M99V08_en
6-1. Maintenance and care
Maintenance and care
Remove dirt using a water-
dampened soft cloth or synthetic
chamois.
Wipe the surface with a dry, soft
cloth to remove any remaining
moisture.
■Cleaning the areas with satin-finish
metal accents
The metal areas use a layer of real metal for the surface. It is necessary to
clean them regularly. If dirty areas are left uncleaned for long periods of time, they may be difficult to clean.
Remove dirt and dust using a
vacuum cleaner.
Wipe off any excess dirt and dust
with a soft cloth dampened with
diluted detergent.
Use a diluted water solution of approxi-
mately 5% neutral wool detergent.
Wring out any excess water from
NOTICE
●Do not use a polish wax or polish cleaner. The instrument panel’s or
other interior part’s painted surface may be damaged.
■Preventing damage to leather surfaces
Observe the following precautions to
avoid damage to and deterioration of leather surfaces:
●Remove any dust or dirt from
leather surfaces immediately.
●Do not expose the vehicle to direct
sunlight for extended periods of time. Park the vehicle in the shade, especially during summer.
●Do not place items made of vinyl, plastic, or containing wax on the
upholstery, as they may stick to the leather surface if the vehicle interior heats up significantly.
■Water on the floor
Do not wash the vehicle floor with
water. Vehicle systems such as the audio system may be damaged if water
comes into contact with electrical components such as the audio sys-tem above or under the floor of the
vehicle. Water may also cause the body to rust.
■When cleaning the inside of the windshield
Do not allow glass cleaner to contact
the lens. Also, do not touch the lens. ( P.156)
■Cleaning the inside of the rear window
●Do not use glass cleaner to clean
the rear window, as this may cause damage to the rear window defog-ger heater wires or antenna. Use a
cloth dampened with lukewarm water to gently wipe the window clean. Wipe the window in strokes
running parallel to the heater wires or antenna.
●Be careful not to scratch or damage the heater wires or antenna.
Cleaning the areas with
satin-finish metal accents
Cleaning the leather areas
Page 254 of 494
252
Owner's Manual_Europe_M99V08_en
6-2. Maintenance
request that a record of maintenance
be kept.
■Does your vehicle need repairs?
Be on the alert for changes in perfor- mance and sounds, and visual tip-offs
that indicate service is needed. Some important clues are:
●Engine misses (misfire), stumbling or pinging
●Appreciable loss of power
●Strange engine noises
●A fluid leak under the vehicle (How-ever, water dripping from the air con-
ditioning system after use is normal.)
●Change in exhaust sound (This may
indicate a dangerous carbon monox- ide leak. Drive with the windows open and have the exhaust system checked
immediately.)
●Flat-looking tires, excessive tire
squeal when cornering, uneven tire wear
●Vehicle pulls to one side when driven straight on a level road
●Strange noises related to suspension movement
●Loss of brake effectiveness, spongy feeling brake pedal or clutch pedal (vehicles with manual transmission),
pedal almost touches the floor, vehicle pulls to one side when braking
●Engine coolant temperature continu-ally higher than normal ( P.304)
If you notice any of these clues, take
your vehicle to any authorized Toyota
retailer or Toyota authorized repairer, or
any reliable repairer as soon as possi-
ble. Your vehicle may need adjustment
or repair.
Page 299 of 494
297
7
Owner's Manual_Europe_M99V08_en
7-1. Essential information
When trouble arises
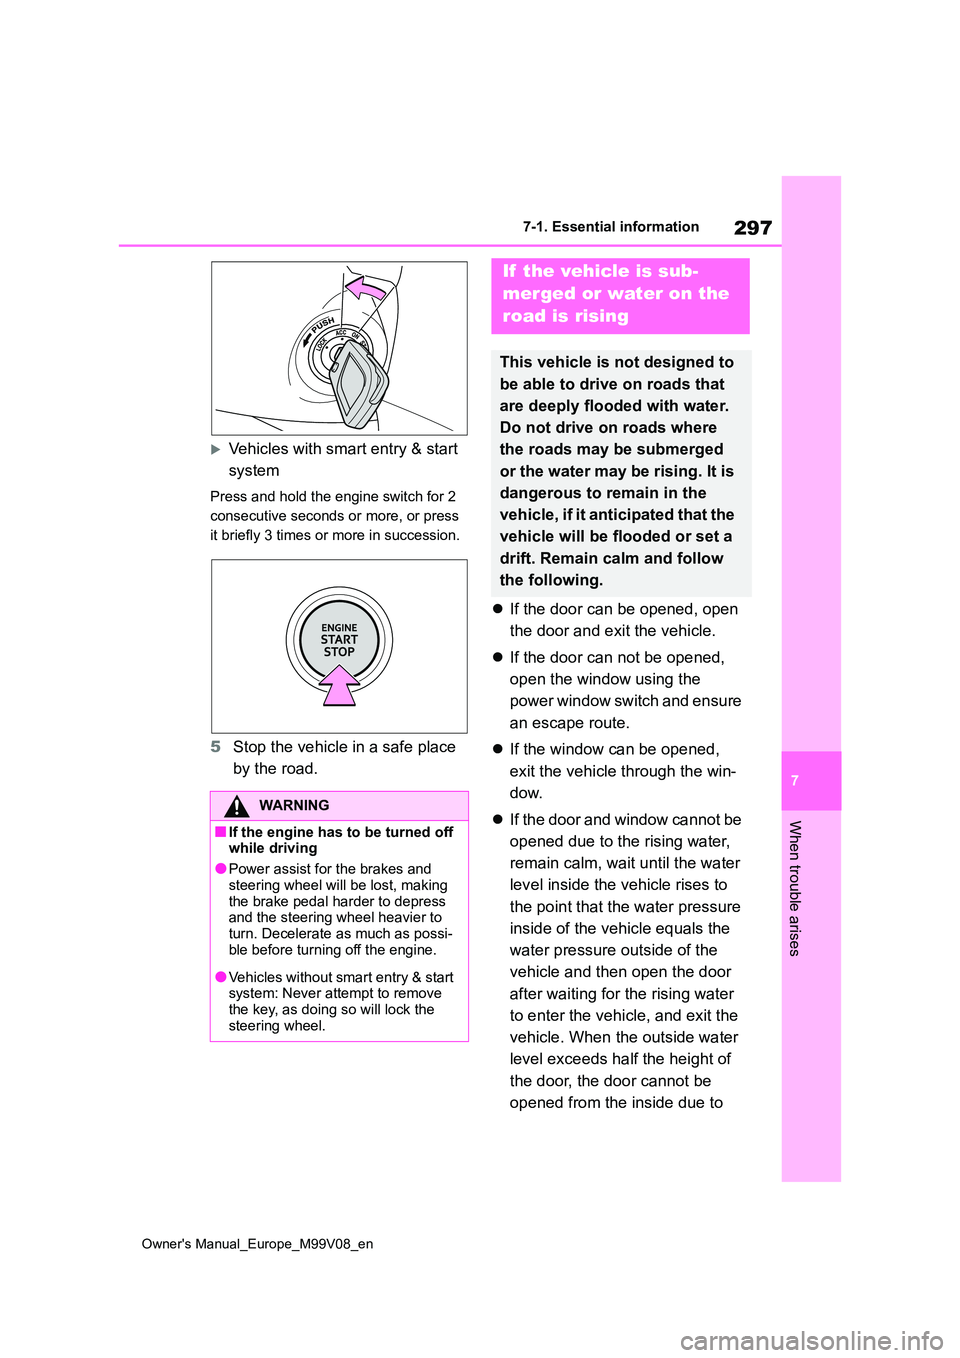
Vehicles with smart entry & start
system
Press and hold the engine switch for 2
consecutive seconds or more, or press
it briefly 3 times or more in succession.
5 Stop the vehicle in a safe place
by the road.
If the door can be opened, open
the door and exit the vehicle.
If the door can not be opened,
open the window using the
power window switch and ensure
an escape route.
If the window can be opened,
exit the vehicle through the win-
dow.
If the door and window cannot be
opened due to the rising water,
remain calm, wait until the water
level inside the vehicle rises to
the point that the water pressure
inside of the vehicle equals the
water pressure outside of the
vehicle and then open the door
after waiting for the rising water
to enter the vehicle, and exit the
vehicle. When the outside water
level exceeds half the height of
the door, the door cannot be
opened from the inside due to
WARNING
■If the engine has to be turned off while driving
●Power assist for the brakes and
steering wheel will be lost, making the brake pedal harder to depress and the steering wheel heavier to
turn. Decelerate as much as possi- ble before turning off the engine.
●Vehicles without smart entry & start system: Never attempt to remove the key, as doing so will lock the
steering wheel.
If the vehicle is sub-
merged or water on the
road is rising
This vehicle is not designed to
be able to drive on roads that
are deeply flooded with water.
Do not drive on roads where
the roads may be submerged
or the water may be rising. It is
dangerous to remain in the
vehicle, if it anticipated that the
vehicle will be flooded or set a
drift. Remain calm and follow
the following.
Page 300 of 494
298
Owner's Manual_Europe_M99V08_en
7-1. Essential information
water pressure.
■Water level exceeds the floor
When the water level exceeds the floor and time has passed, the electrical equipment will get damaged, the power
windows will not operate, the engine stop, and the vehicle may not be able to get moving.
■Using an emergency escape ham-
mer*
Laminated glass is used in the wind- shield on this vehicle.
Laminated glass cannot be shattered
with an emergency hammer*. Tempered glass is used in the windows
on this vehicle.*: Contact any authorized Toyota retailer
or Toyota authorized repairer, or any
reliable repairer, or aftermarket acces-
sory manufacturer for further informa-
tion about an emergency hammer.
WARNING
■Caution while driving
Do not drive on roads where the roads may be submerged or the water may be rising. Otherwise the vehicle
may be damaged and cannot move, as well as become flooded and set a drift, which may lead to death.
Page 359 of 494
357
8
Owner's Manual_Europe_M99V08_en
8-2. Customization
Vehicle specifications
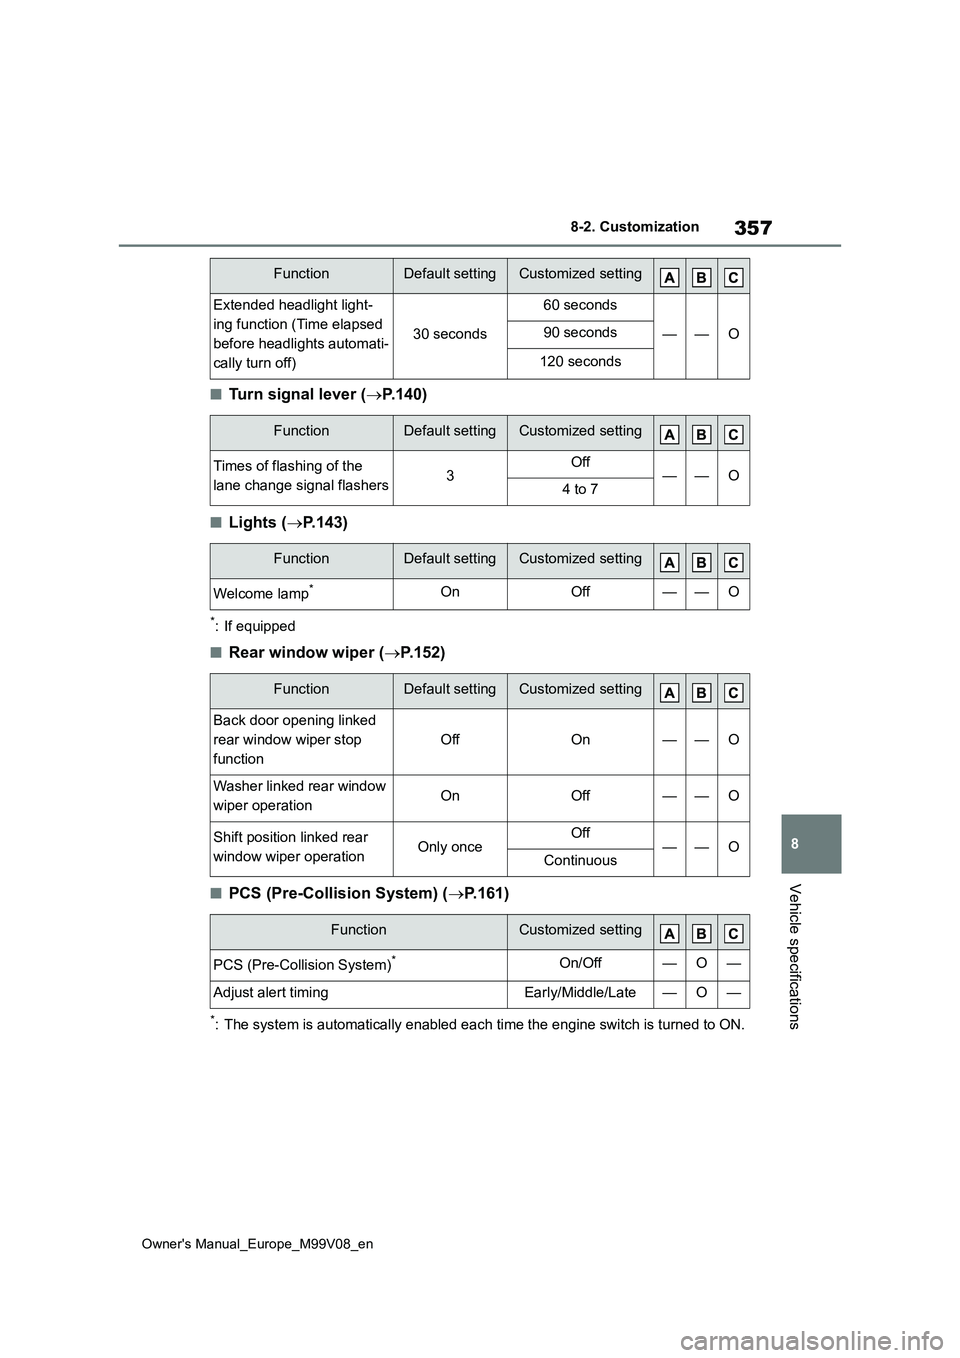
■Turn signal lever (P.140)
■Lights (P.143)
*: If equipped
■Rear window wiper (P.152)
■PCS (Pre-Collision System) (P.161)
*: The system is automatically enabled each time the engine switch is turned to ON.
Extended headlight light-
ing function (Time elapsed
before headlights automati-
cally turn off)
30 seconds
60 seconds
——O90 seconds
120 seconds
FunctionDefault settingCustomized setting
Times of flashing of the
lane change signal flashers3Off——O4 to 7
FunctionDefault settingCustomized setting
Welcome lamp*OnOff——O
FunctionDefault settingCustomized setting
Back door opening linked
rear window wiper stop
function
OffOn——O
Washer linked rear window
wiper operationOnOff——O
Shift position linked rear
window wiper operationOnly onceOff——OContinuous
FunctionCustomized setting
PCS (Pre-Collision System)*On/Off—O—
Adjust alert timingEarly/Middle/Late—O—
FunctionDefault settingCustomized setting
Page 370 of 494
368
Owner's Manual_Europe_M99V08_en
Alphabetical Index
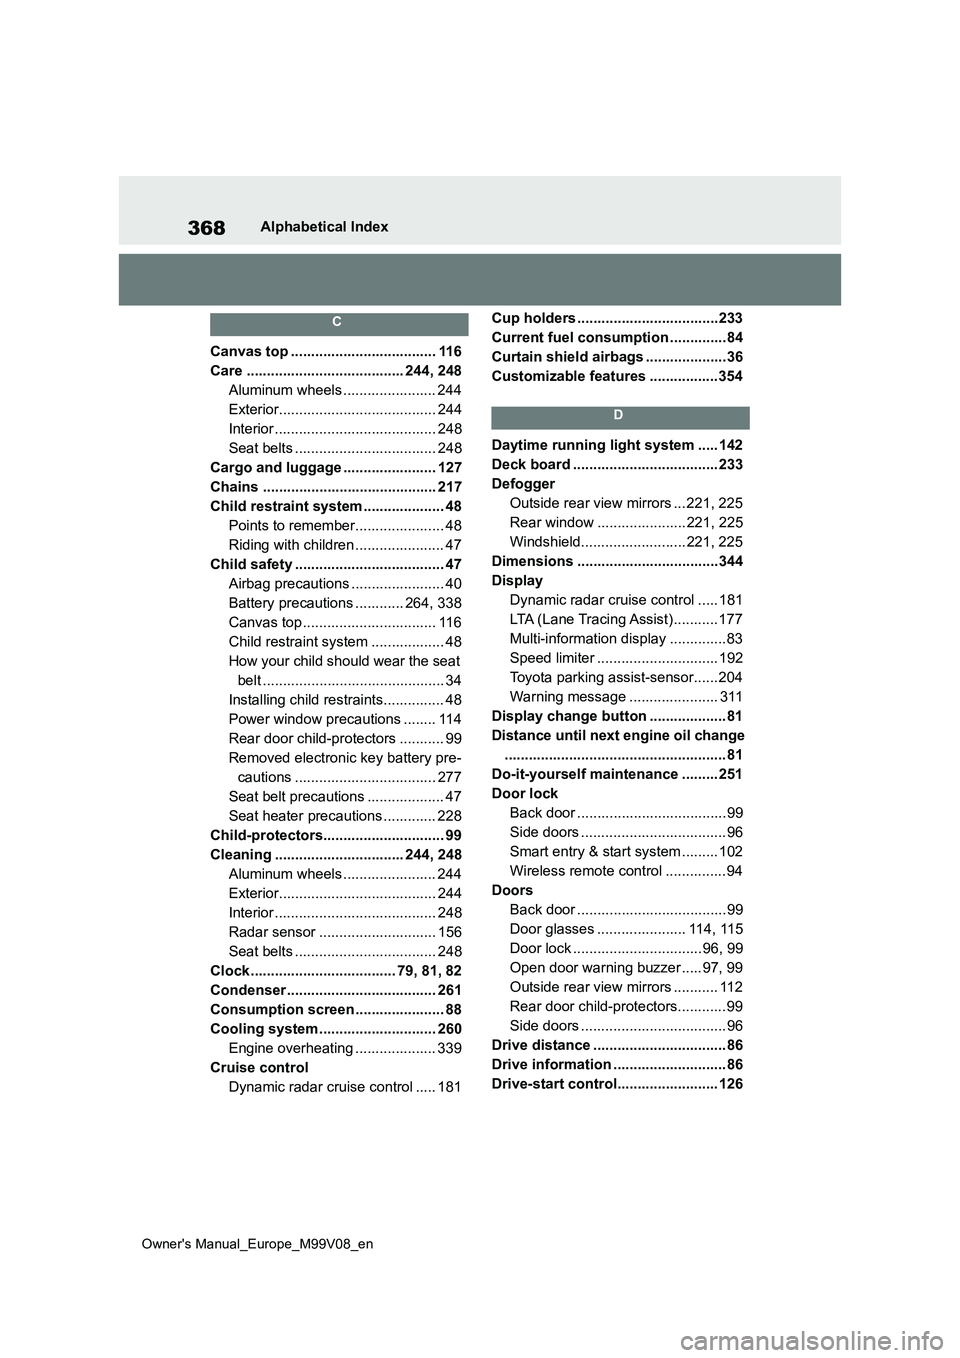
C
Canvas top .................................... 116
Care ....................................... 244, 248
Aluminum wheels ....................... 244
Exterior....................................... 244
Interior ........................................ 248
Seat belts ................................... 248
Cargo and luggage ....................... 127
Chains ........................................... 217
Child restraint system .................... 48
Points to remember...................... 48
Riding with children ...................... 47
Child safety ..................................... 47
Airbag precautions ....................... 40
Battery precautions ............ 264, 338
Canvas top ................................. 116
Child restraint system .................. 48
How your child should wear the seat
belt ............................................. 34
Installing child restraints............... 48
Power window precautions ........ 114
Rear door child-protectors ........... 99
Removed electronic key battery pre-
cautions ................................... 277
Seat belt precautions ................... 47
Seat heater precautions ............. 228
Child-protectors.............................. 99
Cleaning ................................ 244, 248
Aluminum wheels ....................... 244
Exterior....................................... 244
Interior ........................................ 248
Radar sensor ............................. 156
Seat belts ................................... 248
Clock .................................... 79, 81, 82
Condenser..................................... 261
Consumption screen ...................... 88
Cooling system ............................. 260
Engine overheating .................... 339
Cruise control
Dynamic radar cruise control ..... 181
Cup holders ...................................233
Current fuel consumption ..............84
Curtain shield airbags ....................36
Customizable features ................. 354
D
Daytime running light system ..... 142
Deck board .................................... 233
Defogger
Outside rear view mirrors ... 221, 225
Rear window ...................... 221, 225
Windshield.......................... 221, 225
Dimensions ...................................344
Display
Dynamic radar cruise control ..... 181
LTA (Lane Tracing Assist)........... 177
Multi-information display ..............83
Speed limiter .............................. 192
Toyota parking assist-sensor...... 204
Warning message ...................... 311
Display change button ................... 81
Distance until next engine oil change
....................................................... 81
Do-it-yourself maintenance ......... 251
Door lock
Back door .....................................99
Side doors .................................... 96
Smart entry & start system ......... 102
Wireless remote control ............... 94
Doors
Back door .....................................99
Door glasses ...................... 114, 115
Door lock ................................ 96, 99
Open door warning buzzer ..... 97, 99
Outside rear view mirrors ........... 112
Rear door child-protectors............ 99
Side doors .................................... 96
Drive distance ................................. 86
Drive information ............................ 86
Drive-start control......................... 126