reset TOYOTA C-HR 2019 Owners Manual (in English)
[x] Cancel search | Manufacturer: TOYOTA, Model Year: 2019, Model line: C-HR, Model: TOYOTA C-HR 2019Pages: 532, PDF Size: 10.35 MB
Page 89 of 532
892. Instrument cluster
2
Instrument cluster
C-HR_OM_USA_OM10569U
Odometer and trip meter display
Displays the following items.
Odometer:
Displays the total distance the vehicle has been driven.
Trip meter:
Displays the distance the vehicle has been driven since the meter was last
reset. Trip meters A and B can be used to record and display different dis-
tances independently.
Maintenance required information (U.S.A. only):
Displays the remaining distance until the engine oil should be changed. If
“-” is displayed before distance, it means oil maintenance is o verdue. Have
the engine oil changed by your Toyota dealer. • Displays the maintenance required information when the engine switch
is turned to the “ON” position (vehicles without smart key syst em) or in
IGNITION ON mode (vehicles with smart key system).
• Maintenance required information reset method (P. 337)
Shift position and shift range display
Displays the selected shift position or selected shift range. ( P. 181)
Engine coolant temperature gauge
Displays the engine coolant temperature.
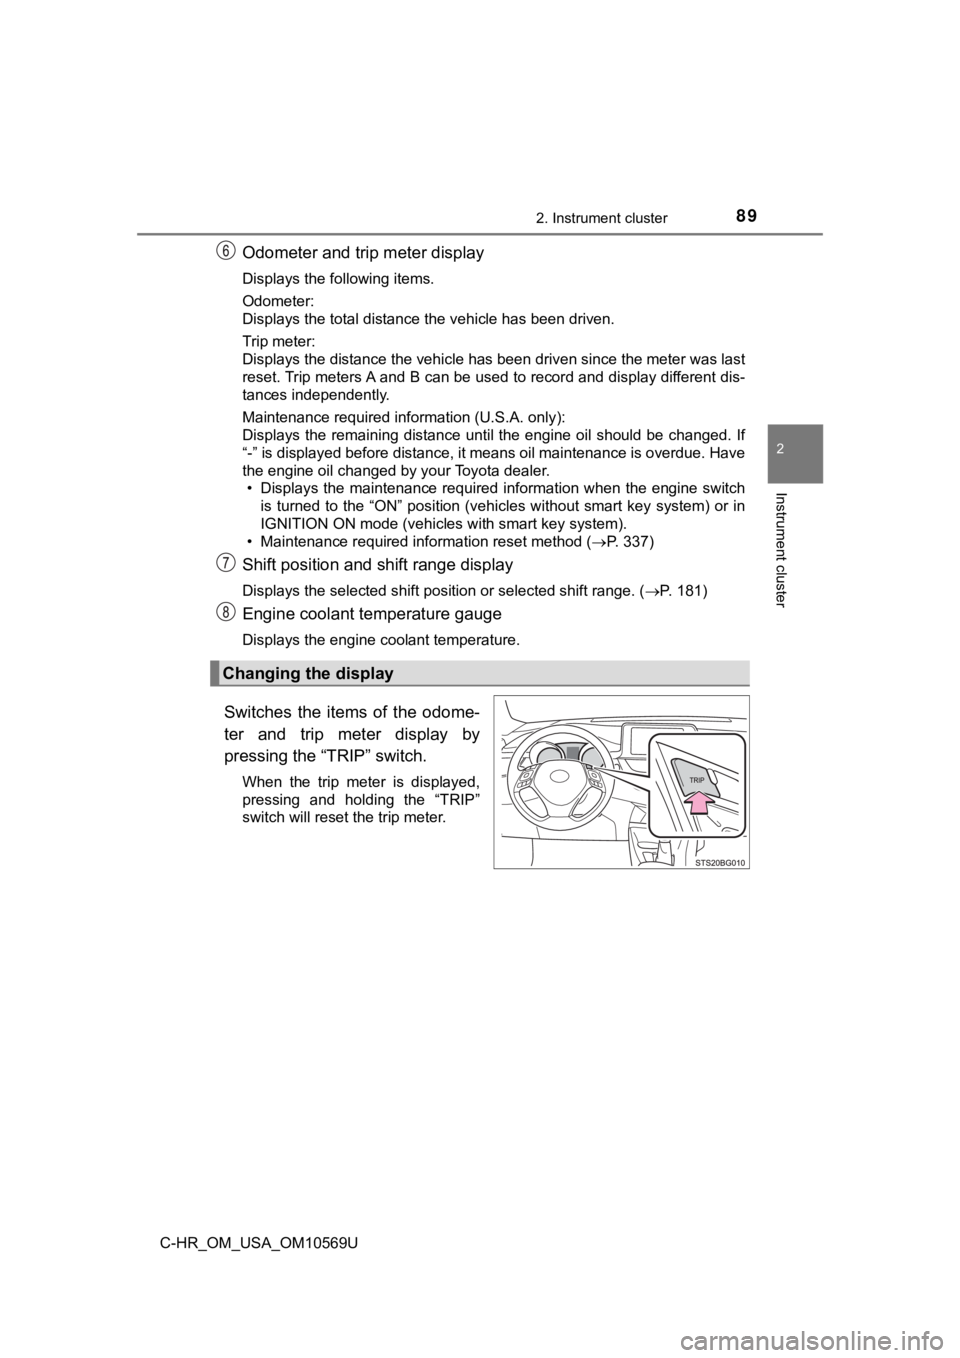
Switches the items of the odome-
ter and trip meter display by
pressing the “TRIP” switch.
When the trip meter is displayed,
pressing and holding the “TRIP”
switch will reset the trip meter.
Changing the display
Page 92 of 532
922. Instrument cluster
C-HR_OM_USA_OM10569U
Settings display
Select to change the meter display settings and the operation set-
tings of some vehicle functions. (P. 94)
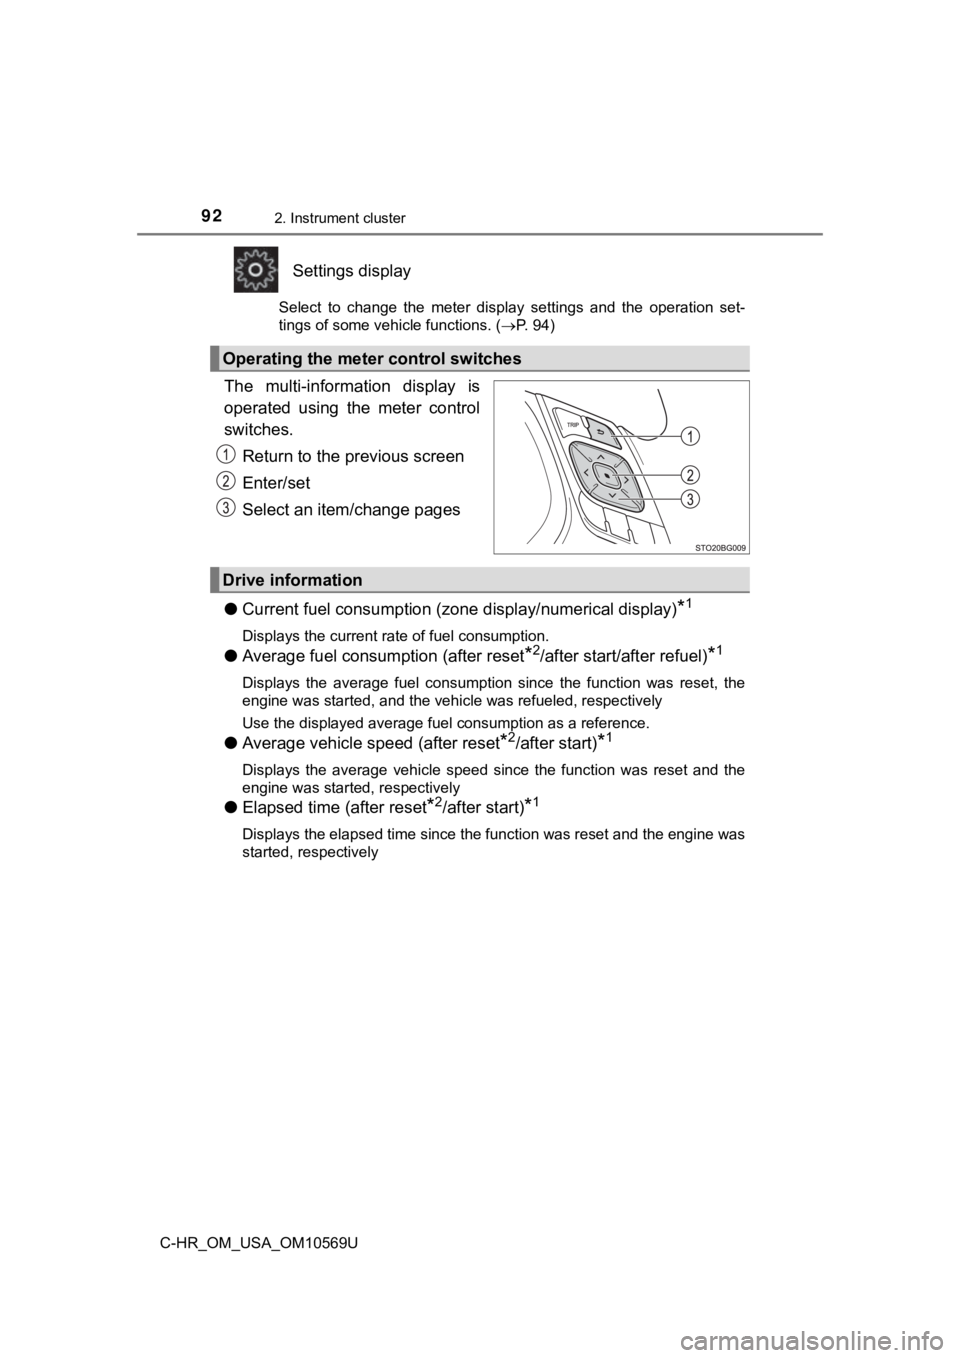
The multi-information display is
operated using the meter control
switches.
Return to the previous screen
Enter/set
Select an item/change pages
● Current fuel consumption (zone display/numerical display)
*1
Displays the current rate of fuel consumption.
●Average fuel consumption (after reset*2/after start/after refuel)*1
Displays the average fuel consumption since the function was reset, the
engine was started, and the vehicle was refueled, respectively
Use the displayed average fuel consumption as a reference.
●Average vehicle speed (after reset*2/after start)*1
Displays the average vehicle speed since the function was reset and the
engine was started, respectively
● Elapsed time (after reset*2/after start)*1
Displays the elapsed time since the function was reset and the engine was
started, respectively
Operating the meter control switches
Drive information
Page 93 of 532

932. Instrument cluster
2
Instrument cluster
C-HR_OM_USA_OM10569U
●Distance (driving range/after start)*1
Displays the estimated maximum distance that can be driven with the
quantity of fuel remaining and the distance driven after the engine was
started, respectively
• This distance is computed based on your average fuel consumpti on. As
a result, the actual distance that can be driven may differ fro m that dis-
played.
• When only a small amount of fuel is added to the tank, the dis play may
not be updated.
When refueling, turn the engine switch off. If the vehicle is r efueled with-
out turning the engine switch off, the display may not be updat ed.
●Eco Driving Indicator Zone Display
P. 9 6
●Speedometer
Displays the vehicle speed.
●G Monitor
P. 9 7
●Sway warning
Detects the sway of the vehicle within a lane, which is often a ssociated
with a decrease in the driver’s attention level, and displays the decrease in
attention using a bar display.
The shorter the bar length, the more the driver may need to res t.
This display is a part of the LDA (Lane Departure Alert with steering con-
trol). The display is enabled when the operating conditions of the vehicle
sway warning are met. ( P. 238)
●Display off
A blank screen is displayed.
*1: Can be registered to Drive information 1 and 2. ( P. 94)
*2: Resetting procedures:
• Select a function to be reset using the meter control switches and then
press and hold to reset.
• If there is more than one function that can be reset, check bo xes will be
displayed next to those functions.
Page 96 of 532
962. Instrument cluster
C-HR_OM_USA_OM10569U
■Setting items
●“Meter Settings” and “Vehicle Settings” setting items are not s electable
during driving and cannot be operated.
Also, the settings screen is temporarily canceled in the follow ing situations.
• A warning message is displayed.
• The vehicle starts off.
● Settings for functions not equipped to the vehicle are not disp layed.
● When a function is turned off, the related settings for that fu nction are not
selectable.
■ Pop-up display
In some situations, such as when a switch operation is performe d, a pop-up
display will be temporarily displayed on the multi-information display.
■ Liquid crystal display
Small spots or light spots may appear on the display. This phen omenon is
characteristic of liquid crystal displays, and there is no prob lem continuing to
use the display.
■ When disconnecting and reco nnecting battery terminals
The drive information will be reset.
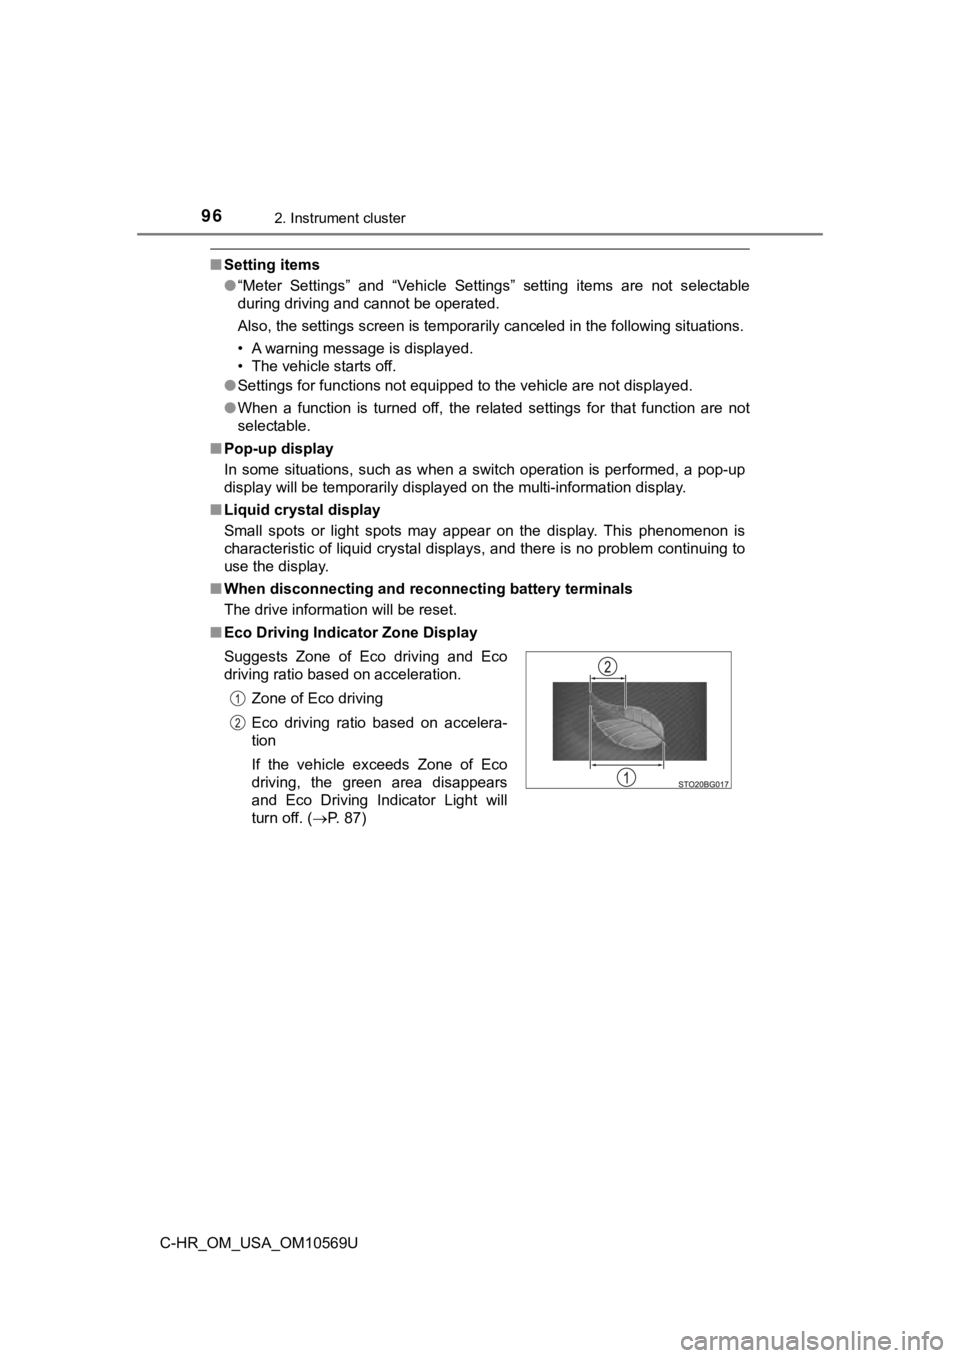
■ Eco Driving Indicator Zone Display
Suggests Zone of Eco driving and Eco
driving ratio based on acceleration.
Zone of Eco driving
Eco driving ratio based on accelera-
tion
If the vehicle exceeds Zone of Eco
driving, the green area disappears
and Eco Driving Indicator Light will
turn off. ( P. 87)
Page 100 of 532
1002. Instrument cluster
C-HR_OM_USA_OM10569U
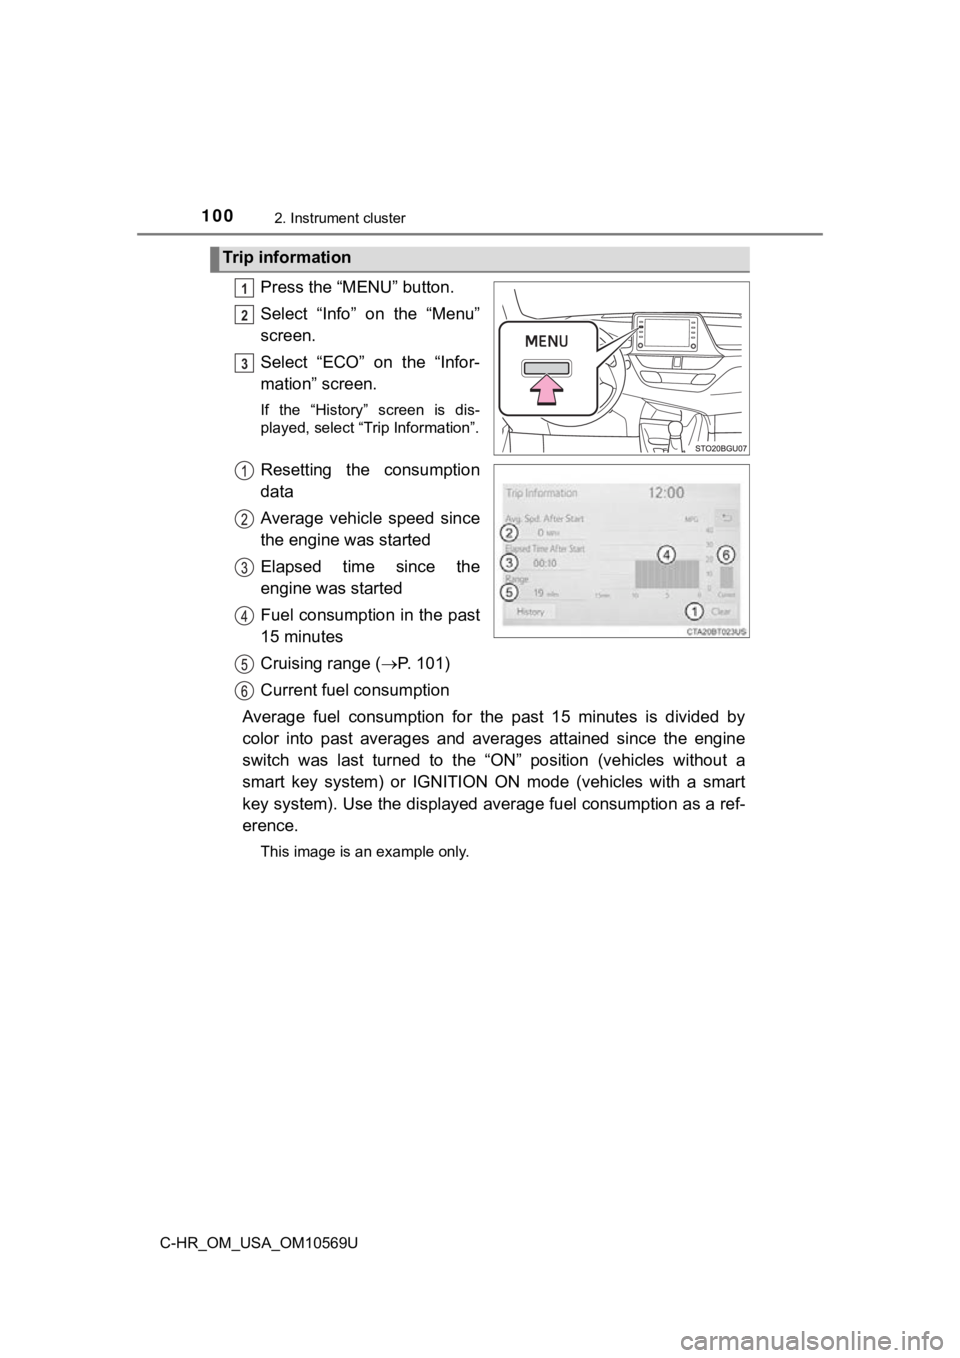
Press the “MENU” button.
Select “Info” on the “Menu”
screen.
Select “ECO” on the “Infor-
mation” screen.
If the “History” screen is dis-
played, select “Trip Information”.
Resetting the consumption
data
Average vehicle speed since
the engine was started
Elapsed time since the
engine was started
Fuel consumption in the past
15 minutes
Cruising range ( P. 101)
Current fuel consumption
Average fuel consumption for the past 15 minutes is divided by
color into past averages and averages attained since the engine
switch was last turned to the “ON” position (vehicles without a
smart key system) or IGNITION ON mode (vehicles with a smart
key system). Use the displayed a verage fuel consumption as a ref-
erence.
This image is an example only.
Trip information
1
2
3
Page 101 of 532
1012. Instrument cluster
2
Instrument cluster
C-HR_OM_USA_OM10569U
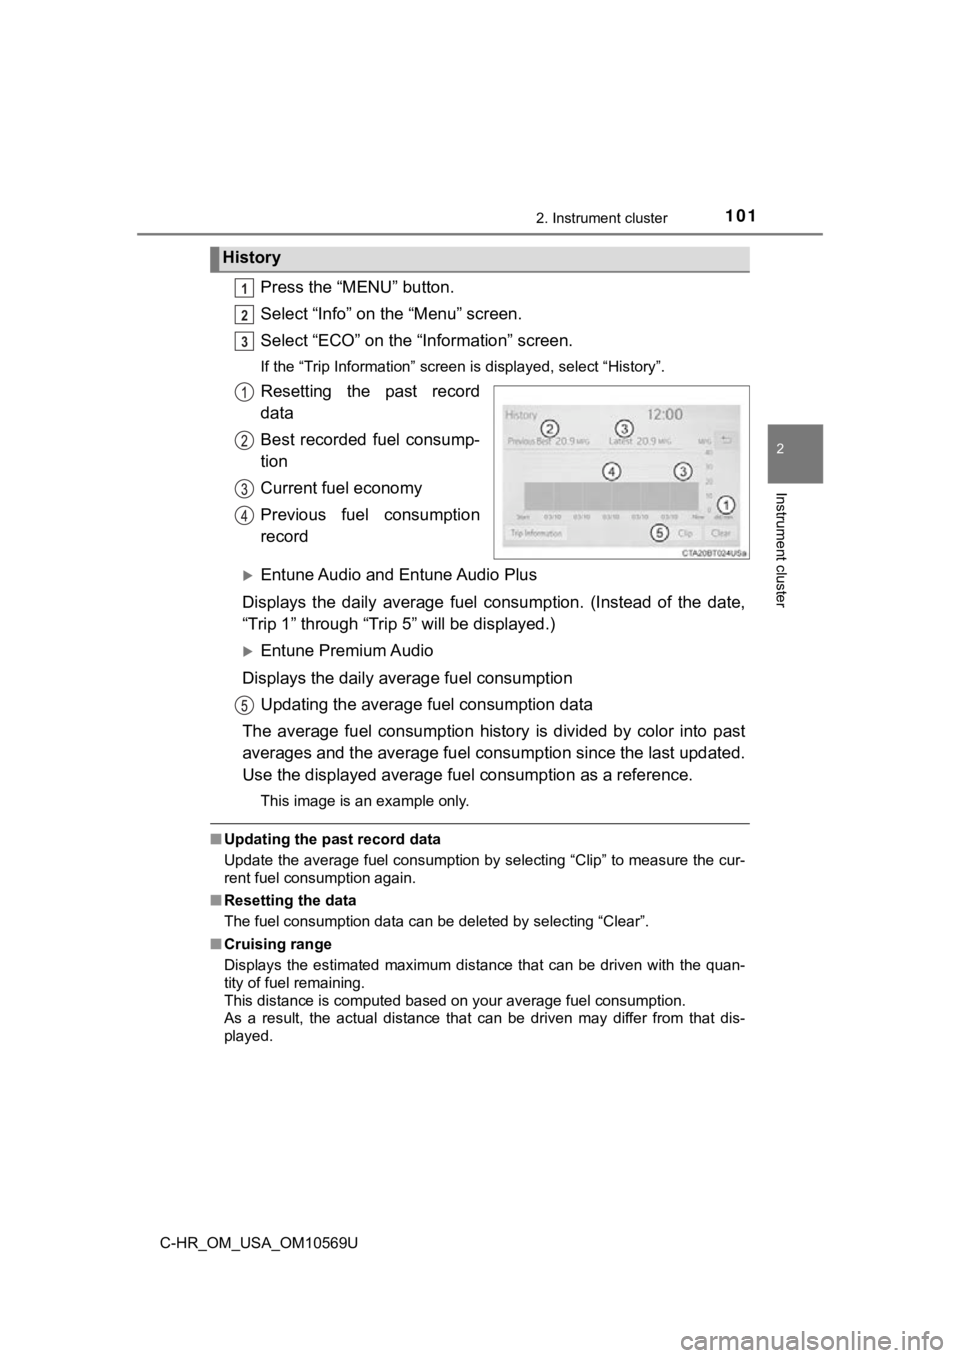
Press the “MENU” button.
Select “Info” on the “Menu” screen.
Select “ECO” on the “Information” screen.
If the “Trip Information” screen is displayed, select “History” .
Resetting the past record
data
Best recorded fuel consump-
tion
Current fuel economy
Previous fuel consumption
record
Entune Audio and Entune Audio Plus
Displays the daily average fuel consumption. (Instead of the da te,
“Trip 1” through “Trip 5” will be displayed.)
Entune Premium Audio
Displays the daily average fuel consumption Updating the average fuel consumption data
The average fuel consumption history is divided by color into p ast
averages and the average fuel con sumption since the last updated.
Use the displayed average fuel consumption as a reference.
This image is an example only.
■ Updating the past record data
Update the average fuel consumption by selecting “Clip” to meas ure the cur-
rent fuel consumption again.
■ Resetting the data
The fuel consumption data can be deleted by selecting “Clear”.
■ Cruising range
Displays the estimated maximum distance that can be driven with the quan-
tity of fuel remaining.
This distance is computed based on your average fuel consumptio n.
As a result, the actual distance that can be driven may differ from that dis-
played.
History
1
2
3
Page 337 of 532

3376-2. Maintenance
6
Maintenance and care
C-HR_OM_USA_OM10569U
■Repair and replacement
It is recommended that genuine Toyota parts be used for repairs to ensure
performance of each system. If non-Toyota parts are used in rep lacement or if
a repair shop other than a Toyota dealer performs repairs, conf irm the war-
ranty coverage.
■ Resetting the message indicating ma intenance is required (U.S.A. only)
After the required maintenance is performed according to the ma intenance
schedule, please reset the message.
To reset the message, follow the procedure described below:
Switch the display to the trip meter “A” when the engine is running. ( P. 89)
Turn the engine switch off.
Vehicles without a smart key system:
While pressing the “TRIP” switch ( P. 89), turn the engine switch to the
“ON” position (do not start the engine because the reset mode w ill be can-
celed). Continue to press and hold the switch until the trip me ter displays
“00000”.
Vehicles with a smart key system:
While pressing the “TRIP” switch ( P. 89), turn the engine switch to the
IGNITION ON mode (do not start the engine because the reset mode will
be canceled). Continue to press and hold the switch until the t rip meter dis-
plays “00000”.
■ Allow inspection and repairs to be performed by a Toyota dealer
●Toyota technicians are well-trained specialists and are kept up to date with
the latest service information. They are well informed about th e operations
of all systems on your vehicle.
● Keep a copy of the repair order. It proves that the maintenance that has
been performed is under warranty coverage. If any problem should arise
while your vehicle is under warranty, your Toyota dealer will p romptly take
care of it.
1
2
3
Page 371 of 532

3716-3. Do-it-yourself maintenance
6
Maintenance and care
C-HR_OM_USA_OM10569U■
The initialization operation
●Make sure to carry out initializ
ation after adjusting the tire inflation pres-
sure.
Also, make sure the tires are co ld before carrying out initialization or tire
inflation pressure adjustment.
●If you have accidentally turned the engine switch off during in itialization,
it is not necessary to press the reset swit ch again as initialization will
restart automatically when the en gine switch to the “ON” position (vehi-
cles without a smart key system) or IGNITION ON mode (vehicles with a
smart key system) for the next time.
●If you accidentally press the reset switch when initialization is not neces-
sary, adjust the tire inflation pressure to the specified level when the
tires are cold, and cond uct initialization again.
■Warning performance of the tire pressure warning system
The warning of the tire pressu re warning system will change in accor-
dance with driving conditions. F or this reason, the system may give a
warning even if the tire pressure does not reach a low enough l evel, or if
the pressure is higher than the pressure that was adjusted to w hen the
system was initialized.
■When initialization of the tire pressure warning system has fai led
Initialization can be completed i n a few minutes. However, in the following
cases, the settings have not been record ed and the system will not oper-
ate properly. If repeated attempts to record tire inflation pre ssure settings
are unsuccessful, have the vehicl e inspected by your Toyota dealer.
●When operating the initialization of the system, the tire pressure warning
light does not blink 3 times and the setting message does not a ppear on
the multi-information display.
●After driving for a certain period of time since the initializa tion has been
completed, the warning light comes on after blinking for 1 minute.
Page 433 of 532
4337-2. Steps to take in an emergency
7
When trouble arises
C-HR_OM_USA_OM10569U■
If “See Owner’s Manual” is shown
●If “Braking Power Low Stop in a Safe Place See Owner’s Manual” is shown,
this may be a malfunction. Immediately stop the vehicle in a sa fe place and
contact your Toyota dealer. Continuing to drive the vehicle may be danger-
ous.
● Vehicles with a smart key system:
If “Entry & Start System Malfunction See Owner’s Manual” is shown, there
may be a malfunction. Immediately have the vehicle inspected by your
Toyota dealer.
■ If “Charging System Malfunction” is shown
Indicates a malfunction in the vehicle’s charging system. Immed iately stop
the vehicle in a safe place and contact your Toyota dealer. Con tinuing to drive
the vehicle may be dangerous.
■ If “Engine Coolant Temperature High” is shown
Indicates that the engine coolant temperature is too high. Imme diately stop
the vehicle in a safe place. ( P. 455)
■ If “Engine Oil Pressure Low” is shown
Indicates that the engine oil pressure is too low. Immediately stop the vehicle
in a safe place and contact your Toyota dealer.
■ If “Maintenance Required Soon” is shown (U.S.A. only)
Indicates that all maintenance according to the driven distance on the mainte-
nance schedule
* should be performed soon.
Comes on approximately 4500 miles (7200 km) after the message has been
reset.
If necessary, perform maintenance. Please reset the message aft er the main-
tenance is performed. ( P. 337)
*: Refer to the separate “Scheduled Maintenance Guide” or “Owner ’s Manual
Supplement” for the maintenance interval applicable to your vehicle.
■ If “Maintenance Required Visit Your Dealer.” is shown (U.S.A. o nly)
Indicates that all maintenance is required to correspond to the driven distance
on the maintenance schedule
*.
Comes on approximately 5000 miles (8000 km) after the message has been
reset. (The indicator will not work properly unless the message has been
reset.)
Perform the necessary maintenance. Please reset the message aft er the
maintenance is performed. ( P. 337)
*: Refer to the separate “Scheduled Maintenance Guide” or “Owner ’s Manual
Supplement” for the maintenance interval applicable to your vehicle.
Page 443 of 532
4437-2. Steps to take in an emergency
7
When trouble arises
C-HR_OM_USA_OM10569U
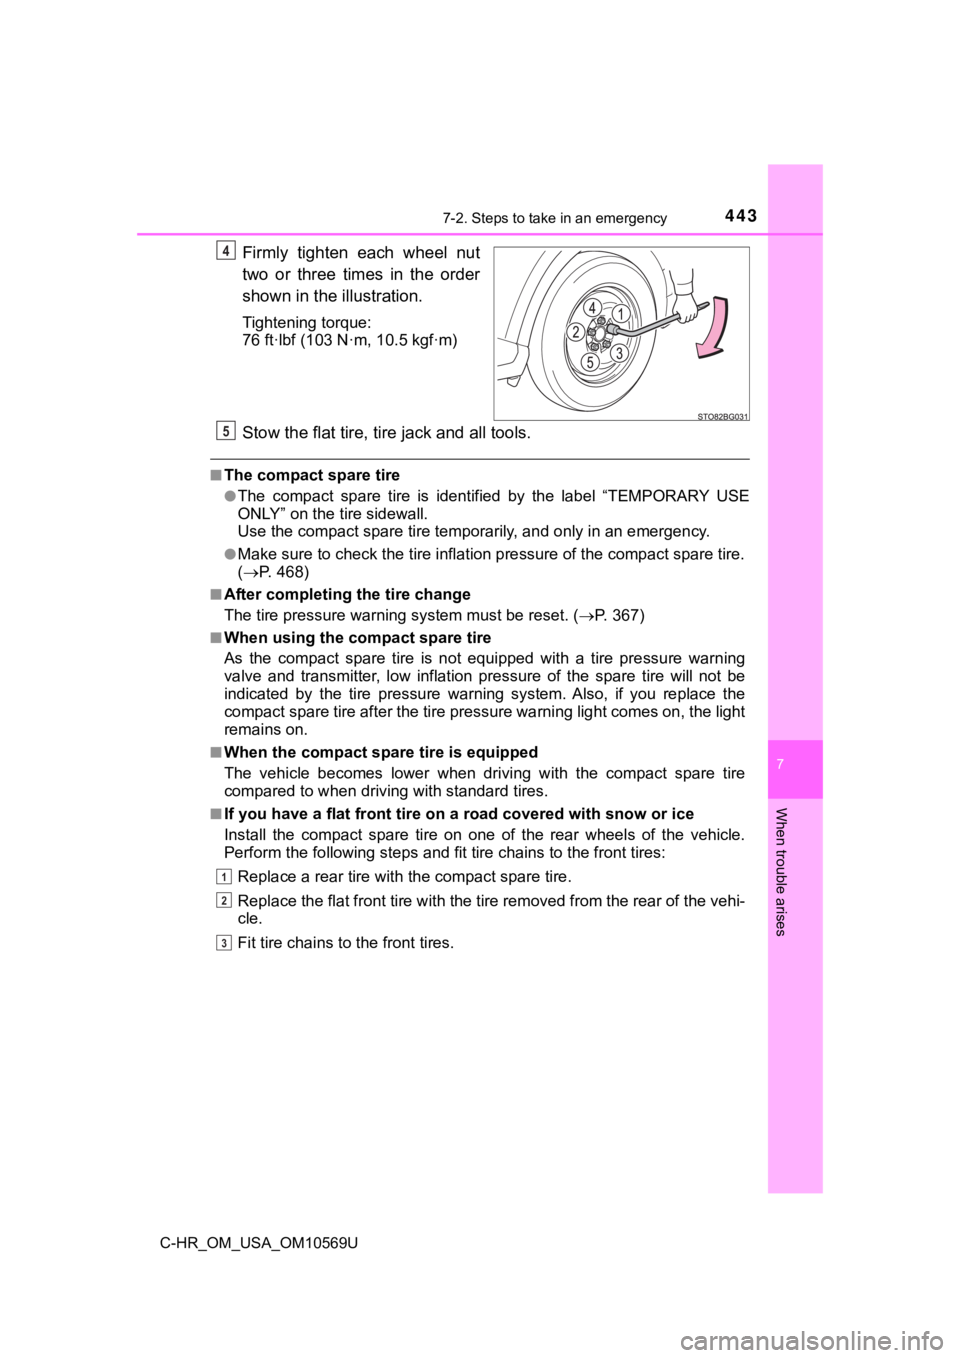
Firmly tighten each wheel nut
two or three times in the order
shown in the illustration.
Tightening torque:
76 ft
·lbf (103 N·m, 10.5 kgf·m)
Stow the flat tire, tire jack and all tools.
■The compact spare tire
●The compact spare tire is identified by the label “TEMPORARY US E
ONLY” on the tire sidewall.
Use the compact spar e tire temporarily, and only in an emergenc y.
●Make sure to check the tire inflation pressure of the compact spare tire.
( P. 4 6 8 )
■After completing the tire change
The tire pressure warni ng system must be reset. ( P. 367)
■When using the compact spare tire
As the compact spare tire is not equipped with a tire pressure warning
valve and transmitter, low inflation pressure of the spare tire will not be
indicated by the tire pressure warning system. Also, if you rep lace the
compact spare tire after the tire pressure warning light comes on, the light
remains on.
■When the compact spa re tire is equipped
The vehicle becomes lower when driving with the compact spare t ire
compared to when driving with standard tires.
■If you have a flat front tire on a road covered with snow or ic e
Install the compact spare tire on one of the rear wheels of the vehicle.
Perform the following steps and f it tire chains to the front tires:
Replace a rear tire with the compact spare tire.
Replace the flat front tire with the tire removed from the rear of the vehi-
cle.
Fit tire chains to the front tires.
4
5
1
2
3