TOYOTA CAMRY 1999 Service Repair Manual
Manufacturer: TOYOTA, Model Year: 1999, Model line: CAMRY, Model: TOYOTA CAMRY 1999Pages: 4592, PDF Size: 55.16 MB
Page 3841 of 4592
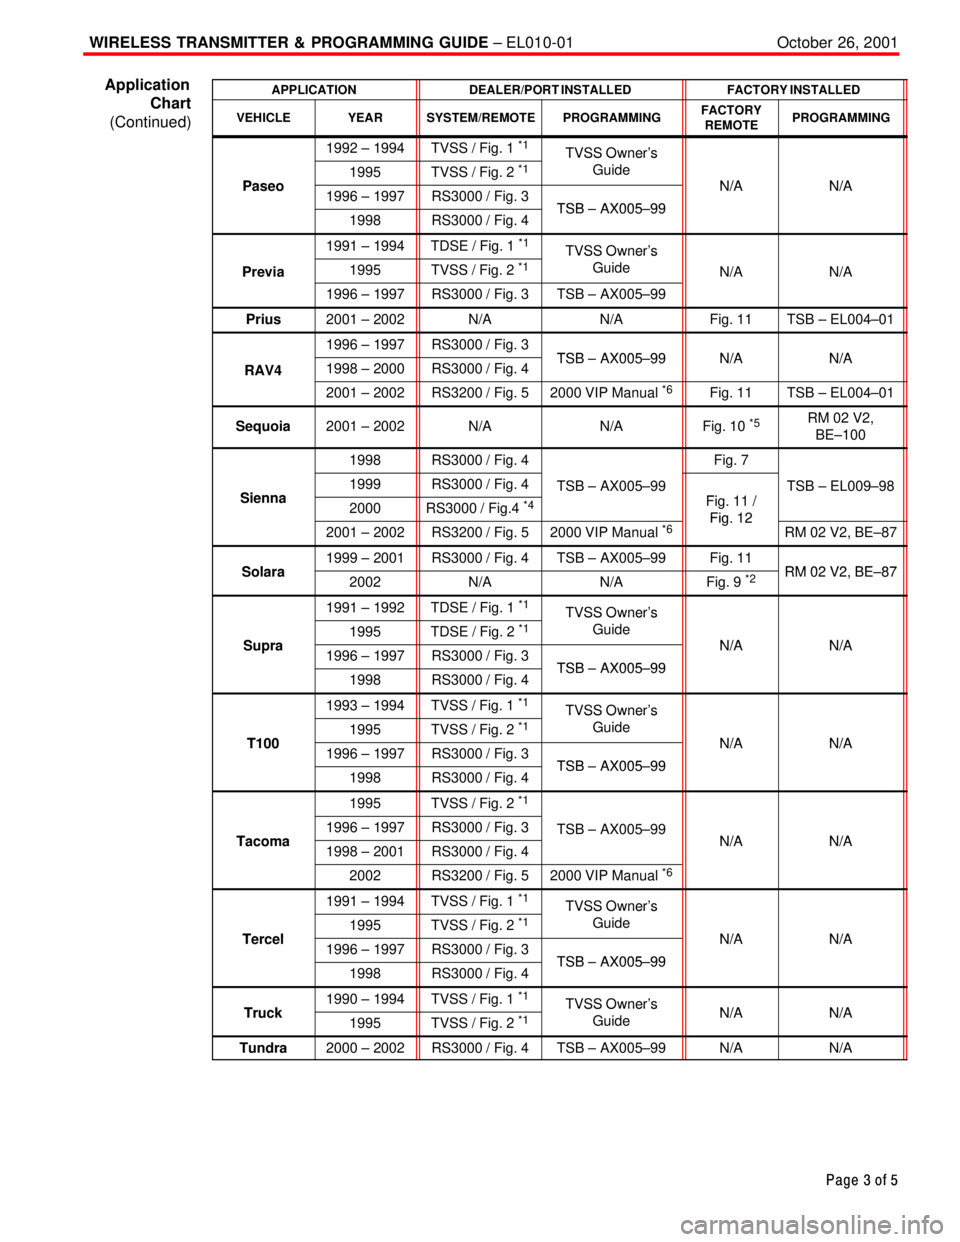
October 26, 2001WIRELESS TRANSMITTER & PROGRAMMING GUIDE ± EL010-01
Page 3 of 5
APPLICATIONDEALER/PORT INSTALLEDFACTORY INSTALLED
VEHICLEYEARSYSTEM/REMOTEPROGRAMMINGFACTORY
REMOTEPROGRAMMING
1992 ± 1994TVSS / Fig. 1 *1TVSS Owner's
Paseo1995TVSS / Fig. 2 *1TVSS Owner s
Guide
N/AN/APaseo1996 ± 1997RS3000 / Fig. 3TSB AX005 99
N/AN/A
1998RS3000 / Fig. 4TSB ± AX005±99
1991 ± 1994TDSE / Fig. 1 *1TVSS Owner's
Previa1995TVSS / Fig. 2 *1TVSS Owner s
GuideN/AN/A
1996 ± 1997RS3000 / Fig. 3TSB ± AX005±99
Prius2001 ± 2002N/AN/AFig. 11TSB ± EL004±01
1996 ± 1997RS3000 / Fig. 3TSB AX005 99N/AN/ARAV41998 ± 2000RS3000 / Fig. 4TSB ± AX005±99N/AN/A
2001 ± 2002RS3200 / Fig. 52000 VIP Manual *6Fig. 11TSB ± EL004±01
Sequoia2001 ± 2002N/AN/AFig. 10 *5RM 02 V2,
BE±100
1998RS3000 / Fig. 4Fig. 7
Sienna1999RS3000 / Fig. 4TSB ± AX005±99Fi 11 /TSB ± EL009±98Sienna2000RS3000 / Fig.4 *4Fig. 11 /
Fig 122001 ± 2002RS3200 / Fig. 52000 VIP Manual *6Fig. 12RM 02 V2, BE±87
Solara1999 ± 2001RS3000 / Fig. 4TSB ± AX005±99Fig. 11RM 02 V2 BE 87Solara2002N/AN/AFig. 9 *2RM 02 V2, BE±87
1991 ± 1992TDSE / Fig. 1 *1TVSS Owner's
S pra1995TDSE / Fig. 2 *1TVSS Owner s
Guide
N/AN/ASupra1996 ± 1997RS3000 / Fig. 3TSB AX005 99
N/AN/A
1998RS3000 / Fig. 4TSB ± AX005±99
1993 ± 1994TVSS / Fig. 1 *1TVSS Owner's
T1001995TVSS / Fig. 2 *1TVSS Owner s
Guide
N/AN/AT1001996 ± 1997RS3000 / Fig. 3TSB AX005 99
N/AN/A
1998RS3000 / Fig. 4TSB ± AX005±99
1995TVSS / Fig. 2 *1
Tacoma1996 ± 1997RS3000 / Fig. 3TSB ± AX005±99N/AN/ATacoma1998 ± 2001RS3000 / Fig. 4N/AN/A
2002RS3200 / Fig. 52000 VIP Manual *6
1991 ± 1994TVSS / Fig. 1 *1TVSS Owner's
Tercel1995TVSS / Fig. 2 *1TVSS Owner s
Guide
N/AN/ATercel1996 ± 1997RS3000 / Fig. 3TSB AX005 99
N/AN/A
1998RS3000 / Fig. 4TSB ± AX005±99
Tr ck1990 ± 1994TVSS / Fig. 1 *1TVSS Owner'sN/AN/ATruck1995TVSS / Fig. 2 *1TVSS Owner s
GuideN/AN/A
Tundra2000 ± 2002RS3000 / Fig. 4TSB ± AX005±99N/AN/A
Application
Chart
(Continued)
Page 3842 of 4592
October 26, 2001WIRELESS TRANSMITTER & PROGRAMMING GUIDE ± EL010-01
Page 4 of 5
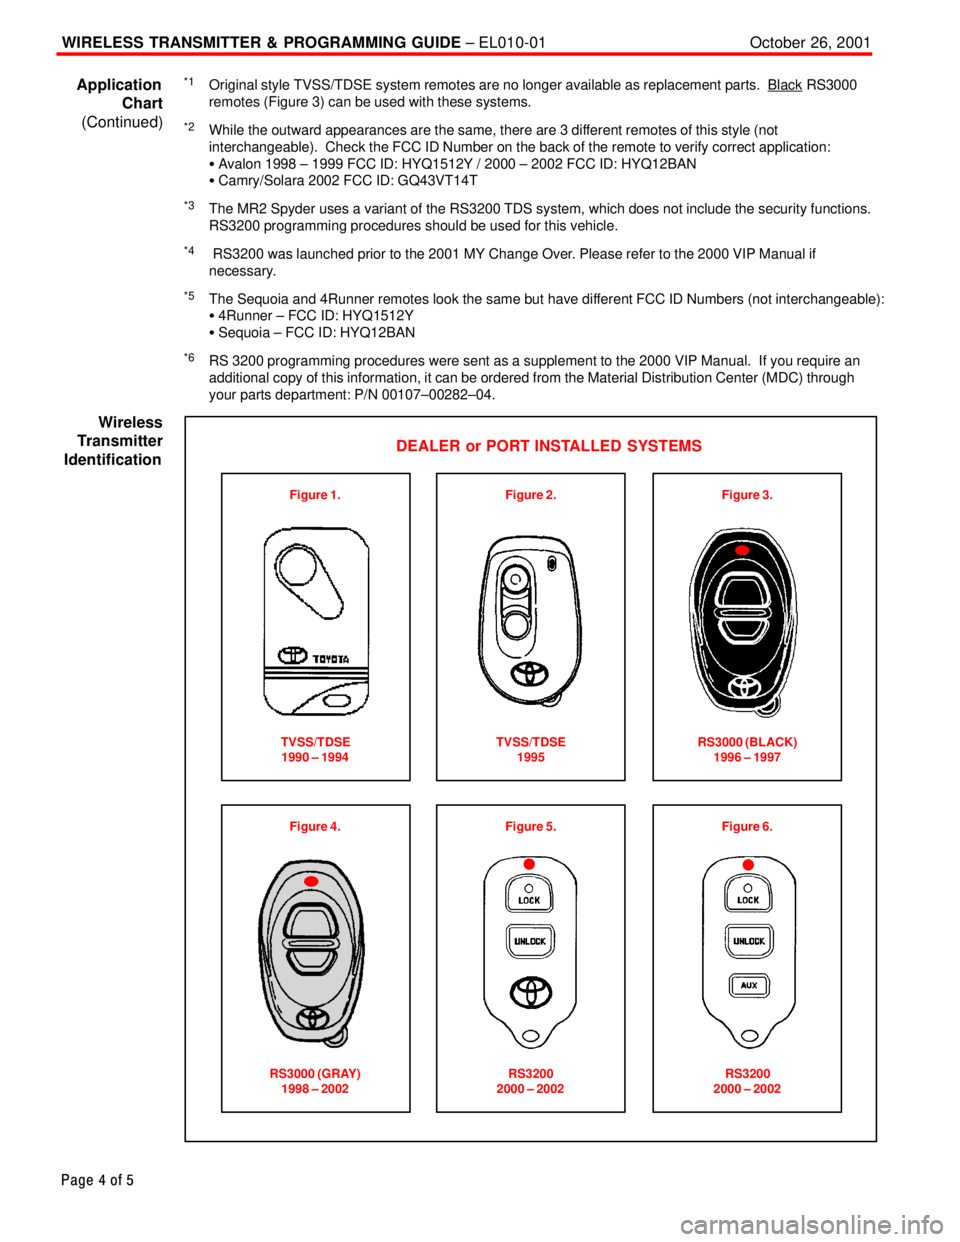
*1Original style TVSS/TDSE system remotes are no longer available as replacement parts. Black RS3000
remotes (Figure 3) can be used with these systems.
*2While the outward appearances are the same, there are 3 different remotes of this style (not
interchangeable). Check the FCC ID Number on the back of the remote to verify correct application:
� Avalon 1998 ± 1999 FCC ID: HYQ1512Y / 2000 ± 2002 FCC ID: HYQ12BAN
� Camry/Solara 2002 FCC ID: GQ43VT14T
*3The MR2 Spyder uses a variant of the RS3200 TDS system, which does not include the security functions.
RS3200 programming procedures should be used for this vehicle.
*4 RS3200 was launched prior to the 2001 MY Change Over. Please refer to the 2000 VIP Manual if
necessary.
*5The Sequoia and 4Runner remotes look the same but have different FCC ID Numbers (not interchangeable):
� 4Runner ± FCC ID: HYQ1512Y
� Sequoia ± FCC ID: HYQ12BAN
*6RS 3200 programming procedures were sent as a supplement to the 2000 VIP Manual. If you require an
additional copy of this information, it can be ordered from the Material Distribution Center (MDC) through
your parts department: P/N 00107±00282±04.
DEALER or PORT INSTALLED SYSTEMS
Figure 1.
TVSS/TDSE
1990 ± 1994Figure 2.
TVSS/TDSE
1995Figure 3.
RS3000 (BLACK)
1996 ± 1997
Figure 4.
RS3000 (GRAY)
1998 ± 2002
Figure 5.
RS3200
2000 ± 2002Figure 6.
RS3200
2000 ± 2002
Application
Chart
(Continued)
Wireless
Transmitter
Identification
Page 3843 of 4592
October 26, 2001WIRELESS TRANSMITTER & PROGRAMMING GUIDE ± EL010-01
Page 5 of 5
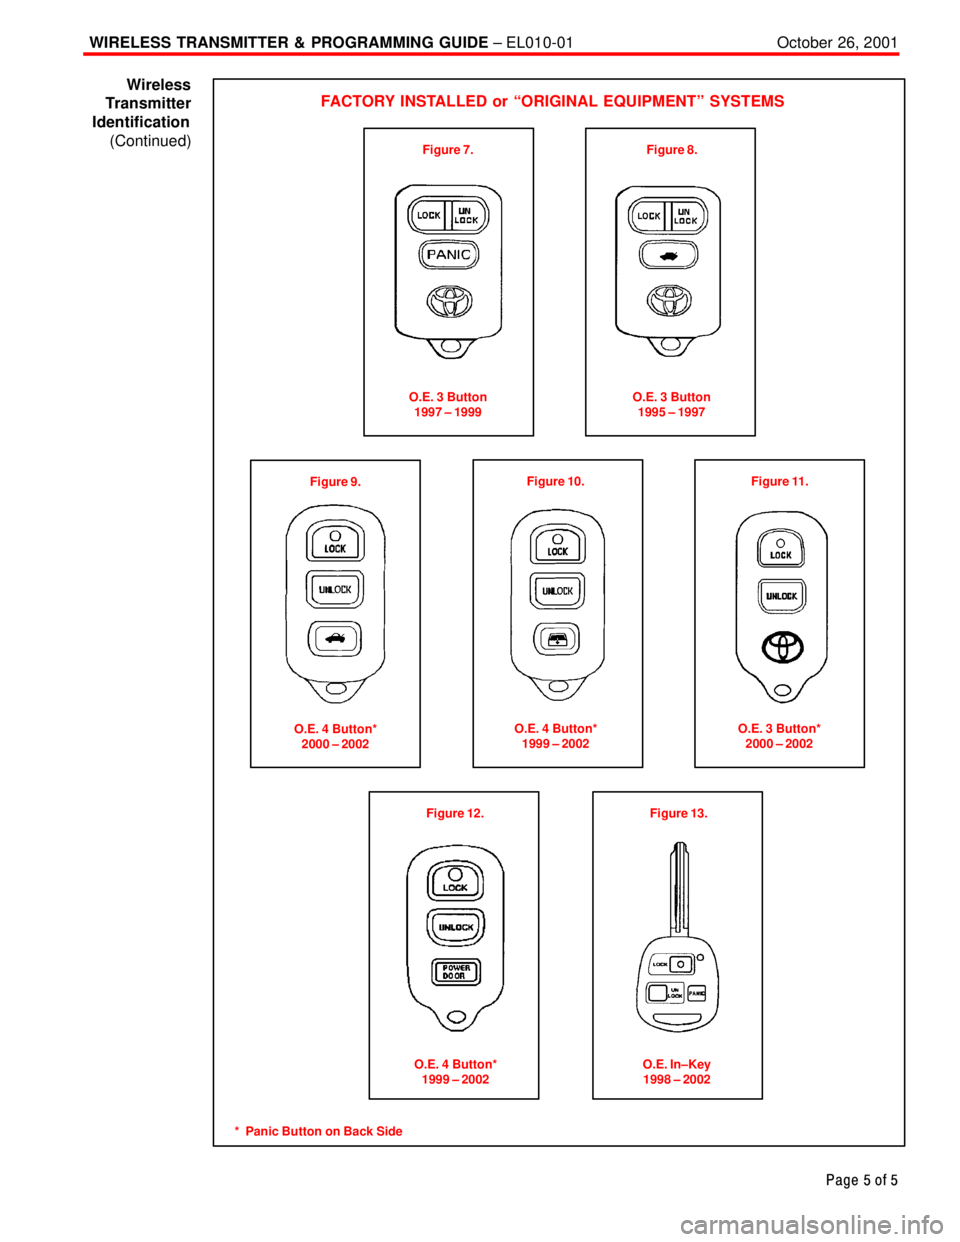
FACTORY INSTALLED or ªORIGINAL EQUIPMENTº SYSTEMS
Figure 7.
O.E. 3 Button
1997 ± 1999Figure 8.
O.E. 3 Button
1995 ± 1997
Figure 9.
O.E. 4 Button*
2000 ± 2002Figure 10.
O.E. 4 Button*
1999 ± 2002
Figure 11.
O.E. 3 Button*
2000 ± 2002
Figure 12.
Figure 13.
* Panic Button on Back SideO.E. 4 Button*
1999 ± 2002O.E. In±Key
1998 ± 2002
Wireless
Transmitter
Identification
(Continued)
Page 3844 of 4592
Toyota Supports ASE CertificationPage 1 of 3
EL011±00Title:
DAYTIME RUNNING LIGHT DISABLING
PROCEDURE
Models:
All Models
Technical Service
BULLETIN
October 6, 2000
Some customers may request to have the Daytime Running Lights (DRL) on their Toyota
vehicle disabled. These customers may live or work in military bases or in communities
that have light±sensitive gates or guardhouses. This bulletin provides instructions for
disabling the feature on the Toyota vehicles listed below. If the Daytime Running Lights
(DRL) have been previously disabled, the information in this bulletin can be used to
enable the feature at the request of the customer.
IMPORTANT:
Please be sure the customer is informed that when the Daytime Running Lights (DRL)
are being disabled, although it is not required by the Federal Motor Vehicle Safety
Standards for safety compliance, it has been listed as a safety feature in advertising
brochures. In addition, on models equipped with the Twilight Sentinel feature, the
headlights will be defaulted to a manual system and will no longer function
automatically.
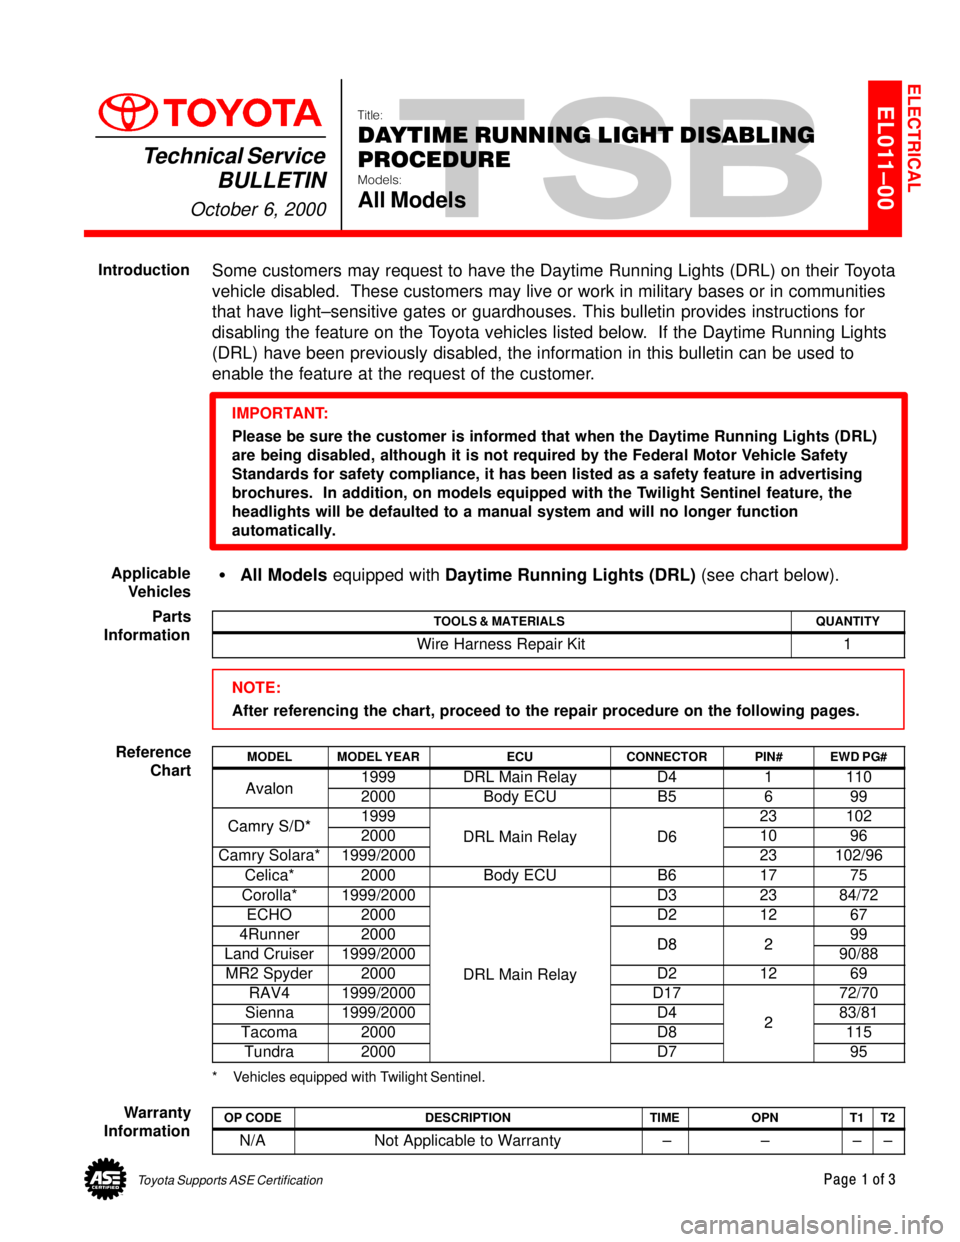
�All Models equipped with Daytime Running Lights (DRL) (see chart below).
TOOLS & MATERIALSQUANTITY
Wire Harness Repair Kit1
NOTE:
After referencing the chart, proceed to the repair procedure on the following pages.
MODELMODEL YEARECUCONNECTORPIN#EWD PG#
Avalon1999DRL Main RelayD41110Avalon2000Body ECUB5699
Camry S/D*199923102Camry S/D*2000DRL Main RelayD61096
Camry Solara*1999/2000
DRL Main RelayD6
23102/96
Celica*2000Body ECUB61775
Corolla*1999/2000D32384/72
ECHO2000D21267
4Runner2000D8299
Land Cruiser1999/2000D8290/88
MR2 Spyder2000DRL Main RelayD21269
RAV41999/2000
DRL Main Relay
D1772/70
Sienna1999/2000D4283/81
Tacoma2000D82115
Tundra2000D795
* Vehicles equipped with Twilight Sentinel.
OP CODEDESCRIPTIONTIMEOPNT1T2
N/ANot Applicable to Warranty ±±±±
ELECTRICAL
Introduction
Applicable
Vehicles
Parts
Information
Reference
Chart
Warranty
Information
Page 3845 of 4592
DAYTIME RUNNING LIGHT DISABLING PROCEDURE ± EL011±00 October 6, 2000
Page 2 of 3
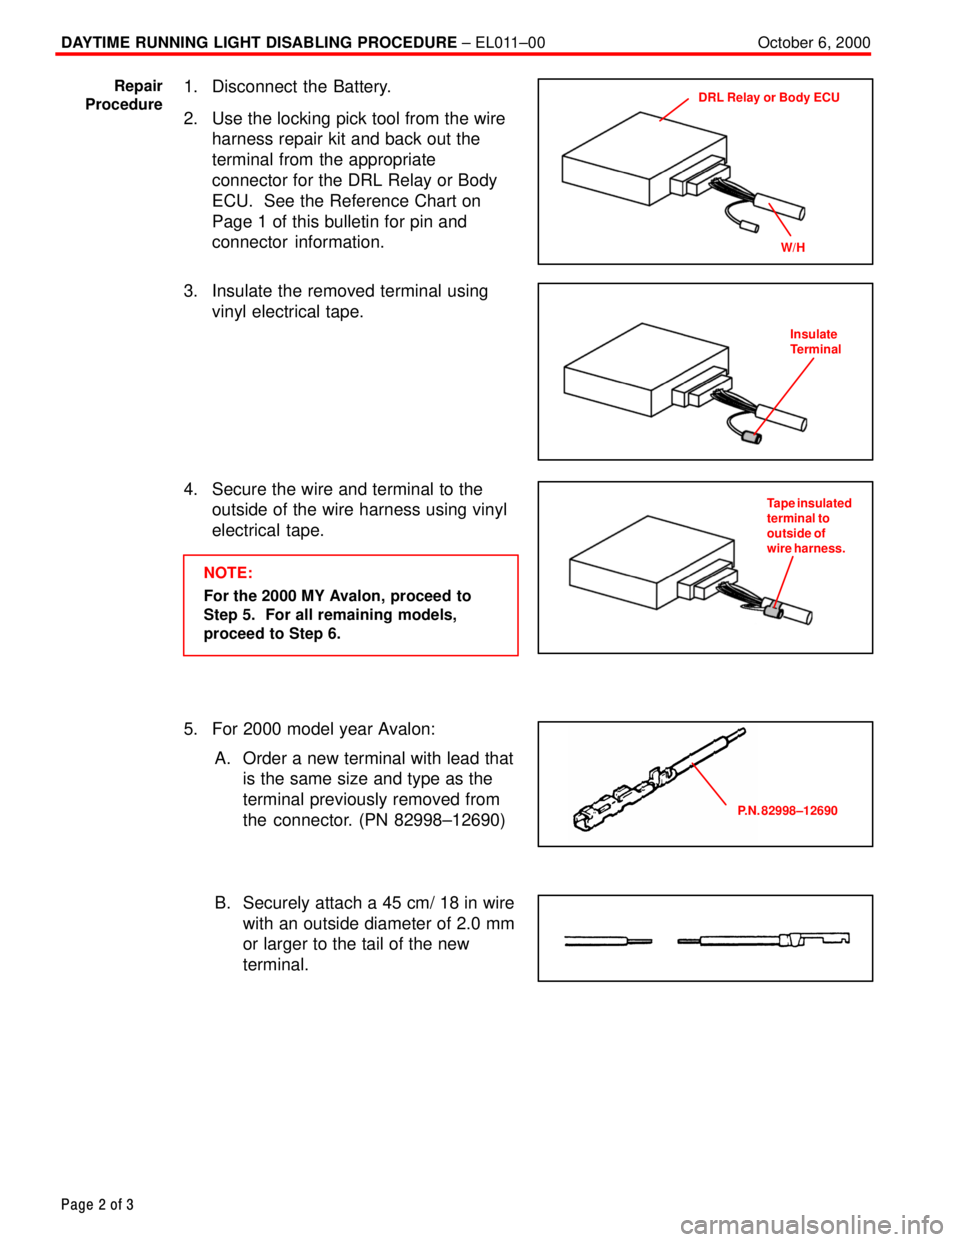
1. Disconnect the Battery.
2. Use the locking pick tool from the wire
harness repair kit and back out the
terminal from the appropriate
connector for the DRL Relay or Body
ECU. See the Reference Chart on
Page 1 of this bulletin for pin and
connector information.
3. Insulate the removed terminal using
vinyl electrical tape.
4. Secure the wire and terminal to the
outside of the wire harness using vinyl
electrical tape.
NOTE:
For the 2000 MY Avalon, proceed to
Step 5. For all remaining models,
proceed to Step 6.
5. For 2000 model year Avalon:
A. Order a new terminal with lead that
is the same size and type as the
terminal previously removed from
the connector. (PN 82998±12690)
B. Securely attach a 45 cm/ 18 in wire
with an outside diameter of 2.0 mm
or larger to the tail of the new
terminal.
Repair
ProcedureDRL Relay or Body ECU
W/H
Insulate
Terminal
Tape insulated
terminal to
outside of
wire harness.
P.N. 82998±12690
Page 3846 of 4592
DAYTIME RUNNING LIGHT DISABLING PROCEDURE ± EL011±00 October 6, 2000
Page 3 of 3
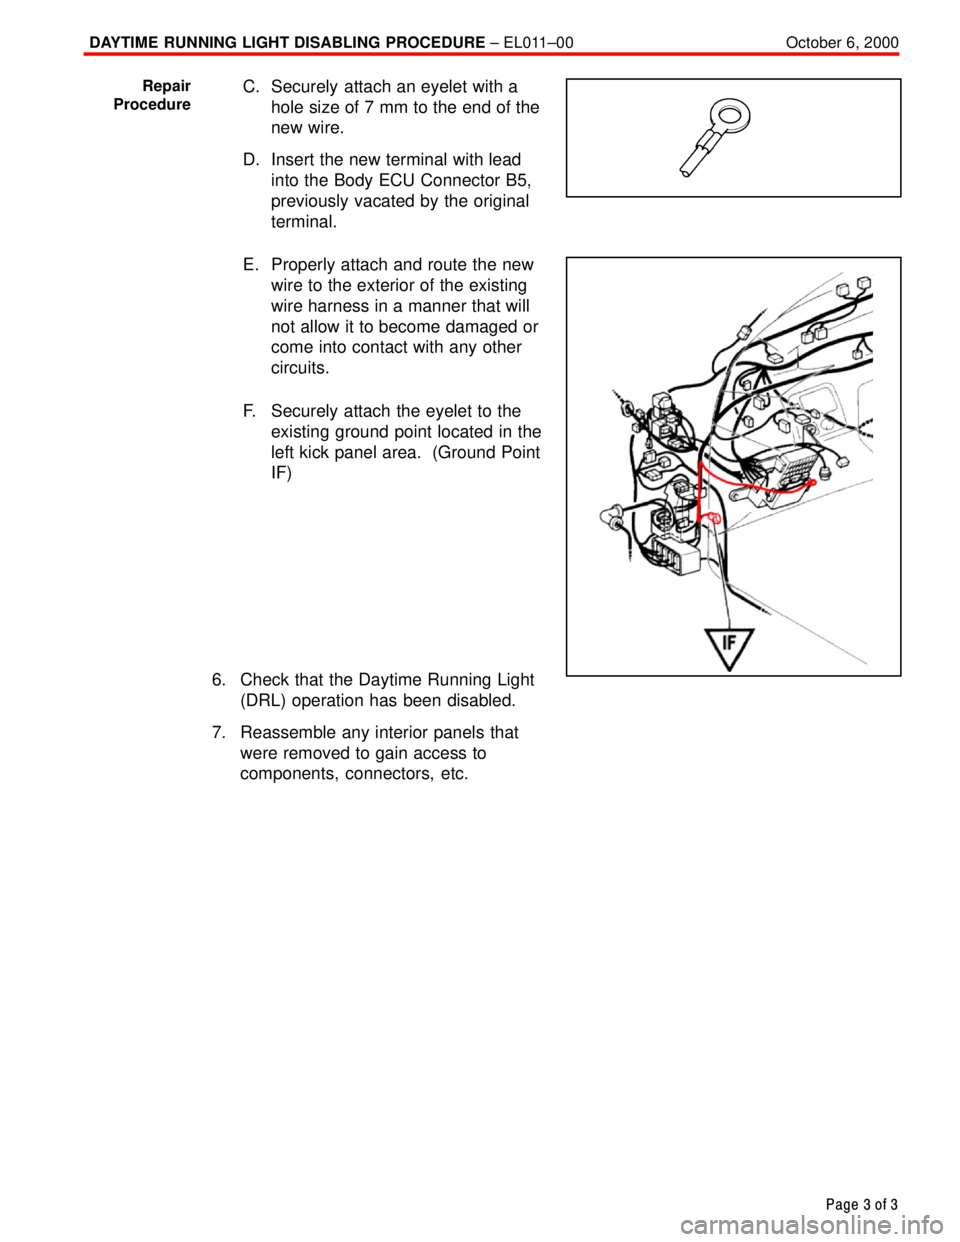
C. Securely attach an eyelet with a
hole size of 7 mm to the end of the
new wire.
D. Insert the new terminal with lead
into the Body ECU Connector B5,
previously vacated by the original
terminal.
E. Properly attach and route the new
wire to the exterior of the existing
wire harness in a manner that will
not allow it to become damaged or
come into contact with any other
circuits.
F. Securely attach the eyelet to the
existing ground point located in the
left kick panel area. (Ground Point
IF)
6. Check that the Daytime Running Light
(DRL) operation has been disabled.
7. Reassemble any interior panels that
were removed to gain access to
components, connectors, etc.Repair
Procedure
Page 3847 of 4592
Toyota Supports ASE CertificationPage 1 of 2
NV007±00Title:
DOOR MIRROR WIND NOISE
Models:
'97 ± '99 Camry
Technical Service
BULLETIN
March 31, 2000
TSB Update Notice:
The information contained in this TSB updates The information contained in this TSB
updates BO019±99 dated December 3, 1999. Revised text is red
and underlined.
Wind/road noise heard around the door mirrors of some Japan produced Camry vehicles
may be caused by an improperly positioned mirror wire harness grommet and/or harness
connector.
�1997 through 1999 Camry vehicles. (Japan produced only)
PLANTSTARTING VIN
TMC
JT2BG22K * X0367325
JT2BG28K * X0367352
JT2BF22K * X0227381
JT2BF28K * X0227306
OP CODEDESCRIPTIONTIMEOPNT1T2
BD0009Adjust the Wire Harness Grommet
and/or Connector0.487940±XXXXX±XX (LH)
87910±XXXXX±XX (RH)5957
Applicable Warranty*:
This repair is covered under the Toyota Basic Warranty. This warranty is in effect for
36 months or 36,000 miles, whichever occurs first, from the vehicle's in±service date.
* Warranty application is limited to correction of a problem based upon a customer's specific complaint.
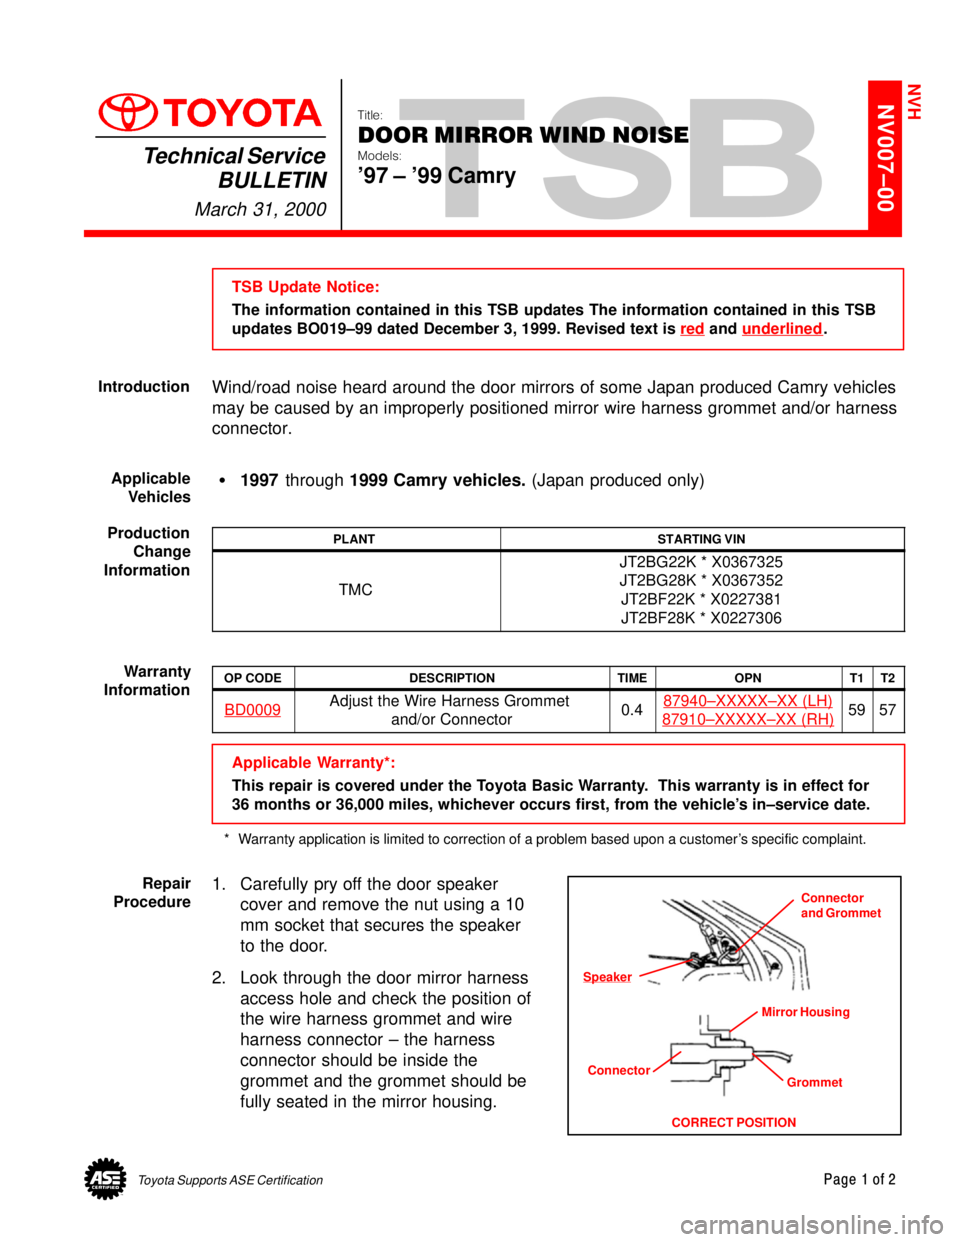
1. Carefully pry off the door speaker
cover and remove the nut using a 10
mm socket that secures the speaker
to the door.
2. Look through the door mirror harness
access hole and check the position of
the wire harness grommet and wire
harness connector ± the harness
connector should be inside the
grommet and the grommet should be
fully seated in the mirror housing.
NVH
Introduction
Applicable
Vehicles
Production
Change
Information
Warranty
Information
Repair
Procedure
Connector
Grommet
CORRECT POSITIONConnector
and Grommet
Mirror Housing
Speaker
Page 3848 of 4592
DOOR MIRROR WIND NOISE ± NV007±00 March 31, 2000
Page 2 of 2
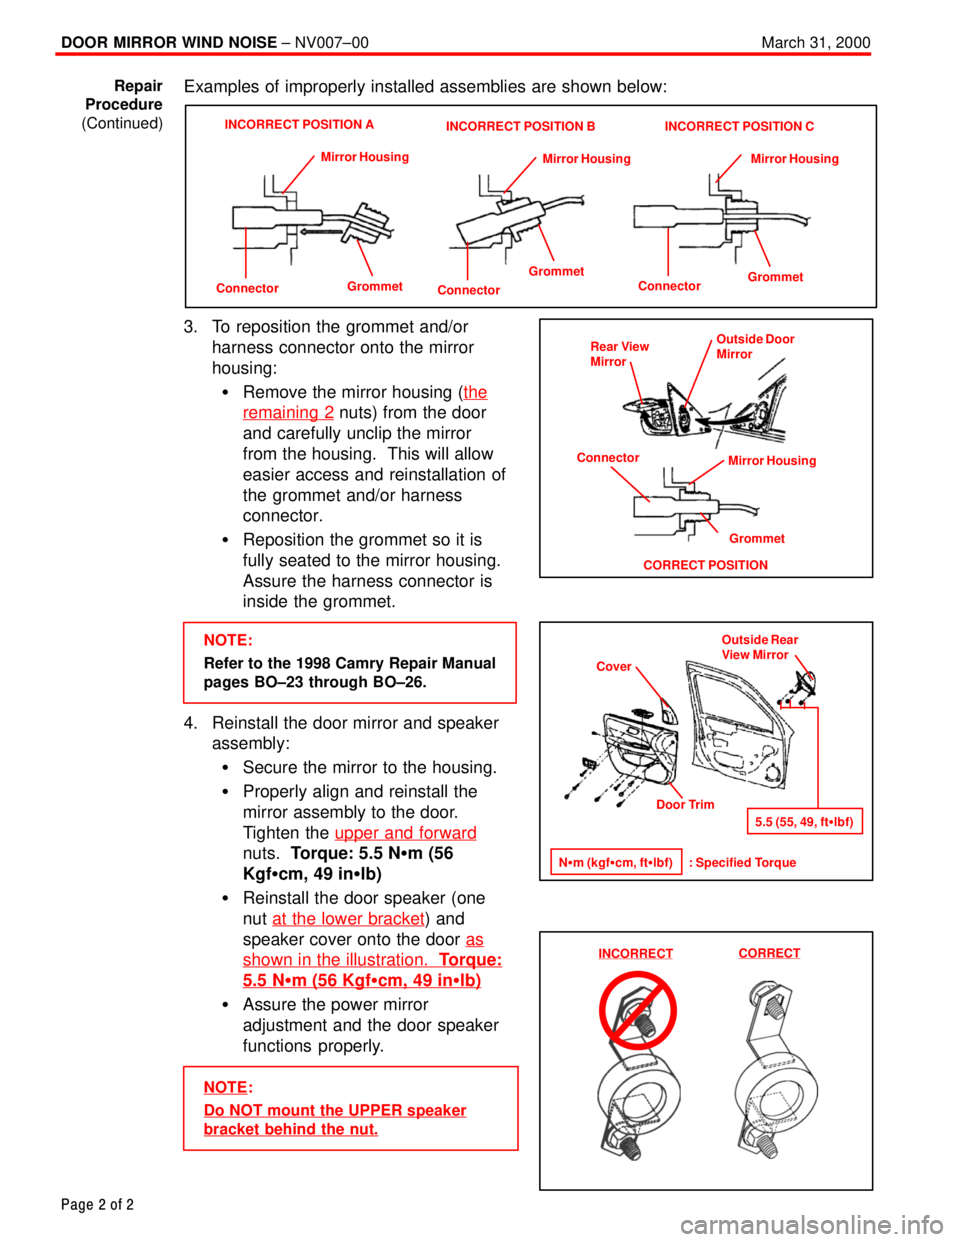
Examples of improperly installed assemblies are shown below:
ConnectorGrommet Mirror Housing
INCORRECT POSITION A
Connector
GrommetMirror Housing
INCORRECT POSITION B
Connector
GrommetMirror Housing
INCORRECT POSITION C
3. To reposition the grommet and/or
harness connector onto the mirror
housing:
�Remove the mirror housing (the
remaining 2 nuts) from the door
and carefully unclip the mirror
from the housing. This will allow
easier access and reinstallation of
the grommet and/or harness
connector.
�Reposition the grommet so it is
fully seated to the mirror housing.
Assure the harness connector is
inside the grommet.
NOTE:
Refer to the 1998 Camry Repair Manual
pages BO±23 through BO±26.
4. Reinstall the door mirror and speaker
assembly:
�Secure the mirror to the housing.
�Properly align and reinstall the
mirror assembly to the door.
Tighten the upper and forward
nuts. Torque: 5.5 N�m (56
Kgf�cm, 49 in�lb)
�Reinstall the door speaker (one
nut at the lower bracket
) and
speaker cover onto the door as
shown in the illustration. Torque:
5.5 N�m (56 Kgf�cm, 49 in�lb)
�Assure the power mirror
adjustment and the door speaker
functions properly.
NOTE:
Do NOT mount the UPPER speaker
bracket behind the nut.
Repair
Procedure
(Continued)
Rear View
Mirror
Grommet
CORRECT POSITIONOutside Door
Mirror
Mirror Housing
Connector
Cover
Door Trim
N�m (kgf�cm, ft�lbf) : Specified TorqueOutside Rear
View Mirror
5.5 (55, 49, ft�lbf)
INCORRECTCORRECT
Page 3849 of 4592
Toyota Supports ASE CertificationPage 1 of 5
PA002±99Title:
1999 PAINT AND REFINISH FORMULA
CODES
Models:
All 1999 Models
Technical Service
BULLETIN
March 12, 1999
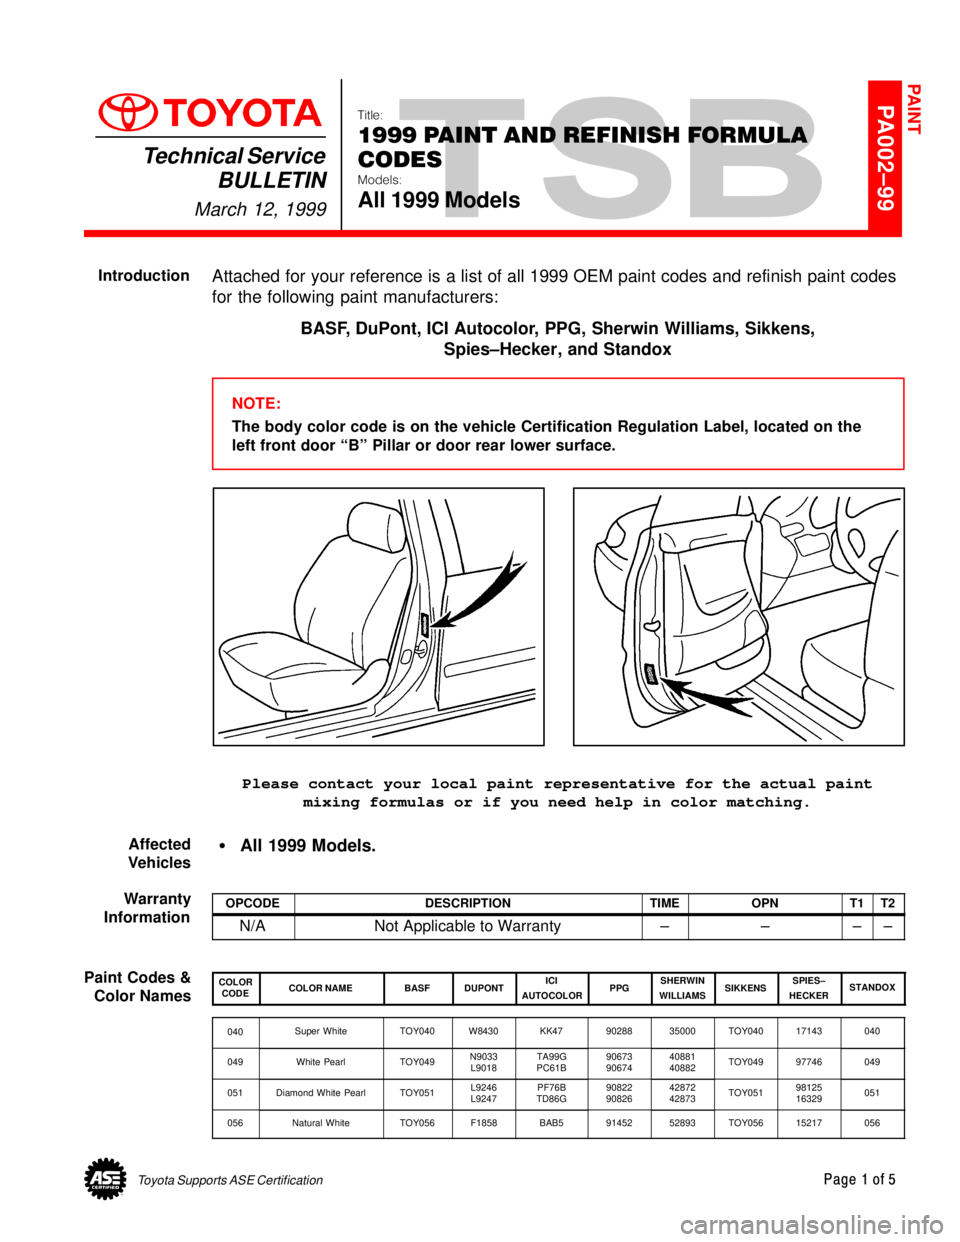
Attached for your reference is a list of all 1999 OEM paint codes and refinish paint codes
for the following paint manufacturers:
BASF, DuPont, ICI Autocolor, PPG, Sherwin Williams, Sikkens,
Spies±Hecker, and Standox
NOTE:
The body color code is on the vehicle Certification Regulation Label, located on the
left front door ªBº Pillar or door rear lower surface.
Please contact your local paint representative for the actual paint
mixing formulas or if you need help in color matching.
�All 1999 Models.
OPCODEDESCRIPTIONTIMEOPNT1T2
N/ANot Applicable to Warranty±±±±
COLOR
CODECOLOR NAMEBASFDUPONTICI
AUTOCOLORPPGSHERWIN
WILLIAMSSIKKENSSPIES±
HECKERSTANDOX
040Super WhiteTOY040W8430KK479028835000TOY04017143040
049White PearlTOY049N9033
L9018TA99G
PC61B90673
9067440881
40882TOY04997746049
051Diamond White PearlTOY051L9246
L9247PF76B
TD86G90822
9082642872
42873TOY05198125
16329051
056Natural WhiteTOY056F1858BAB59145252893TOY05615217056
PAINT
Introduction
Affected
Vehicles
Warranty
Information
Paint Codes &
Color Names
Page 3850 of 4592

1999 PAINT AND REFINISH FORMULA CODES ± PA002±99 March 12, 1999
Page 2 of 5
COLOR
CODECOLOR NAMEBASFDUPONTICI
AUTOCOLORPPGSHERWIN
WILLIAMSSIKKENSSPIES±
HECKERSTANDOX
181Silver MetallicTOY181L9245C523B3487844337TOY18198127181
199Alpine Silver MetallicTOY199L99905TX1B490048976TOY19970706199
1A0Platinum MetallicTOY1A0N99236ED5B489649700TOY1A0708091A0
1A2Topaz MetallicTOY1A2F00166ED9B489849701TOY1A2708551A2
1A3Silver MetallicTOY1A3F06977DJ9B3584153001TOY1A3723191A3
1A5Desert Dune PearlTOY1A5F14588NH3B3609052139TOY1A5727591A5
1B1Champagne PearlTOY1B1F2186FLT9B525253074TOY1B1206991B1
1B2Antique Sage PearlTOY1B2F2201HRE5B532454757TOY1B2736221B2
1B9Quiksilver FXTOY1B9F4996LJC5B544956738TOY1B9743321B9
1C0Millennium SilverTOY1C0F4928LCJ4B3664356793TOY1C0745001C0
1C3River Rock Green MicaTOY1C3F4513LVT2B4870357226TOY1C3744881C3
1C4Silverstream OpTOY1C4F5137NPD6B556057927TOY1C4747711C4
1C7Thunder Gray MetallicTOY1C7F5581PEJ6B560058581TOY1C7748061C7
1C8Lunar Mist MetallicTOY1C8F8569PEJ7B553958582TOY1C8748071C8
202BlackTOY202FO22001229510057871TOY20272941202
204Black MetallicTOY204H8645A237B962435533TOY20496020204
205Satin Black MetallicTOY205L9024B941B975640888TOY20597765205
3E5Super RedTOY3E5W8431KK417271735001TOY3E5382363E5
3H7Cardinal RedTOY3H7L9026WJ917327940890TOY3H7388053H7
3J8Prussian Red PearlTOY3J8W9463PT73B459646590TOY3J8998273J8
3K4Sunfire Red PearlTOY3K4W9546PM54B451146144TOY3K4997223K4
3L2Renaissance RedTOY3L2L99925TX3B490248978TOY3L2304913L2
3L5Radiant RedTOY3L5F2688GNK8528754291TOY3L5334763L5
3M5Sandrift MetallicTOY3M5F3531LCP1B544456742TOY3M5342613M5
3M6Napa Burgundy PearlTOY3M6F3747LJC2B544756739TOY3M6342623M6
3M8Venetian Red PearlTOY3M8F4929LCJ5B556156795TOY3M8343003M8
3M9Baroque Red MetallicTOY3M9F4464KWB9B542156658TOY3M9342573M9
3N1Cinnabar PearlTOY3N1F4483LPC9B543556752TOY3N1342543N1
3N2Mahogany PearlTOY3N2F1744LVT3B2876357227TOY3N2343173N2
3N5Red Flame MetallicTOY3N5F5138NPD7B556357928TOY3N5345873N5
3N6Vintage Red PearlTOY3N6F8568PEB8B552558338TOY3N6346223N6
4J6Sadona Sunset MetallicTOY4J6L9028B945B2660140892TOY4J6977534J6
4M4Sierra Beige MetallicTOY4M4H98794SS7B474347606TOY4M4201574M4
Paint Codes &
Color Names
(Continued)