lock TOYOTA CAMRY 2010 XV40 / 8.G Owners Manual
[x] Cancel search | Manufacturer: TOYOTA, Model Year: 2010, Model line: CAMRY, Model: TOYOTA CAMRY 2010 XV40 / 8.GPages: 538, PDF Size: 9.22 MB
Page 357 of 538
355
4-2. Maintenance
4
Maintenance and care
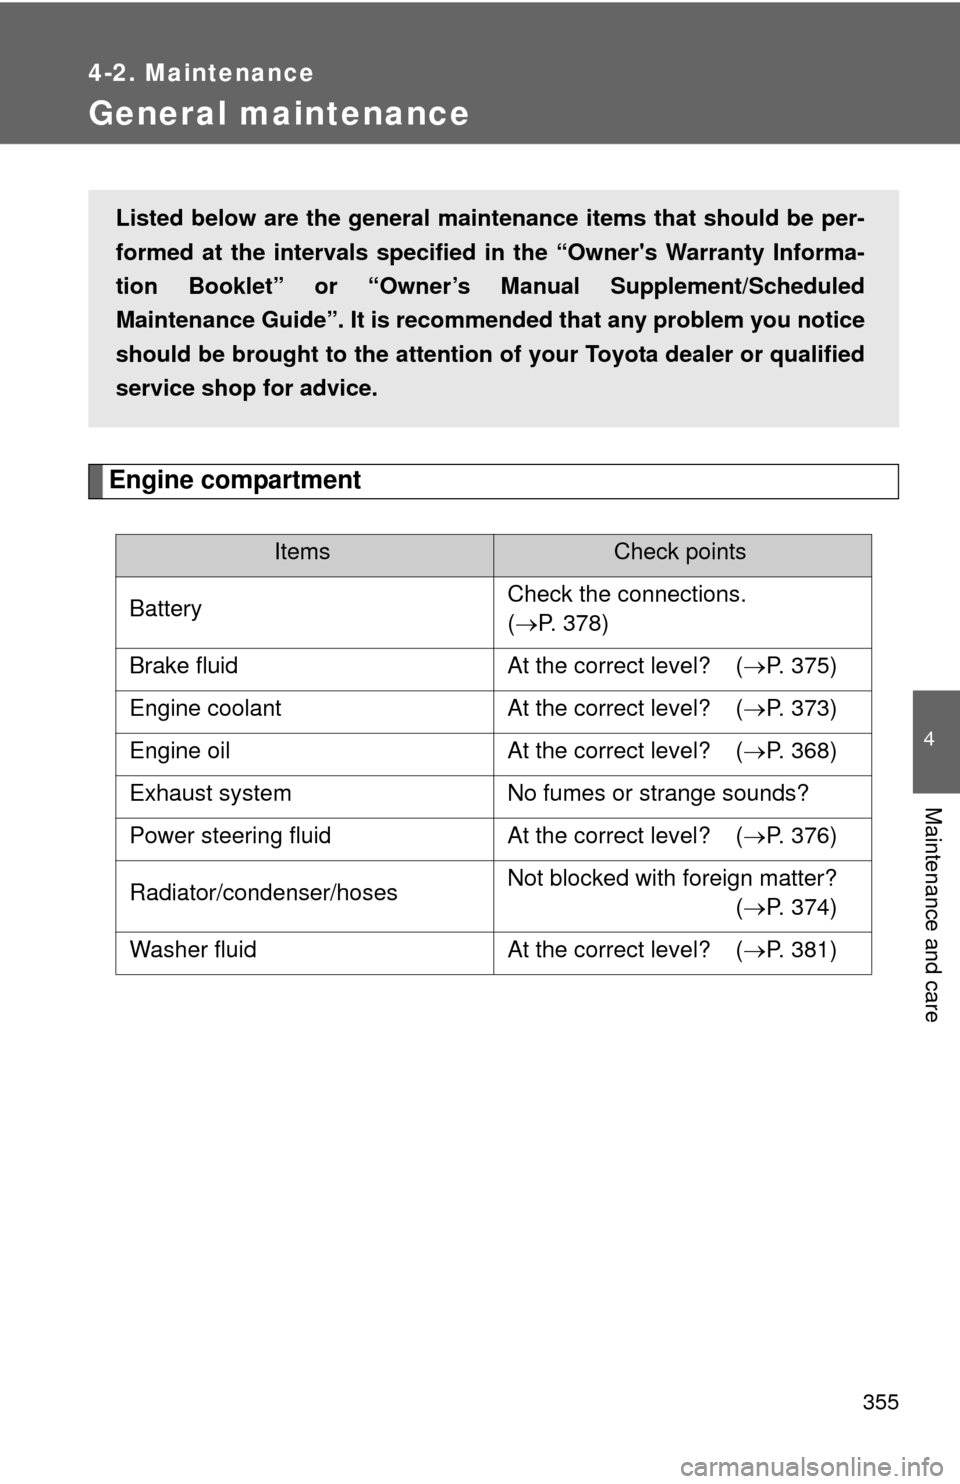
General maintenance
Engine compartment
ItemsCheck points
Battery Check the connections.
(
P. 378)
Brake fluid At the correct level? ( P. 375)
Engine coolant At the correct level? ( P. 373)
Engine oil At the correct level? ( P. 368)
Exhaust system No fumes or strange sounds?
Power steering fluid At the correct level? ( P. 376)
Radiator/condenser/hoses Not blocked with foreign matter?
(
P. 374)
Washer fluid At the correct level? ( P. 381)
Listed below are the general maintenance items that should be per-
formed at the intervals specified in the “Owner's Warranty Informa-
tion Booklet” or “Owner’s Manual Supplement/Scheduled
Maintenance Guide”. It is recomme nded that any problem you notice
should be brought to the attention of your Toyota dealer or qualified
service shop for advice.
Page 358 of 538
356 4-2. Maintenance
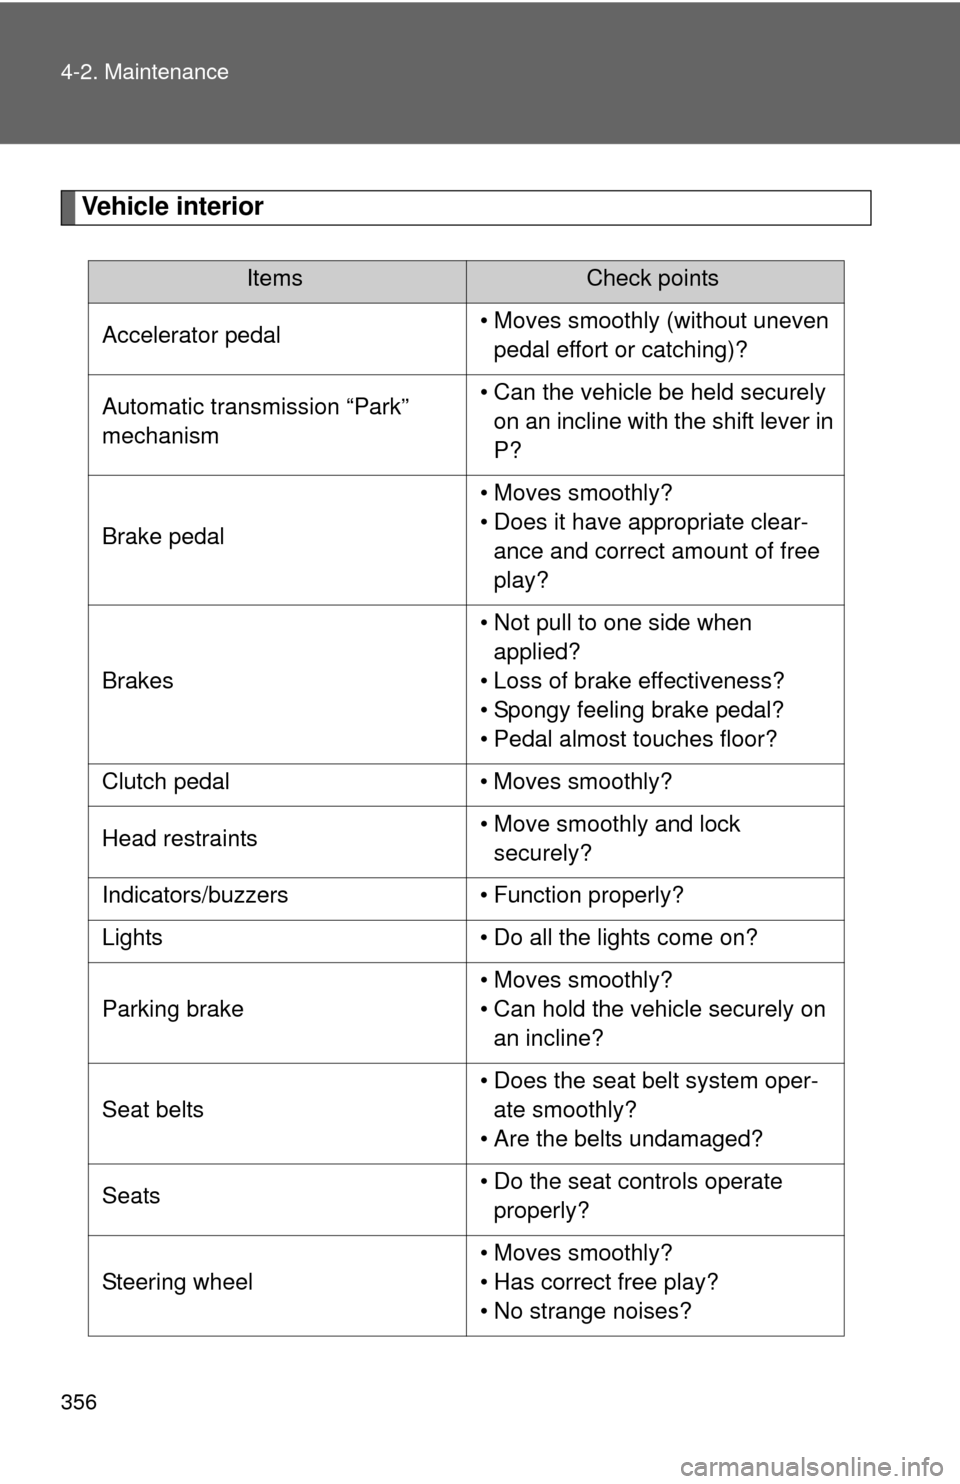
Vehicle interior
ItemsCheck points
Accelerator pedal • Moves smoothly (without uneven
pedal effort or catching)?
Automatic transmission “Park”
mechanism • Can the vehicle be held securely
on an incline with the shift lever in
P?
Brake pedal • Moves smoothly?
• Does it have appropriate clear-
ance and correct amount of free
play?
Brakes • Not pull to one side when
applied?
• Loss of brake effectiveness?
• Spongy feeling brake pedal?
• Pedal almost touches floor?
Clutch pedal • Moves smoothly?
Head restraints • Move smoothly and lock
securely?
Indicators/buzzers • Function properly?
Lights • Do all the lights come on?
Parking brake • Moves smoothly?
• Can hold the vehicle securely on
an incline?
Seat belts • Does the seat belt system oper-
ate smoothly?
• Are the belts undamaged?
Seats • Do the seat controls operate
properly?
Steering wheel • Moves smoothly?
• Has correct free play?
• No strange noises?
Page 359 of 538
357
4-2. Maintenance
4
Maintenance and care
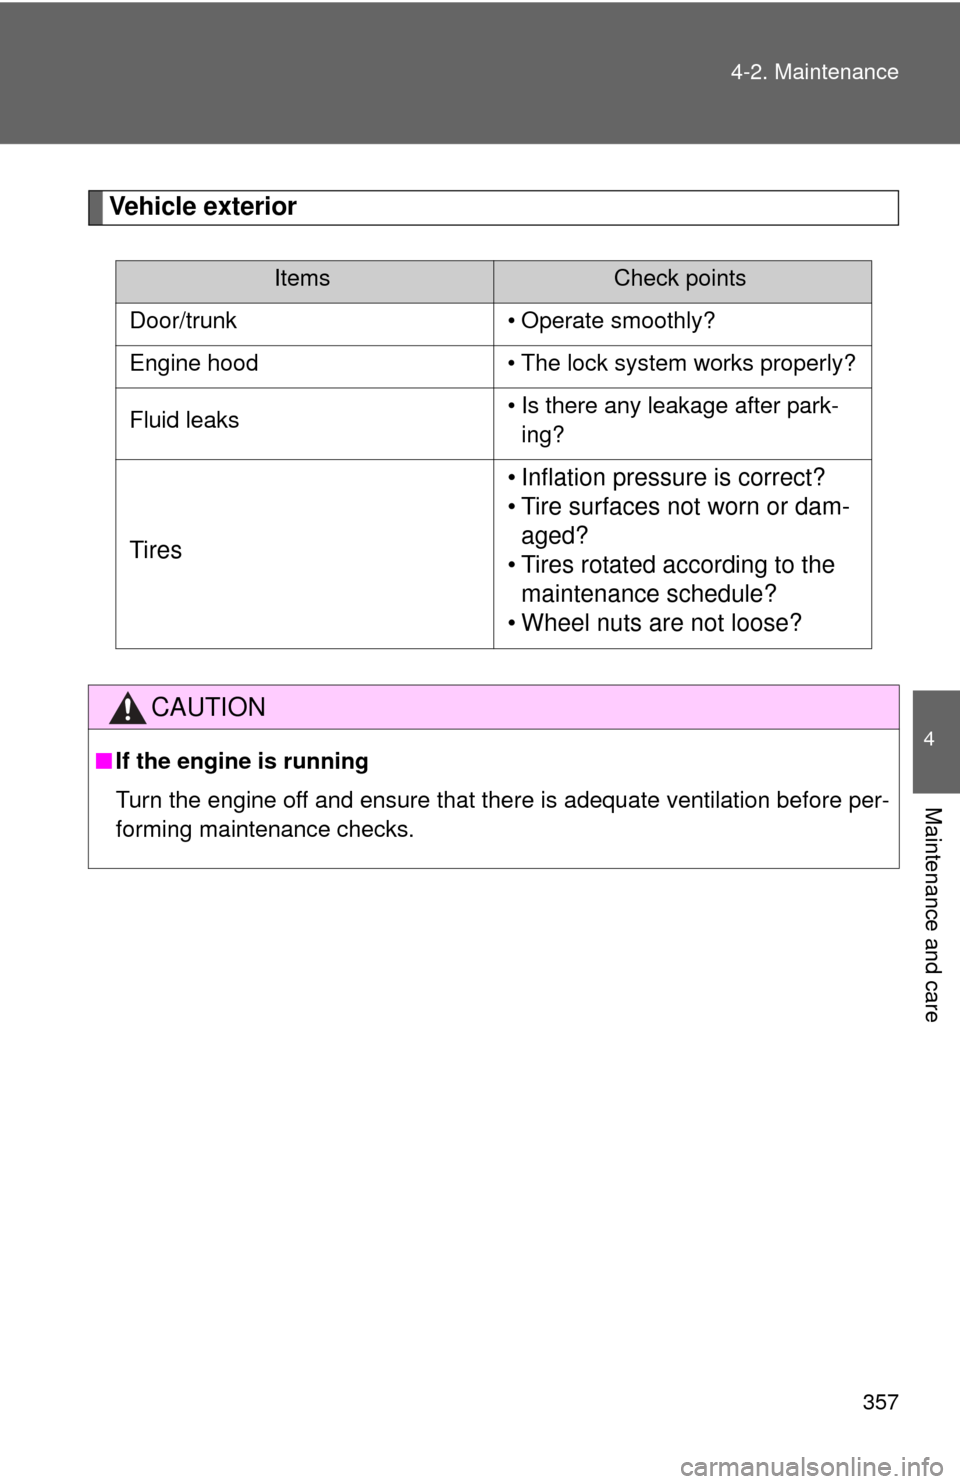
Vehicle exterior
ItemsCheck points
Door/trunk • Operate smoothly?
Engine hood • The lock system works properly?
Fluid leaks • Is there any leakage after park-
ing?
Tires • Inflation pressure is correct?
• Tire surfaces not worn or dam-
aged?
• Tires rotated according to the maintenance schedule?
• Wheel nuts are not loose?
CAUTION
■ If the engine is running
Turn the engine off and ensure that there is adequate ventilation before per-
forming maintenance checks.
Page 364 of 538
362
4-3. Do-it-yourself maintenance
Hood
CAUTION
■Pre-driving check
Check that the hood is fully closed and locked.
If the hood is not locked properly, it may open while the vehicle is in motion
and cause an accident, which may result in death or serious injury.
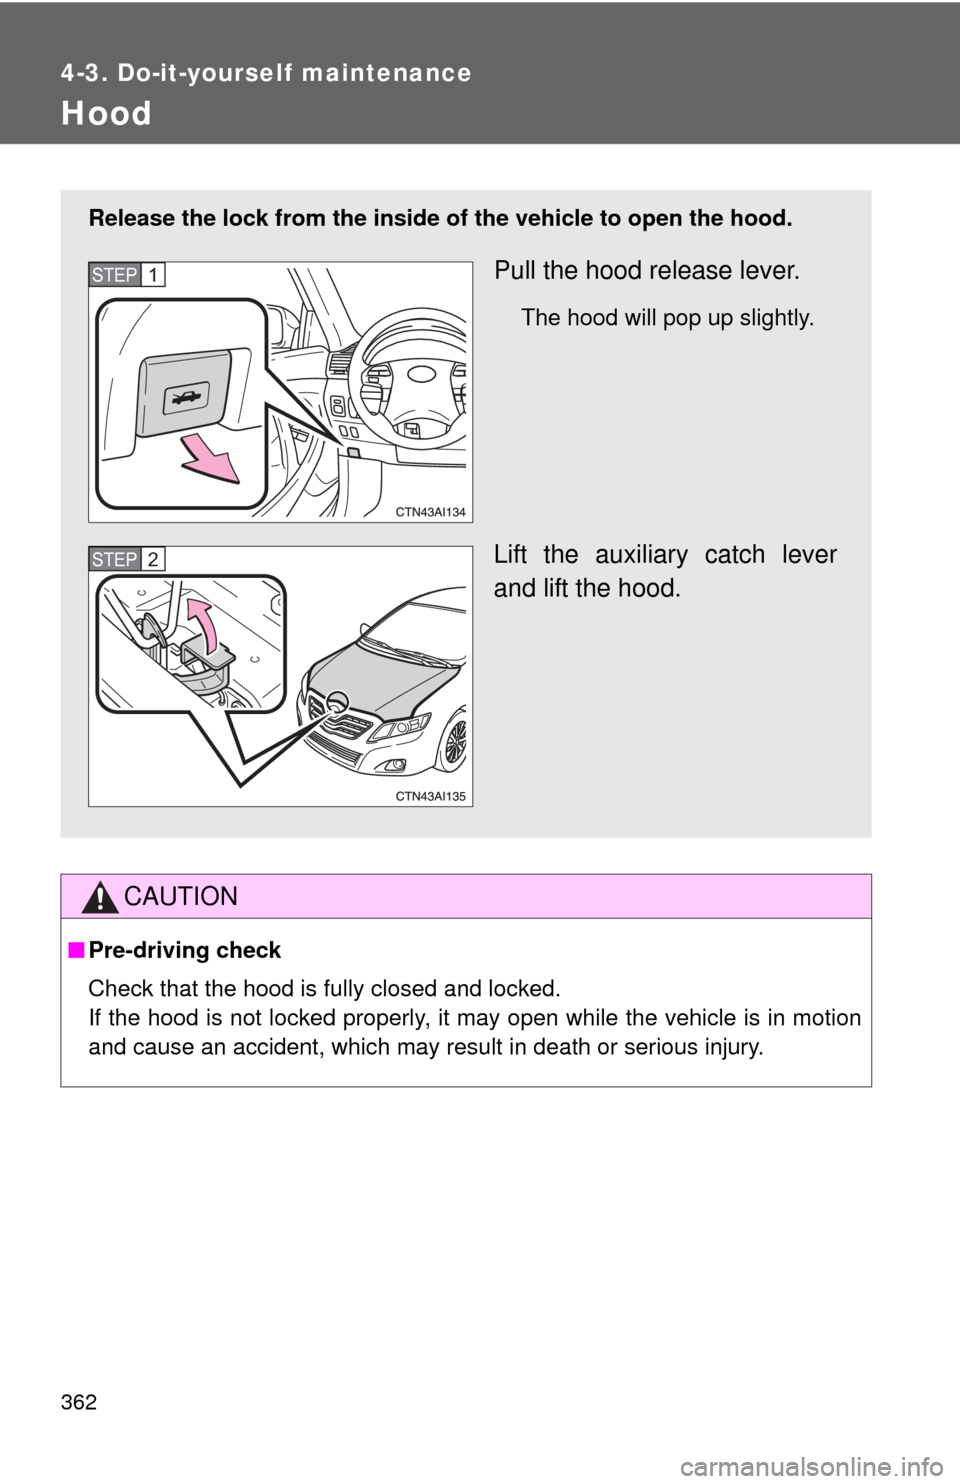
Release the lock from the inside of the vehicle to open the hood.
Pull the hood release lever.
The hood will pop up slightly.
Lift the auxiliary catch lever
and lift the hood.
STEP1
STEP2
Page 372 of 538
370 4-3. Do-it-yourself maintenance
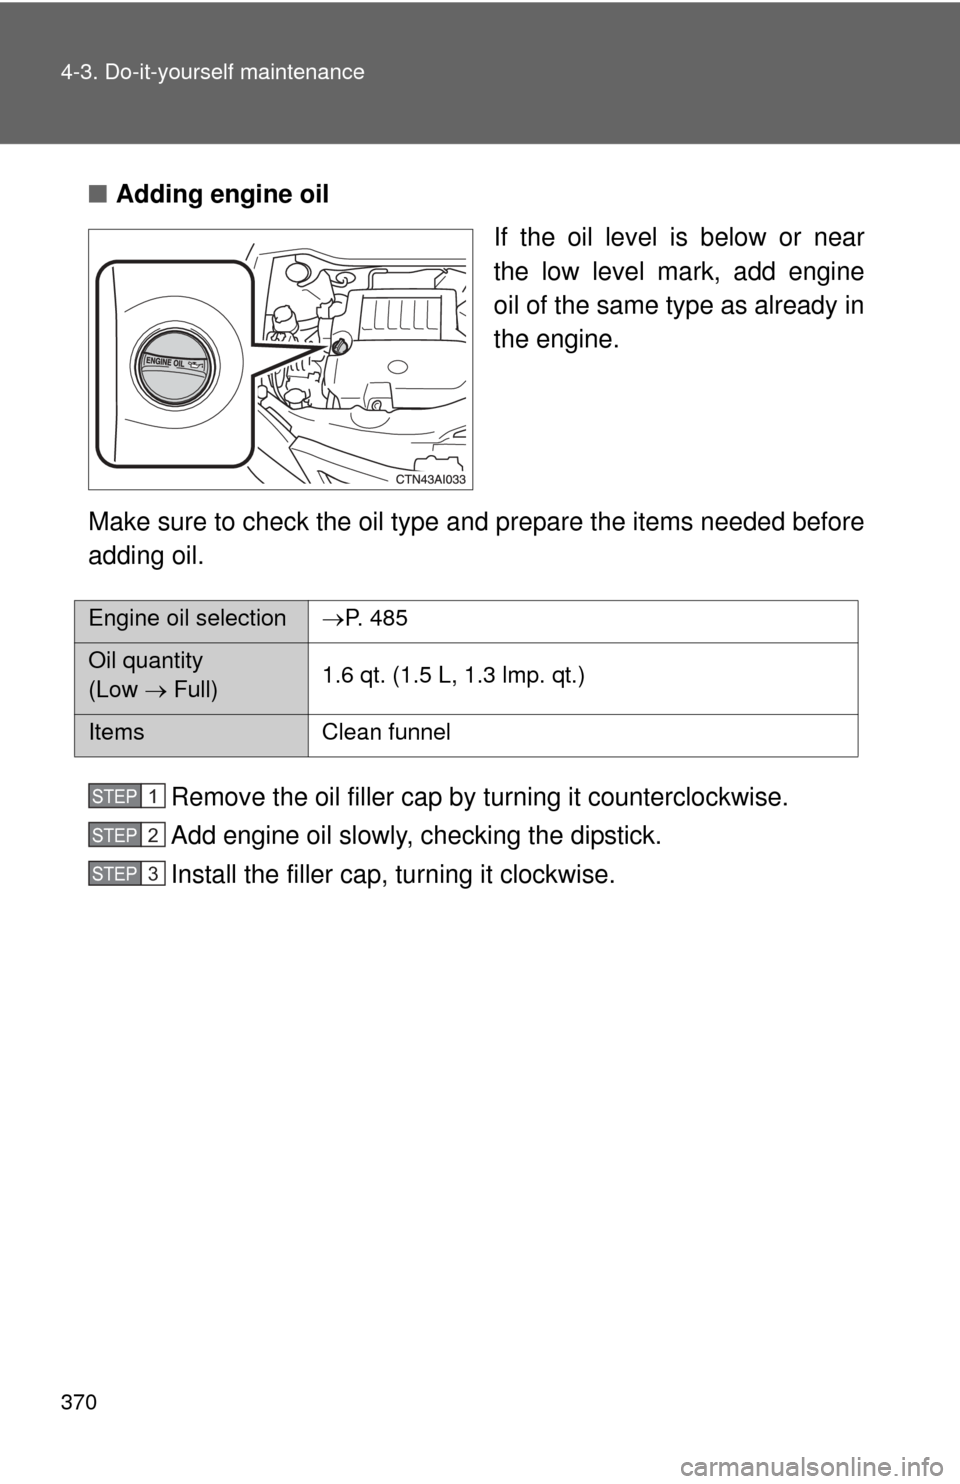
■Adding engine oil
If the oil level is below or near
the low level mark, add engine
oil of the same type as already in
the engine.
Make sure to check the oil type and prepare the items needed before
adding oil.
Remove the oil filler cap by turning it counterclockwise.
Add engine oil slowly, checking the dipstick.
Install the filler cap, turning it clockwise.
Engine oil selection P. 4 8 5
Oil quantity
(Low Full)1.6 qt. (1.5 L, 1.3 lmp. qt.)
Items
Clean funnel
STEP1
STEP2
STEP3
Page 379 of 538
377
4-3. Do-it-yourself maintenance
4
Maintenance and care
■
Checking the fluid level
Make sure to check the fluid type and prepare the necessary items.
Clean all dirt off the reservoir.
Remove the reservoir cap by turning it counterclockwise and
wipe the dipstick clean.
Reinstall the reservoir cap.
Remove the reservoir cap again and look at the fluid level.
Fluid type Automatic transmission fluid DEXRON II or III
Items Rag or paper towel and funnel (only for adding
fluid)
CAUTION
■
Checking the fluid level
Take care, as the reservoir may be hot.
NOTICE
■When adding fluid
Avoid overfilling, or the power steering may be damaged.
■ After replacing the reservoir cap
Check the steering box case, vane pump and hose connections for leaks or
damage.
STEP1
STEP2
STEP3
STEP4
Page 387 of 538
385
4-3. Do-it-yourself maintenance
4
Maintenance and care
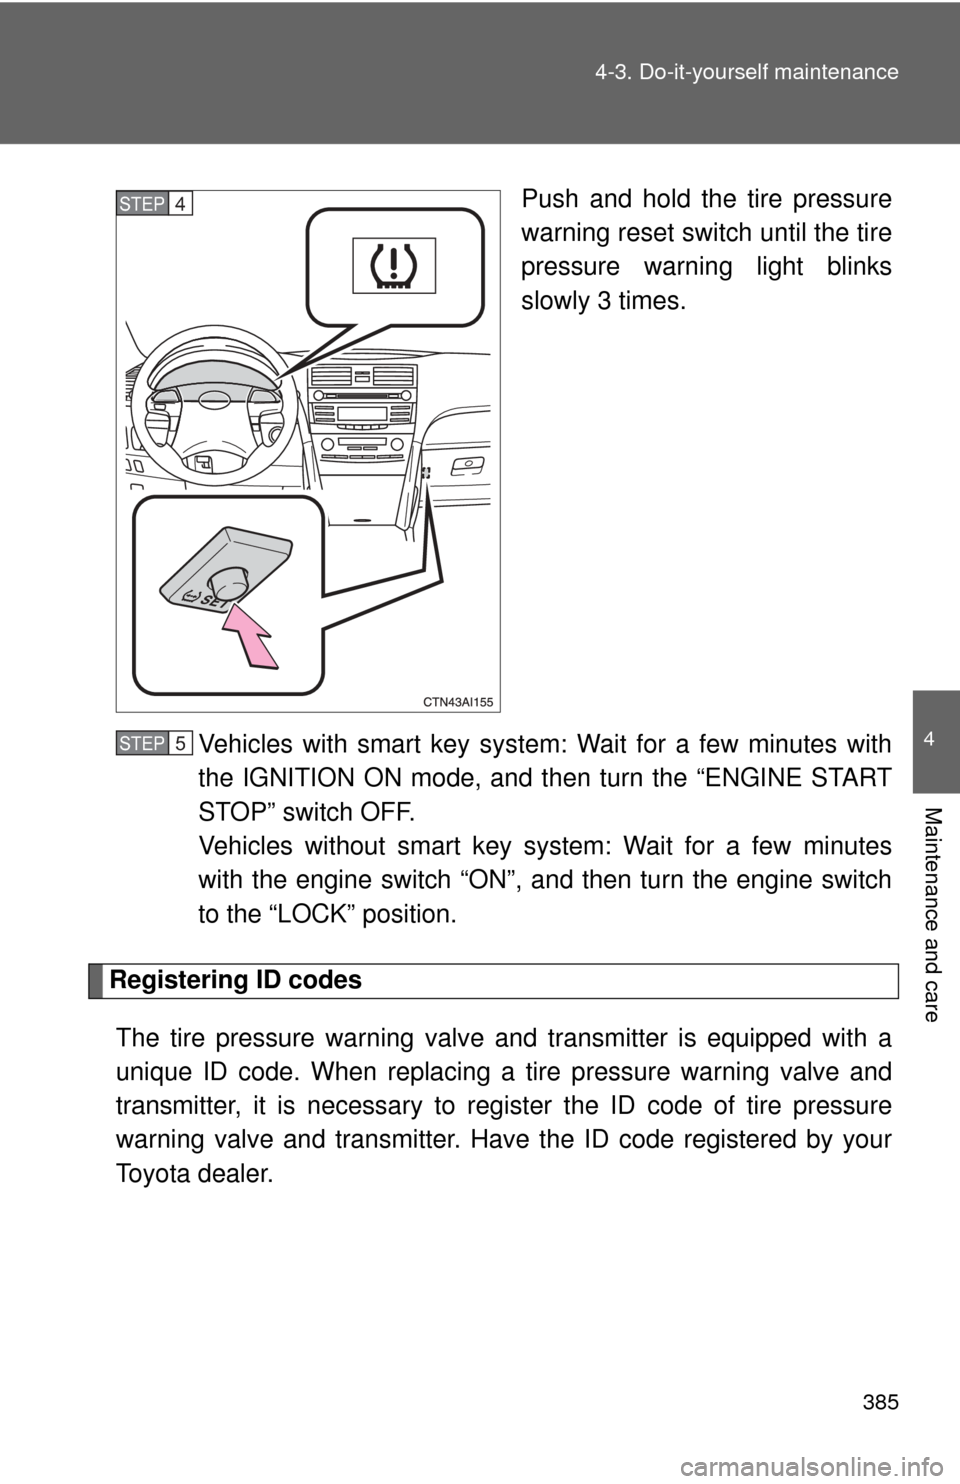
Push and hold the tire pressure
warning reset switch until the tire
pressure warning light blinks
slowly 3 times.
Vehicles with smart key system: Wait for a few minutes with
the IGNITION ON mode, and then turn the “ENGINE START
STOP” switch OFF.
Vehicles without smart key system: Wait for a few minutes
with the engine switch “ON”, a nd then turn the engine switch
to the “LOCK” position.
Registering ID codes
The tire pressure warning valve and transmitter is equipped with a
unique ID code. When replacing a tire pressure warning valve and
transmitter, it is necessary to regi ster the ID code of tire pressure
warning valve and transmitter. Have the ID code registered by your
Toyota dealer.
STEP4
STEP5
Page 410 of 538
408 4-3. Do-it-yourself maintenance
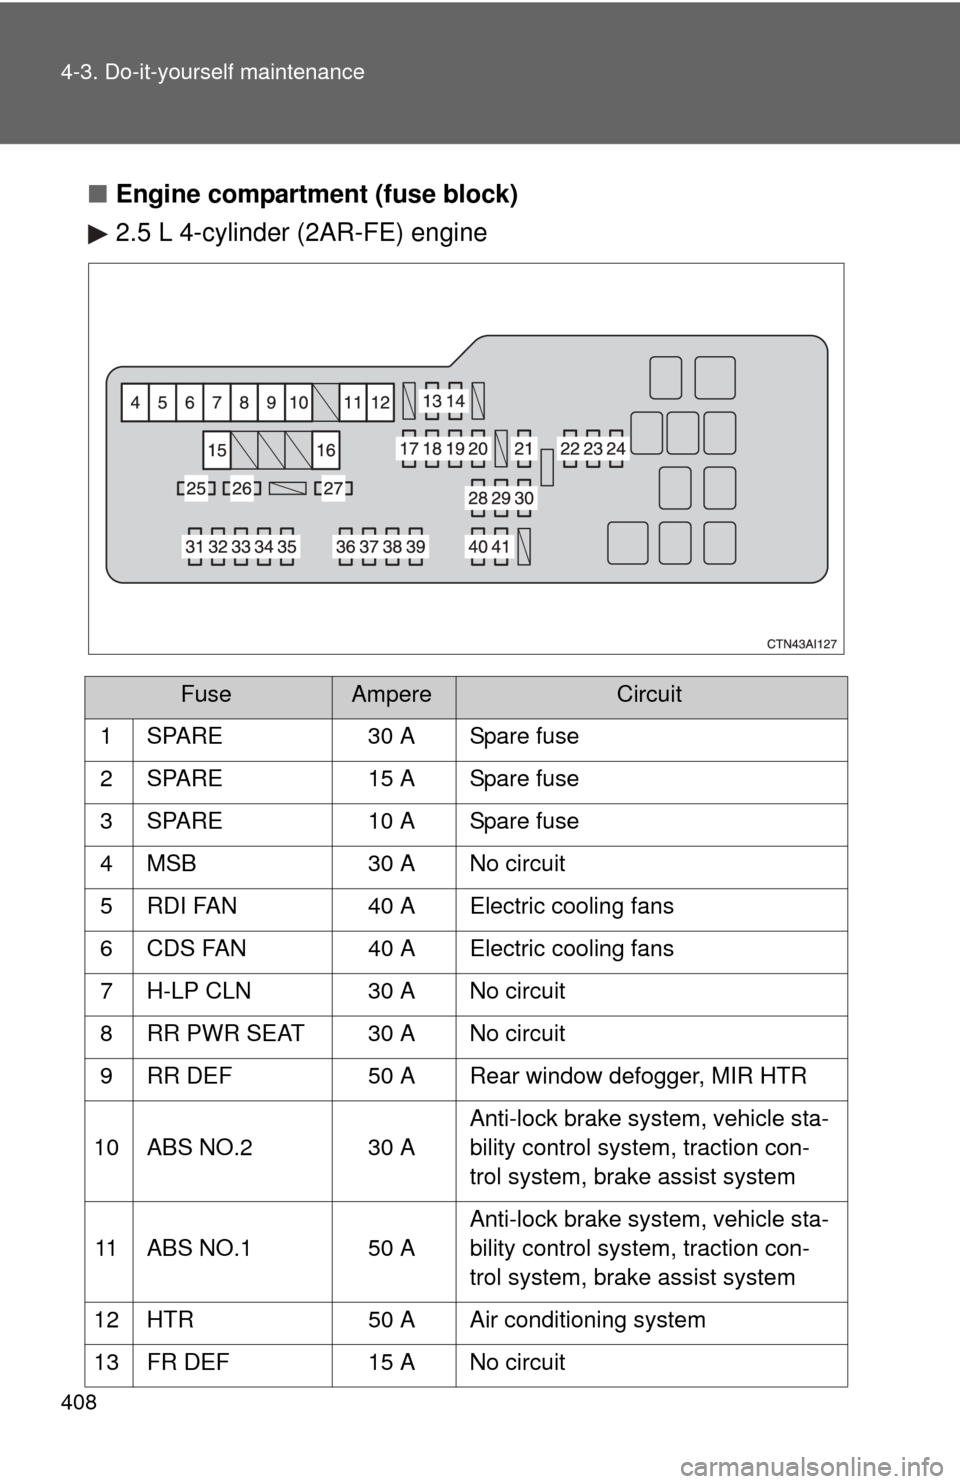
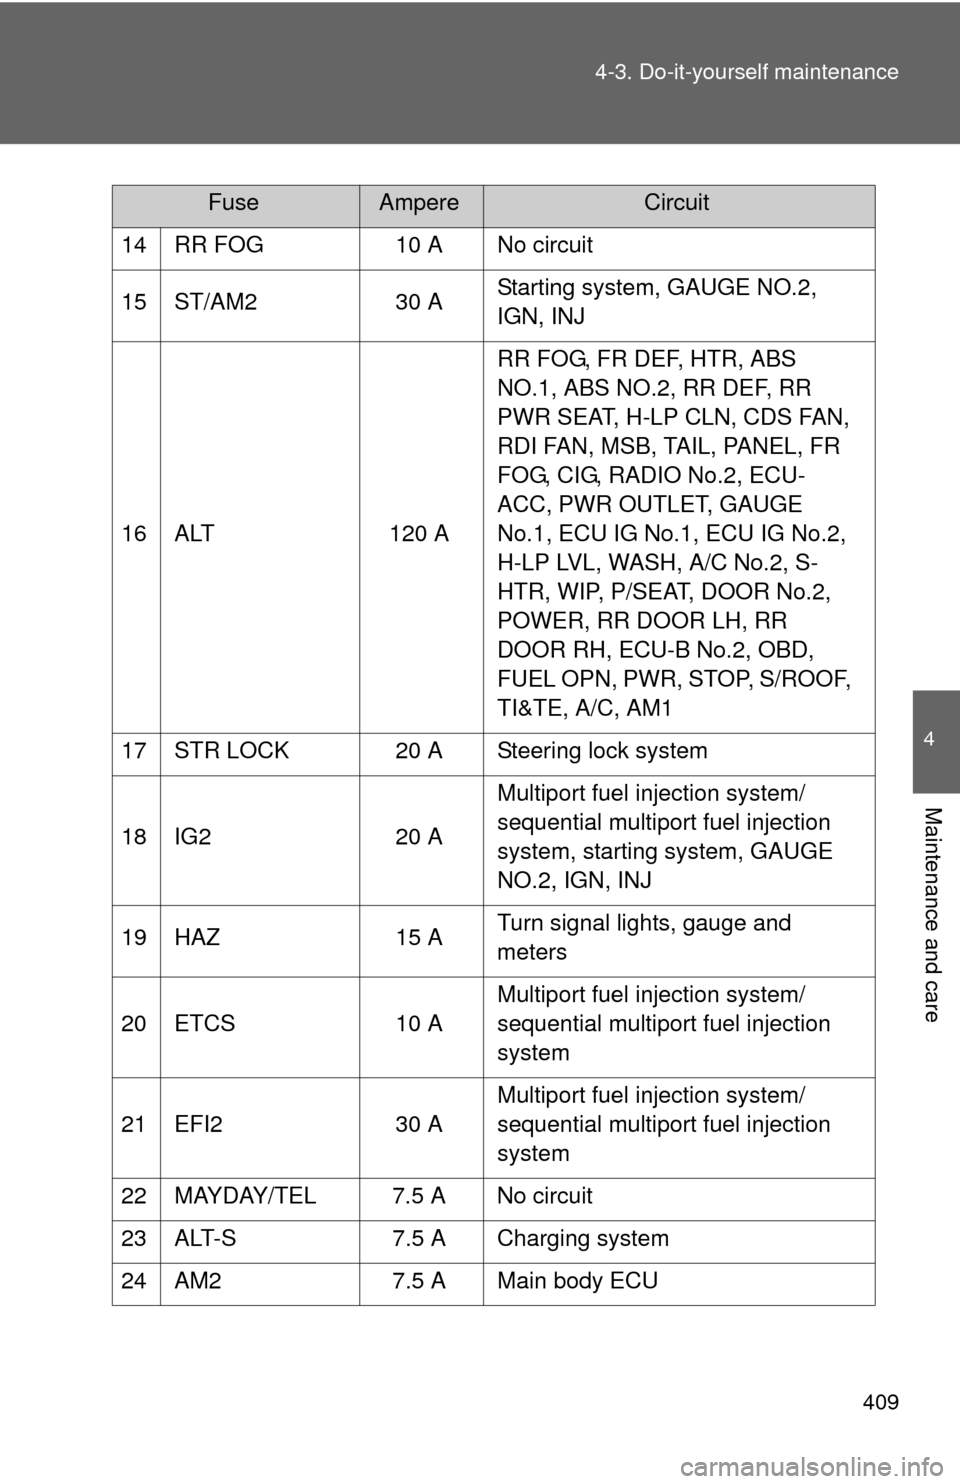
■Engine compartment (fuse block)
2.5 L 4-cylinder (2AR-FE) engine
FuseAmpereCircuit
1 SPARE 30 A Spare fuse
2 SPARE 15 A Spare fuse
3 SPARE 10 A Spare fuse
4 MSB 30 A No circuit
5 RDI FAN 40 A Electric cooling fans
6 CDS FAN 40 A Electric cooling fans
7 H-LP CLN 30 A No circuit
8 RR PWR SEAT 30 A No circuit
9 RR DEF 50 A Rear window defogger, MIR HTR
10 ABS NO.2 30 A Anti-lock brake system, vehicle sta-
bility control system, traction con-
trol system, brake assist system
11 ABS NO.1 50 A Anti-lock brake system, vehicle sta-
bility control system, traction con-
trol system, brake assist system
12 HTR 50 A Air conditioning system
13 FR DEF 15 A No circuit
Page 411 of 538
409
4-3. Do-it-yourself maintenance
4
Maintenance and care
14 RR FOG
10 A No circuit
15 ST/AM2 30 AStarting system, GAUGE NO.2,
IGN, INJ
16 ALT 120 ARR FOG, FR DEF, HTR, ABS
NO.1, ABS NO.2, RR DEF, RR
PWR SEAT, H-LP CLN, CDS FAN,
RDI FAN, MSB, TAIL, PANEL, FR
FOG, CIG, RADIO No.2, ECU-
ACC, PWR OUTLET, GAUGE
No.1, ECU IG No.1, ECU IG No.2,
H-LP LVL, WASH, A/C No.2, S-
HTR, WIP, P/SEAT, DOOR No.2,
POWER, RR DOOR LH, RR
DOOR RH, ECU-B No.2, OBD,
FUEL OPN, PWR, STOP, S/ROOF,
TI&TE, A/C, AM1
17 STR LOCK 20 A Steering lock system
18 IG2 20 AMultiport fuel injection system/
sequential multiport fuel injection
system, starting system, GAUGE
NO.2, IGN, INJ
19 HAZ 15 ATurn signal lights, gauge and
meters
20 ETCS 10 AMultiport fuel injection system/
sequential multiport fuel injection
system
21 EFI2 30 AMultiport fuel injection system/
sequential multiport fuel injection
system
22 MAYDAY/TEL 7.5 A No circuit
23 ALT-S 7.5 A Charging system
24 AM2 7.5 A Main body ECU
FuseAmpereCircuit
Page 412 of 538
410 4-3. Do-it-yourself maintenance
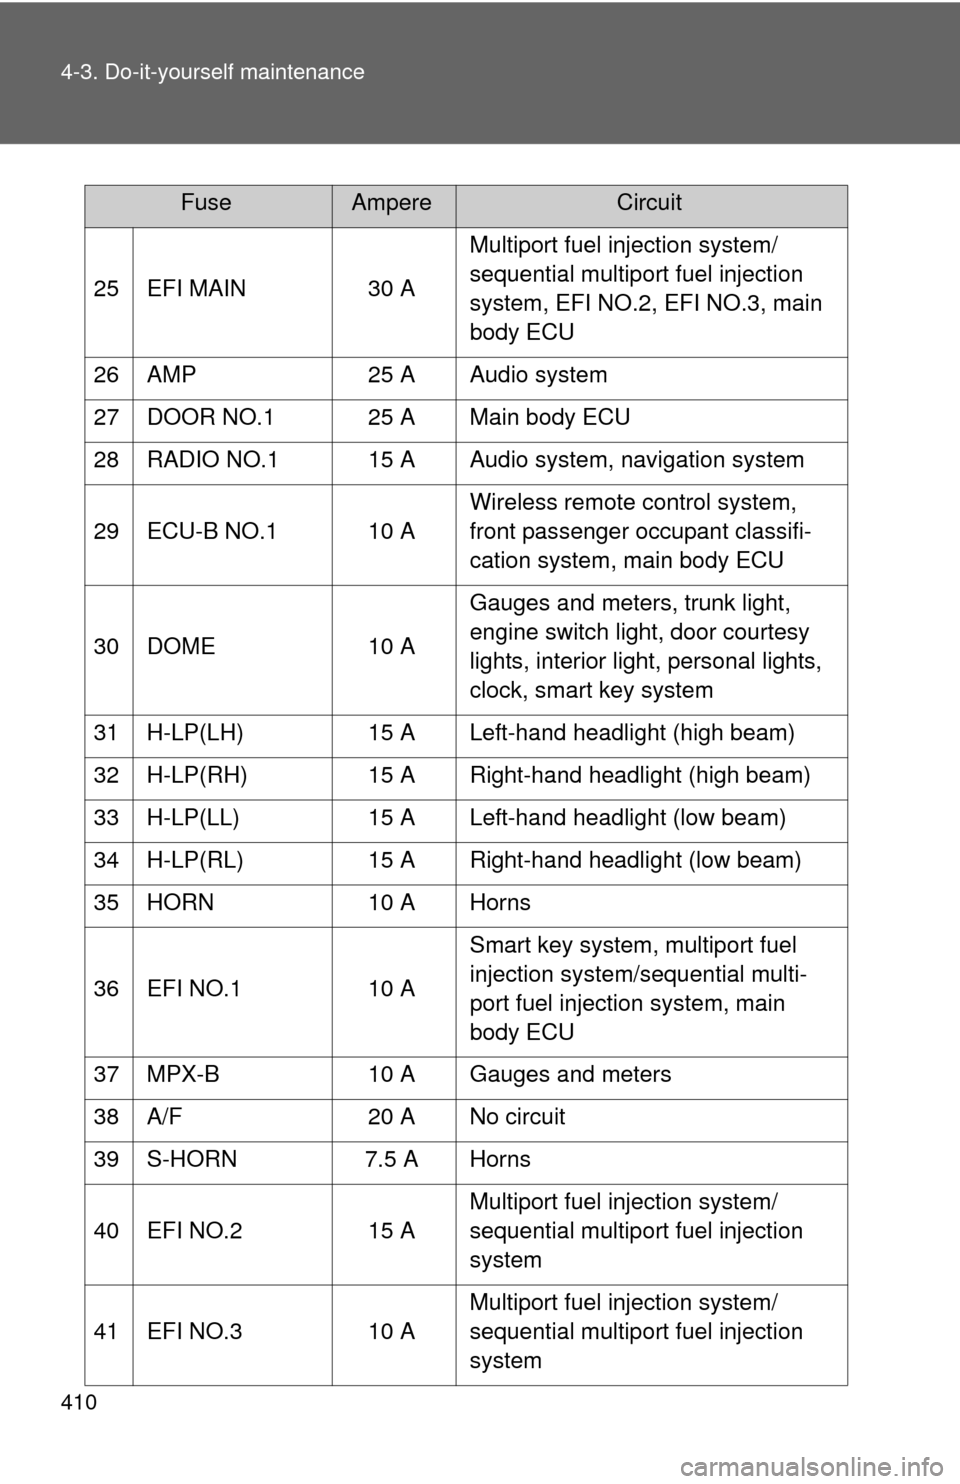
25 EFI MAIN 30 AMultiport fuel injection system/
sequential multiport fuel injection
system, EFI NO.2, EFI NO.3, main
body ECU
26 AMP 25 A Audio system
27 DOOR NO.1 25 A Main body ECU
28 RADIO NO.1 15 A Audio system, navigation system
29 ECU-B NO.1 10 A Wireless remote control system,
front passenger occupant classifi-
cation system, main body ECU
30 DOME 10 AGauges and meters, trunk light,
engine switch light, door courtesy
lights, interior light, personal lights,
clock, smart key system
31 H-LP(LH) 15 A Left-hand headlight (high beam)
32 H-LP(RH) 15 A Right-hand headlight (high beam)
33 H-LP(LL) 15 A Left-hand headlight (low beam)
34 H-LP(RL) 15 A Right-hand headlight (low beam)
35 HORN 10 A Horns
36 EFI NO.1 10 ASmart key system, multiport fuel
injection system/sequential multi-
port fuel injection system, main
body ECU
37 MPX-B 10 A Gauges and meters
38 A/F 20 A No circuit
39 S-HORN 7.5 A Horns
40 EFI NO.2 15 AMultiport fuel injection system/
sequential multiport fuel injection
system
41 EFI NO.3 10 AMultiport fuel injection system/
sequential multiport fuel injection
system
FuseAmpereCircuit