lock TOYOTA CAMRY 2010 XV40 / 8.G Manual Online
[x] Cancel search | Manufacturer: TOYOTA, Model Year: 2010, Model line: CAMRY, Model: TOYOTA CAMRY 2010 XV40 / 8.GPages: 538, PDF Size: 9.22 MB
Page 304 of 538
302 3-4. Using the hands-free phone system (for cellular phone)
■Changing the PIN
Select “Set PIN” by using a voice command or .
Enter the registered PIN by using a voice command or .
Enter a new PIN by using a voice command or .
When using , input the code 1 digit at a time.
Locking or unlocking the phone book Select “Phonebook lock” or “Phonebook unlock” by using a
voice command or .
Input the PIN by either of the following methods and select
“Confirm” by using a voice command or :
a. Press the talk switch and say the registered PIN.
b. Input a new PIN by using .
STEP1
STEP2
STEP3
STEP1
STEP2
Page 305 of 538
303
3-4. Using the hand
s-free phone system (for cellular phone)
3
Interior features
Setting voice guidance volume
Select “Guidance Volume” by using .
Change the voice guidance volume.
To decrease the volume: Turn counterclockwise.
To increase the volume: Turn clockwise.
Initialization
Select “Initialize” and then “Confirm” by using .
Select “Confirm” by using .
STEP1
STEP2
STEP1
STEP2
Page 306 of 538
304 3-4. Using the hands-free phone system (for cellular phone)
■Initialization
●The following data in the system can be initialized:
• Phone book
• Outgoing and incoming call history
• Speed dials
• Registered cellular phone data
• Security code
● Once the initialization has been completed, the data cannot be restored
to its original state.
■ When the phone book is locked
The following functions cannot be used:
●Dialing by inputting a name
● Speed dialing
● Dialing a number stored in the call history memory
● Using the phone book
Page 316 of 538
314 3-5. Using the interior lights
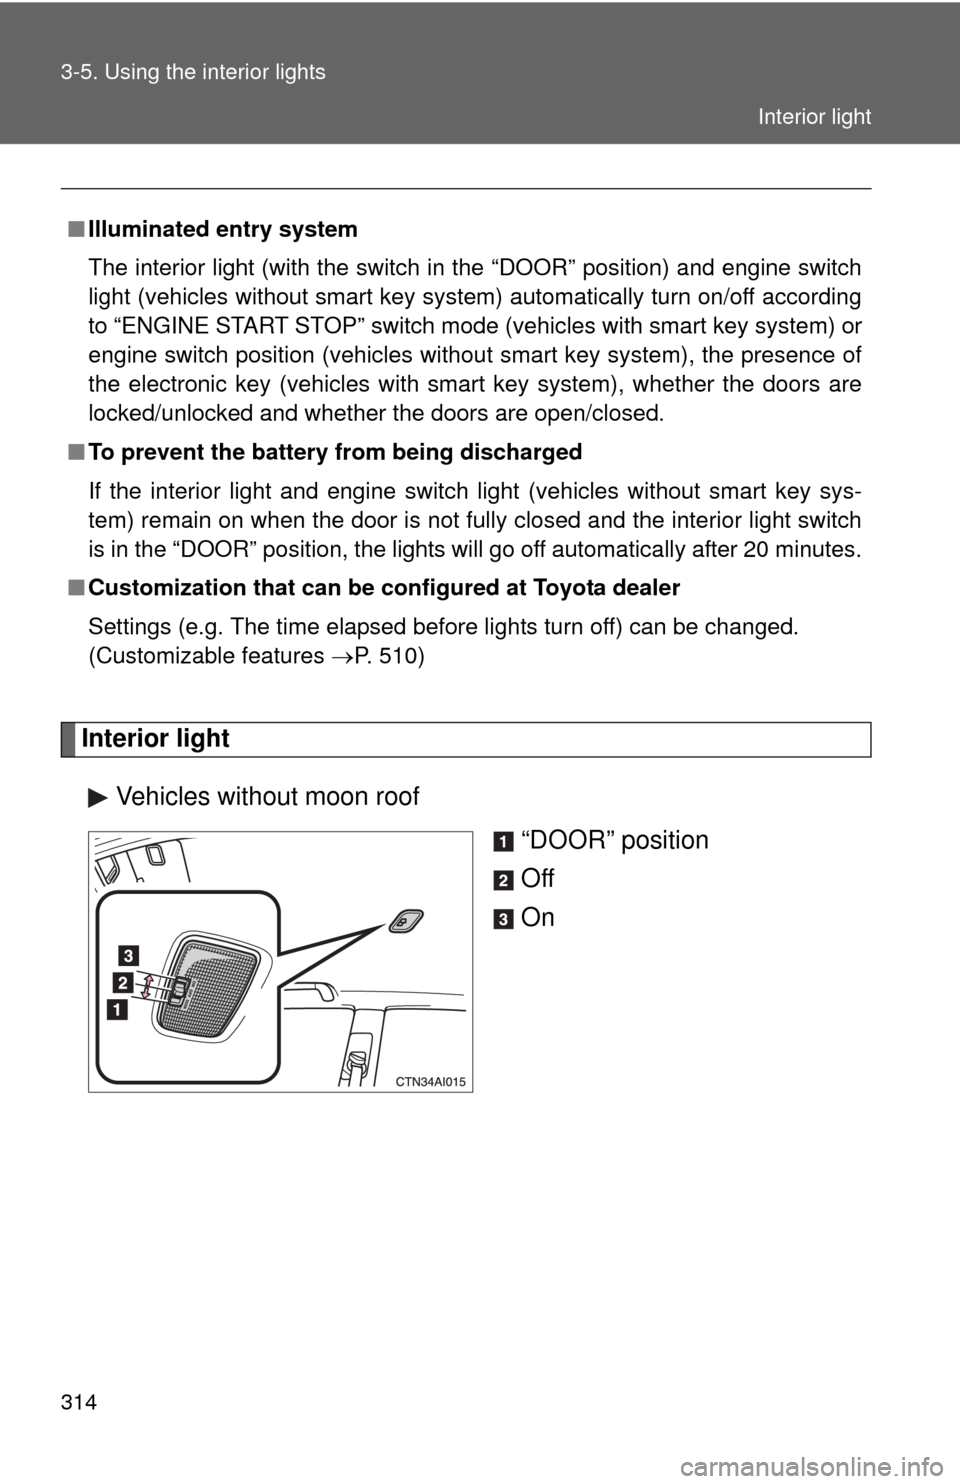
Interior lightVehicles without moon roof “DOOR” position
Off
On
■Illuminated entry system
The interior light (with the switch in the “DOOR” position) and engine switch
light (vehicles without smart key system) automatically turn on/off according
to “ENGINE START STOP” switch mode (vehicles with smart key system) or
engine switch position (vehicles without smart key system), the presence of
the electronic key (vehicles with smart key system), whether the doors are
locked/unlocked and whether the doors are open/closed.
■ To prevent the battery from being discharged
If the interior light and engine switch light (vehicles without smart key sys-
tem) remain on when the door is not fully closed and the interior light switch
is in the “DOOR” position, the lights will go off automatically after 20 minutes.
■ Customization that can be co nfigured at Toyota dealer
Settings (e.g. The time elapsed before lights turn off) can be changed.
(Customizable features P. 510)
Interior light
Page 319 of 538
317
3-6. Using the
storage features
3
Interior features
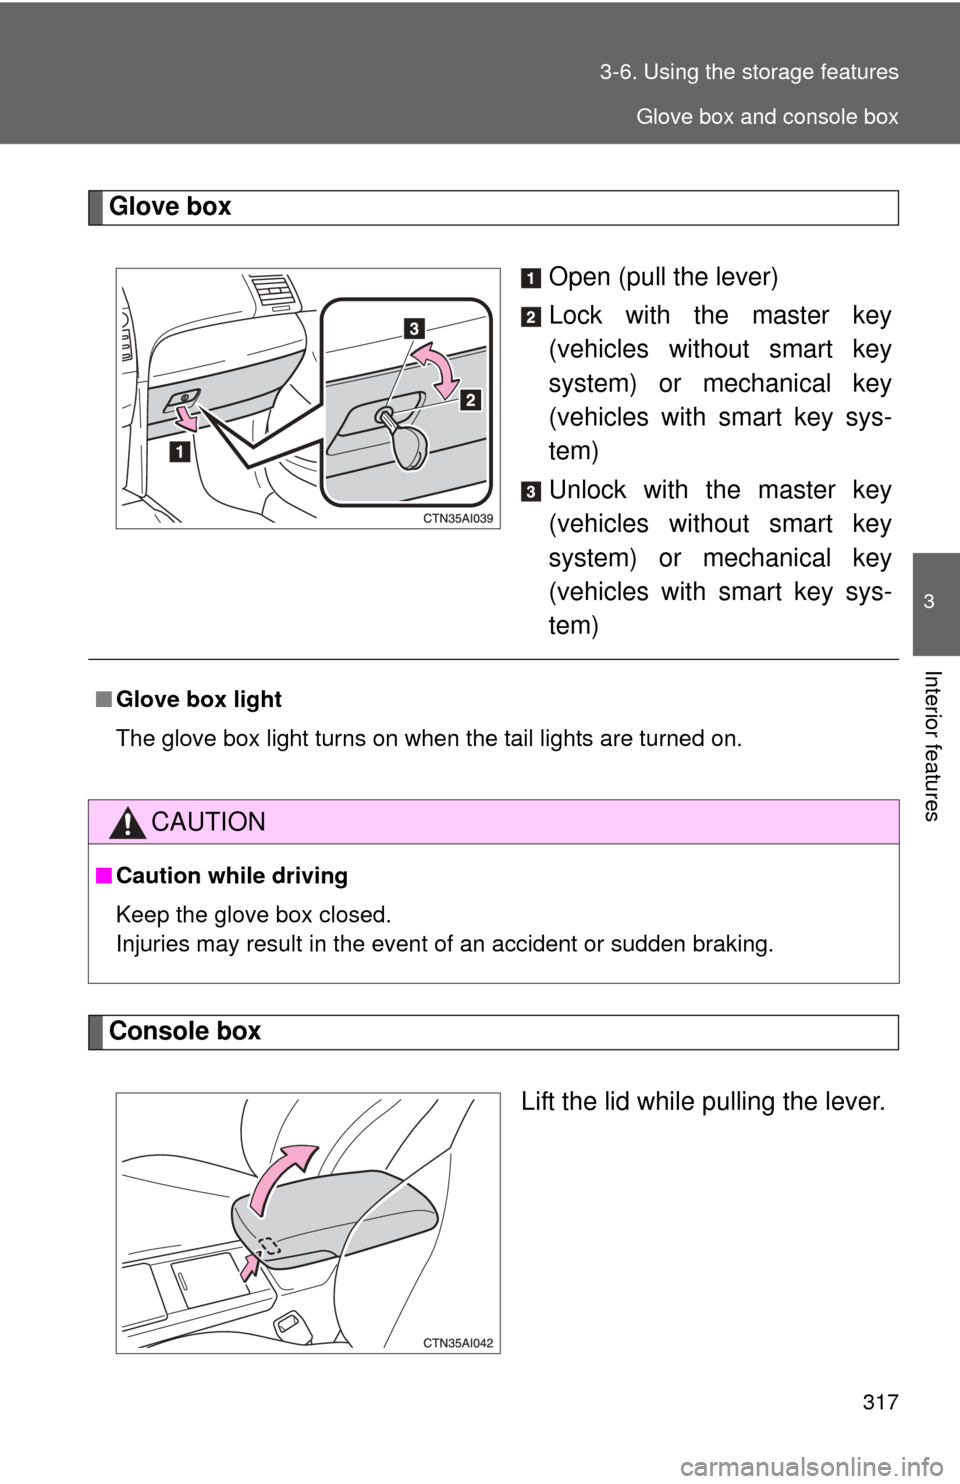
Glove box
Open (pull the lever)
Lock with the master key
(vehicles without smart key
system) or mechanical key
(vehicles with smart key sys-
tem)
Unlock with the master key
(vehicles without smart key
system) or mechanical key
(vehicles with smart key sys-
tem)
Console box
Lift the lid while pulling the lever.
■Glove box light
The glove box light turns on when the tail lights are turned on.
CAUTION
■Caution while driving
Keep the glove box closed.
Injuries may result in the event of an accident or sudden braking.
Glove box and console box
Page 328 of 538
326
3-7. Other interior features
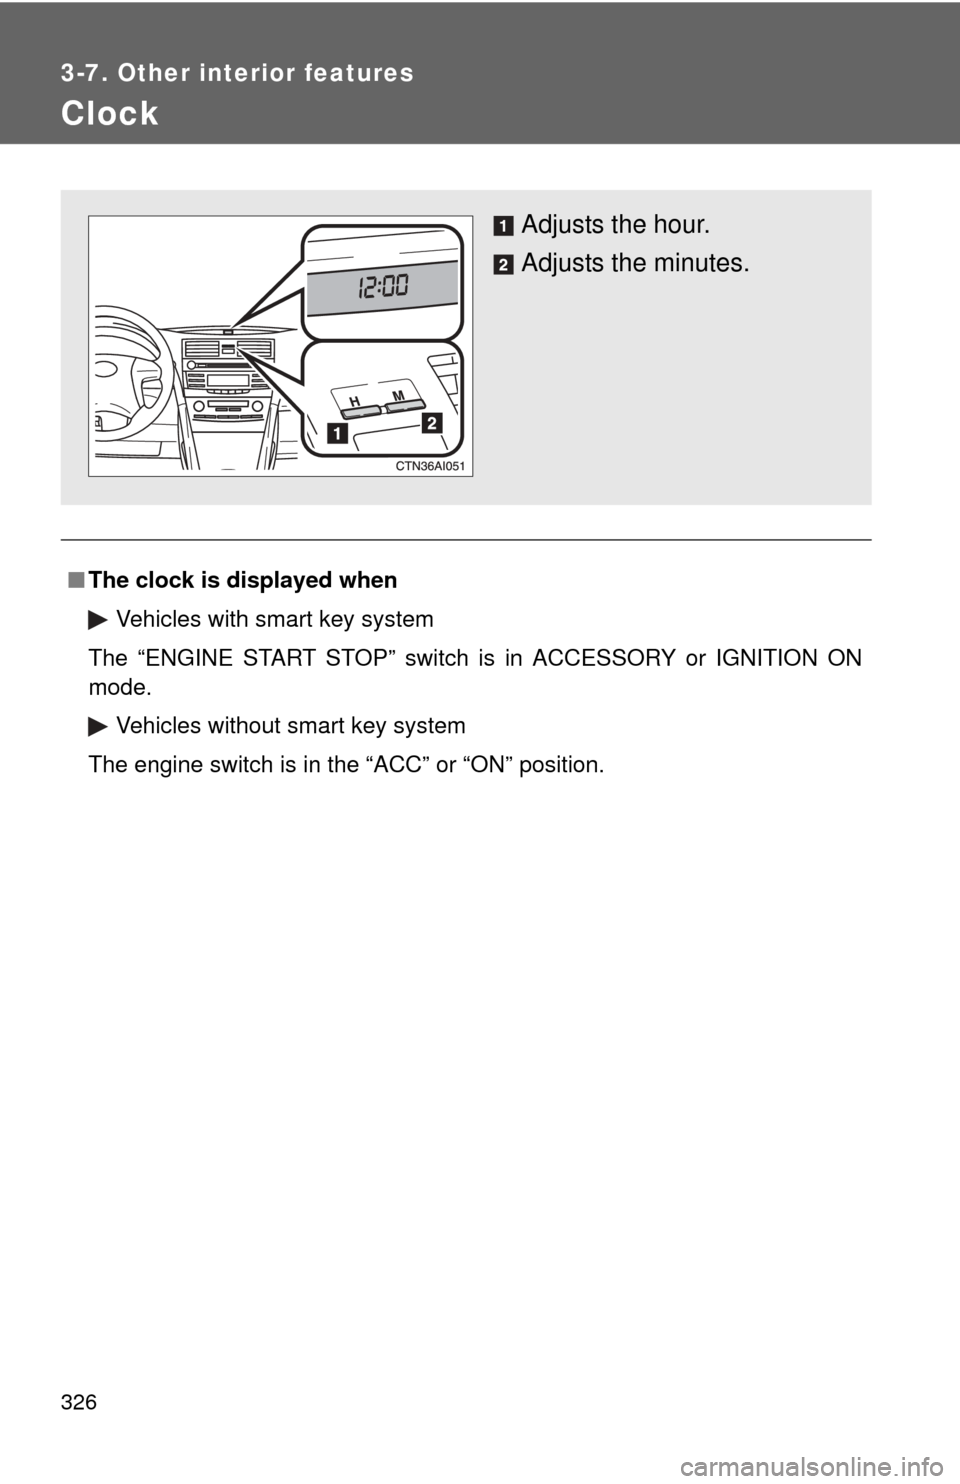
Clock
■The clock is displayed when
Vehicles with smart key system
The “ENGINE START STOP” switch is in ACCESSORY or IGNITION ON
mode. Vehicles without smart key system
The engine switch is in the “ACC” or “ON” position.
Adjusts the hour.
Adjusts the minutes.
Page 336 of 538
334
3-7. Other interior features
Trunk storage extension
CAUTION
■When not in use
Ensure that the armrest door is closed.
In the event of sudden braking, items stored in the trunk may be thrown for-
ward into the cabin, resulting in injury.
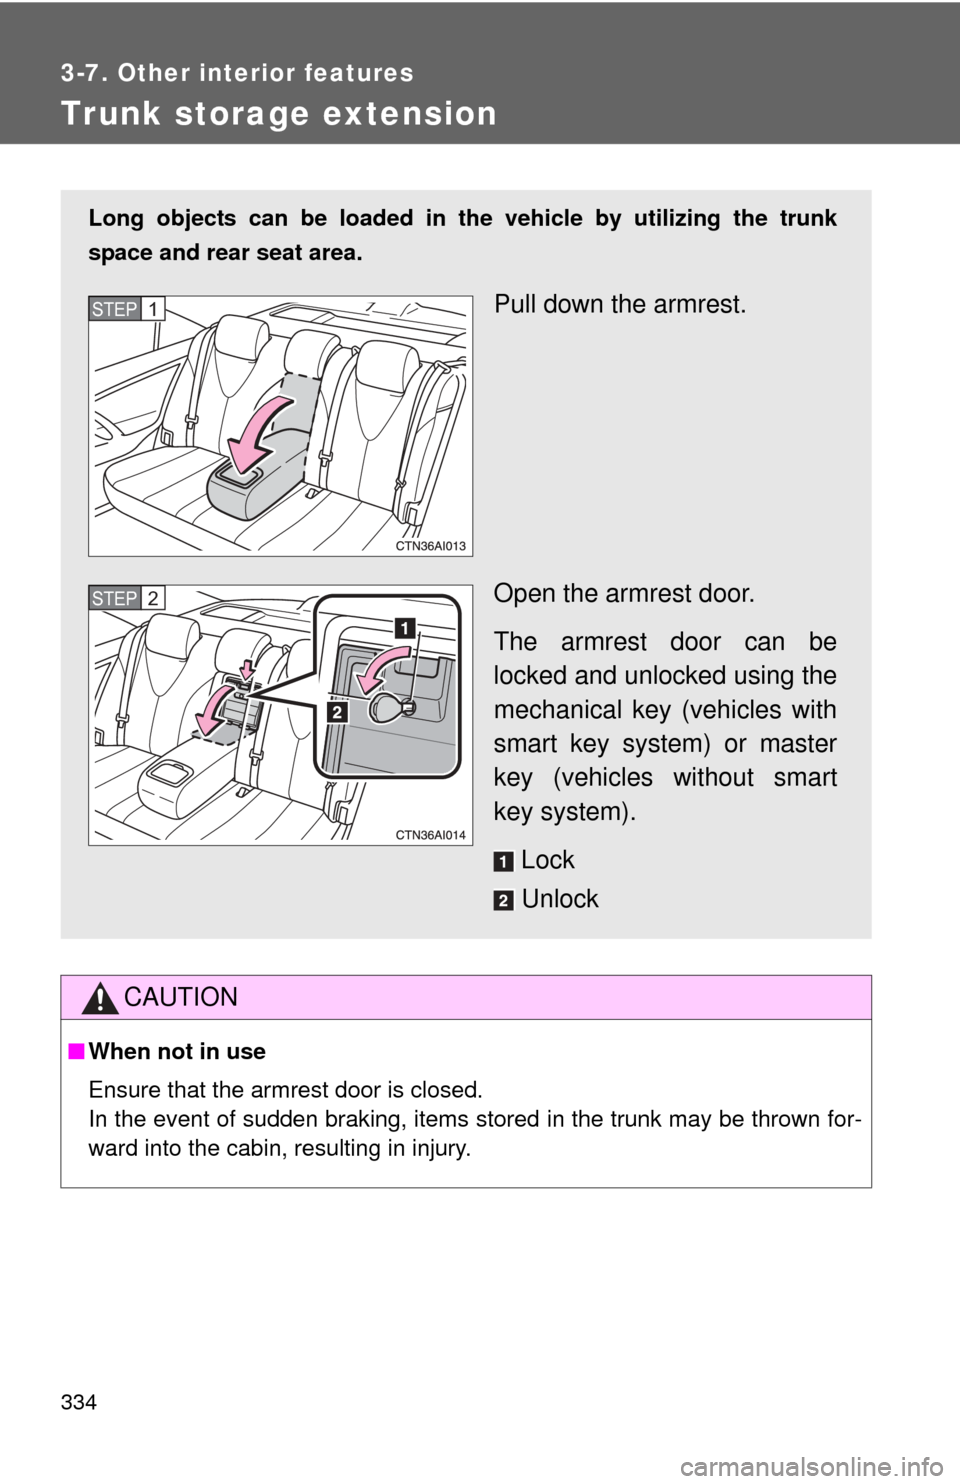
Long objects can be loaded in the vehicle by utilizing the trunk
space and rear seat area.
Pull down the armrest.
Open the armrest door.
The armrest door can be
locked and unlocked using the
mechanical key (vehicles with
smart key system) or master
key (vehicles without smart
key system).
Lock
UnlockSTEP1
STEP2
Page 340 of 538
338
3-7. Other interior features
Garage door opener
The garage door opener (HomeLink Universal Transceiver) is manufac-
tured under license from HomeLink.
Programming HomeLink (for U.S. owners)
To ensure correct programming into the HomeLink
, install a new
battery in the hand-held transmitter prior to programming. Failure to
install a new battery into the hand- held transmitter will affect both the
range and accuracy of the HomeLink
in your vehicle.
The battery side of the hand-held transmitter must be pointed away
from the HomeLink
during the programming process.
The HomeLink
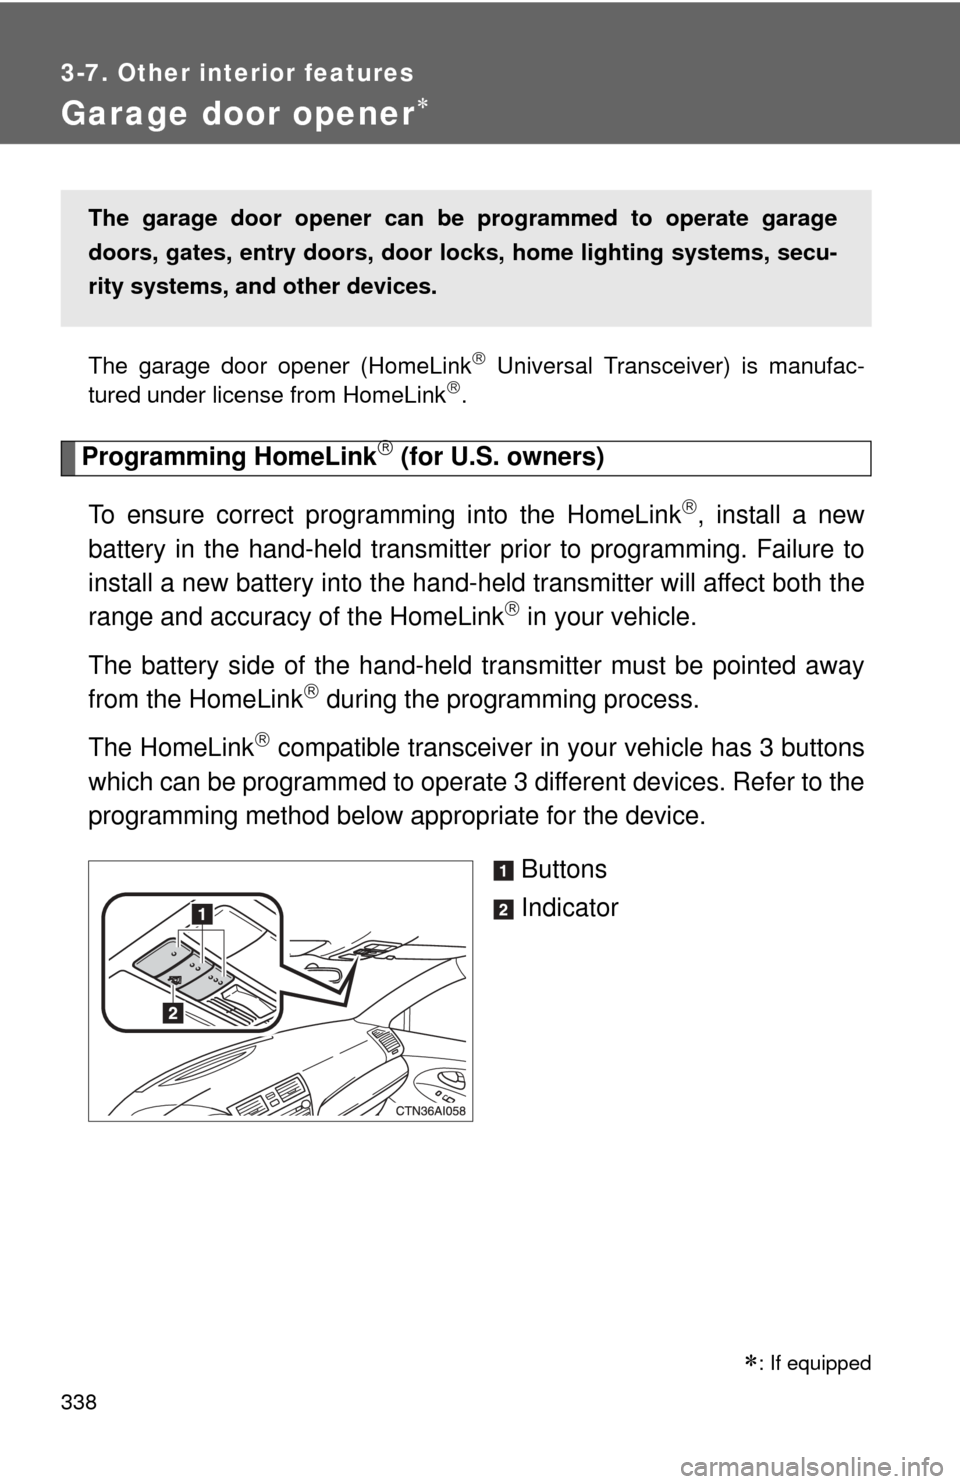
compatible transceiver in your vehicle has 3 buttons
which can be programmed to operate 3 different devices. Refer to the
programming method below appropriate for the device.
Buttons
Indicator
The garage door opener can be programmed to operate garage
doors, gates, entry doors, door locks, hom e lighting systems, secu-
rity systems, and other devices.
: If equipped
Page 343 of 538

341
3-7. Other interior features
3
Interior features
Test the operation of HomeLink by pressing the newly pro-
grammed button. Check to see if the gate/device operates
correctly.
Repeat the steps above to program another device for each of
the remaining HomeLink
buttons.
■ Programming other devices
To program other devices such as home security systems, home
door locks or lighting, contact your authorized Toyota dealer for
assistance.
■ Reprogramming a button
The individual HomeLink
buttons cannot be erased but can be
reprogrammed. To reprogram a bu tton, follow the “Programming”
instructions.
Operating HomeLink
Press the appropriate HomeLink button. The HomeLink indicator
light on the HomeLink transceiver should turn on.
HomeLink continues to send a signal for up to 20 seconds as long as the
button is pressed.
Erasing the entire HomeLink memory (all three programs)
Press and hold down the 2 out-
side buttons for 20 seconds until
the indicator light flashes.
If you sell your vehicle, be sure to
erase the programs stored in the
HomeLink
memory.
STEP5
STEP6
Page 347 of 538
345
3-7. Other interior features
3
Interior features
■
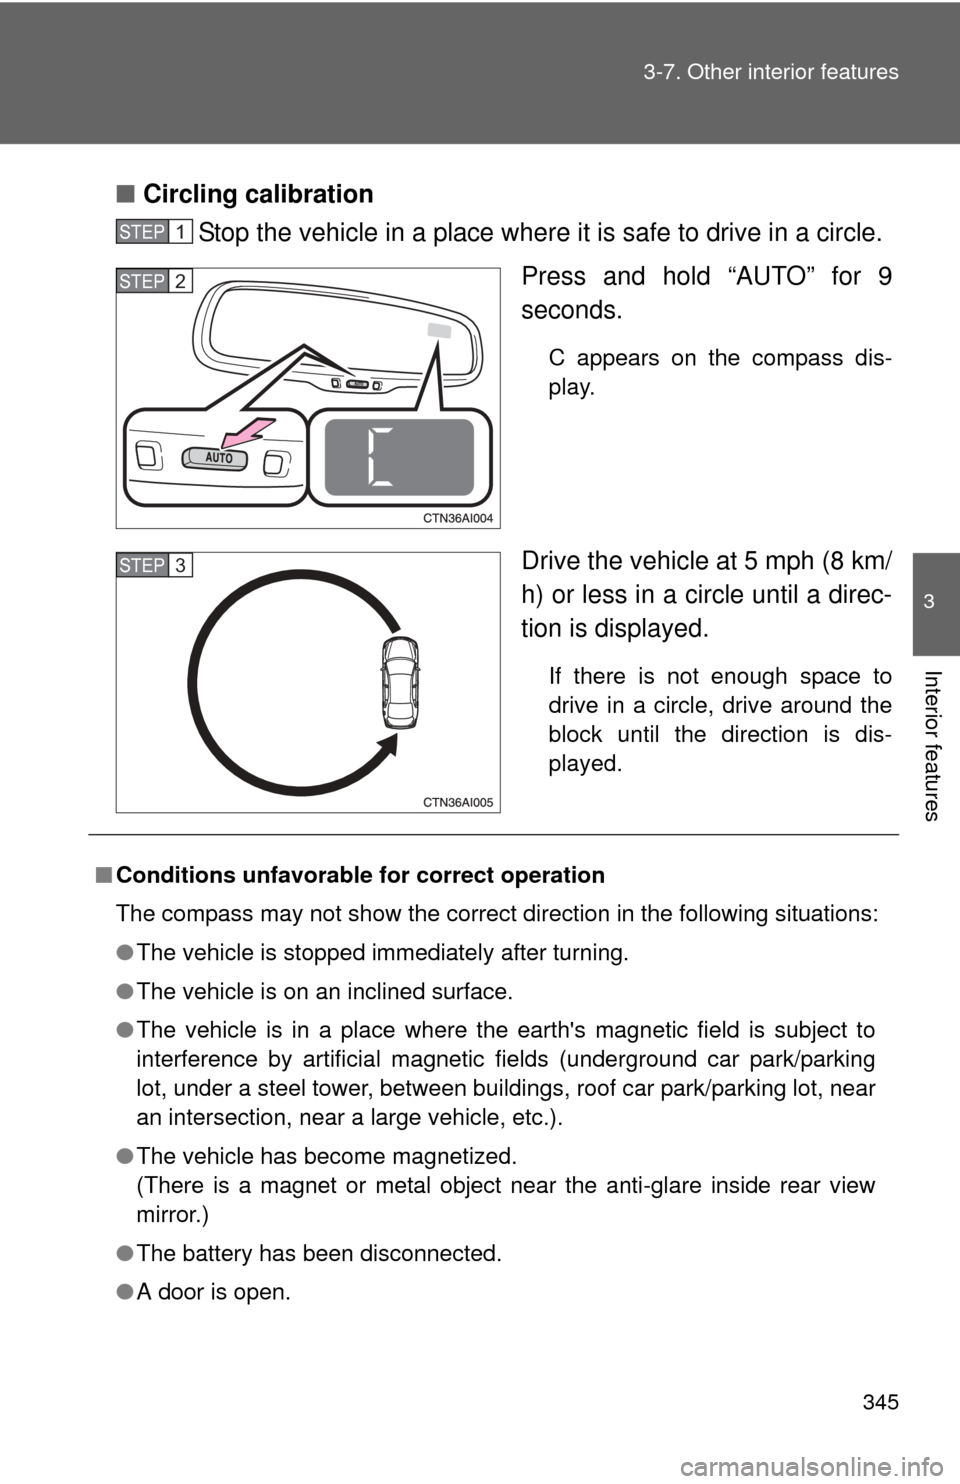
Circling calibration
Stop the vehicle in a place where it is safe to drive in a circle.
Press and hold “AUTO” for 9
seconds.
C appears on the compass dis-
play.
Drive the vehicle at 5 mph (8 km/
h) or less in a circle until a direc-
tion is displayed.
If there is not enough space to
drive in a circle, drive around the
block until the direction is dis-
played.
STEP1
STEP2
STEP3
■Conditions unfavorable for correct operation
The compass may not show the correct direction in the following situations:
●The vehicle is stopped immediately after turning.
● The vehicle is on an inclined surface.
● The vehicle is in a place where the earth's magnetic field is subject to
interference by artificial magnetic fields (underground car park/parking
lot, under a steel tower, between buildings, roof car park/parking lot, near
an intersection, near a large vehicle, etc.).
● The vehicle has become magnetized.
(There is a magnet or metal object near the anti-glare inside rear view
mirror.)
● The battery has been disconnected.
● A door is open.