TOYOTA CAMRY 2012 XV50 / 9.G Navigation Manual
Manufacturer: TOYOTA, Model Year: 2012, Model line: CAMRY, Model: TOYOTA CAMRY 2012 XV50 / 9.GPages: 328, PDF Size: 5.67 MB
Page 141 of 328
141
1. PHONE OPERATION
4
PHONE
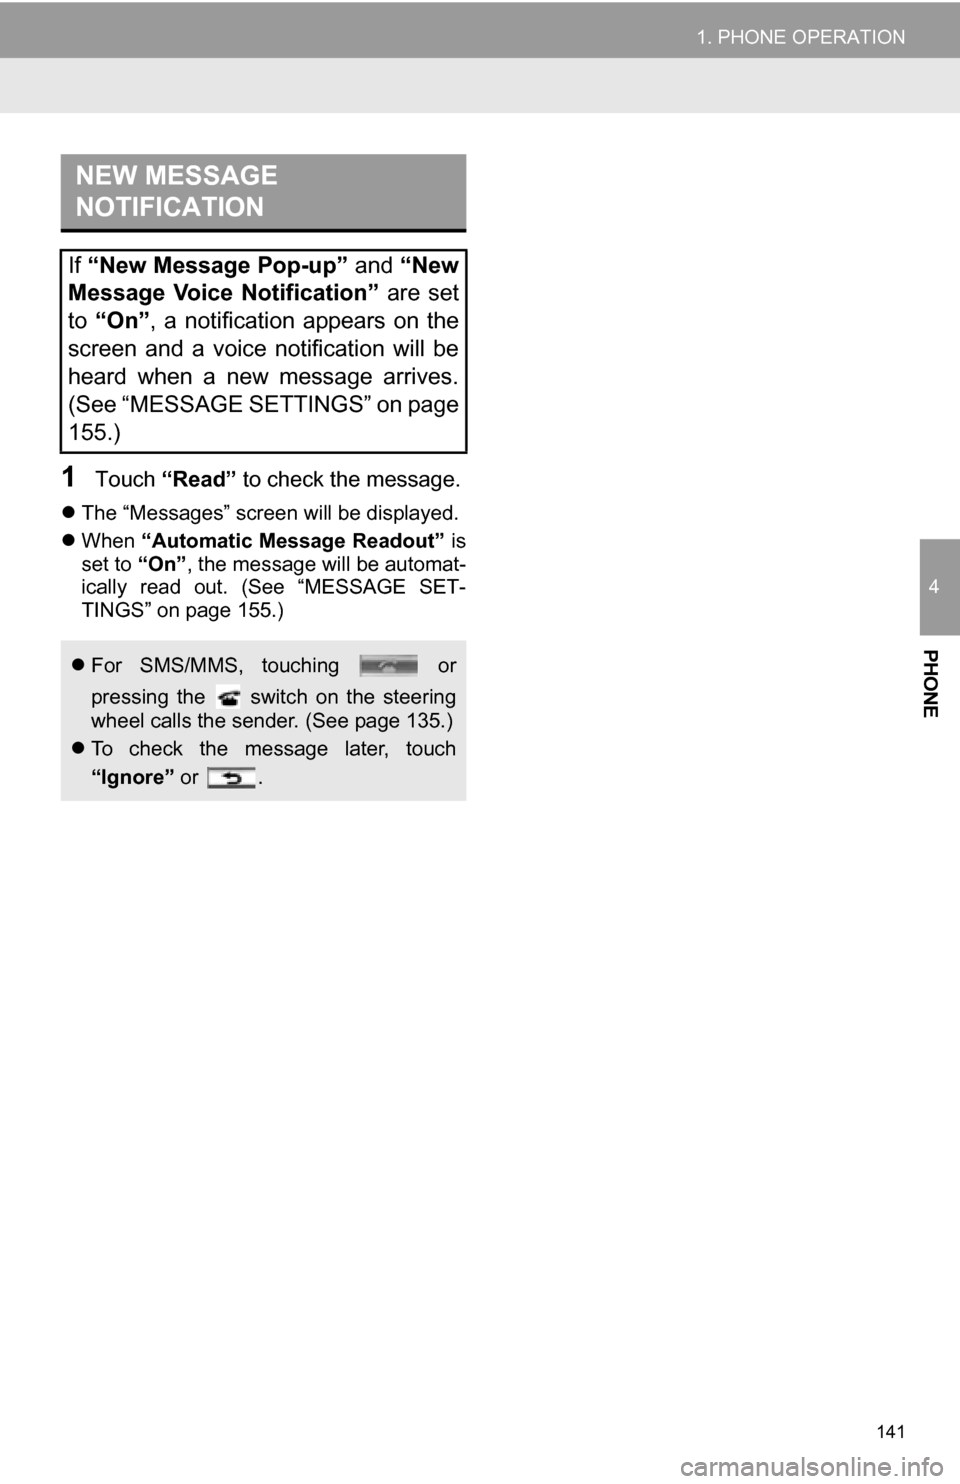
1Touch ÔÇťReadÔÇŁ to check the message.
´üČThe ÔÇťMessagesÔÇŁ screen will be displayed.
´üČ When ÔÇťAutomatic Message ReadoutÔÇŁ is
set to ÔÇťOnÔÇŁ , the message will be automat-
ically read out. (See ÔÇťMESSAGE SET-
TINGSÔÇŁ on page 155.)
NEW MESSAGE
NOTIFICATION
If ÔÇťNew Message Pop-upÔÇŁ and ÔÇťNew
Message Voice NotificationÔÇŁ are set
to ÔÇťOnÔÇŁ , a notification appears on the
screen and a voice notification will be
heard when a new message arrives.
(See ÔÇťMESSAGE SETTINGSÔÇŁ on page
155.)
´üČ For SMS/MMS, touching or
pressing the switch on the steering
wheel calls the sender. (See page 135.)
´üČ To check the message later, touch
ÔÇťIgnoreÔÇŁ or .
Page 142 of 328
142
2. SETUP
1. PHONE SETTINGS
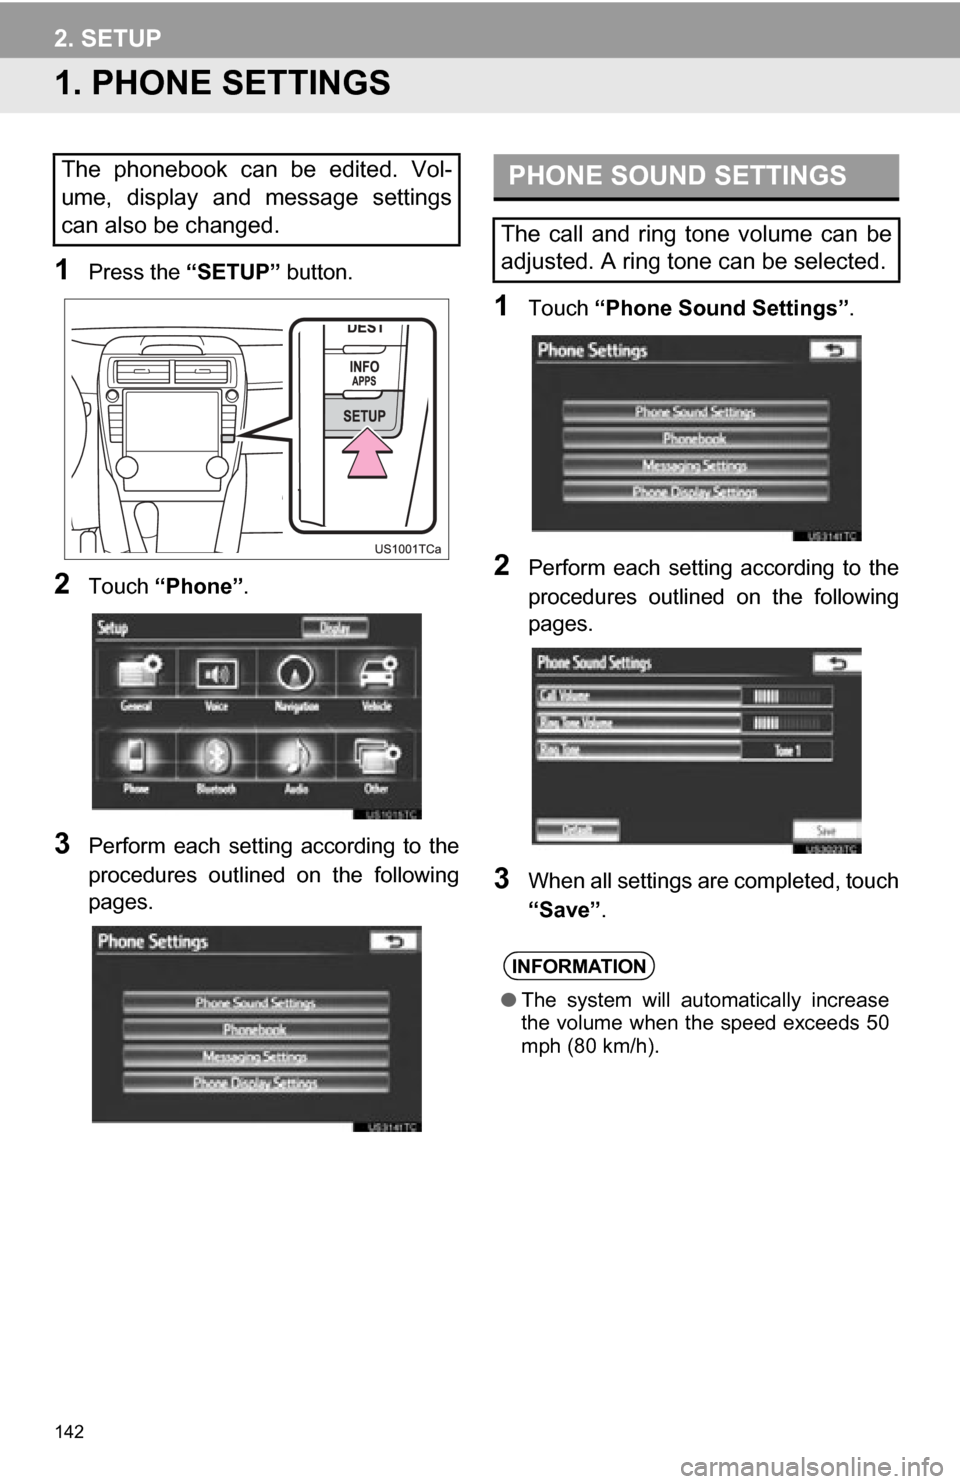
1Press the ÔÇťSETUPÔÇŁ button.
2Touch ÔÇťPhoneÔÇŁ .
3Perform each setting according to the
procedures outlined on the following
pages.
1Touch ÔÇťPhone Sound SettingsÔÇŁ .
2Perform each setting according to the
procedures outlined on the following
pages.
3When all settings are completed, touch
ÔÇťSaveÔÇŁ.
The phonebook can be edited. Vol-
ume, display and message settings
can also be changed.PHONE SOUND SETTINGS
The call and ring tone volume can be
adjusted. A ring tone can be selected.
INFORMATION
ÔŚĆThe system will automatically increase
the volume when the speed exceeds 50
mph (80 km/h).
Page 143 of 328
143
2. SETUP
4
PHONE
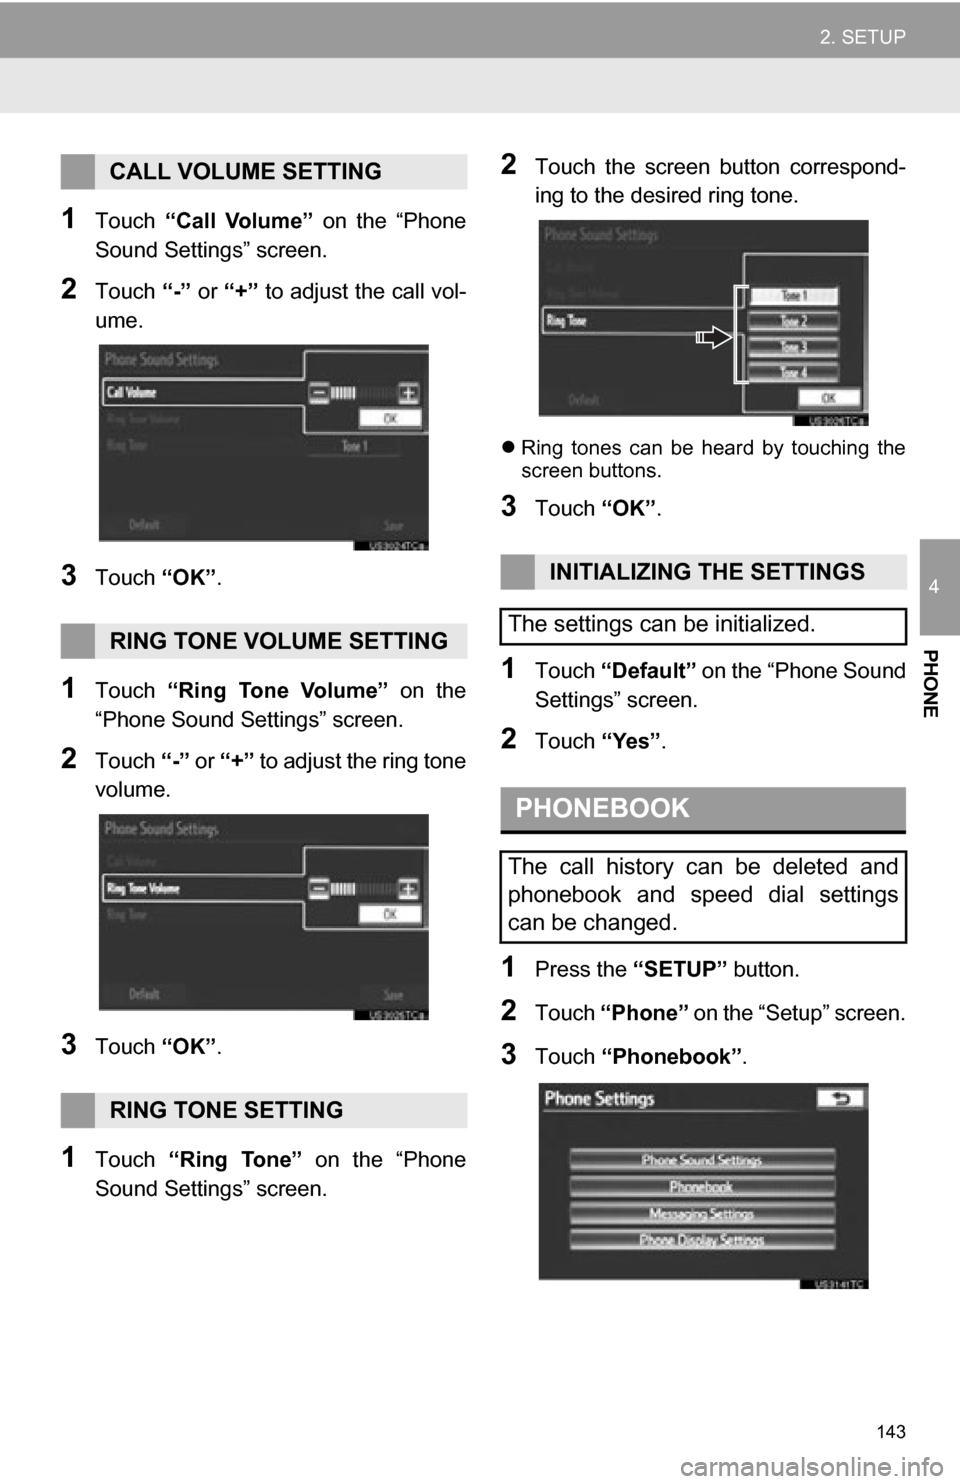
1Touch ÔÇťCall VolumeÔÇŁ on the ÔÇťPhone
Sound SettingsÔÇŁ screen.
2Touch ÔÇť-ÔÇŁ or ÔÇť+ÔÇŁ to adjust the call vol-
ume.
3Touch ÔÇťOKÔÇŁ.
1Touch ÔÇťRing Tone VolumeÔÇŁ on the
ÔÇťPhone Sound SettingsÔÇŁ screen.
2Touch ÔÇť-ÔÇŁ or ÔÇť+ÔÇŁ to adjust the ring tone
volume.
3Touch ÔÇťOKÔÇŁ.
1Touch ÔÇťRing ToneÔÇŁ on the ÔÇťPhone
Sound SettingsÔÇŁ screen.
2Touch the screen button correspond-
ing to the desired ring tone.
´üČ Ring tones can be heard by touching the
screen buttons.
3Touch ÔÇťOKÔÇŁ.
1Touch ÔÇťDefaultÔÇŁ on the ÔÇťPhone Sound
SettingsÔÇŁ screen.
2Touch ÔÇťYesÔÇŁ.
1Press the ÔÇťSETUPÔÇŁ button.
2Touch ÔÇťPhoneÔÇŁ on the ÔÇťSetupÔÇŁ screen.
3Touch ÔÇťPhonebookÔÇŁ .
CALL VOLUME SETTING
RING TONE VOLUME SETTING
RING TONE SETTING
INITIALIZING THE SETTINGS
The settings can be initialized.
PHONEBOOK
The call history can be deleted and
phonebook and speed dial settings
can be changed.
Page 144 of 328
144
2. SETUP
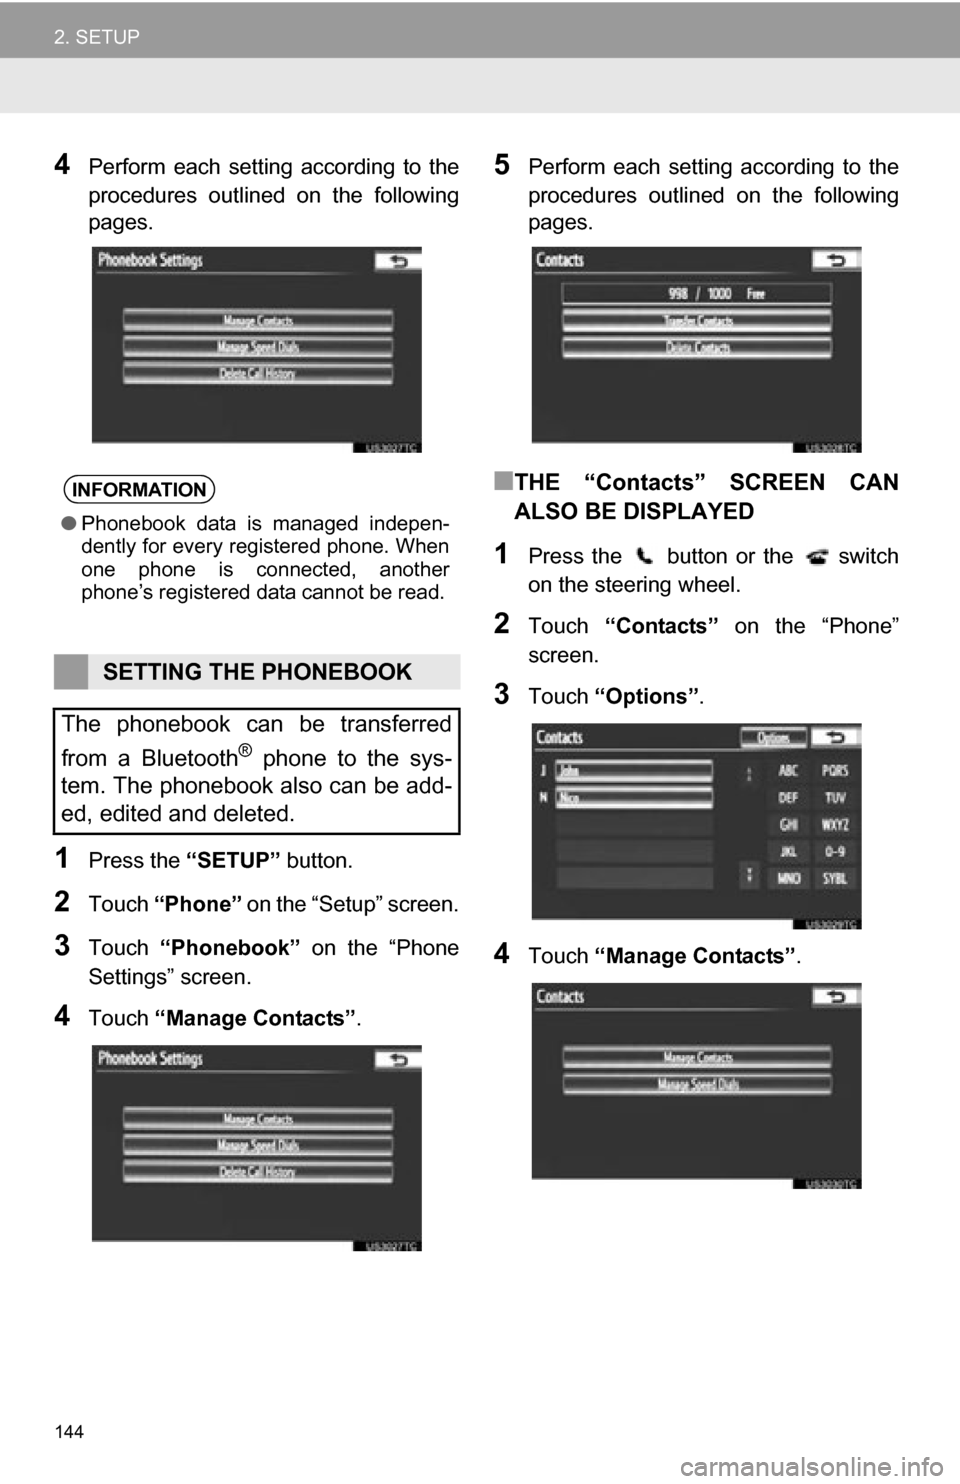
4Perform each setting according to the
procedures outlined on the following
pages.
1Press the ÔÇťSETUPÔÇŁ button.
2Touch ÔÇťPhoneÔÇŁ on the ÔÇťSetupÔÇŁ screen.
3Touch ÔÇťPhonebookÔÇŁ on the ÔÇťPhone
SettingsÔÇŁ screen.
4Touch ÔÇťManage ContactsÔÇŁ.
5Perform each setting according to the
procedures outlined on the following
pages.
ÔľáTHE ÔÇťContactsÔÇŁ SCREEN CAN
ALSO BE DISPLAYED
1Press the button or the switch
on the steering wheel.
2Touch ÔÇťContactsÔÇŁ on the ÔÇťPhoneÔÇŁ
screen.
3Touch ÔÇťOptionsÔÇŁ .
4Touch ÔÇťManage ContactsÔÇŁ .
INFORMATION
ÔŚĆPhonebook data is managed indepen-
dently for every registered phone. When
one phone is connected, another
phoneÔÇÖs registered data cannot be read.
SETTING THE PHONEBOOK
The phonebook can be transferred
from a Bluetooth
® phone to the sys-
tem. The phonebook also can be add-
ed, edited and deleted.
Page 145 of 328
145
2. SETUP
4
PHONE
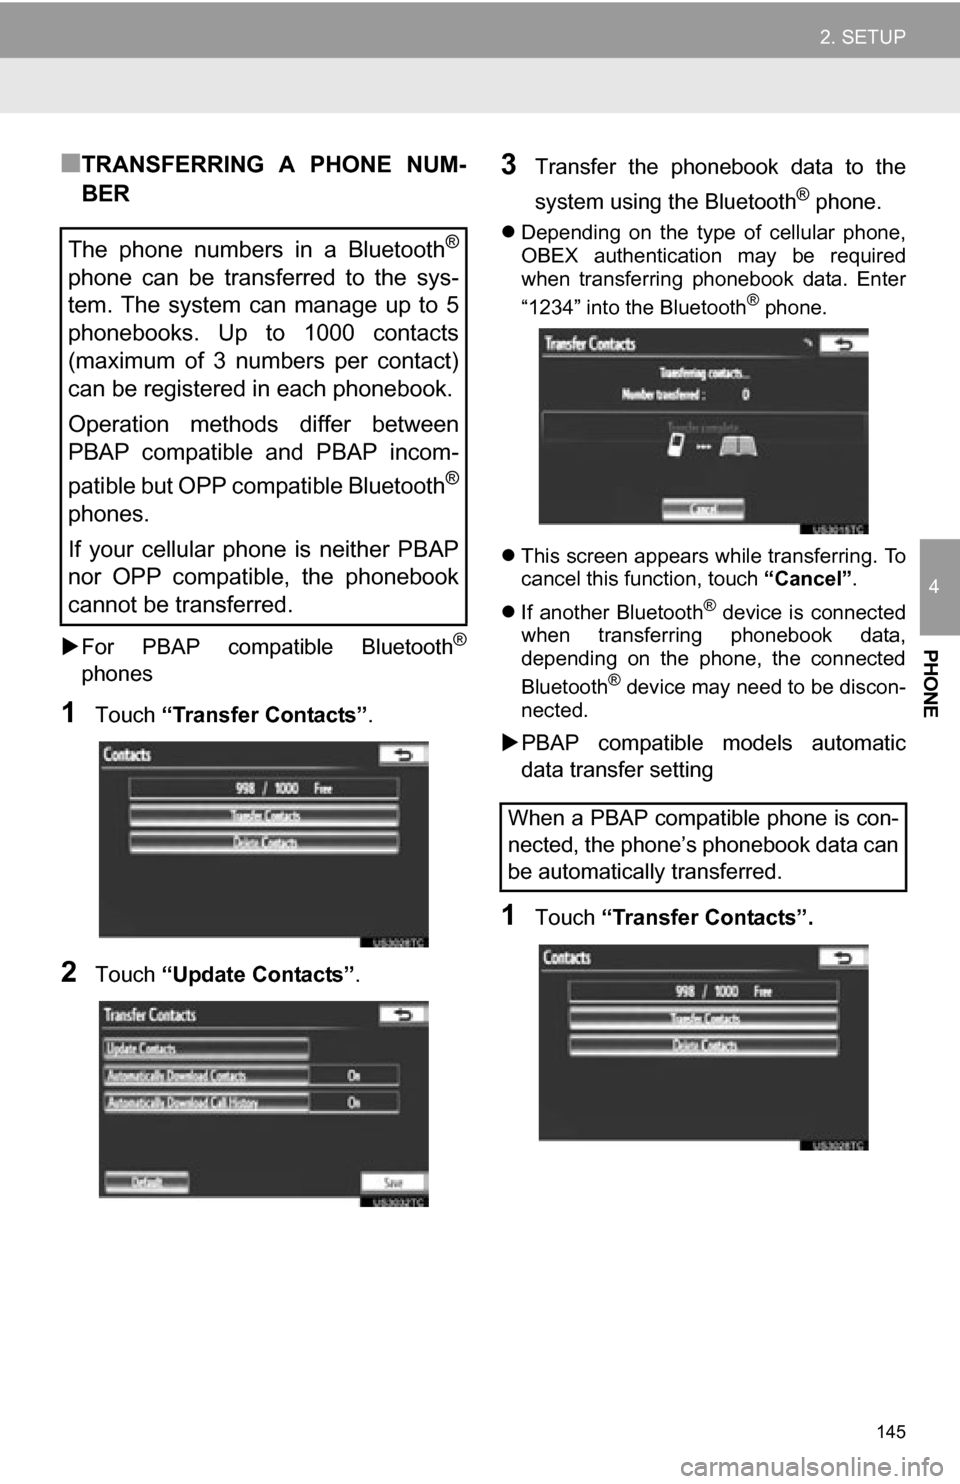
ÔľáTRANSFERRING A PHONE NUM-
BER
´üÁFor PBAP compatible Bluetooth┬«
phones
1Touch ÔÇťTransfer ContactsÔÇŁ .
2Touch ÔÇťUpdate ContactsÔÇŁ .
3Transfer the phonebook data to the
system using the Bluetooth
® phone.
´üČDepending on the type of cellular phone,
OBEX authentication may be required
when transferring phonebook data. Enter
ÔÇť1234ÔÇŁ into the Bluetooth
® phone.
´üČ This screen appears while transferring. To
cancel this function, touch ÔÇťCancelÔÇŁ.
´üČ If another Bluetooth
® device is connected
when transferring phonebook data,
depending on the phone, the connected
Bluetooth
® device may need to be discon-
nected.
´üÁ PBAP compatible models automatic
data transfer setting
1Touch ÔÇťTransfer ContactsÔÇŁ.
The phone numbers in a Bluetooth®
phone can be transferred to the sys-
tem. The system can manage up to 5
phonebooks. Up to 1000 contacts
(maximum of 3 numbers per contact)
can be registered in each phonebook.
Operation methods differ between
PBAP compatible and PBAP incom-
patible but OPP compatible Bluetooth
®
phones.
If your cellular phone is neither PBAP
nor OPP compatible, the phonebook
cannot be transferred.
When a PBAP compatible phone is con-
nected, the phoneÔÇÖs phonebook data can
be automatically transferred.
Page 146 of 328
146
2. SETUP
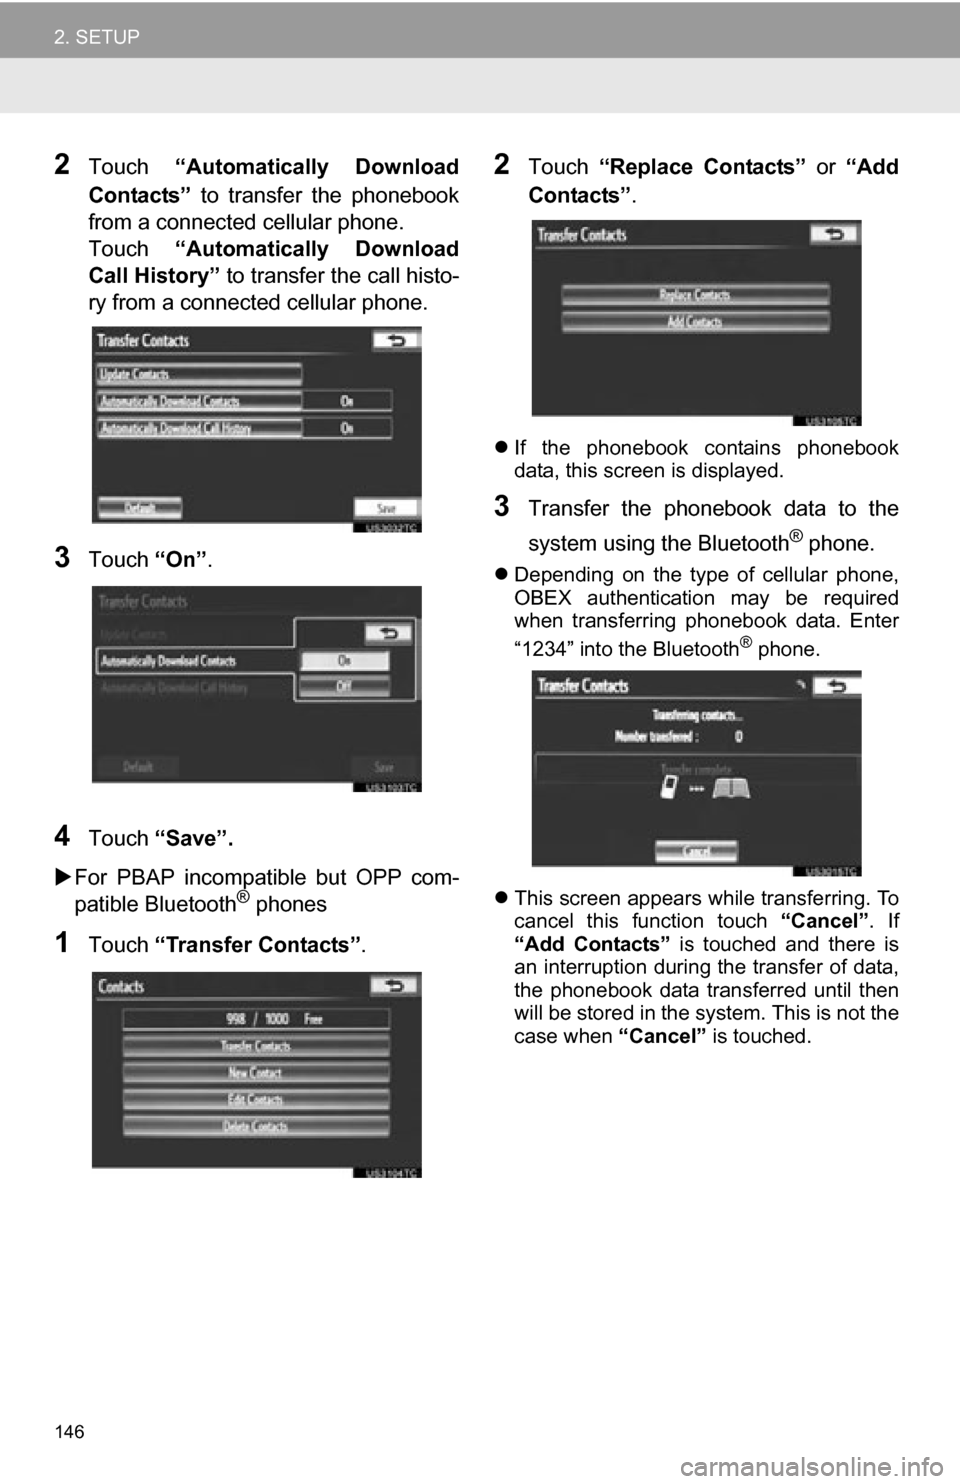
2Touch ÔÇťAutomatically Download
ContactsÔÇŁ to transfer the phonebook
from a connected cellular phone.
Touch ÔÇťAutomatically Download
Call HistoryÔÇŁ to transfer the call histo-
ry from a connected cellular phone.
3Touch ÔÇťOnÔÇŁ.
4Touch ÔÇťSaveÔÇŁ.
´üÁ For PBAP incompatible but OPP com-
patible Bluetooth
® phones
1Touch ÔÇťTransfer ContactsÔÇŁ.
2Touch ÔÇťReplace ContactsÔÇŁ or ÔÇťAdd
ContactsÔÇŁ .
´üČIf the phonebook contains phonebook
data, this screen is displayed.
3Transfer the phonebook data to the
system using the Bluetooth
® phone.
´üČDepending on the type of cellular phone,
OBEX authentication may be required
when transferring phonebook data. Enter
ÔÇť1234ÔÇŁ into the Bluetooth
® phone.
´üČ This screen appears while transferring. To
cancel this function touch ÔÇťCancelÔÇŁ. If
ÔÇťAdd ContactsÔÇŁ is touched and there is
an interruption during the transfer of data,
the phonebook data transferred until then
will be stored in the system. This is not the
case when ÔÇťCancelÔÇŁ is touched.
Page 147 of 328
147
2. SETUP
4
PHONE
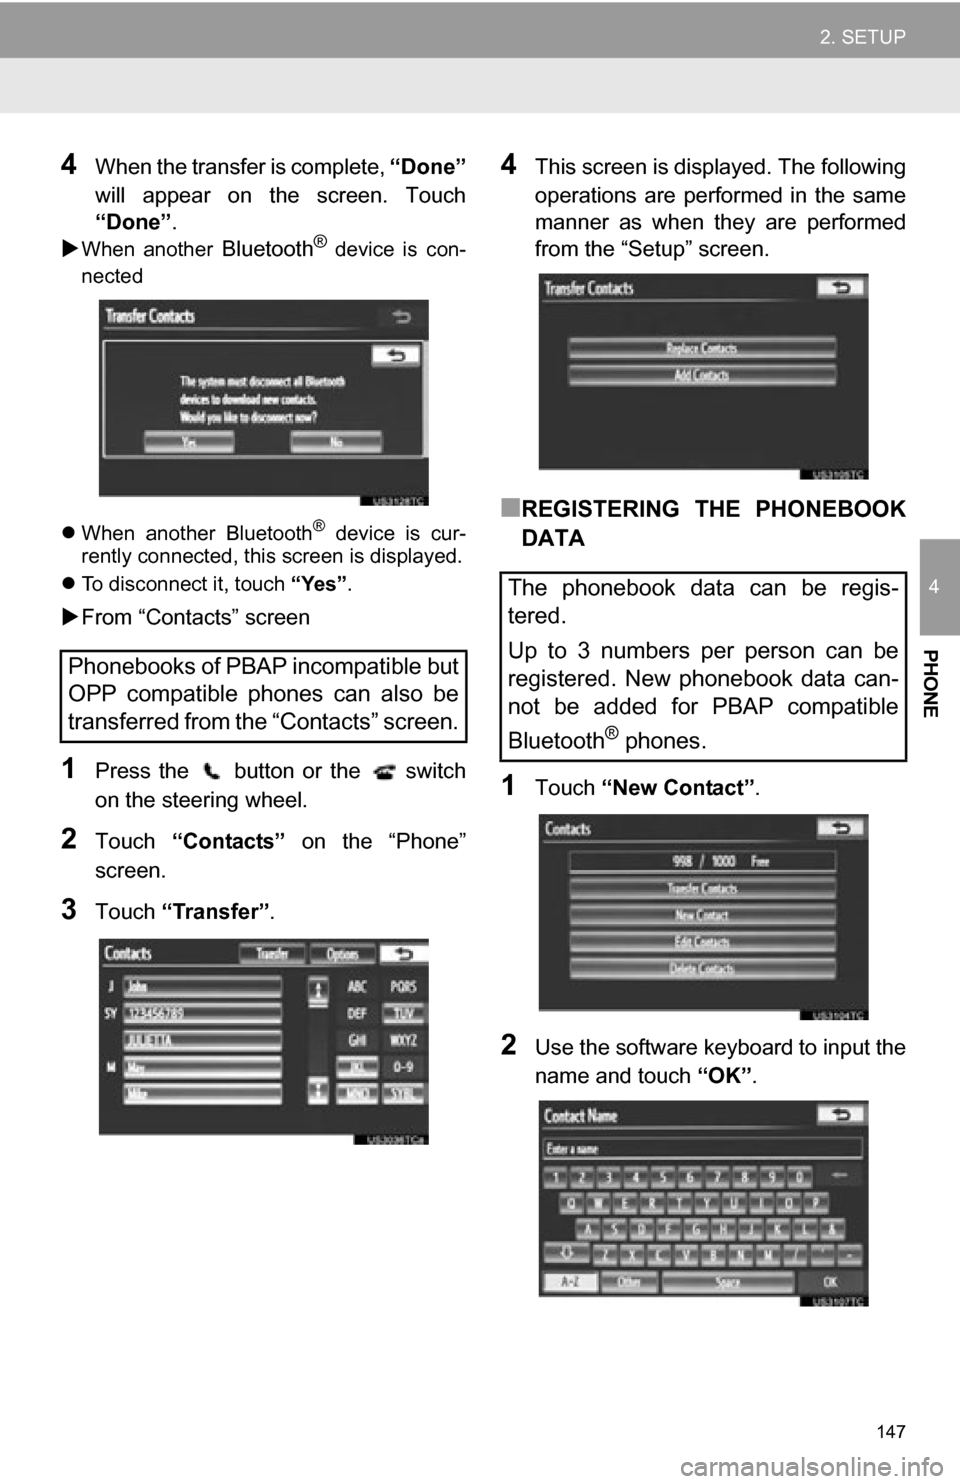
4When the transfer is complete, ÔÇťDoneÔÇŁ
will appear on the screen. Touch
ÔÇťDoneÔÇŁ .
´üÁ
When another Bluetooth® device is con-
nected
´üČ When another Bluetooth
® device is cur-
rently connected, this screen is displayed.
´üČ To disconnect it, touch ÔÇťYesÔÇŁ.
´üÁFrom ÔÇťContactsÔÇŁ screen
1Press the button or the switch
on the steering wheel.
2Touch ÔÇťContactsÔÇŁ on the ÔÇťPhoneÔÇŁ
screen.
3Touch ÔÇťTransferÔÇŁ .
4This screen is displayed. The following
operations are performed in the same
manner as when they are performed
from the ÔÇťSetupÔÇŁ screen.
ÔľáREGISTERING THE PHONEBOOK
DATA
1Touch ÔÇťNew ContactÔÇŁ .
2Use the software keyboard to input the
name and touch ÔÇťOKÔÇŁ.
Phonebooks of PBAP incompatible but
OPP compatible phones can also be
transferred from the ÔÇťContactsÔÇŁ screen.
The phonebook data can be regis-
tered.
Up to 3 numbers per person can be
registered. New phonebook data can-
not be added for PBAP compatible
Bluetooth
® phones.
Page 148 of 328
148
2. SETUP
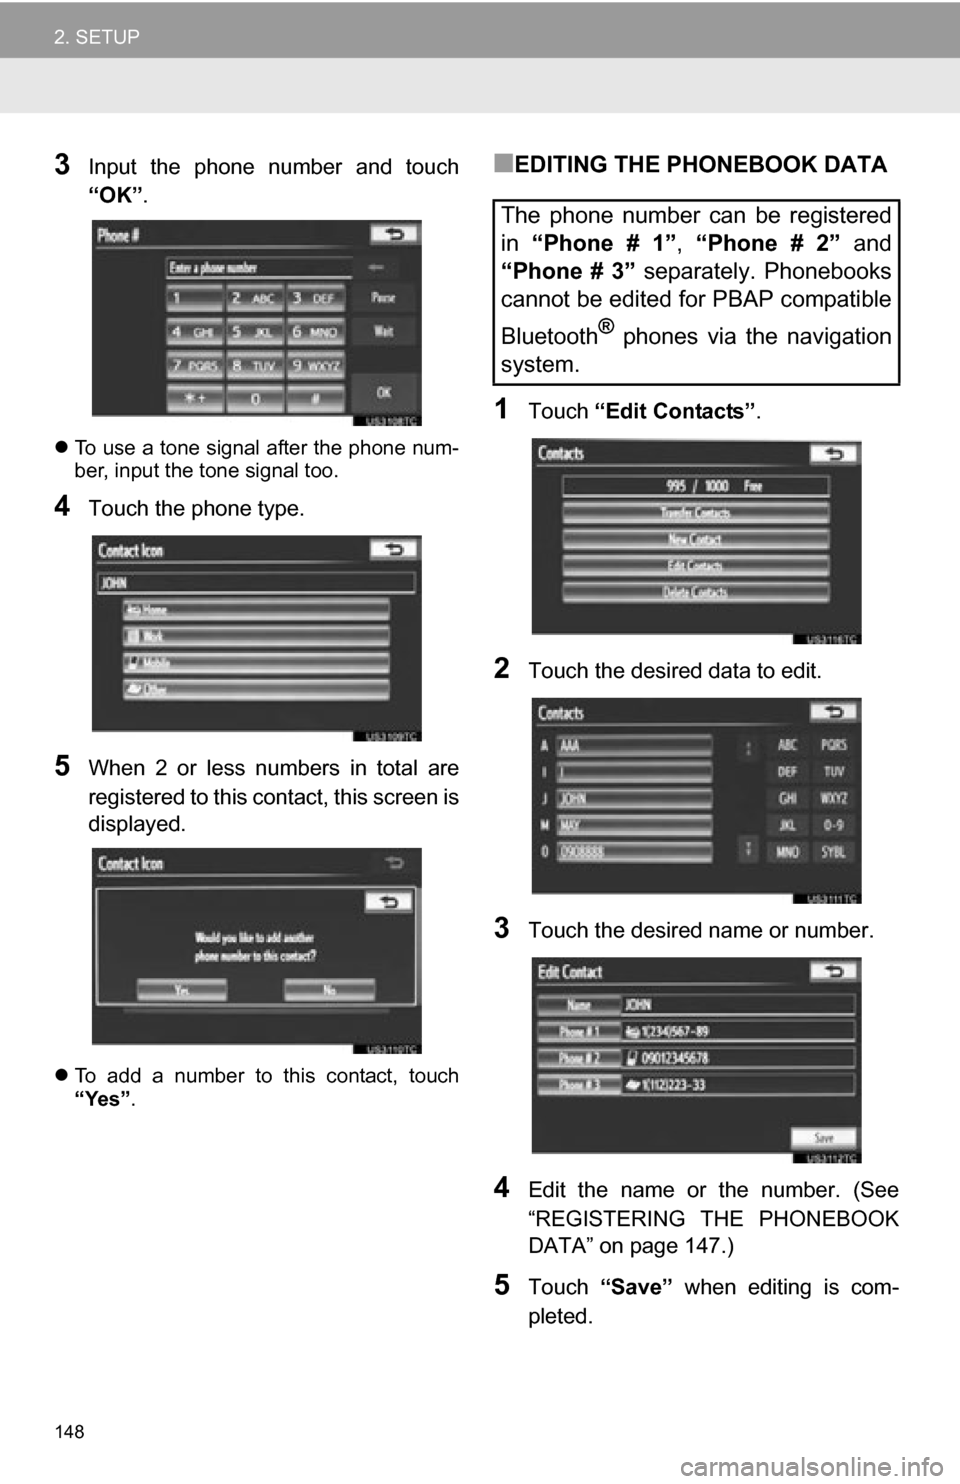
3Input the phone number and touch
ÔÇťOKÔÇŁ.
´üČTo use a tone signal after the phone num-
ber, input the tone signal too.
4Touch the phone type.
5When 2 or less numbers in total are
registered to this contact, this screen is
displayed.
´üČTo add a number to this contact, touch
ÔÇťYesÔÇŁ .
ÔľáEDITING THE PHONEBOOK DATA
1Touch ÔÇťEdit ContactsÔÇŁ .
2Touch the desired data to edit.
3Touch the desired name or number.
4Edit the name or the number. (See
ÔÇťREGISTERING THE PHONEBOOK
DATAÔÇŁ on page 147.)
5Touch ÔÇťSaveÔÇŁ when editing is com-
pleted.
The phone number can be registered
in ÔÇťPhone # 1ÔÇŁ , ÔÇťPhone # 2ÔÇŁ and
ÔÇťPhone # 3ÔÇŁ separately. Phonebooks
cannot be edited for PBAP compatible
Bluetooth
® phones via the navigation
system.
Page 149 of 328
149
2. SETUP
4
PHONE
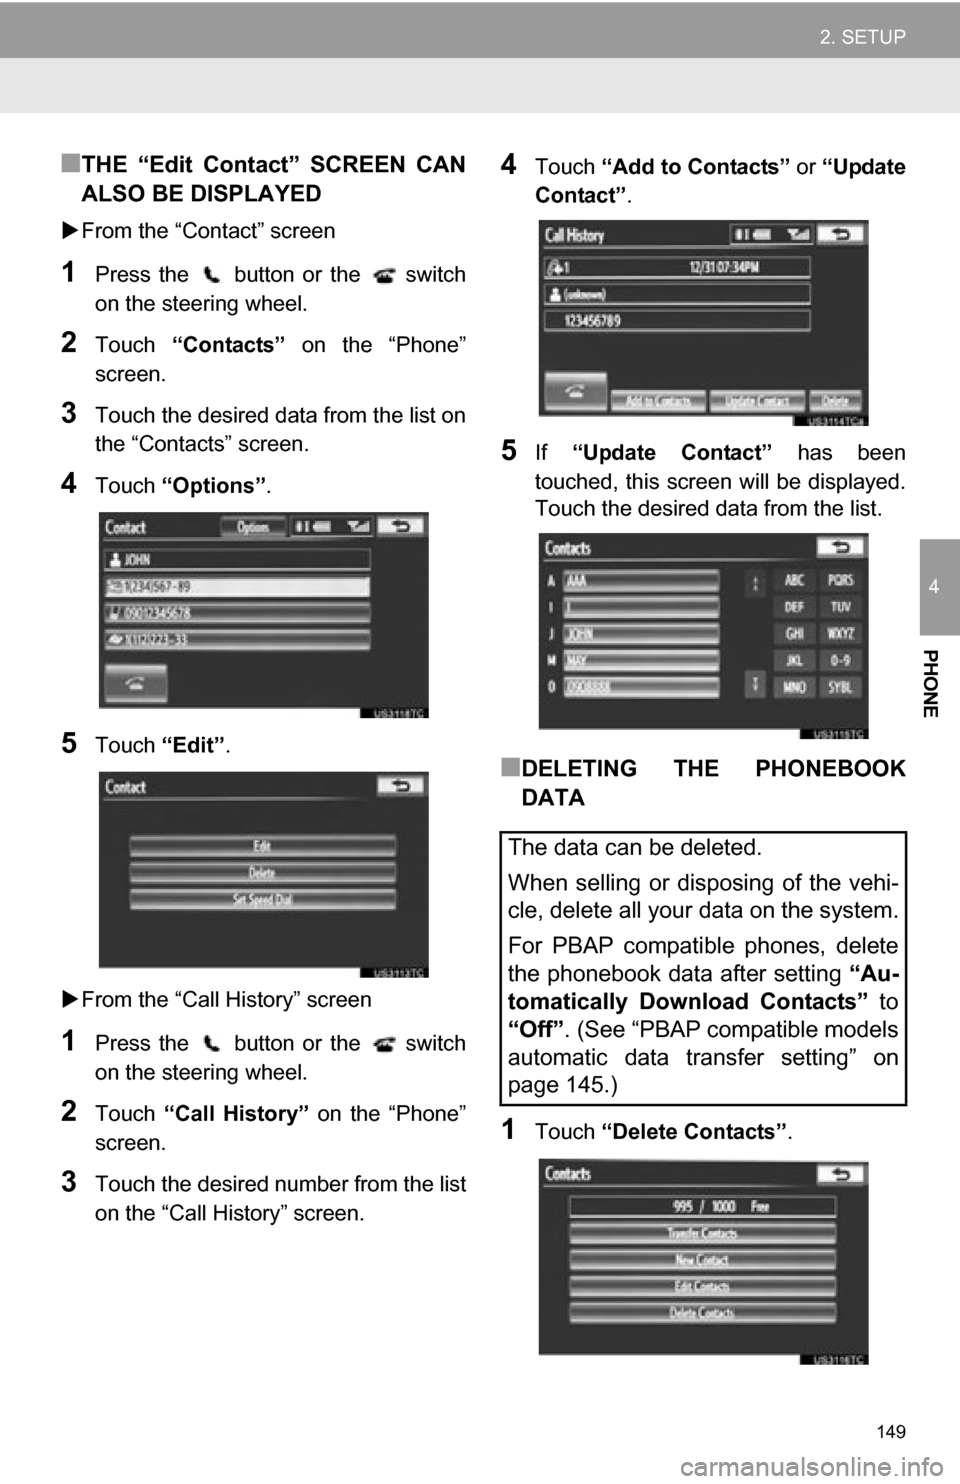
ÔľáTHE ÔÇťEdit ContactÔÇŁ SCREEN CAN
ALSO BE DISPLAYED
´üÁFrom the ÔÇťContactÔÇŁ screen
1Press the button or the switch
on the steering wheel.
2Touch ÔÇťContactsÔÇŁ on the ÔÇťPhoneÔÇŁ
screen.
3Touch the desired data from the list on
the ÔÇťContactsÔÇŁ screen.
4Touch ÔÇťOptionsÔÇŁ.
5Touch ÔÇťEditÔÇŁ.
´üÁ From the ÔÇťCall HistoryÔÇŁ screen
1Press the button or the switch
on the steering wheel.
2Touch ÔÇťCall HistoryÔÇŁ on the ÔÇťPhoneÔÇŁ
screen.
3Touch the desired number from the list
on the ÔÇťCall HistoryÔÇŁ screen.
4Touch ÔÇťAdd to ContactsÔÇŁ or ÔÇťUpdate
ContactÔÇŁ .
5If ÔÇťUpdate ContactÔÇŁ has been
touched, this screen will be displayed.
Touch the desired data from the list.
ÔľáDELETING THE PHONEBOOK
DATA
1Touch ÔÇťDelete ContactsÔÇŁ .
The data can be deleted.
When selling or disposing of the vehi-
cle, delete all your data on the system.
For PBAP compatible phones, delete
the phonebook data after setting ÔÇťAu-
tomatically Download ContactsÔÇŁ to
ÔÇťOffÔÇŁ. (See ÔÇťPBAP compatible models
automatic data transfer settingÔÇŁ on
page 145.)
Page 150 of 328
150
2. SETUP
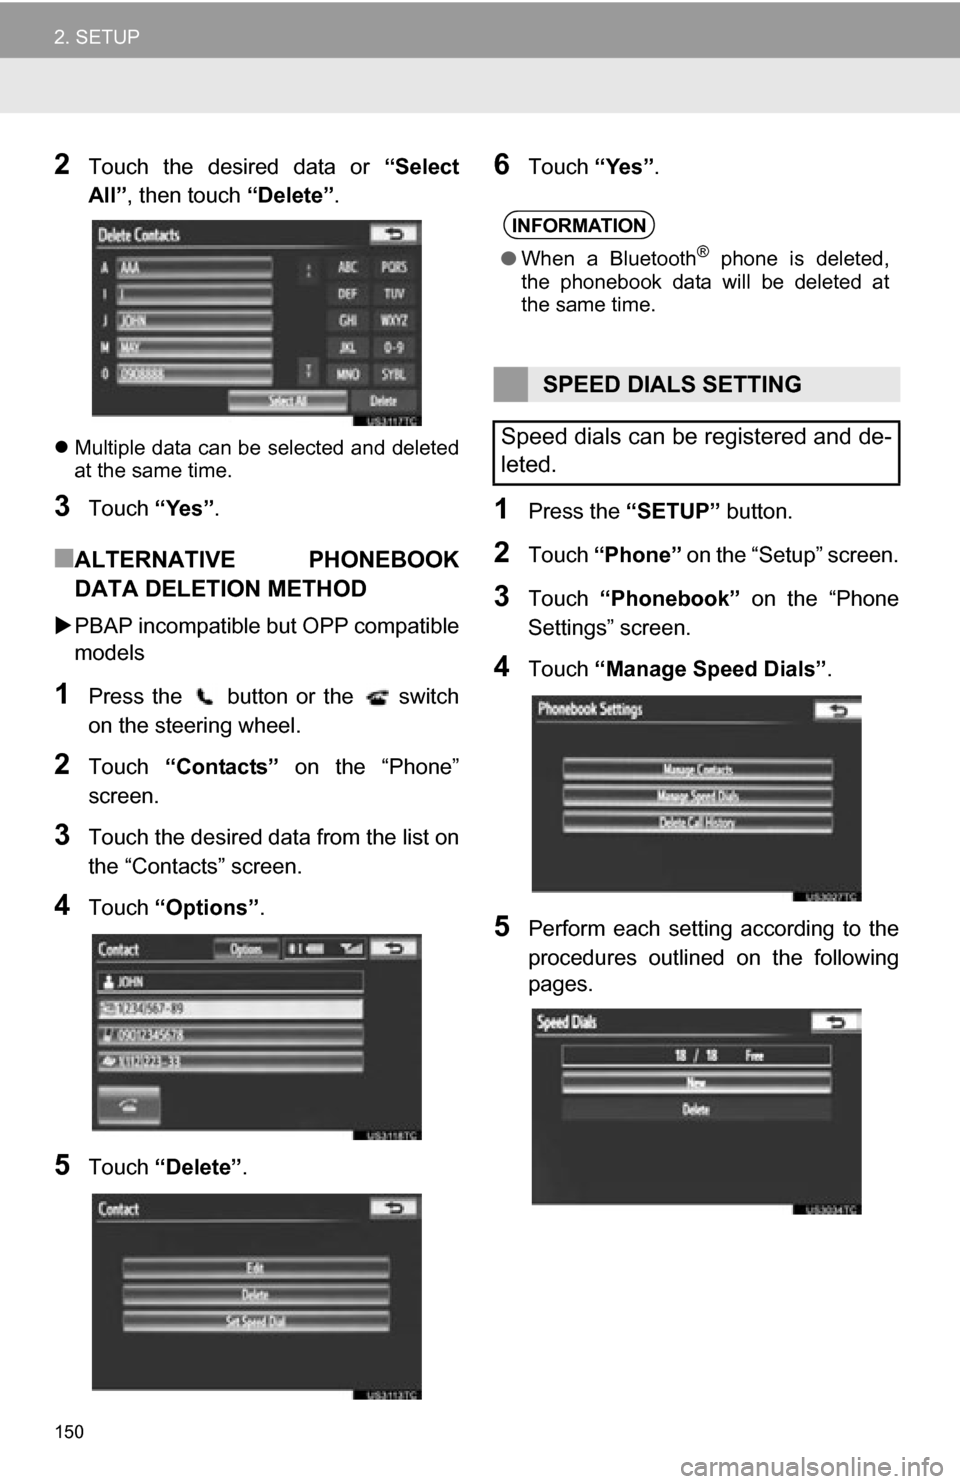
2Touch the desired data or ÔÇťSelect
AllÔÇŁ , then touch ÔÇťDeleteÔÇŁ.
´üČMultiple data can be selected and deleted
at the same time.
3Touch ÔÇťYesÔÇŁ.
ÔľáALTERNATIVE PHONEBOOK
DATA DELETION METHOD
´üÁPBAP incompatible bu t OPP compatible
models
1Press the button or the switch
on the steering wheel.
2Touch ÔÇťContactsÔÇŁ on the ÔÇťPhoneÔÇŁ
screen.
3Touch the desired data from the list on
the ÔÇťContactsÔÇŁ screen.
4Touch ÔÇťOptionsÔÇŁ.
5Touch ÔÇťDeleteÔÇŁ .
6Touch ÔÇťYesÔÇŁ.
1Press the ÔÇťSETUPÔÇŁ button.
2Touch ÔÇťPhoneÔÇŁ on the ÔÇťSetupÔÇŁ screen.
3Touch ÔÇťPhonebookÔÇŁ on the ÔÇťPhone
SettingsÔÇŁ screen.
4Touch ÔÇťManage Speed DialsÔÇŁ .
5Perform each setting according to the
procedures outlined on the following
pages.
INFORMATION
ÔŚĆWhen a Bluetooth┬« phone is deleted,
the phonebook data will be deleted at
the same time.
SPEED DIALS SETTING
Speed dials can be registered and de-
leted.