TOYOTA CAMRY V20 1986 Service Information
Manufacturer: TOYOTA, Model Year: 1986, Model line: CAMRY V20, Model: TOYOTA CAMRY V20 1986Pages: 2389, PDF Size: 84.44 MB
Page 1291 of 2389
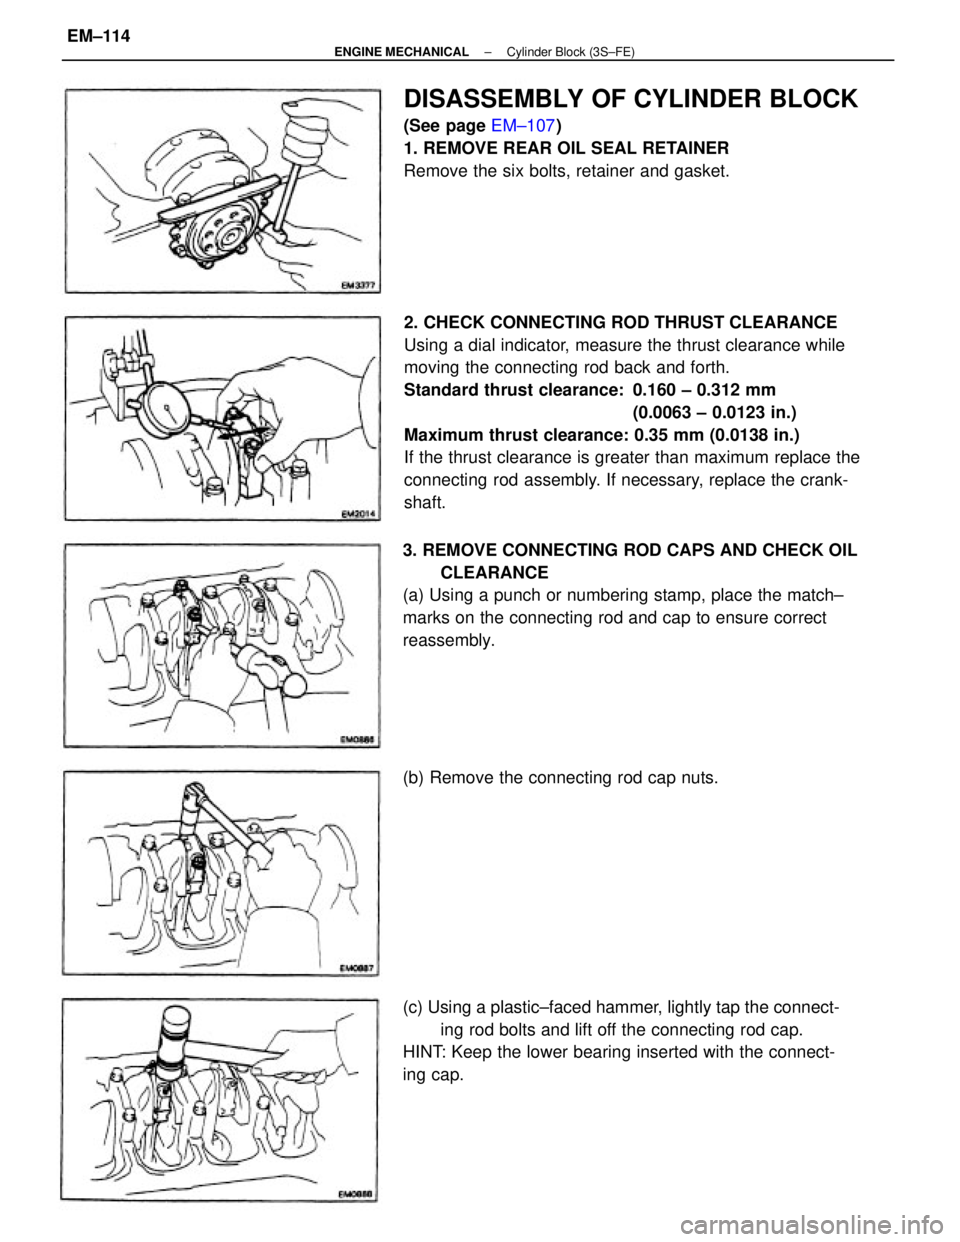
2. CHECK CONNECTING ROD THRUST CLEARANCE
Using a dial indicator, measure the thrust clearance while
moving the connecting rod back and forth.
Standard thrust clearance: 0.160 ± 0.312 mm
(0.0063 ± 0.0123 in.)
Maximum thrust clearance: 0.35 mm (0.0138 in.)
If the thrust clearance is greater than maximum replace the
connecting rod assembly. If necessary, replace the crank-
shaft.
3. REMOVE CONNECTING ROD CAPS AND CHECK OIL
CLEARANCE
(a) Using a punch or numbering stamp, place the match±
marks on the connecting rod and cap to ensure correct
reassembly.
(c) Using a plastic±faced hammer, lightly tap the connect-
ing rod bolts and lift off the connecting rod cap.
HINT: Keep the lower bearing inserted with the connect-
ing cap.
DISASSEMBLY OF CYLINDER BLOCK
(See page EM±107)
1. REMOVE REAR OIL SEAL RETAINER
Remove the six bolts, retainer and gasket.
(b) Remove the connecting rod cap nuts.
± ENGINE MECHANICALCylinder Block (3S±FE)EM±114
Page 1292 of 2389
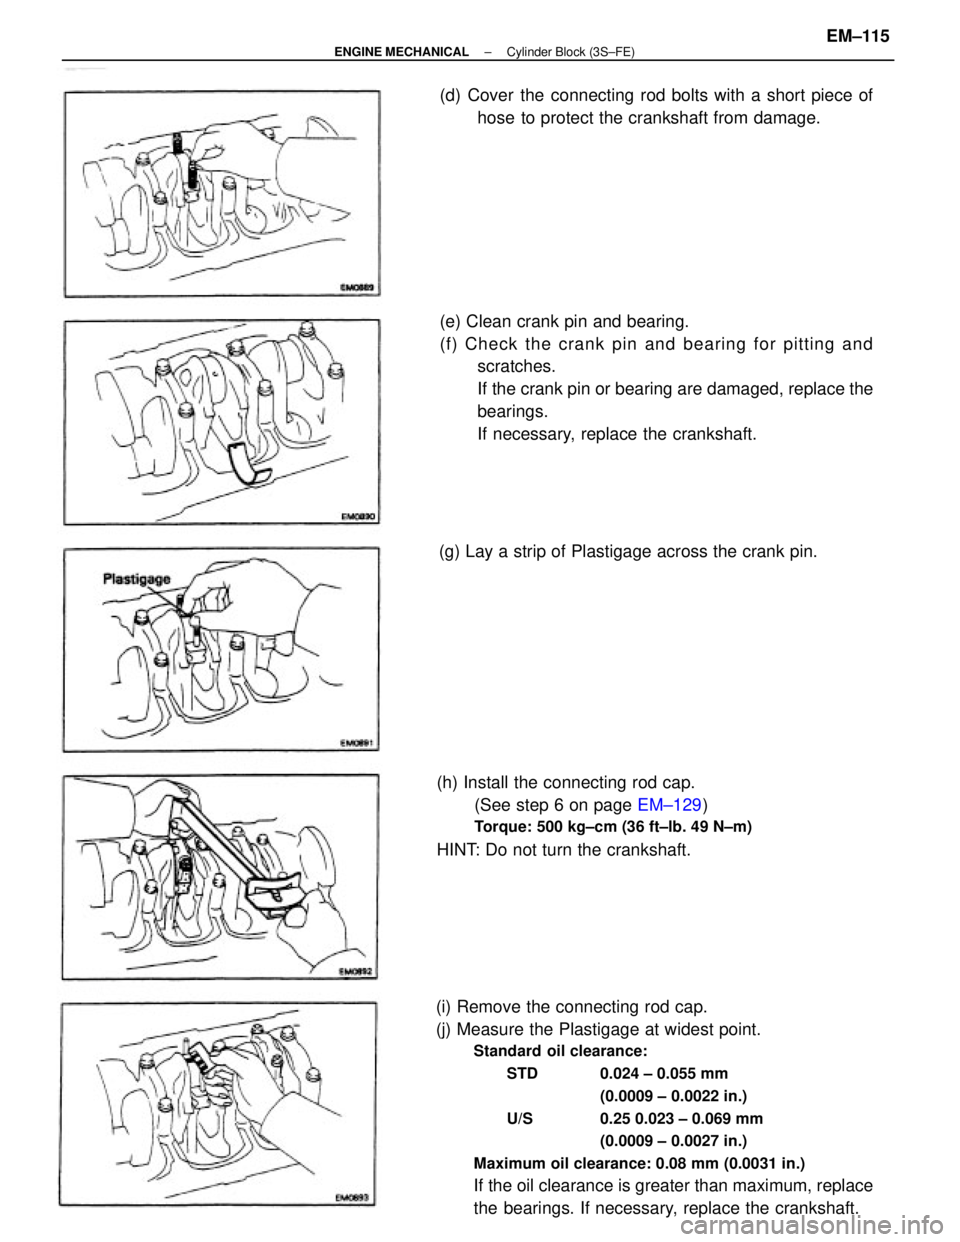
(i) Remove the connecting rod cap.
(j) Measure the Plastigage at widest point.
Standard oil clearance:
STD 0.024 ± 0.055 mm
(0.0009 ± 0.0022 in.)
U/S 0.25 0.023 ± 0.069 mm
(0.0009 ± 0.0027 in.)
Maximum oil clearance: 0.08 mm (0.0031 in.)
If the oil clearance is greater than maximum, replace
the bearings. If necessary, replace the crankshaft. (e) Clean crank pin and bearing.
(f) Check the crank pin and bearing for pitting and
scratches.
If the crank pin or bearing are damaged, replace the
bearings.
If necessary, replace the crankshaft.
(h) Install the connecting rod cap.
(See step 6 on page EM±129)
Torque: 500 kg±cm (36 ft±lb. 49 N±m)
HINT: Do not turn the crankshaft.(d) Cover the connecting rod bolts with a short piece of
hose to protect the crankshaft from damage.
(g) Lay a strip of Plastigage across the crank pin.
± ENGINE MECHANICALCylinder Block (3S±FE)EM±115
Page 1293 of 2389
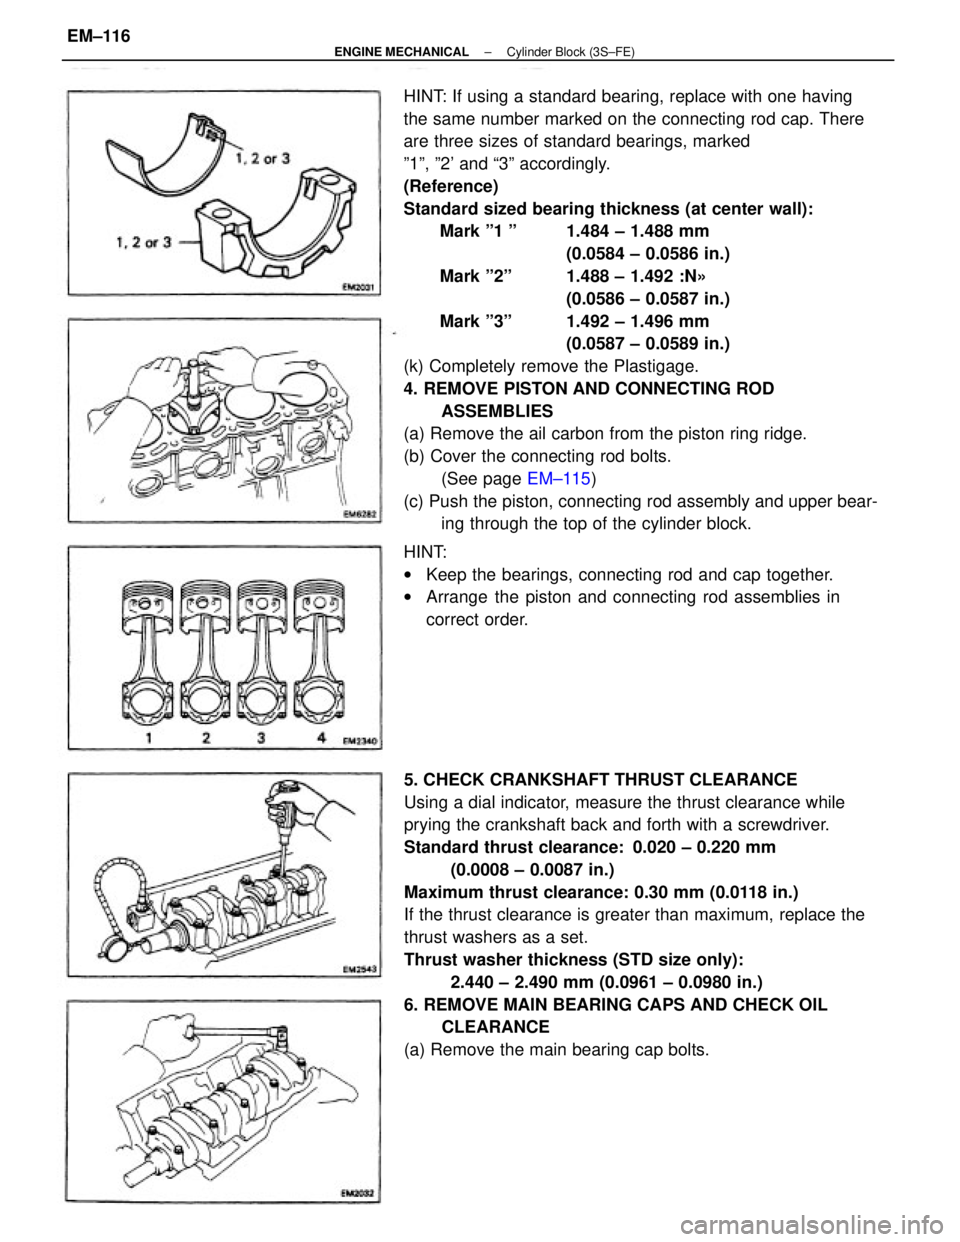
HINT: If using a standard bearing, replace with one having
the same number marked on the connecting rod cap. There
are three sizes of standard bearings, marked
º1º, º2' and ª3º accordingly.
(Reference)
Standard sized bearing thickness (at center wall):
Mark º1 º 1.484 ± 1.488 mm
(0.0584 ± 0.0586 in.)
Mark º2º 1.488 ± 1.492 :N»
(0.0586 ± 0.0587 in.)
Mark º3º 1.492 ± 1.496 mm
(0.0587 ± 0.0589 in.)
(k) Completely remove the Plastigage.
4. REMOVE PISTON AND CONNECTING ROD
ASSEMBLIES
(a) Remove the ail carbon from the piston ring ridge.
(b) Cover the connecting rod bolts.
(See page EM±115)
(c) Push the piston, connecting rod assembly and upper bear-
ing through the top of the cylinder block.
5. CHECK CRANKSHAFT THRUST CLEARANCE
Using a dial indicator, measure the thrust clearance while
prying the crankshaft back and forth with a screwdriver.
Standard thrust clearance: 0.020 ± 0.220 mm
(0.0008 ± 0.0087 in.)
Maximum thrust clearance: 0.30 mm (0.0118 in.)
If the thrust clearance is greater than maximum, replace the
thrust washers as a set.
Thrust washer thickness (STD size only):
2.440 ± 2.490 mm (0.0961 ± 0.0980 in.)
6. REMOVE MAIN BEARING CAPS AND CHECK OIL
CLEARANCE
(a) Remove the main bearing cap bolts. HINT:
wKeep the bearings, connecting rod and cap together.
wArrange the piston and connecting rod assemblies in
correct order.
± ENGINE MECHANICALCylinder Block (3S±FE)EM±116
Page 1294 of 2389
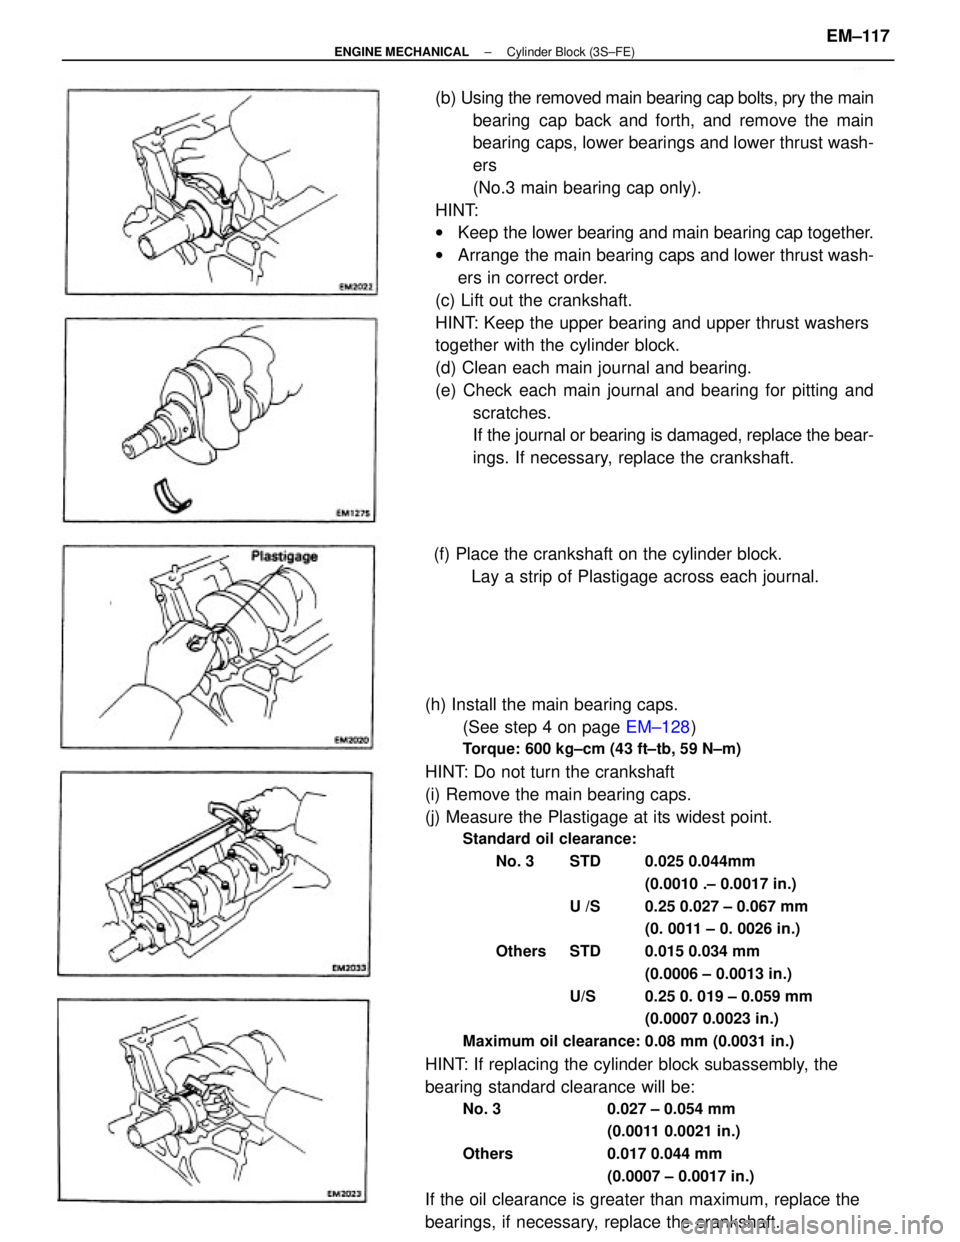
(h) Install the main bearing caps.
(See step 4 on page EM±128)
Torque: 600 kg±cm (43 ft±tb, 59 N±m)
HINT: Do not turn the crankshaft
(i) Remove the main bearing caps.
(j) Measure the Plastigage at its widest point.
Standard oil clearance:
No. 3 STD 0.025 0.044mm
(0.0010 .± 0.0017 in.)
U /S 0.25 0.027 ± 0.067 mm
(0. 0011 ± 0. 0026 in.)
Others STD 0.015 0.034 mm
(0.0006 ± 0.0013 in.)
U/S 0.25 0. 019 ± 0.059 mm
(0.0007 0.0023 in.)
Maximum oil clearance: 0.08 mm (0.0031 in.)
HINT: If replacing the cylinder block subassembly, the
bearing standard clearance will be:
No. 3 0.027 ± 0.054 mm
(0.0011 0.0021 in.)
Others 0.017 0.044 mm
(0.0007 ± 0.0017 in.)
If the oil clearance is greater than maximum, replace the
bearings, if necessary, replace the crankshaft.(b) Using the removed main bearing cap bolts, pry the main
bearing cap back and forth, and remove the main
bearing caps, lower bearings and lower thrust wash-
ers
(No.3 main bearing cap only).
HINT:
wKeep the lower bearing and main bearing cap together.
wArrange the main bearing caps and lower thrust wash-
ers in correct order.
(c) Lift out the crankshaft.
HINT: Keep the upper bearing and upper thrust washers
together with the cylinder block.
(d) Clean each main journal and bearing.
(e) Check each main journal and bearing for pitting and
scratches.
If the journal or bearing is damaged, replace the bear-
ings. If necessary, replace the crankshaft.
(f) Place the crankshaft on the cylinder block.
Lay a strip of Plastigage across each journal.
± ENGINE MECHANICALCylinder Block (3S±FE)EM±117
Page 1295 of 2389
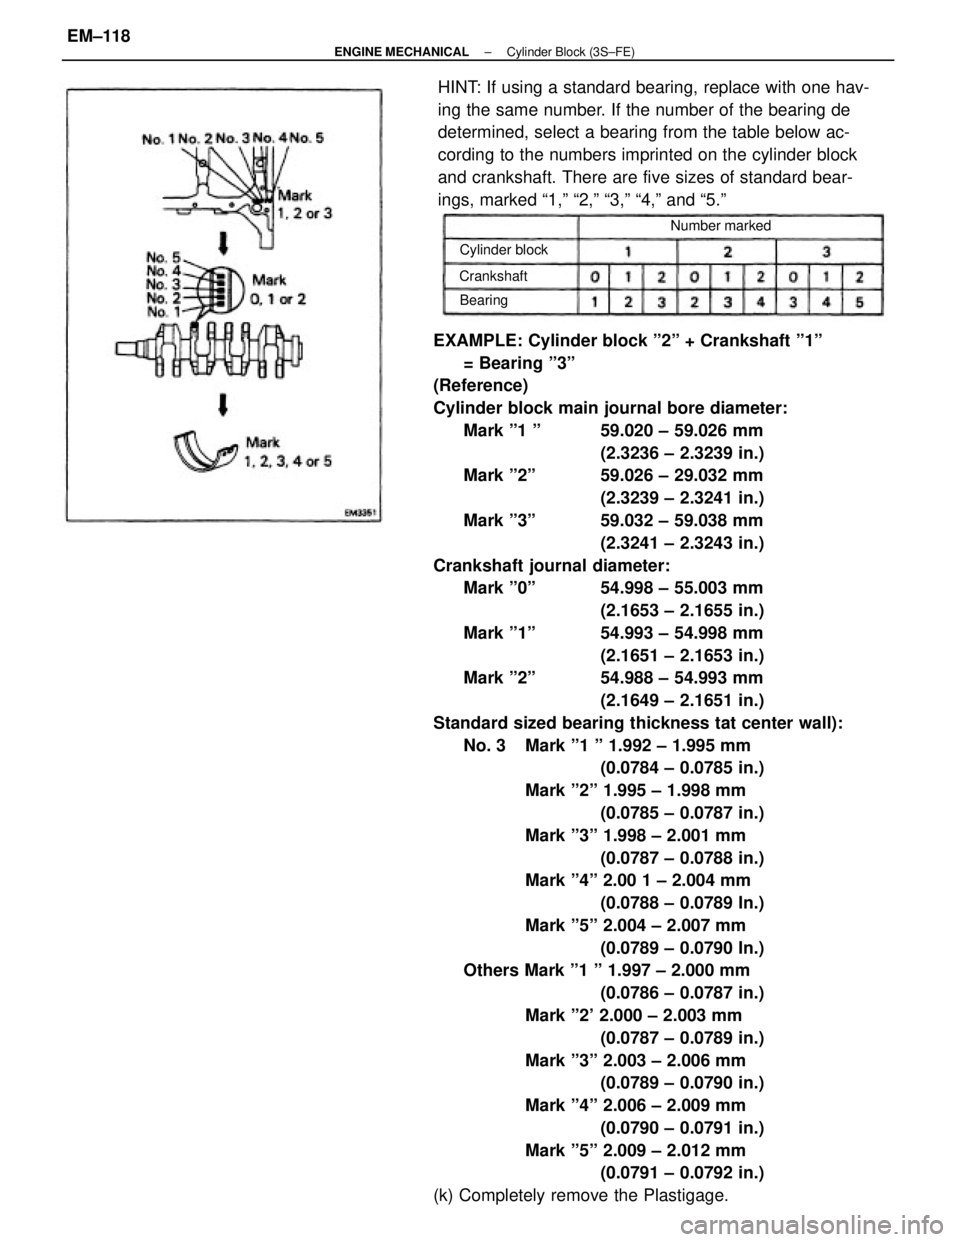
EXAMPLE: Cylinder block º2º + Crankshaft º1º
= Bearing º3º
(Reference)
Cylinder block main journal bore diameter:
Mark º1 º 59.020 ± 59.026 mm
(2.3236 ± 2.3239 in.)
Mark º2º 59.026 ± 29.032 mm
(2.3239 ± 2.3241 in.)
Mark º3º 59.032 ± 59.038 mm
(2.3241 ± 2.3243 in.)
Crankshaft journal diameter:
Mark º0º 54.998 ± 55.003 mm
(2.1653 ± 2.1655 in.)
Mark º1º 54.993 ± 54.998 mm
(2.1651 ± 2.1653 in.)
Mark º2º 54.988 ± 54.993 mm
(2.1649 ± 2.1651 in.)
Standard sized bearing thickness tat center wall):
No. 3 Mark º1 º 1.992 ± 1.995 mm
(0.0784 ± 0.0785 in.)
Mark º2º 1.995 ± 1.998 mm
(0.0785 ± 0.0787 in.)
Mark º3º 1.998 ± 2.001 mm
(0.0787 ± 0.0788 in.)
Mark º4º 2.00 1 ± 2.004 mm
(0.0788 ± 0.0789 In.)
Mark º5º 2.004 ± 2.007 mm
(0.0789 ± 0.0790 In.)
Others Mark º1 º 1.997 ± 2.000 mm
(0.0786 ± 0.0787 in.)
Mark º2' 2.000 ± 2.003 mm
(0.0787 ± 0.0789 in.)
Mark º3º 2.003 ± 2.006 mm
(0.0789 ± 0.0790 in.)
Mark º4º 2.006 ± 2.009 mm
(0.0790 ± 0.0791 in.)
Mark º5º 2.009 ± 2.012 mm
(0.0791 ± 0.0792 in.)
(k) Completely remove the Plastigage.HINT: If using a standard bearing, replace with one hav-
ing the same number. If the number of the bearing de
determined, select a bearing from the table below ac-
cording to the numbers imprinted on the cylinder block
and crankshaft. There are five sizes of standard bear-
ings, marked ª1,º ª2,º ª3,º ª4,º and ª5.º
Number marked
Cylinder block
Crankshaft
Bearing
± ENGINE MECHANICALCylinder Block (3S±FE)EM±118
Page 1296 of 2389
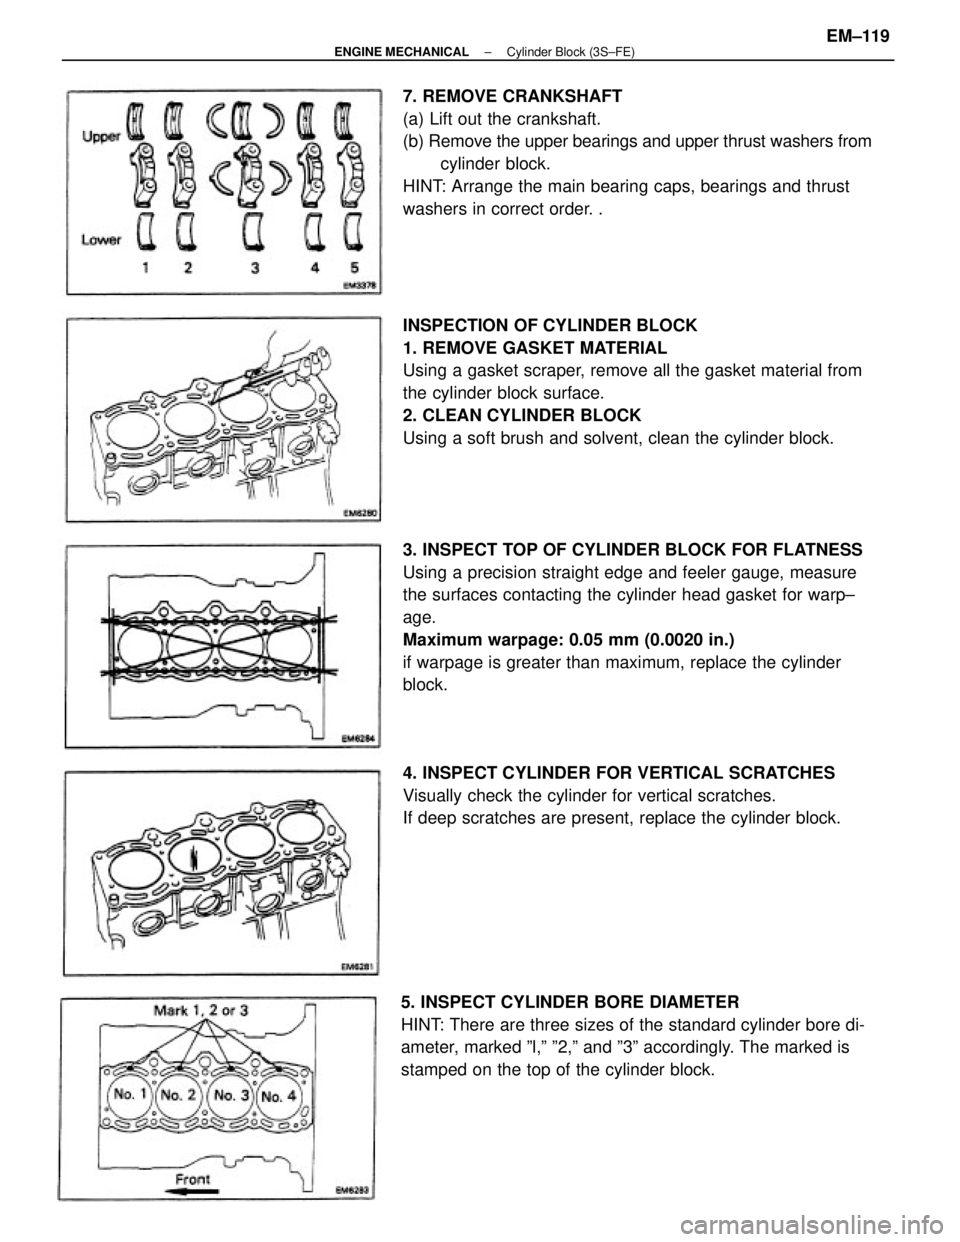
INSPECTION OF CYLINDER BLOCK
1. REMOVE GASKET MATERIAL
Using a gasket scraper, remove all the gasket material from
the cylinder block surface.
2. CLEAN CYLINDER BLOCK
Using a soft brush and solvent, clean the cylinder block.
3. INSPECT TOP OF CYLINDER BLOCK FOR FLATNESS
Using a precision straight edge and feeler gauge, measure
the surfaces contacting the cylinder head gasket for warp±
age.
Maximum warpage: 0.05 mm (0.0020 in.)
if warpage is greater than maximum, replace the cylinder
block. 7. REMOVE CRANKSHAFT
(a) Lift out the crankshaft.
(b) Remove the upper bearings and upper thrust washers from
cylinder block.
HINT: Arrange the main bearing caps, bearings and thrust
washers in correct order. .
5. INSPECT CYLINDER BORE DIAMETER
HINT: There are three sizes of the standard cylinder bore di-
ameter, marked ºl,º º2,º and º3º accordingly. The marked is
stamped on the top of the cylinder block.4. INSPECT CYLINDER FOR VERTICAL SCRATCHES
Visually check the cylinder for vertical scratches.
If deep scratches are present, replace the cylinder block.
± ENGINE MECHANICALCylinder Block (3S±FE)EM±119
Page 1297 of 2389
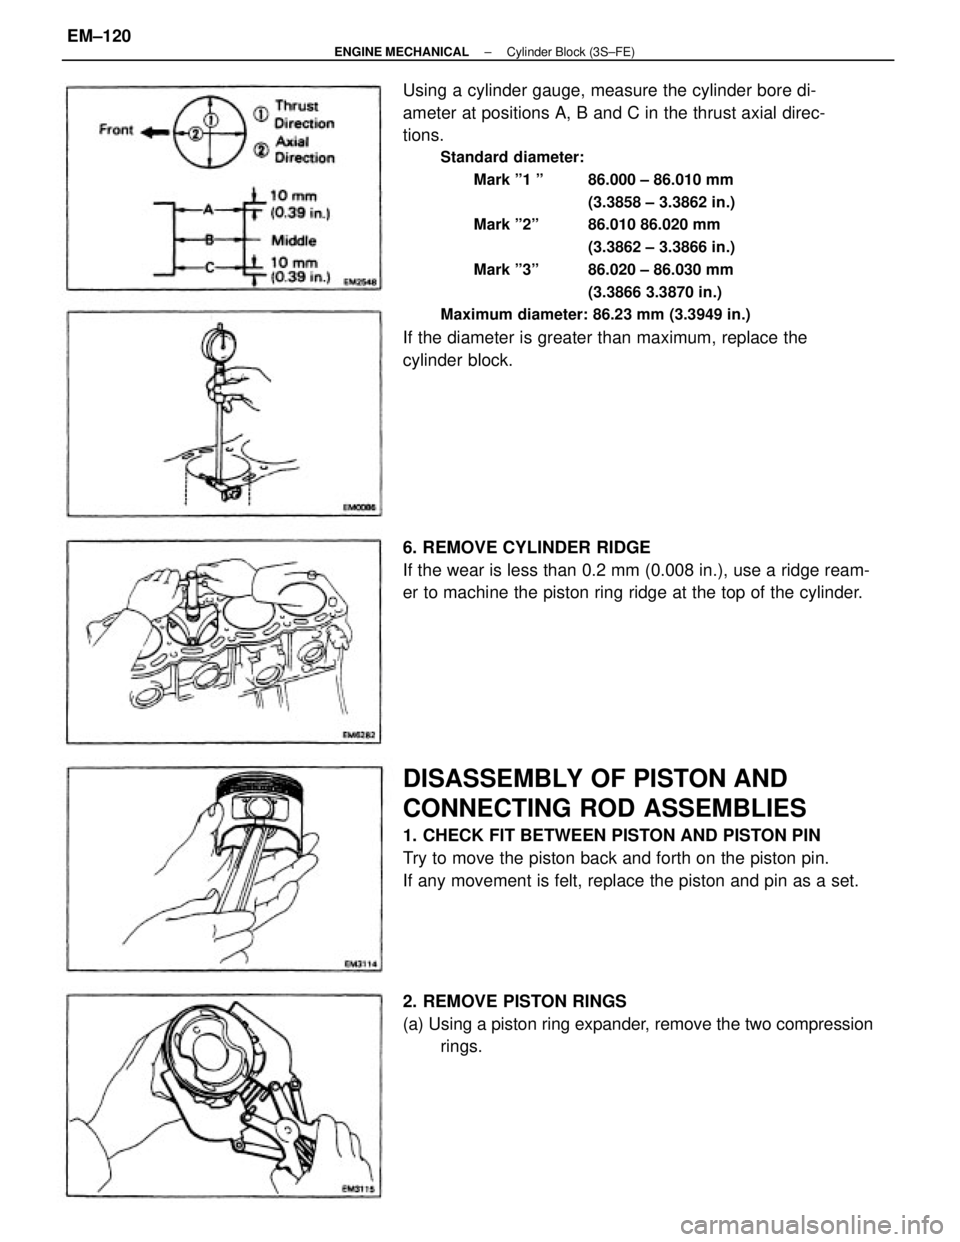
Using a cylinder gauge, measure the cylinder bore di-
ameter at positions A, B and C in the thrust axial direc-
tions.
Standard diameter:
Mark º1 º 86.000 ± 86.010 mm
(3.3858 ± 3.3862 in.)
Mark º2º 86.010 86.020 mm
(3.3862 ± 3.3866 in.)
Mark º3º 86.020 ± 86.030 mm
(3.3866 3.3870 in.)
Maximum diameter: 86.23 mm (3.3949 in.)
If the diameter is greater than maximum, replace the
cylinder block.
DISASSEMBLY OF PISTON AND
CONNECTING ROD ASSEMBLIES
1. CHECK FIT BETWEEN PISTON AND PISTON PIN
Try to move the piston back and forth on the piston pin.
If any movement is felt, replace the piston and pin as a set. 6. REMOVE CYLINDER RIDGE
If the wear is less than 0.2 mm (0.008 in.), use a ridge ream-
er to machine the piston ring ridge at the top of the cylinder.
2. REMOVE PISTON RINGS
(a) Using a piston ring expander, remove the two compression
rings.
± ENGINE MECHANICALCylinder Block (3S±FE)EM±120
Page 1298 of 2389
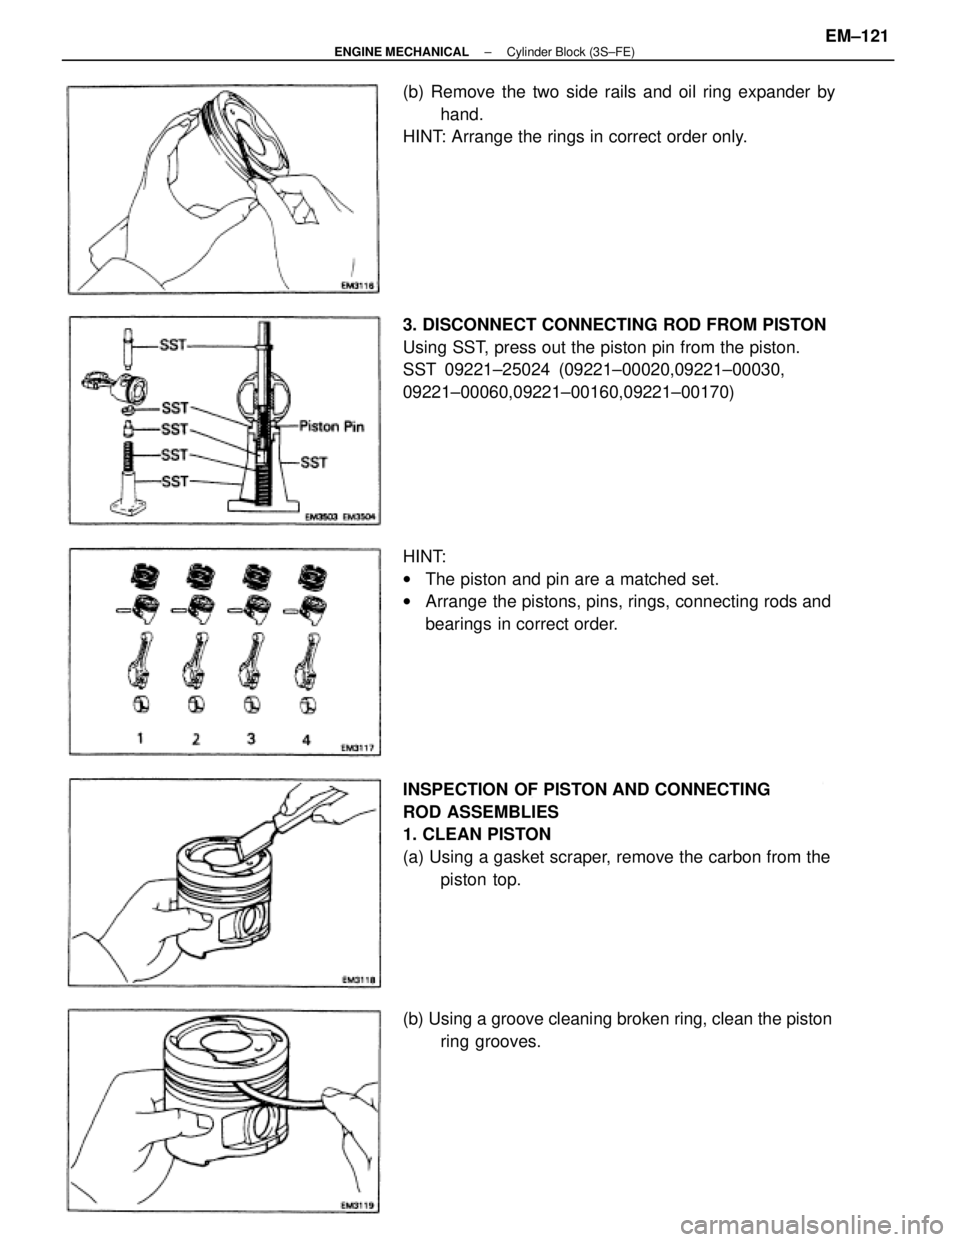
INSPECTION OF PISTON AND CONNECTING
ROD ASSEMBLIES
1. CLEAN PISTON
(a) Using a gasket scraper, remove the carbon from the
piston top. 3. DISCONNECT CONNECTING ROD FROM PISTON
Using SST, press out the piston pin from the piston.
SST 09221±25024 (09221±00020,09221±00030,
09221±00060,09221±00160,09221±00170)
HINT:
wThe piston and pin are a matched set.
wArrange the pistons, pins, rings, connecting rods and
bearings in correct order. (b) Remove the two side rails and oil ring expander by
hand.
HINT: Arrange the rings in correct order only.
(b) Using a groove cleaning broken ring, clean the piston
ring grooves.
± ENGINE MECHANICALCylinder Block (3S±FE)EM±121
Page 1299 of 2389
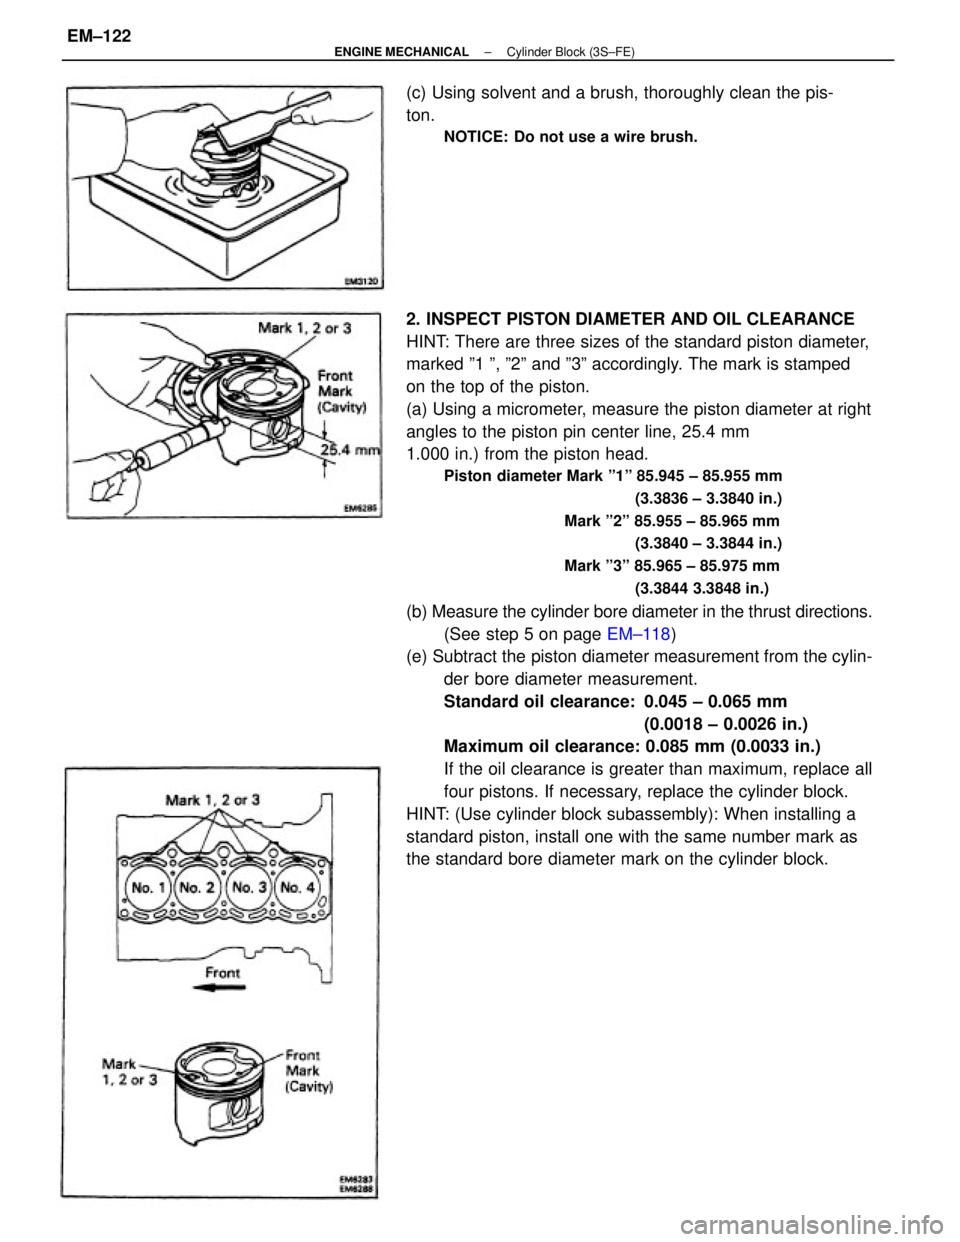
2. INSPECT PISTON DIAMETER AND OIL CLEARANCE
HINT: There are three sizes of the standard piston diameter,
marked º1 º, º2º and º3º accordingly. The mark is stamped
on the top of the piston.
(a) Using a micrometer, measure the piston diameter at right
angles to the piston pin center line, 25.4 mm
1.000 in.) from the piston head.
Piston diameter Mark º1º 85.945 ± 85.955 mm
(3.3836 ± 3.3840 in.)
Mark º2º 85.955 ± 85.965 mm
(3.3840 ± 3.3844 in.)
Mark º3º 85.965 ± 85.975 mm
(3.3844 3.3848 in.)
(b) Measure the cylinder bore diameter in the thrust directions.
(See step 5 on page EM±118)
(e) Subtract the piston diameter measurement from the cylin-
der bore diameter measurement.
Standard oil clearance: 0.045 ± 0.065 mm
(0.0018 ± 0.0026 in.)
Maximum oil clearance: 0.085 mm (0.0033 in.)
If the oil clearance is greater than maximum, replace all
four pistons. If necessary, replace the cylinder block.
HINT: (Use cylinder block subassembly): When installing a
standard piston, install one with the same number mark as
the standard bore diameter mark on the cylinder block. (c) Using solvent and a brush, thoroughly clean the pis-
ton.
NOTICE: Do not use a wire brush.
± ENGINE MECHANICALCylinder Block (3S±FE)EM±122
Page 1300 of 2389
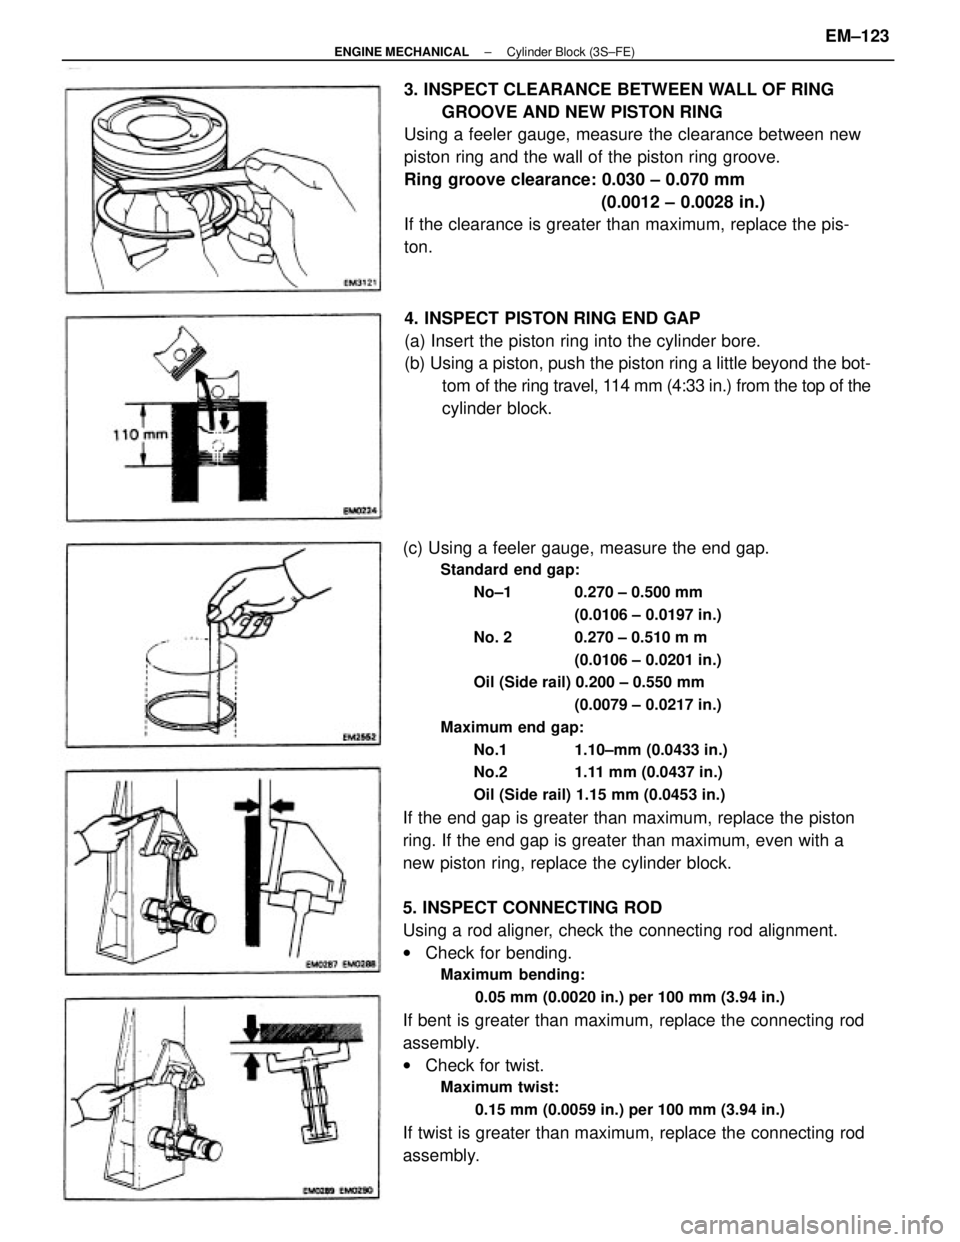
(c) Using a feeler gauge, measure the end gap.
Standard end gap:
No±1 0.270 ± 0.500 mm
(0.0106 ± 0.0197 in.)
No. 2 0.270 ± 0.510 m m
(0.0106 ± 0.0201 in.)
Oil (Side rail) 0.200 ± 0.550 mm
(0.0079 ± 0.0217 in.)
Maximum end gap:
No.1 1.10±mm (0.0433 in.)
No.2 1.11 mm (0.0437 in.)
Oil (Side rail) 1.15 mm (0.0453 in.)
If the end gap is greater than maximum, replace the piston
ring. If the end gap is greater than maximum, even with a
new piston ring, replace the cylinder block.
5. INSPECT CONNECTING ROD
Using a rod aligner, check the connecting rod alignment.
wCheck for bending.
Maximum bending:
0.05 mm (0.0020 in.) per 100 mm (3.94 in.)
If bent is greater than maximum, replace the connecting rod
assembly.
wCheck for twist.
Maximum twist:
0.15 mm (0.0059 in.) per 100 mm (3.94 in.)
If twist is greater than maximum, replace the connecting rod
assembly.3. INSPECT CLEARANCE BETWEEN WALL OF RING
GROOVE AND NEW PISTON RING
Using a feeler gauge, measure the clearance between new
piston ring and the wall of the piston ring groove.
Ring groove clearance: 0.030 ± 0.070 mm
(0.0012 ± 0.0028 in.)
If the clearance is greater than maximum, replace the pis-
ton.
4. INSPECT PISTON RING END GAP
(a) Insert the piston ring into the cylinder bore.
(b) Using a piston, push the piston ring a little beyond the bot-
tom of the ring travel, 114 mm (4:33 in.) from the top of the
cylinder block.
± ENGINE MECHANICALCylinder Block (3S±FE)EM±123