check engine TOYOTA CELICA 1987 Service Manual PDF
[x] Cancel search | Manufacturer: TOYOTA, Model Year: 1987, Model line: CELICA, Model: TOYOTA CELICA 1987Pages: 346, PDF Size: 35.13 MB
Page 216 of 346
EM-54
ENGINE MECHANICAL - Cylinder Head
EM295
EMZS’
I
EM2954
I
EM295! 5
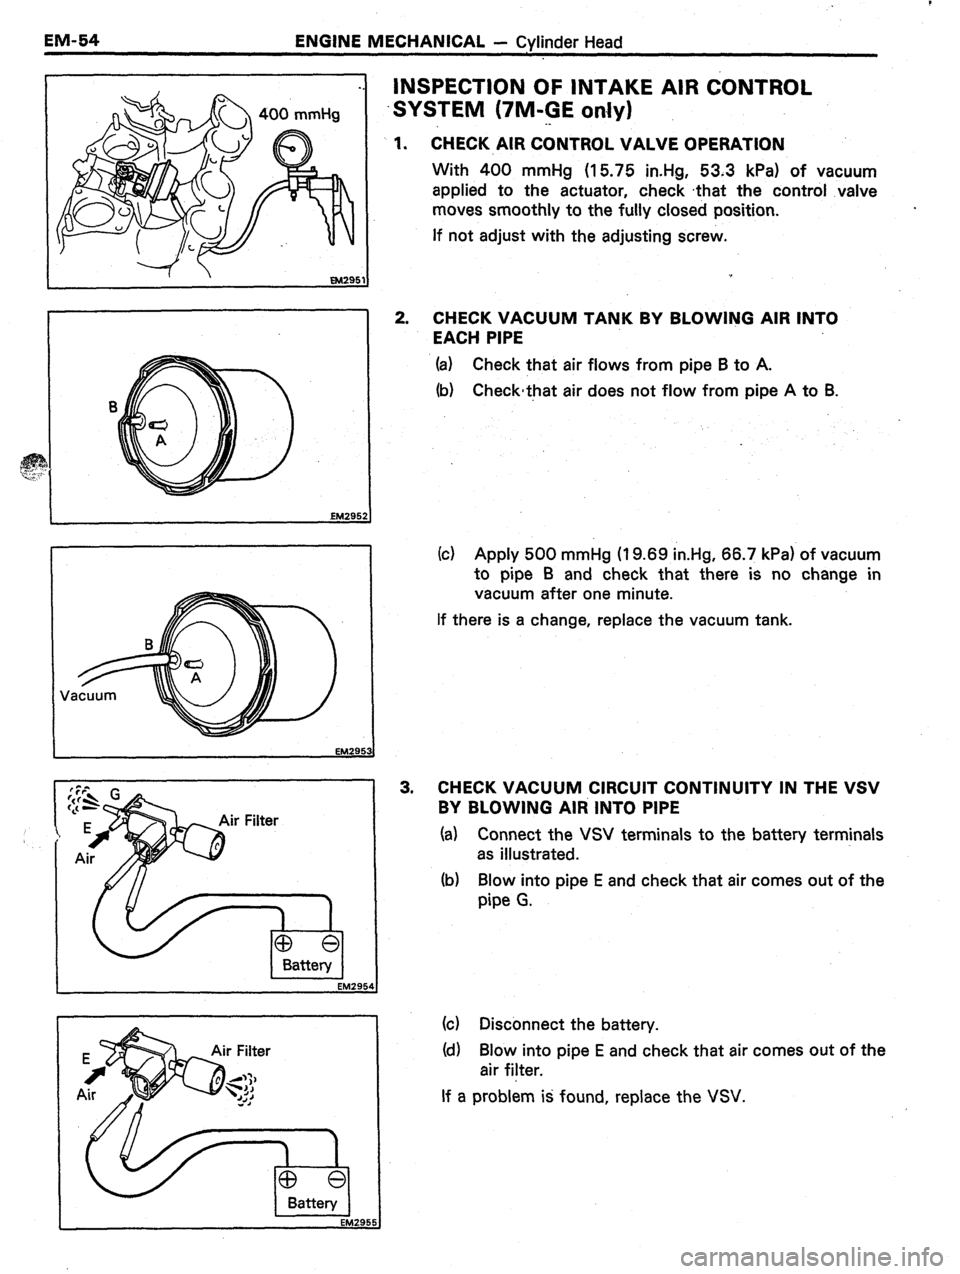
lnwEcTl0~ 0~ INTAKE AIR CONTROL
SYSTEM (‘/M-GE only)
. .
1.
CHECK AIR CONTROL VALVE OPERATION
With 400 mmHg (15.75 in.Hg, 53.3 kPa) of vacuum
applied to the actuator, check that the control valve
moves smoothly to the fully closed position.
If not adjust with the adjusting screw.
2. CHECK VACUUM TANK BY BLOWING AIR INTO
EACH PIPE
(a) Check that air flows from pipe B to A.
(b) Checkthat air does not flow from pipe A to B.
(c) Apply 500 mmHg (I 9.69 in.Hg, 66.7 kPa) of vacuum
to pipe B and check that there is no change in
vacuum after one minute.
If there is a change, replace the vacuum tank.
3. CHECK VACUUM CIRCUIT CONTINUITY IN THE VSV
BY BLOWING Alti INTO PIPE
(a) Connect the VSV terminals to the battery terminals
as illustrated.
(b) Blow into pipe E and check that air comes out of the
pipe G.
(c) Disconnect the battery.
(d) Blow into pipe E and check that air comes out of the
air filter.
If a problem is found, replace the VSV.
Page 219 of 346
ENGINE MECHANICAL - Cylinder Head
EM-67
EM302
EM2921
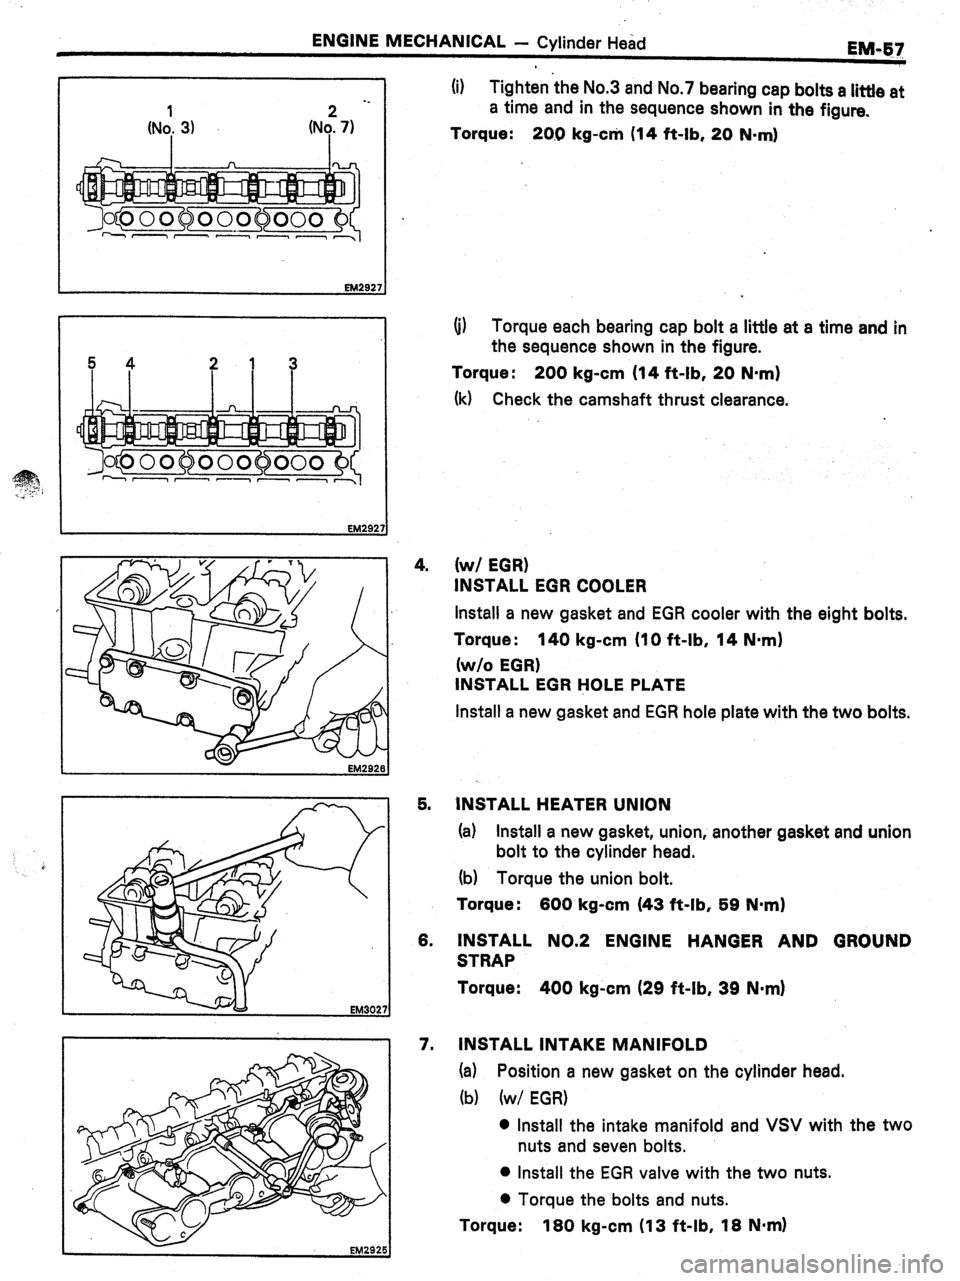
(i) Tighten the No.3 and No.7 bearing cap bolts a little at
a time and in the sequence shown in the figure.
Torque:
20.0 kg-c* (14 ft-lb, 20 N-ml
(i) Torque each bearing cap bolt a little at a time and in
the sequence shown in the figure.
Torque : 200 kg-cm (14 ft-lb, 20 N-m)
(k) Check the camshaft thrust clearance.
4.
(w/ EGR)
INSTALL EGR COOLER
Install a new gasket and EGR cooler with the eight bolts.
Torque :
140 kg-cm (IO ft-lb, 14 Nmrn)
(w/o EGR)
INSTALL EGR HOLE PLATE
Install a new gasket and EGR hole plate with the two bolts.
5. INSTALL HEATER UNION
(a) Install a new gasket, union, another gasket and union
bolt to the cylinder head.
(b) Torque the union bolt.
Torque:
600 kg-cm (43 ft-lb, 59 N-m)
6. INSTALL NO.2 ENGINE HANGER AND GROUND
STRAP
Torque:
400 kg-cm (29 ft-lb, 39 N-m)
7. INSTALL INTAKE MANIFOLD
(a) Position a new gasket on the cylinder head.
(b) (w/ EGR)
0 Install the intake manifold and VSV with the two
nuts and seven bolts.
l Install the EGR valve with the two nuts.
l Torque the bolts and nuts.
Torque: 180 kg-cm (13 ft-lb, 18 Nnrn)
Page 229 of 346
ENGINE MECHANICAL - Cylinder Block
EM-67
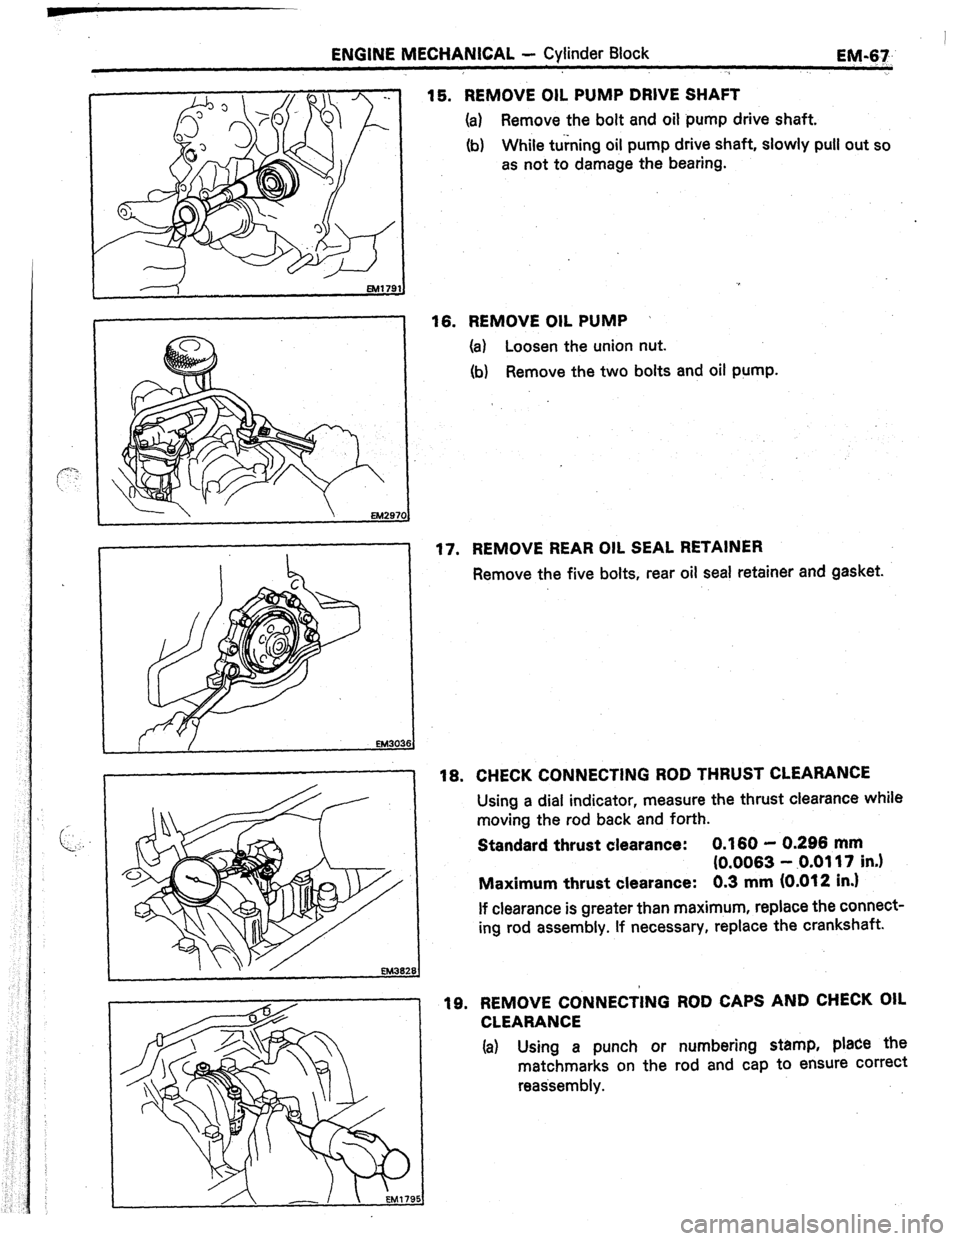
15. REMOVE OIL PUMP DRIVE SHAFT
(a)
Remove the bolt and oil pump drive shaft.
(b) While turning oil pump drive shaft, slowly pull out so
as not to damage the bearing.
16. REMOVE OIL PUMP /
(a) Loosen the union nut.
(b)
Remove the two bolts and oil pump.
17. REMOVE REAR OIL SEAL RETAINER
Remove the five bolts, rear oil seal retainer and gasket.
18. CHECK CONNECTING ROD THRUST CLEARANCE
Using a dial indicator, measure the thrust clearance while
moving the rod back and forth.
Standard thrust clearance:
0.160 - 0.296 mm
(0.0063 - .0.0117 in.)
Maximum thrust clearance:
0.3 mm (0.012 in.)
If clearance is greater than maximum, replace the connect-
ing rod assembly. If necessary, replace the crankshaft.
19. REMOVE CONNECTING ROD CAPS AND CHECK OIL
CLEARANCE
Ia) Using a punch or numbering stamp, place the
matchmarks on the rod and cap to ensure correct
reassembly.
Page 230 of 346
EM-68 . ENGINE MECHANICAL - ,Cylinder Block
EM39
J ,32
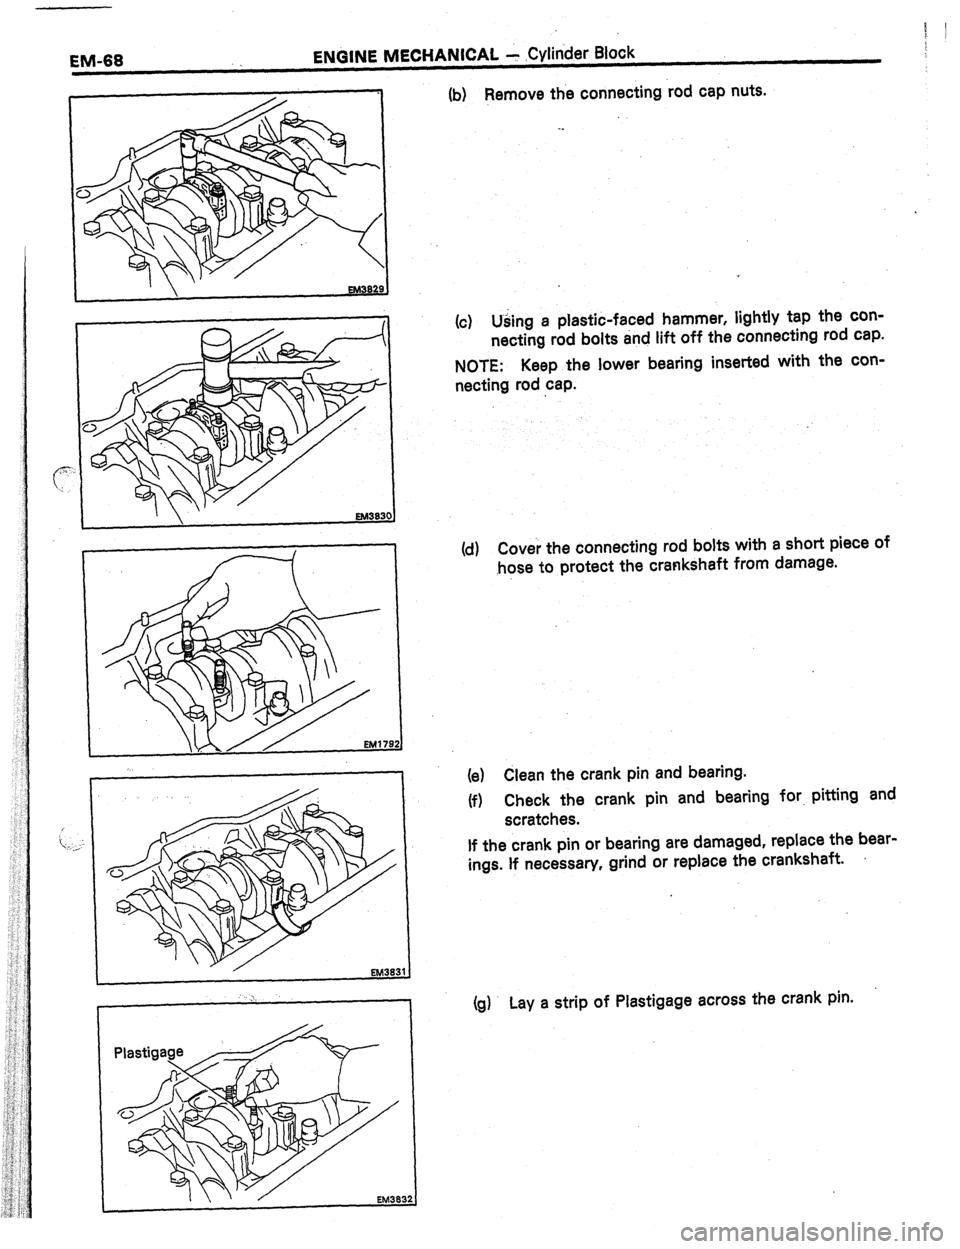
(b) Remove the connecting rod cap nuts.
(c) Using a plastic-faced hammer, lightly tap the con-
necting rod bolts and lift off the connecting rod cap.
NOTE: Keep the lower bearing inserted with the con-
necting rod cap.
(d) Cover the connecting rod bolts with a short piece of
,hose to protect the crankshaft from damage.
(e) Clean the crank pin and bearing.
(f) Check the crank pin and bearing for. pitting and
scratches.
If the crank pin or bearing are damaged, replace the bear-
ings. If necessary, grind or replace the crankshaft.
(g) Lay a strip of Plastigage across the crank pin.
Page 232 of 346
EM-70 ENGINE MECHANICAL - Cylinder Block
c Front
1 2 3 4 5 6
EM147: 3
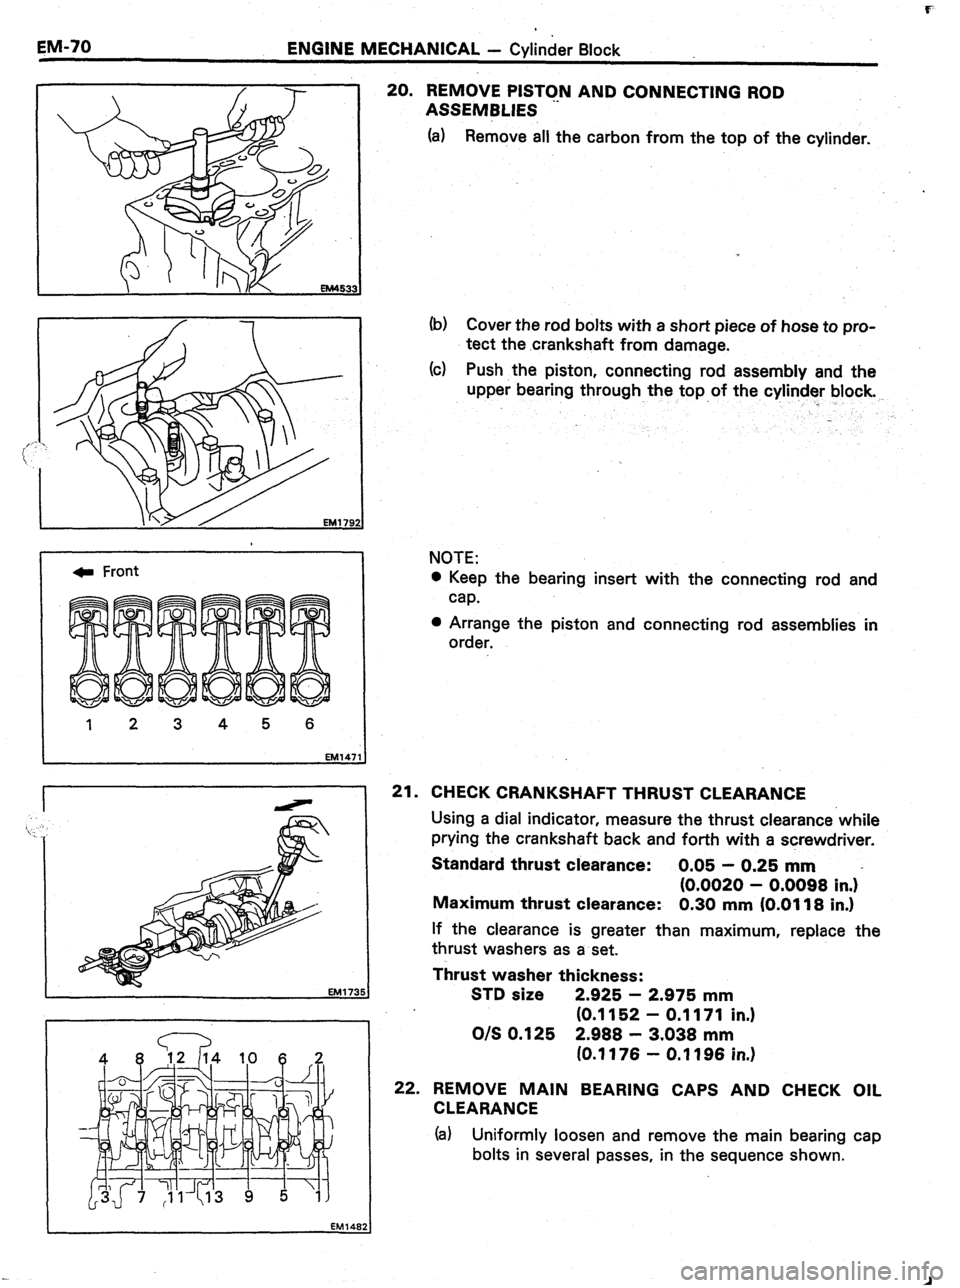
20. REMOVE PISTON AND CONNECTING ROD
ASSEMBLIES
(a) Remove all the carbon from the top of the cylinder.
(b) Cover the rod bolts with a short piece of hose to pro-
tect the crankshaft from damage.
(c) Push the piston, connecting rod assembly and the
upper bearing through the top of the cylinder block.
NOTE:
0 Keep the bearing insert with the connecting rod and
cap.
l Arrange the piston and connecting rod assemblies in
order.
21. CHECK CRANKSHAFT THRUST CLEARANCE
Using a dial indicator, measure the thrust clearance while
prying the crankshaft back and forth with a screwdriver.
Standard thrust clearance: 0.05 - 0.25 mm
(0.0020 - 0.0098 in.)*
Maximum thrust clearance: 0.30 mm (0.0118 in.)
If the clearance is greater than maximum, replace the
thrust washers as a set.
Thrust washer thickness:
STD size 2.925 - 2.975 mm
(0.1152 - 0.1171 in.)
O/S 0.125 2.988 - 3.038 mm
(0.1176 - 0.1196 in.)
22. REMOVE MAIN BEARING CAPS AND CHECK OIL
CLEARANCE
(a) Uniformly loosen and remove the main bearing cap
bolts in several passes, in the sequence shown.
Page 233 of 346
ENGINE MECHANICAL Y Cylinder Block-
. . ,., ,,
..“./.. E”Q+‘J.g
. . . “h,. ,<_ .,., aa* _
. . . . . . . ..I. C/~ a....,,.?._.h, j
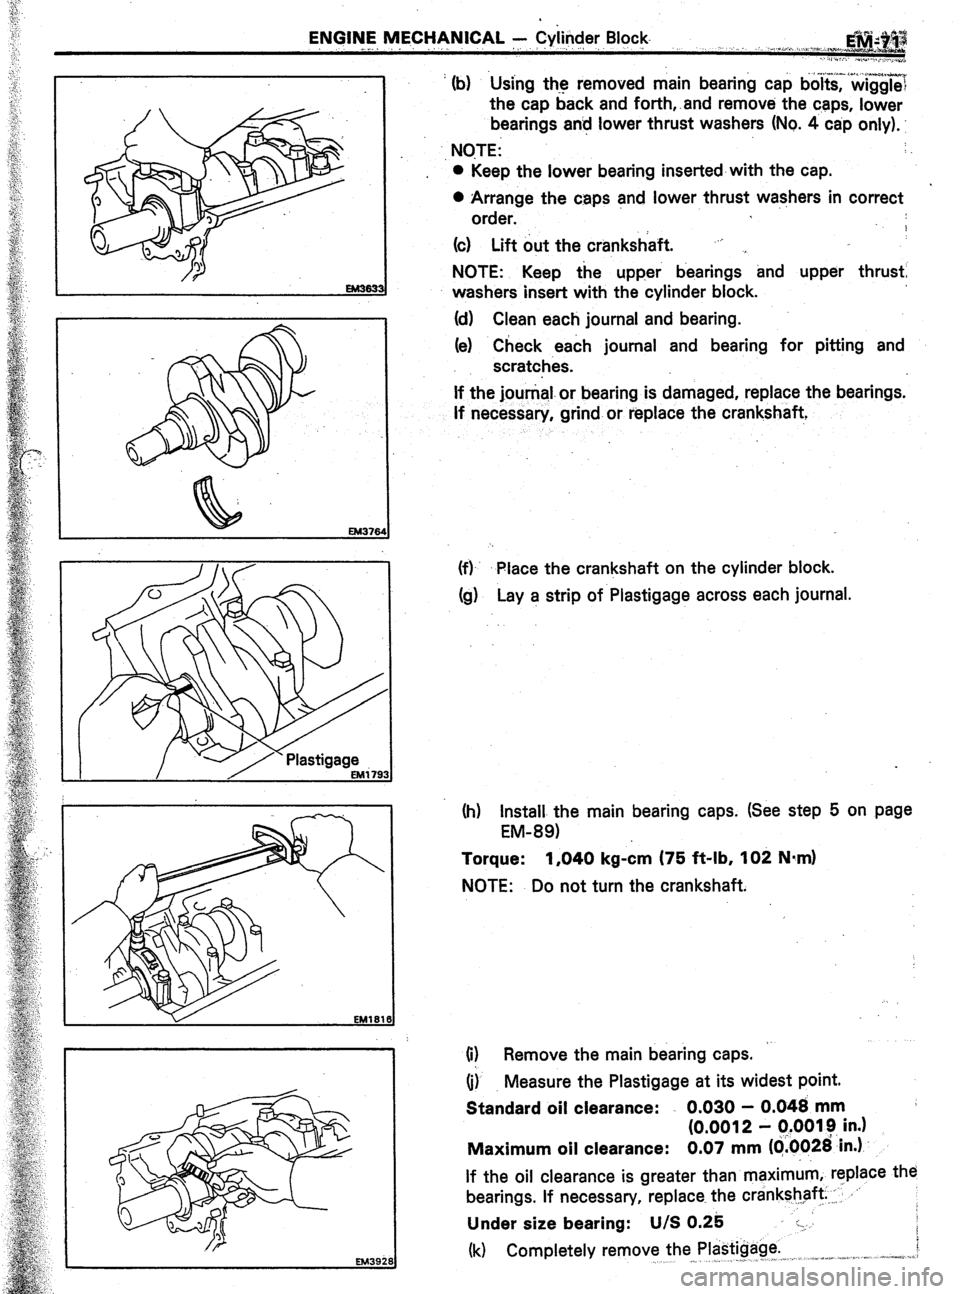
’ (b) Using the removed main bearing cap bo~t&?&gg~~
the cap back and forth,.and remove the caps, lower
bearings an! lower thrust washers (No. 4 cap only).
., NOTE: :
0 Keep the lower bearing inserted-with the cap.
0 Arrange the caps and lower thrust washers in correct
order.
9
(c) Lift out the crankshaft. “j ,
NOTE: Keep the upper bearings and upper thrust
washers insert with the cylinder block.
(d) Clean each journal and bearing.
(e) Check each journal and bearing for pitting and
scratches.
If the jounial.or bearing is damaged, replace the bearings.
If necessary, grind or replace the crankshaft,
(f)- Place the crankshaft on the cylinder block.
Cg) Lay a strip of Plastigage across each journal.
(h) Install the main bearing caps. (See step 5 on page
EM-891
Torque: 1,040 kg-&n (75 ft-lb, 102 N*m)
NOTE: Do not turn the crankshaft.
(i) Remove the main bearing caps.
(i) Measure the Plastigage at its widest point.
Standard oil clearance: . 0.030 - 0.048 mm
(0.0012 - q.0019 in.)
Maximum oil clearance: 0.07 mm ((i.0026’in.)
If the oil clearance is greater than maximum, replace the
bearings. If necessary, replace the crankshaft ,: .‘-
Under size bearing: U/S 0.25 :-.
(k) Completely remove the Plastigage. i
,^ -_ _ . j” ,,I, ,. .a”*+% -,..: :,.-__, ,-,--se. .j.z,.
Page 235 of 346
ENGINE MECHANICAL --‘Cylinder Block.
. &#.&
./ 1 .,_. . . .,~..“._~__,_Y_
._
INSPECTION OF CYLINDER BiOCk ~. -.,. ;;.. i*
I
.
Front 0 Thrust
Direction
0 Axial
Direction
IOmm
(0.39 in.)
Middle 1. REMOVE GASKET MATERIAL
Using a gasket scraper, remove ail the gasket material
from the cylinder block surface.
2. CLEAN CYLINDER BLOCK
Using a soft brush and solvent, clean the block.
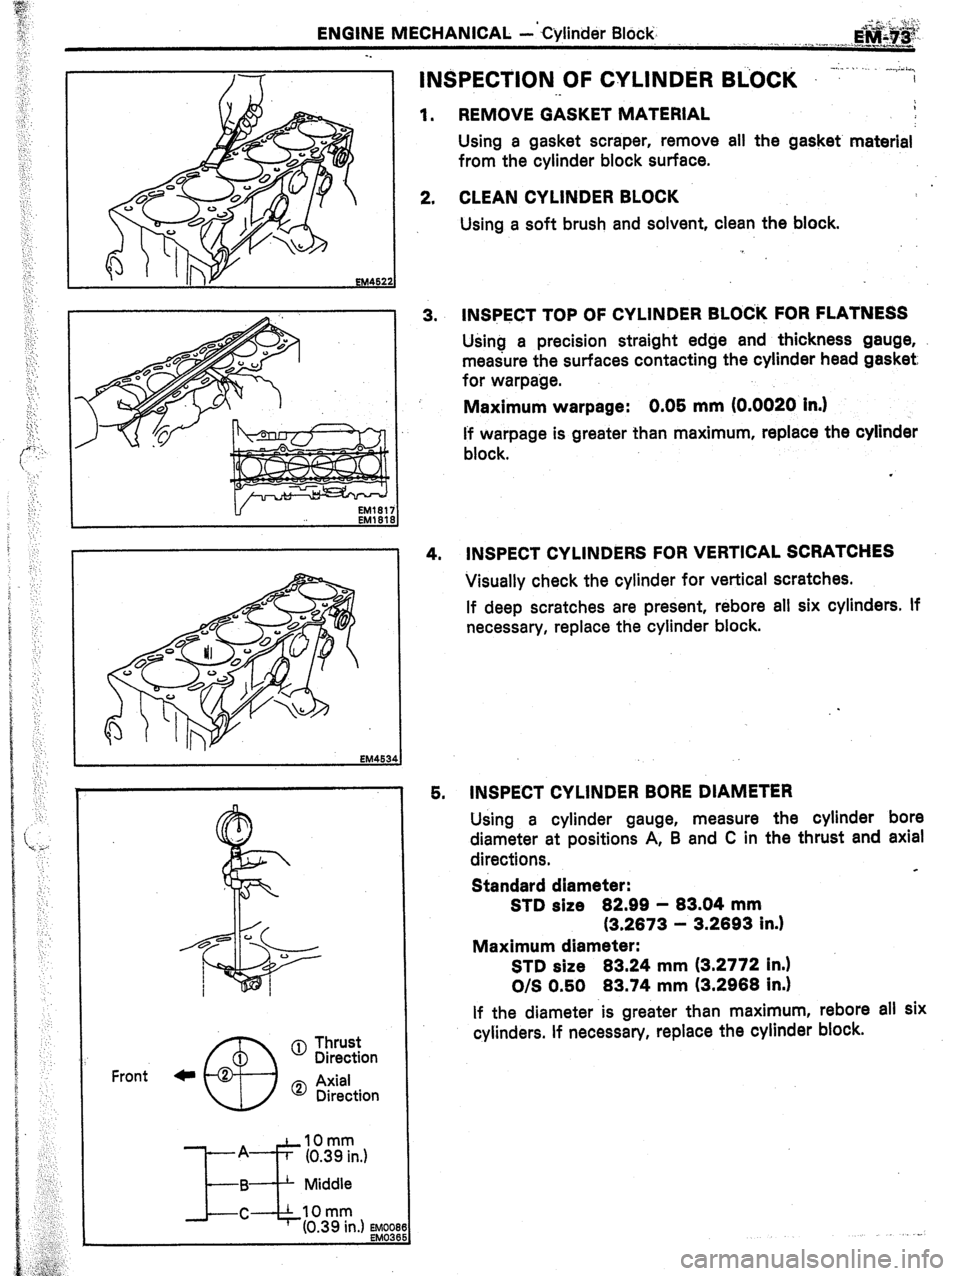
3. INWCT TOP OF CYLINDER BLOC’K FOR FLATNESS
Using a precision straight edge and thickness gauge,
measure the surfaces contacting the cylinder head gasket,
for warpage.
Maximum warpage: 0.05 mm (0.0020 in.)
I’f warpage is greater than maximum, replace the cylinder
block.
4. INSPECT CYLINDERS FOR VERTICAL SCRATCHES
Visually check the cylinder for vertical scratches.
If deep scratches are present, rebore all six cylinders. If
necessary, replace the cylinder block.
5. INSPECT CYLINDER BORE DIAMETER
Using a cylinder gauge, measure the cylinder bore
diameter at positions A, B and C in the thrust and axial
directions.
c
Standard diameter:
STD size 82.99 - 83.04 mm
(3.2873 - 3.2893 in.)
Maximum diameter:
STD size 83.24 mm (3.2772 in.)
O/S 0.50 83.74 mm (3.2988 in.)
If the diameter is greater than maximum, rebore ali six
cylinders. If necessary, replace the cylinder block.
Page 239 of 346
ENGINE MECHANICAL -. Cylinder Block
E,M.+$ i
-.
:
:
. . .
. .
‘,’
‘.
:
t‘,
::
,c ;
‘:
:‘
::
;
. .
:
,i
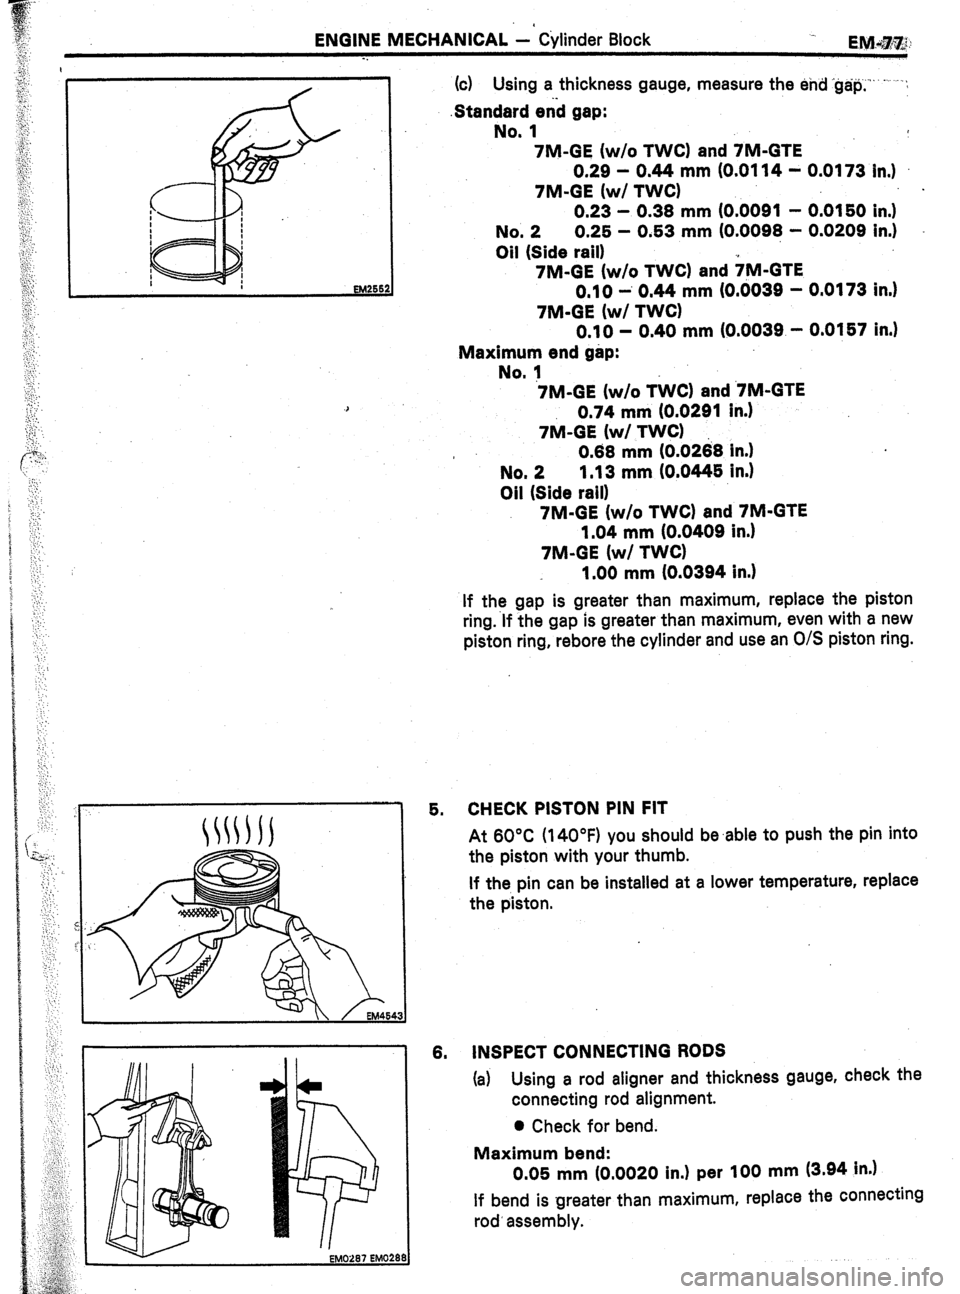
(c) Using a thickness gauge, measure the end ‘g&p,‘“--’ .‘:
.Standerd enb gap:
No. 1
7M-GE (w/o TWC) and 7M-GTE
0.29 - 0.44 mm (0.0114 - 0.0173 in.)
7M-GE (w/ TWC) .
0.23 - 0.38 mm (0.0091 - 0.0150 in.)
No. 2 0.25 - 0.53 mm (0.0098 - 0.0209 in.)
Oil (Side rail)
7M-GE (w/o TWC) and +M-GTE
0.10 -’ 0.44 mm (O.dO3g - 0.0173 in.)
7M-GE (w/ TWC)
0.10 - 0.40 mm (0.0039 - 0.0157 in.)
Maximum end gap:
No. 1
7M-GE (w/o T&Z) and ‘7M-GTE
0.74 mm (0.0291 in.)
7&l-GE (w/ TWC)
* 0.88 mm IO.0268 in.)
No. 2 1.13 mm (0.0445 in.)
Oil (Side rail)
7M-GE (w/o TWC) and 7M-GTE
1.04 mm (0.0409 in.)
7M-GE (w/ TWC)
1.00 mm (0.0394 in.)
If the gap is greater than maximum, replace the piston
ring.‘lf the gap is greater than maximum, even with a new
piston ring, rebore the cylinder and use an O/S piston ring.
5. CHECK PISTON PIN FIT
At 60°C (14OOF) you should be.able to push the pin into
the piston with your thumb.
If the pin can be installed at a lower temperature, replace
the piston.
8. INSPECT CONNECTING RODS
(a)
Using a rod aligner and thickness gauge, check the
connecting rod alignment.
0 Check for bend.
Maximum bend:
0.05 mm (0.0020 in.) per 100 mm (3.94 in.)
If bend is greater than maximum, replace the connecting
rod’ assembly.
Page 240 of 346
EM-78 ENGINE MECHANICAL - Cylinder Block
ml0269 EM029 OJ
EM0226
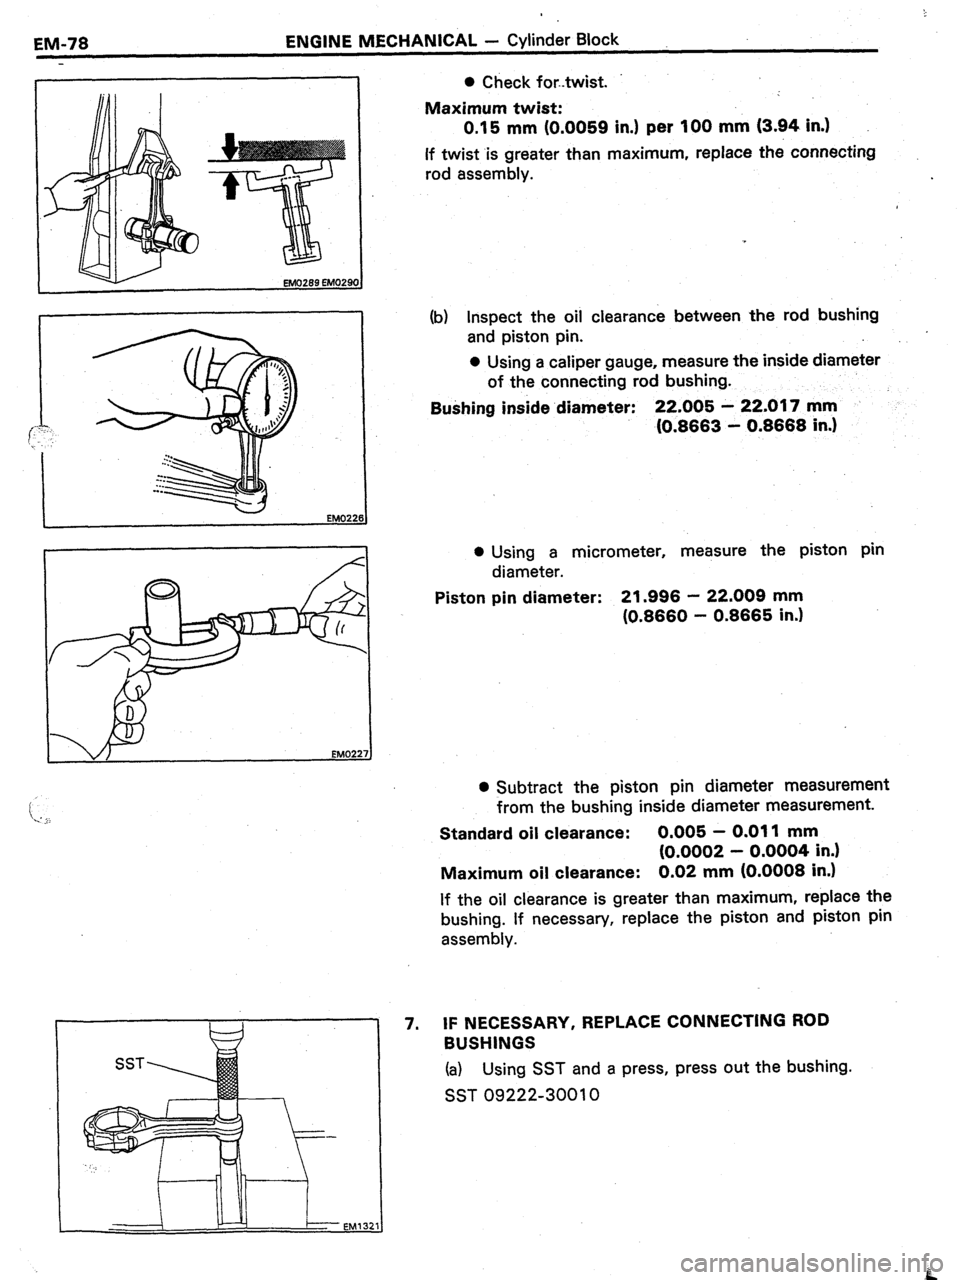
SST 0 Check fortwist.
Maximum twist:
0.15 mm (0.0059 in.) per 100 mm (3.94 in.)
If twist is greater than maximum, replace the connecting
rod assembly.
(b) Inspect the oil clearance between the rod bushing
and piston pin.
0 Using a caliper gauge, measure the inside diameter
of the connecting rod bushing.
BuShing inside diameter: 22.005 - 22.017 mm
IO.8663 - 0.8668 in.)
l Using a micrometer, measure the piston pin
diameter.
Piston pin diameter: 21.996 - 22.009 mm
(0.8660 - 0.8665 in.)
l Subtract the piston pin diameter measurement
from the bushing inside diameter measurement.
Standard oil clearance: 0.005 - 0.011 mm
(0.0002 - 0.0004 in.)
Maximum oil clearance: 0.02 mm (0.0008 in.)
If the oil clearance is greater than maximum, replace the
bushing. If necessary, replace the piston and piston pin
assembly.
7. IF NECESSARY, REPLACE CONNECTING ROD
BUSHINGS
(a) Using SST and a press, press out the bushing.
SST 09222-30010
.B
Page 241 of 346
.
ENGINE MECHANICAL - Cylinder Block
EM-79
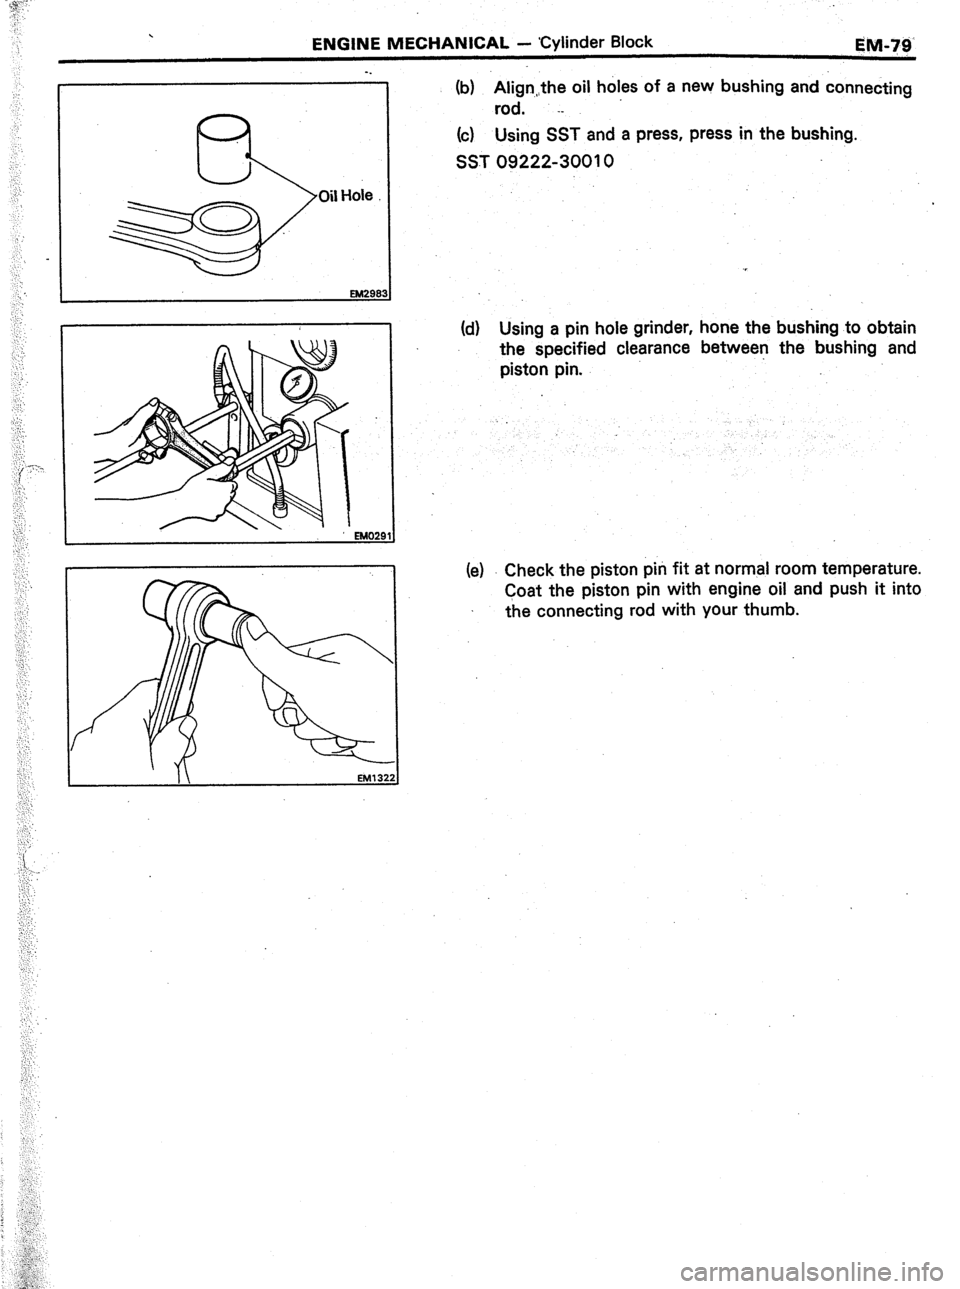
Oil Hole (b) Alignthe oil holes of a new bushing and connecting
rod. .-
(c) Using SST and a press, press in the bushing.
SST 09222-30010
(d) Using a pin hole grinder, hone the bushing to obtain
the specified clearance between the bushing and
piston pin.
(e) Check the piston pin fit at normal room temperature.
Coat the piston pin with engine oil and push it into
the connecting rod with your thumb.