TOYOTA COROLLA 2020 Owners Manual (in English)
Manufacturer: TOYOTA, Model Year: 2020, Model line: COROLLA, Model: TOYOTA COROLLA 2020Pages: 588, PDF Size: 13.49 MB
Page 491 of 588

4918-2. Steps to take in an emergency
COROLLA_U
8
When trouble arises
the level of the engine oil, and add if
necessary.
This message may appear if the
vehicle is stopped on a slope. Move
the vehicle to a level surface and
check to see if the message disap-
pears.
■If “Engine Stopped Steering
Power Low” is displayed
This message is displayed if the
engine is stopped while driving.
When steering wheel operations are
heavier than usual, grip the steering
wheel firmly and operate it using
more force than usual.
■If “Auto Power OFF to Conserve
Battery” is displayed
Power was cut off due to the auto-
matic power off function. Next time
when starting the engine, increase
the engine speed slightly and main-
tain that level for approximately 5
minutes to recharge the battery.
■If “Headlight System Malfunc-
tion Visit Your Dealer” is dis-
played
The following systems may be mal-
functioning. Have the vehicle
inspected by your Toyota dealer
immediately.
●The LED headlight system
●AFS (Adaptive Front-lighting Sys-
tem) (if equipped)
●The automatic headlight leveling
system (if equipped)
●Automatic High Beam
■If “Front Camera Unavailable”
or “Front Camera Unavailable
See Owner’s Manual” is dis-
played
The following systems may be sus-
pended until the problem shown in
the message is resolved. ( P.185,
481)
●PCS (Pre-Collision system)
●LTA (Lane Tracing Assist) (if
equipped)
●LDA (Lane Departure Alert with
steering control) (if equipped)
●Automatic High Beam
●RSA (Road Sign Assist) (if
equipped)
●Dynamic radar cruise control with
full-speed range (if equipped)
●Dynamic radar cruise control (if
equipped)
■If “Radar Cruise Control
Unavailable See Owner's Man-
ual” is displayed
The dynamic radar cruise control
with full-speed range system or
dynamic radar cruise control system
is suspended temporarily or until the
problem shown in the message is
resolved. (causes and coping meth-
ods: P.185)
■If “Radar Cruise Control
Unavailable” is displayed
The dynamic radar cruise control
with full-speed range system or
dynamic radar cruise control system
cannot be used temporarily. Use the
system when it becomes available
again.
■If “Maintenance Required
Soon” is displayed
Indicates that all maintenance
according to the driven distance on
the maintenance schedule
* should
be performed soon.
Comes on approximately 4500
miles (7200 km) after the message
has been reset. If necessary, per-
form maintenance. Please reset the
message after the maintenance is
performed. ( P.428)
*: Refer to the separate “Scheduled
Maintenance” or “Owner’s Man-
ual Supplement” for the mainte-
nance interval applicable to your
vehicle.
■If “Maintenance Required Visit
Your Dealer” is displayed
Indicates that all maintenance is
Page 492 of 588

4928-2. Steps to take in an emergency
COROLLA_Urequired to correspond to the driven
distance on the maintenance sched-
ule
*.
Comes on approximately 5000
miles (8000 km) after the message
has been reset. (The indicator will
not work properly unless the mes-
sage has been reset.) Perform the
necessary maintenance. Please
reset the message after the mainte-
nance is performed. ( P.428)
*: Refer to the separate “Scheduled
Maintenance” or “Owner’s Man-
ual Supplement” for the mainte-
nance interval applicable to your
vehicle.
■If a message that indicates the
need for visiting your Toyota
dealer is displayed
The system or part shown on the
multi-information di splay is malfunc-
tioning. Have the vehicle inspected
by your Toyota dealer immediately.
■If a message that indicates the
need for referring to Owner’s
Manual is displayed
●If “Engine Coolant Temp High” is
displayed, follow the instructions
accordingly. ( P.519)
●If any of the following messages
are displayed on the multi-infor-
mation display, it may indicate a
malfunction. Have the vehicle
inspected by your Toyota dealer
immediately.
• “Smart Key System Malfunction”
●If any of the following messages
are displayed on the multi-infor-
mation display, it may indicate a
malfunction. Immediately stop the
vehicle and contact your Toyota
dealer.
• “Braking Power Low”
• “Charging System Malfunction”
• “Oil Pressure Low”
NOTICE
■If “High Power Consumption
Partial Limit on AC/Heater
Operation” is displayed fre-
quently
There is a possible malfunction
relating to the charging system or
the battery may be deteriorating.
Have the vehicle inspected by
your Toyota dealer.
Page 493 of 588
4938-2. Steps to take in an emergency
COROLLA_U
8
When trouble arises
Stop the vehicle in a safe
place on a hard, flat surface.
Set the parking brake.
Shift the shift lever to P (con- tinuously variable transmis-
sion) or N (manual
transmission).
Stop the engine.
Turn on the emergency flash-
ers.
Check the degree of the tire
damage.
A tire should only be repaired
with the emergency tire punc-
ture repair kit if the damage is
caused by a nail or screw pass-
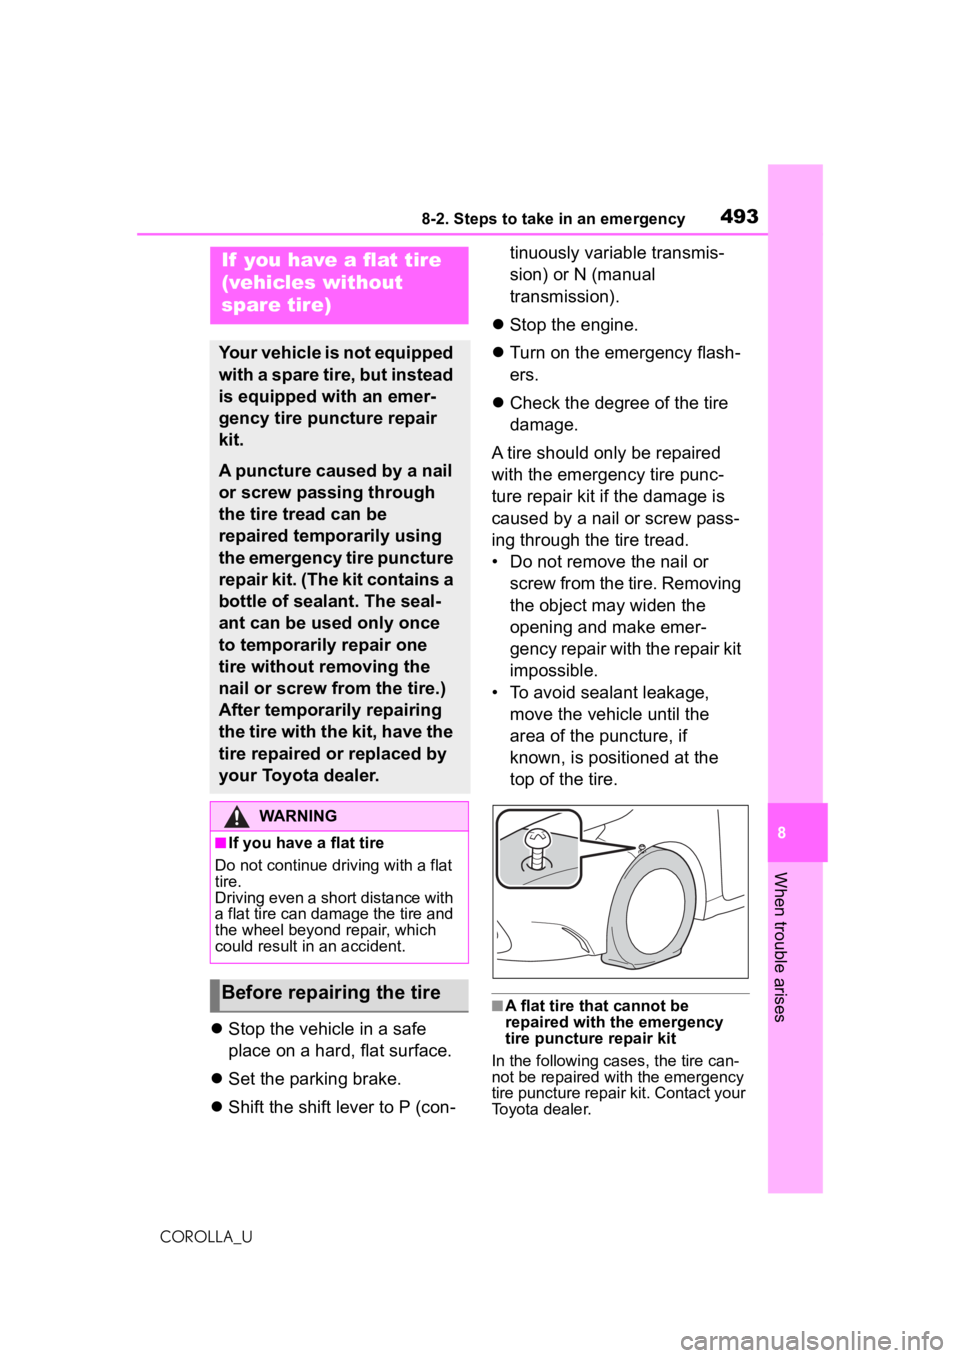
ing through the tire tread.
• Do not remove the nail or screw from the tire. Removing
the object may widen the
opening and make emer-
gency repair with the repair kit
impossible.
• To avoid sealant leakage, move the vehicle until the
area of the puncture, if
known, is positioned at the
top of the tire.
■A flat tire that cannot be
repaired with the emergency
tire puncture repair kit
In the following cases, the tire can-
not be repaired with the emergency
tire puncture repair kit. Contact your
Toyota dealer.
If you have a flat tire
(vehicles without
spare tire)
Your vehicle is not equipped
with a spare tire, but instead
is equipped with an emer-
gency tire puncture repair
kit.
A puncture caused by a nail
or screw passing through
the tire tread can be
repaired temporarily using
the emergency tire puncture
repair kit. (The kit contains a
bottle of sealant. The seal-
ant can be used only once
to temporarily repair one
tire without removing the
nail or screw from the tire.)
After temporarily repairing
the tire with the kit, have the
tire repaired or replaced by
your Toyota dealer.
WARNING
■If you have a flat tire
Do not continue driving with a flat
tire.
Driving even a short distance with
a flat tire can damage the tire and
the wheel beyond repair, which
could result in an accident.
Before repairing the tire
Page 494 of 588
4948-2. Steps to take in an emergency
COROLLA_U
●When the tire is damaged due to
driving without sufficient air pres-
sure
●When there are any cracks or
damage at any location on the
tire, such as on the side wall,
except the tread
●When the tire is visibly separated
from the wheel
●When the cut or damage to the
tread is 0.16 in. (4 mm) long or more
●When the wheel is damaged
●When 2 or more tires have been
punctured
●When 2 or more sharp objects
such as nails or screws have
passed through the tread on a sin-
gle tire
●When the sealant has expired
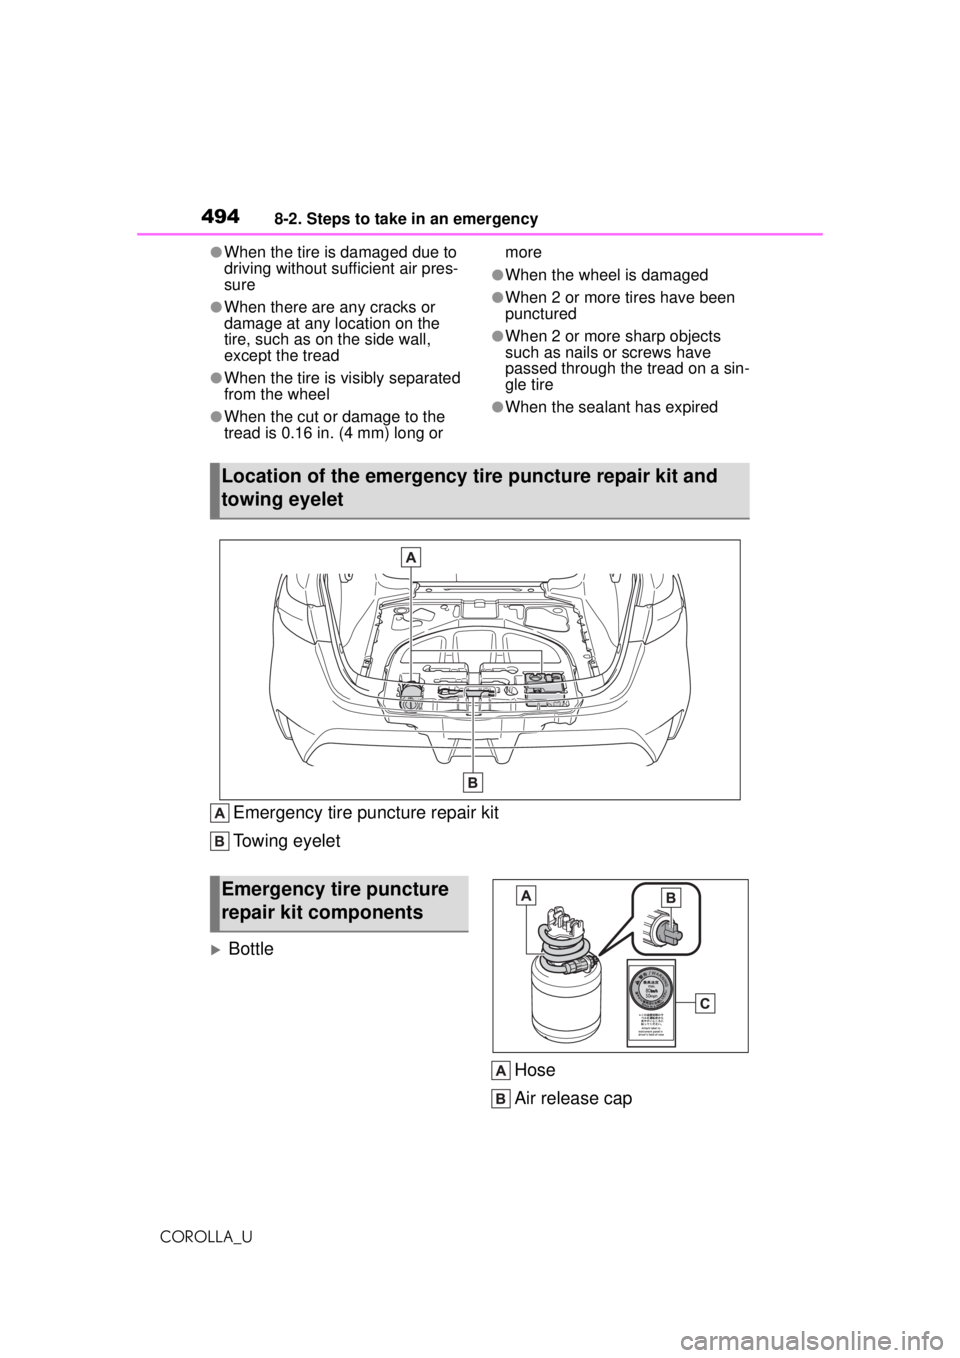
Emergency tire puncture repair kit
Towing eyelet
Bottle
Hose
Air release cap
Location of the emergency tire puncture repair kit and
towing eyelet
Emergency tire puncture
repair kit components
Page 495 of 588
4958-2. Steps to take in an emergency
COROLLA_U
8
When trouble arises
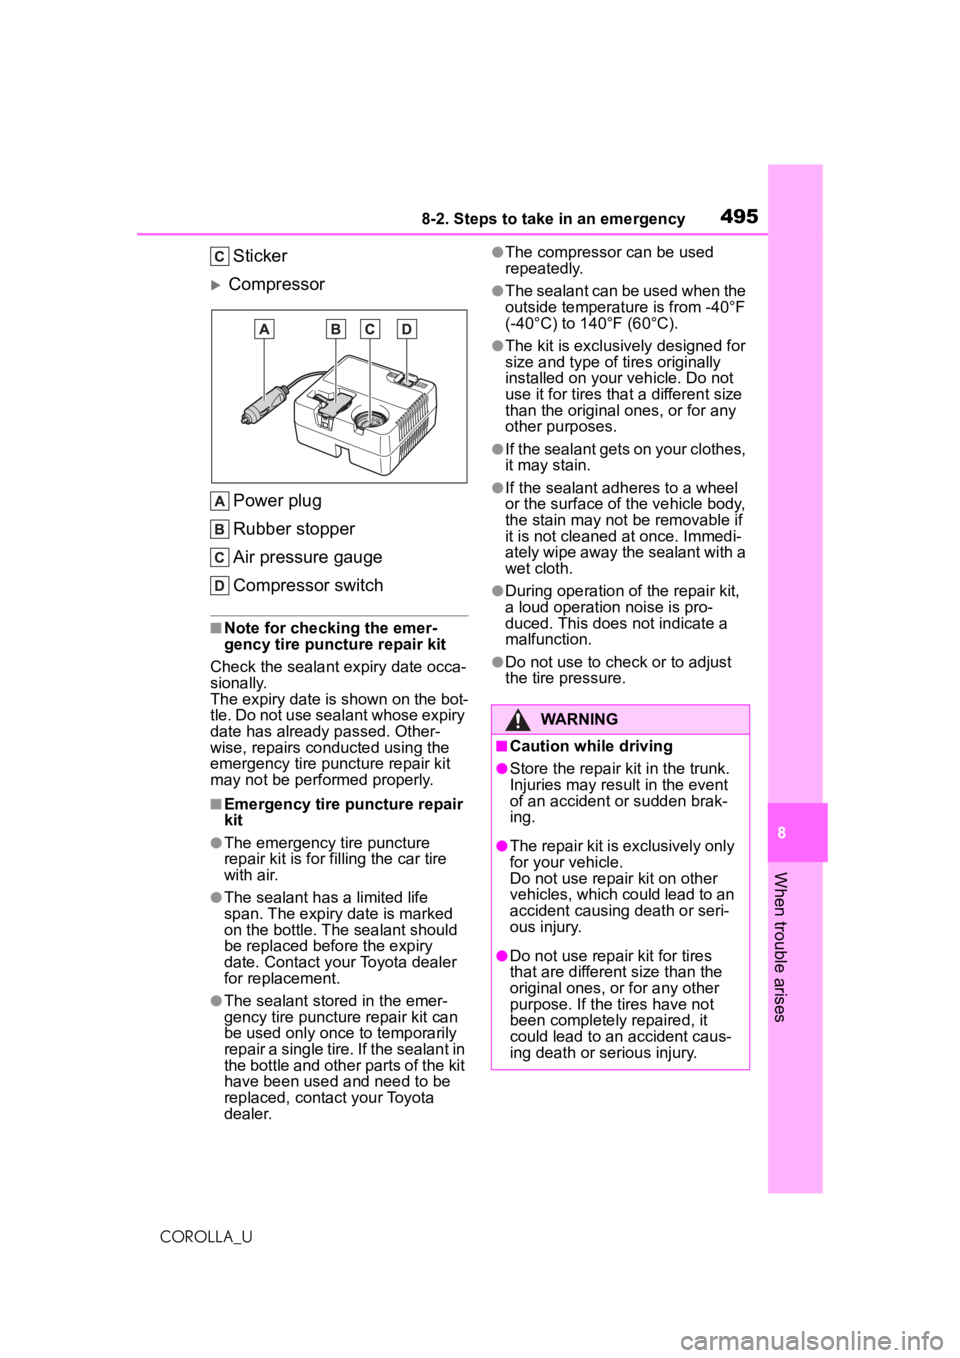
Sticker
Compressor Power plug
Rubber stopper
Air pressure gauge
Compressor switch
■Note for checking the emer-
gency tire puncture repair kit
Check the sealant expiry date occa-
sionally.
The expiry date is shown on the bot-
tle. Do not use sealant whose expiry
date has already passed. Other-
wise, repairs conducted using the
emergency tire puncture repair kit
may not be performed properly.
■Emergency tire puncture repair
kit
●The emergency tire puncture
repair kit is for filling the car tire
with air.
●The sealant has a limited life
span. The expiry date is marked
on the bottle. The sealant should
be replaced before the expiry
date. Contact your Toyota dealer
for replacement.
●The sealant stored in the emer-
gency tire puncture repair kit can
be used only once to temporarily
repair a single tire. If the sealant in
the bottle and other parts of the kit
have been used and need to be
replaced, contact your Toyota
dealer.
●The compressor can be used
repeatedly.
●The sealant can be used when the
outside temperature is from -40°F
(-40°C) to 140°F (60°C).
●The kit is exclusively designed for
size and type of tires originally
installed on your vehicle. Do not
use it for tires that a different size
than the original ones, or for any
other purposes.
●If the sealant gets on your clothes,
it may stain.
●If the sealant adheres to a wheel
or the surface of the vehicle body,
the stain may not be removable if
it is not cleaned at once. Immedi-
ately wipe away the sealant with a
wet cloth.
●During operation of the repair kit,
a loud operation noise is pro-
duced. This does not indicate a
malfunction.
●Do not use to check or to adjust
the tire pressure.
WARNING
■Caution while driving
●Store the repair kit in the trunk.
Injuries may result in the event
of an accident or sudden brak-
ing.
●The repair kit is exclusively only
for your vehicle.
Do not use repair kit on other
vehicles, which could lead to an
accident causing death or seri-
ous injury.
●Do not use repair kit for tires
that are different size than the
original ones, or for any other
purpose. If the tires have not
been completely repaired, it
could lead to an accident caus-
ing death or serious injury.
Page 496 of 588
4968-2. Steps to take in an emergency
COROLLA_U
1Lift the deck mat. ( P.403)
2 Take out the emergency tire
puncture repair kit. ( P.494)
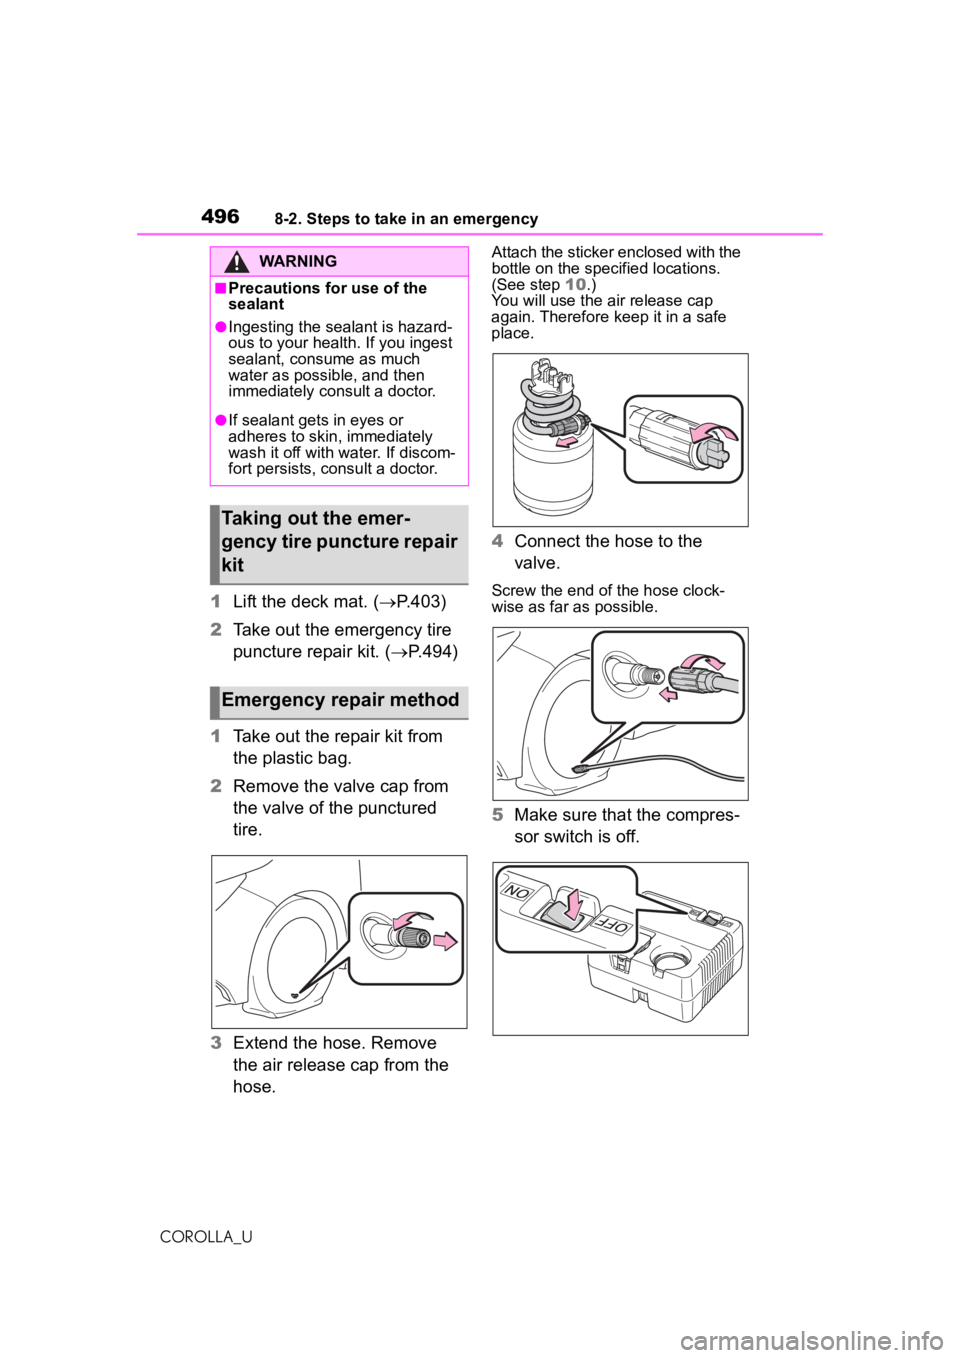
1 Take out the repair kit from
the plastic bag.
2 Remove the valve cap from
the valve of the punctured
tire.
3 Extend the hose. Remove
the air release cap from the
hose.
Attach the sticker enclosed with the
bottle on the specified locations.
(See step 10.)
You will use the air release cap
again. Therefore keep it in a safe
place.
4 Connect the hose to the
valve.
Screw the end of the hose clock-
wise as far as possible.
5Make sure that the compres-
sor switch is off.
WARNING
■Precautions for use of the
sealant
●Ingesting the sealant is hazard-
ous to your health. If you ingest
sealant, consume as much
water as possible, and then
immediately consult a doctor.
●If sealant gets in eyes or
adheres to skin, immediately
wash it off with water. If discom-
fort persists, consult a doctor.
Taking out the emer-
gency tire puncture repair
kit
Emergency repair method
Page 497 of 588
4978-2. Steps to take in an emergency
COROLLA_U
8
When trouble arises
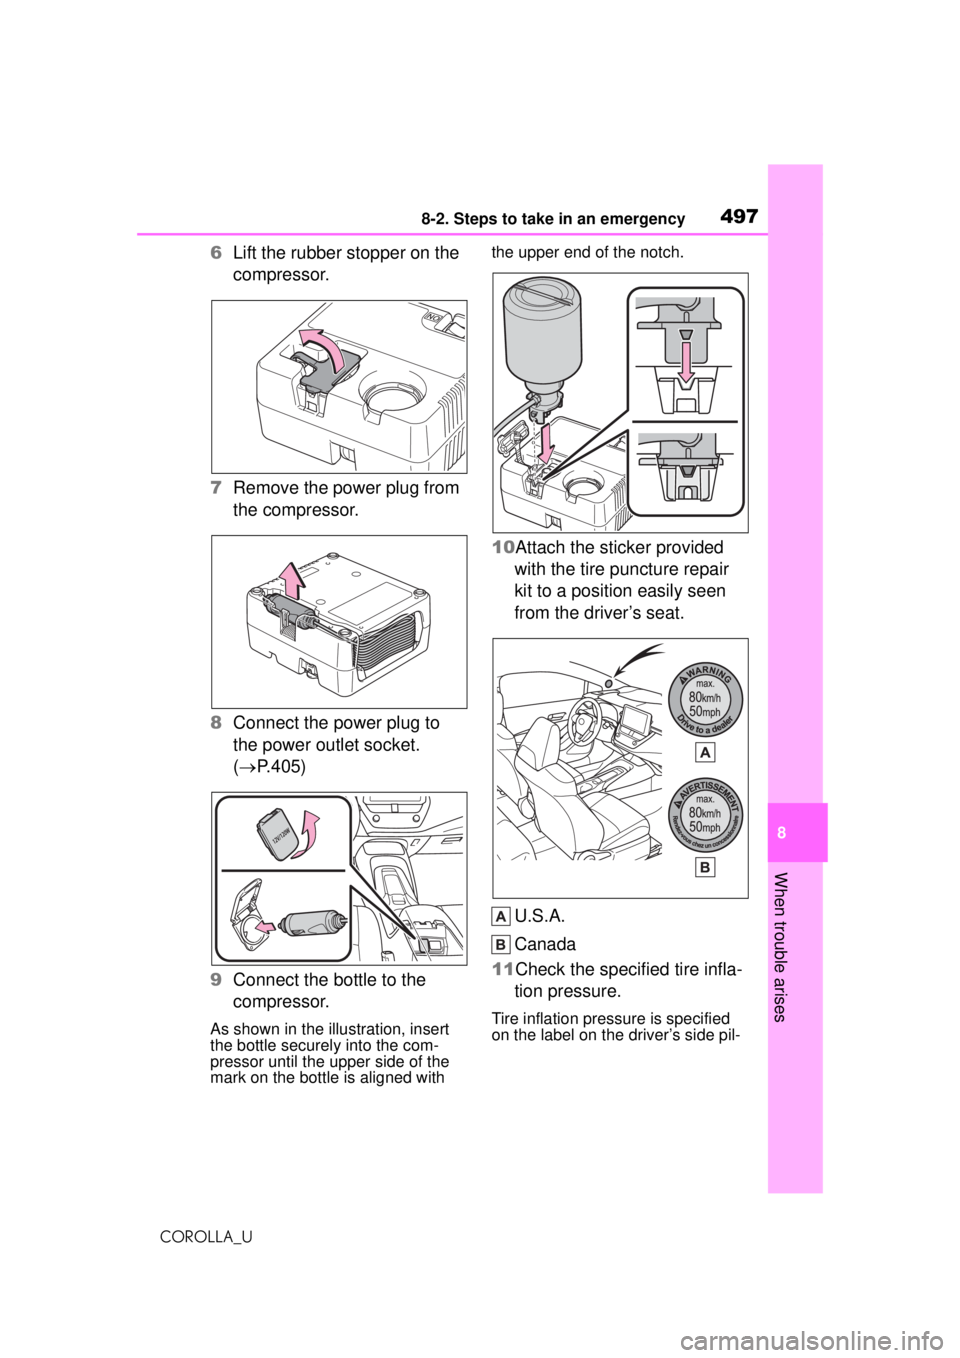
6 Lift the rubber stopper on the
compressor.
7 Remove the power plug from
the compressor.
8 Connect the power plug to
the power outlet socket.
( P.405)
9 Connect the bottle to the
compressor.
As shown in the illustration, insert
the bottle securely into the com-
pressor until the upper side of the
mark on the bottle is aligned with the upper end of the notch.
10Attach the sticker provided
with the tire puncture repair
kit to a position easily seen
from the driver’s seat.
U.S.A.
Canada
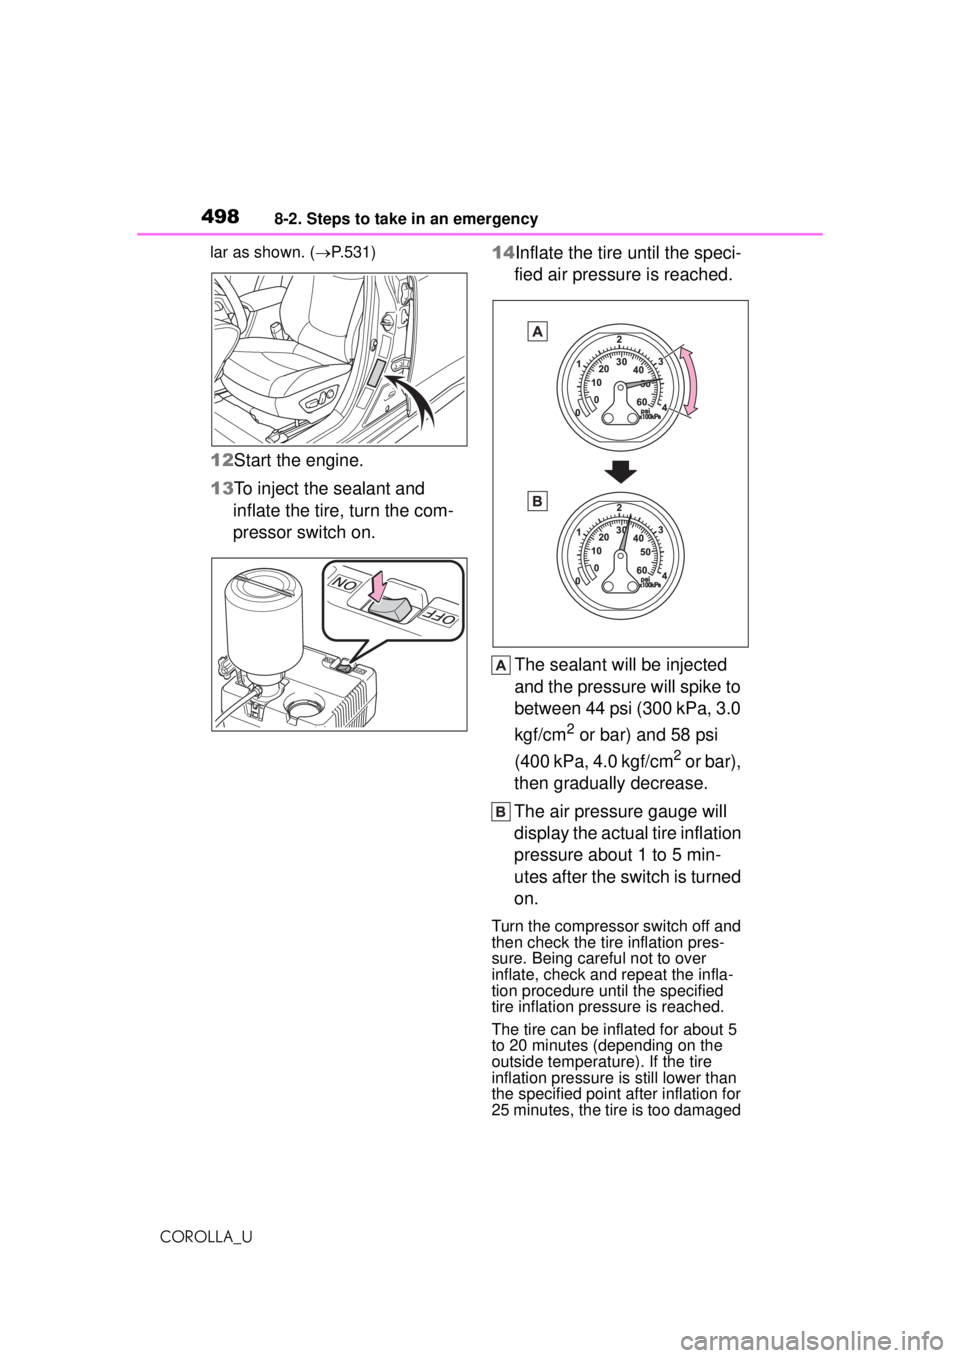
11Check the specified tire infla- tion pressure.
Tire inflation pressure is specified
on the label on the driver’s side pil-
Page 498 of 588
4988-2. Steps to take in an emergency
COROLLA_Ular as shown. (
P.531)
12 Start the engine.
13 To inject the sealant and
inflate the tire, turn the com-
pressor switch on. 14Inflate the tire until the speci-
fied air pressure is reached.
The sealant will be injected
and the pressure will spike to
between 44 psi (300 kPa, 3.0
kgf/cm
2 or bar) and 58 psi
(400 kPa, 4.0 kgf/cm
2 or bar),
then gradually decrease.
The air pressure gauge will
display the actual tire inflation
pressure about 1 to 5 min-
utes after the switch is turned
on.
Turn the compressor switch off and
then check the tire inflation pres-
sure. Being careful not to over
inflate, check and repeat the infla-
tion procedure until the specified
tire inflation pressure is reached.
The tire can be inflated for about 5
to 20 minutes (depending on the
outside temperature). If the tire
inflation pressure is still lower than
the specified point after inflation for
25 minutes, the tire is too damaged
Page 499 of 588
4998-2. Steps to take in an emergency
COROLLA_U
8
When trouble arises
to be repaired. Turn the compres-
sor switch off and contact your Toy-
ota dealer.
If the tire inflation pressure exceeds
the specified air pressure, let out
some air to adjust the tire inflation
pressure. ( P.500, 531)
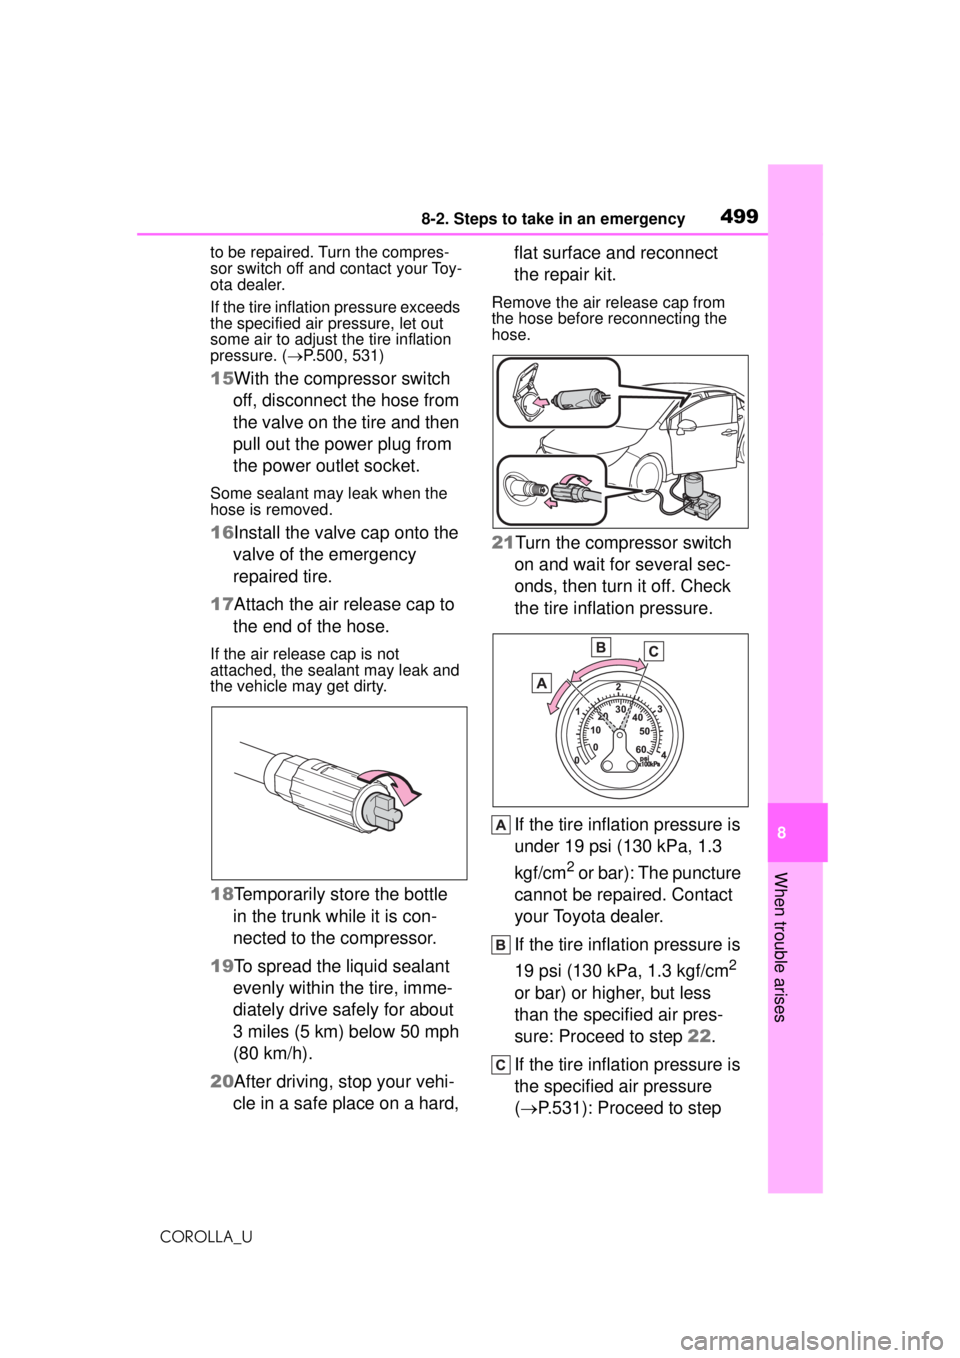
15 With the compressor switch
off, disconnect the hose from
the valve on the tire and then
pull out the power plug from
the power outlet socket.
Some sealant may leak when the
hose is removed.
16 Install the valve cap onto the
valve of the emergency
repaired tire.
17 Attach the air release cap to
the end of the hose.
If the air release cap is not
attached, the sealant may leak and
the vehicle may get dirty.
18 Temporarily store the bottle
in the trunk while it is con-
nected to the compressor.
19 To spread the liquid sealant
evenly within the tire, imme-
diately drive safely for about
3 miles (5 km) below 50 mph
(80 km/h).
20 After driving, stop your vehi-
cle in a safe place on a hard, flat surface and reconnect
the repair kit.
Remove the air release cap from
the hose before reconnecting the
hose.
21Turn the compressor switch
on and wait for several sec-
onds, then turn it off. Check
the tire inflation pressure.
If the tire inflation pressure is
under 19 psi (130 kPa, 1.3
kgf/cm
2 or bar): The puncture
cannot be repaired. Contact
your Toyota dealer.
If the tire inflation pressure is
19 psi (130 kPa, 1.3 kgf/cm
2
or bar) or higher, but less
than the specified air pres-
sure: Proceed to step 22.
If the tire inflation pressure is
the specified air pressure
( P.531): Proceed to step
Page 500 of 588
5008-2. Steps to take in an emergency
COROLLA_U
23.
22 Turn the compressor switch
on to inflate the tire until the
specified air pressure is
reached. Drive for about 3
miles (5 km) and then per-
form step 20.
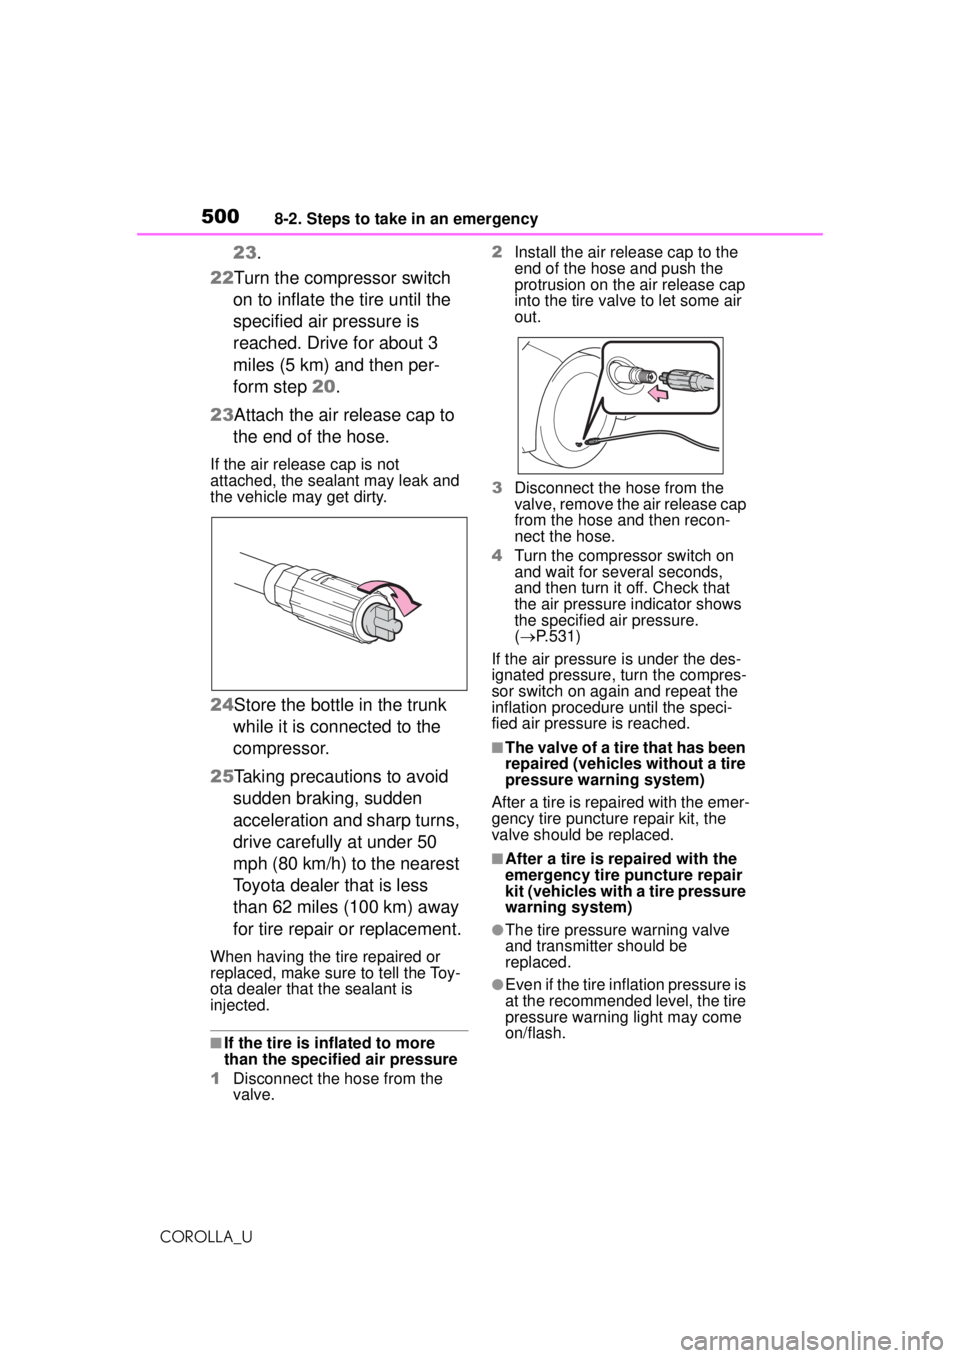
23 Attach the air release cap to
the end of the hose.
If the air release cap is not
attached, the sealant may leak and
the vehicle may get dirty.
24 Store the bottle in the trunk
while it is connected to the
compressor.
25 Taking precautions to avoid
sudden braking, sudden
acceleration and sharp turns,
drive carefully at under 50
mph (80 km/h) to the nearest
Toyota dealer that is less
than 62 miles (100 km) away
for tire repair or replacement.
When having the tire repaired or
replaced, make sure to tell the Toy-
ota dealer that the sealant is
injected.
■If the tire is inflated to more
than the specified air pressure
1 Disconnect the hose from the
valve. 2
Install the air release cap to the
end of the hose and push the
protrusion on the air release cap
into the tire valve to let some air
out.
3 Disconnect the hose from the
valve, remove the air release cap
from the hose and then recon-
nect the hose.
4 Turn the compress or switch on
and wait for se veral seconds,
and then turn it off. Check that
the air pressure indicator shows
the specified air pressure.
( P.531)
If the air pressure is under the des-
ignated pressure, turn the compres-
sor switch on again and repeat the
inflation procedure until the speci-
fied air pressure is reached.
■The valve of a tire that has been
repaired (vehicles without a tire
pressure warning system)
After a tire is repaired with the emer-
gency tire puncture repair kit, the
valve should be replaced.
■After a tire is repaired with the
emergency tire puncture repair
kit (vehicles with a tire pressure
warning system)
●The tire pressure warning valve
and transmitter should be
replaced.
●Even if the tire in flation pressure is
at the recommended level, the tire
pressure warning light may come
on/flash.