change time TOYOTA COROLLA 2023 Owners Manual
[x] Cancel search | Manufacturer: TOYOTA, Model Year: 2023, Model line: COROLLA, Model: TOYOTA COROLLA 2023Pages: 468, PDF Size: 14.4 MB
Page 5 of 468
5
Please note that this manual
applies to all models and
explains all equipment, including
options. Therefore, you may find
explanations for equipment not
installed on your vehicle and the
illustrations used may differ from
your vehicle.
All specifications provided in this
manual are current at the time of
printing. Over time, your vehicle
may receive updates that modify
the vehicle and make material in
this manual incomplete and/or
inaccurate. Because of Toyota's
interest in continual product
improvement, Toyota reserves
the right to make changes to this
manual at any time without
notice.
If Toyota chooses to update the
manual, updated versions can
be viewed by selecting your
vehicle by model and year at the
following URL or on your mobile
device if you have access to the
Toyota app.
www.toyota.com/owners
Approximately five hours after
the engine is turned off, you
may hear sound coming from under the vehicle for several
minutes. This is the sound of a
fuel evaporation leakage check
and, it does not indicate a mal-
function.
A wide variety of non-genuine
spare parts and accessories for
Toyota vehicles are currently
available in the market. You
should know that Toyota does
not warrant these products and
is not responsible for their per-
formance, repair, or replace-
ment, or for any damage they
may cause to, or adverse effect
they may have on, your Toyota
vehicle.
This vehicle should not be modi-
fied with non-genuine Toyota
products. Modification with
non-genuine Toyota products
could affect its performance,
safety or durability, and may
even violate governmental regu-
lations. In addition, damage or
performance problems resulting
from the modification may not
be covered under warranty.
Also, remodeling like this will
have an effect on advanced
safety equipment such as Toy-
ota Safety Sense 3.0 and there
is a danger that it will not work
properly or the danger that it
For your information
Main Owner’s Manual
Noise from under vehicle
after turning off the engine
Accessories, spare parts
and modification of your
To y o t a
Page 88 of 468
882-1. Instrument cluster
different distances independently.
To reset, display the desired trip
meter and press and hold the dis-
play change button.
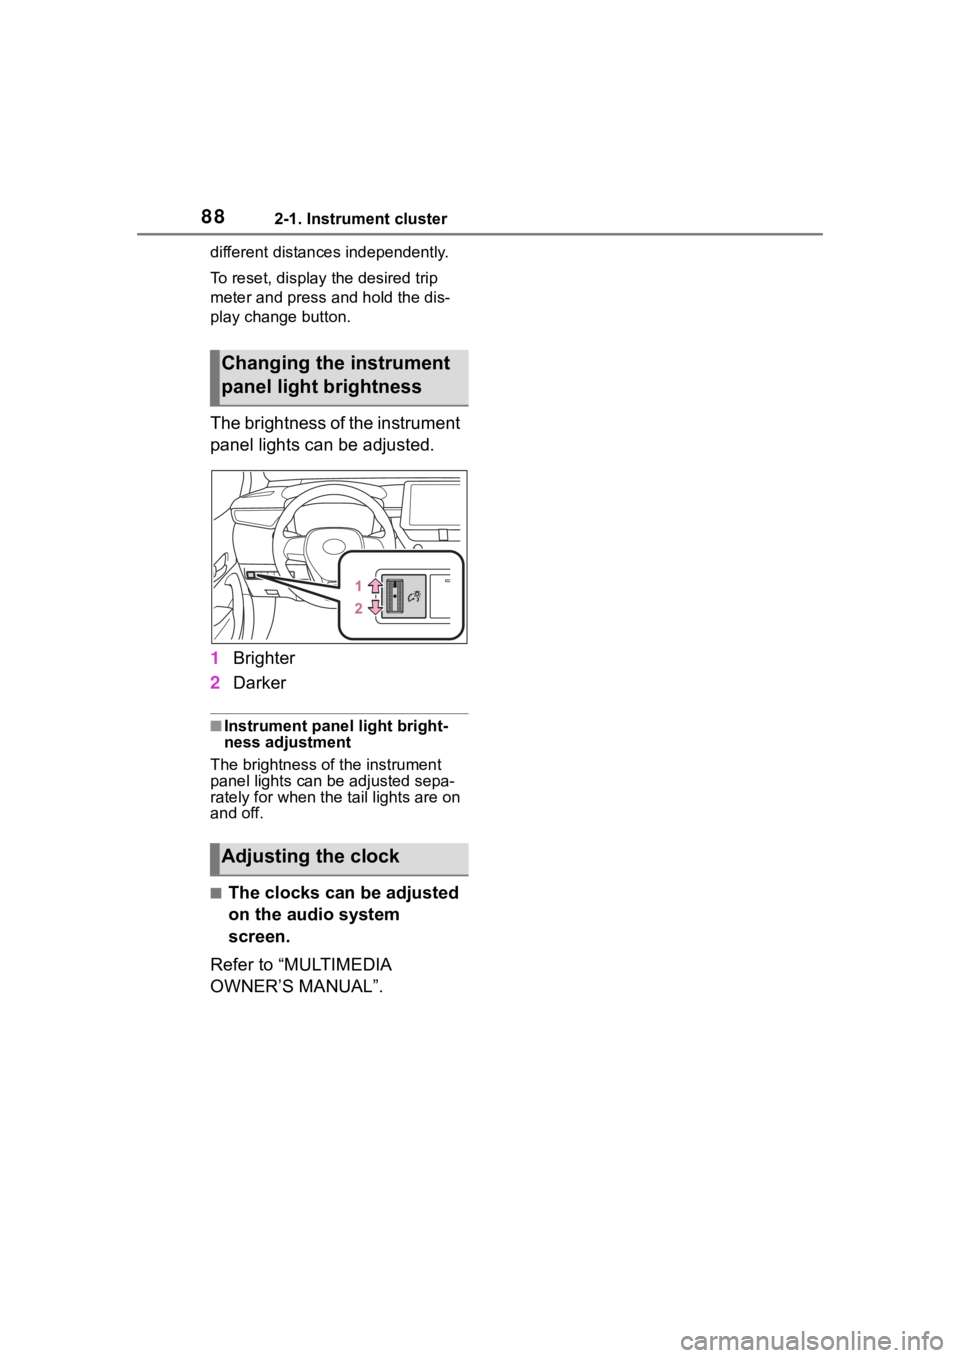
The brightness of the instrument
panel lights can be adjusted.
1Brighter
2 Darker
■Instrument panel light bright-
ness adjustment
The brightness of the instrument
panel lights can be adjusted sepa-
rately for when the tail lights are on
and off.
■The clocks can be adjusted
on the audio system
screen.
Refer to “MULTIMEDIA
OWNER’S MANUAL”.
Changing the instrument
panel light brightness
Adjusting the clock
Page 91 of 468
912-1. Instrument cluster
2
Vehicle status information and indicators
can be used to record and display
different distances independently.
To reset, display the desired trip
meter and press and hold the dis-
play change button.
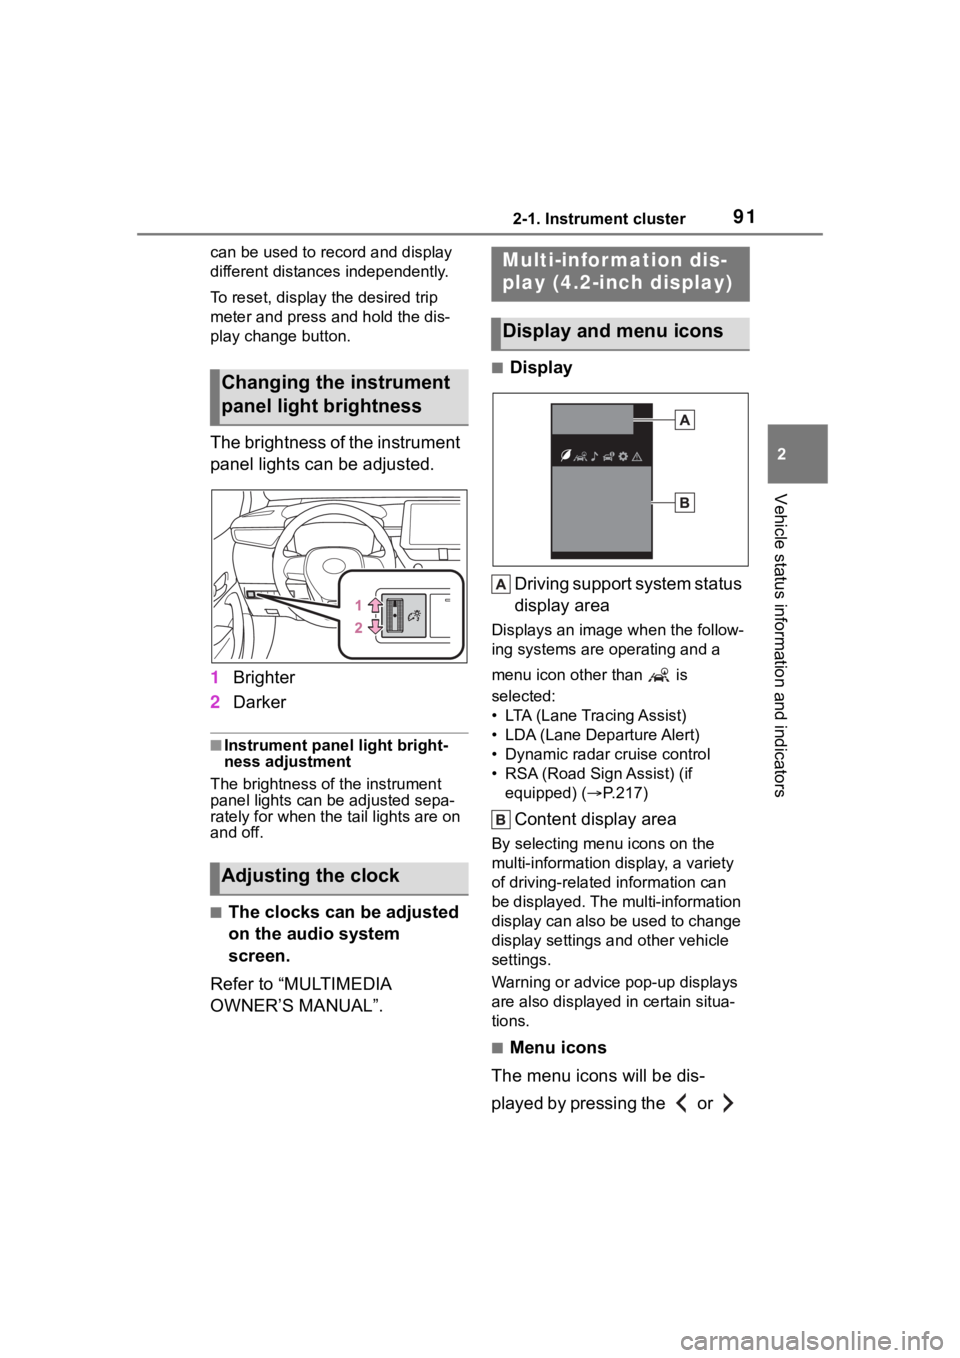
The brightness of the instrument
panel lights can be adjusted.
1Brighter
2 Darker
■Instrument panel light bright-
ness adjustment
The brightness of the instrument
panel lights can be adjusted sepa-
rately for when the tail lights are on
and off.
■The clocks can be adjusted
on the audio system
screen.
Refer to “MULTIMEDIA
OWNER’S MANUAL”.
■Display
Driving support system status
display area
Displays an image when the follow-
ing systems are operating and a
menu icon other than is
selected:
• LTA (Lane Tracing Assist)
• LDA (Lane Departure Alert)
• Dynamic radar cruise control
• RSA (Road Sign Assist) (if equipped) ( P.217)
Content display area
By selecting menu icons on the
multi-information di splay, a variety
of driving-related information can
be displayed. The multi-information
display can also be used to change
display settings and other vehicle
settings.
Warning or advice pop-up displays
are also displayed in certain situa-
tions.
■Menu icons
The menu icons will be dis-
played by pressing the or
Changing the instrument
panel light brightness
Adjusting the clock
Multi-infor mation dis-
play (4.2-inch display)
Display and menu icons
Page 92 of 468
922-1. Instrument cluster
meter control switch.
■Liquid crystal display
Small spots or light spots may
appear on the display. This phenom-
enon is characteristi c of liquid crys-
tal displays, and there is no problem
continuing to use the display.
The multi-information display is
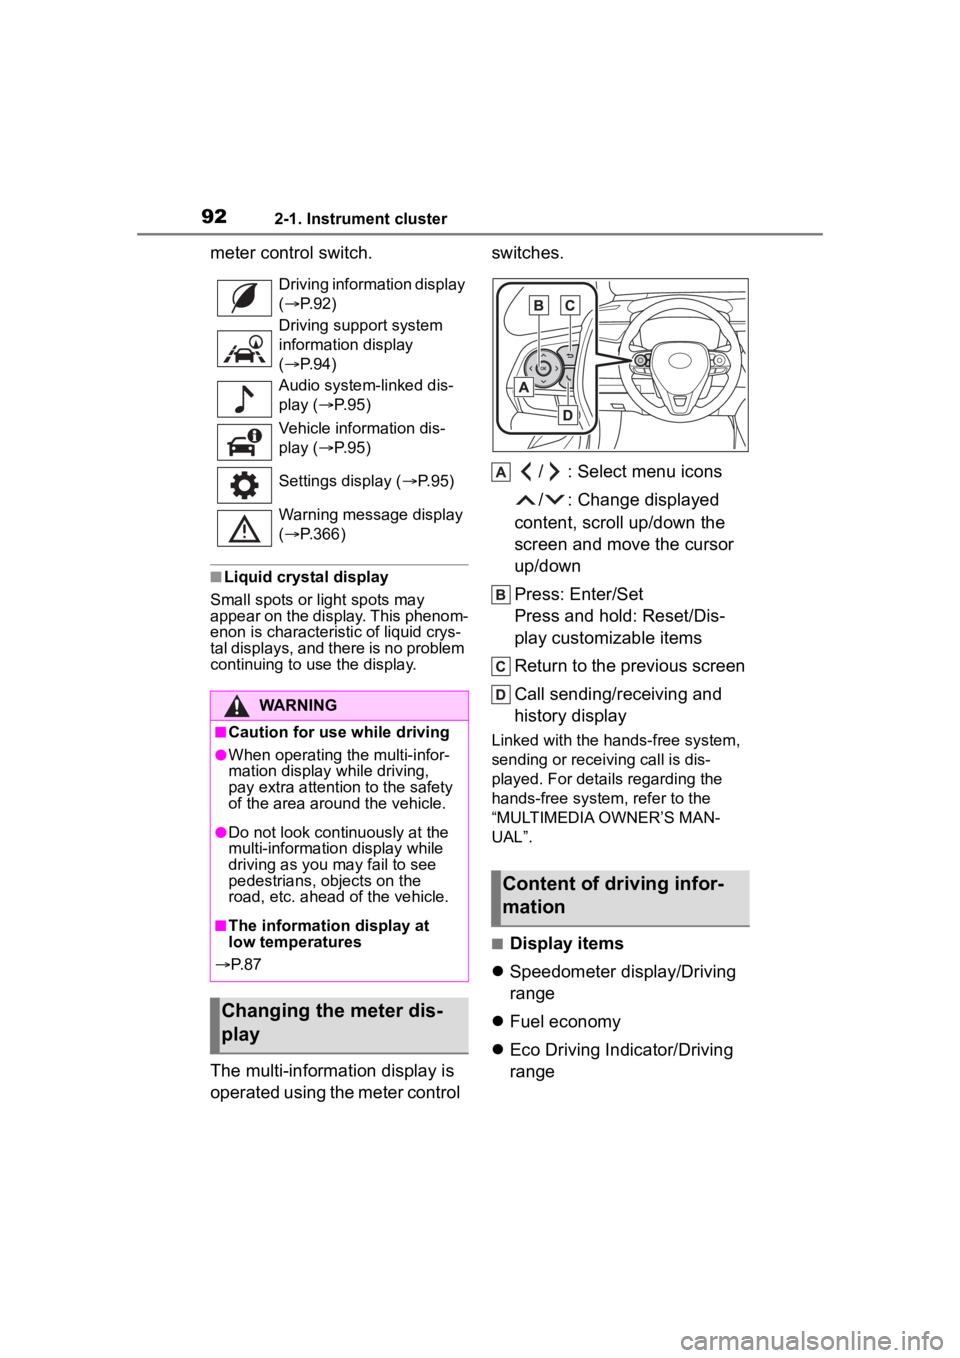
operated using the meter control switches.
/ : Select menu icons
/ : Change displayed
content, scroll up/down the
screen and move the cursor
up/down
Press: Enter/Set
Press and hold: Reset/Dis-
play customizable items
Return to the previous screen
Call sending/receiving and
history display
Linked with the hands-free system,
sending or receiving call is dis-
played. For details regarding the
hands-free system, refer to the
“MULTIMEDIA OWNER’S MAN-
UAL”.
■Display items
Speedometer display/Driving
range
Fuel economy
Eco Driving Indicator/Driving
range
Driving information display
( P. 9 2 )
Driving support system
information display
( P. 9 4 )
Audio system-linked dis-
play ( P. 9 5 )
Vehicle information dis-
play ( P. 9 5 )
Settings display ( P. 9 5 )
Warning message display
( P.366)
WARNING
■Caution for use while driving
●When operating the multi-infor-
mation display while driving,
pay extra attention to the safety
of the area aroun d the vehicle.
●Do not look continuously at the
multi-information display while
driving as you may fail to see
pedestrians, objects on the
road, etc. ahead o f the vehicle.
■The information display at
low temperatures
P. 8 7
Changing the meter dis-
play
Content of driving infor-
mation
Page 95 of 468
952-1. Instrument cluster
2
Vehicle status information and indicators
■Navigation system-linked
display (if equipped)
Select to display the following
navigation system-linked infor-
mation:
Route guidance to destination
Compass display (head-
ing-up display)
Select to enable selection of an
audio source or track on the
meter using the meter control
switches.
This menu icon can be set to be
displayed/not displayed in .
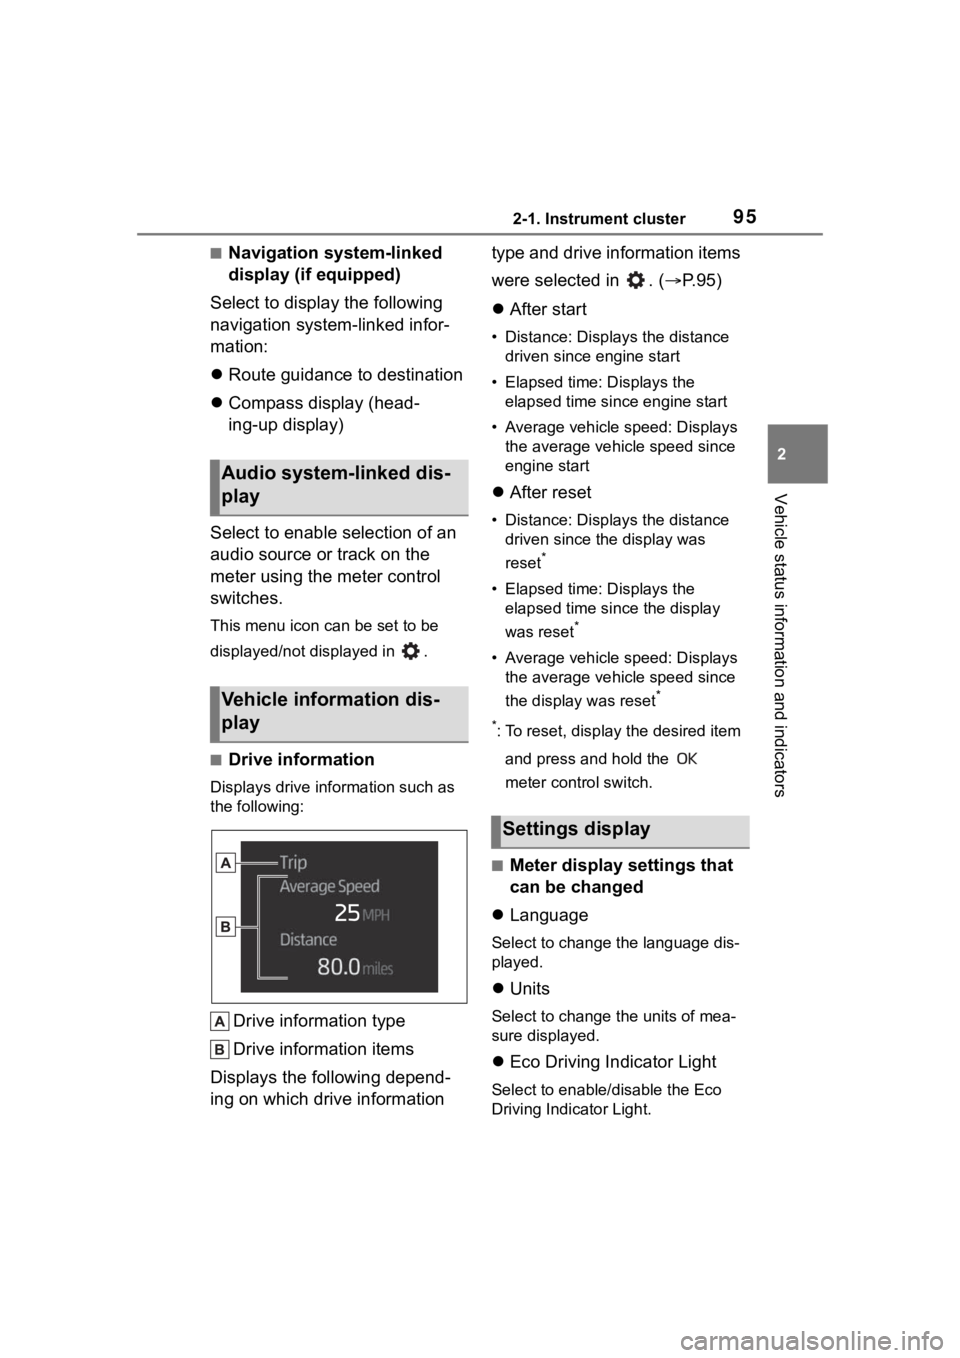
■Drive information
Displays drive information such as
the following:
Drive information type
Drive information items
Displays the following depend-
ing on which drive information type and drive information items
were selected in . (
P.95)
After start
• Distance: Displays the distance
driven since engine start
• Elapsed time: Displays the elapsed time since engine start
• Average vehicle speed: Displays the average vehicle speed since
engine start
After reset
• Distance: Displays the distance
driven since the display was
reset
*
• Elapsed time: Displays the elapsed time since the display
was reset
*
• Average vehicle speed: Displays the average vehicle speed since
the display was reset
*
*
: To reset, display the desired item and press and hold the
meter control switch.
■Meter display settings that
can be changed
Language
Select to change the language dis-
played.
Units
Select to change the units of mea-
sure displayed.
Eco Driving Indicator Light
Select to enable/disable the Eco
Driving Indi cator Light.
Audio system-linked dis-
play
Vehicle information dis-
play
Settings display
Page 96 of 468
962-1. Instrument cluster
• Fuel economy display
Select to change the average fuel
consumption display between after
start/after reset. (P. 9 3 )
Select to display/not display the
audio system linked display.
Select to change the displayed con-
tent of the following:
• Drive information type
Select to change the drive informa-
tion type display between after
start/after reset.
• Drive information items
Select to set the first and second
items of the drive information dis-
play to any of the following: aver-
age vehicle
speed/distance/elapsed time.
Pop-up display
Select to enable/disable pop-up
displays for each relevant system.
Multi-information display off
Select to turn the m ulti-information
display off.
To turn the multi-in formation display
on again, press any of the following
meter control switches
//// /.
Default setting
Select to reset the meter display
settings to the default setting.
■Vehicle functions and set-
tings that can be changed
P.412
■Suspension of the settings dis-
play
●Some settings cannot be changed
while driving. When changing set-
tings, park the vehicle in a safe
place.
●If a warning message is displayed,
operation of the settings display
will be suspended.
WARNING
■Cautions during setting up
the display
If the engine is running when
changing the dis play settings,
ensure that the vehicle is parked
in a place with adequate ventila-
tion. In a closed area such as a
garage, exhaust gases including
harmful carbon monoxide (CO)
may collect and enter the vehicle.
This may lead to death or a seri-
ous health hazard.
NOTICE
■During setting up the display
To prevent batte ry discharge,
ensure that the engine is running
while setting up the display fea-
tures.
Page 98 of 468
982-1. Instrument cluster
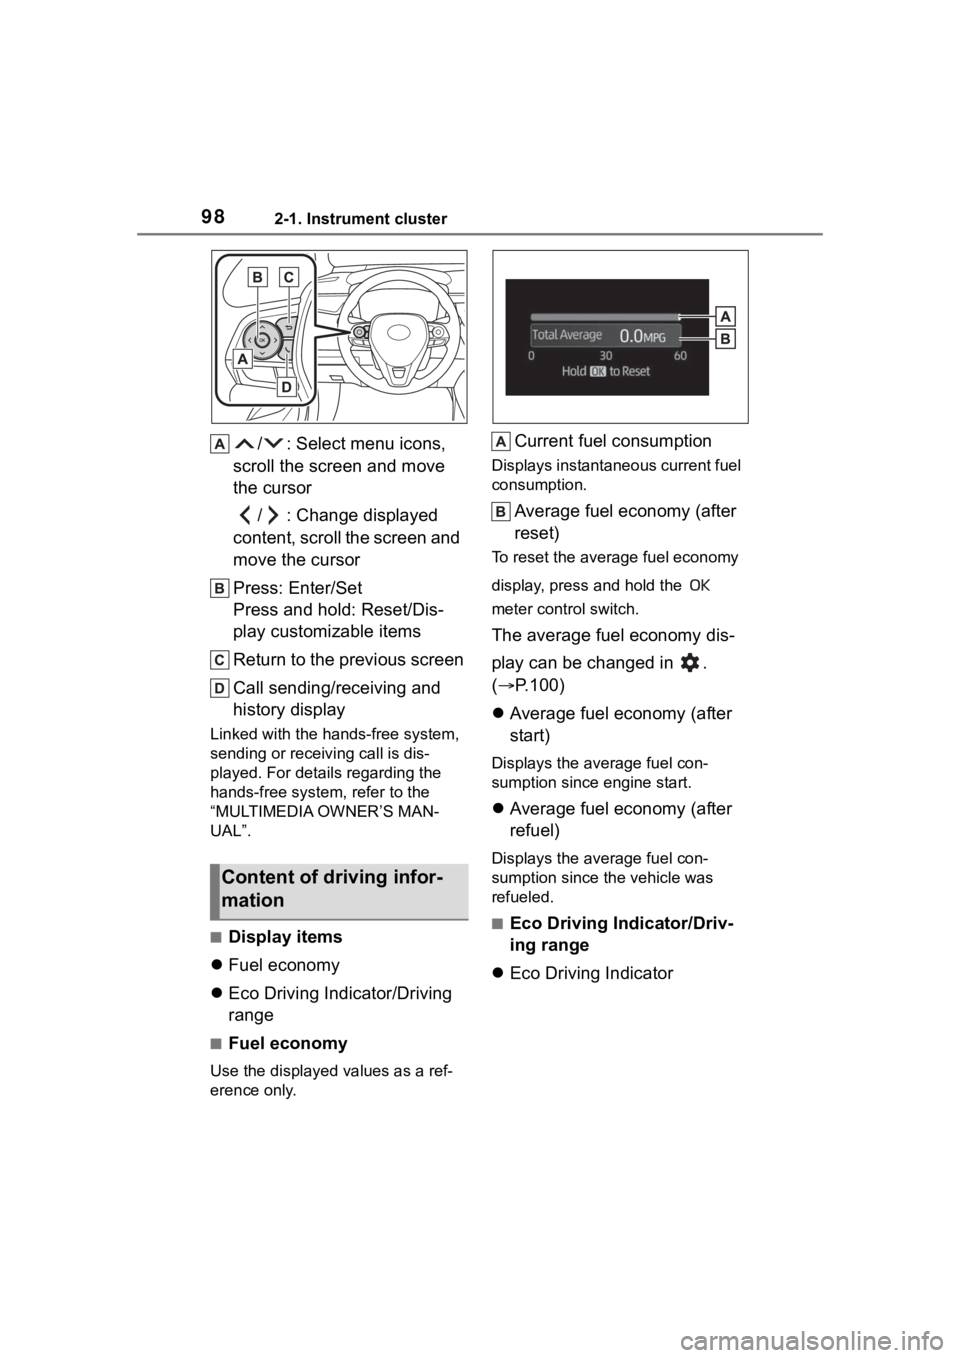
/ : Select menu icons,
scroll the screen and move
the cursor
/ : Change displayed
content, scroll the screen and
move the cursor
Press: Enter/Set
Press and hold: Reset/Dis-
play customizable items
Return to the previous screen
Call sending/receiving and
history display
Linked with the hands-free system,
sending or receiv ing call is dis-
played. For details regarding the
hands-free system, refer to the
“MULTIMEDIA OWNER’S MAN-
UAL”.
■Display items
Fuel economy
Eco Driving Indicator/Driving
range
■Fuel economy
Use the displayed values as a ref-
erence only.
Current fuel consumption
Displays instantaneous current fuel
consumption.
Average fuel economy (after
reset)
To reset the average fuel economy
display, press and hold the
meter control switch.
The average fuel economy dis-
play can be changed in .
( P.100)
Average fuel economy (after
start)
Displays the average fuel con-
sumption since engine start.
Average fuel economy (after
refuel)
Displays the average fuel con-
sumption since the vehicle was
refueled.
■Eco Driving Indicator/Driv-
ing range
Eco Driving Indicator
Content of driving infor-
mation
Page 100 of 468
1002-1. Instrument cluster
mation:
Route guidance to destination
Compass display (head-
ing-up display)
Select to enable selection of an
audio source or track on the
meter using the meter control
switches.
This menu icon can be set to be
displayed/not displayed in .
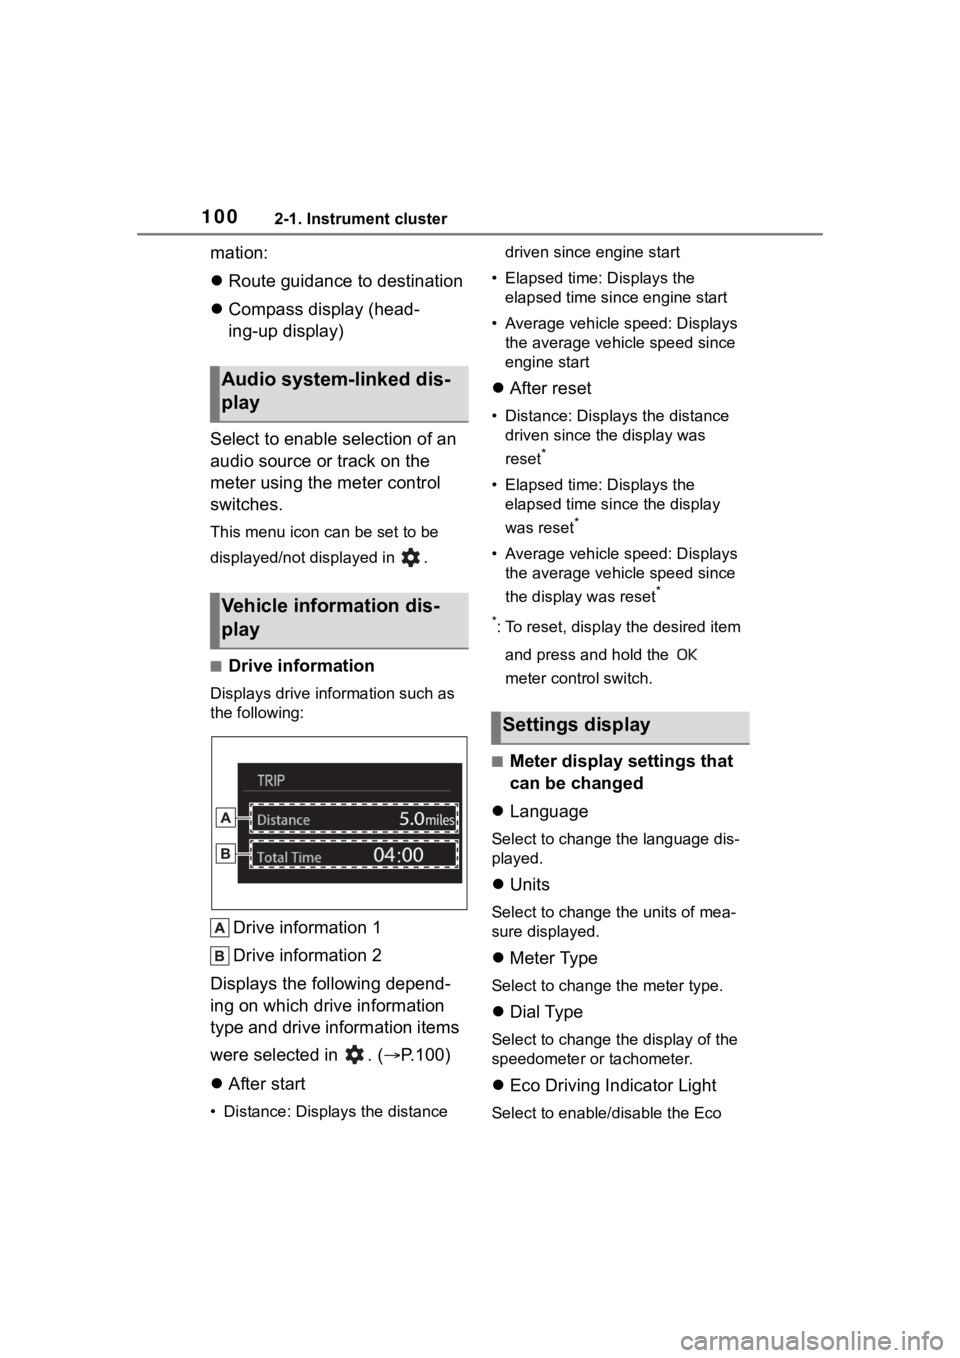
■Drive information
Displays drive information such as
the following:
Drive information 1
Drive information 2
Displays the following depend-
ing on which drive information
type and drive information items
were selected in . ( P.100)
After start
• Distance: Displays the distance driven since engine start
• Elapsed time: Displays the elapsed time since engine start
• Average vehicle speed: Displays the average vehicle speed since
engine start
After reset
• Distance: Displays the distance
driven since the display was
reset
*
• Elapsed time: Displays the elapsed time since the display
was reset
*
• Average vehicle speed: Displays the average vehicle speed since
the display was reset
*
*
: To reset, display the desired item and press and hold the
meter control switch.
■Meter display settings that
can be changed
Language
Select to change the language dis-
played.
Units
Select to change the units of mea-
sure displayed.
Meter Type
Select to change the meter type.
Dial Type
Select to change the display of the
speedometer or tachometer.
Eco Driving Indicator Light
Select to enable/disable the Eco
Audio system-linked dis-
play
Vehicle information dis-
play
Settings display
Page 101 of 468
1012-1. Instrument cluster
2
Vehicle status information and indicators
Driving Indicator Light.
Fuel economy display
Select to change the average fuel
consumption display to any of the
following: trip average/total aver-
age/tank average. ( P. 9 8 )
Select to display/not display the
audio system linked display.
Select to change the displayed con-
tent of the following:
• Drive information type
Select to change the drive informa-
tion type display between trip infor-
mation/total information.
• Drive information items
Select to set the first and second
items of the drive information dis-
play to any of the following: aver-
age vehicle
speed/distance/elapsed time.
Pop-up display
Select to enable/disable pop-up
displays for each relevant system.
Multi-information display off
Select to turn the m ulti-information
display off.
To turn the multi-in formation display
on again, press any of the following
meter control switches
//// /.
Default setting
Select to reset the meter display
settings to the default setting.
■Vehicle functions and set-
tings that can be changed
P.412
■Suspension of the settings dis-
play
●Some settings cannot be changed
while driving. When changing set-
tings, park the vehicle in a safe
place.
●If a warning message is displayed,
operation of the settings display
will be suspended.
WARNING
■Cautions during setting up
the display
If the engine is running when
changing the dis play settings,
ensure that the vehicle is parked
in a place with adequate ventila-
tion. In a closed area such as a
garage, exhaust gases including
harmful carbon monoxide (CO)
may collect and enter the vehicle.
This may lead to death or a seri-
ous health hazard.
NOTICE
■During setting up the display
To prevent batte ry discharge,
ensure that the engine is running
while setting up the display fea-
tures.
Page 112 of 468
1123-2. Opening, closing and locking the doors
again within 3 seconds unlocks the
other doors.
Press and hold to open the win-
dows
*1and moon roof.*1, 2
*1
:This setting mu st be customized
at your Toyota dealer.
*2: If equipped
■Key
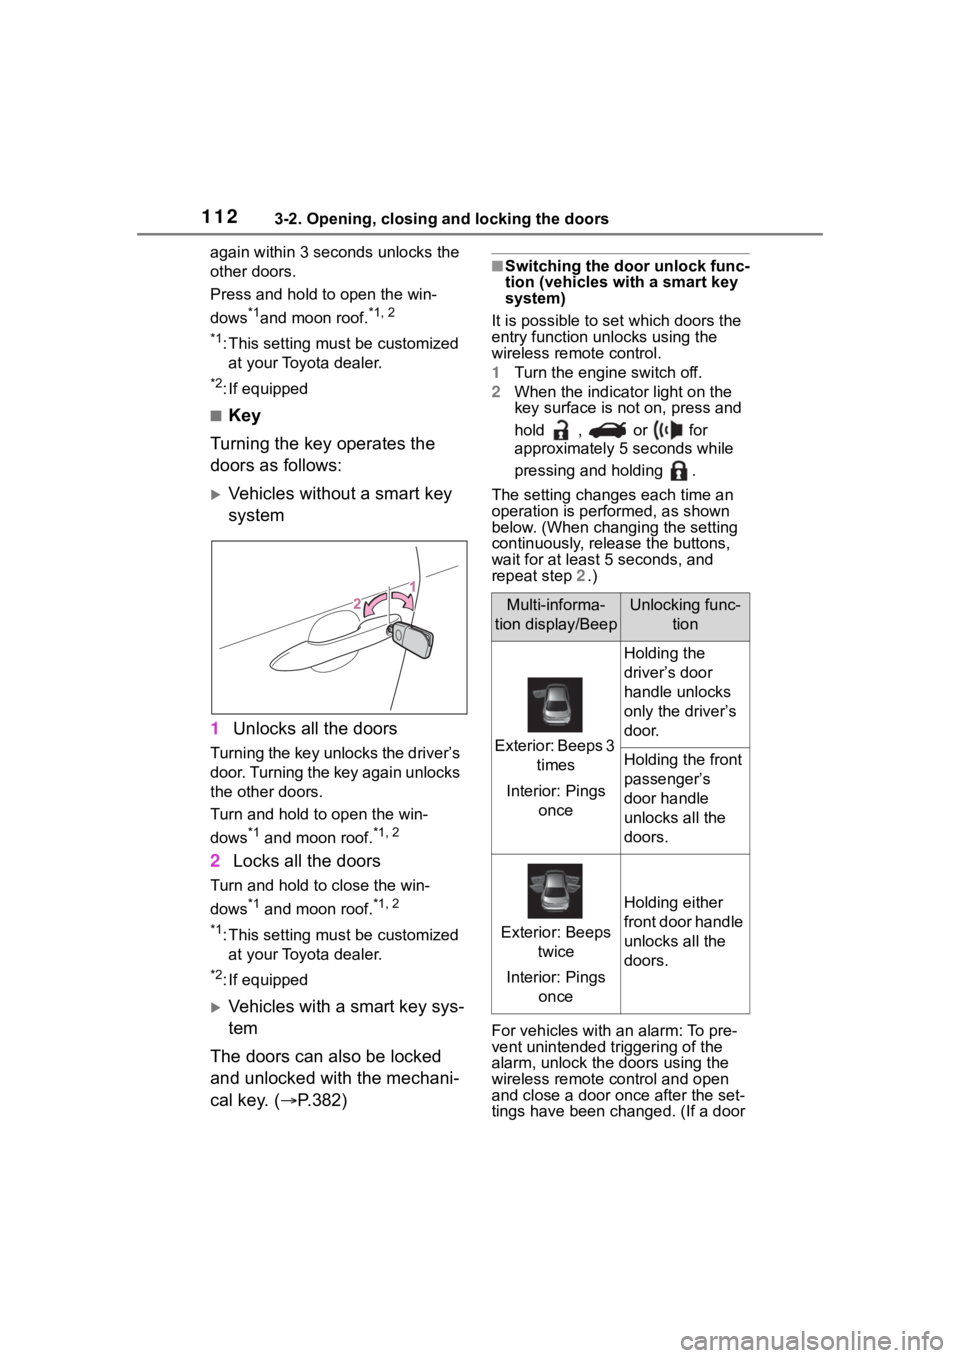
Turning the key operates the
doors as follows:
Vehicles without a smart key
system
1 Unlocks all the doors
Turning the key unlocks the driver’s
door. Turning the key again unlocks
the other doors.
Turn and hold to open the win-
dows
*1 and moon roof.*1, 2
2Locks all the doors
Turn and hold to close the win-
dows
*1 and moon roof.*1, 2
*1
:This setting mu st be customized
at your Toyota dealer.
*2: If equipped
Vehicles with a smart key sys-
tem
The doors can also be locked
and unlocked with the mechani-
cal key. ( P.382)
■Switching the door unlock func-
tion (vehicles with a smart key
system)
It is possible to set which doors the
entry function unlocks using the
wireless remote control.
1 Turn the engine switch off.
2 When the indicator light on the
key surface is not on, press and
hold , or for
approximately 5 seconds while
pressing and holding .
The setting changes each time an
operation is per formed, as shown
below. (When changing the setting
continuously, release the buttons,
wait for at least 5 seconds, and
repeat step 2 .)
For vehicles with an alarm: To pre-
vent unintended triggering of the
alarm, unlock the doors using the
wireless remote control and open
and close a door once after the set-
tings have been ch anged. (If a door
Multi-informa-
tion display/BeepUnlocking func- tion
Exterior: Beeps 3 times
Interior: Pings once
Holding the
driver’s door
handle unlocks
only the driver’s
door.
Holding the front
passenger’s
door handle
unlocks all the
doors.
Exterior: Beeps twice
Interior: Pings once
Holding either
front door handle
unlocks all the
doors.