TOYOTA HIGHLANDER HYBRID 2009 XU40 / 2.G Owners Manual
HIGHLANDER HYBRID 2009 XU40 / 2.G
TOYOTA
TOYOTA
https://www.carmanualsonline.info/img/14/6439/w960_6439-0.png
TOYOTA HIGHLANDER HYBRID 2009 XU40 / 2.G Owners Manual
Trending: child lock, tire size, park assist, weight, audio, tires, octane
Page 301 of 592
301
3-2. Using the audio system
3
Interior features
●
Extensions
If the file extensions .mp3 and .wma are used for files other than MP3 and
WMA files, they will be mistakenly recognized and played as MP3 and
WMA files. This may result in large amounts of interference and damage
to the speakers.
● Playback
• To play MP3 file with steady sound quality, we recommend a fixed bit
rate of at least 128 kbps and a sampling frequency of 44.1 kHz.
• CD-R or CD-RW playback may not be possible in some instances, depending on the characteristics of the disc.
• There is a wide variety of freeware and other encoding software for MP3 and WMA files on the market, and depending on the status of the
encoding and the file format, poor sound quality or noise at the start of
playback may result. In some cases, playback may not be possible at
all.
• When files other than MP3 or WMA files are recorded on a disc, it may take more time to recognize the disc and in some cases, playback may
not be possible at all.
• Microsoft, Windows, and Windows Media are the registered trade- marks of Microsoft Corporation in the U.S. and other countries.
NOTICE
■ CDs and adapters that cannot be used
→P. 293
■ CD player precautions
→P. 294
Page 302 of 592
302
3-2. Using the audio system
Optimal use of the audio system
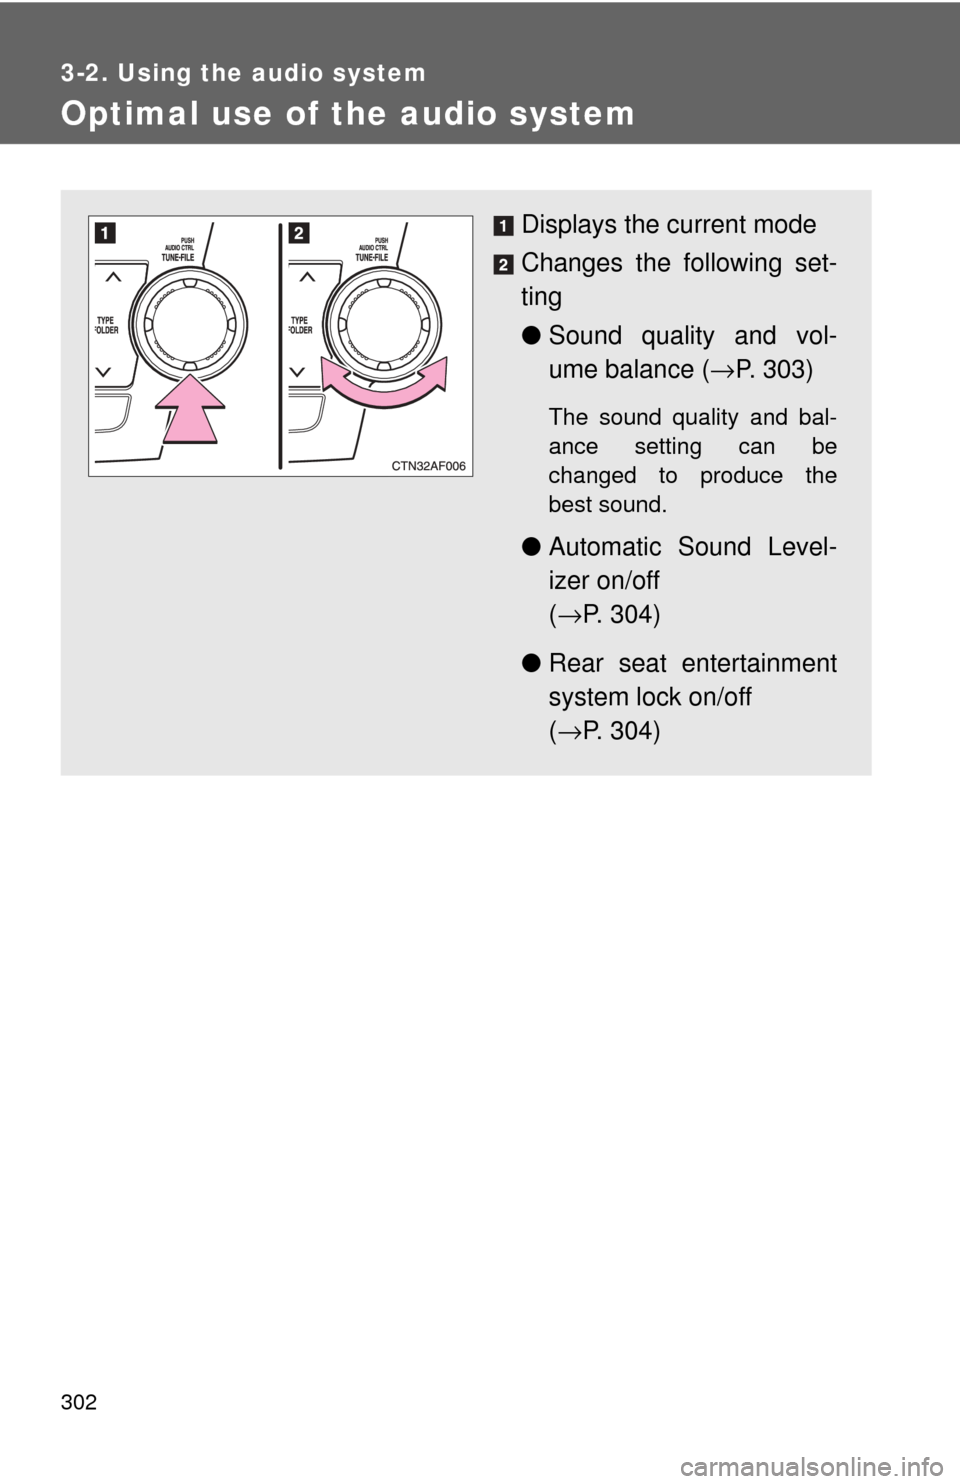
Displays the current mode
Changes the following set-
ting
●Sound quality and vol-
ume balance ( →P. 303)
The sound quality and bal-
ance setting can be
changed to produce the
best sound.
● Automatic Sound Level-
izer on/off
(→ P. 304)
● Rear seat entertainment
system lock on/off
(→ P. 304)
Page 303 of 592
303
3-2. Using the audio system
3
Interior features
Using the audio control function
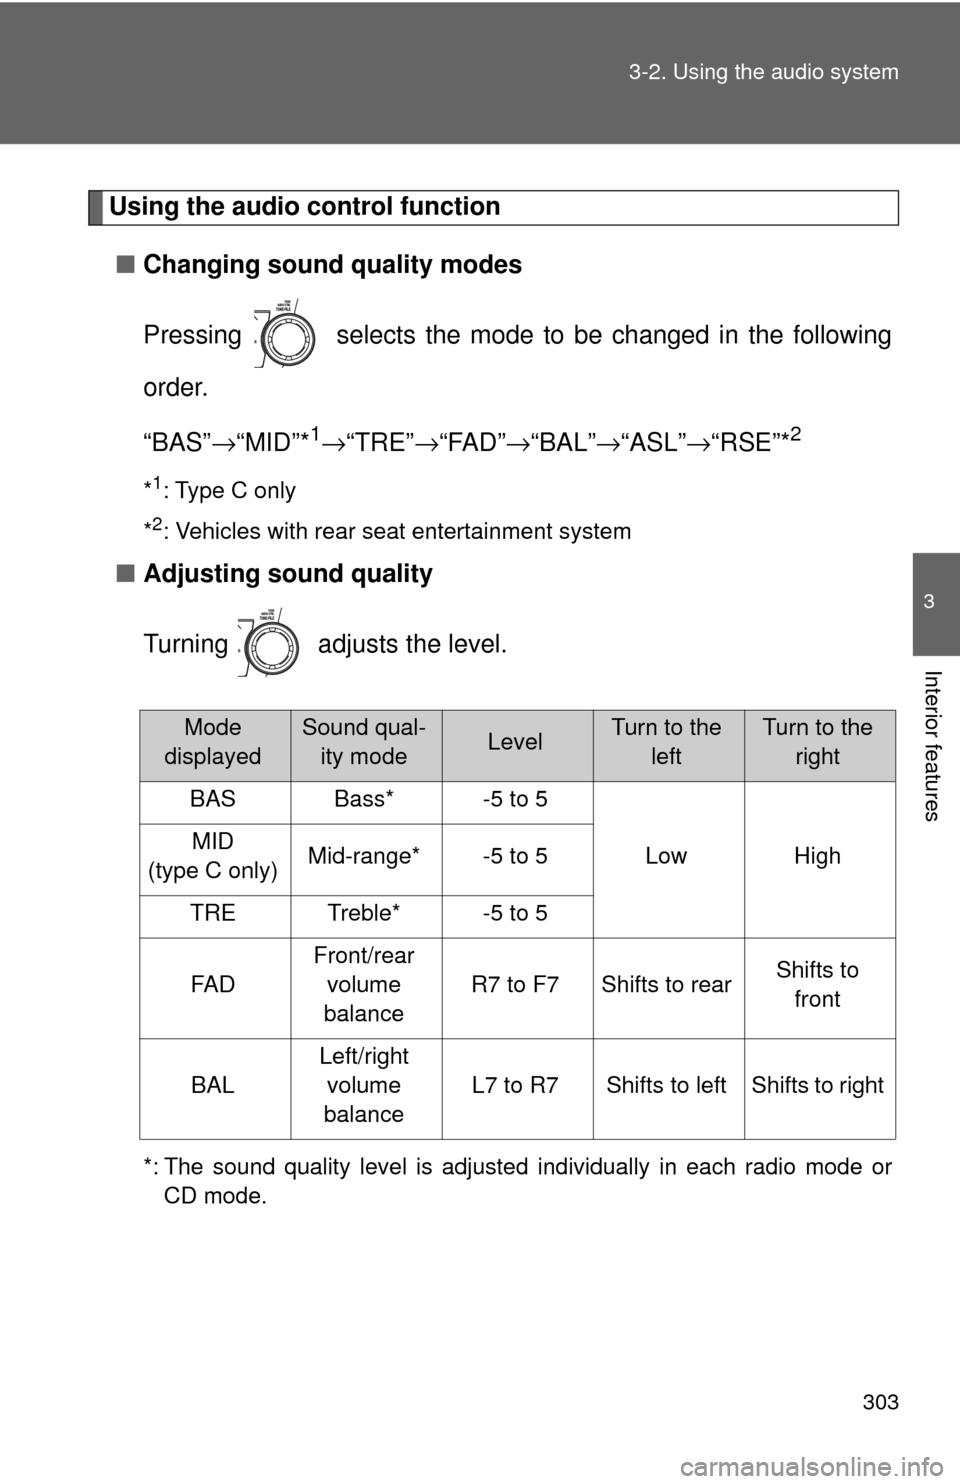
■ Changing sound quality modes
Pressing selects the mode to be changed in the following
order.
“BAS” →“MID”*
1→ “TRE” →“FAD” →“BAL” →“ASL” →“RSE”*2
*1: Type C only
*
2: Vehicles with rear seat entertainment system
■ Adjusting sound quality
Turning adjusts the level.
*: The sound quality level is adjusted individually in each radio mode or
CD mode.
Mode
displayedSound qual- ity modeLevelTurn to the leftTurn to the right
BASBass*-5 to 5
LowHighMID
(type C only)Mid-range*-5 to 5
TRETreble*-5 to 5
FA D
Front/rear volume
balance
R7 to F7Shifts to rearShifts to front
BAL
Left/right volume
balance
L7 to R7Shifts to leftShifts to right
Page 304 of 592
304 3-2. Using the audio system
■Adjusting the Automatic Sound Levelizer (ASL)
Type A and B
When “ASL” is selected, turning to the right changes the
amount of “ASL” in the order of “LOW”, “MID” and “HIGH”.
Turning to the left turns “ASL” off.
ASL automatically adjusts the volume and tone quality according to vehi-
cle speed.
Type C
When “ASL” is selected, turning to the right turns “ASL” on,
and turning to the left turns “ASL” off.
“ASL” automatically adjusts the volume and tone quality according to the
noise level as you drive your vehicle.
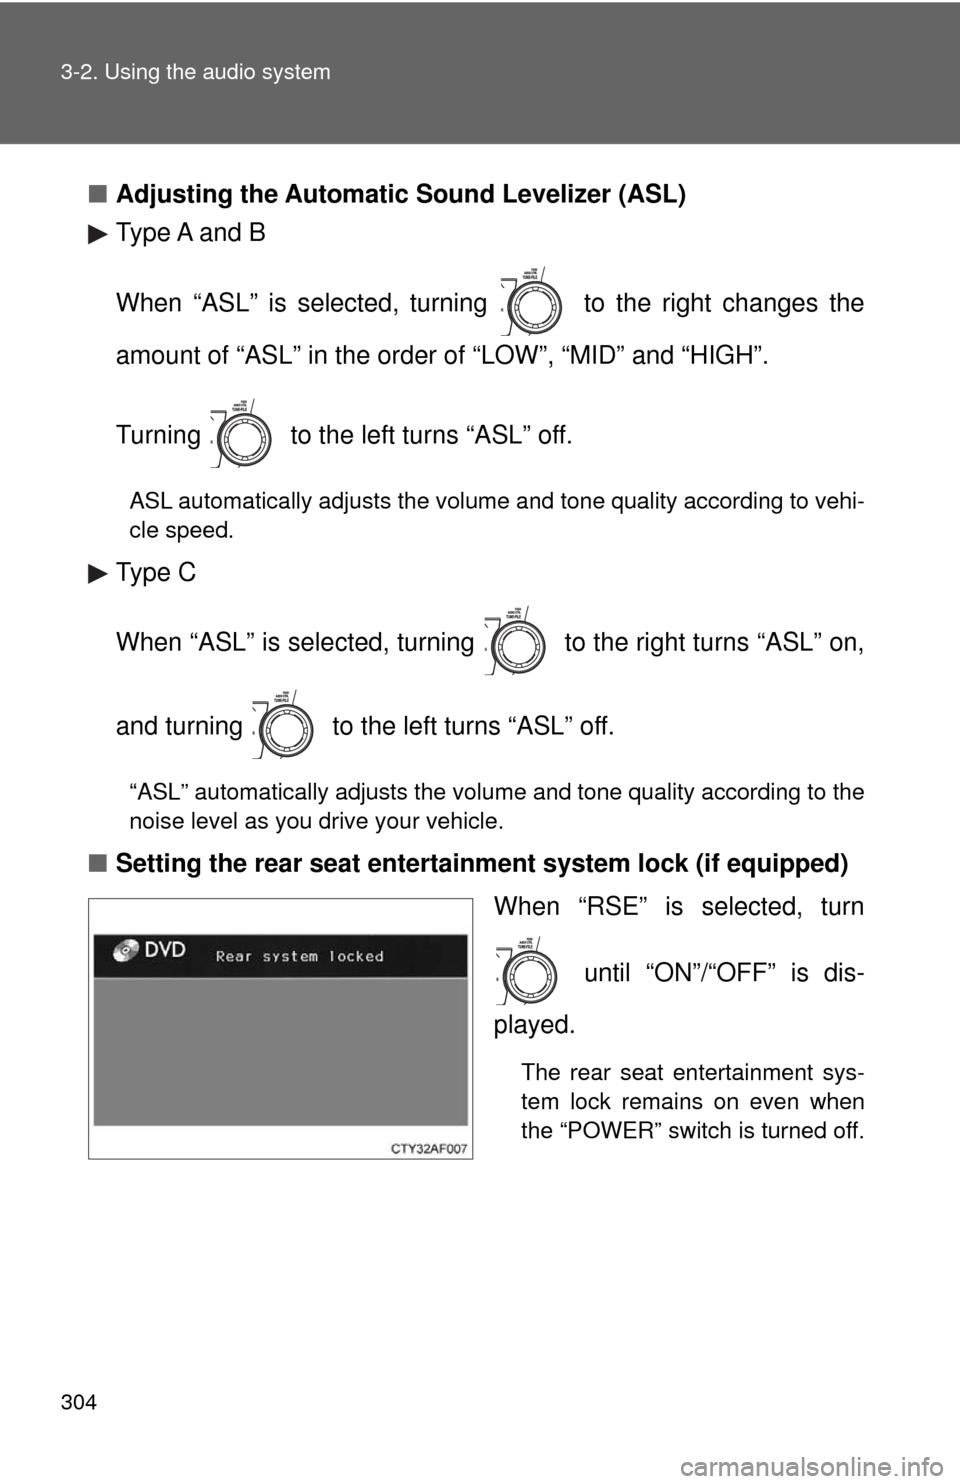
■Setting the rear seat entertainment system lock (if equipped)
When “RSE” is selected, turn
until “ON”/“OFF” is dis-
played.
The rear seat entertainment sys-
tem lock remains on even when
the “POWER” switch is turned off.
Page 305 of 592
305
3-2. Using the audio system
3
Interior features
Using the AUX adapter
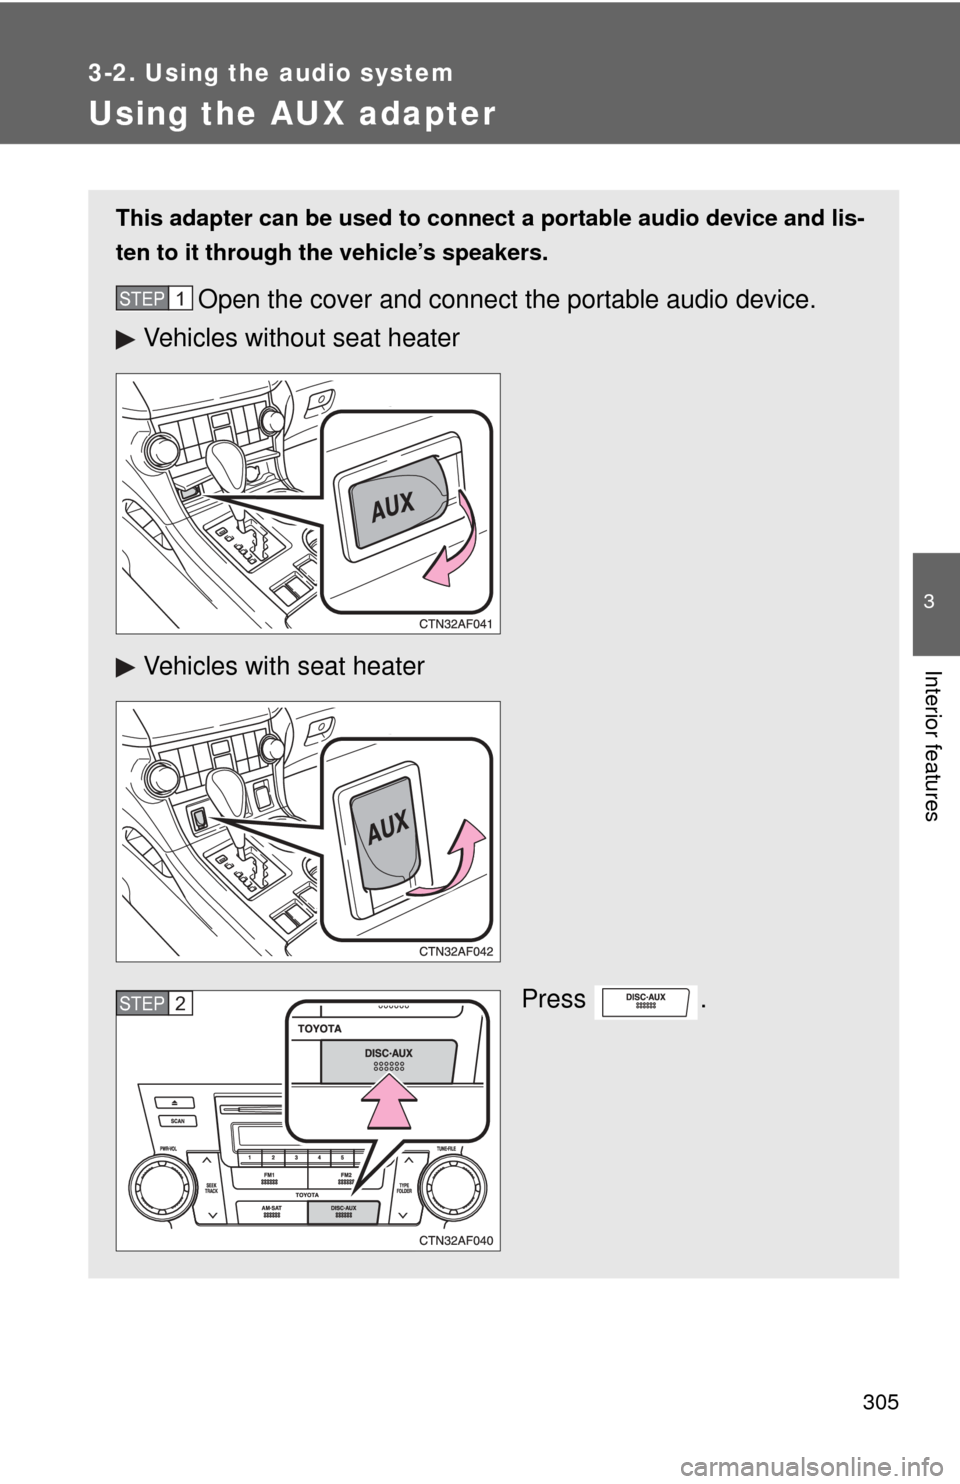
This adapter can be used to connect a portable audio device and lis-
ten to it through the vehicle’s speakers.
Open the cover and connect the portable audio device.
Vehicles without seat heater
Vehicles with seat heater
Press .STEP1
STEP2
Page 306 of 592
306 3-2. Using the audio system
■Operating portable audio devi ces connected to the audio system
The volume can be adjusted using the vehicle's audio controls. All other
adjustments must be made on the portable audio device itself.
■ When using a portable audio device connected to the power outlet
Noise may occur during playback. Use the power source of the portable
audio device.
Page 307 of 592
307
3-2. Using the audio system
3
Interior features
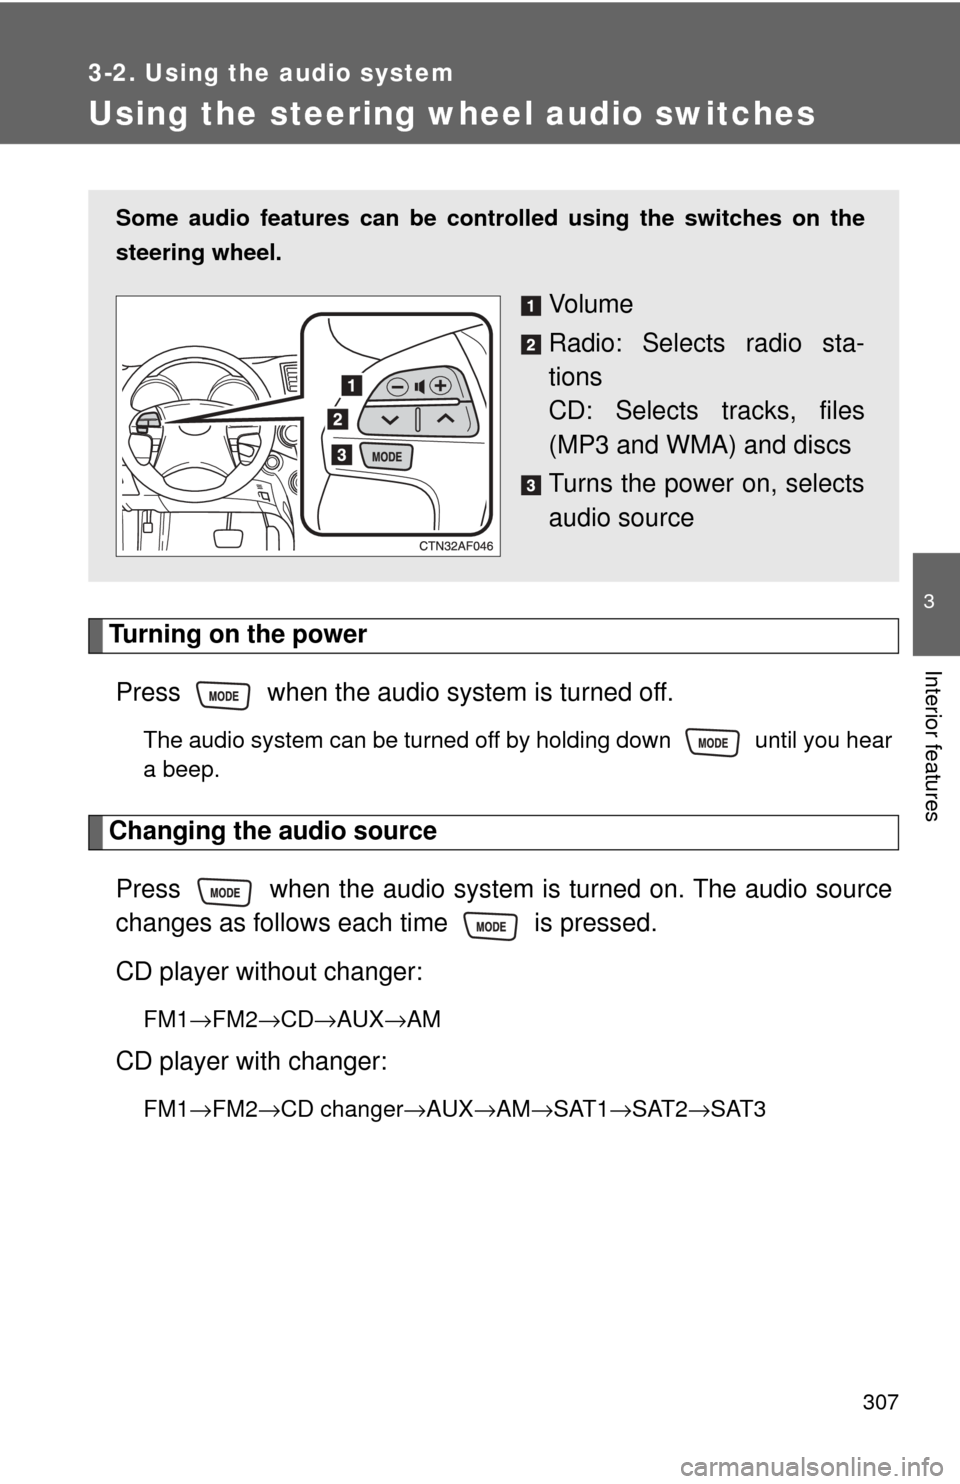
Using the steering wheel audio switches
Turning on the powerPress when the audio system is turned off.
The audio system can be turned off by holding down until you hear
a beep.
Changing the audio sourcePress when the audio system is turned on. The audio source
changes as follows each time is pressed.
CD player without changer:
FM1 →FM2 →CD→ AUX→AM
CD player with changer:
FM1→FM2 →CD changer →AUX→AM→SAT1 →SAT2→SAT3
Some audio features can be cont rolled using the switches on the
steering wheel.
Vo l u m e
Radio: Selects radio sta-
tions
CD: Selects tracks, files
(MP3 and WMA) and discs
Turns the power on, selects
audio source
Page 308 of 592
308 3-2. Using the audio system
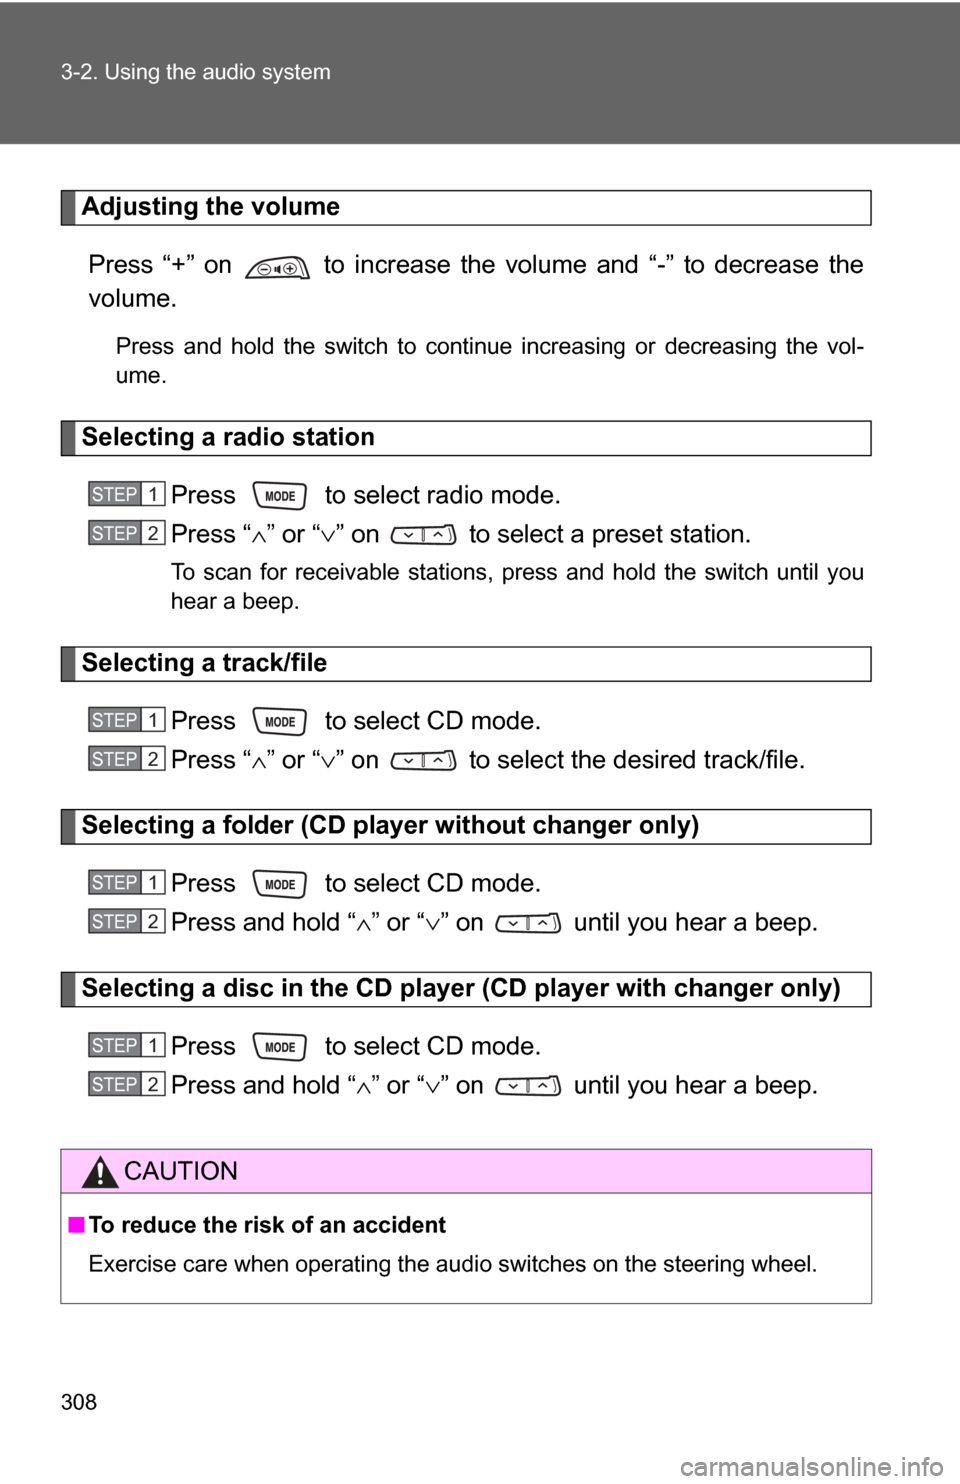
Adjusting the volumePress “+” on to increase the volume and “-” to decrease the
volume.
Press and hold the switch to continue increasing or decreasing the vol-
ume.
Selecting a radio station Press to select radio mode.
Press “∧” or “∨ ” on to select a preset station.
To scan for receivable stations, press and hold the switch until you
hear a beep.
Selecting a track/file
Press to select CD mode.
Press “∧” or “∨ ” on to select t he desired track/file.
Selecting a folder (CD player without changer only)
Press to select CD mode.
Press and hold “ ∧” or “ ∨” on until you hear a beep.
Selecting a disc in the CD player (CD player with changer only)
Press to select CD mode.
Press and hold “ ∧” or “ ∨” on until you hear a beep.
CAUTION
■ To reduce the risk of an accident
Exercise care when operating the audio switches on the steering wheel.
STEP1
STEP2
STEP1
STEP2
STEP1
STEP2
STEP1
STEP2
Page 309 of 592
309
3
Interior features
3-3. Using the rear audio system
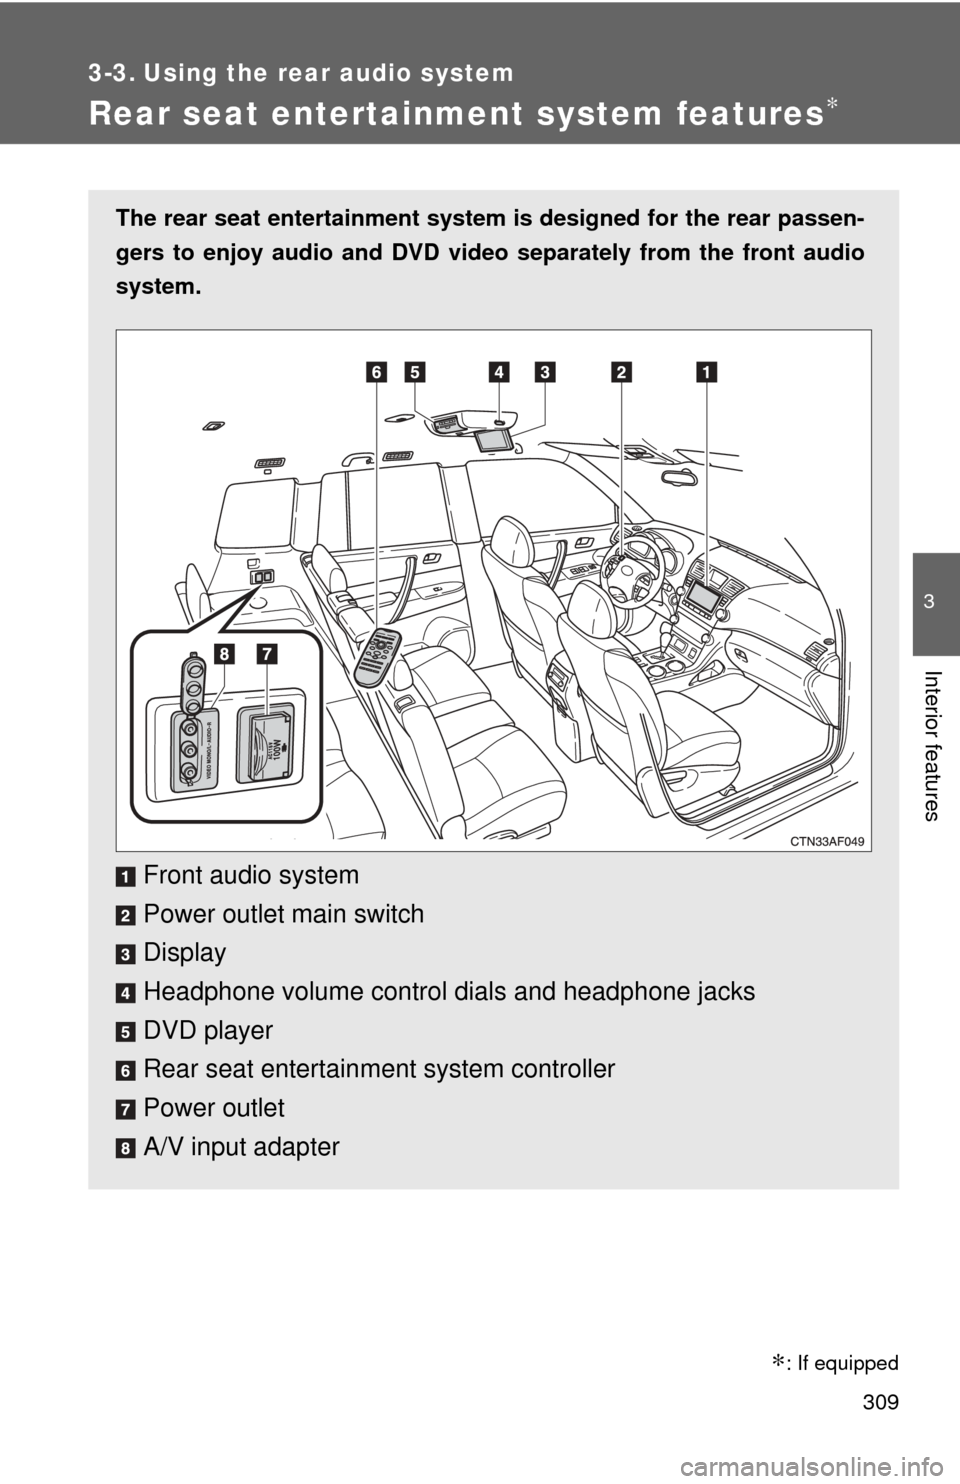
Rear seat entertainment system features∗
The rear seat entertainment system is designed for the rear passen-
gers to enjoy audio and DVD video separately from the front audio
system.
Front audio system
Power outlet main switch
Display
Headphone volume control dials and headphone jacks
DVD player
Rear seat entertainment system controller
Power outlet
A/V input adapter
�: If equipped
Page 310 of 592
310 3-3. Using the rear audio system
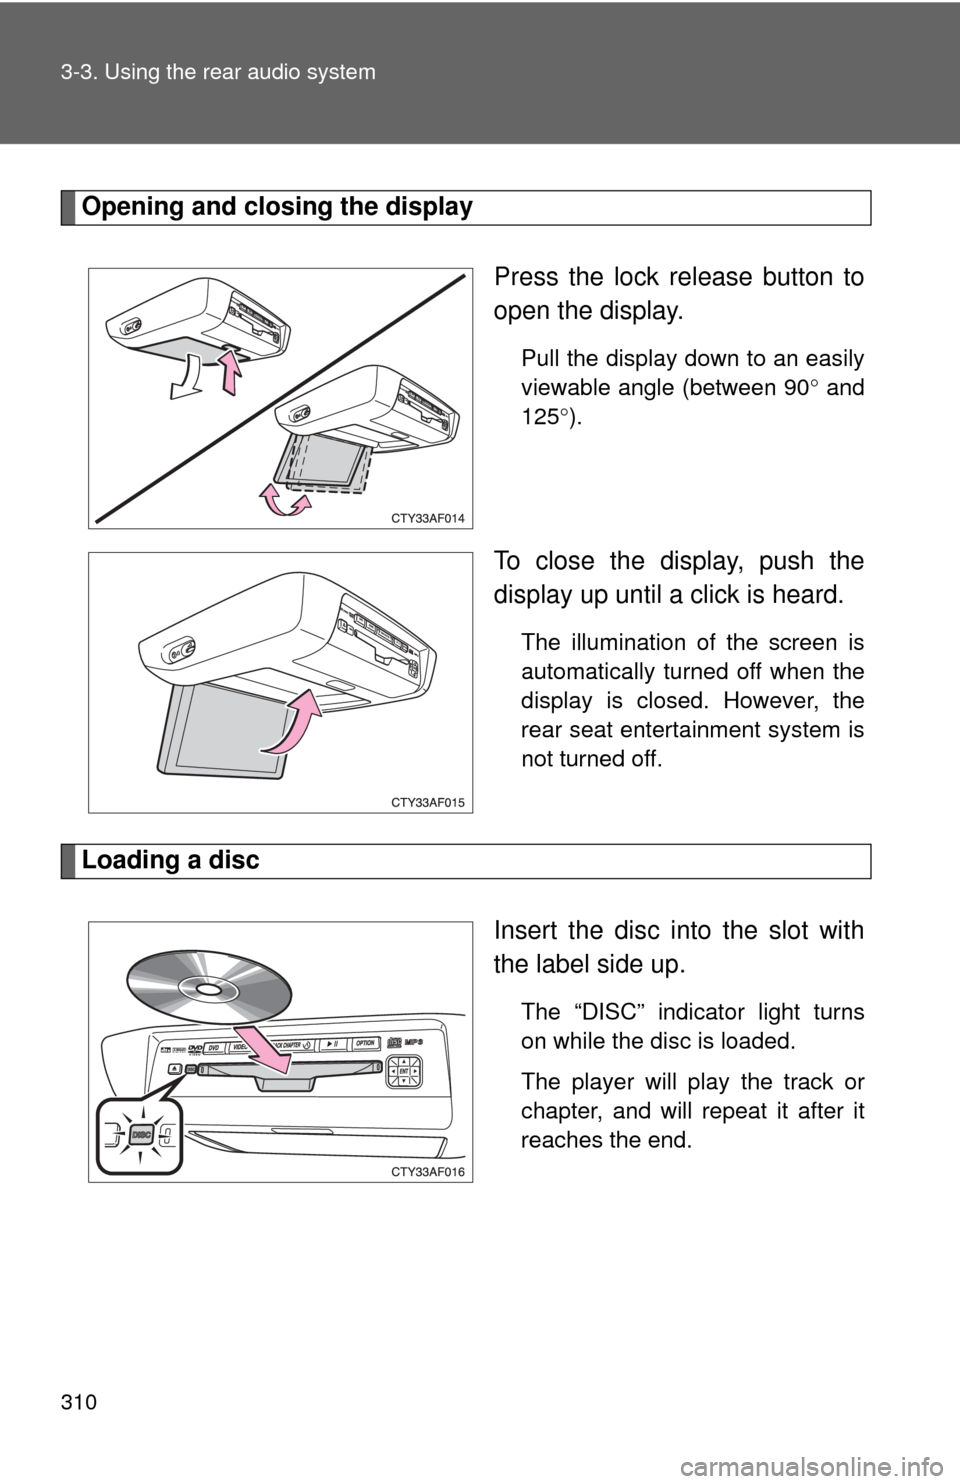
Opening and closing the displayPress the lock release button to
open the display.
Pull the display down to an easily
viewable angle (between 90° and
125° ).
To close the display, push the
display up until a click is heard.
The illumination of the screen is
automatically turned off when the
display is closed. However, the
rear seat entertainment system is
not turned off.
Loading a disc
Insert the disc into the slot with
the label side up.
The “DISC” indicator light turns
on while the disc is loaded.
The player will play the track or
chapter, and will repeat it after it
reaches the end.
Trending: charging, power steering, deactivate airbag, tire type, air temperature, lights, center console

