Maintenance TOYOTA HILUX 2020 (in English) Workshop Manual
[x] Cancel search | Manufacturer: TOYOTA, Model Year: 2020, Model line: HILUX, Model: TOYOTA HILUX 2020Pages: 744, PDF Size: 108.13 MB
Page 597 of 744
5977-3. Do-it-yourself maintenance
HILUX_OM_OM0K321E_(EE)
7
Maintenance and care
Air conditioning filter
Vehicles without smart entry & start system: Turn the engine switch
to the “LOCK” position.
Vehicles with smart entry & start system: Turn the engine switch off.
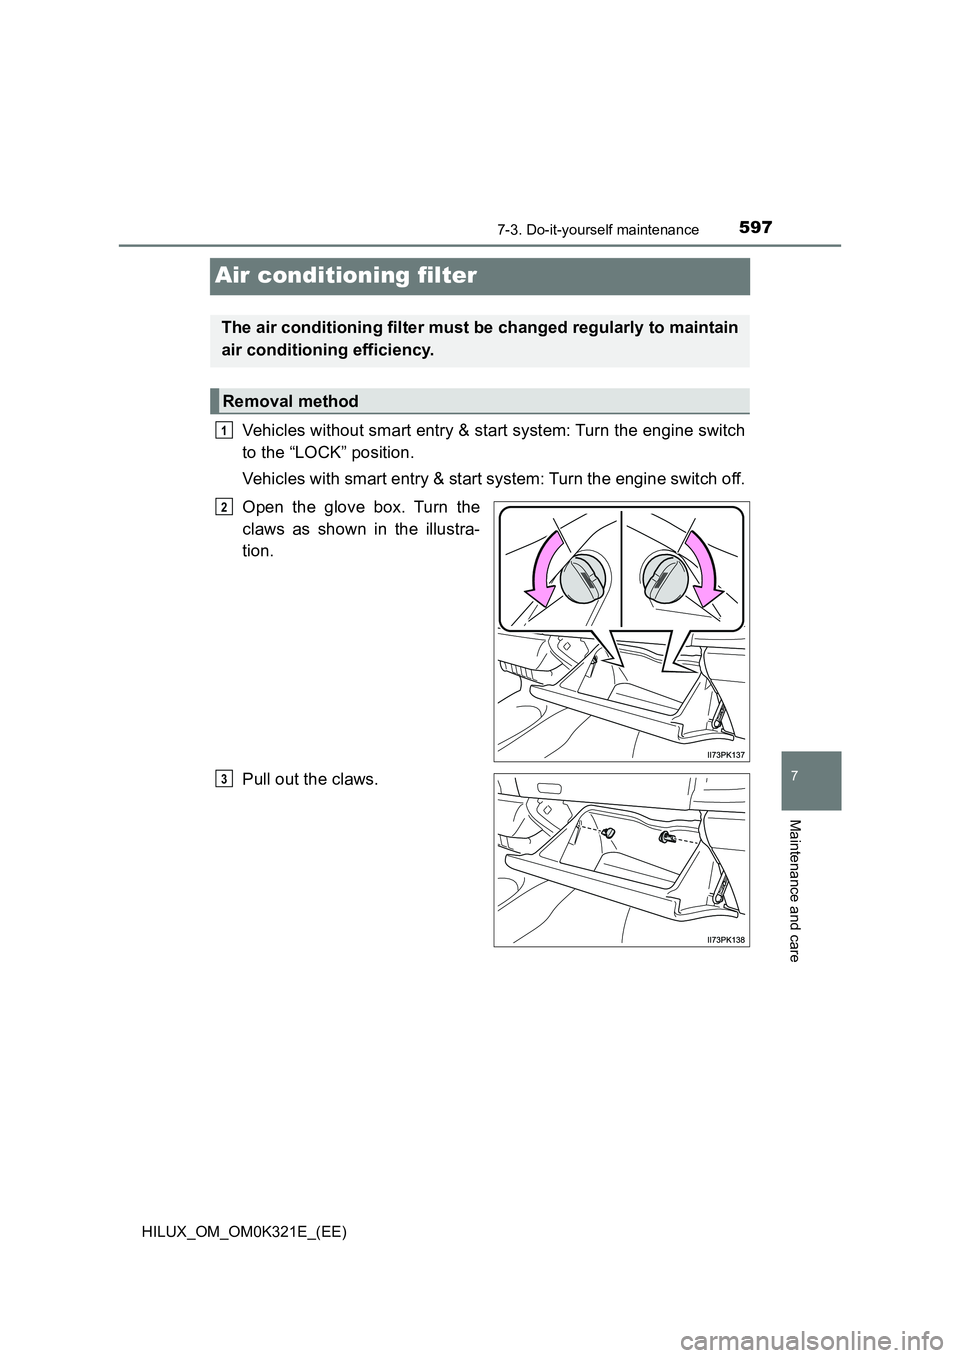
Open the glove box. Turn the
claws as shown in the illustra-
tion.
Pull out the claws.
The air conditioning filter must be changed regularly to maintain
air conditioning efficiency.
Removal method
1
2
3
Page 598 of 744
5987-3. Do-it-yourself maintenance
HILUX_OM_OM0K321E_(EE)
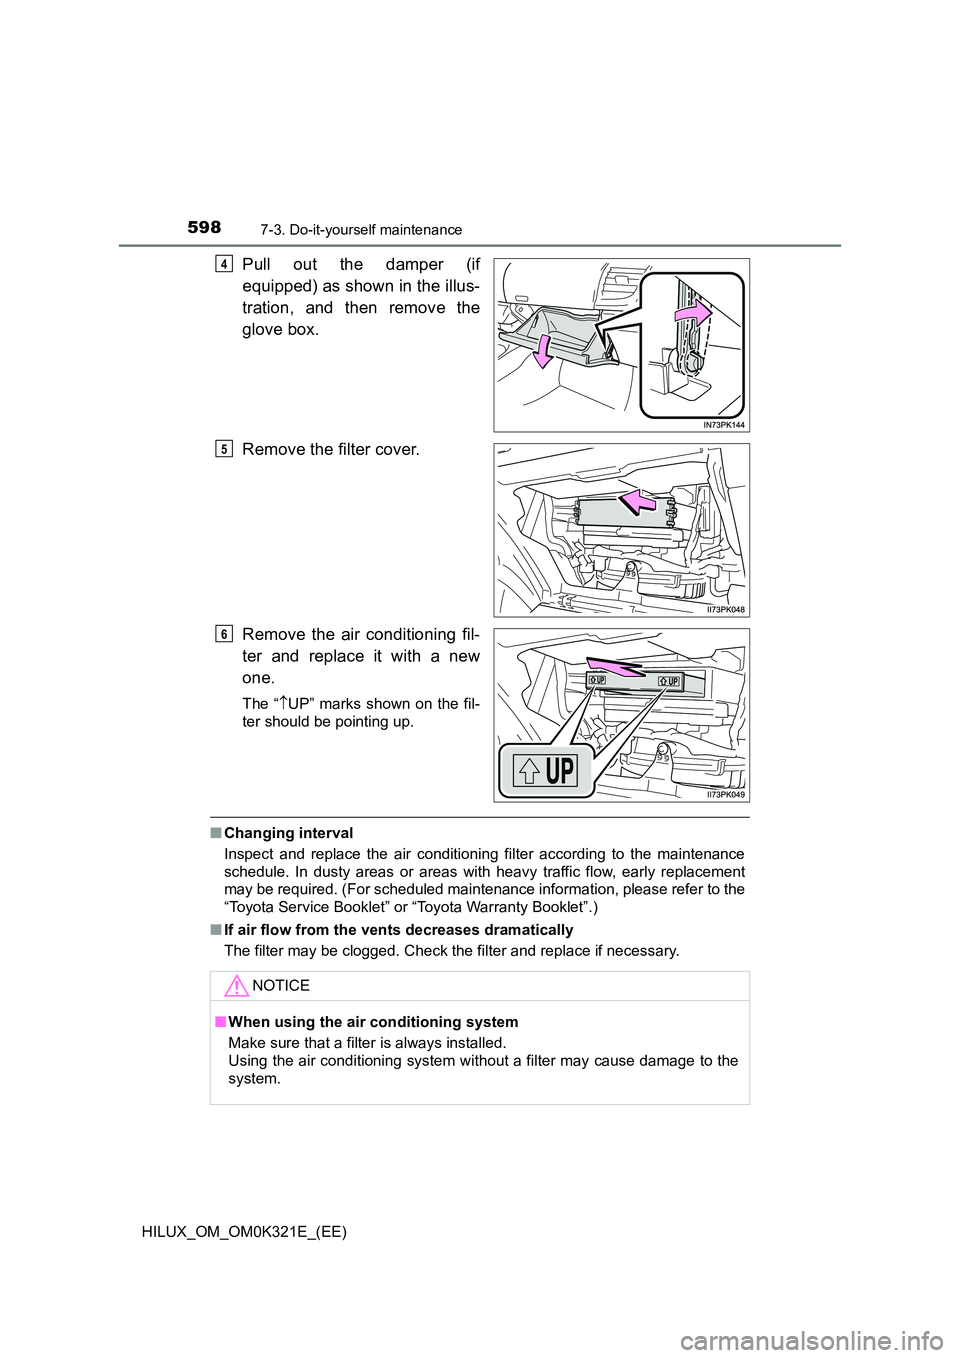
Pull out the damper (if
equipped) as shown in the illus-
tration, and then remove the
glove box.
Remove the filter cover.
Remove the air conditioning fil-
ter and replace it with a new
one.
The “ UP” marks shown on the fil-
ter should be pointing up.
■ Changing interval
Inspect and replace the air conditioning filter according to the maintenance
schedule. In dusty areas or areas with heavy traffic flow, early replacement
may be required. (For scheduled maintenance information, please refer to the
“Toyota Service Booklet” or “Toyota Warranty Booklet”.)
■ If air flow from the vents decreases dramatically
The filter may be clogged. Check the filter and replace if necessary.
4
5
6
NOTICE
■ When using the air conditioning system
Make sure that a filter is always installed.
Using the air conditi oning system without a filter may cause damage to the
system.
Page 599 of 744
5997-3. Do-it-yourself maintenance
HILUX_OM_OM0K321E_(EE)
7
Maintenance and care
Wireless remote control/electronic key
batter y
● Flathead screwdriver
● Small flathead screwdriver
● Lithium battery
Vehicles without smart entry & start system: CR1620
Vehicles with smart entry & start system: CR2032
Vehicles without smart entry & start system
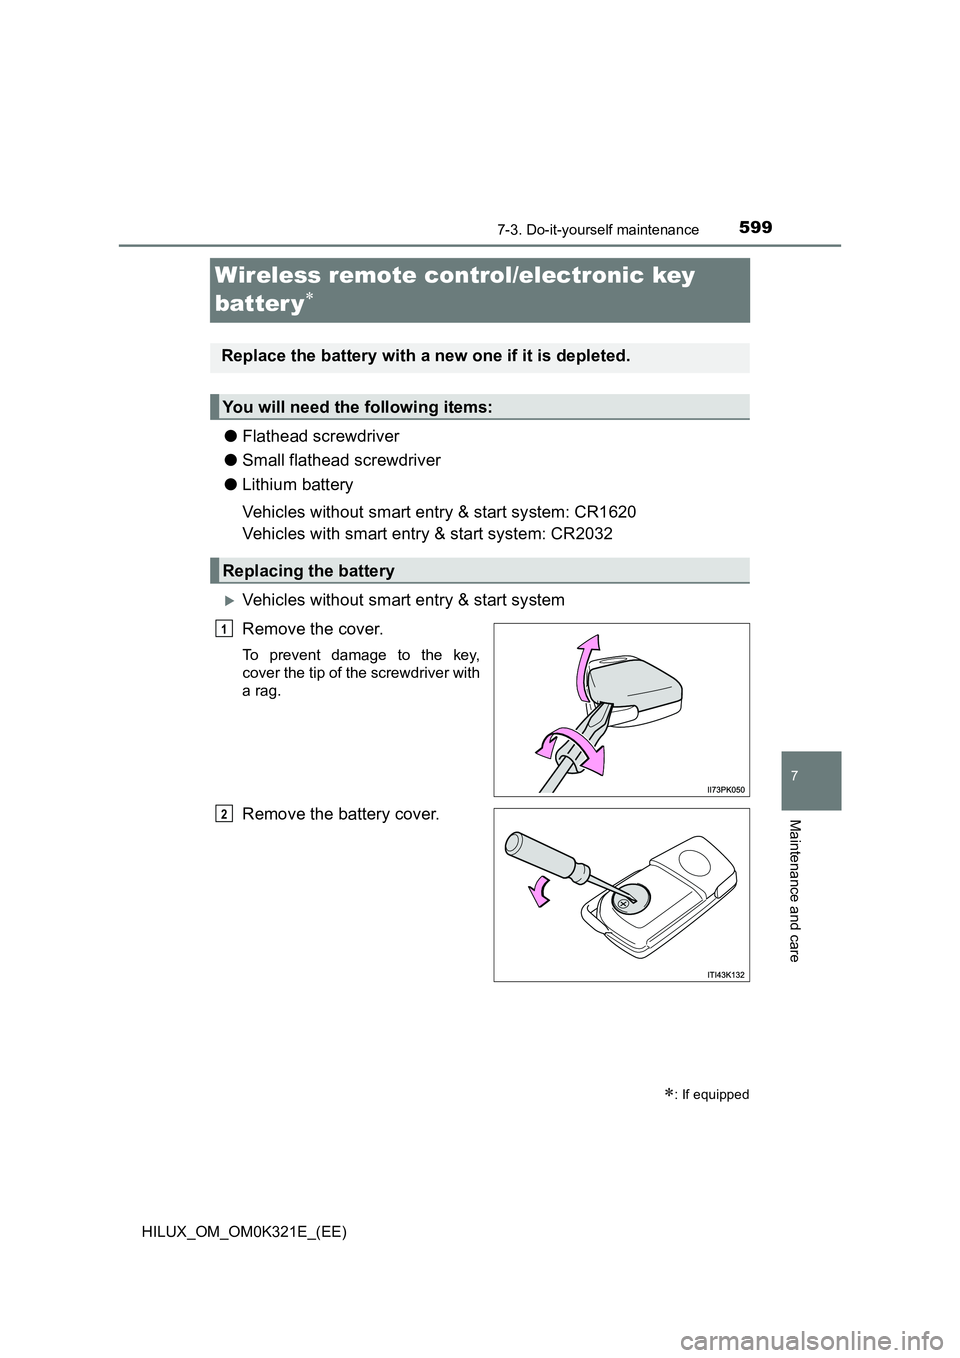
Remove the cover.
To prevent damage to the key,
cover the tip of the screwdriver with
a rag.
Remove the battery cover.
: If equipped
Replace the battery with a new one if it is depleted.
You will need the following items:
Replacing the battery
1
2
Page 600 of 744
6007-3. Do-it-yourself maintenance
HILUX_OM_OM0K321E_(EE)
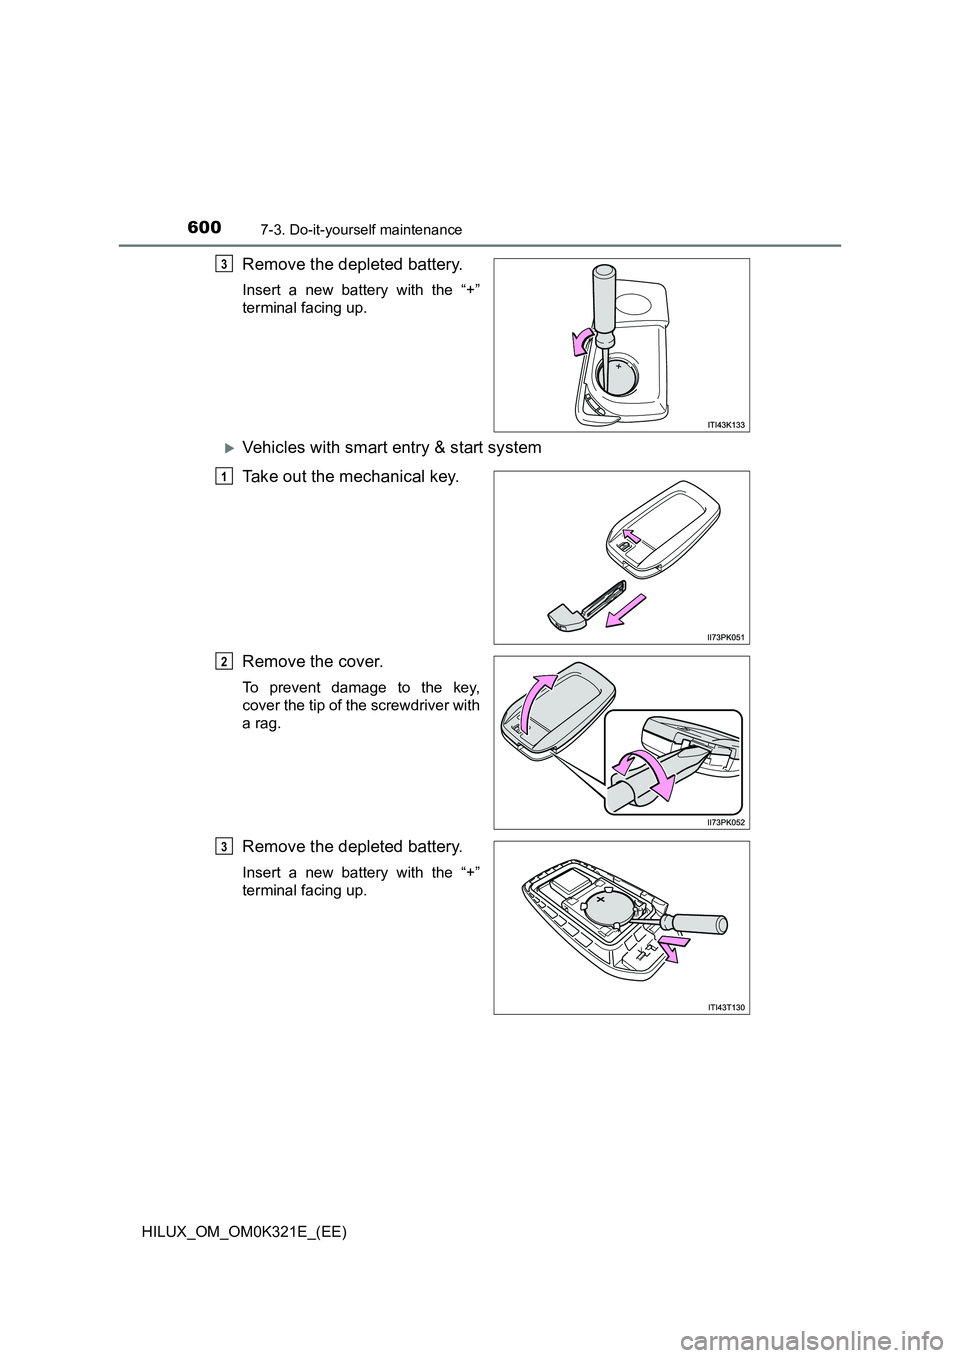
Remove the depleted battery.
Insert a new battery with the “+”
terminal facing up.
Vehicles with smart entry & start system
Take out the mechanical key.
Remove the cover.
To prevent damage to the key,
cover the tip of the screwdriver with
a rag.
Remove the depleted battery.
Insert a new battery with the “+”
terminal facing up.
3
1
2
3
Page 601 of 744
6017-3. Do-it-yourself maintenance
HILUX_OM_OM0K321E_(EE)
7
Maintenance and care
■Use a lithium battery
Vehicles without smart entry & start system: CR1620
Vehicles with smart entry & start system: CR2032
● Batteries can be purchased at any authorized Toyota retailer or Toyota
authorized repairer, or any reliable repairer, local electrical appliance shops
or camera stores.
● Replace only with the same or equivalent type recommended by the manu-
facturer.
● Dispose of used batteries according to local laws.
■ If the key battery is depleted
The following symptoms may occur:
● The smart entry & start system (if equipped) and wireless remote control will
not function properly.
● The operational range will be reduced.
WARNING
■Removed battery and other parts
These parts are small and if swallowed by a child, they can cause choking.
Keep away from children. Failure to do so could result in death or serious
injury.
■ Certification for the key battery
CAUTION
RISK OF EXPLOSION IF BATTERY IS REPLACED BY AN INCORRECT
TYPE. DISPOSE OF USED BATTERIES ACCORDING TO THE
INSTRUCTIONS
NOTICE
■ For normal operation after replacing the battery
Observe the following precautions to prevent accidents:
● Always work with dry hands.
Moisture may cause the battery to rust.
● Do not touch or move any other component inside the remote control.
● Do not bend either of the battery terminals.
Page 602 of 744
6027-3. Do-it-yourself maintenance
HILUX_OM_OM0K321E_(EE)
Checking and replacing fuses
Vehicles without smart entry & start system:
Turn the engine switch to the “LOCK” position.
Vehicles with smart entry & start system:
Turn the engine switch off.
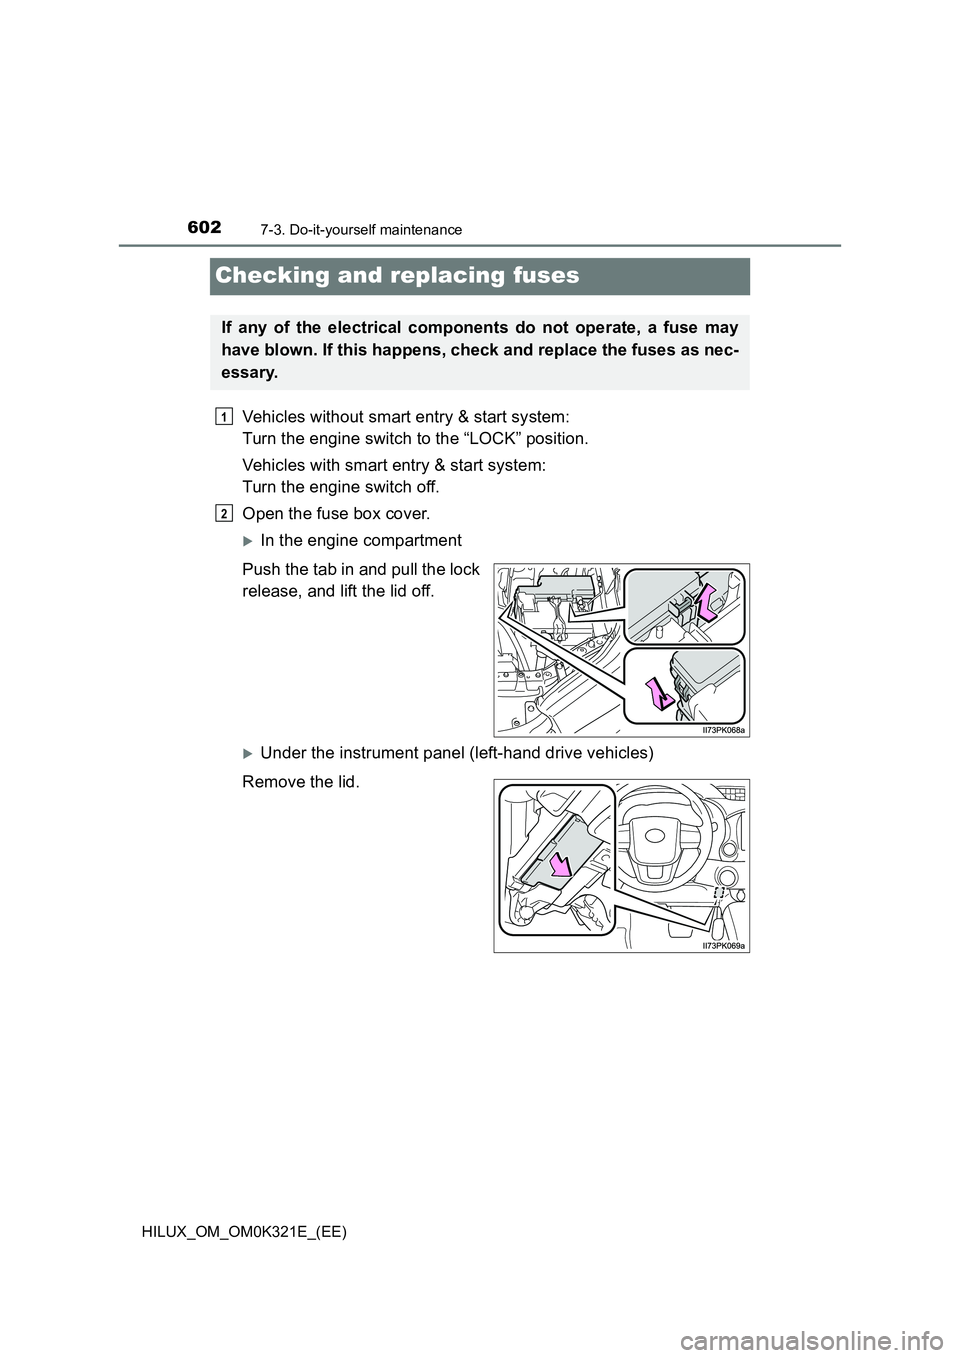
Open the fuse box cover.
In the engine compartment
Push the tab in and pull the lock
release, and lift the lid off.
Under the instrument panel (left-hand drive vehicles)
Remove the lid.
If any of the electrical components do not operate, a fuse may
have blown. If this happens, check and replace the fuses as nec-
essary.
1
2
Page 603 of 744
6037-3. Do-it-yourself maintenance
HILUX_OM_OM0K321E_(EE)
7
Maintenance and care
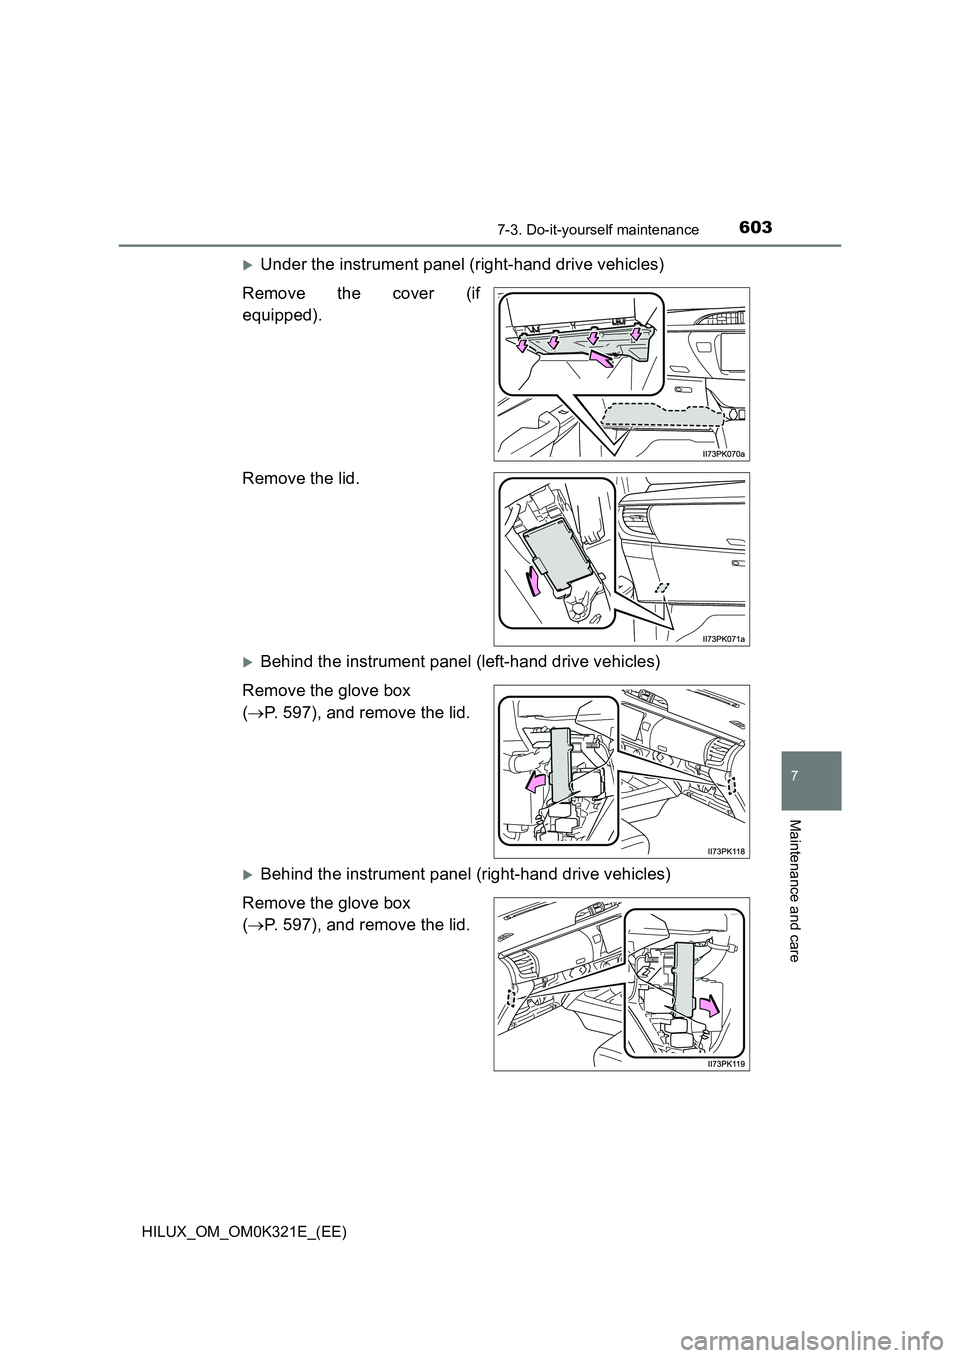
Under the instrument panel (right-hand drive vehicles)
Remove the cover (if
equipped).
Remove the lid.
Behind the instrument panel (left-hand drive vehicles)
Remove the glove box
( P. 597), and remove the lid.
Behind the instrument panel (right-hand drive vehicles)
Remove the glove box
( P. 597), and remove the lid.
Page 604 of 744
6047-3. Do-it-yourself maintenance
HILUX_OM_OM0K321E_(EE)
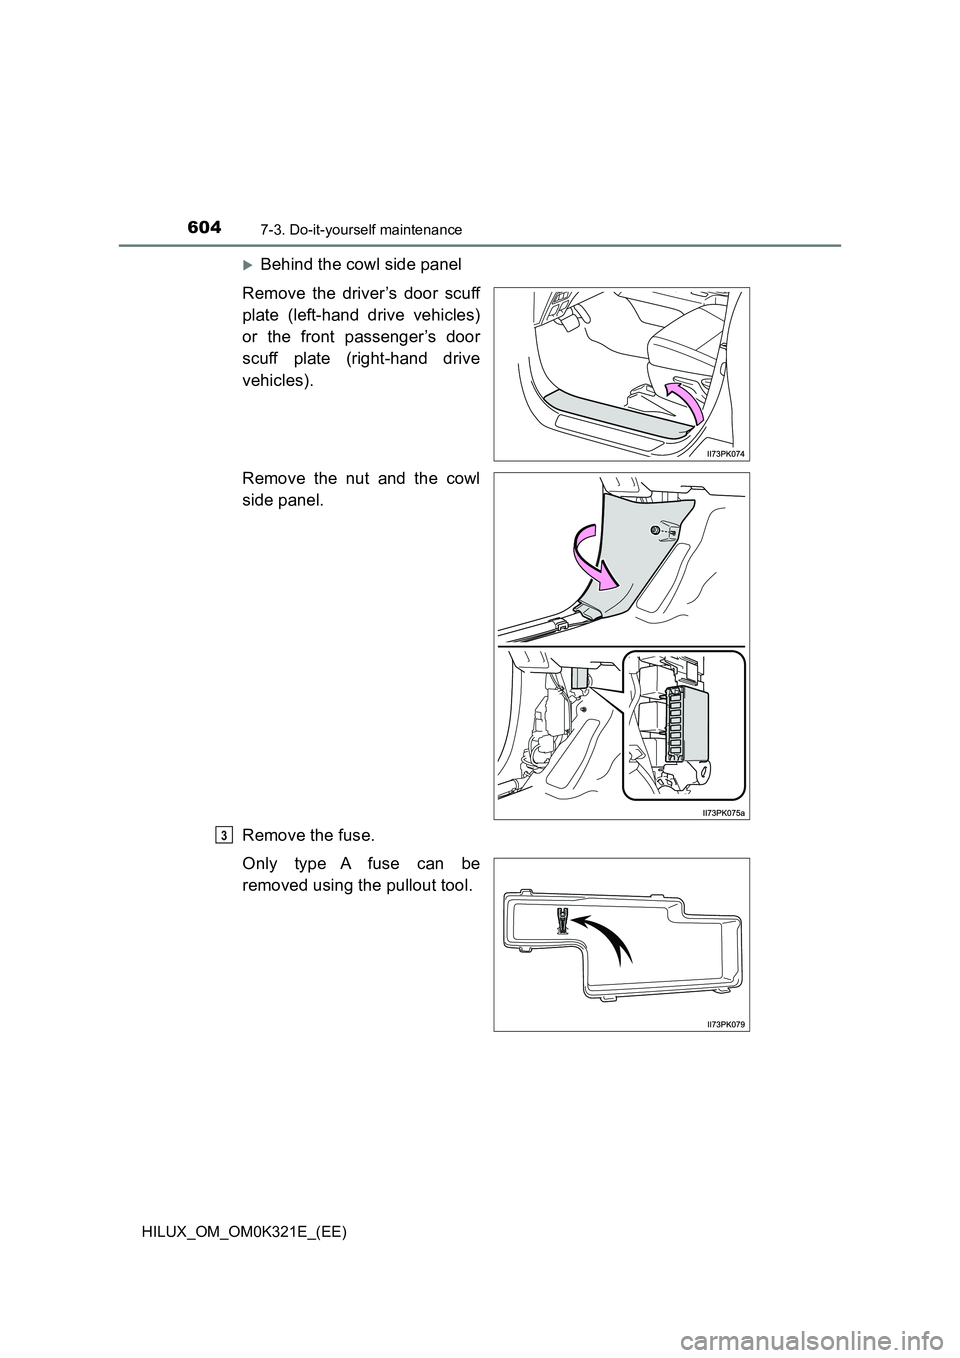
Behind the cowl side panel
Remove the driver’s door scuff
plate (left-hand drive vehicles)
or the front passenger’s door
scuff plate (right-hand drive
vehicles).
Remove the nut and the cowl
side panel.
Remove the fuse.
Only type A fuse can be
removed using the pullout tool.
3
Page 605 of 744
6057-3. Do-it-yourself maintenance
HILUX_OM_OM0K321E_(EE)
7
Maintenance and care
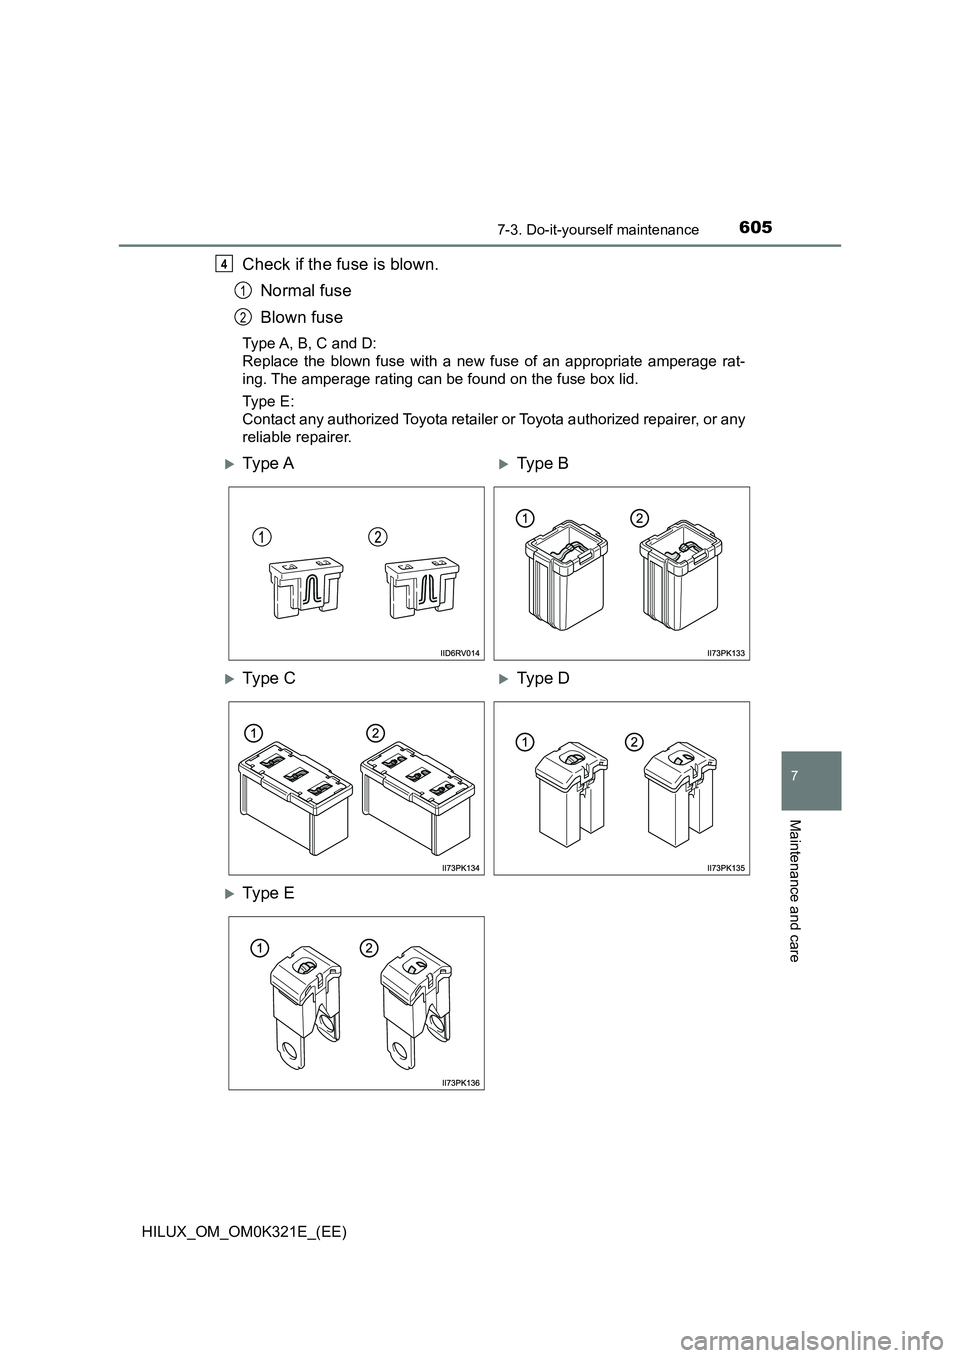
Check if the fuse is blown.
Normal fuse
Blown fuse
Type A, B, C and D:
Replace the blown fuse with a new fuse of an appropriate amperage rat-
ing. The amperage rating can be found on the fuse box lid.
Type E:
Contact any authorized Toyota retailer or Toyota authorized repairer, or any
reliable repairer.
4
1
2
Ty pe AType B
Ty pe CType D
Ty pe E
Page 606 of 744
6067-3. Do-it-yourself maintenance
HILUX_OM_OM0K321E_(EE)
■After a fuse is replaced
● If the lights do not turn on even after the fuse has been replaced, a bulb may
need replacement. ( P. 607)
● If the replaced fuse blows again, have the vehicle inspected by any autho-
rized Toyota retailer or Toyota authorized repairer, or any reliable repairer.
■ If there is an overload in a circuit
The fuses are designed to blow, protecting the wiring harness from damage.
WARNING
■ To prevent system breakdowns and vehicle fire
Observe the following precautions.
Failure to do so may cause damage to the vehicle, and possibly a fire or
injury.
● Never use a fuse of a higher amperage rating than that indicated, or use
any other object in place of a fuse.
● Always use a genuine Toyota fuse or equivalent.
Never replace a fuse with a wire, even as a temporary fix.
● Do not modify the fuses or fuse boxes.
NOTICE
■Before replacing fuses
Have the cause of electrical overload determined and repaired by any
authorized Toyota retailer or Toyota authorized repairer, or any reliable
repairer as soon as possible.