display TOYOTA LAND CRUISER 2020 Accessories, Audio & Navigation (in English)
[x] Cancel search | Manufacturer: TOYOTA, Model Year: 2020, Model line: LAND CRUISER, Model: TOYOTA LAND CRUISER 2020Pages: 277, PDF Size: 8.4 MB
Page 125 of 277
LC200_Navi_OM60R69U_(U)
19.03.06 15:36
Audio/visual system
4
1252. Radio operation
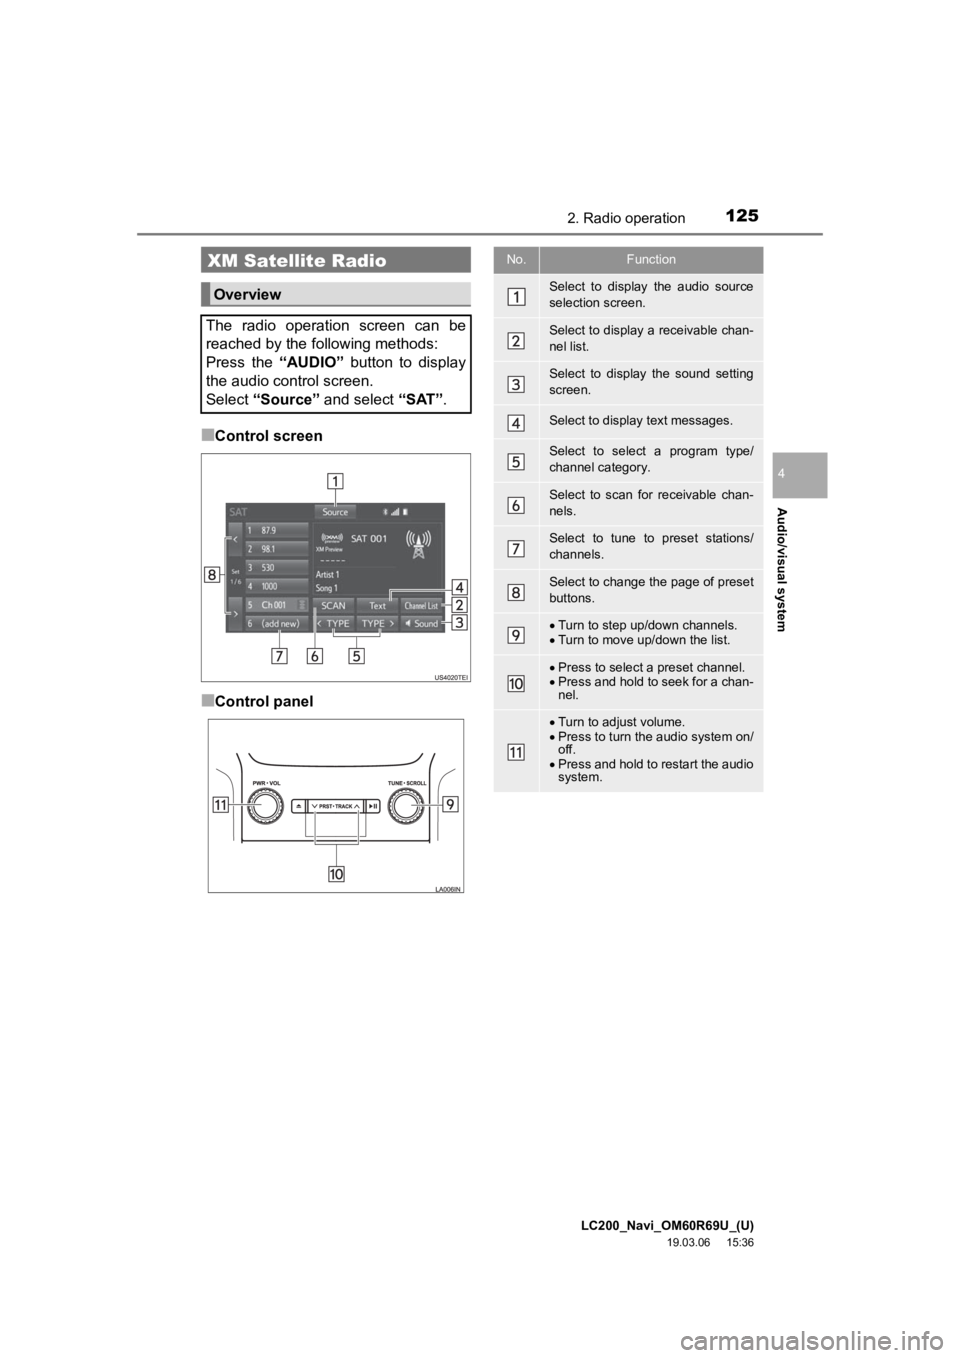
■Control screen
■Control panel
XM Satellite Radio
Overview
The radio operation screen can be
reached by the following methods:
Press the “AUDIO” button to display
the audio control screen.
Select “Source” and select “SAT”.
No.Function
Select to display the audio source
selection screen.
Select to display a receivable chan-
nel list.
Select to display the sound setting
screen.
Select to display text messages.
Select to select a program type/
channel category.
Select to scan for receivable chan-
nels.
Select to tune to preset stations/
channels.
Select to change the page of preset
buttons.
Turn to step up/down channels.
Turn to move up/down the list.
Press to select a preset channel.
Press and hold to seek for a chan-
nel.
Turn to adjust volume.
Press to turn the audio system on/
off.
Press and hold to restart the audio
system.
Page 128 of 277
LC200_Navi_OM60R69U_(U)
19.03.06 15:36
1282. Radio operation
If “Ch 000” is selected using the
“TUNE·SCROLL” knob, the ID code,
which is 8 alphanumeric characters, will
be displayed. If another channel is
selected, the ID code will no longer be dis-
played. The channel (000) alternates
between displaying the radio ID and the
specific radio code.
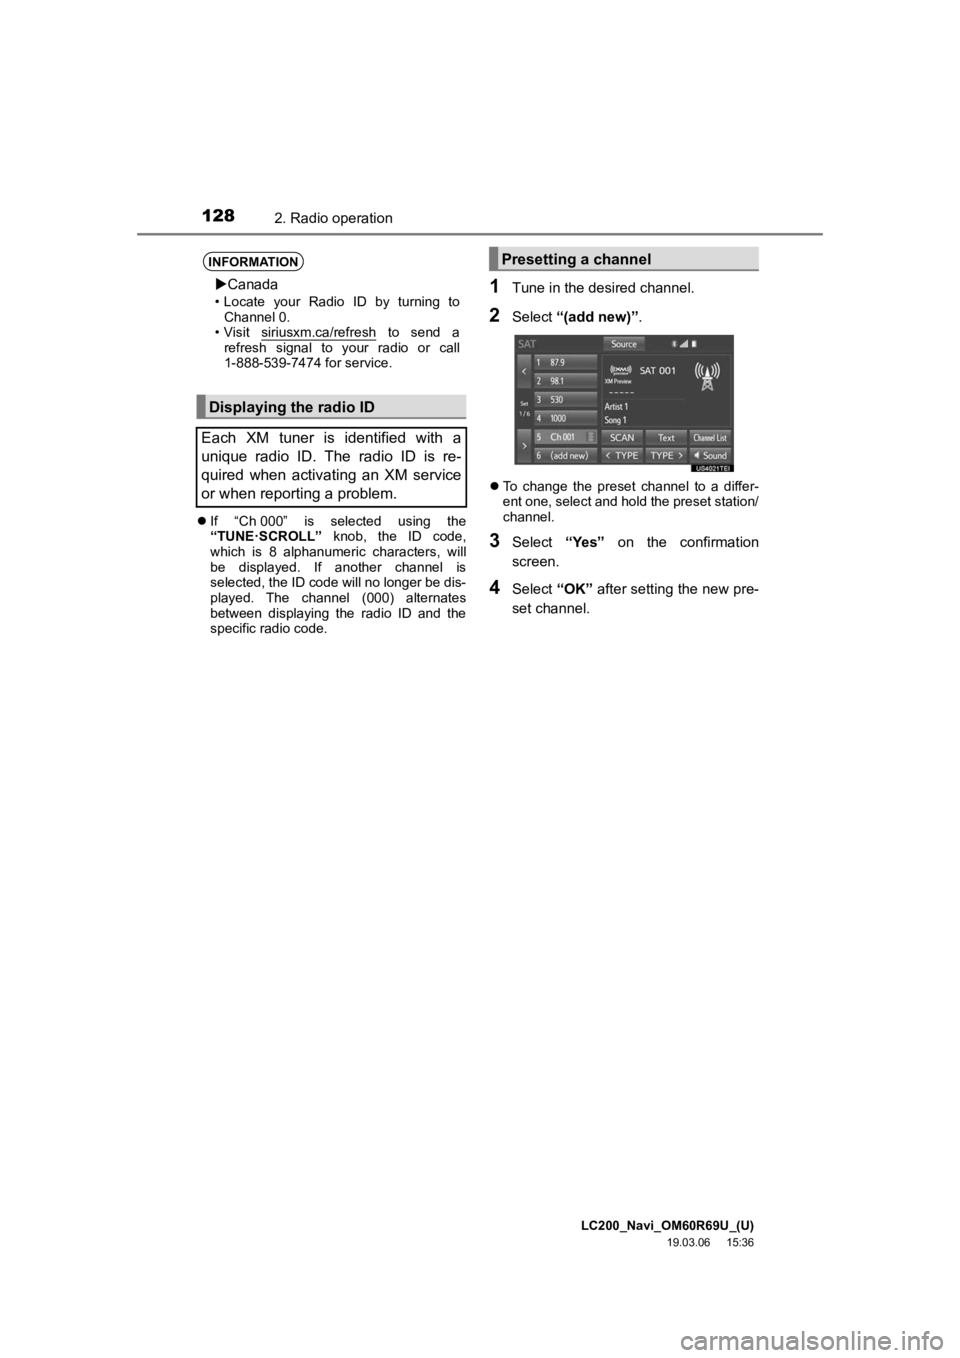
1Tune in the desired channel.
2Select “(add new)” .
To change the preset channel to a differ-
ent one, select and hold the preset station/
channel.
3Select “Yes” on the confirmation
screen.
4Select “OK” after setting the new pre-
set channel.
INFORMATION
Canada
• Locate your Radio ID by turning to
Channel 0.
• Visit siriusxm.ca/refresh
to send a
refresh signal to your radio or call
1-888-539-7474 for service.
Displaying the radio ID
Each XM tuner is identified with a
unique radio ID. The radio ID is re-
quired when activating an XM service
or when reporting a problem.
Presetting a channel
Page 131 of 277
LC200_Navi_OM60R69U_(U)
19.03.06 15:36
Audio/visual system
4
1312. Radio operation
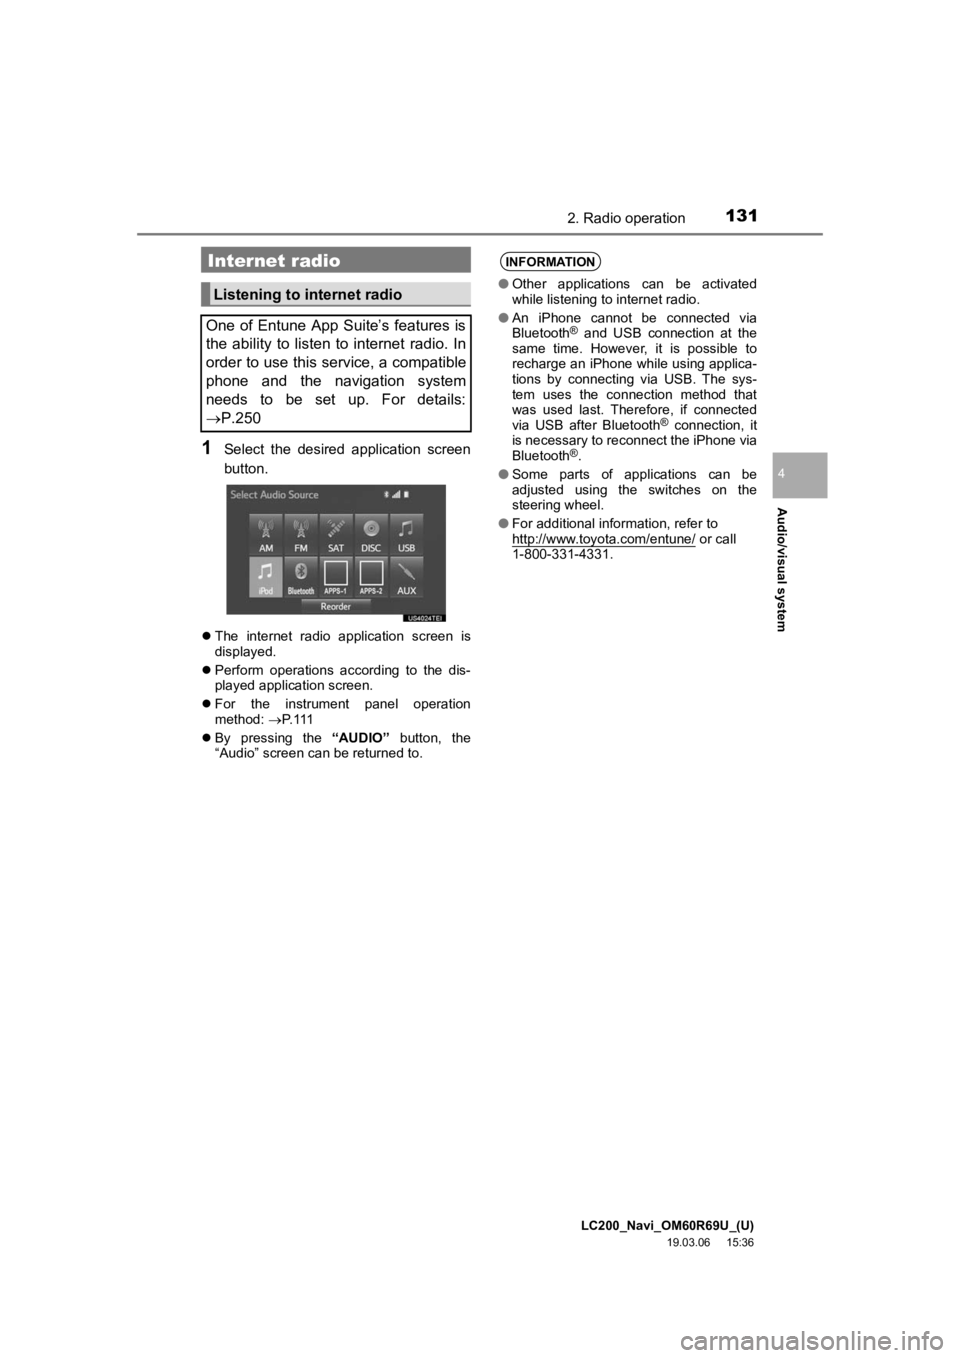
1Select the desired application screen
button.
The internet radio application screen is
displayed.
Perform operations according to the dis-
played application screen.
For the instrument panel operation
method: P. 1 1 1
By pressing the “AUDIO” button, the
“Audio” screen can be returned to.
Internet radio
Listening to internet radio
One of Entune App Suite’s features is
the ability to listen to internet radio. In
order to use this service, a compatible
phone and the navigation system
needs to be set up. For details:
P.250
INFORMATION
● Other applications can be activated
while listening to internet radio.
● An iPhone cannot be connected via
Bluetooth
® and USB connection at the
same time. However, it is possible to
recharge an iPhone while using applica-
tions by connecting via USB. The sys-
tem uses the connection method that
was used last. Therefore, if connected
via USB after Bluetooth
® connection, it
is necessary to reconnect the iPhone via
Bluetooth
®.
● Some parts of applications can be
adjusted using the switches on the
steering wheel.
● For additional information, refer to
http://www.toyota.com/entune/
or call
1-800-331-4331.
Page 132 of 277
LC200_Navi_OM60R69U_(U)
19.03.06 15:36
1323. Media operation
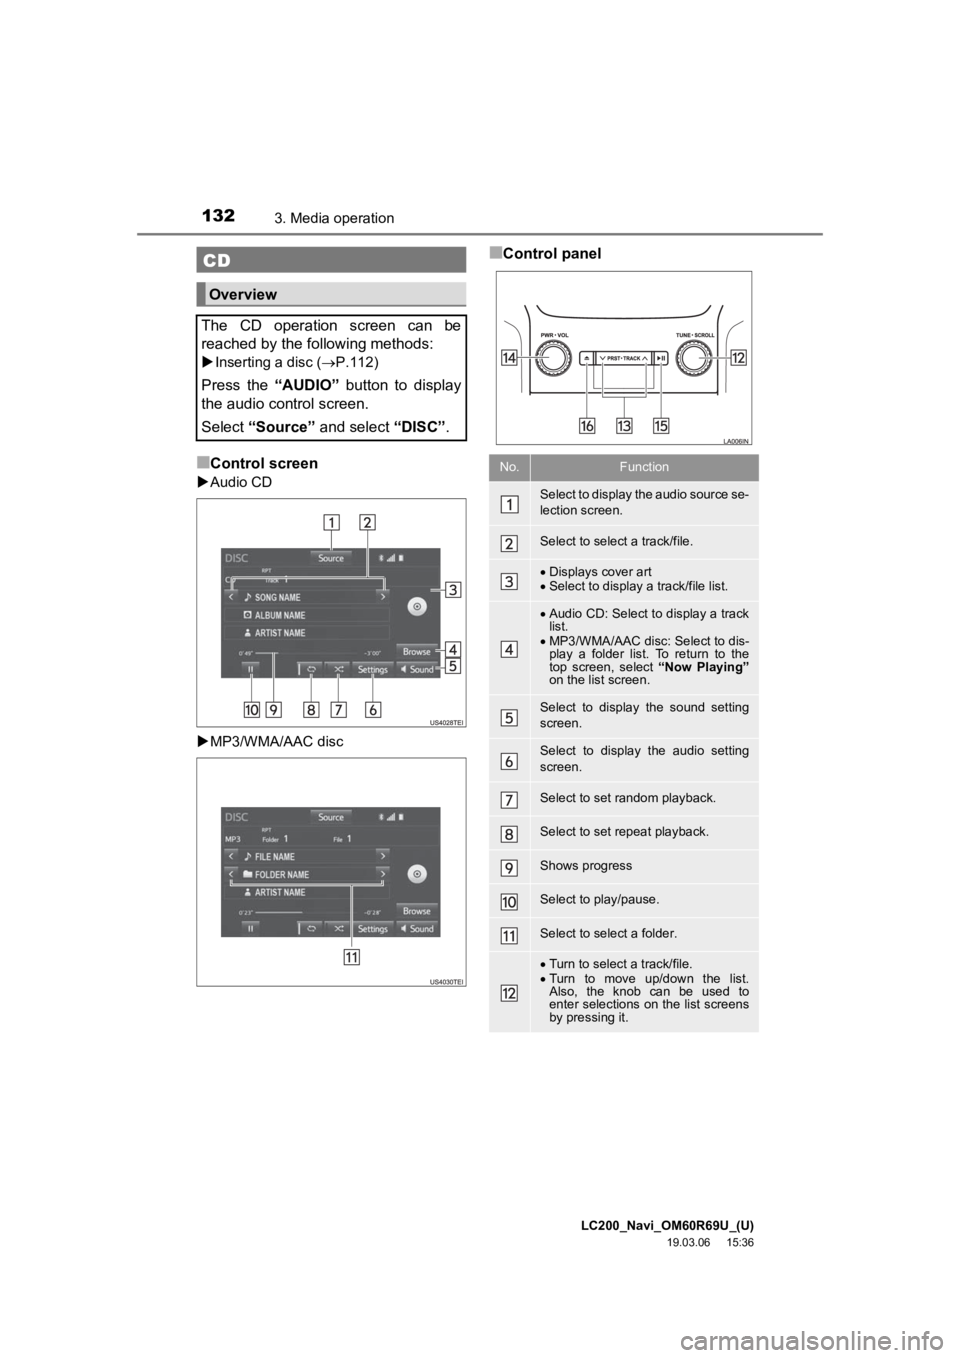
■Control screen
Audio CD
MP3/WMA/AAC disc
■Control panelCD
Overview
The CD operation screen can be
reached by the following methods:
Inserting a disc ( P.112)
Press the “AUDIO” button to display
the audio control screen.
Select “Source” and select “DISC”.
No.Function
Select to display the audio source se-
lection screen.
Select to select a track/file.
Displays cover art
Select to display a track/file list.
Audio CD: Select to display a track
list.
MP3/WMA/AAC disc: Select to dis-
play a folder list. To return to the
top screen, select “Now Playing”
on the list screen.
Select to display the sound setting
screen.
Select to display the audio setting
screen.
Select to set random playback.
Select to set repeat playback.
Shows progress
Select to play/pause.
Select to select a folder.
Turn to select a track/file.
Turn to move up/down the list.
Also, the knob can be used to
enter selections on the list screens
by pressing it.
Page 133 of 277
LC200_Navi_OM60R69U_(U)
19.03.06 15:36
Audio/visual system
4
1333. Media operation
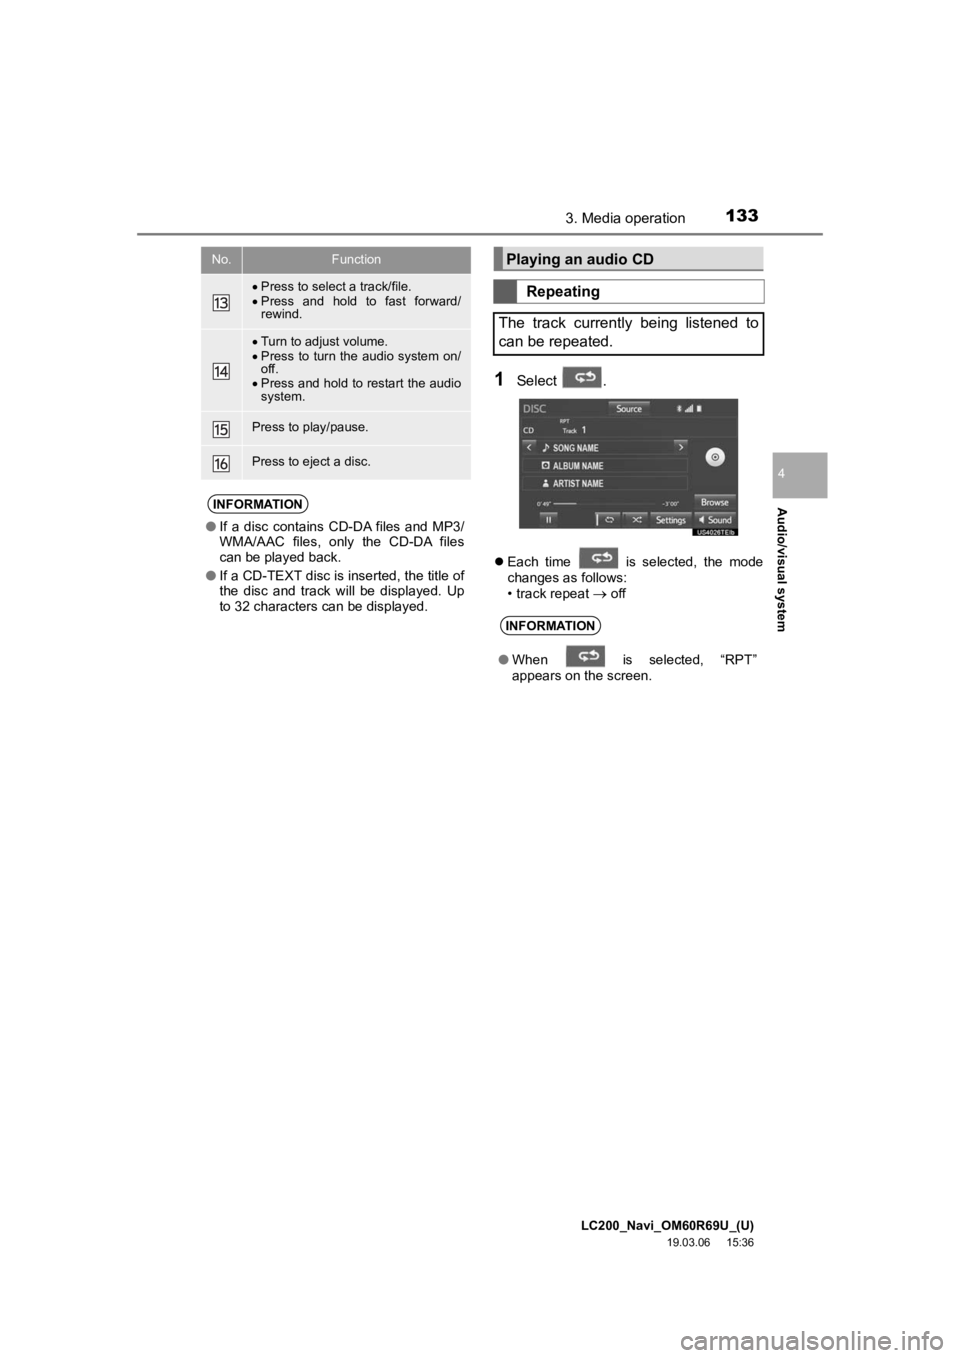
1Select .
Each time is selected, the mode
changes as follows:
• track repeat
off
Press to select a track/file.
Press and hold to fast forward/
rewind.
Turn to adjust volume.
Press to turn the audio system on/
off.
Press and hold to restart the audio
system.
Press to play/pause.
Press to eject a disc.
INFORMATION
● If a disc contains CD-DA files and MP3/
WMA/AAC files, only the CD-DA files
can be played back.
● If a CD-TEXT disc is inserted, the title of
the disc and track will be displayed. Up
to 32 characters can be displayed.
No.FunctionPlaying an audio CD
Repeating
The track currently being listened to
can be repeated.
INFORMATION
● When is selected, “RPT”
appears on the screen.
Page 135 of 277
LC200_Navi_OM60R69U_(U)
19.03.06 15:36
Audio/visual system
4
1353. Media operation
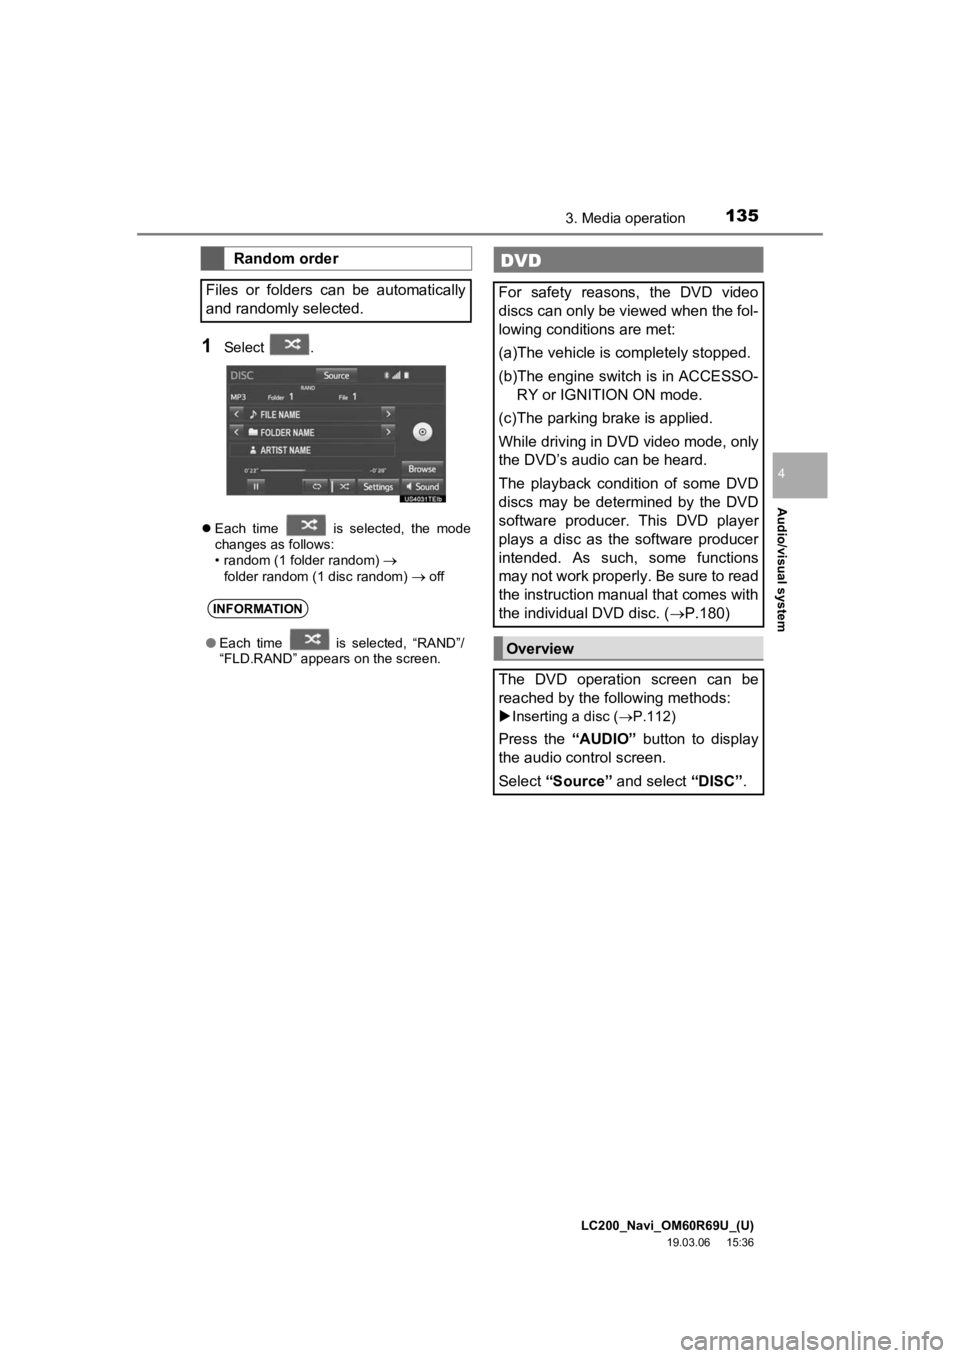
1Select .
Each time is selected, the mode
changes as follows:
• random (1 folder random)
folder random (1 disc random) off
Random order
Files or folders can be automatically
and randomly selected.
INFORMATION
● Each time is selected, “RAND”/
“FLD.RAND” appears on the screen.
DVD
For safety reasons, the DVD video
discs can only be viewed when the fol-
lowing conditions are met:
(a)The vehicle is completely stopped.
(b)The engine switch is in ACCESSO-
RY or IGNITION ON mode.
(c)The parking brake is applied.
While driving in DVD video mode, only
the DVD’s audio can be heard.
The playback condition of some DVD
discs may be determined by the DVD
software producer. This DVD player
plays a disc as the software producer
intended. As such, some functions
may not work properly. Be sure to read
the instruction manual that comes with
the individual DVD disc. ( P.180)
Overview
The DVD operation screen can be
reached by the following methods:
Inserting a disc ( P.112)
Press the “AUDIO” button to display
the audio control screen.
Select “Source” and select “DISC”.
Page 136 of 277
LC200_Navi_OM60R69U_(U)
19.03.06 15:36
1363. Media operation
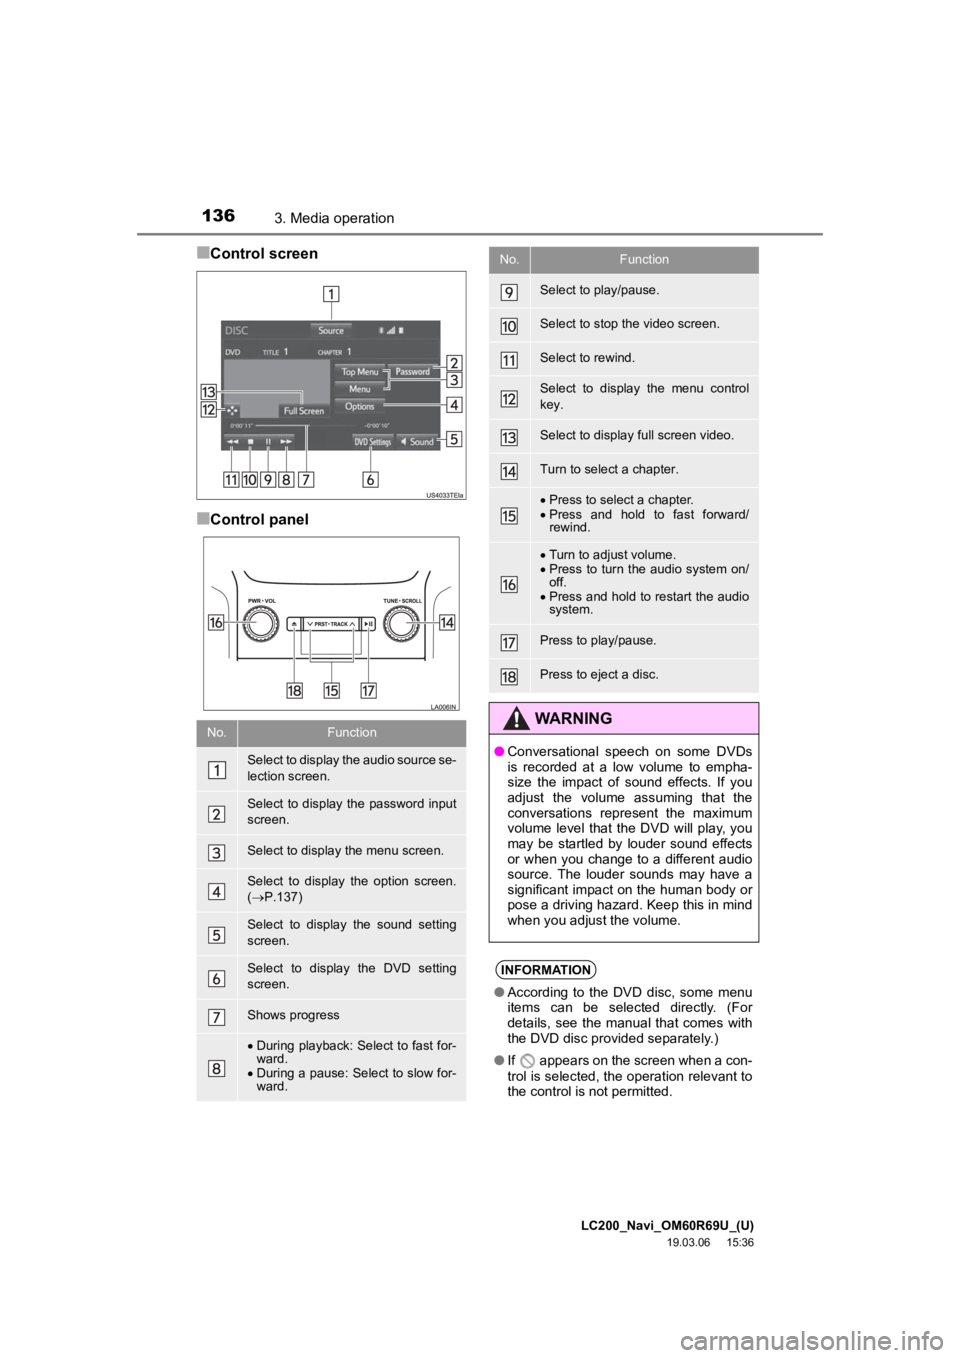
■Control screen
■Control panel
No.Function
Select to display the audio source se-
lection screen.
Select to display the password input
screen.
Select to display the menu screen.
Select to display the option screen.
( P.137)
Select to display the sound setting
screen.
Select to display the DVD setting
screen.
Shows progress
During playback: Select to fast for-
ward.
During a pause: Select to slow for-
ward.
Select to play/pause.
Select to stop the video screen.
Select to rewind.
Select to display the menu control
key.
Select to display full screen video.
Turn to select a chapter.
Press to select a chapter.
Press and hold to fast forward/
rewind.
Turn to adjust volume.
Press to turn the audio system on/
off.
Press and hold to restart the audio
system.
Press to play/pause.
Press to eject a disc.
WARNING
● Conversational speech on some DVDs
is recorded at a low volume to empha-
size the impact of sound effects. If you
adjust the volume assuming that the
conversations represent the maximum
volume level that the DVD will play, you
may be startled by louder sound effects
or when you change to a different audio
source. The louder sounds may have a
significant impact on the human body or
pose a driving hazard. Keep this in mind
when you adjust the volume.
INFORMATION
●According to the DVD disc, some menu
items can be selected directly. (For
details, see the manual that comes with
the DVD disc provided separately.)
● If appears on the screen when a con-
trol is selected, the operation relevant to
the control is not permitted.
No.Function
Page 137 of 277
LC200_Navi_OM60R69U_(U)
19.03.06 15:36
Audio/visual system
4
1373. Media operation
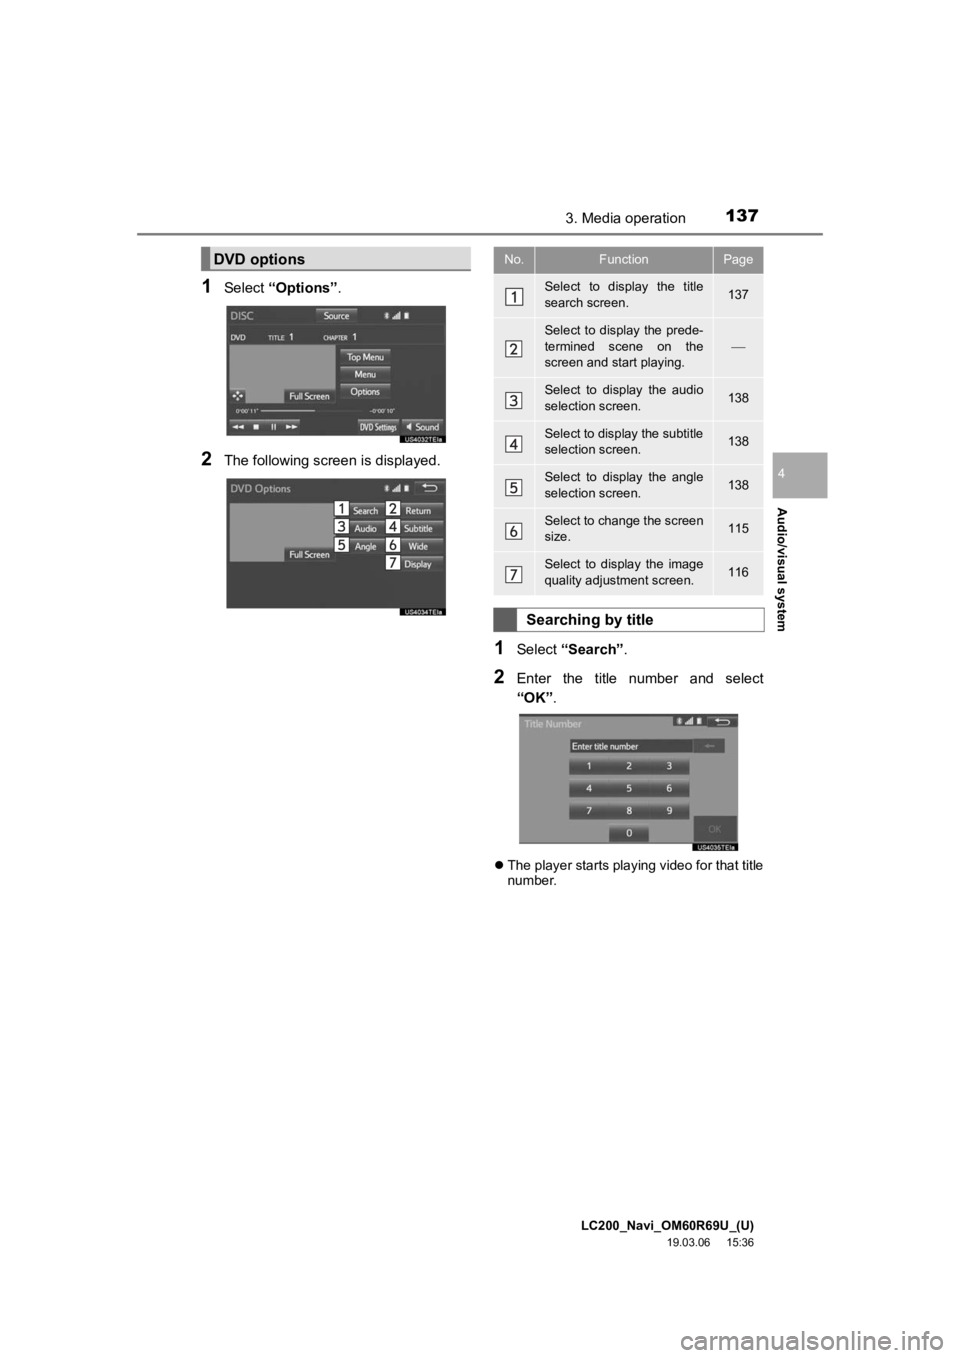
1Select “Options”.
2The following screen is displayed.
1Select “Search” .
2Enter the title number and select
“OK”.
The player starts playing video for that title
number.
DVD optionsNo.FunctionPage
Select to display the title
search screen.137
Select to display the prede-
termined scene on the
screen and start playing.
Select to display the audio
selection screen.138
Select to display the subtitle
selection screen.138
Select to display the angle
selection screen.138
Select to change the screen
size. 115
Select to display the image
quality adjustment screen.116
Searching by title
Page 138 of 277
LC200_Navi_OM60R69U_(U)
19.03.06 15:36
1383. Media operation
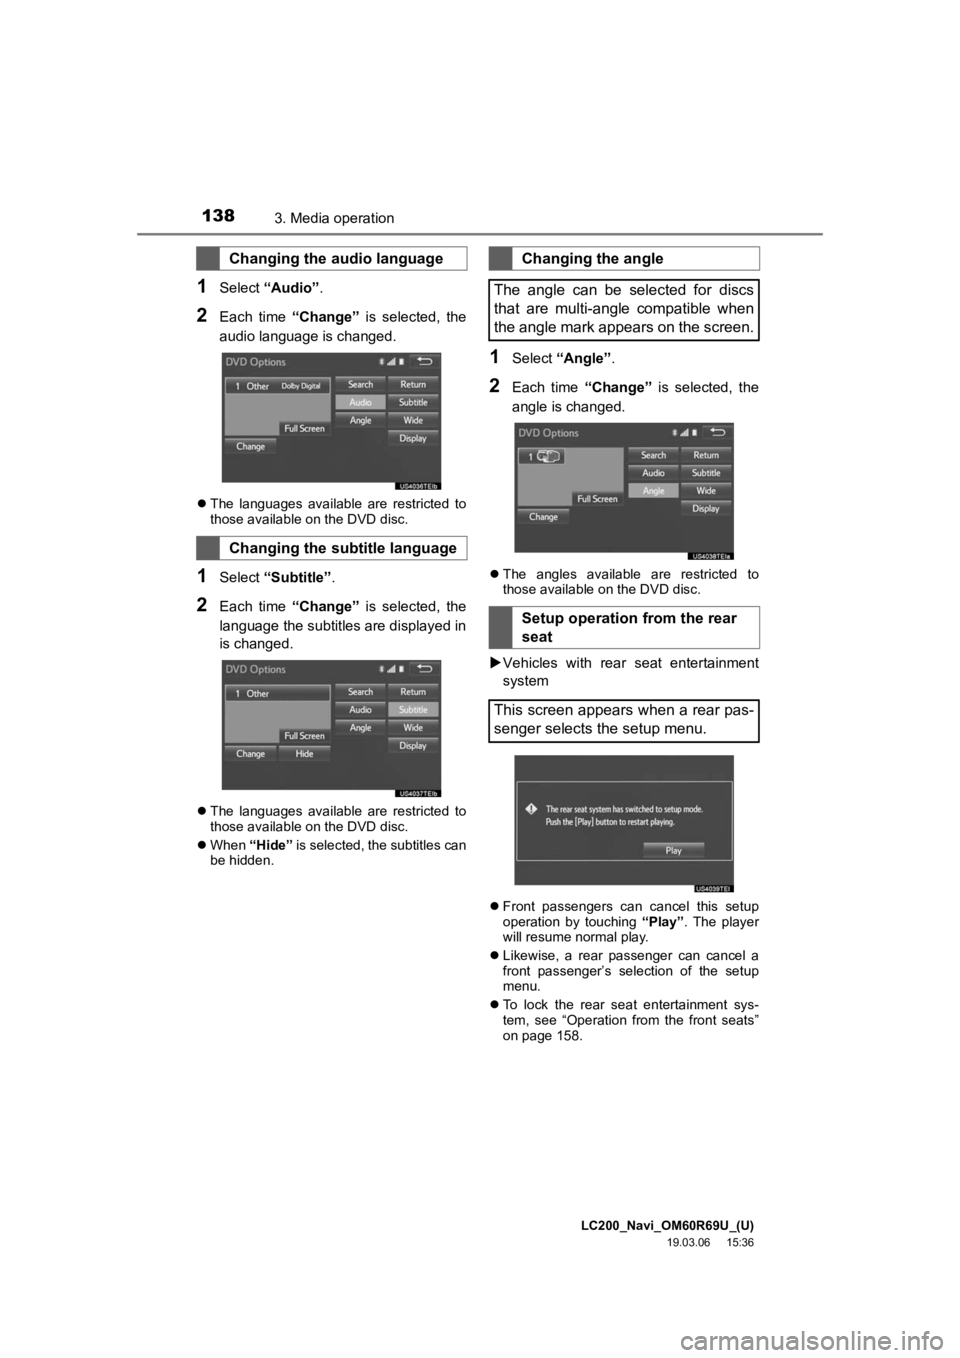
1Select “Audio” .
2Each time “Change” is selected, the
audio language is changed.
The languages available are restricted to
those available on the DVD disc.
1Select “Subtitle” .
2Each time “Change” is selected, the
language the subtitles are displayed in
is changed.
The languages available are restricted to
those available on the DVD disc.
When “Hide” is selected, the subtitles can
be hidden.
1Select “Angle” .
2Each time “Change” is selected, the
angle is changed.
The angles available are restricted to
those available on the DVD disc.
Vehicles with rear seat entertainment
system
Front passengers can cancel this setup
operation by touching “Play”. The player
will resume normal play.
Likewise, a rear passenger can cancel a
front passenger’s selection of the setup
menu.
To lock the rear seat entertainment sys-
tem, see “Operation from the front seats”
on page 158.
Changing the audio language
Changing the subtitle language
Changing the angle
The angle can be selected for discs
that are multi-angle compatible when
the angle mark appears on the screen.
Setup operation from the rear
seat
This screen appears when a rear pas-
senger selects the setup menu.
Page 139 of 277
LC200_Navi_OM60R69U_(U)
19.03.06 15:36
Audio/visual system
4
1393. Media operation
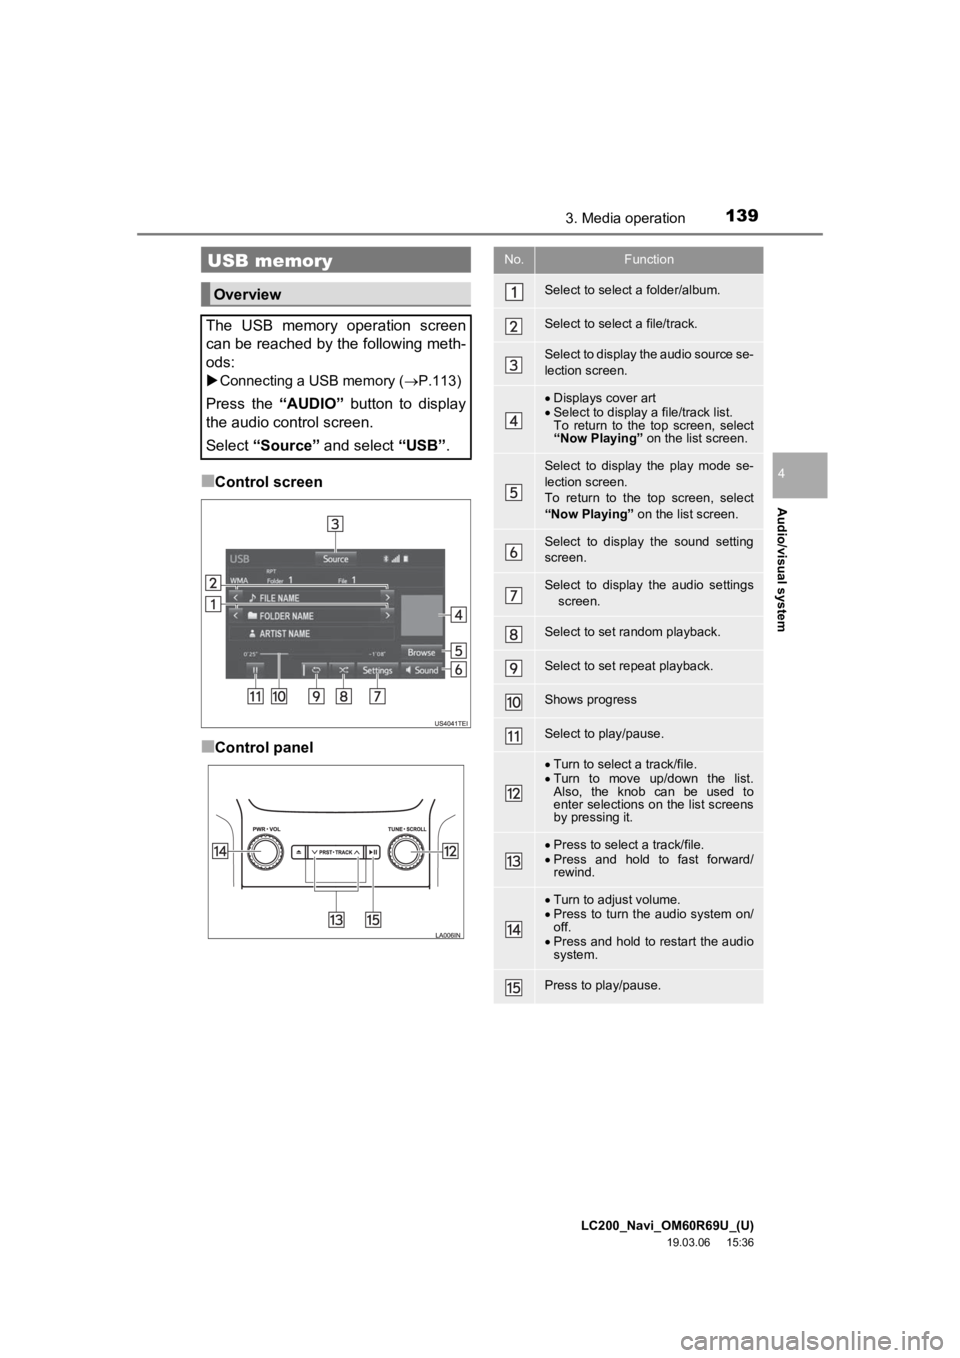
■Control screen
■Control panel
USB memory
Overview
The USB memory operation screen
can be reached by the following meth-
ods:
Connecting a USB memory ( P.113)
Press the “AUDIO” button to display
the audio control screen.
Select “Source” and select “USB”.
No.Function
Select to select a folder/album.
Select to select a file/track.
Select to display the audio source se-
lection screen.
Displays cover art
Select to display a file/track list.
To return to the top screen, select
“Now Playing” on the list screen.
Select to display the play mode se-
lection screen.
To return to the top screen, select
“Now Playing” on the list screen.
Select to display the sound setting
screen.
Select to display the audio settings
screen.
Select to set random playback.
Select to set repeat playback.
Shows progress
Select to play/pause.
Turn to select a track/file.
Turn to move up/down the list.
Also, the knob can be used to
enter selections on the list screens
by pressing it.
Press to select a track/file.
Press and hold to fast forward/
rewind.
Turn to adjust volume.
Press to turn the audio system on/
off.
Press and hold to restart the audio
system.
Press to play/pause.