remove TOYOTA MIRAI 2019 (in English) Owner's Manual
[x] Cancel search | Manufacturer: TOYOTA, Model Year: 2019, Model line: MIRAI, Model: TOYOTA MIRAI 2019Pages: 528, PDF Size: 11.84 MB
Page 159 of 528
1594-3. Adjusting the seats
4
Operation of each component
MIRAI_OM_USA_OM62054U(18MY)_O
M62048U(19MY)
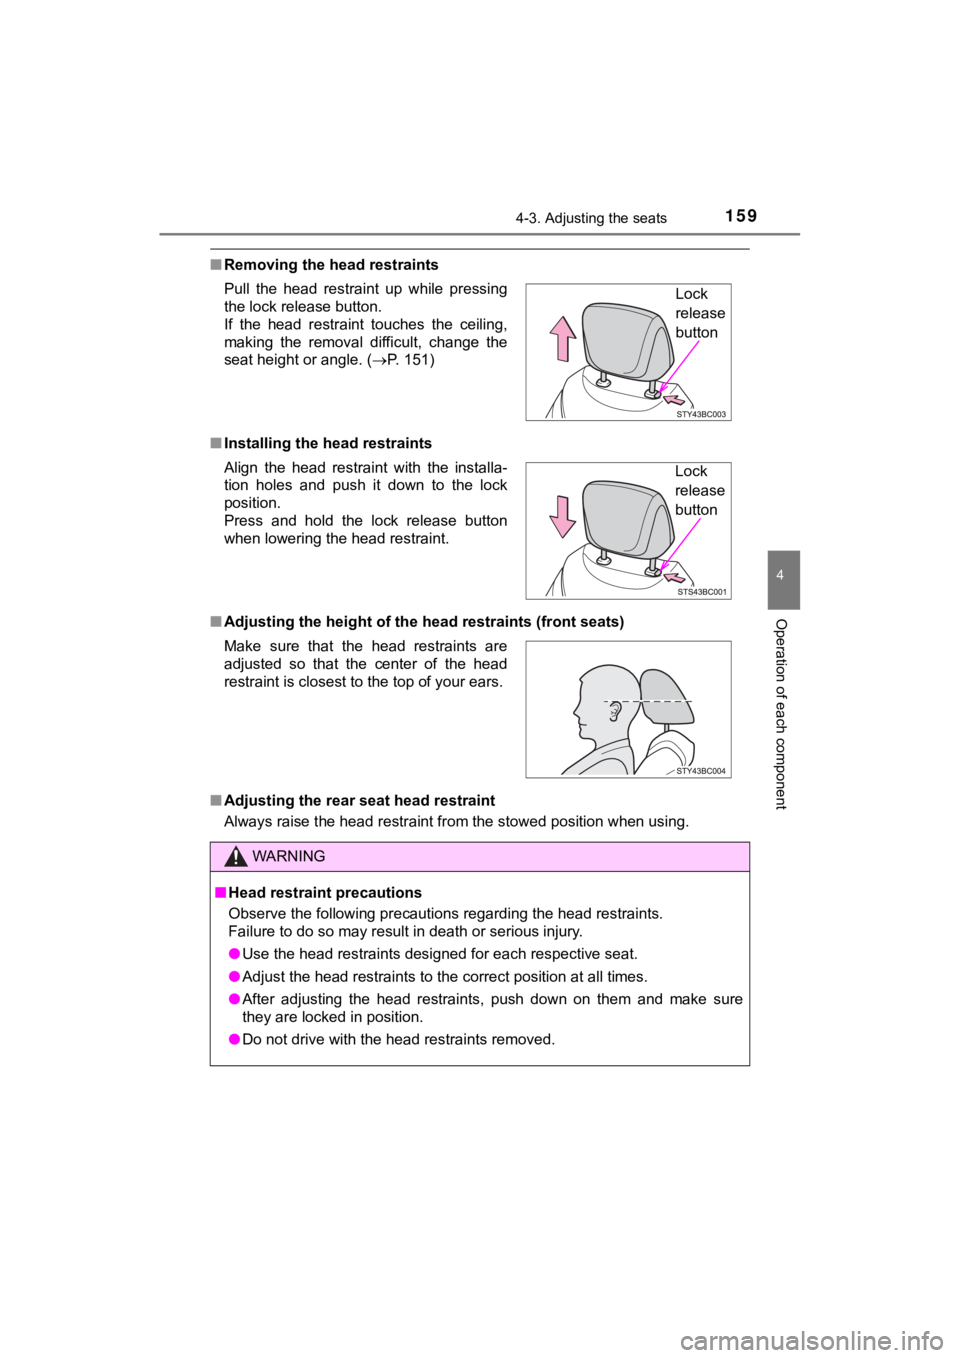
■Removing the head restraints
■ Installing the head restraints
■ Adjusting the height of the head restraints (front seats)
■ Adjusting the rear seat head restraint
Always raise the head restraint from the stowed position when u sing.
Pull the head restraint up while pressing
the lock release button.
If the head restraint touches the ceiling,
making the removal difficult, change the
seat height or angle. (
P. 151)
Align the head restraint with the installa-
tion holes and push it down to the lock
position.
Press and hold the lock release button
when lowering the head restraint.
Make sure that the head restraints are
adjusted so that the center of the head
restraint is closest to the top of your ears.
WARNING
■ Head restraint precautions
Observe the following precautions regarding the head restraints.
Failure to do so may result in death or serious injury.
● Use the head restraints designed for each respective seat.
● Adjust the head restraints to the correct position at all times.
● After adjusting the head restraints, push down on them and make sure
they are locked in position.
● Do not drive with the head restraints removed.
Lock
release
button
Lock
release
button
Page 166 of 528

1664-4. Adjusting the steering wheel and mirrors
MIRAI_OM_USA_OM62054U(18MY)_O
M62048U(19MY)■
Using automatic mode in cold weather
When automatic mode is used in cold weather, the door mirror co uld freeze
up and automatic stowing and return may not be possible. In thi s event,
remove any ice and snow from the door mirror, then either opera te the mirror
using manual mode or move the mirror by hand.
■ Customization
The automatic mirror folding and extending operation can be cha nged.
(Customizable features: P. 488)
WARNING
■Important points while driving
Observe the following precautions while driving.
Failure to do so may result in loss of control of the vehicle and cause an
accident, resulting in death or serious injury.
● Do not adjust the mirrors while driving.
● Do not drive with the mirrors folded.
● Both the driver and passenger side mirrors must be extended and properly
adjusted before driving.
■ When a mirror is moving
To avoid personal injury and mirror malfunction, be careful not to get your
hand caught by the moving mirror.
■ When the mirror defoggers are operating
Do not touch the rear view mirror surfaces, as they can become very hot
and burn you.
NOTICE
■ Handling the rain clearing mirror
The rain clearing effect is finite. Observe the following precautions in order
to retain the rain-clearing properties of the mirrors:
● When using water repellent, oil film remover, wax, or any other car mainte-
nance product that contains silicone, pay full attention not to adhere it to
the mirror surface.
● Do not wipe the mirror surface by using any cloth smeared with sand, oil
film remover, abrasive agent, or any other thing that may scrat ch the mir-
ror surface.
● When the mirrors become iced up, remove the ice by applying war m
water, or operating the outside rear view mirror defoggers.
But, do not attempt to scrape the ice off by using the plastic plate, etc.
● When washing your vehicle using car shampoo with water repellen t effect,
rinse the mirror surface with a lot of water, and remove the wa ter drops by
using a clean and soft cloth.
Page 197 of 528
1975-2. Driving procedures
5
Driving
MIRAI_OM_USA_OM62054U(18MY)_O
M62048U(19MY)■
Regenerative Braking
When the shift position is in D, regenerative braking is engage d when the foot
is released from the accelerator pedal.
■ ECO HEAT/COOL mode operation for Eco drive mode
●When the “ECO MODE” switch is pressed, the system switches over to
ECO HEAT/COOL mode. ( P. 311) During the use of Eco drive mode, only
the ECO HEAT/COOL mode can be canceled.
● When it is desired to improve the effectiveness of the air cond itioning sys-
tem, perform the following operations.
• Adjust the temperature settings and airflow mode.
• Press of the air conditioning operation panel ( P. 306) and can-
cel the ECO HEAT/COOL mode, or cancel Eco drive mode.
■ Power mode automatic deactivation
Power mode is automatically deactivated if the power switch is turned off after
driving in power mode.
■ Shifting from P on a slope
When changing to another position from P when parked on a slope in the P
position, vibrations may be felt.
WARNING
■When driving on slippery road surfaces
Do not accelerate or shift the shift position suddenly.
Sudden changes in regenerative braking may cause the vehicle to spin or
skid, resulting in an accident.
■ For the shift lever
Do not remove the shift lever knob or use anything but a genuin e Toyota
shift lever knob. Also, do not hang anything on the shift lever .
Doing so could prevent the shift lever from returning to position, causing
unexpected accidents to occur when the vehicle is in motion.
■ P position switch
Do not press the P position switch while the vehicle is moving.
If the P position switch is pressed when driving at very low speeds (for
example, directly before stopping the vehicle), the vehicle may stop sud-
denly when the shift position switches to P, which could lead t o an accident.
Page 214 of 528

2145-4. Refueling
MIRAI_OM_USA_OM62054U(18MY)_O
M62048U(19MY)
WARNING
■When filling
Observe the following precautions while fueling the vehicle.
Failure to do so may result in death or serious injury.
● Turn the power switch off before fueling.
● Ensure the hydrogen gas nozzle is locked onto the vehicle recep tacle
before filling. This can be done by pulling on the hydrogen gas nozzle to
check that it cannot be pulled off.
Failure to do so may result in injury or damage to the hydrogen gas nozzle
or vehicle.
● Do not smoke while fueling.
● Because the fuel is cold, the hydrogen gas nozzle and vehicle r eceptacle
surface will become cold, and frost may develop. After fueling is com-
pleted, remove the hydrogen gas nozzle by the plastic handle on ly. Do not
touch any other parts of the hydrogen gas nozzle or vehicle rec eptacle
with bare hands immediately after fueling, as frostbite may occ ur.
NOTICE
■When filling
● Fuel only with compressed hydrogen gas at stations compliant with the
Society of Automotive Engineers (SAE) J2601 fueling protocol or laws that
may supersede such SAE protocols.
If improper fuels are used, the fuel cell stack will be damaged .
● Do not swing or drop the hydrogen gas nozzle, or subject it to a large
amount of force. Doing so may cause damage.
● If the hydrogen gas nozzle cannot be removed after fueling, it may be fro-
zen to the vehicle receptacle. Wait for the hydrogen gas nozzle to thaw
before attempting to remove. Do not pull or rotate the hydrogen gas nozzle
forcibly. Failure to follow these precautions may cause damage.
● Be sure to replace the cap after filling. If foreign material g ets in the vehicle
receptacle, it may cause damage.
● Do not put anything sharp, such as a screwdriver, blade, or any foreign
object into the mouth of the vehicle receptacle. If the vehicle receptacle is
damaged, hydrogen gas may leak during fueling.
● If you notice anything unusual about the vehicle receptacle, pl ease notify
your Toyota dealer.
● If you notice anything unusual with the hydrogen dispenser or h ydrogen
gas nozzle, please notify the hydrogen station operator. Contac t informa-
tion is usually displayed on the dispenser.
Page 215 of 528
2155-4. Refueling
5
Driving
MIRAI_OM_USA_OM62054U(18MY)_O
M62048U(19MY)
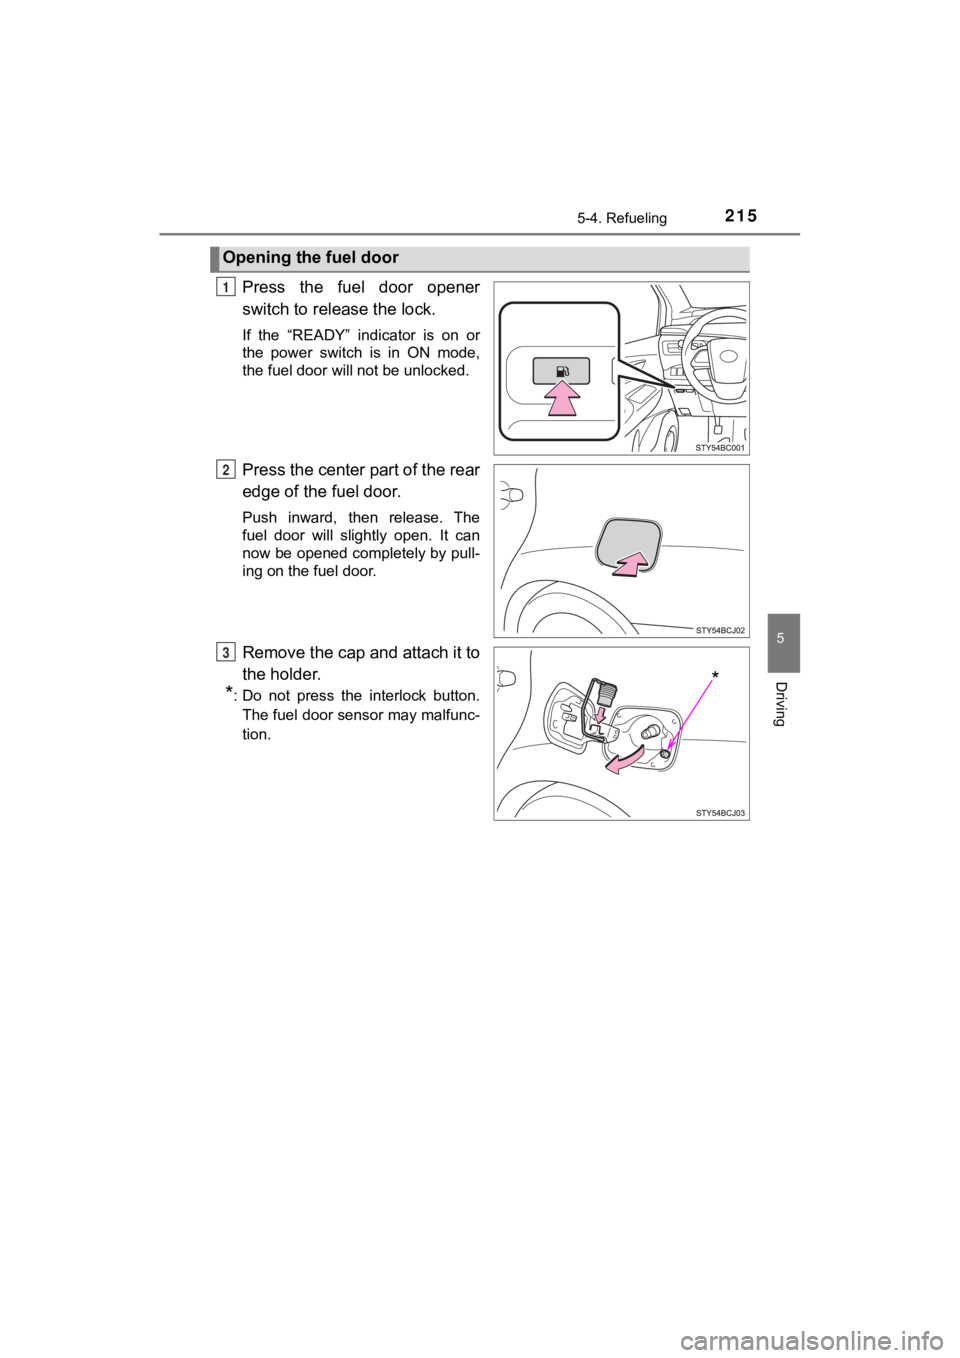
Press the fuel door opener
switch to release the lock.
If the “READY” indicator is on or
the power switch is in ON mode,
the fuel door will not be unlocked.
Press the center part of the rear
edge of the fuel door.
Push inward, then release. The
fuel door will slightly open. It can
now be opened completely by pull-
ing on the fuel door.
Remove the cap and attach it to
the holder.
*: Do not press the interlock button.The fuel door sensor may malfunc-
tion.
Opening the fuel door
1
2
*
P
Page 216 of 528
2165-4. Refueling
MIRAI_OM_USA_OM62054U(18MY)_O
M62048U(19MY)
■If “Open H2 Filler Door in a Safe Place when Vehicle is Powered OFF” is
displayed on the multi-information display
Stop the vehicle in a safe place and press the fuel door opener switch once
more with the following procedure:
Shift the shift position to P.
Turn the power switch off.
Press the fuel door opener switch.
■ If the fuel door lock cannot be released (i.e., if it is damaged)
■ Sounds during filling
When fueling with compressed hydrogen gas, noises from gas flow ing
through the hydrogen gas nozzle and hydrogen tank valves can so metimes
be heard. ( P. 88)
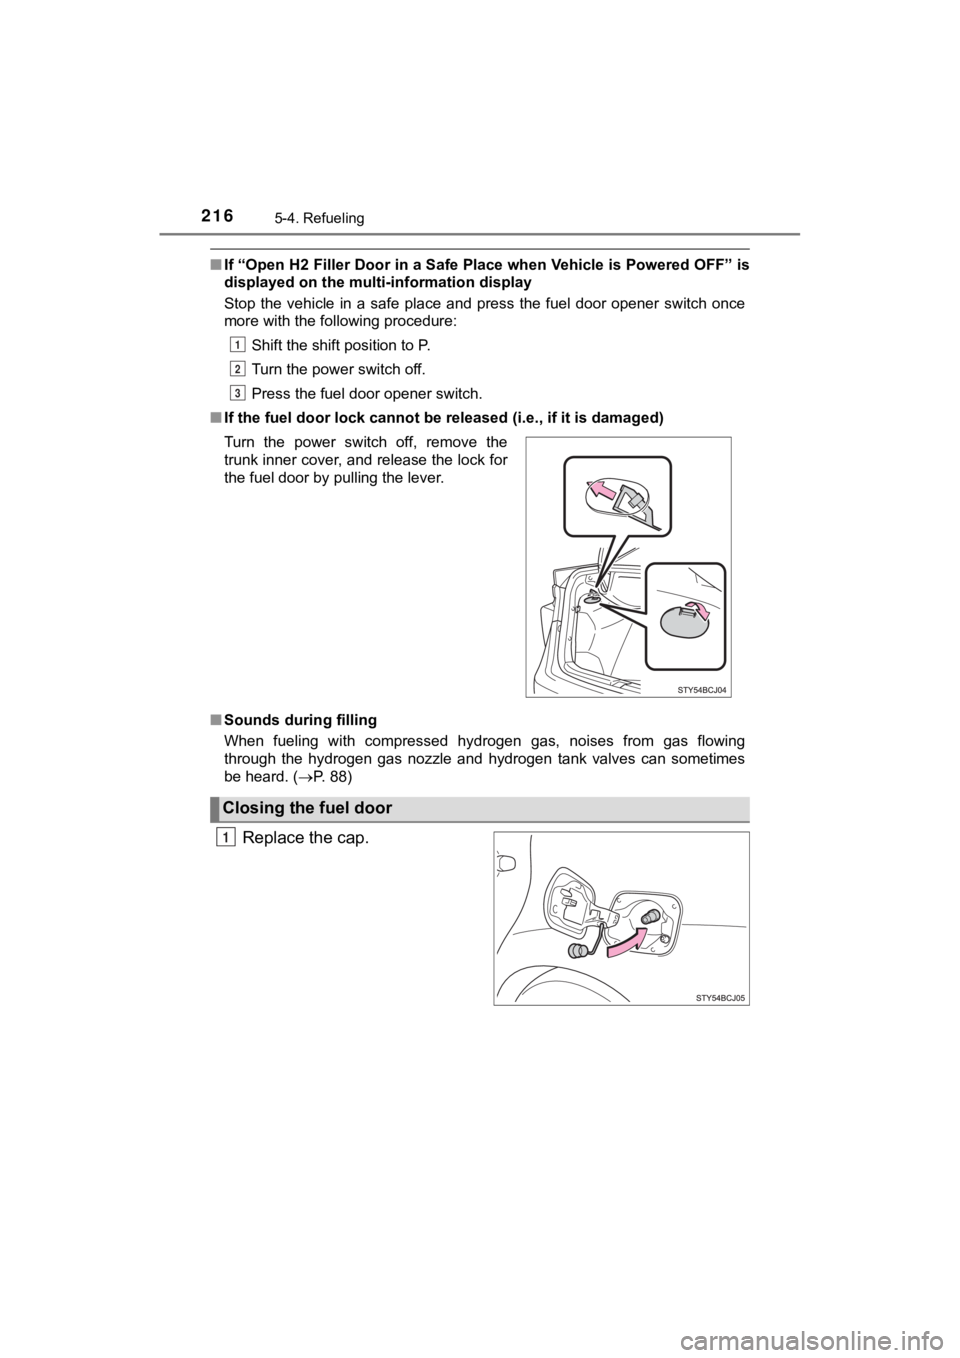
Replace the cap.
Turn the power switch off, remove the
trunk inner cover, and release the lock for
the fuel door by pulling the lever.
Closing the fuel door
1
2
3
1
Page 220 of 528
2205-5. Using the driving support systems
MIRAI_OM_USA_OM62054U(18MY)_O
M62048U(19MY)
WARNING
●Do not attach accessories, stickers (including transparent stic kers) or
other items to the radar sensor, grille cover or surrounding ar ea.
● Do not subject the radar sensor or its surrounding area to a st rong impact.
If the radar sensor, front grille, or front bumper has been sub jected to a
strong impact, have the vehicle inspected by your Toyota dealer .
● Do not disassemble the radar sensor.
● Do not modify or paint the radar sensor or grille cover.
● If the radar sensor, front grille, or front bumper needs to be removed and
installed, or replaced, contact your Toyota dealer.
■ To avoid malfunction of the front camera
Observe the following precautions.
Otherwise, the front camera may not operate properly, possibly leading to
an accident resulting in death or serious injury.
● Keep the windshield clean at all times.
• If the windshield is dirty or covered with an oily film, water droplets,
snow, etc., clean the windshield.
• If a glass coating agent is applied to the windshield, it will still be neces-
sary to use the windshield wipers to remove water droplets, etc ., from
the area of the windshield in front of the front camera.
• If the inner side of the windshield where the front camera is installed is
dirty, contact your Toyota dealer.
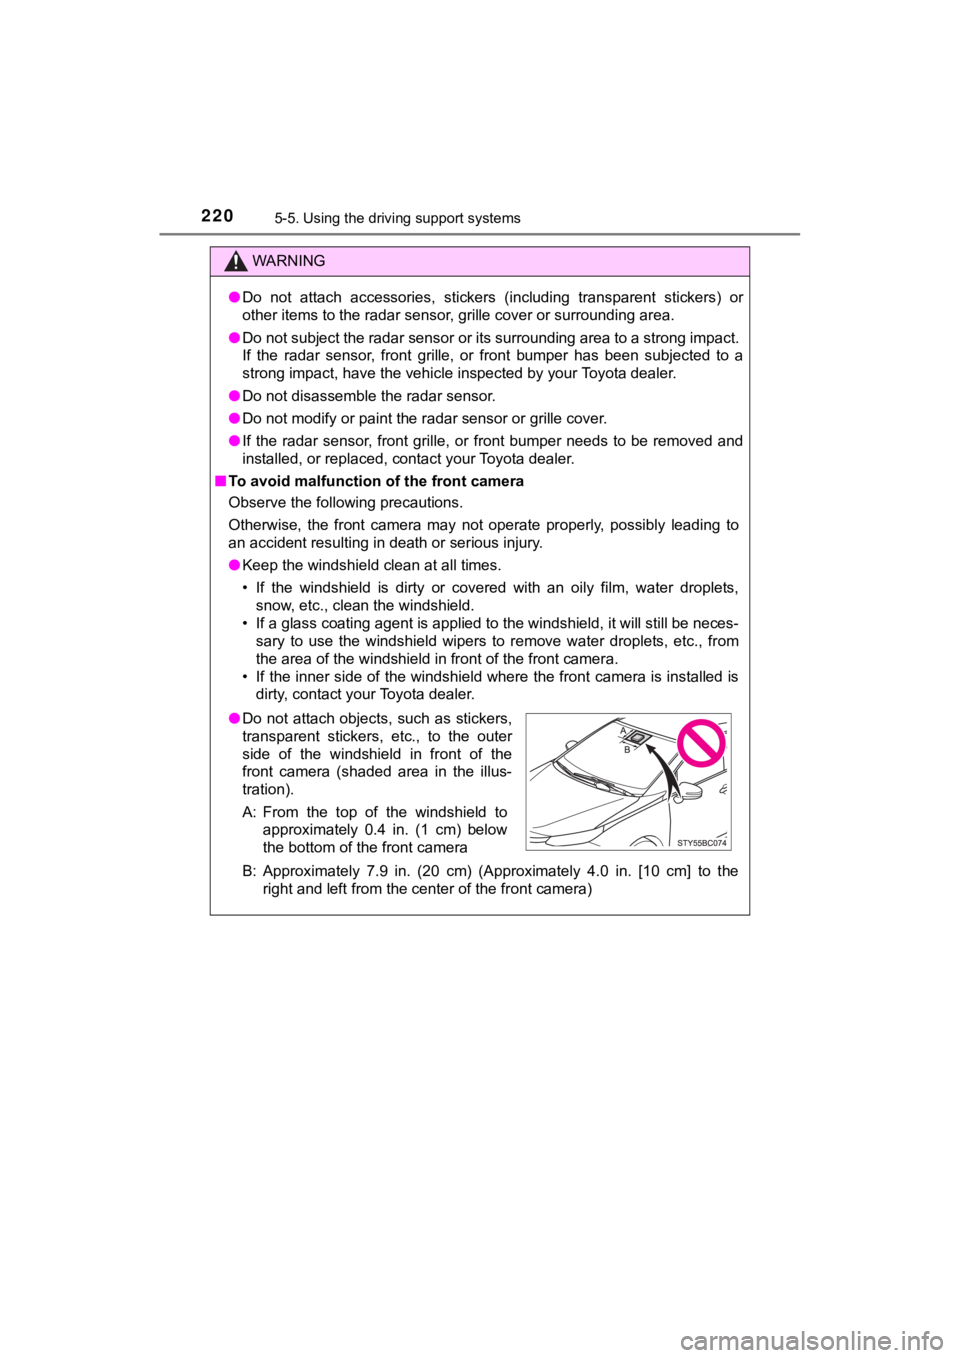
B: Approximately 7.9 in. (20 cm) (Approximately 4.0 in. [10 cm] to the
right and left from the center of the front camera)
● Do not attach objects, such as stickers,
transparent stickers, etc., to the outer
side of the windshield in front of the
front camera (shaded area in the illus-
tration).
A: From the top of the windshield to
approximately 0.4 in. (1 cm) below
the bottom of the front camera
Page 221 of 528
2215-5. Using the driving support systems
5
Driving
MIRAI_OM_USA_OM62054U(18MY)_O
M62048U(19MY)
WARNING
●If the part of the windshield in front of the front camera is f ogged up or cov-
ered with condensation or ice, use the windshield defogger to remove the
fog, condensation or ice. ( P. 309)
● If water droplets cannot be properly removed from the area of t he wind-
shield in front of the front camera by the windshield wipers, replace the
wiper insert or wiper blade.
If the wiper inserts or wiper blades need to be replaced, contact your
Toyota dealer.
● Do not attach window tint to the windshield.
● Replace the windshield if it is damaged or cracked.
If the windshield needs to be replaced, contact your Toyota dea ler.
● Do not allow liquids to contact the front camera.
● Do not allow bright lights to shine into the front camera.
● Do not dirty or damage the front camera.
When cleaning the inside of the windshield, do not allow glass cleaner to
contact the lens of the front camera. Also, do not touch the lens.
If the lens is dirty or damaged, contact your Toyota dealer.
● Do not subject the front camera to a strong impact.
● Do not change the installation position or direction of the fro nt camera or
remove it.
● Do not disassemble the front camera.
● Do not modify any components of the vehicle around the front ca mera
(inside rear view mirror, etc.) or ceiling.
● Do not attach any accessories to the hood, front grille or fron t bumper that
may obstruct the front camera. Contact your Toyota dealer for d etails.
● If a surfboard or other long object is to be mounted on the roo f, make sure
that it will not obstruct the front camera.
● Do not modify the headlights or other lights.
Page 224 of 528
2245-5. Using the driving support systems
MIRAI_OM_USA_OM62054U(18MY)_O
M62048U(19MY)■
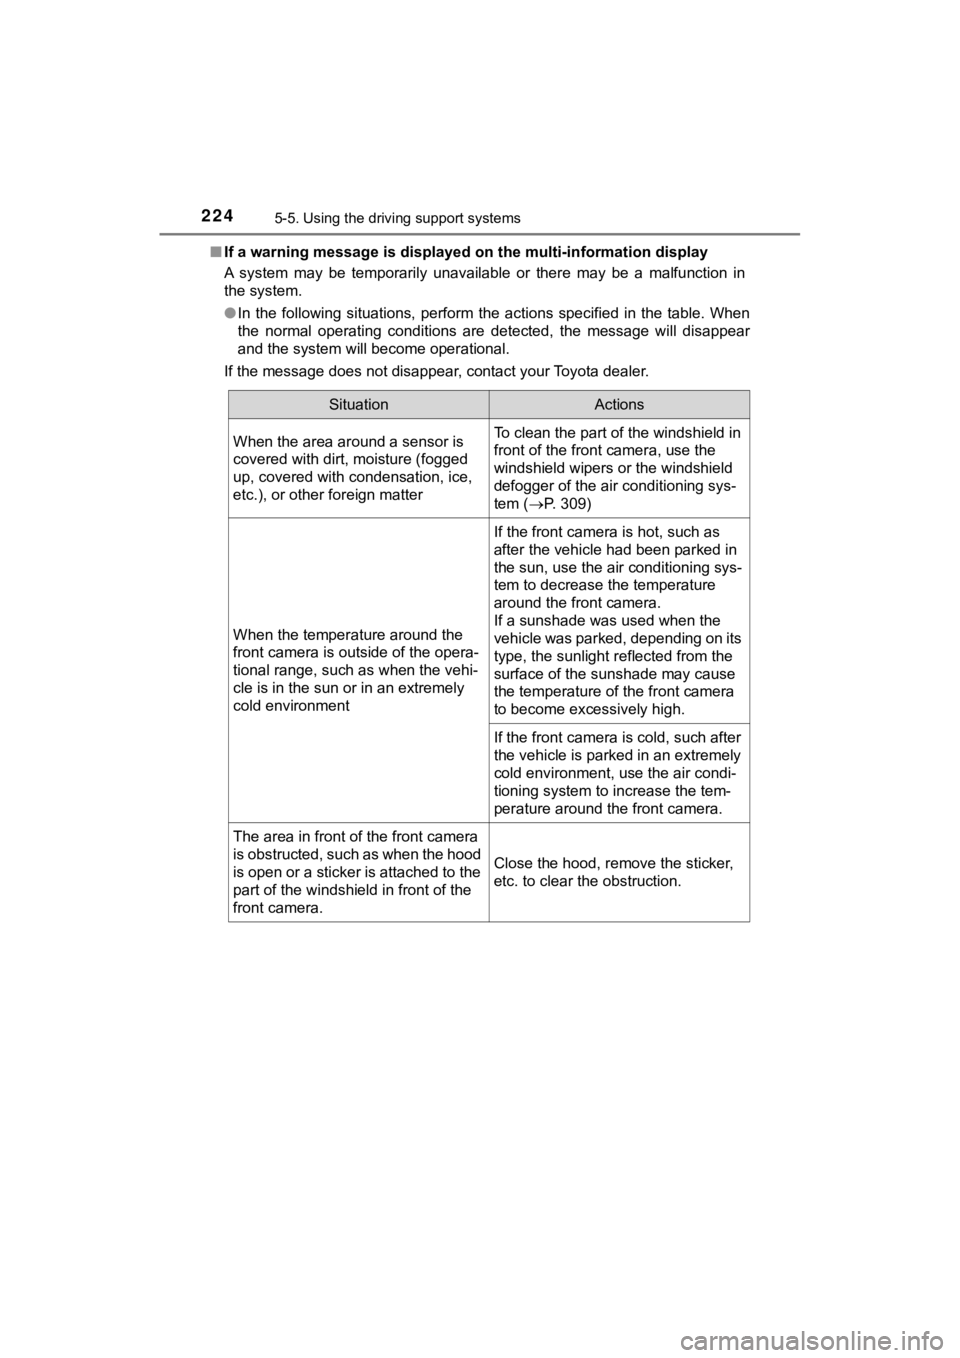
If a warning message is displayed on the multi-information disp lay
A system may be temporarily unavailable or there may be a malfu nction in
the system.
● In the following situations, perform the actions specified in t he table. When
the normal operating conditions are detected, the message will disappear
and the system will become operational.
If the message does not disappear, contact your Toyota dealer.
SituationActions
When the area around a sensor is
covered with dirt, moisture (fogged
up, covered with condensation, ice,
etc.), or other foreign matterTo clean the part of the windshield in
front of the front camera, use the
windshield wipers or the windshield
defogger of the air conditioning sys-
tem ( P. 309)
When the temperature around the
front camera is outside of the opera-
tional range, such as when the vehi-
cle is in the sun or in an extremely
cold environment
If the front camera is hot, such as
after the vehicle had been parked in
the sun, use the air conditioning sys-
tem to decrease the temperature
around the front camera.
If a sunshade was used when the
vehicle was parked, depending on its
type, the sunlight reflected from the
surface of the sunshade may cause
the temperature of the front camera
to become excessively high.
If the front camera is cold, such after
the vehicle is parked in an extremely
cold environment, use the air condi-
tioning system to increase the tem-
perature around the front camera.
The area in front of the front camera
is obstructed, such as when the hood
is open or a sticker is attached to the
part of the windshield in front of the
front camera.
Close the hood, remove the sticker,
etc. to clear the obstruction.
Page 271 of 528
2715-5. Using the driving support systems
5
Driving
MIRAI_OM_USA_OM62054U(18MY)_O
M62048U(19MY)●
The following situations may occur during use.
• Depending on the shape of the obstacle and other factors, the detection
distance may shorten, or detection may be impossible.
• Obstacles may not be detected if they are too close to the sen sor.
• There will be a short delay between obstacle detection and dis play. Even
at slow speeds, there is a possibility that the obstacle will c ome within the
sensor’s detection areas before the display is shown and the bu zzer
sounds.
• Thin posts or objects lower than the sensor may not be detecte d when
approached, even if they have been detected once.
• It might be difficult to hear beeps due to the volume of audio system or air
flow noise of the air conditioning system.
■ Muting the buzzer sound
●To mute the buzzer sound
The buzzer can be temporarily muted by pressing of the meter c ontrol
switches while an obstacle detection display is shown on the mu lti-informa-
tion display.
● To cancel the mute
Mute will be automatically canceled in the following situations .
• When the shift position is changed
• When the vehicle speed has reac hed or exceeded approximately 6 mph
(10 km/h)
• When the intuitive parking assist is turned off once and turned on again
• When the power switch is turned off once and turned to ON mode again
• When a sensor is malfunctioning
■ If “Parking Assist Unavailable Clean Parking Assist Sensor” is displayed
on the multi-information display
A sensor may be dirty or covered with snow or ice. In such case s, if it is
removed from the sensor, the system should return to normal.
Also, due to the sensor being frozen at low temperatures, a mal function dis-
play may appear or an obstacle may not be detected. If the sens or thaws out,
the system should return to normal.
■ If “Parking Assist Malfunction Visit Your Dealer” is displayed on the
multi-information display
Depending on the malfunction of the sensor, the device may not be working
normally.
Have the vehicle inspected by your Toyota dealer.
■ Customization
Some functions can be customized.
(Customizable features: P. 492)