remove TOYOTA MIRAI 2019 (in English) Repair Manual
[x] Cancel search | Manufacturer: TOYOTA, Model Year: 2019, Model line: MIRAI, Model: TOYOTA MIRAI 2019Pages: 528, PDF Size: 11.84 MB
Page 414 of 528
4148-2. Steps to take in an emergency
MIRAI_OM_USA_OM62054U(18MY)_O
M62048U(19MY)
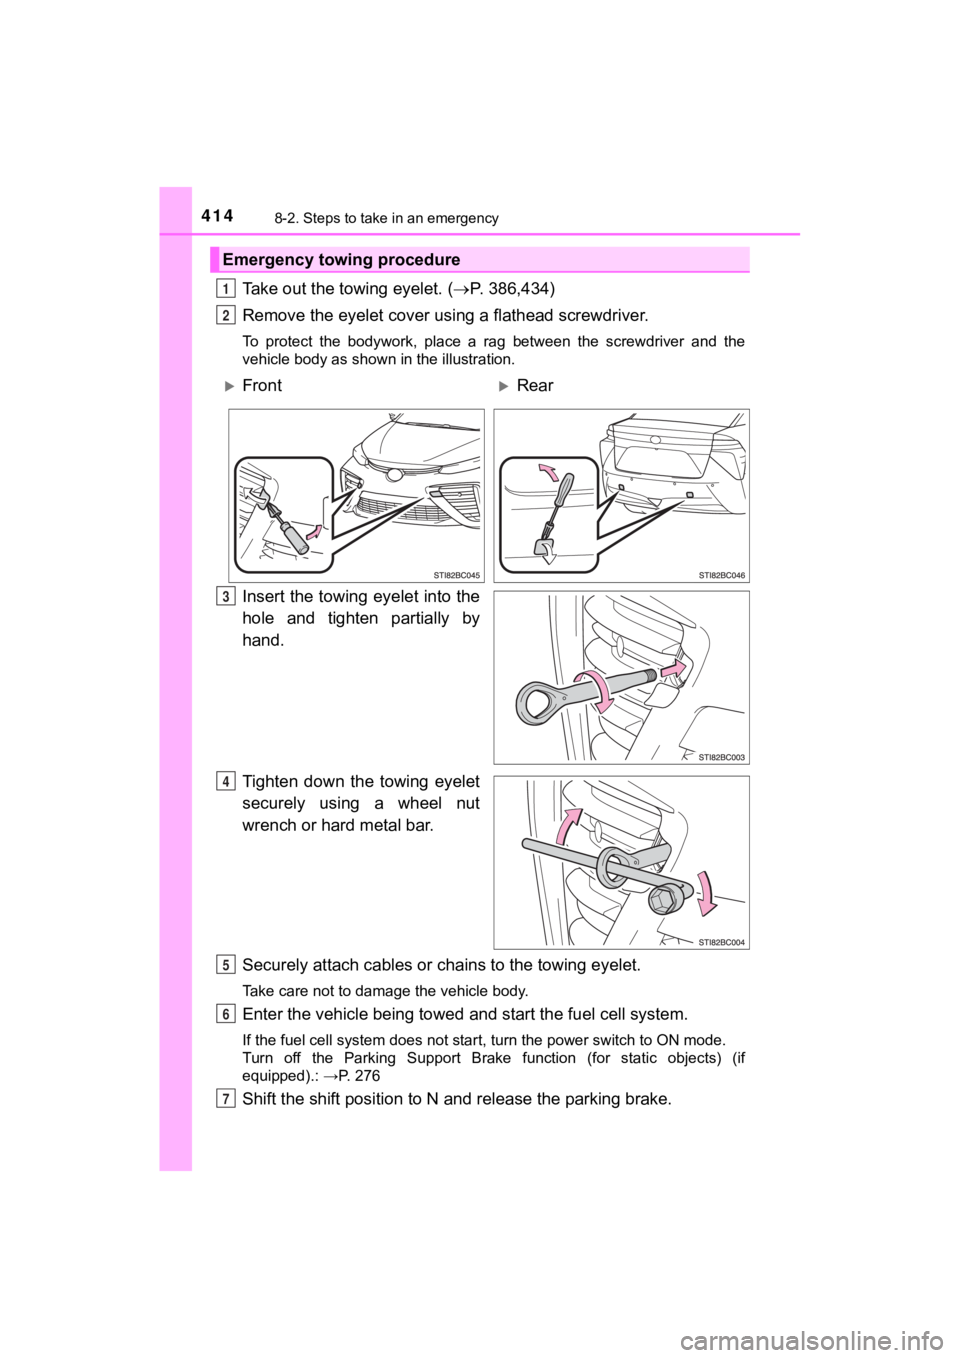
Take out the towing eyelet. (P. 386,434)
Remove the eyelet cover usi ng a flathead screwdriver.
To protect the bodywork, place a rag between the screwdriver an d the
vehicle body as shown in the illustration.
Insert the towing eyelet into the
hole and tighten partially by
hand.
Tighten down the towing eyelet
securely using a wheel nut
wrench or hard metal bar.
Securely attach cables or c hains to the towing eyelet.
Take care not to damage the vehicle body.
Enter the vehicle being towed and start the fuel cell system.
If the fuel cell system does not start, turn the power switch to ON mode.
Turn off the Parking Support Brake function (for static objects) (if
equipped).: →P. 276
Shift the shift position to N and release the parking brake.
Emergency towing procedure
1
2
FrontRear
3
4
5
6
7
Page 428 of 528

4288-2. Steps to take in an emergency
MIRAI_OM_USA_OM62054U(18MY)_O
M62048U(19MY)■
If “High FC Temperature Reduced Power” is displayed
Lower the speed while check the safety, and run the vehicle like this for
several minutes.
If the message goes off, the vehicle can be driven as is, since it temporarily
overheated.
This message may be displayed when driving under severe operati ng con-
ditions.
(For example, when driving up a long steep hill.)
■ If “FC System Shutdown due to F reezing conditions Stop Your Veh icle in
a Safe Place and Contact Your Dealer” is displayed.
P. 189
■ If “Maintenance Required for Hybrid Battery Cooling Parts at Yo ur
Dealer” is displayed
The filter may be clogged, the air intake vent may be blocked or there may be
a gap in the duct. Have maintenance performed on the traction b attery cool-
ing component at your Toyota dealer.
■ If “Shift to P Before Exiting Vehicle” is displayed
Message is displayed when the driver’s door is opened without t urning the
power switch to off with the shift position in any position oth er than P.
Shift the shift position to P.
■ If “Shift is in N Release Accelerator Before Shifting” is displ ayed
Message is displayed when the accelerator pedal has been depressed and
the shift position is in N. Release the accelerator pedal and s hift the shift posi-
tion to D or R.
■ If “Press Brake When Vehicle is Stopped FC System may Overheat” is
displayed
Message is displayed when the accelerator pedal is depressed to maintain
the vehicle position when stopped on an upward slope, etc.
If this continues, the fuel cell system may overheat.
Release the accelerator pedal and depress the brake pedal.
■ If “Accelerator Pedal is Pressed Check The Accelerator Pedal” i s dis-
played
The accelerator pedal may be stuck.
If the message does not disappear even when the foot has been removed
from the accelerator pedal, check that the accelerator pedal is not stuck.
■ If “Ion Filter Maintenance Requi red Visit Your Dealer” is displayed
Ion filter replacement is necessary. Contact your Toyota dealer .
■ If “Shift System Malfunction St op Your Vehicle in a Safe Place then See
Owner’s Manual” is displayed
The shift position may not be able to be shifted. Stop the vehi cle in a safe
place.
Contact your Toyota dealer immediately.
1
2
Page 433 of 528
4338-2. Steps to take in an emergency
MIRAI_OM_USA_OM62054U(18MY)_O
M62048U(19MY)
8
When trouble arises
●Stop the vehicle in a safe place on a hard, flat surface.
● Set the parking brake.
● Shift the shift position to P.
● Stop the fuel cell system.
● Turn on the emergency flashers. ( P. 408)
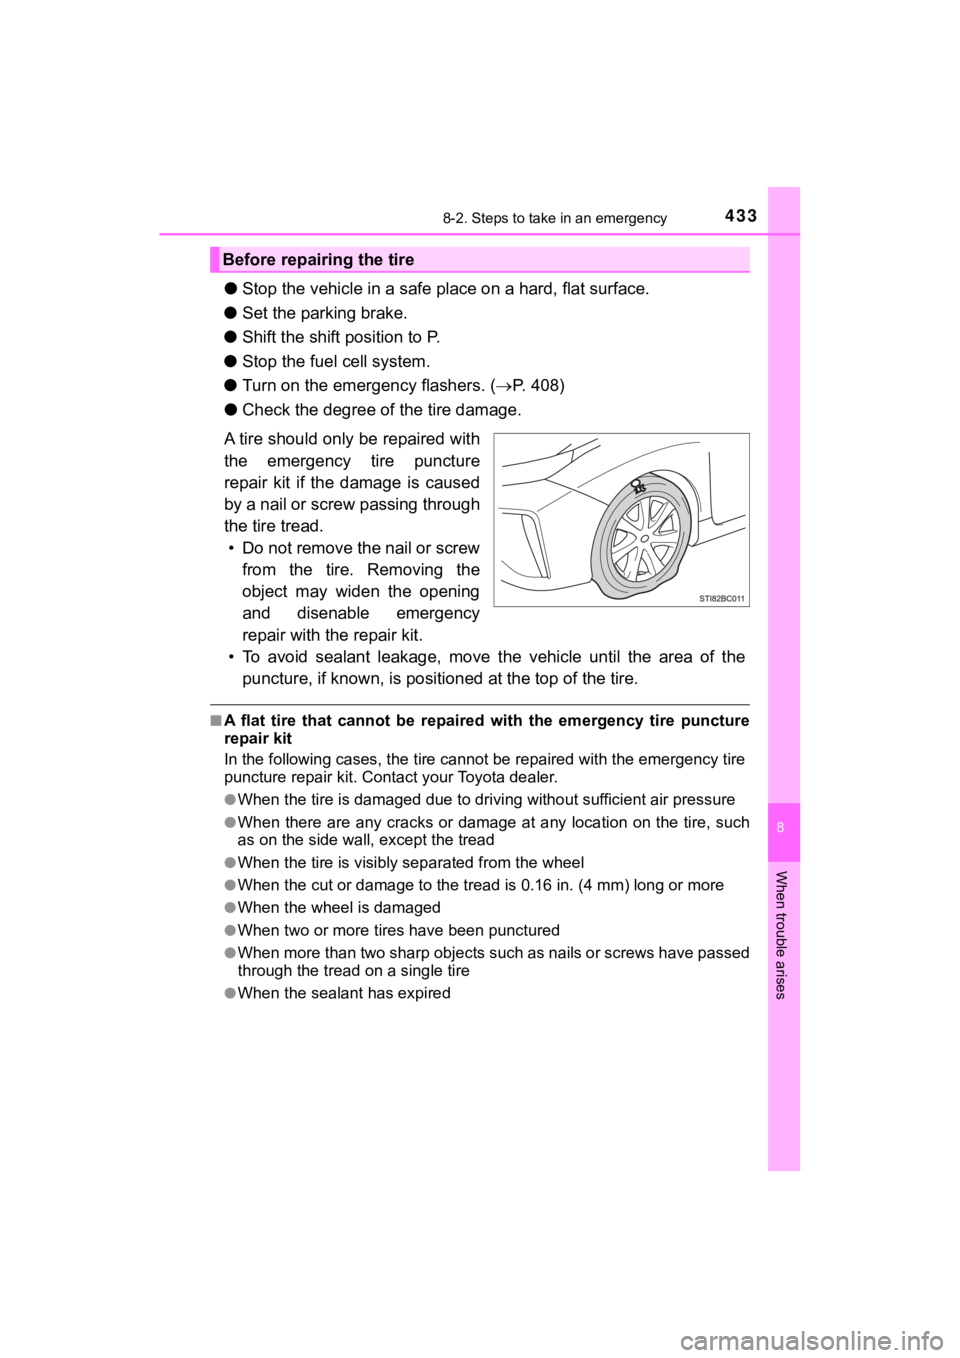
● Check the degree of the tire damage.
A tire should only be repaired with
the emergency tire puncture
repair kit if the damage is caused
by a nail or screw passing through
the tire tread. • Do not remove the nail or screw from the tire. Removing the
object may widen the opening
and disenable emergency
repair with the repair kit.
• To avoid sealant leakage, move t he vehicle until the area of the
puncture, if known, is positioned at the top of the tire.
■A flat tire that cannot be repaired with the emergency tire pun cture
repair kit
In the following cases, the tire cannot be repaired with the em ergency tire
puncture repair kit. Contact your Toyota dealer.
●When the tire is damaged due to driving without sufficient air pressure
●When there are any cracks or damage at any location on the tire , such
as on the side wall, except the tread
●When the tire is visibly separated from the wheel
●When the cut or damage to the tr ead is 0.16 in. (4 mm) long or more
●When the wheel is damaged
●When two or more tires have been punctured
●When more than two sharp objects such as nails or screws have p assed
through the tread on a single tire
●When the sealant has expired
Before repairing the tire
Page 435 of 528
4358-2. Steps to take in an emergency
MIRAI_OM_USA_OM62054U(18MY)_O
M62048U(19MY)
8
When trouble arises
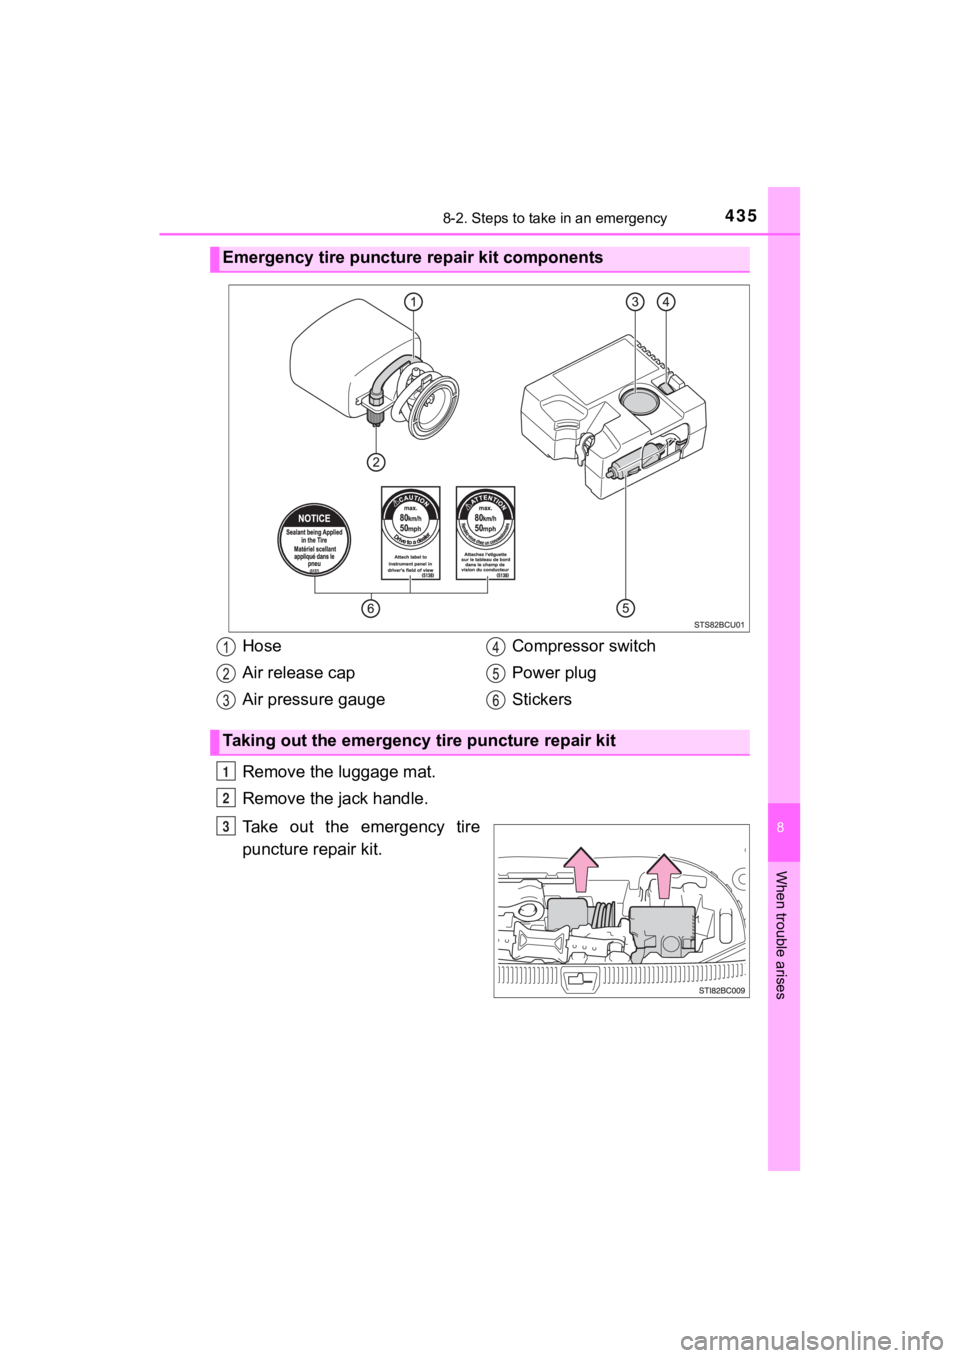
Remove the luggage mat.
Remove the jack handle.
Take out the emergency tire
puncture repair kit.
Emergency tire puncture repair kit components
Hose
Air release cap
Air pressure gaugeCompressor switch
Power plug
Stickers
Taking out the emergency t
ire puncture repair kit
1
2
3
Page 436 of 528
4368-2. Steps to take in an emergency
MIRAI_OM_USA_OM62054U(18MY)_O
M62048U(19MY)
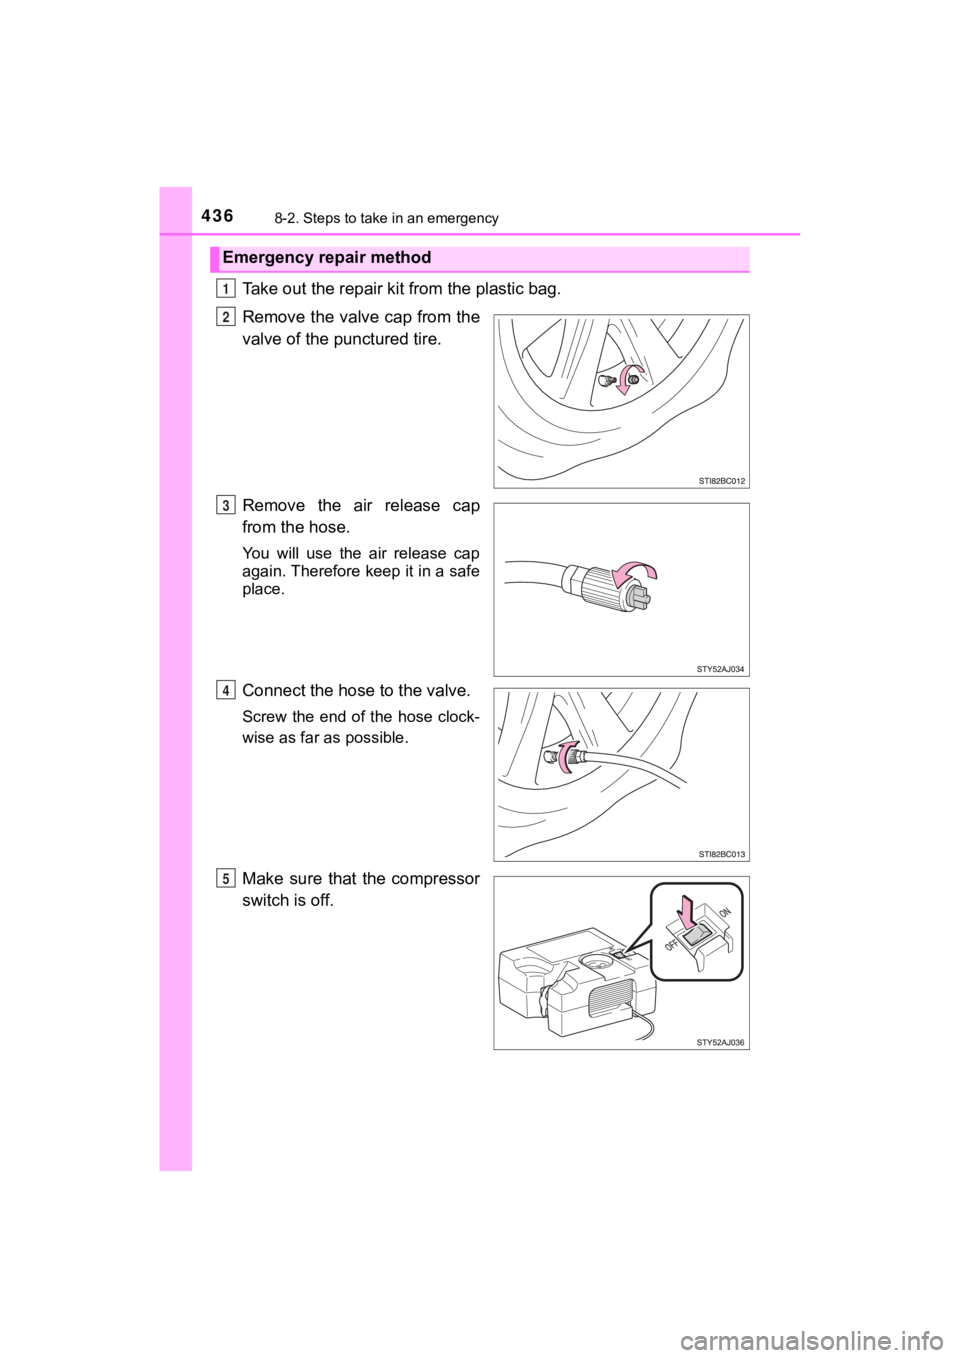
Take out the repair kit from the plastic bag.
Remove the valve cap from the
valve of the punctured tire.
Remove the air release cap
from the hose.
You will use the air release cap
again. Therefore keep it in a safe
place.
Connect the hose to the valve.
Screw the end of the hose clock-
wise as far as possible.
Make sure that the compressor
switch is off.
Emergency repair method
1
2
3
4
5
Page 437 of 528
4378-2. Steps to take in an emergency
MIRAI_OM_USA_OM62054U(18MY)_O
M62048U(19MY)
8
When trouble arises
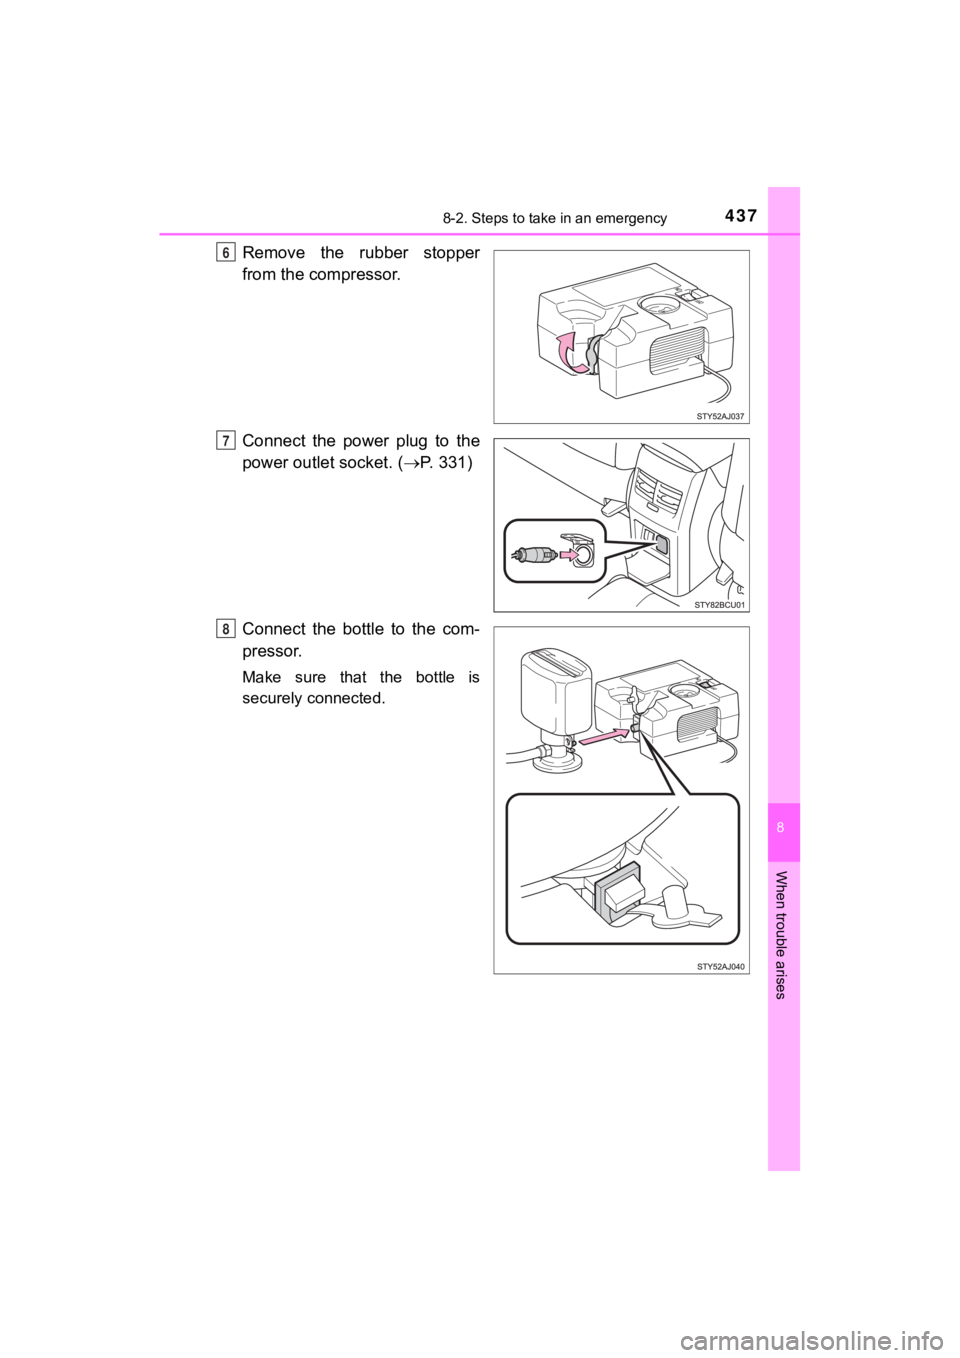
Remove the rubber stopper
from the compressor.
Connect the power plug to the
power outlet socket. (P. 331)
Connect the bottle to the com-
pressor.
Make sure that the bottle is
securely connected.
6
7
8
Page 438 of 528
4388-2. Steps to take in an emergency
MIRAI_OM_USA_OM62054U(18MY)_O
M62048U(19MY)
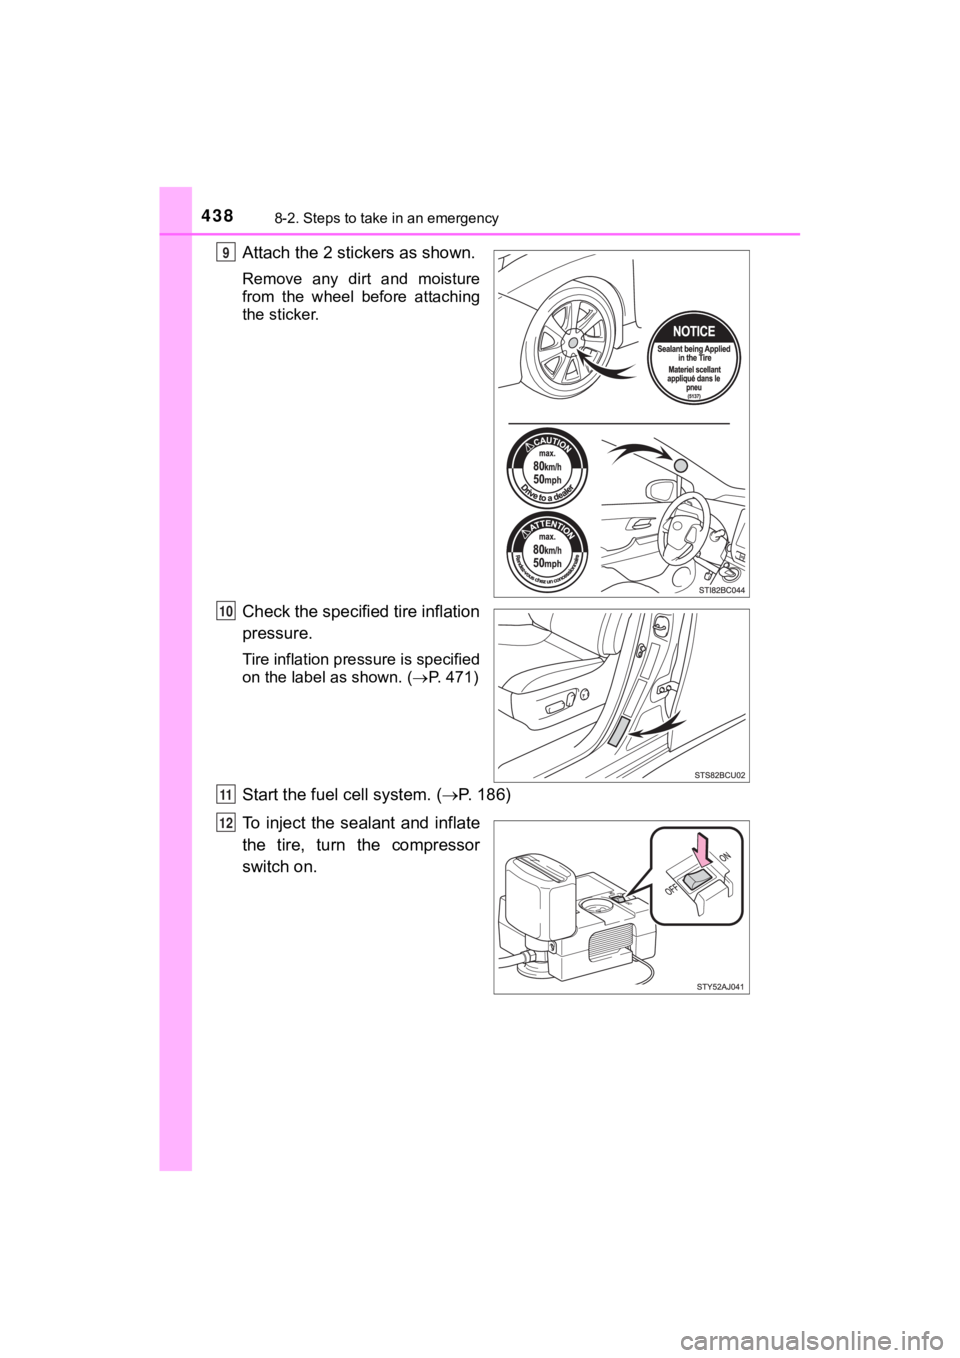
Attach the 2 stickers as shown.
Remove any dirt and moisture
from the wheel before attaching
the sticker.
Check the specified tire inflation
pressure.
Tire inflation pressure is specified
on the label as shown. (P. 4 7 1 )
Start the fuel cell system. ( P. 186)
To inject the sealant and inflate
the tire, turn the compressor
switch on.
9
10
11
12
Page 440 of 528
4408-2. Steps to take in an emergency
MIRAI_OM_USA_OM62054U(18MY)_O
M62048U(19MY)
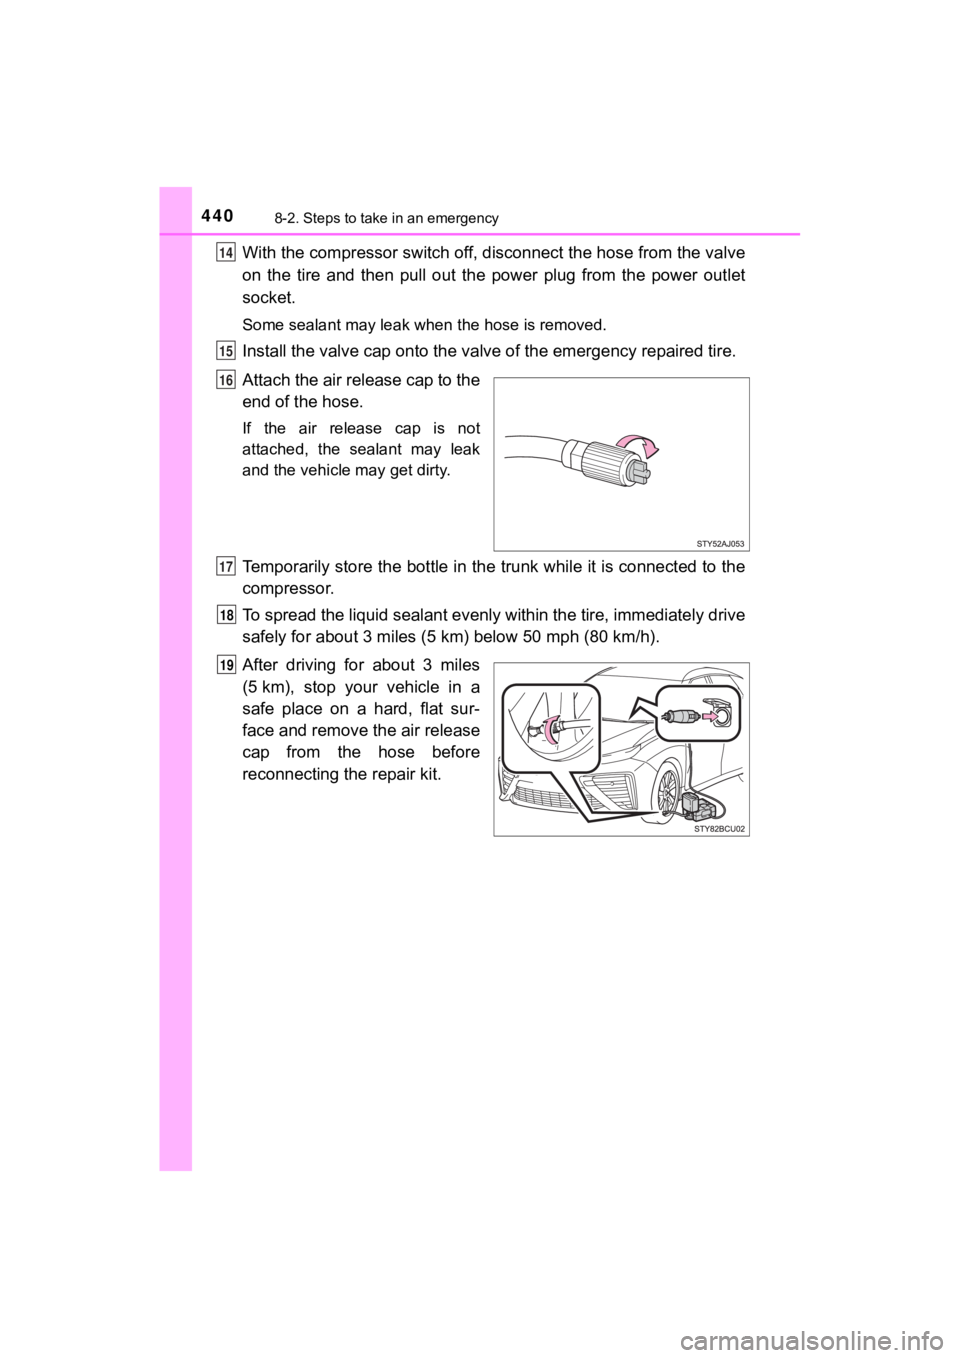
With the compressor switch off, disconnect the hose from the valve
on the tire and then pull out the power plug from the power out let
socket.
Some sealant may leak when the hose is removed.
Install the valve cap onto the valve of the emergency repaired tire.
Attach the air release cap to the
end of the hose.
If the air release cap is not
attached, the sealant may leak
and the vehicle may get dirty.
Temporarily store the bottle in t he trunk while it is connected to the
compressor.
To spread the liquid sealant evenly within the tire, immediatel y drive
safely for about 3 miles (5 km) below 50 mph (80 km/h).
After driving for about 3 miles
(5 km), stop your vehicle in a
safe place on a hard, flat sur-
face and remove the air release
cap from the hose before
reconnecting the repair kit.
14
15
16
17
18
19
Page 443 of 528
4438-2. Steps to take in an emergency
MIRAI_OM_USA_OM62054U(18MY)_O
M62048U(19MY)
8
When trouble arises
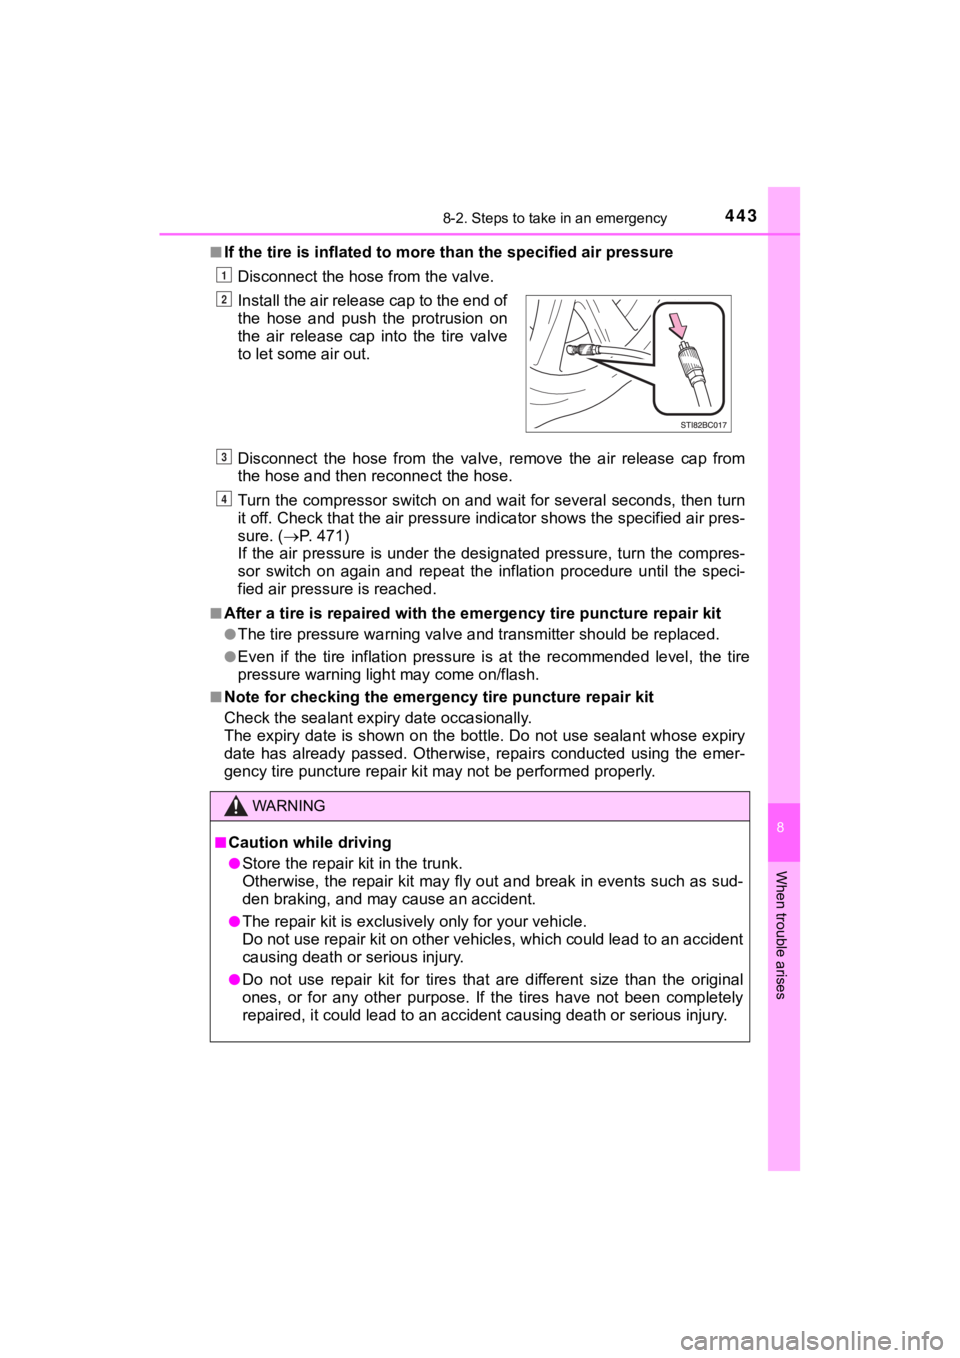
■If the tire is inflated to more than the specified air pressure
Disconnect the hose from the valve.
Disconnect the hose from the valv e, remove the air release cap from
the hose and then reconnect the hose.
Turn the compressor switch on and wait for several seconds, then turn
it off. Check that the air pressu re indicator shows the specified air pres-
sure. ( P. 471)
If the air pressure is under the designated pressure, turn the compres-
sor switch on again and repeat the inflation procedure until th e speci-
fied air pressure is reached.
■After a tire is repaired with the emergency tire puncture repai r kit
●The tire pressure warning valve and transmitter should be replaced.
●Even if the tire inflation pressure is at the recommended level, the tire
pressure warning light may come on/flash.
■Note for checking the emergency tire puncture repair kit
Check the sealant expiry date occasionally.
The expiry date is shown on the bottle. Do not use sealant whos e expiry
date has already passed. Otherwise, repairs conducted using the emer-
gency tire puncture repair kit may not be performed properly. Install the air release cap to the end of
the hose and push the protrusion on
the air release cap into the tire valve
to let some air out.
WARNING
■Caution while driving
●Store the repair kit in the trunk.
Otherwise, the repair kit may fl
y out and break in events such as sud-
den braking, and may cause an accident.
●The repair kit is exclusively only for your vehicle.
Do not use repair kit on other vehicles, which could lead to an accident
causing death or serious injury.
●Do not use repair kit for tires that are different size than th e original
ones, or for any other purpose. If the tires have not been comp letely
repaired, it could le ad to an accident causing death or serious injury.
1
2
3
4
Page 446 of 528
4468-2. Steps to take in an emergency
MIRAI_OM_USA_OM62054U(18MY)_O
M62048U(19MY)
NOTICE
■When performing an emergency repair
●A tire should only be repaired with the emergency tire puncture repair
kit if the damage is caused by a sharp object such as nail or s crew
passing through the tire tread.
Do not remove the sharp object from the tire. Removing the obje ct may
widen the opening and disenable e mergency repair with the repair kit.
●The repair kit is not waterproof. Make sure that the repair kit is not
exposed to water, such as when it is being used in the rain.
●Do not put the repair kit direct ly onto dusty ground such as sa nd at the
side of the road. If the repair kit vacuums up dust etc., a mal function
may occur.
■Handling the emergency tire puncture repair kit
●The repair kit power source should be 12 V DC suitable for vehi cle
use. Do not connect the repa ir kit to any other source.
●If organic substances such as benzene or gasoline splatters on the
repair kit, the repair kit may deteriorate. Take care not to al low organic
substances to contact it.
●Place the repair kit in a stor age to prevent it from being exposed to dirt
or water.
●Store the repair kit in the assigned place out of reach of chil dren.
●Do not disassemble or modify the repair kit. Do not subject par ts such
as the air pressure indicator to impacts. This may cause a malf unction.
■To avoid damage to the tire pressure warning valves and transmi t-
ters
When a tire is repaired with liqui d sealants, the tire pressure warning
valve and transmitter may not operate properly. If a liquid sea lant is
used, contact your Toyota dealer as soon as possible. After use of liquid
sealant, make sure to replace the tire pressure warning valve a nd trans-
mitter when repairing or replacing the tire. ( P. 379)