TOYOTA PRIUS PLUG-IN HYBRID 2014 1.G Navigation Manual
Manufacturer: TOYOTA, Model Year: 2014, Model line: PRIUS PLUG-IN HYBRID, Model: TOYOTA PRIUS PLUG-IN HYBRID 2014 1.GPages: 356, PDF Size: 24.98 MB
Page 41 of 356
41
1. BASIC INFORMATION BEFORE OPERATION
2
BASIC FUNCTION
PRIUS_Navi_OM47858U_(U)
13.08.06 10:30
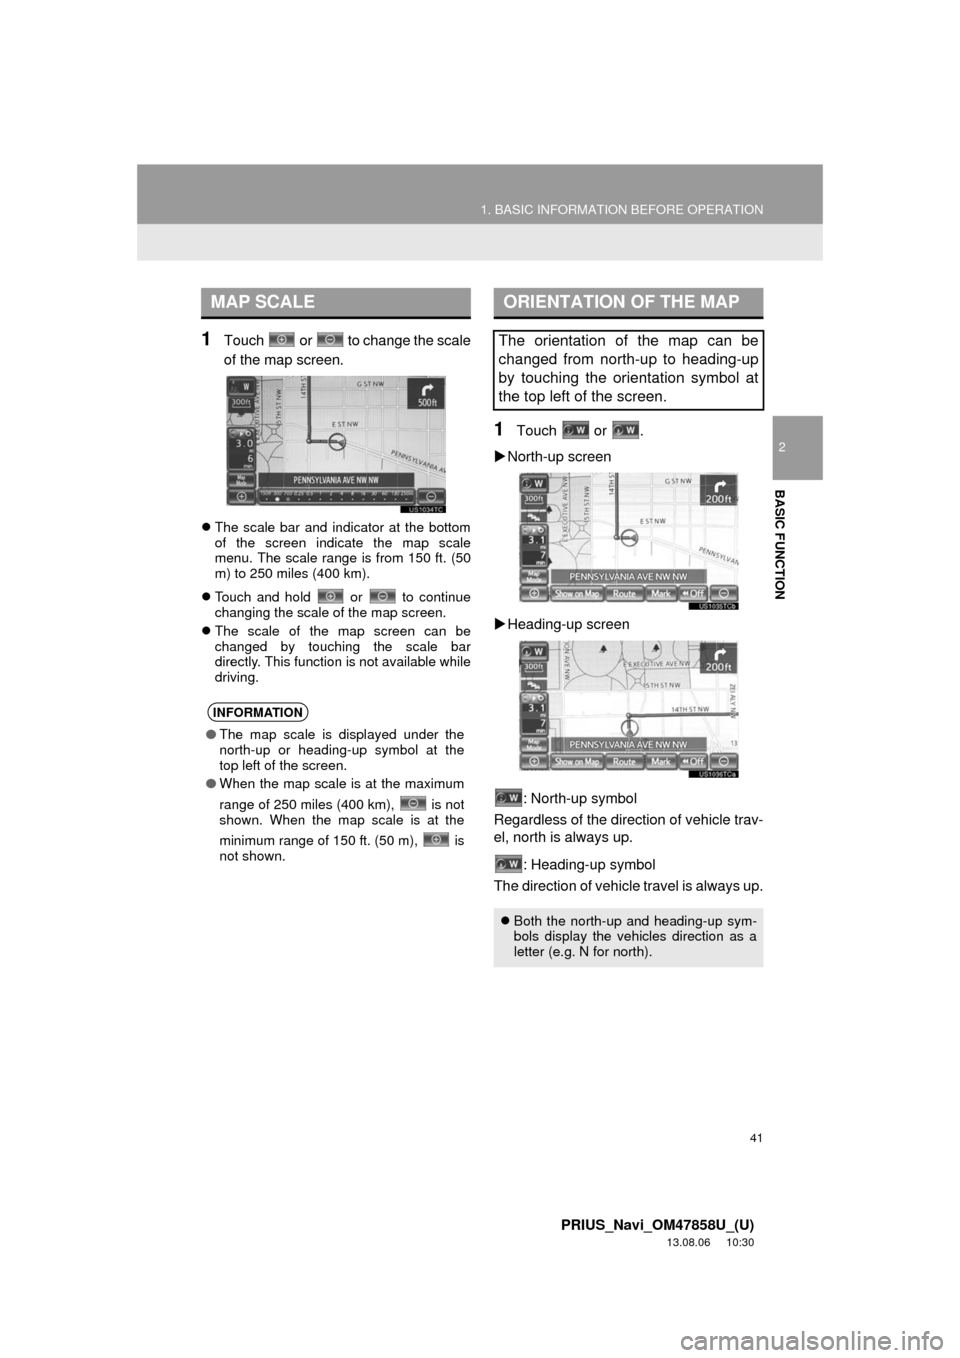
1Touch or to change the scale
of the map screen.
The scale bar and indicator at the bottom
of the screen indicate the map scale
menu. The scale range is from 150 ft. (50
m) to 250 miles (400 km).
Touch and hold or to continue
changing the scale of the map screen.
The scale of the map screen can be
changed by touching the scale bar
directly. This function is not available while
driving.
1Touch or .
North-up screen
Heading-up screen
: North-up symbol
Regardless of the direction of vehicle trav-
el, north is always up.
: Heading-up symbol
The direction of vehicle travel is always up.
MAP SCALE
INFORMATION
●The map scale is displayed under the
north-up or heading-up symbol at the
top left of the screen.
●When the map scale is at the maximum
range of 250 miles (400 km), is not
shown. When the map scale is at the
minimum range of 150 ft. (50 m), is
not shown.
ORIENTATION OF THE MAP
The orientation of the map can be
changed from north-up to heading-up
by touching the orientation symbol at
the top left of the screen.
Both the north-up and heading-up sym-
bols display the vehicles direction as a
letter (e.g. N for north).
Page 42 of 356
42
1. BASIC INFORMATION BEFORE OPERATION
PRIUS_Navi_OM47858U_(U)
13.08.06 10:30
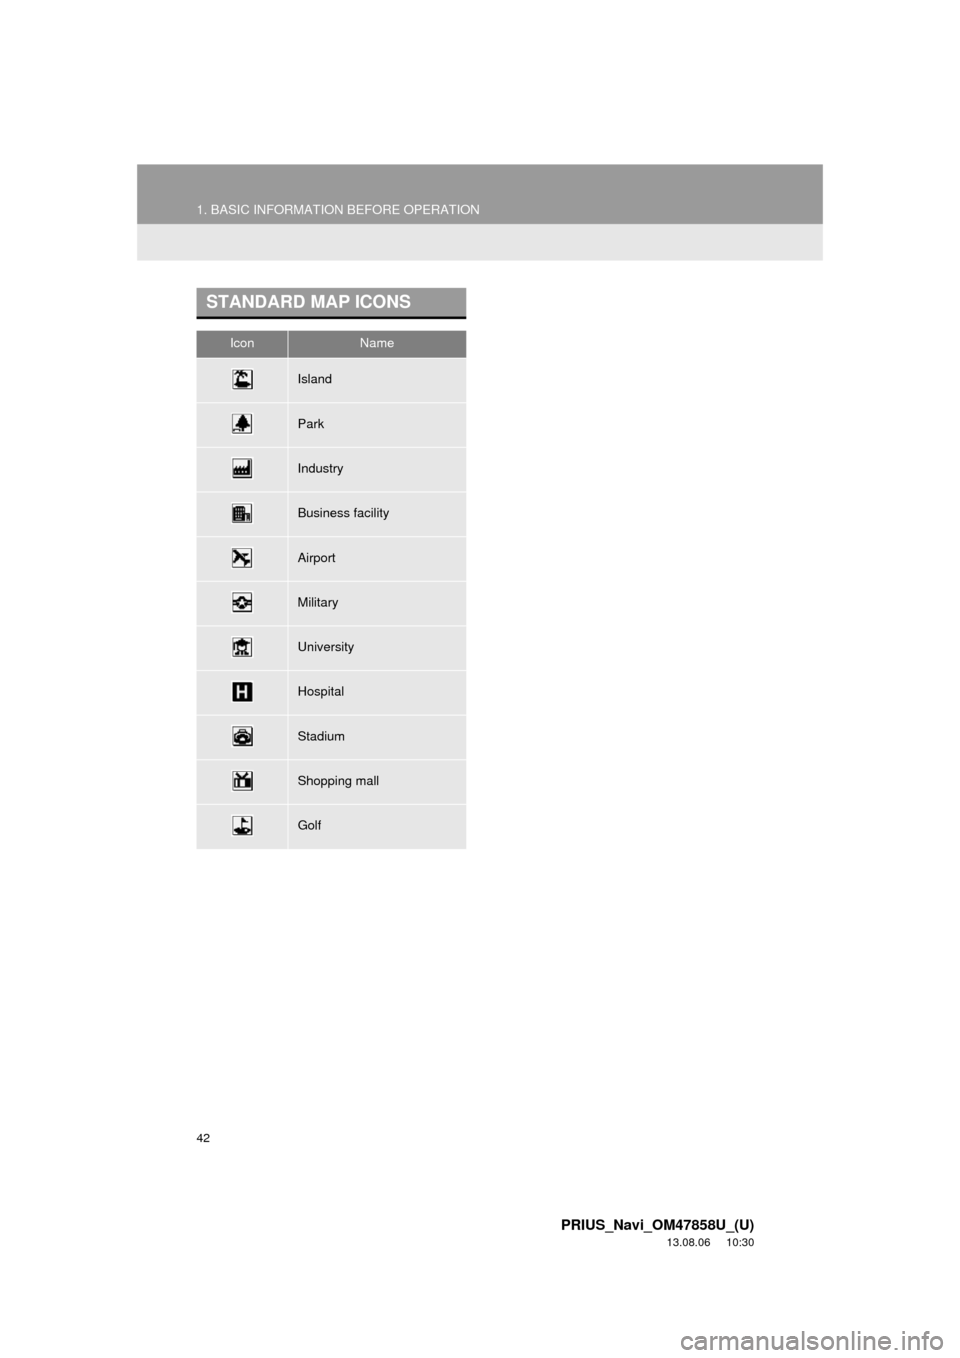
STANDARD MAP ICONS
IconName
Island
Park
Industry
Business facility
Airport
Military
University
Hospital
Stadium
Shopping mall
Golf
Page 43 of 356
43
2
BASIC FUNCTION
PRIUS_Navi_OM47858U_(U)
13.08.06 10:30
2. SETUP
1. GENERAL SETTINGS
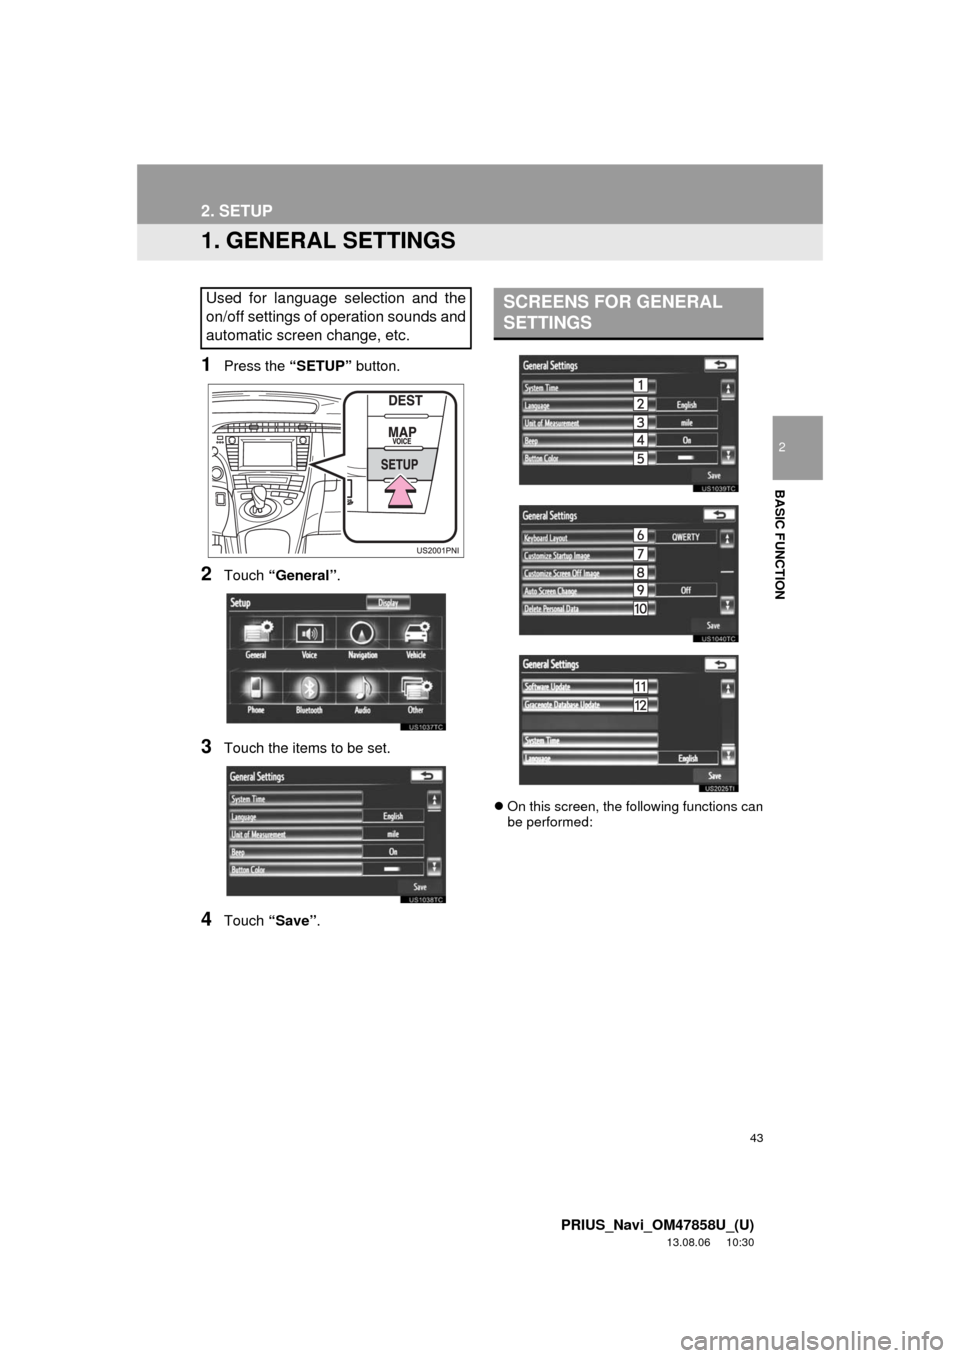
1Press the “SETUP” button.
2Touch “General”.
3Touch the items to be set.
4Touch “Save”.
On this screen, the following functions can
be performed:
Used for language selection and the
on/off settings of operation sounds and
automatic screen change, etc.SCREENS FOR GENERAL
SETTINGS
Page 44 of 356
44
2. SETUP
PRIUS_Navi_OM47858U_(U)
13.08.06 10:30
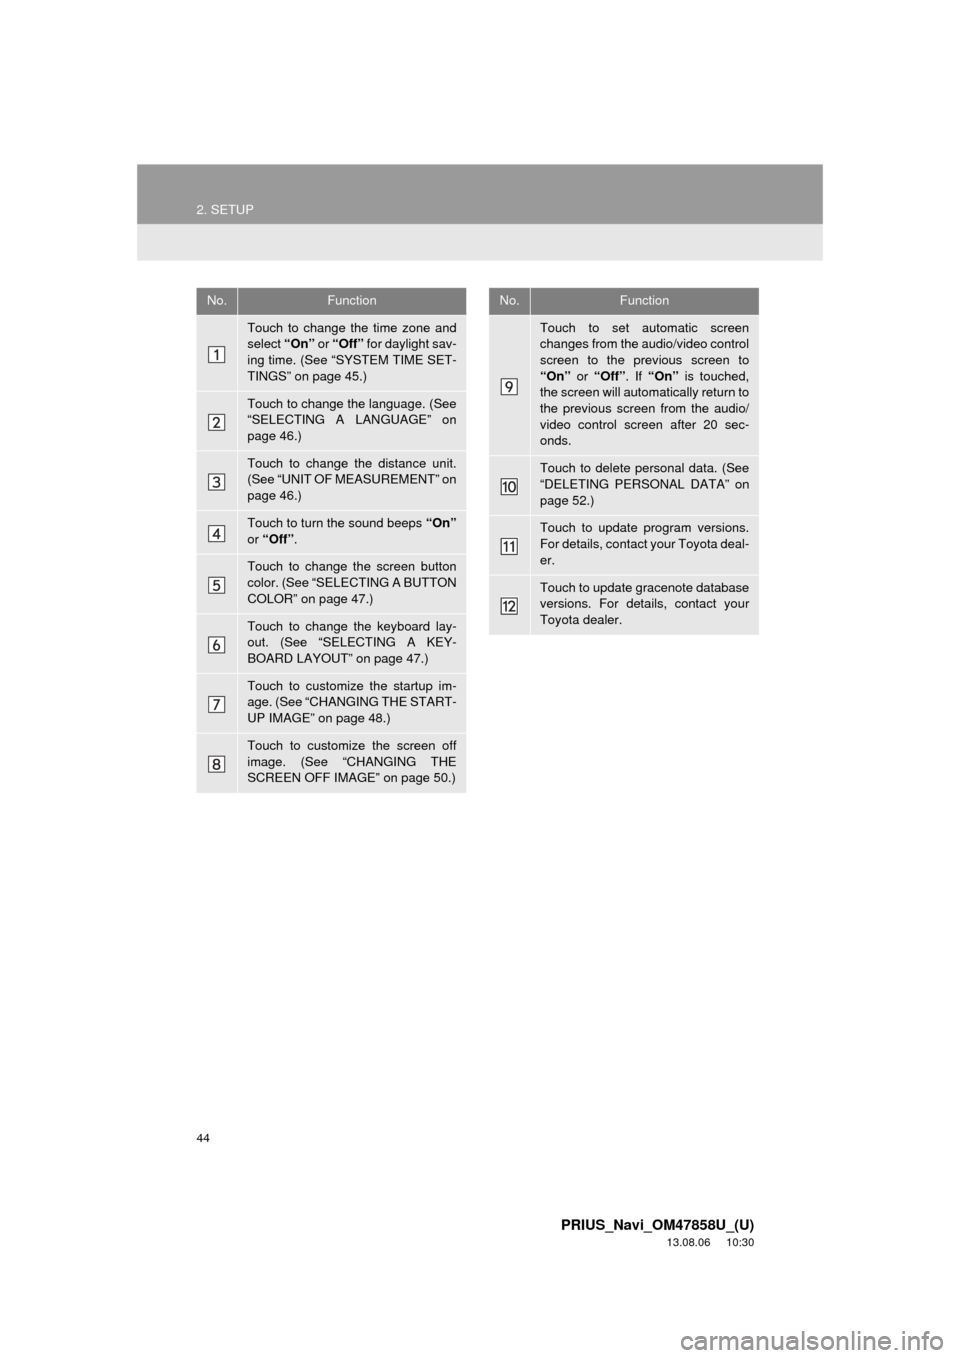
No.Function
Touch to change the time zone and
select “On” or “Off” for daylight sav-
ing time. (See “SYSTEM TIME SET-
TINGS” on page 45.)
Touch to change the language. (See
“SELECTING A LANGUAGE” on
page 46.)
Touch to change the distance unit.
(See “UNIT OF MEASUREMENT” on
page 46.)
Touch to turn the sound beeps “On”
or “Off”.
Touch to change the screen button
color. (See “SELECTING A BUTTON
COLOR” on page 47.)
Touch to change the keyboard lay-
out. (See “SELECTING A KEY-
BOARD LAYOUT” on page 47.)
Touch to customize the startup im-
age. (See “CHANGING THE START-
UP IMAGE” on page 48.)
Touch to customize the screen off
image. (See “CHANGING THE
SCREEN OFF IMAGE” on page 50.)
Touch to set automatic screen
changes from the audio/video control
screen to the previous screen to
“On” or “Off”. If “On” is touched,
the screen will automatically return to
the previous screen from the audio/
video control screen after 20 sec-
onds.
Touch to delete personal data. (See
“DELETING PERSONAL DATA” on
page 52.)
Touch to update program versions.
For details, contact your Toyota deal-
er.
Touch to update gracenote database
versions. For details, contact your
Toyota dealer.
No.Function
Page 45 of 356
45
2. SETUP
2
BASIC FUNCTION
PRIUS_Navi_OM47858U_(U)
13.08.06 10:30
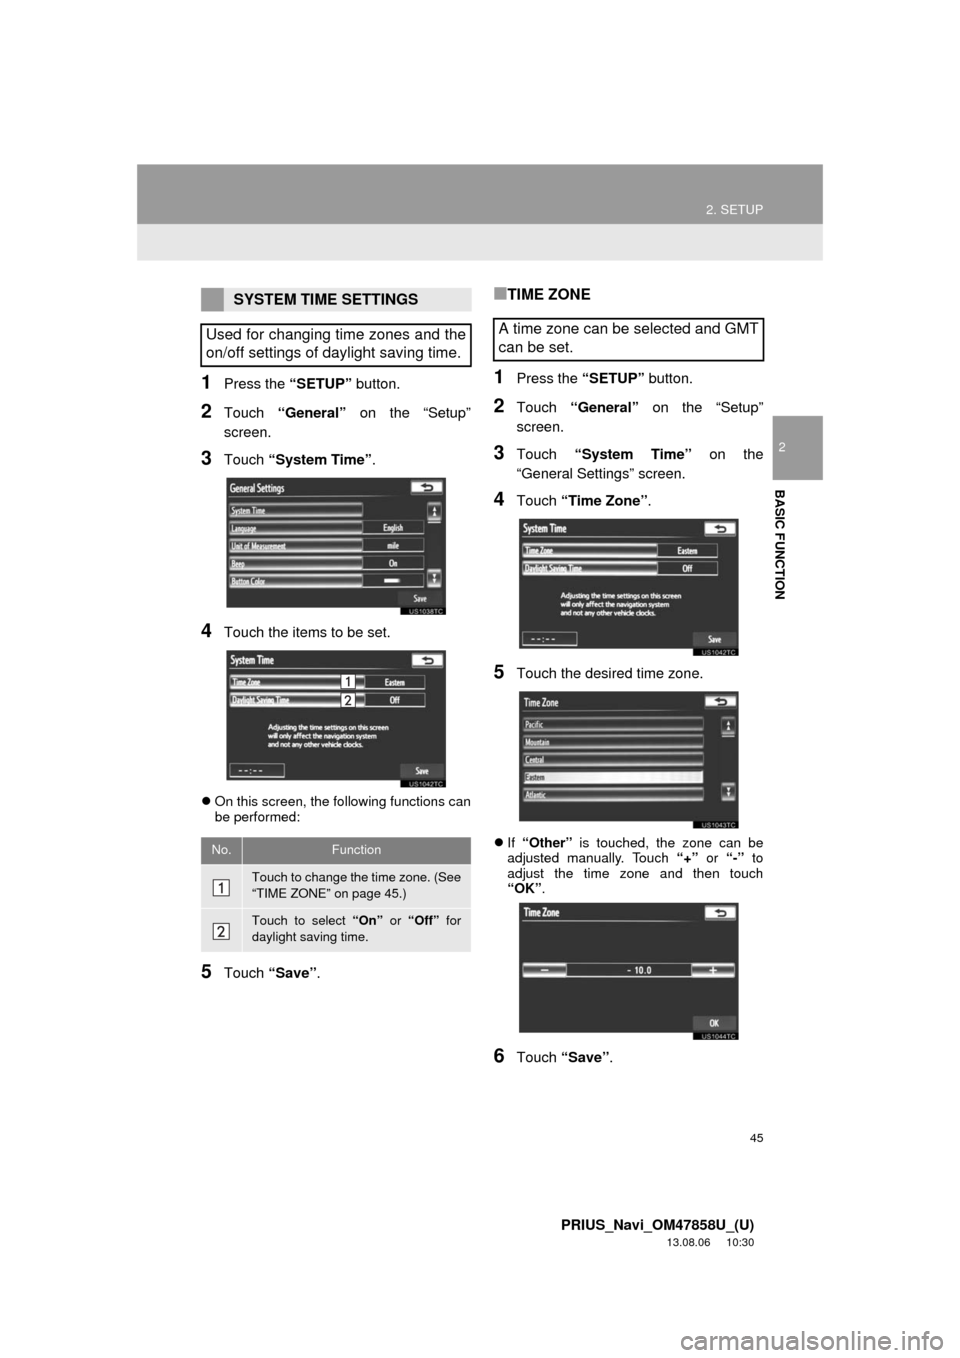
1Press the “SETUP” button.
2Touch “General” on the “Setup”
screen.
3Touch “System Time”.
4Touch the items to be set.
On this screen, the following functions can
be performed:
5Touch “Save”.
■TIME ZONE
1Press the “SETUP” button.
2Touch “General” on the “Setup”
screen.
3Touch “System Time” on the
“General Settings” screen.
4Touch “Time Zone”.
5Touch the desired time zone.
If “Other” is touched, the zone can be
adjusted manually. Touch “+” or “-” to
adjust the time zone and then touch
“OK”.
6Touch “Save”.
SYSTEM TIME SETTINGS
Used for changing time zones and the
on/off settings of daylight saving time.
No.Function
Touch to change the time zone. (See
“TIME ZONE” on page 45.)
Touch to select “On” or “Off” for
daylight saving time.
A time zone can be selected and GMT
can be set.
Page 46 of 356
46
2. SETUP
PRIUS_Navi_OM47858U_(U)
13.08.06 10:30
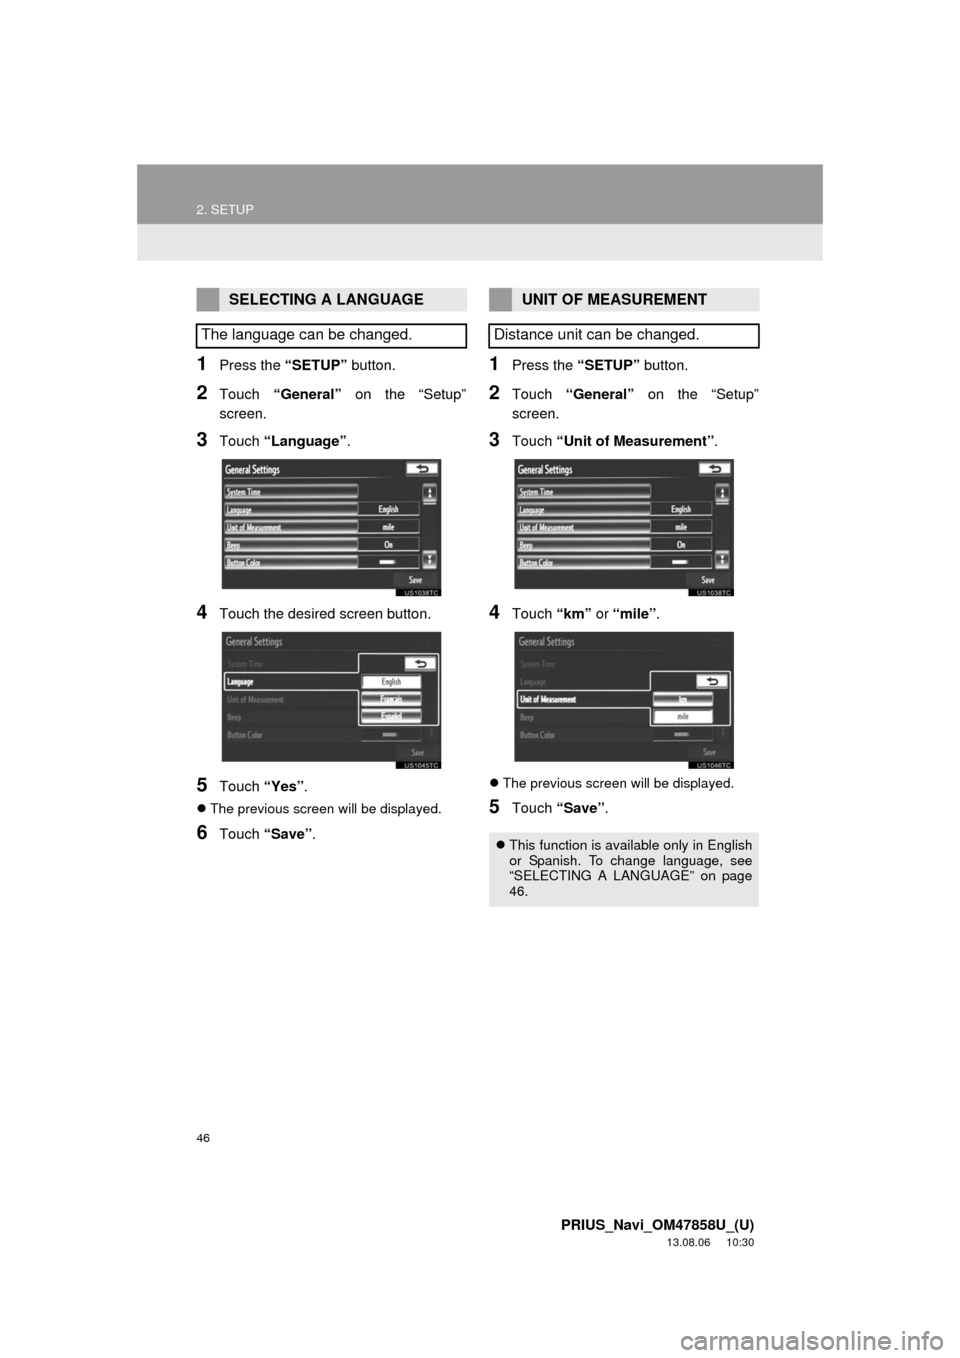
1Press the “SETUP” button.
2Touch “General” on the “Setup”
screen.
3Touch “Language”.
4Touch the desired screen button.
5Touch “Yes”.
The previous screen will be displayed.
6Touch “Save”.
1Press the “SETUP” button.
2Touch “General” on the “Setup”
screen.
3Touch “Unit of Measurement”.
4Touch “km” or “mile”.
The previous screen will be displayed.
5Touch “Save”.
SELECTING A LANGUAGE
The language can be changed.UNIT OF MEASUREMENT
Distance unit can be changed.
This function is available only in English
or Spanish. To change language, see
“SELECTING A LANGUAGE” on page
46.
Page 47 of 356
47
2. SETUP
2
BASIC FUNCTION
PRIUS_Navi_OM47858U_(U)
13.08.06 10:30
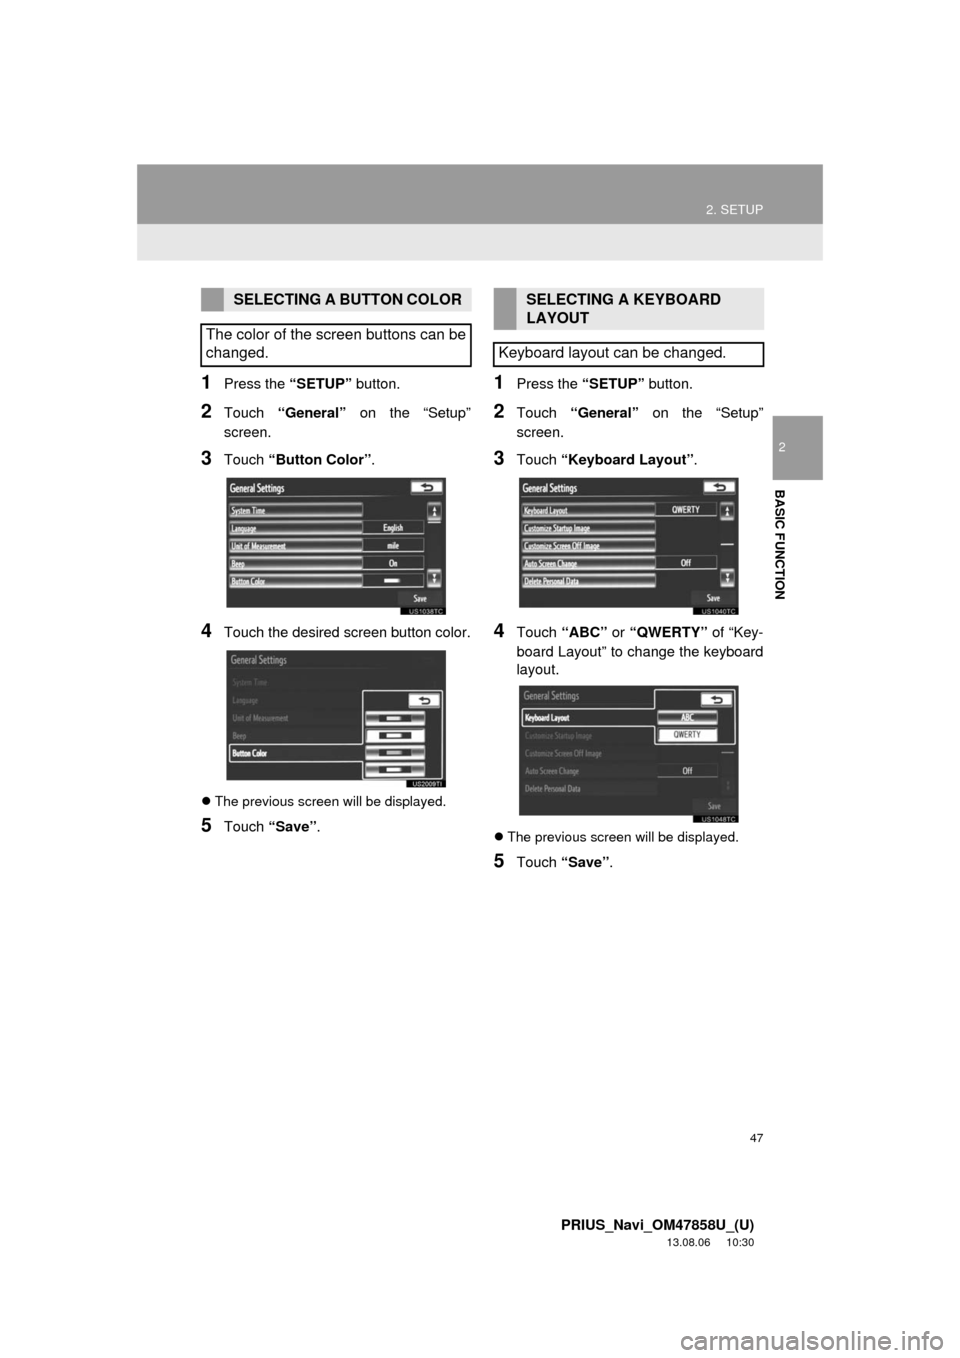
1Press the “SETUP” button.
2Touch “General” on the “Setup”
screen.
3Touch “Button Color”.
4Touch the desired screen button color.
The previous screen will be displayed.
5Touch “Save”.
1Press the “SETUP” button.
2Touch “General” on the “Setup”
screen.
3Touch “Keyboard Layout”.
4Touch “ABC” or “QWERTY” of “Key-
board Layout” to change the keyboard
layout.
The previous screen will be displayed.
5Touch “Save”.
SELECTING A BUTTON COLOR
The color of the screen buttons can be
changed.SELECTING A KEYBOARD
LAYOUT
Keyboard layout can be changed.
Page 48 of 356
48
2. SETUP
PRIUS_Navi_OM47858U_(U)
13.08.06 10:30
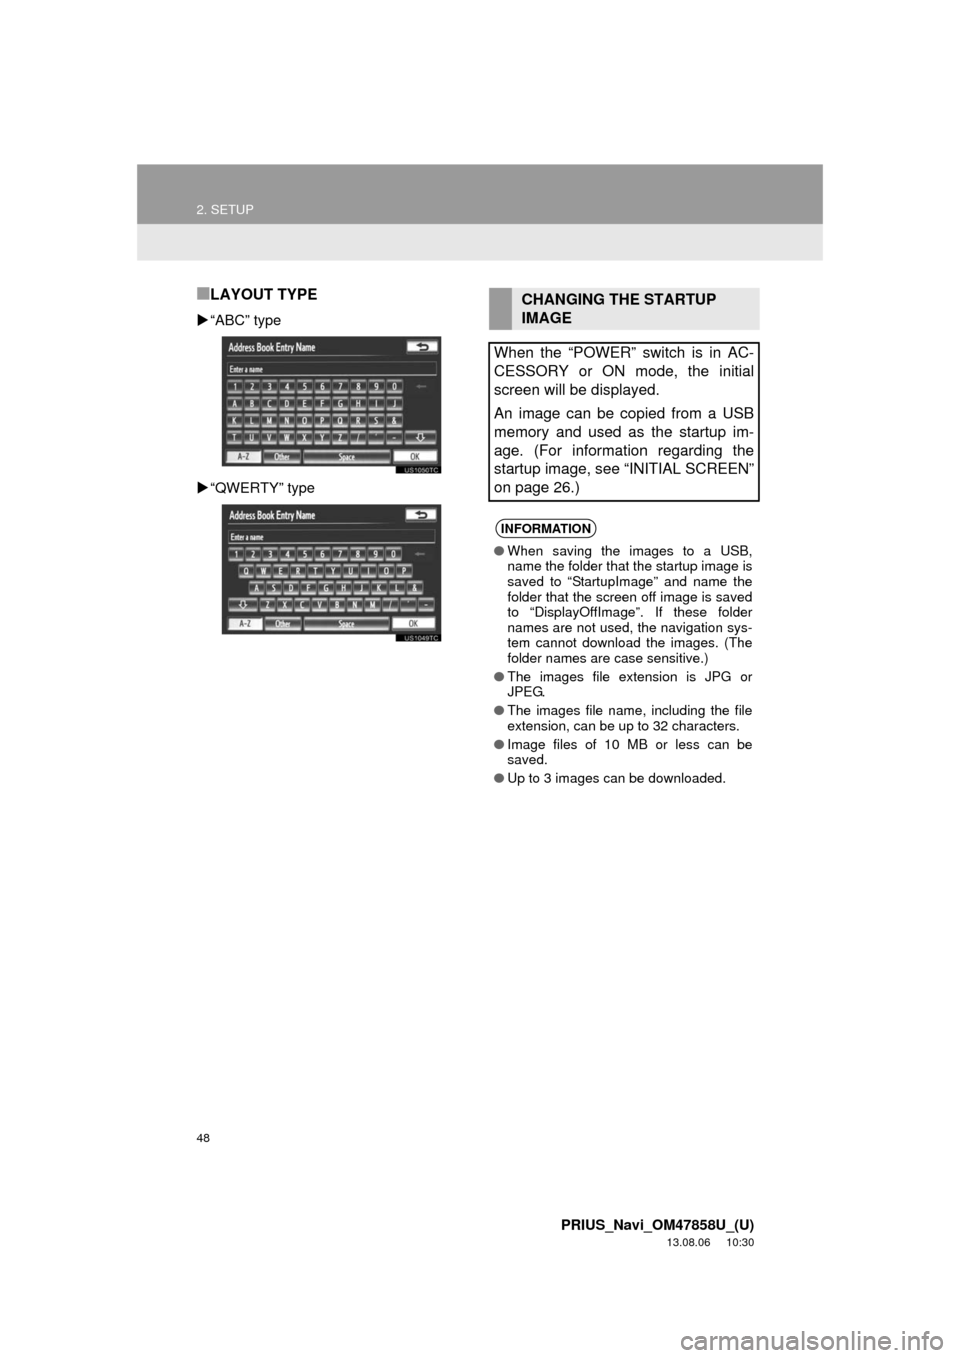
■LAYOUT TYPE
“ABC” type
“QWERTY” type
CHANGING THE STARTUP
IMAGE
When the “POWER” switch is in AC-
CESSORY or ON mode, the initial
screen will be displayed.
An image can be copied from a USB
memory and used as the startup im-
age. (For information regarding the
startup image, see “INITIAL SCREEN”
on page 26.)
INFORMATION
●When saving the images to a USB,
name the folder that the startup image is
saved to “StartupImage” and name the
folder that the screen off image is saved
to “DisplayOffImage”. If these folder
names are not used, the navigation sys-
tem cannot download the images. (The
folder names are case sensitive.)
●The images file extension is JPG or
JPEG.
●The images file name, including the file
extension, can be up to 32 characters.
●Image files of 10 MB or less can be
saved.
●Up to 3 images can be downloaded.
Page 49 of 356
49
2. SETUP
2
BASIC FUNCTION
PRIUS_Navi_OM47858U_(U)
13.08.06 10:30
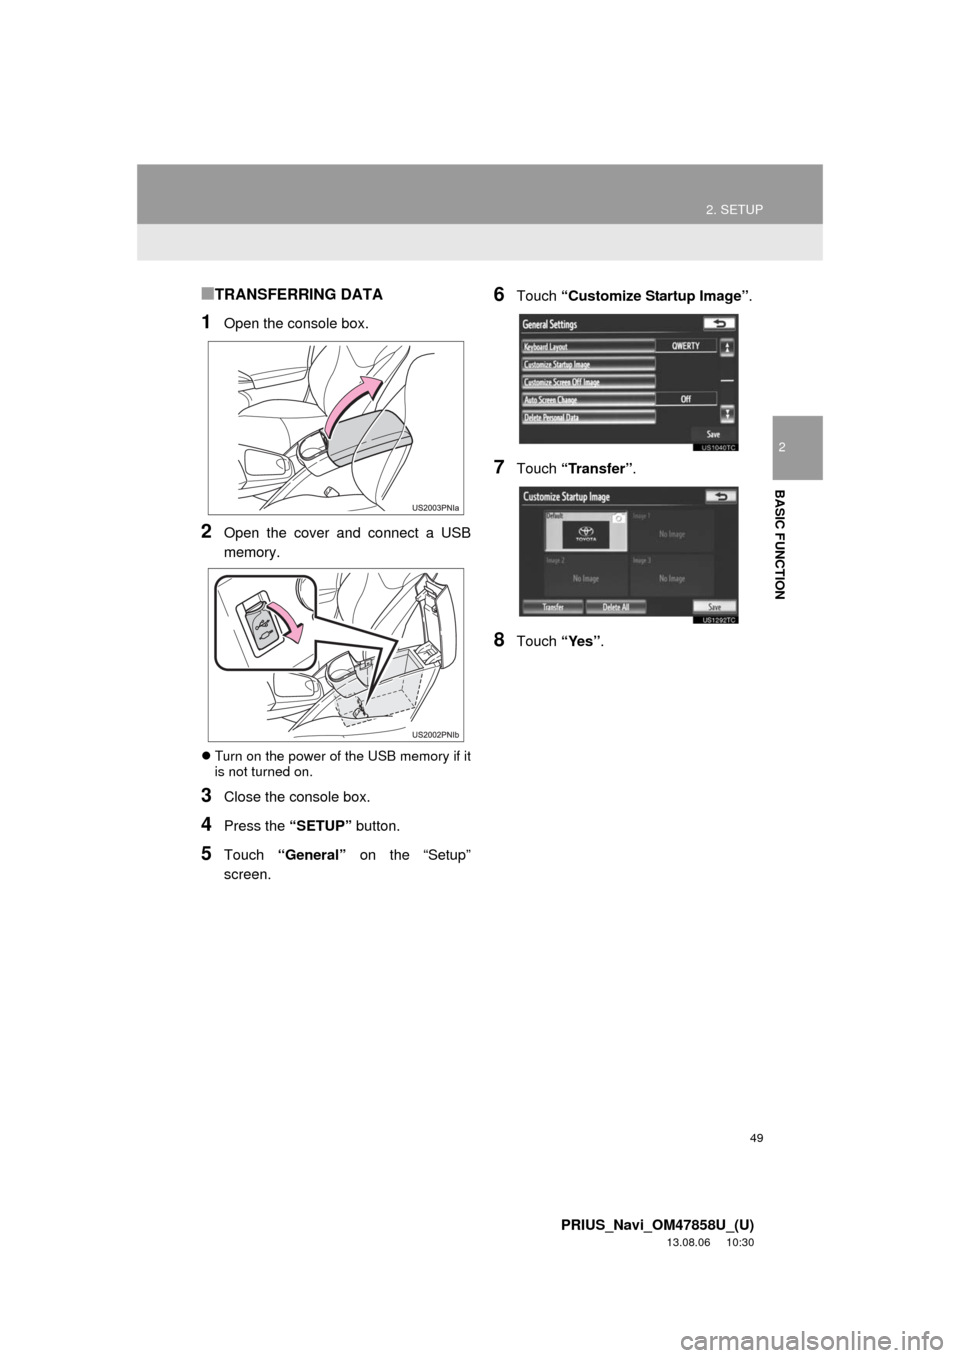
■TRANSFERRING DATA
1Open the console box.
2Open the cover and connect a USB
memory.
Turn on the power of the USB memory if it
is not turned on.
3Close the console box.
4Press the “SETUP” button.
5Touch “General” on the “Setup”
screen.
6Touch “Customize Startup Image”.
7Touch “Transfer”.
8Touch “Yes”.
Page 50 of 356
50
2. SETUP
PRIUS_Navi_OM47858U_(U)
13.08.06 10:30
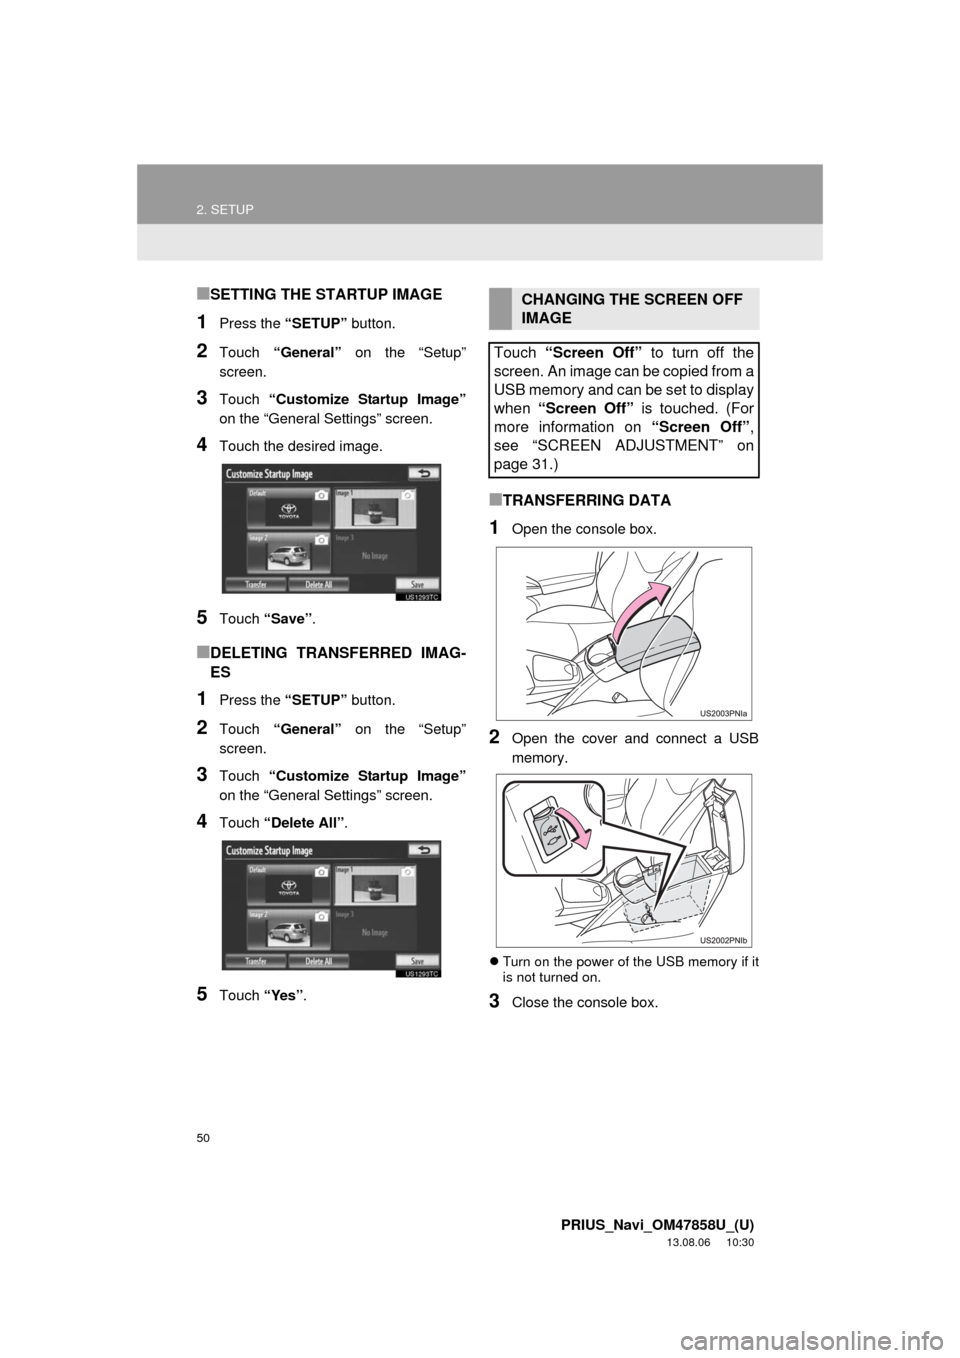
■SETTING THE STARTUP IMAGE
1Press the “SETUP” button.
2Touch “General” on the “Setup”
screen.
3Touch “Customize Startup Image”
on the “General Settings” screen.
4Touch the desired image.
5Touch “Save”.
■DELETING TRANSFERRED IMAG-
ES
1Press the “SETUP” button.
2Touch “General” on the “Setup”
screen.
3Touch “Customize Startup Image”
on the “General Settings” screen.
4Touch “Delete All”.
5Touch “Yes”.
■TRANSFERRING DATA
1Open the console box.
2Open the cover and connect a USB
memory.
Turn on the power of the USB memory if it
is not turned on.
3Close the console box.
CHANGING THE SCREEN OFF
IMAGE
Touch “Screen Off” to turn off the
screen. An image can be copied from a
USB memory and can be set to display
when “Screen Off” is touched. (For
more information on “Screen Off”,
see “SCREEN ADJUSTMENT” on
page 31.)