TOYOTA PRIUS PLUG-IN HYBRID 2018 Owners Manual
Manufacturer: TOYOTA, Model Year: 2018, Model line: PRIUS PLUG-IN HYBRID, Model: TOYOTA PRIUS PLUG-IN HYBRID 2018Pages: 772, PDF Size: 107.88 MB
Page 171 of 772
171
2
2-2. Charging
Plug-in hybrid system
PRIUS PHV_OM_OM47C99E_(EE)
Using the charging timer function
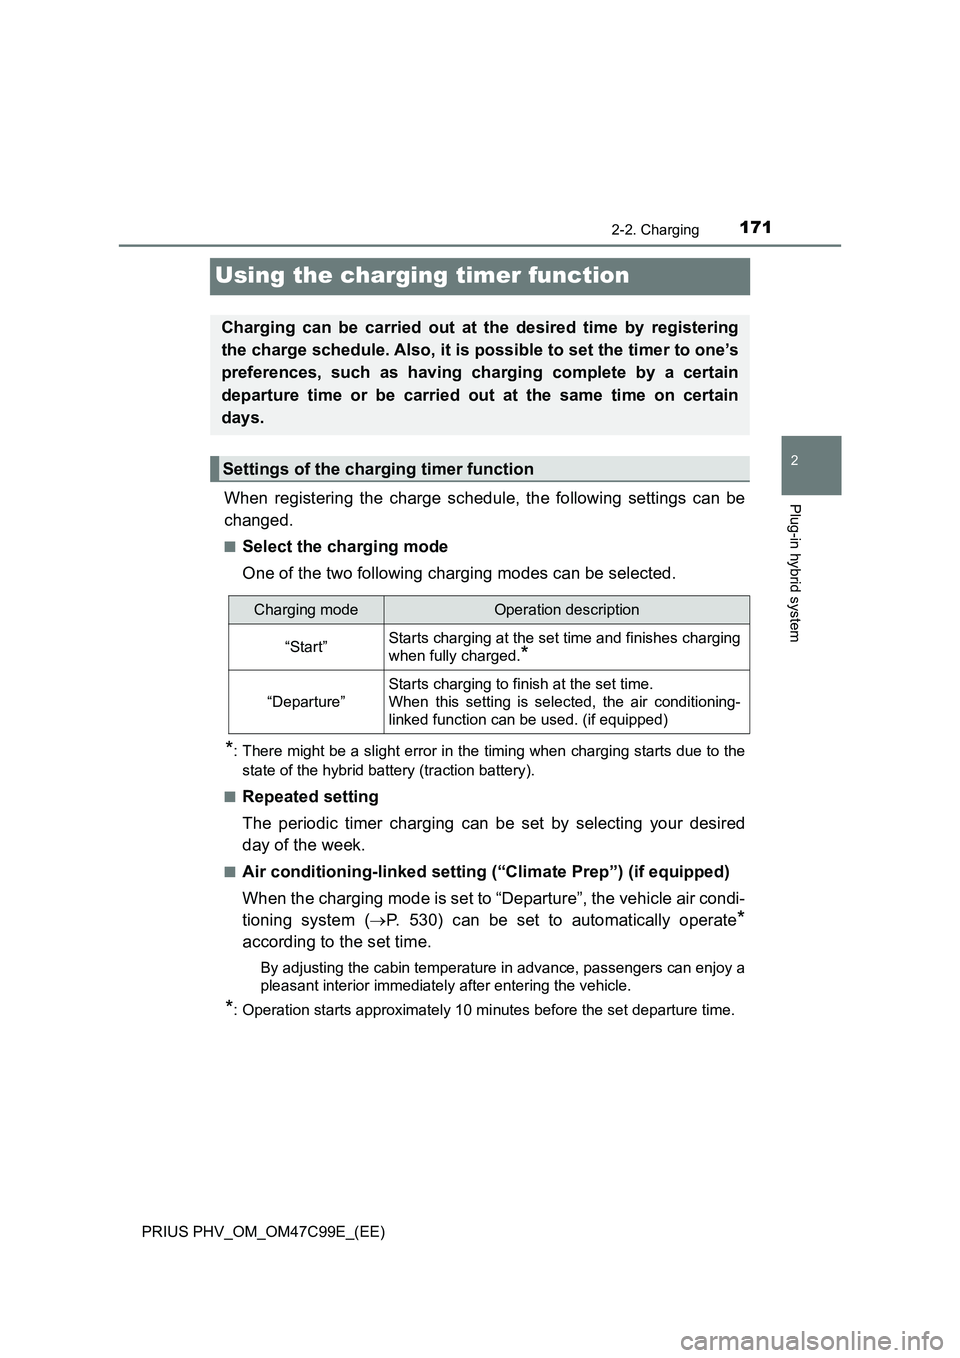
When registering the charge schedule, the following settings can be
changed.
■Select the charging mode
One of the two following charging modes can be selected.
*: There might be a slight error in the timing when charging starts due to the
state of the hybrid battery (traction battery).
■
Repeated setting
The periodic timer charging can be set by selecting your desired
day of the week.
■Air conditioning-linked setting (“Climate Prep”) (if equipped)
When the charging mode is set to “Departure”, the vehicle air condi-
tioning system (P. 530) can be set to automatically operate
*
according to the set time.
By adjusting the cabin temperature in advance, passengers can enjoy a
pleasant interior immediately after entering the vehicle.
*: Operation starts approximately 10 minutes before the set departure time.
Charging can be carried out at the desired time by registering
the charge schedule. Also, it is possible to set the timer to one’s
preferences, such as having charging complete by a certain
departure time or be carried out at the same time on certain
days.
Settings of the charging timer function
Charging modeOperation description
“Start”Starts charging at the set time and finishes charging
when fully charged.
*
“Departure”
Starts charging to finish at the set time.
When this setting is selected, the air conditioning-
linked function can be used. (if equipped)
Page 172 of 772
1722-2. Charging
PRIUS PHV_OM_OM47C99E_(EE)■
Turning “Charge Now” on and off
If even one charge schedule is registered, charging does not start
until the set time, even if the charging cable is connected to the
vehicle. To start charging immediately without changing the charge
schedule setting, turn “Charge Now” on to temporarily cancel the
charge schedule and enable charging immediate after connecting
the charging cable.
■Changing “Next Charging Event”*1
It is possible to temporarily set the time of the next scheduled
charge without changing the registered repeated setting.
*2
*1: The “Next Charging Event” refers to the closest charge schedule from the
current time among the registered charge schedules. Timer charging is
performed based on the “Next Charging Event”.
*2: When “Next Charging Event” is changed, the current charge schedule will
be temporarily ignored and charging will not be carried out until the time
specified by “Next Charging Event”. (For example, when “Next Charging
Event” is set for 2 days later, even if items are registered on the charge
schedule, charging will not be carried out until the time specified by “Next
Charging Event”.)
■Timer settings
A maximum of 15 charge schedules can be registered.
■To make sure that the charging timer function operates correctly
Check the following items.
●Adjust the clock to the correct time (P. 204)
●The calendar is set to the correct date (P. 205)
●Check that the power switch is turned off
●After registering the charge schedule, connect the charging cable
The charging start time is determined based on the charge schedule at the
time that the charging cable was connected.
●After connecting the charging cable, check that the charging indicator
flashes (P. 125)
●Do not use a socket that has a power cut off function (including a timer func-
tion)
Use a socket that constantly supplies electricity. For sockets where the
power is cut off due to a timer function, etc., charging may not be carried
out according to plan if the power is cut off during the set time.
Page 173 of 772
1732-2. Charging
2
Plug-in hybrid system
PRIUS PHV_OM_OM47C99E_(EE)■When the charging cable remains connected to the vehicle
Even if multiple consecutive charge schedules are registered, the next
charge will not be carried out according to the timer until the charging cable is
removed and reconnected after charging completes. Also, when the hybrid
battery (traction battery) is fully charged, charging according to the timer will
not be carried out.
■“Climate Prep” (if equipped)
●When the air conditioning-linked setting is turned on, the air conditioning
operates until the set departure time. Therefore, the air conditioning will con-
sume electricity and charging may not complete by the set departure time.
●If the hybrid battery (traction battery) is fully charged, charging will not be
carried out, even if the charge schedule is set. However, if “Climate Prep” is
turned on, the air conditioning will operate only once when it nears the time
set in “Departure”. If this occurs, the air conditioning will consume electricity
and the remaining charge of the hybrid battery (traction battery) when
departing may be decreased.
■When timer settings are ignored
When the following operations are performed while the charging timer is on
standby, timer charging is temporarily canceled and charging is started imme-
diately.
●When the Remote Air Conditioning System (P. 542) is operated
●When turning “Charge Now” on (P. 179)
●When an operation that temporarily cancel charging using the timer
(P. 163)
■Effects of outside temperature
When the charging mode is set to “Departure”, timer settings may be ignored
due to the outside temperature and charging may start immediately.
■“Traction Battery Cooler” (if equipped) (P. 150)
When charging is carried out using the timer, the hybrid battery (traction bat-
tery) cooling function may operate according to the temperature of the hybrid
battery (traction battery).
●When the charging mode is set to “Start”, cooling starts at the set charging
start time.
●When the charging mode is set to “Departure”, cooling starts approximately
30 minutes before the charging start time. However, if there is no time to fin-
ish charging by the timer setting, the hybrid battery (traction battery) cooling
time may be shortened and “Traction Battery Cooler” may not operate.
Page 174 of 772
1742-2. Charging
PRIUS PHV_OM_OM47C99E_(EE)
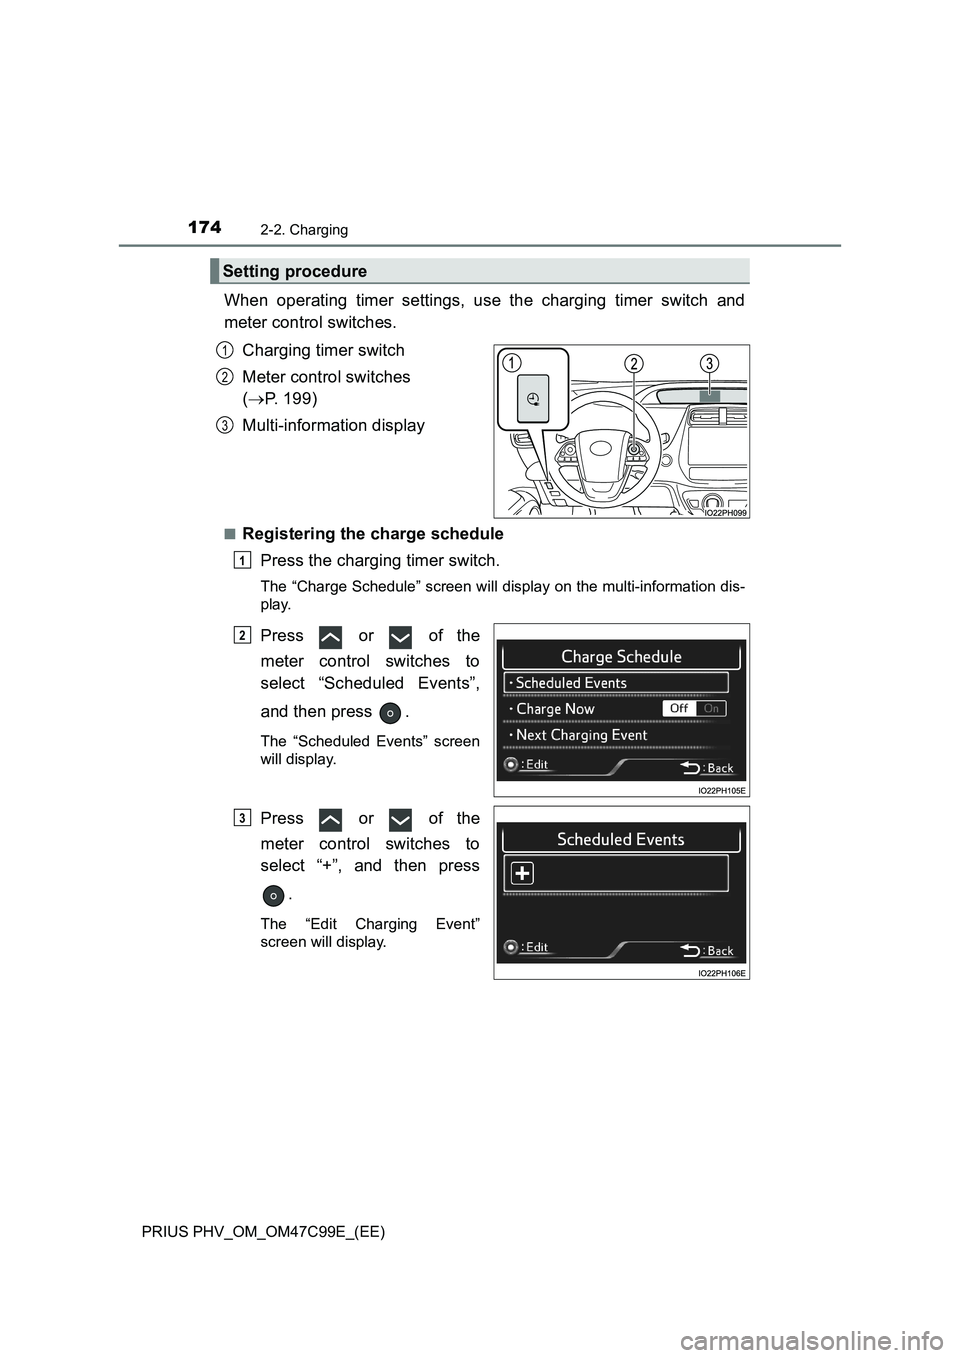
When operating timer settings, use the charging timer switch and
meter control switches.
Charging timer switch
Meter control switches
(P. 199)
Multi-information display
■Registering the charge schedule
Press the charging timer switch.
The “Charge Schedule” screen will display on the multi-information dis-
play.
Press or of the
meter control switches to
select “Scheduled Events”,
and then press .
The “Scheduled Events” screen
will display.
Press or of the
meter control switches to
select “+”, and then press
.
The “Edit Charging Event”
screen will display.
Setting procedure
1
2
3
1
2
3
Page 175 of 772
1752-2. Charging
2
Plug-in hybrid system
PRIUS PHV_OM_OM47C99E_(EE)
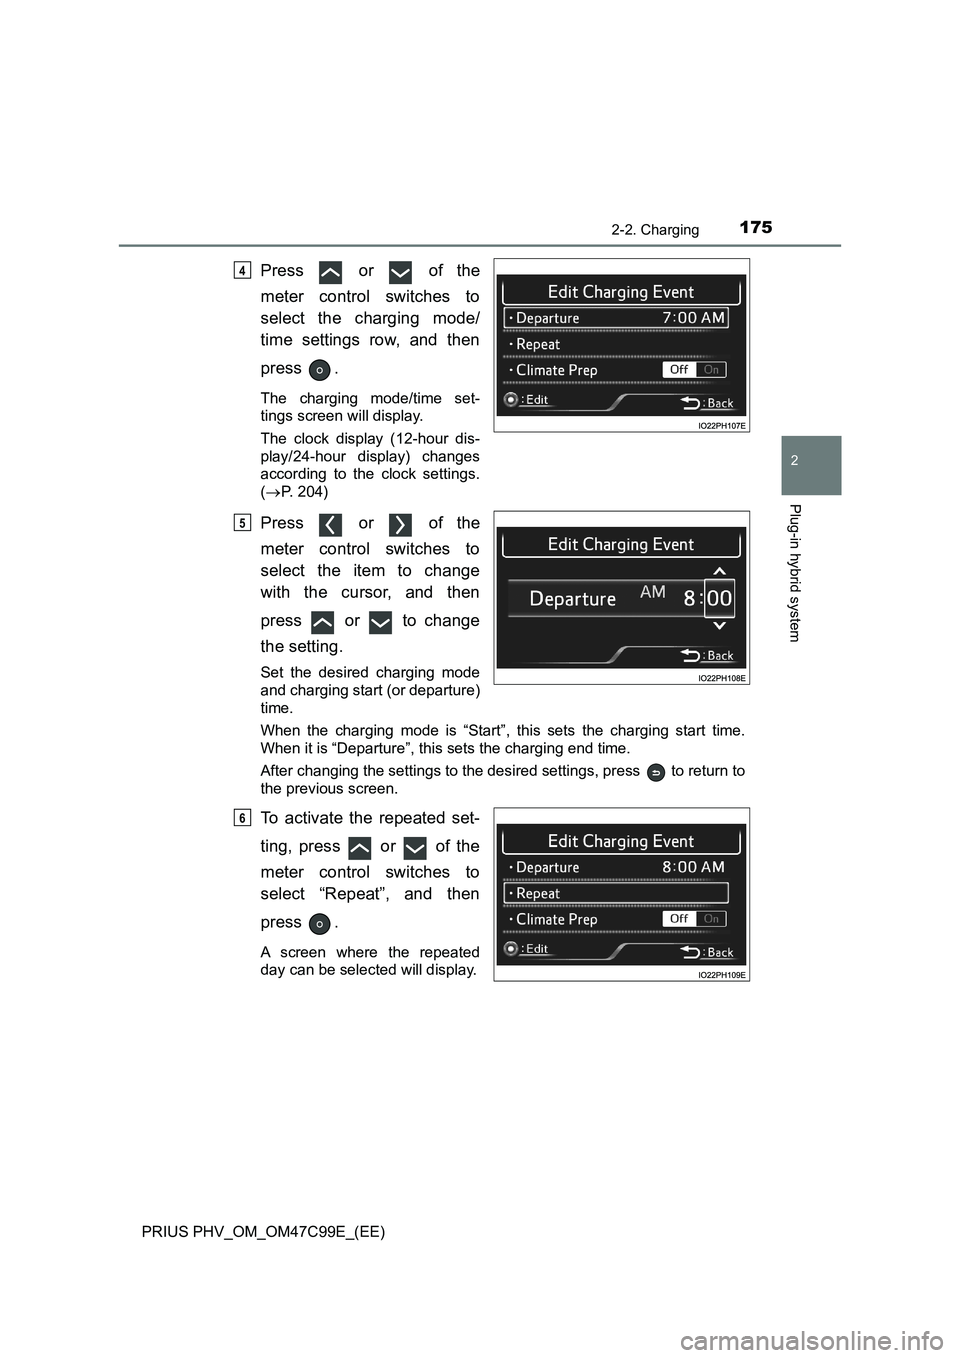
Press or of the
meter control switches to
select the charging mode/
time settings row, and then
press .
The charging mode/time set-
tings screen will display.
The clock display (12-hour dis-
play/24-hour display) changes
according to the clock settings.
(P. 204)
Press or of the
meter control switches to
select the item to change
with the cursor, and then
press or to change
the setting.
Set the desired charging mode
and charging start (or departure)
time.
When the charging mode is “Start”, this sets the charging start time.
When it is “Departure”, this sets the charging end time.
After changing the settings to the desired settings, press to return to
the previous screen.
To activate the repeated set-
ting, press or of the
meter control switches to
select “Repeat”, and then
press .
A screen where the repeated
day can be selected will display.
4
5
6
Page 176 of 772
1762-2. Charging
PRIUS PHV_OM_OM47C99E_(EE)
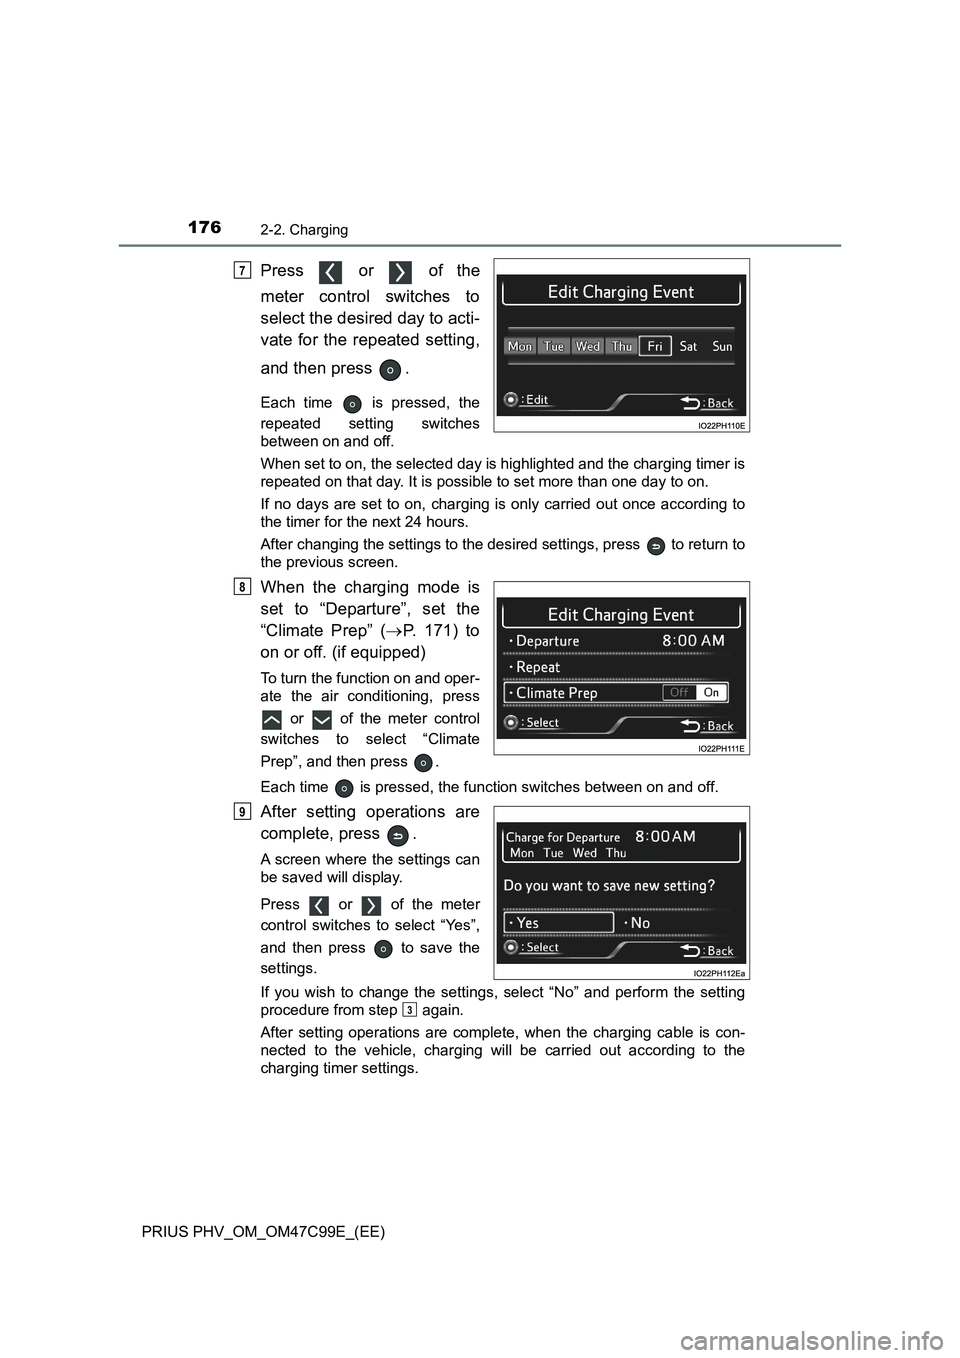
Press or of the
meter control switches to
select the desired day to acti-
vate for the repeated setting,
and then press .
Each time is pressed, the
repeated setting switches
between on and off.
When set to on, the selected day is highlighted and the charging timer is
repeated on that day. It is possible to set more than one day to on.
If no days are set to on, charging is only carried out once according to
the timer for the next 24 hours.
After changing the settings to the desired settings, press to return to
the previous screen.
When the charging mode is
set to “Departure”, set the
“Climate Prep” (P. 171) to
on or off. (if equipped)
To turn the function on and oper-
ate the air conditioning, press
or of the meter control
switches to select “Climate
Prep”, and then press .
Each time is pressed, the function switches between on and off.
After setting operations are
complete, press .
A screen where the settings can
be saved will display.
Press or of the meter
control switches to select “Yes”,
and then press to save the
settings.
If you wish to change the settings, select “No” and perform the setting
procedure from step again.
After setting operations are complete, when the charging cable is con-
nected to the vehicle, charging will be carried out according to the
charging timer settings.
7
8
9
3
Page 177 of 772
1772-2. Charging
2
Plug-in hybrid system
PRIUS PHV_OM_OM47C99E_(EE)■
Changing the registered charge schedules
The registered charge schedules can be turned on, off, deleted or
modified.
Press the charging timer switch.
The “Charge Schedule” screen will display on the multi-information dis-
play.
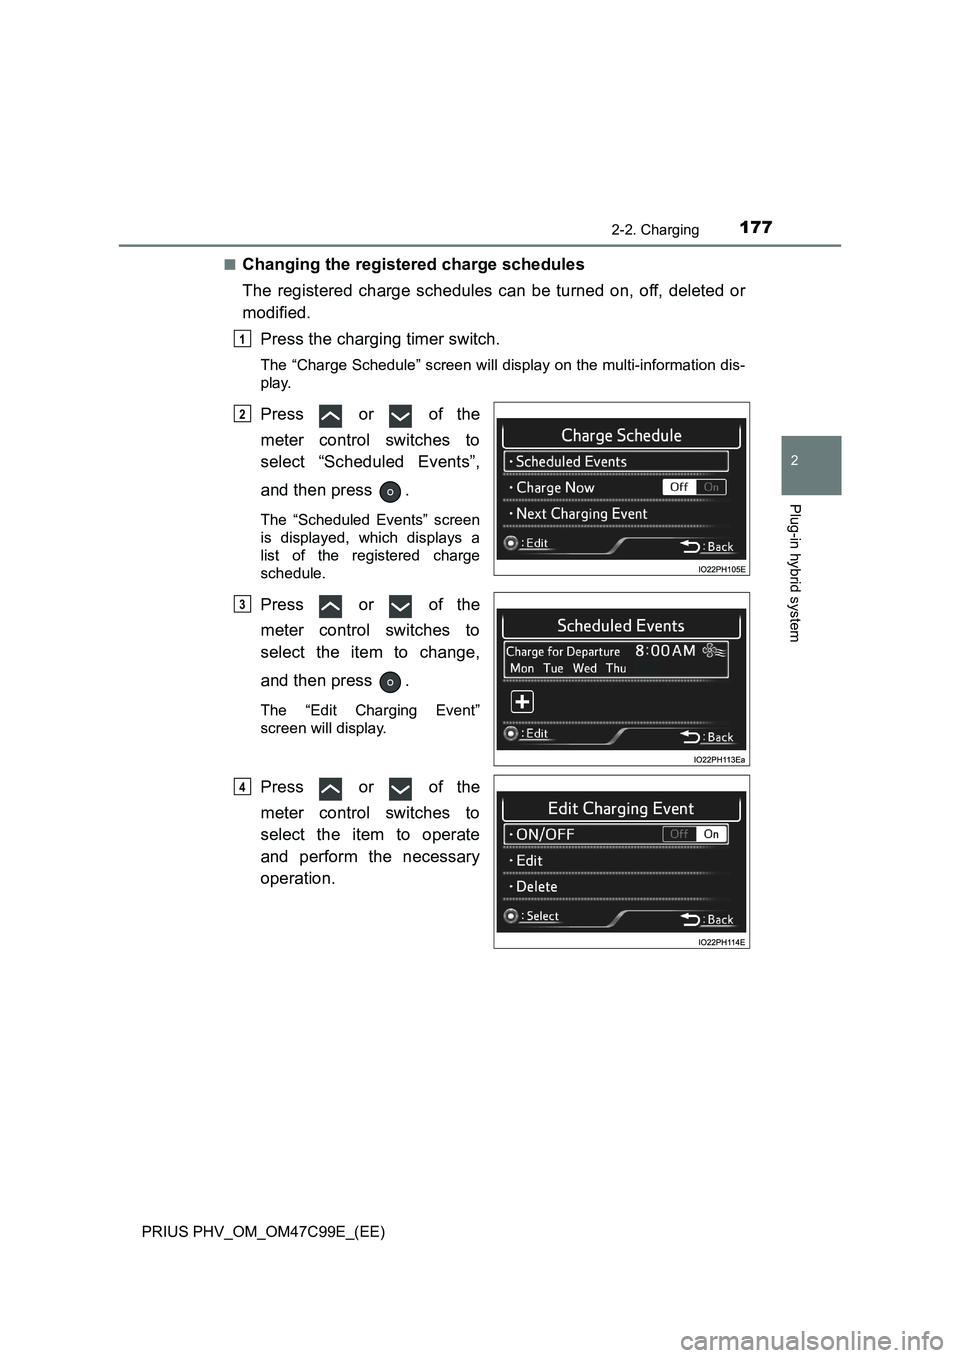
Press or of the
meter control switches to
select “Scheduled Events”,
and then press .
The “Scheduled Events” screen
is displayed, which displays a
list of the registered charge
schedule.
Press or of the
meter control switches to
select the item to change,
and then press .
The “Edit Charging Event”
screen will display.
Press or of the
meter control switches to
select the item to operate
and perform the necessary
operation.
1
2
3
4
Page 178 of 772
1782-2. Charging
PRIUS PHV_OM_OM47C99E_(EE)
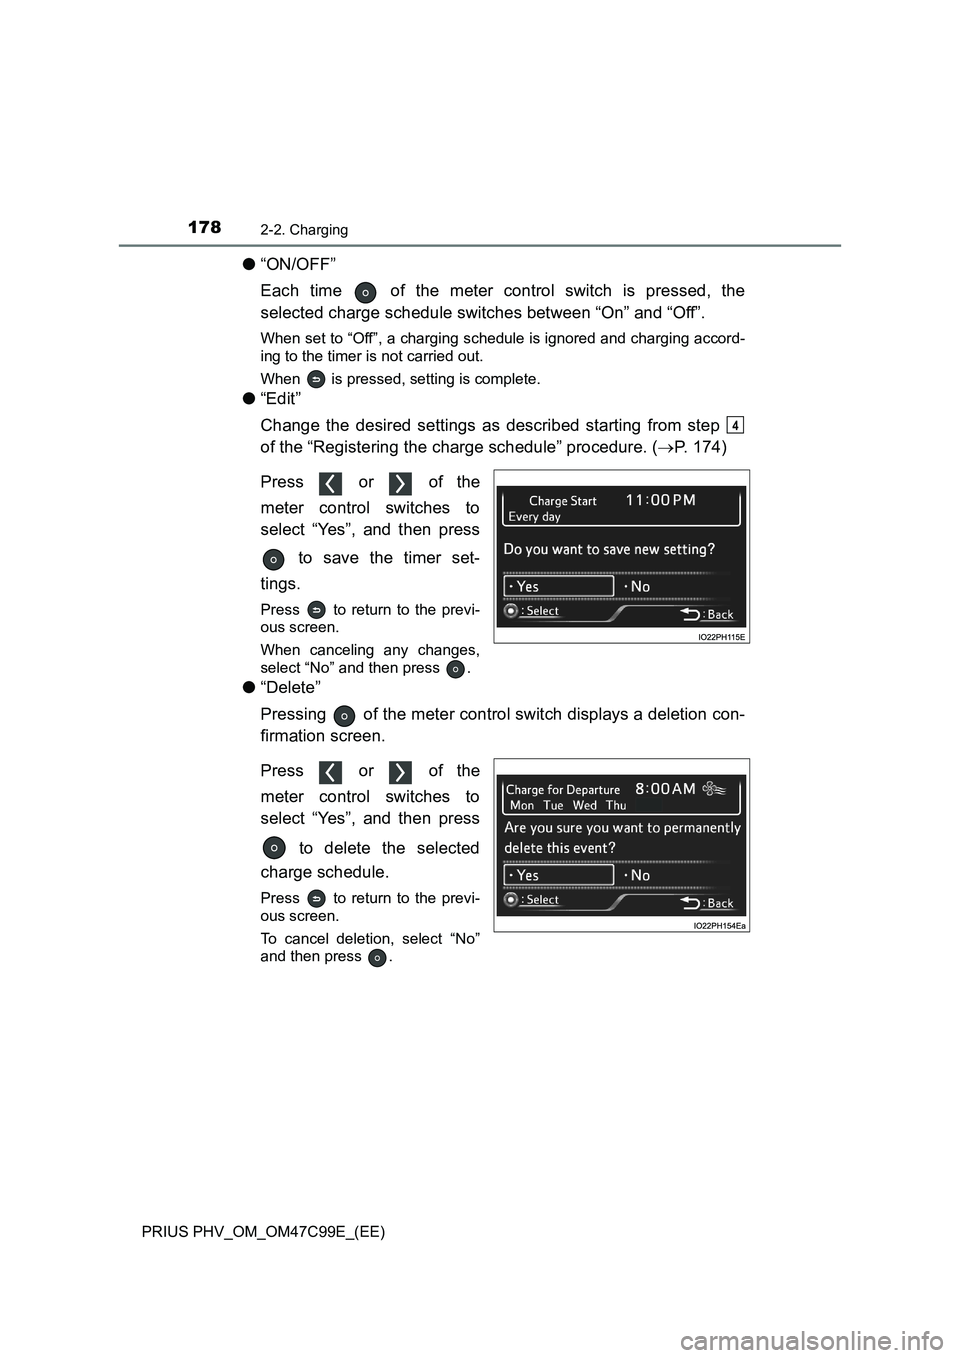
●“ON/OFF”
Each time of the meter control switch is pressed, the
selected charge schedule switches between “On” and “Off”.
When set to “Off”, a charging schedule is ignored and charging accord-
ing to the timer is not carried out.
When is pressed, setting is complete.
●“Edit”
Change the desired settings as described starting from step
of the “Registering the charge schedule” procedure. (P. 174)
Press or of the
meter control switches to
select “Yes”, and then press
to save the timer set-
tings.
Press to return to the previ-
ous screen.
When canceling any changes,
select “No” and then press .
●“Delete”
Pressing of the meter control switch displays a deletion con-
firmation screen.
Press or of the
meter control switches to
select “Yes”, and then press
to delete the selected
charge schedule.
Press to return to the previ-
ous screen.
To cancel deletion, select “No”
and then press .
4
Page 179 of 772
1792-2. Charging
2
Plug-in hybrid system
PRIUS PHV_OM_OM47C99E_(EE)■
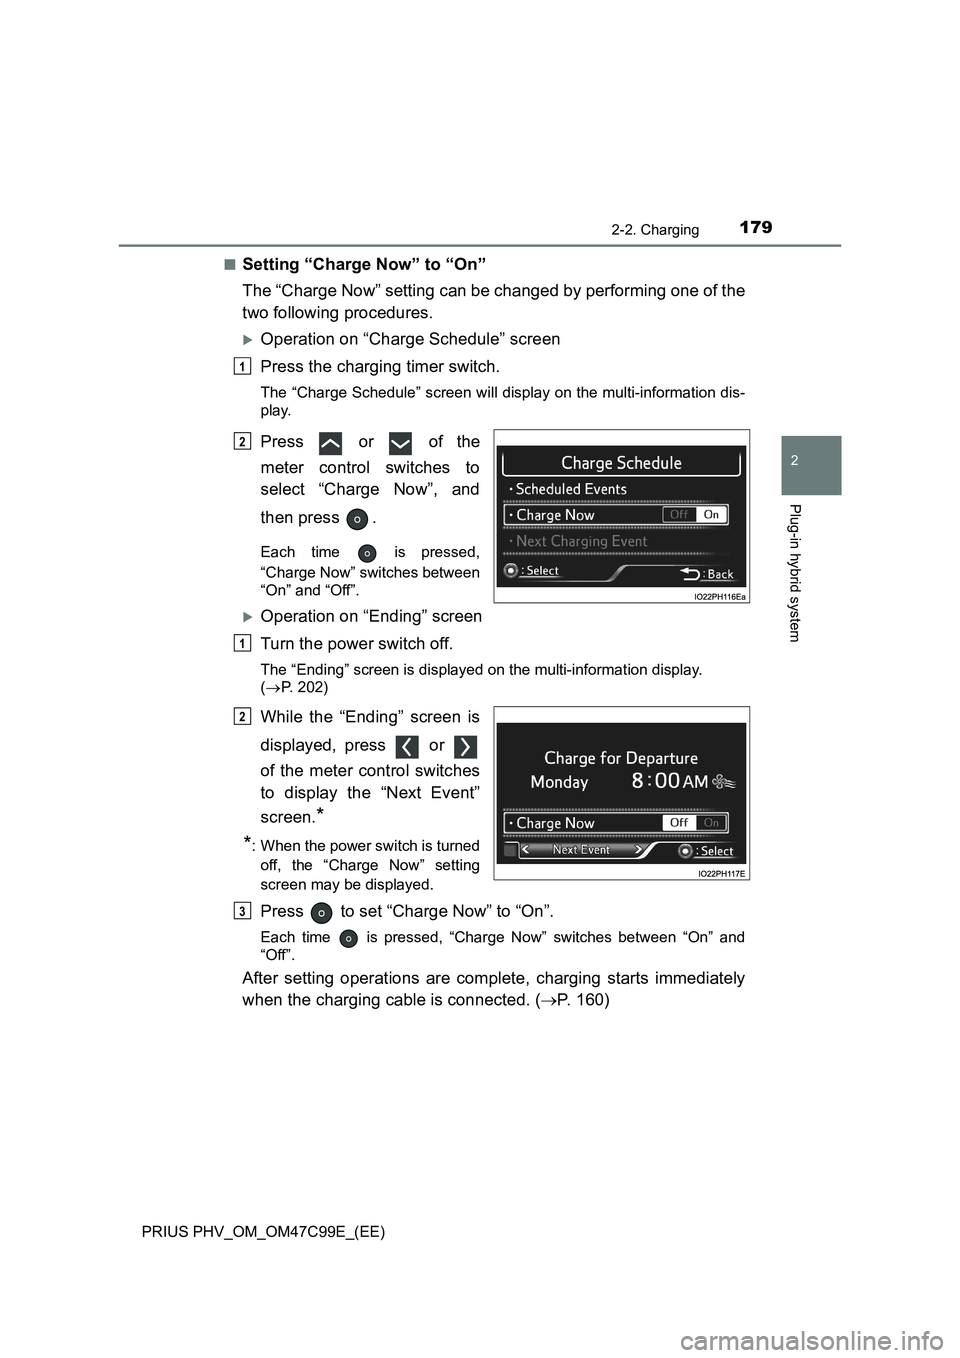
Setting “Charge Now” to “On”
The “Charge Now” setting can be changed by performing one of the
two following procedures.
Operation on “Charge Schedule” screen
Press the charging timer switch.
The “Charge Schedule” screen will display on the multi-information dis-
play.
Press or of the
meter control switches to
select “Charge Now”, and
then press .
Each time is pressed,
“Charge Now” switches between
“On” and “Off”.
Operation on “Ending” screen
Turn the power switch off.
The “Ending” screen is displayed on the multi-information display.
(P. 202)
While the “Ending” screen is
displayed, press or
of the meter control switches
to display the “Next Event”
screen.
*
*
: When the power switch is turned
off, the “Charge Now” setting
screen may be displayed.
Press to set “Charge Now” to “On”.
Each time is pressed, “Charge Now” switches between “On” and
“Off”.
After setting operations are complete, charging starts immediately
when the charging cable is connected. (P. 160)
1
2
1
2
3
Page 180 of 772
1802-2. Charging
PRIUS PHV_OM_OM47C99E_(EE)■
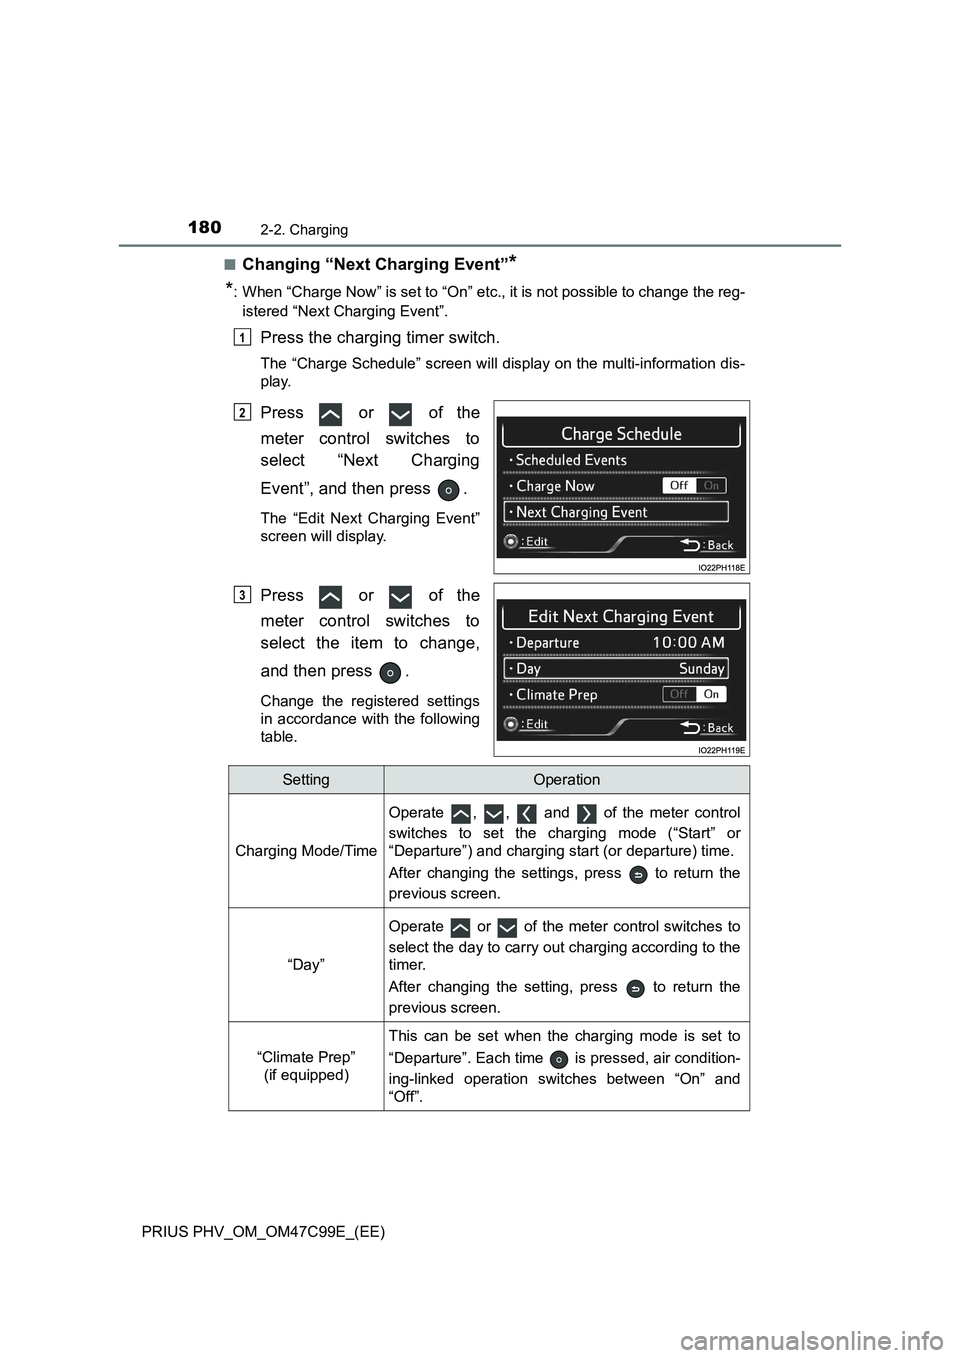
Changing “Next Charging Event”*
*
: When “Charge Now” is set to “On” etc., it is not possible to change the reg-
istered “Next Charging Event”.
Press the charging timer switch.
The “Charge Schedule” screen will display on the multi-information dis-
play.
Press or of the
meter control switches to
select “Next Charging
Event”, and then press .
The “Edit Next Charging Event”
screen will display.
Press or of the
meter control switches to
select the item to change,
and then press .
Change the registered settings
in accordance with the following
table.
1
2
3
SettingOperation
Charging Mode/Time
Operate , , and of the meter control
switches to set the charging mode (“Start” or
“Departure”) and charging start (or departure) time.
After changing the settings, press to return the
previous screen.
“Day”
Operate or of the meter control switches to
select the day to carry out charging according to the
timer.
After changing the setting, press to return the
previous screen.
“Climate Prep”
(if equipped)
This can be set when the charging mode is set to
“Departure”. Each time is pressed, air condition-
ing-linked operation switches between “On” and
“Off”.