tow TOYOTA PROACE CITY VERSO 2020 User Guide
[x] Cancel search | Manufacturer: TOYOTA, Model Year: 2020, Model line: PROACE CITY VERSO, Model: TOYOTA PROACE CITY VERSO 2020Pages: 272, PDF Size: 58.6 MB
Page 44 of 272
44
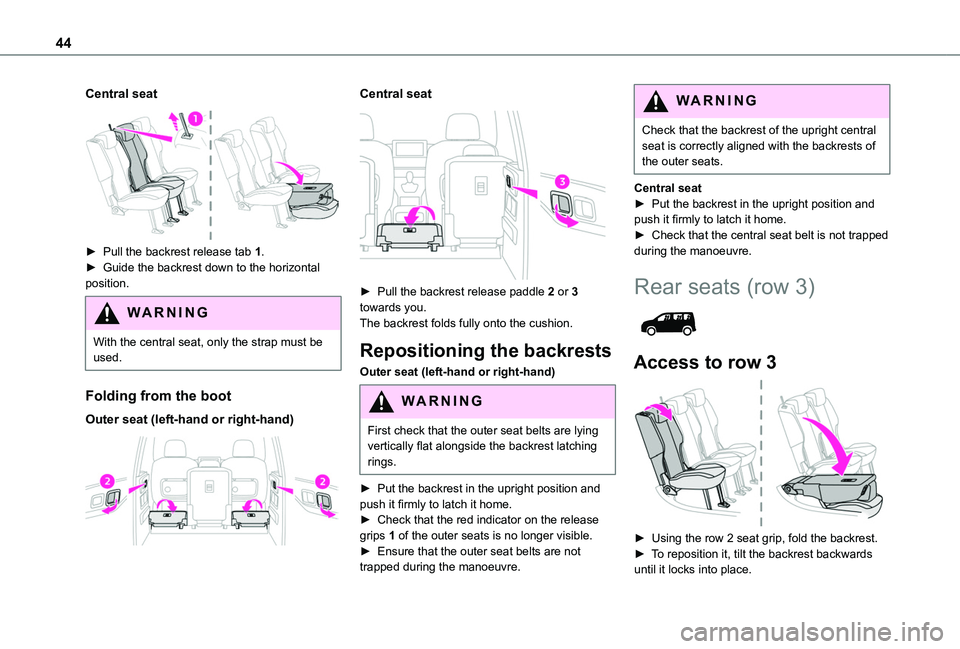
Central seat
► Pull the backrest release tab 1.► Guide the backrest down to the horizontal position.
WARNI NG
With the central seat, only the strap must be used.
Folding from the boot
Outer seat (left-hand or right-hand)
Central seat
► Pull the backrest release paddle 2 or 3 towards you.The backrest folds fully onto the cushion.
Repositioning the backrests
Outer seat (left-hand or right-hand)
WARNI NG
First check that the outer seat belts are lying vertically flat alongside the backrest latching rings.
► Put the backrest in the upright position and push it firmly to latch it home.► Check that the red indicator on the release grips 1 of the outer seats is no longer visible.
► Ensure that the outer seat belts are not trapped during the manoeuvre.
WARNI NG
Check that the backrest of the upright central seat is correctly aligned with the backrests of the outer seats.
Central seat► Put the backrest in the upright position and push it firmly to latch it home.► Check that the central seat belt is not trapped during the manoeuvre.
Rear seats (row 3)
Access to row 3
► Using the row 2 seat grip, fold the backrest.
► To reposition it, tilt the backrest backwards until it locks into place.
Page 52 of 272

52
spring hook to the ring on the corresponding strap.► Fold down the rear seats.► Tighten the straps without raising the bench seat.► Check that the net is hooked and tightened correctly.
Installation behind row 2
► Fold or remove the luggage cover.► Open the covers on the upper mountings 2.► Unroll the high load retaining net.
► Position one end of the net's metal bar in the corresponding upper mounting 2, then do the same with the other end.► Attach the hook on each of the net's straps to the corresponding stowing ring 4 (located on the floor).► Tighten the straps.► Check that the net is hooked and tightened correctly.
WARNI NG
Never use the ISOFIX ring, which is for fixing the strap of a child seat with Top Tether.
Two-position luggage cover
shelf (removable)
L1
L1
It can be installed in two different positions: high and low.It consists of two sections which can be folded back on each other.
► To fold it from the boot, grasp it and fold it back on itself up to the rear seats. From the low position, you can store it folded by sliding it towards the backrests of the rear seats.► To deploy it from the boot, grasp it and unfold it to the boot pillars.
NOTIC E
The maximum authorised weight on the
luggage cover shelf is 25 kg (55 lb).
Luggage cover
L2
L2
In the 5-seat configuration, it is installed behind the second row seats, with the third row seats stored folded away.In the 7-seat configuration, it is stored behind the third row seats.
WARNI NG
In the event of sudden deceleration, objects placed on the load space cover can turn into projectiles.
Page 53 of 272

53
Ease of use and comfort
3
Installation
► Position the left and right ends of the roller in the cut-outs A.► Pull out the roller until it reaches the boot pillars.► Insert the roller guides into the rails in the pillars B.
► Depending on version, you can access the boot by opening the rear screen in the tailgate and attaching the roller guides into the rails in the pillars C.
► The roller can be stored behind row 2 or 3.
Removal
► Remove the roller guides from the rails in pillars B.► Guide the roller as it reels in.► Unlock the roller by pressing one of the handles located at the ends of the roller bracket.
Stowing rings
Use the stowing rings on the rear floor to secure loads.
As a safety precaution in case of sharp braking, we recommend placing heavy objects as far forwards as possible (i.e. near the cab).We recommend using the stowing rings on the floor to firmly secure the load.
WARNI NG
When washing your vehicle, never clean the inside directly using a water jet.
Warning triangle
As a safety precaution, before leaving your vehicle to set up and install the triangle, always switch on the hazard warning lamps and put on your high visibility vest.
Storage compartment
There is a compartment in the interior trim of the boot in which to store a warning triangle.
Page 54 of 272

54
Heating and Ventilation
Advice
NOTIC E
Using the ventilation and air conditioning system► To ensure that air is distributed evenly,
keep the external air intake grilles at the base of the windscreen, the nozzles, the vents, the air outlets and the air extractor in the boot free from obstructions.► Do not cover the sunshine sensor located on the dashboard; this sensor is used to regulate the automatic air conditioning system.► Operate the air conditioning system for at least 5 to 10 minutes once or twice a month to keep it in perfect working order.► If the system does not produce cold air, switch it off and contact a TOYOTA dealer or a qualified workshop.When towing the maximum load on a steep gradient in high temperatures, switching off the air conditioning increases the available engine power, enhancing the towing capacity.
WARNI NG
Avoid driving for too long with the ventilation off or with prolonged operation of interior air
recirculation. Risk of misting and deterioration of the air quality!
If the interior temperature is very high after the vehicle has stood for a long time in the sunshine, air the passenger compartment for a few moments.Put the air flow control at a setting high
enough to quickly change the air in the passenger compartment.
NOTIC E
Condensation created by the air conditioning results in a discharge of water underneath the vehicle. This is perfectly normal.
NOTIC E
Servicing the ventilation and air conditioning system► Ensure that the passenger compartment filter is in good condition and have the filter elements replaced regularly.We recommend using a composite passenger compartment filter. Thanks to its special active additive, this type of filter helps to purify the air breathed by the occupants and keep the passenger compartment clean (by reducing
allergic symptoms, unpleasant odours and greasy deposits).► To ensure correct operation of the air conditioning system, have it checked according to the recommendations in the Maintenance and Warranty Guide.
NOTIC E
Stop & StartThe heating and air conditioning systems only operate when the engine is running.Temporarily deactivate the Stop & Start system to maintain a comfortable temperature in the passenger compartment.For more information on the Stop & Start, refer to the corresponding section.
Heating
Manual air conditioning
The air conditioning system only operates with the engine running.
Page 56 of 272

56
NOTIC E
When the engine is cold, the air flow will only increase to its optimum level gradually, to avoid distributing too much cold air.In cold weather, it prioritises the distribution of warm air to the windscreen, the side windows and the footwells only.
Manual mode
If you wish, you can make a different choice from that suggested by the system, by changing a setting. The other functions will still be controlled automatically. The "AUTO" symbol disappears if you change a setting.
Deactivating the system
► Press button 2 "-" until the fan symbol disappears.This disables all functions of the dual-zone automatic air conditioning system.
The temperature is no longer regulated. A slight flow of air can still be felt, due to the forward movement of the vehicle.► Press button 2 "+" to switch the system on again.
Temperature
The driver and front passenger can each set the temperature to suit their preferences.
The value shown on the display is a level of comfort, not a temperature in Celsius or Fahrenheit.► Push button 1 down to decrease the value or up to increase it.
NOTIC E
A setting of around 21 provides optimum comfort. Depending on your requirements, a
setting between 18 and 24 is normal.In addition, we recommend avoiding left/right setting differences of more than 3.
NOTIC E
On entering the vehicle, if the interior temperature is significantly colder or warmer than the comfort value setting, there is no need to alter the value displayed in order to reach the required level of comfort. The system compensates automatically and corrects the temperature difference as quickly as possible.
NOTIC E
For maximum cooling or heating of the passenger compartment, it is possible to
exceed the minimum value 14 or the maximum value 28.► Push button 1 down until "LO" is displayed or up until "HI" is displayed.
"Mono" function
The comfort setting for the passenger side can be indexed to the driver's comfort setting (mono-zone).► Press the corresponding button 8 to activate/deactivate the function.The indicator lamp in the button comes on when the function is activated.The function is deactivated automatically if a passenger uses the temperature control.
Visibility programme
► Press the “visibility” button 7 to demist or defrost the windscreen and side windows as quickly as possible. The system automatically manages the air conditioning, air flow and air intake, and provides
optimum distribution towards the windscreen and side windows.► Press the “visibility” button 7 again to stop the programme.Or► Press the “AUTO” button 6 to return to the automatic comfort programme.
Page 57 of 272
57
Ease of use and comfort
3
Air conditioning
With the engine running, the air conditioning is designed to operate effectively in all seasons, with the windows closed.It enables you to:– lower the temperature in summer,– enhance the effectiveness of the demisting function in winter, above 3°C.
On/Off
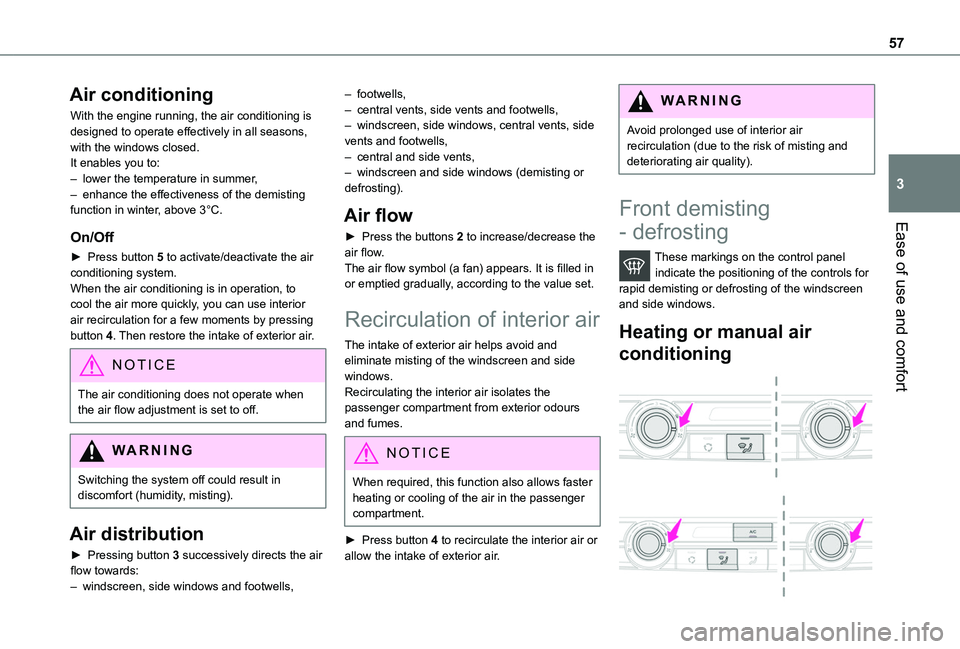
► Press button 5 to activate/deactivate the air conditioning system.When the air conditioning is in operation, to cool the air more quickly, you can use interior air recirculation for a few moments by pressing button 4. Then restore the intake of exterior air.
NOTIC E
The air conditioning does not operate when the air flow adjustment is set to off.
WARNI NG
Switching the system off could result in discomfort (humidity, misting).
Air distribution
► Pressing button 3 successively directs the air flow towards:– windscreen, side windows and footwells,
– footwells,– central vents, side vents and footwells,– windscreen, side windows, central vents, side vents and footwells,– central and side vents, – windscreen and side windows (demisting or defrosting).
Air flow
► Press the buttons 2 to increase/decrease the air flow.The air flow symbol (a fan) appears. It is filled in or emptied gradually, according to the value set.
Recirculation of interior air
The intake of exterior air helps avoid and eliminate misting of the windscreen and side windows.Recirculating the interior air isolates the passenger compartment from exterior odours and fumes.
NOTIC E
When required, this function also allows faster heating or cooling of the air in the passenger compartment.
► Press button 4 to recirculate the interior air or allow the intake of exterior air.
WARNI NG
Avoid prolonged use of interior air recirculation (due to the risk of misting and deteriorating air quality).
Front demisting
- defrosting
These markings on the control panel indicate the positioning of the controls for rapid demisting or defrosting of the windscreen and side windows.
Heating or manual air
conditioning
Page 58 of 272

58
► Set the air flow, temperature and air distribution controls to the appropriately marked positions.► For air conditioning, press this button; its indicator lamp comes on.
Dual-zone automatic air
conditioning
► Press this button to demist or defrost the windscreen and side windows more quickly.The system automatically manages the air conditioning, air flow and air intake, and provides optimum distribution towards the windscreen and side windows.► To turn it off, press this button again or press "AUTO".The system restarts with the values in use before it was deactivated.
NOTIC E
Heated windscreen and washer jetsFor more information on the Wiper control lever and in particular the heated windscreen and washer jets, refer to the corresponding section.
NOTIC E
With Stop & Start, when demisting - defrosting has been activated, STOP mode is not available.
Heated windscreen
Depending on country of sale.This function heats the windscreen in cold weather.
In area 1, the heating melts ice, enabling you to free the wiper blades.
In area 2, the heating enhances visibility by preventing the build-up of snow while the wipers are operating.
On/Off
► With the engine running, press this button to activate/deactivate the function (confirmed by an indicator lamp).The period of operation depends on the exterior temperature.
Rear screen demisting
- defrosting
Page 68 of 272

68
Manual controls
The wipers are controlled directly by the driver.
With manual wiping (intermittent)
With AUTO wiping
Windscreen wipers
► To select the wiping speed: raise or lower the lever to the desired position.Fast wiping (heavy rain)
Normal wiping (moderate rain)
Intermittent wiping (proportional to the vehicle’s speed)
Off
orAutomatic wiping (press down, then release).Single wipe (pull the lever briefly towards you).
Windscreen wash
► Pull the wiper control lever towards you and hold.The screenwash and windscreen wipers operate for as long as the control lever is pulled.A final wiping cycle is performed when screenwashing ends.
NOTIC E
On vehicles fitted with automatic air conditioning, any action on the screenwash control temporarily closes the air intake, to avoid odours inside the passenger compartment.
NOTIC E
The windscreen wash jets are incorporated into the tip of each wiper arm.Screenwash fluid is sprayed along the length of the wiper blade. This improves visibility and reduces screenwash fluid consumption.In some cases, depending on the contents or colour of the fluid and on the exterior brightness, the liquid spray may be barely noticeable.
WARNI NG
To avoid damaging the wiper blades, do not operate the windscreen washer if the windscreen washer reservoir is empty.Only operate the windscreen washer if there is no risk of the fluid freezing on the windscreen and hindering visibility. Always use windscreen washer fluid suitable for low temperatures during the winter period.
Never top up with water.
Rear wiper
Rear wiper selection ring:
Page 76 of 272

76
WARNI NG
ASR / DSCThese systems enhance safety during normal driving, but should not encourage the driver to take extra risks or drive at high speed.It is in conditions of reduced grip (rain, snow, ice) that the risk of loss of grip increases. It is therefore important for your safety to keep these systems activated in all conditions, and particularly in difficult conditions.Correct operation of these systems depends on compliance with the manufacturer's recommendations relating to the wheels (tyres and rims), braking and electronic components, as well as the assembly and repair procedures used by TOYOTA dealers.The use of snow tyres is recommended, to ensure that these systems remain effective in winter conditions. All four wheels must be fitted with tyres approved for the vehicle.
Trailer stability assist (TSA)
When towing, this system reduces the risk of the vehicle or trailer snaking.
Operation
The system is activated automatically when the ignition is switched on.The electronic stability control system (ESC) must not have any faults.
At speeds between 60 and 160 km/h (37 and 99 mph), if the system detects oscillating trailer movements (snaking), it acts on the brakes to stabilise the trailer and, if necessary, reduces engine power to slow the vehicle.This warning lamp flashes on the instrument panel and the brake lamps light up to draw attention to this corrective action.For information on weights and towed loads, refer to the Engine Technical Data and Towed Loads section or your vehicle’s registration certificateTo ensure safe driving with a Towing device, refer to the corresponding section.
Malfunction
If a fault occurs, this warning lamp comes on in the instrument panel, accompanied by a message and an audible signal.If you wish to continue towing a trailer, reduce your speed and drive carefully!Contact a TOYOTA dealer or a qualified workshop to have the system checked.
WARNI NG
The trailer stability assist system offers enhanced safety in normal driving, provided that the recommendations on towing a trailer are observed. It should not encourage the driver to take risks, such as towing a trailer in adverse operating conditions (overloading, failure to observe the trailer nose weight,
worn or under-inflated tyres, faulty braking system, etc.), or to drive at excessive speeds.In certain cases, the system may not detect trailer snaking, particularly with a light trailer.When driving on slippery or poor surfaces, the system may not be able to prevent sudden trailer snaking.
Advanced Grip Control
A special, patented traction control system which improves driveability on snow, mud and sand.This system, optimised for operation in a range of conditions, enables you to manoeuvre in most slippery conditions (encountered during normal passenger car use).When combined with suitable tyres, this system offers a compromise between safety, grip and driveability.The accelerator pedal should be pressed sufficiently to allow the system to harness the power of the engine. Operation at high engine
speeds is completely normal.A five-position selector knob allows you to choose the setting best suited to the driving conditions encountered.An indicator lamp associated with each mode comes on, accompanied by the display of a message to confirm your choice.
Page 81 of 272

81
Safety
5
Advice
WARNI NG
The driver must ensure that passengers use the seat belts correctly and that they are all fastened before setting off.Wherever you are seated in the vehicle, always fasten your seat belt, even for short journeys.
Do not interchange the seat belt buckles, as they will not fulfil their role fully.Before and after use, ensure that the seat belt is reeled in correctly.After folding or moving a seat or rear bench seat, ensure that the seat belt is positioned and reeled in correctly.
WARNI NG
InstallationThe lower part of the strap must be positioned as low as possible on the pelvis.The upper part must be positioned in the hollow of the shoulder.In order to be effective, a seat belt must:– be tightened as close to the body as possible,– be pulled in front of you with a smooth
movement, checking that it does not twist,– be used to restrain only one person,
– not show any signs of cuts or fraying,– not be converted or modified in order not to affect its performance.
WARNI NG
Recommendations for childrenUse a suitable child seat if the passenger is less than 12 years old or shorter than one and a half metres (4 ft 11").
Never use the same seat belt to secure more than one child.Never carry a child on your lap.For more information on Child seats, refer to the corresponding section.
WARNI NG
MaintenanceIn accordance with current safety regulations, for all repairs on your vehicle's seat belts, go to a qualified workshop with the skills and equipment needed, which a TOYOTA dealer is able to provide.Have the seat belts checked regularly by a TOYOTA dealer or a qualified workshop, particularly if the straps show signs of damage.
Clean the seat belt straps with soapy water or a textile cleaning product, sold by TOYOTA dealers.
WARNI NG
In the event of an impactDepending on the nature and seriousness of impacts, the pyrotechnic pretensioner device may trigger before and independently of airbag deployment. Deployment of the pretensioners is accompanied by a slight discharge of harmless smoke and a noise, due to the activation of the pyrotechnic cartridge incorporated in the system.In all cases, the airbag warning lamp comes on.Following an impact, have the seat belt system checked, and if necessary replaced, by a TOYOTA dealer or a qualified workshop.
Airbags
System designed to contribute towards improving the safety of the occupants (with the exception of the centre seat in row 2) in the
event of violent collisions.The airbags supplement the action of the force-limiting seat belts.If a collision occurs, the electronic detectors record and analyse the front and side impacts sustained in the impact detection zones:– in the event of a serious impact, the airbags are deployed instantly and contribute towards better protection of the occupants (with the exception of the centre seat in row 2);