coolant TOYOTA RAV4 1996 Service Owner's Guide
[x] Cancel search | Manufacturer: TOYOTA, Model Year: 1996, Model line: RAV4, Model: TOYOTA RAV4 1996Pages: 1632, PDF Size: 41.64 MB
Page 893 of 1632
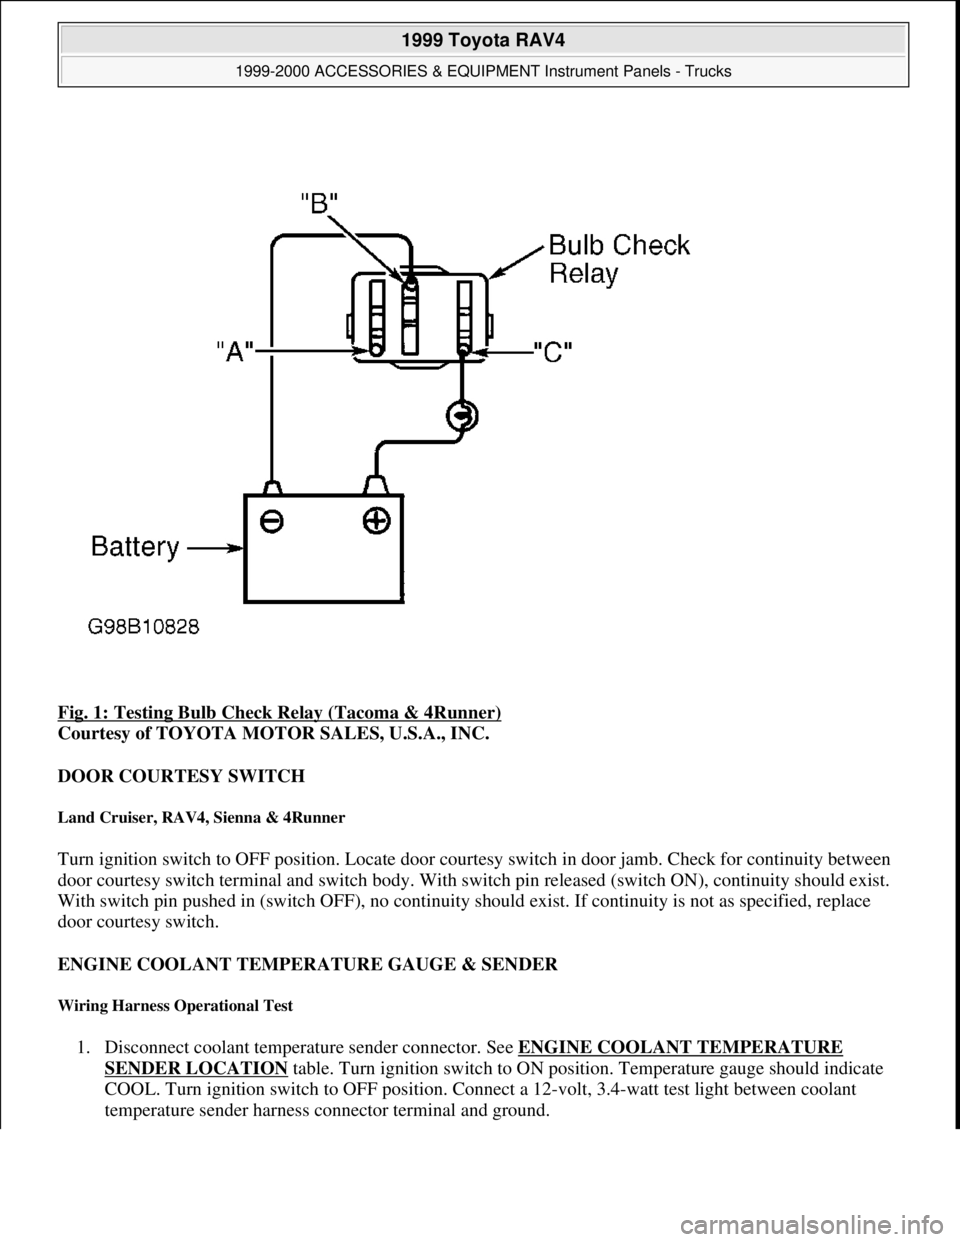
Fig. 1: Testing Bulb Check Relay (Tacoma & 4Runner)
Courtesy of TOYOTA MOTOR SALES, U.S.A., INC.
DOOR COURTESY SWITCH
Land Cruiser, RAV4, Sienna & 4Runner
Turn ignition switch to OFF position. Locate door courtesy switch in door jamb. Check for continuity between
door courtesy switch terminal and switch body. With switch pin released (switch ON), continuity should exist.
With switch pin pushed in (switch OFF), no continuity should exist. If continuity is not as specified, replace
door courtesy switch.
ENGINE COOLANT TEMPERATURE GAUGE & SENDER
Wiring Harness Operational Test
1. Disconnect coolant temperature sender connector. See ENGINE COOLANT TEMPERATURE
SENDER LOCATION table. Turn ignition switch to ON position. Temperature gauge should indicate
COOL. Turn ignition switch to OFF position. Connect a 12-volt, 3.4-watt test light between coolant
temperature sender harness connector terminal and
ground.
1999 Toyota RAV4
1999-2000 ACCESSORIES & EQUIPMENT Instrument Panels - Trucks
Microsoft
Sunday, November 22, 2009 10:54:09 AMPage 3 © 2005 Mitchell Repair Information Company, LLC.
Page 894 of 1632
2. Turn ignition switch to ON position. Test light should be on and temperature gauge should slowly move
to HOT. If gauge functions as specified, replace sending unit. If gauge does not function as specified,
perform TEMPERATURE GAUGE RESISTANCE TEST
.
Engine Coolant Temperature (ECT) Sender
1. Turn ignition switch to OFF position. Disconnect ECT sender 1-pin connector. See ENGINE
COOLANT TEMPERATURE SENDER LOCATION table. Drain cooling system and remove ECT
sender. Place probe end of ECT sender and thermometer in a container of water. Connect an ohmmeter
between ECT sender terminal and ECT sender body.
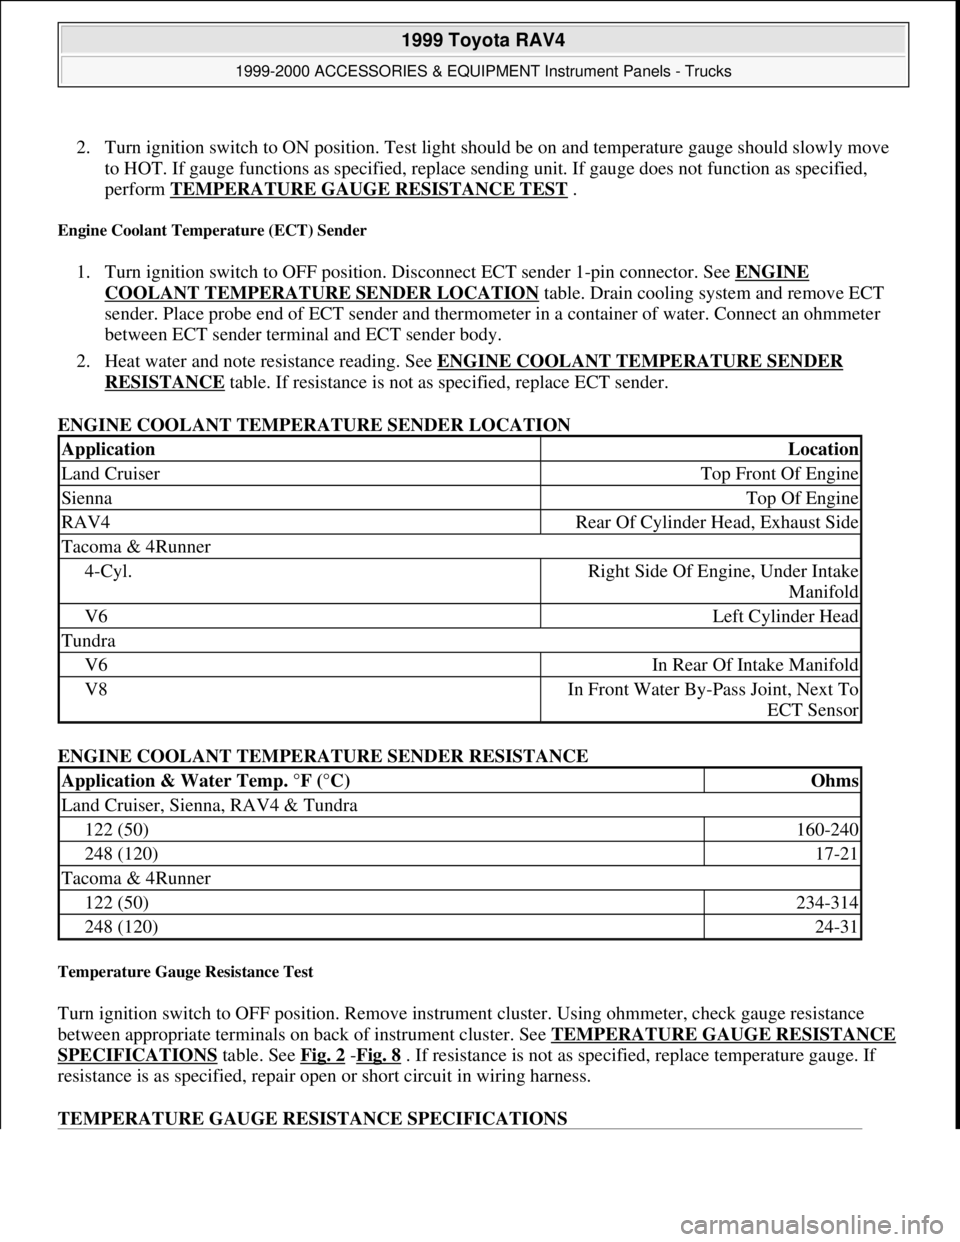
2. Heat water and note resistance reading. See ENGINE COOLANT TEMPERATURE SENDER
RESISTANCE table. If resistance is not as specified, replace ECT sender.
ENGINE COOLANT TEMPERATURE SENDER LOCATION
ENGINE COOLANT TEMPERATURE SENDER RESISTANCE
Temperature Gauge Resistance Test
Turn ignition switch to OFF position. Remove instrument cluster. Using ohmmeter, check gauge resistance
between appropriate terminals on back of instrument cluster. See TEMPERATURE GAUGE RESISTANCE
SPECIFICATIONS table. See Fig. 2 -Fig. 8 . If resistance is not as specified, replace temperature gauge. If
resistance is as specified, repair open or short circuit in wiring harness.
TEMPERATURE GAUGE RESISTANCE SPECIFICATIONS
ApplicationLocation
Land CruiserTop Front Of Engine
SiennaTop Of Engine
RAV4Rear Of Cylinder Head, Exhaust Side
Tacoma & 4Runner
4-Cyl.Right Side Of Engine, Under Intake
Manifold
V6Left Cylinder Head
Tundra
V6In Rear Of Intake Manifold
V8In Front Water By-Pass Joint, Next To
ECT Sensor
Application & Water Temp. °F (°C)Ohms
Land Cruiser, Sienna, RAV4 & Tundra
122 (50)160-240
248 (120)17-21
Tacoma & 4Runner
122 (50)234-314
248 (120)24-31
1999 Toyota RAV4
1999-2000 ACCESSORIES & EQUIPMENT Instrument Panels - Trucks
Microsoft
Sunday, November 22, 2009 10:54:09 AMPage 4 © 2005 Mitchell Repair Information Company, LLC.
Page 948 of 1632
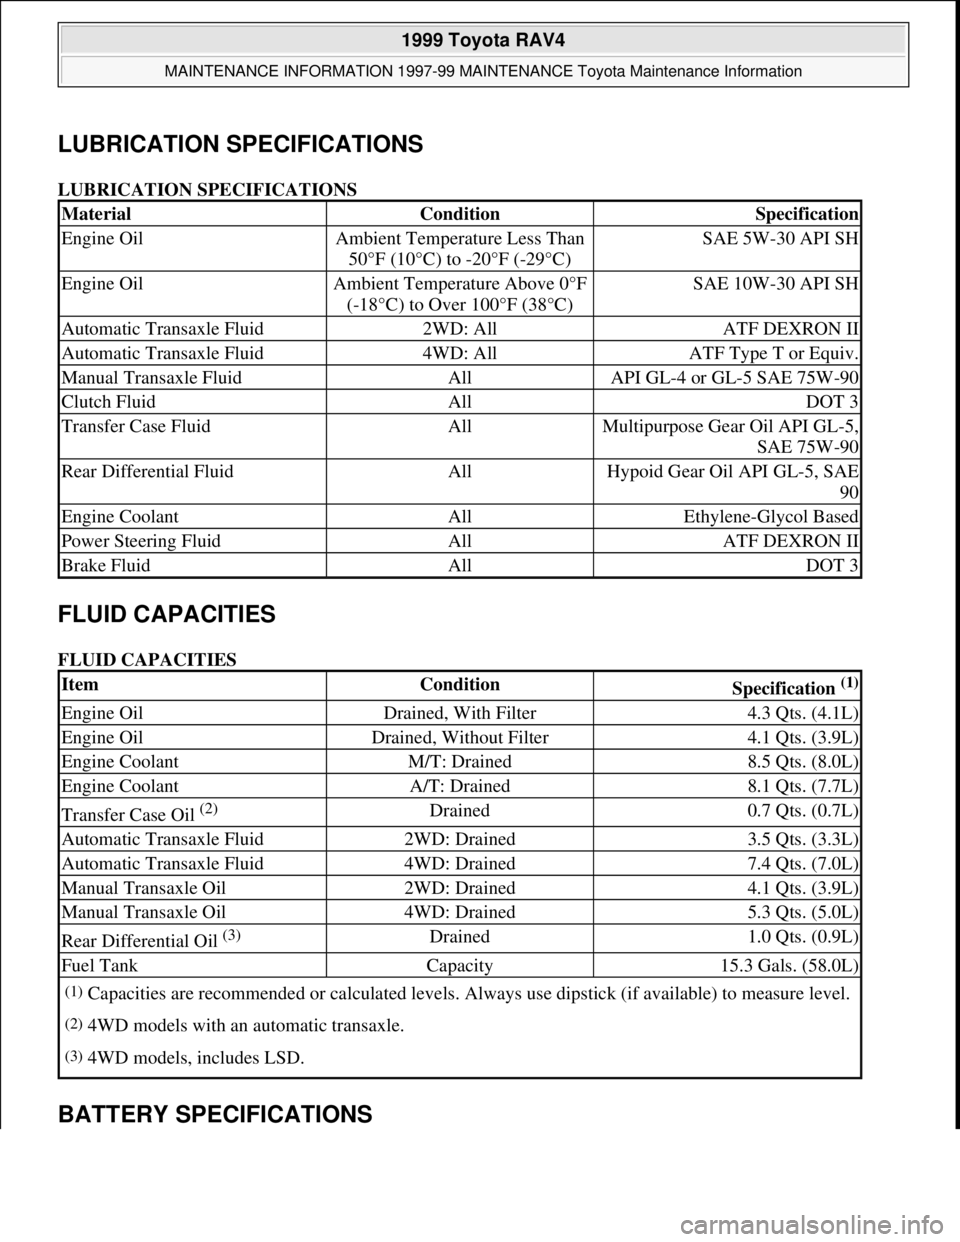
LUBRICATION SPECIFICATIONS
LUBRICATION SPECIFICATIONS
FLUID CAPACITIES
FLUID CAPACITIES
BATTERY SPECIFICATIONS
MaterialConditionSpecification
Engine OilAmbient Temperature Less Than
50°F (10°C) to -20°F (-29°C)SAE 5W-30 API SH
Engine OilAmbient Temperature Above 0°F
(-18°C) to Over 100°F (38°C)SAE 10W-30 API SH
Automatic Transaxle Fluid2WD: AllATF DEXRON II
Automatic Transaxle Fluid4WD: AllATF Type T or Equiv.
Manual Transaxle FluidAllAPI GL-4 or GL-5 SAE 75W-90
Clutch FluidAllDOT 3
Transfer Case FluidAllMultipurpose Gear Oil API GL-5,
SAE 75W-90
Rear Differential FluidAllHypoid Gear Oil API GL-5, SAE
90
Engine CoolantAllEthylene-Glycol Based
Power Steering FluidAllATF DEXRON II
Brake FluidAllDOT 3
ItemConditionSpecification (1)
Engine OilDrained, With Filter4.3 Qts. (4.1L)
Engine OilDrained, Without Filter4.1 Qts. (3.9L)
Engine CoolantM/T: Drained8.5 Qts. (8.0L)
Engine CoolantA/T: Drained8.1 Qts. (7.7L)
Transfer Case Oil (2) Drained0.7 Qts. (0.7L)
Automatic Transaxle Fluid2WD: Drained3.5 Qts. (3.3L)
Automatic Transaxle Fluid4WD: Drained7.4 Qts. (7.0L)
Manual Transaxle Oil2WD: Drained4.1 Qts. (3.9L)
Manual Transaxle Oil4WD: Drained5.3 Qts. (5.0L)
Rear Differential Oil (3) Drained1.0 Qts. (0.9L)
Fuel TankCapacity15.3 Gals. (58.0L)
(1)Capacities are recommended or calculated levels. Always use dipstick (if available) to measure level.
(2)4WD models with an automatic transaxle.
(3)4WD models, includes LSD.
1999 Toyota RAV4
MAINTENANCE INFORMATION 1997-99 MAINTENANCE Toyota Maintenance Information
Microsoft
Sunday, November 22, 2009 10:32:42 AMPage 6 © 2005 Mitchell Repair Information Company, LLC.
Page 1175 of 1632
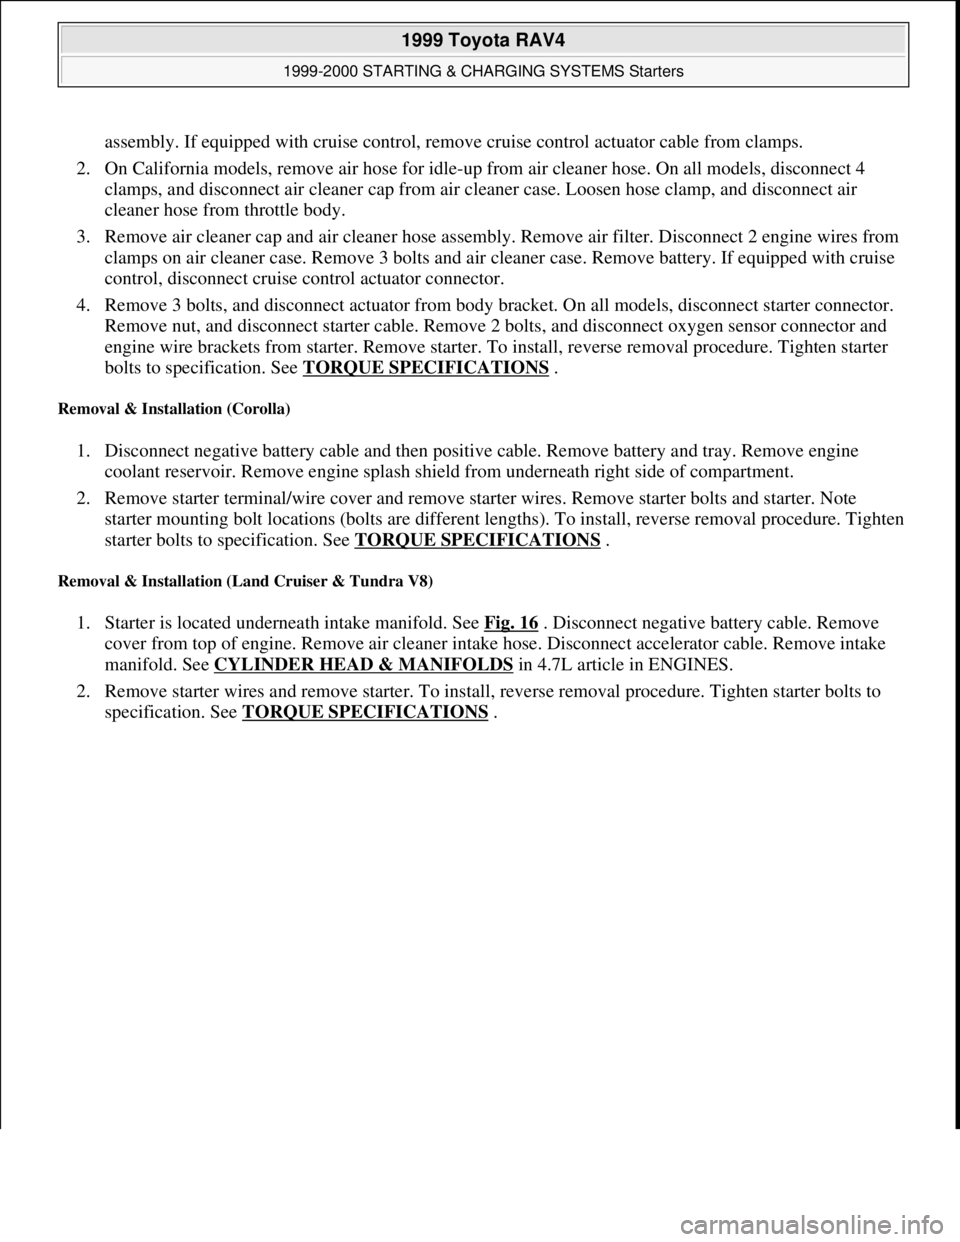
assembly. If equipped with cruise control, remove cruise control actuator cable from clamps.
2. On California models, remove air hose for idle-up from air cleaner hose. On all models, disconnect 4
clamps, and disconnect air cleaner cap from air cleaner case. Loosen hose clamp, and disconnect air
cleaner hose from throttle body.
3. Remove air cleaner cap and air cleaner hose assembly. Remove air filter. Disconnect 2 engine wires from
clamps on air cleaner case. Remove 3 bolts and air cleaner case. Remove battery. If equipped with cruise
control, disconnect cruise control actuator connector.
4. Remove 3 bolts, and disconnect actuator from body bracket. On all models, disconnect starter connector.
Remove nut, and disconnect starter cable. Remove 2 bolts, and disconnect oxygen sensor connector and
engine wire brackets from starter. Remove starter. To install, reverse removal procedure. Tighten starter
bolts to specification. See TORQUE SPECIFICATIONS
.
Removal & Installation (Corolla)
1. Disconnect negative battery cable and then positive cable. Remove battery and tray. Remove engine
coolant reservoir. Remove engine splash shield from underneath right side of compartment.
2. Remove starter terminal/wire cover and remove starter wires. Remove starter bolts and starter. Note
starter mounting bolt locations (bolts are different lengths). To install, reverse removal procedure. Tighten
starter bolts to specification. See TORQUE SPECIFICATIONS
.
Removal & Installation (Land Cruiser & Tundra V8)
1. Starter is located underneath intake manifold. See Fig. 16 . Disconnect negative battery cable. Remove
cover from top of engine. Remove air cleaner intake hose. Disconnect accelerator cable. Remove intake
manifold. See CYLINDER HEAD & MANIFOLDS
in 4.7L article in ENGINES.
2. Remove starter wires and remove starter. To install, reverse removal procedure. Tighten starter bolts to
specification. See TORQUE SPECIFICATIONS
.
1999 Toyota RAV4
1999-2000 STARTING & CHARGING SYSTEMS Starters
Microsoft
Sunday, November 22, 2009 10:19:18 AMPage 20 © 2005 Mitchell Repair Information Company, LLC.
Page 1177 of 1632
Removal & Installation (RAV4)
Disconnect negative battery cable. Remove engine coolant reservoir. Disconnect relay connectors, PCV hose,
intake air temperature sensor connector, air cleaner intake hose, remaining hoses and lines for air cleaner
removal. Remove air cleaner assembly. Disconnect starter connector. Remove starter wires and remove starter.
To install, reverse removal procedure. Tighten starter bolts to specification. See TORQUE
SPECIFICATIONS .
Removal & Installation (Tacoma, Tundra V6 & 4Runner)
Removal and installation is basically an unbolt and bolt-on procedure. Tighten starter bolts to specification. See
TORQUE SPECIFICATIONS
.
OVERHAUL
NOTE: See Fig. 17 for overhaul procedure.
1999 Toyota RAV4
1999-2000 STARTING & CHARGING SYSTEMS Starters
Microsoft
Sunday, November 22, 2009 10:19:18 AMPage 22 © 2005 Mitchell Repair Information Company, LLC.