diagram TOYOTA RAV4 1996 Service Owner's Guide
[x] Cancel search | Manufacturer: TOYOTA, Model Year: 1996, Model line: RAV4, Model: TOYOTA RAV4 1996Pages: 1632, PDF Size: 41.64 MB
Page 280 of 1632
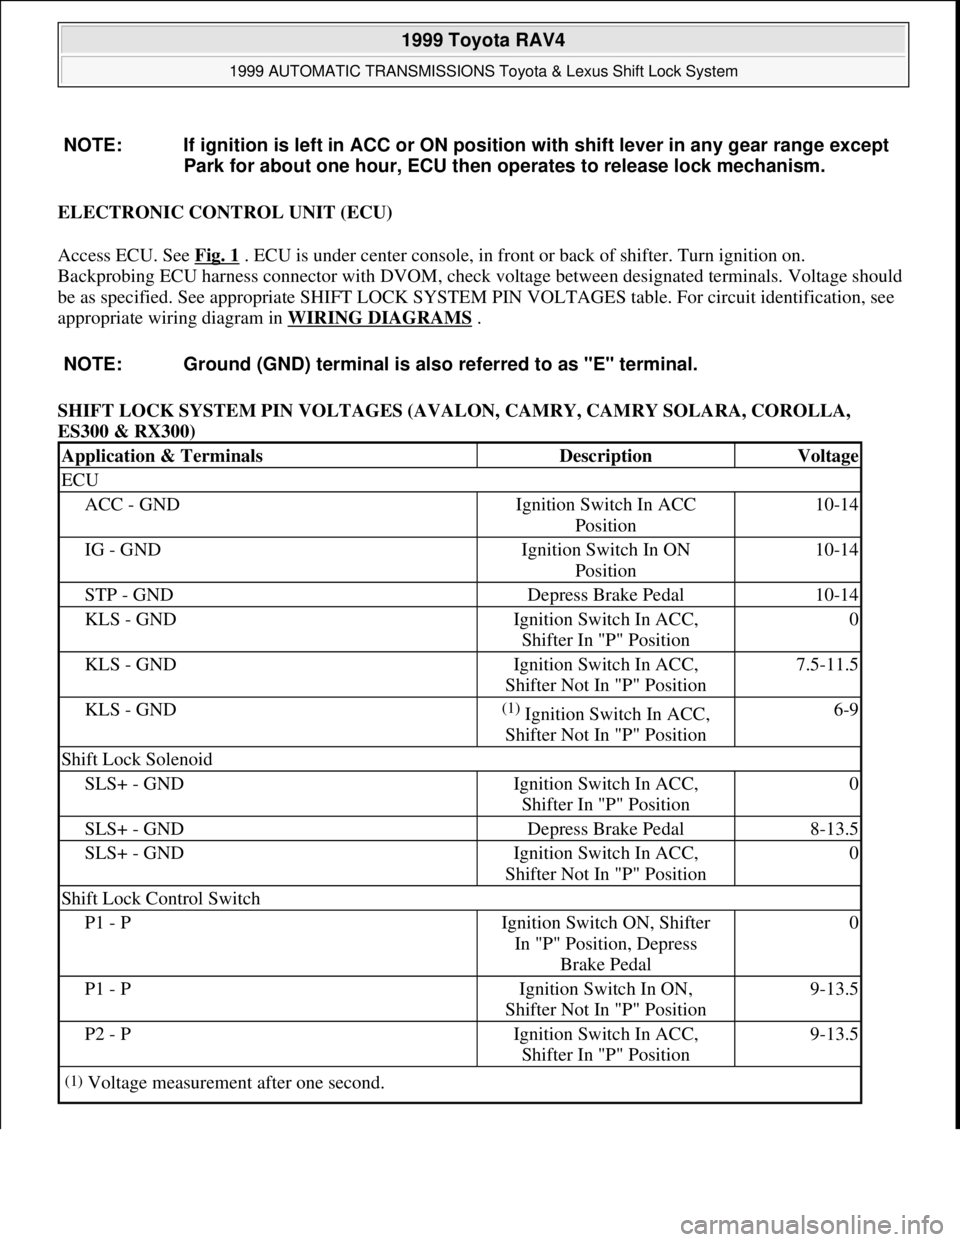
ELECTRONIC CONTROL UNIT (ECU)
Access ECU. See Fig. 1
. ECU is under center console, in front or back of shifter. Turn ignition on.
Backprobing ECU harness connector with DVOM, check voltage between designated terminals. Voltage should
be as specified. See appropriate SHIFT LOCK SYSTEM PIN VOLTAGES table. For circuit identification, see
appropriate wiring diagram in WIRING DIAGRAMS
.
SHIFT LOCK SYSTEM PIN VOLTAGES (AVALON, CAMRY, CAMRY SOLARA, COROLLA,
ES300 & RX300) NOTE: If ignition is left in ACC or ON position with shift lever in any gear range except
Park for about one hour, ECU then operates to release lock mechanism.
NOTE: Ground (GND) terminal is also referred to as "E" terminal.
Application & TerminalsDescriptionVoltage
ECU
ACC - GNDIgnition Switch In ACC
Position10-14
IG - GNDIgnition Switch In ON
Position10-14
STP - GNDDepress Brake Pedal10-14
KLS - GNDIgnition Switch In ACC,
Shifter In "P" Position0
KLS - GNDIgnition Switch In ACC,
Shifter Not In "P" Position7.5-11.5
KLS - GND(1) Ignition Switch In ACC,
Shifter Not In "P" Position6-9
Shift Lock Solenoid
SLS+ - GNDIgnition Switch In ACC,
Shifter In "P" Position0
SLS+ - GNDDepress Brake Pedal8-13.5
SLS+ - GNDIgnition Switch In ACC,
Shifter Not In "P" Position0
Shift Lock Control Switch
P1 - PIgnition Switch ON, Shifter
In "P" Position, Depress
Brake Pedal0
P1 - PIgnition Switch In ON,
Shifter Not In "P" Position9-13.5
P2 - PIgnition Switch In ACC,
Shifter In "P" Position9-13.5
(1)Voltage measurement after one second.
1999 Toyota RAV4
1999 AUTOMATIC TRANSMISSIONS Toyota & Lexus Shift Lock System
Microsoft
Sunday, November 22, 2009 10:46:00 AMPage 3 © 2005 Mitchell Repair Information Company, LLC.
Page 285 of 1632
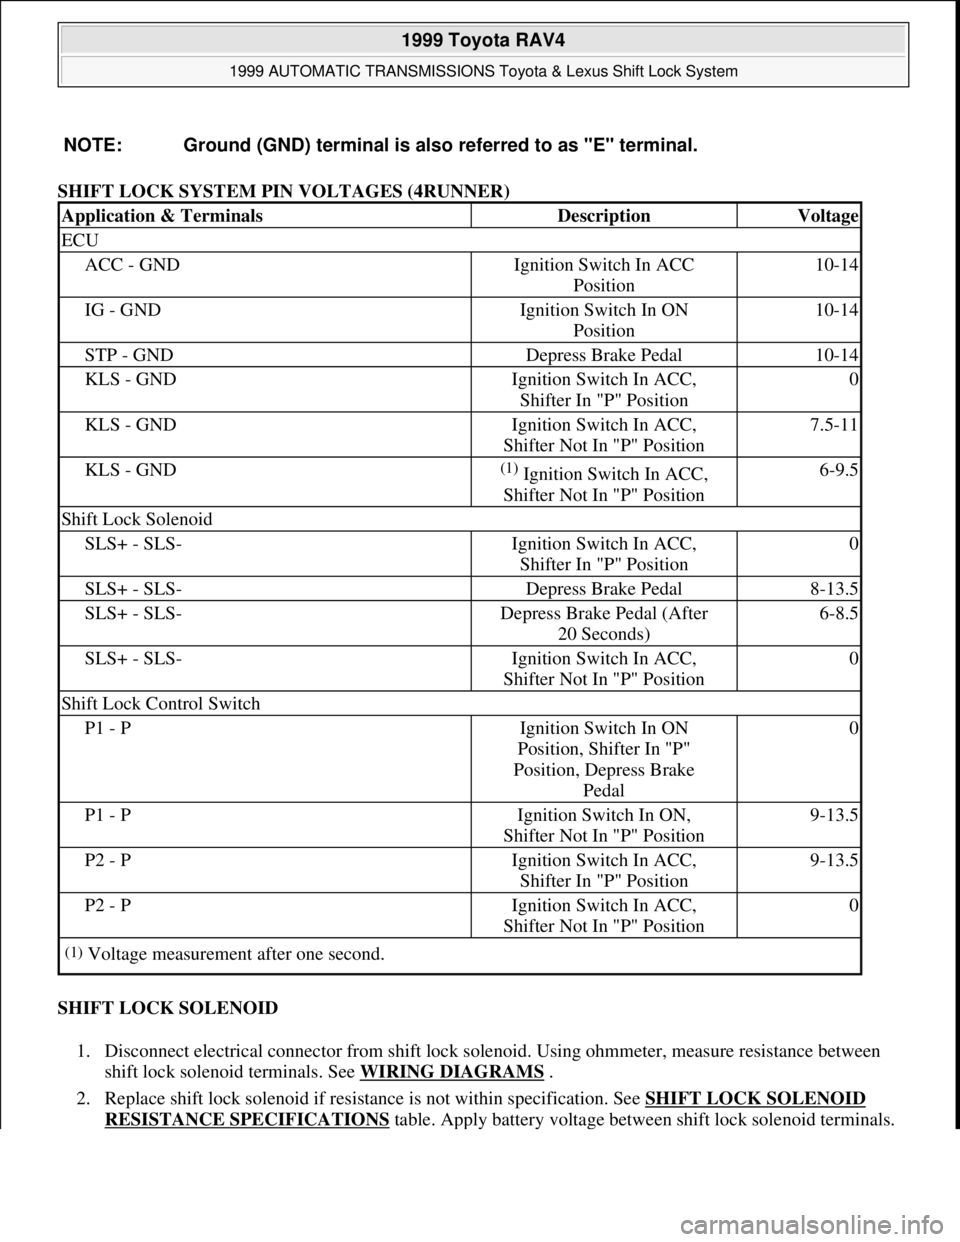
SHIFT LOCK SYSTEM PIN VOLTAGES (4RUNNER)
SHIFT LOCK SOLENOID
1. Disconnect electrical connector from shift lock solenoid. Using ohmmeter, measure resistance between
shift lock solenoid terminals. See WIRING DIAGRAMS
.
2. Replace shift lock solenoid if resistance is not within specification. See SHIFT LOCK SOLENOID
RESISTANCE SPECIFICATIONStable. Apply battery voltage between shift lock solenoid terminals. NOTE: Ground (GND) terminal is also referred to as "E" terminal.
Application & TerminalsDescriptionVoltage
ECU
ACC - GNDIgnition Switch In ACC
Position10-14
IG - GNDIgnition Switch In ON
Position10-14
STP - GNDDepress Brake Pedal10-14
KLS - GNDIgnition Switch In ACC,
Shifter In "P" Position0
KLS - GNDIgnition Switch In ACC,
Shifter Not In "P" Position7.5-11
KLS - GND(1) Ignition Switch In ACC,
Shifter Not In "P" Position6-9.5
Shift Lock Solenoid
SLS+ - SLS-Ignition Switch In ACC,
Shifter In "P" Position0
SLS+ - SLS-Depress Brake Pedal8-13.5
SLS+ - SLS-Depress Brake Pedal (After
20 Seconds)6-8.5
SLS+ - SLS-Ignition Switch In ACC,
Shifter Not In "P" Position0
Shift Lock Control Switch
P1 - PIgnition Switch In ON
Position, Shifter In "P"
Position, Depress Brake
Pedal0
P1 - PIgnition Switch In ON,
Shifter Not In "P" Position9-13.5
P2 - PIgnition Switch In ACC,
Shifter In "P" Position9-13.5
P2 - PIgnition Switch In ACC,
Shifter Not In "P" Position0
(1)Voltage measurement after one second.
1999 Toyota RAV4
1999 AUTOMATIC TRANSMISSIONS Toyota & Lexus Shift Lock System
Microsoft
Sunday, November 22, 2009 10:46:00 AMPage 8 © 2005 Mitchell Repair Information Company, LLC.
Page 286 of 1632
Replace shift lock solenoid if operating sound cannot be heard.
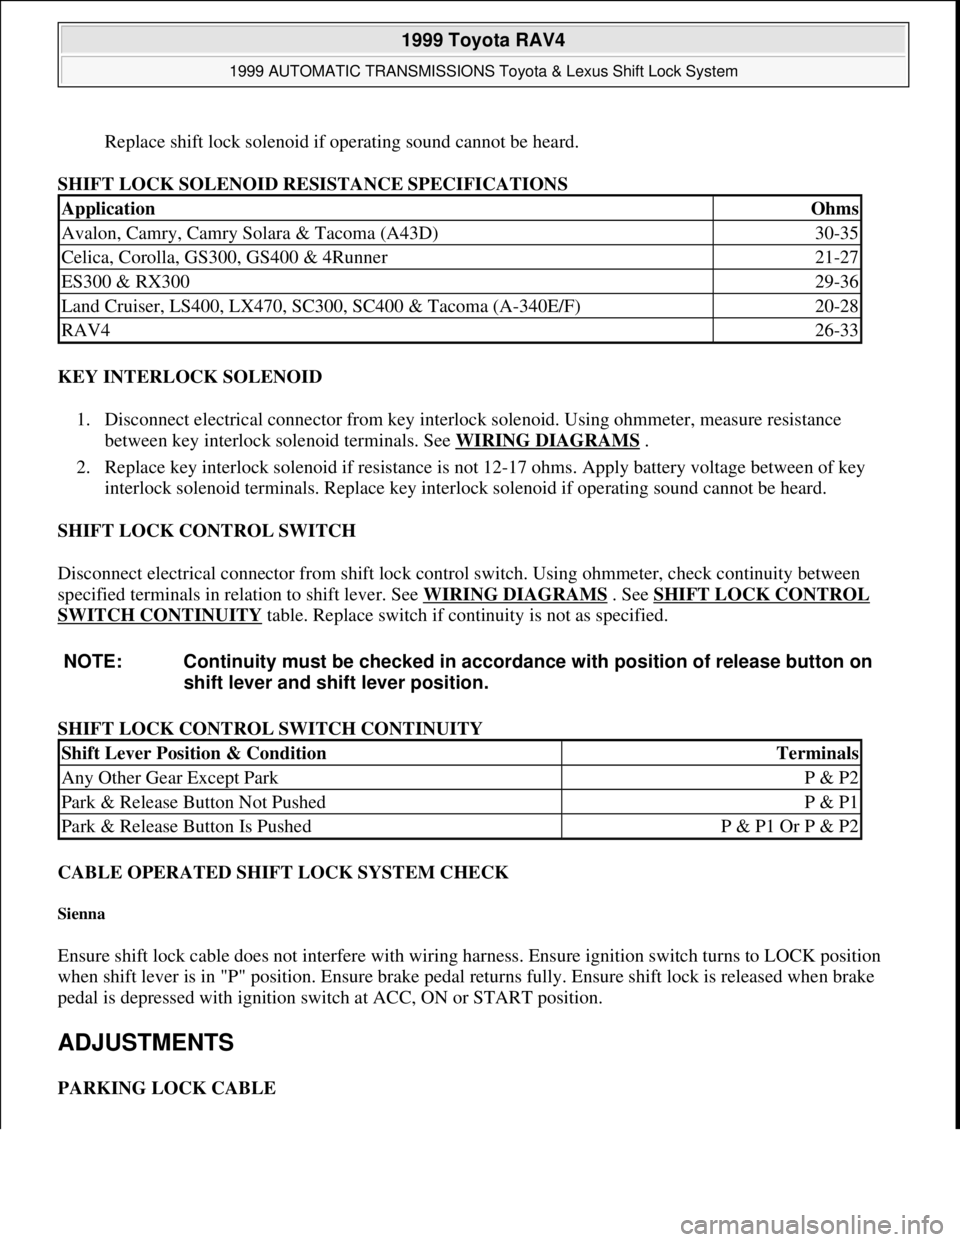
SHIFT LOCK SOLENOID RESISTANCE SPECIFICATIONS
KEY INTERLOCK SOLENOID
1. Disconnect electrical connector from key interlock solenoid. Using ohmmeter, measure resistance
between key interlock solenoid terminals. See WIRING DIAGRAMS
.
2. Replace key interlock solenoid if resistance is not 12-17 ohms. Apply battery voltage between of key
interlock solenoid terminals. Replace key interlock solenoid if operating sound cannot be heard.
SHIFT LOCK CONTROL SWITCH
Disconnect electrical connector from shift lock control switch. Using ohmmeter, check continuity between
specified terminals in relation to shift lever. See WIRING DIAGRAMS
. See SHIFT LOCK CONTROL
SWITCH CONTINUITY table. Replace switch if continuity is not as specified.
SHIFT LOCK CONTROL SWITCH CONTINUITY
CABLE OPERATED SHIFT LOCK SYSTEM CHECK
Sienna
Ensure shift lock cable does not interfere with wiring harness. Ensure ignition switch turns to LOCK position
when shift lever is in "P" position. Ensure brake pedal returns fully. Ensure shift lock is released when brake
pedal is depressed with ignition switch at ACC, ON or START position.
ADJUSTMENTS
PARKING LOCK CABLE
ApplicationOhms
Avalon, Camry, Camry Solara & Tacoma (A43D)30-35
Celica, Corolla, GS300, GS400 & 4Runner21-27
ES300 & RX30029-36
Land Cruiser, LS400, LX470, SC300, SC400 & Tacoma (A-340E/F)20-28
RAV426-33
NOTE: Continuity must be checked in accordance with position of release button on
shift lever and shift lever position.
Shift Lever Position & ConditionTerminals
Any Other Gear Except ParkP & P2
Park & Release Button Not PushedP & P1
Park & Release Button Is PushedP & P1 Or P & P2
1999 Toyota RAV4
1999 AUTOMATIC TRANSMISSIONS Toyota & Lexus Shift Lock System
Microsoft
Sunday, November 22, 2009 10:46:00 AMPage 9 © 2005 Mitchell Repair Information Company, LLC.
Page 287 of 1632
Sienna
Place shift lever in "P" position. Turn ignition switch to LOCK position. Loosen 2 bolts and ensure pedal button
touches pedal plate cushion. Tighten 2 bolts to 97 INCH lbs. (11 N.m).
WIRING DIAGRAMS
1999 Toyota RAV4
1999 AUTOMATIC TRANSMISSIONS Toyota & Lexus Shift Lock System
Microsoft
Sunday, November 22, 2009 10:46:00 AMPage 10 © 2005 Mitchell Repair Information Company, LLC.
Page 289 of 1632

Fig. 2: Shift Interlock System Wiring Diagram (1999 ES300)
1999 Toyota RAV4
1999 AUTOMATIC TRANSMISSIONS Toyota & Lexus Shift Lock System
Microsoft
Sunday, November 22, 2009 10:46:00 AMPage 12 © 2005 Mitchell Repair Information Company, LLC.
Page 291 of 1632

Fig. 3: Shift Interlock System Wiring Diagram (1999 GS300)
1999 Toyota RAV4
1999 AUTOMATIC TRANSMISSIONS Toyota & Lexus Shift Lock System
Microsoft
Sunday, November 22, 2009 10:46:00 AMPage 14 © 2005 Mitchell Repair Information Company, LLC.
Page 293 of 1632

Fig. 4: Shift Interlock System Wiring Diagram (1999 GS400)
1999 Toyota RAV4
1999 AUTOMATIC TRANSMISSIONS Toyota & Lexus Shift Lock System
Microsoft
Sunday, November 22, 2009 10:46:00 AMPage 16 © 2005 Mitchell Repair Information Company, LLC.
Page 295 of 1632

Fig. 5: Shift Interlock System Wiring Diagram (1999 LS400)
1999 Toyota RAV4
1999 AUTOMATIC TRANSMISSIONS Toyota & Lexus Shift Lock System
Microsoft
Sunday, November 22, 2009 10:46:00 AMPage 18 © 2005 Mitchell Repair Information Company, LLC.
Page 297 of 1632

Fig. 6: Shift Interlock System Wiring Diagram (1999 LX470)
1999 Toyota RAV4
1999 AUTOMATIC TRANSMISSIONS Toyota & Lexus Shift Lock System
Microsoft
Sunday, November 22, 2009 10:46:00 AMPage 20 © 2005 Mitchell Repair Information Company, LLC.
Page 299 of 1632

Fig. 7: Shift Interlock System Wiring Diagram (1999 RX300)
1999 Toyota RAV4
1999 AUTOMATIC TRANSMISSIONS Toyota & Lexus Shift Lock System
Microsoft
Sunday, November 22, 2009 10:46:00 AMPage 22 © 2005 Mitchell Repair Information Company, LLC.