USB TOYOTA RAV4 2019 Owners Manual (in English)
[x] Cancel search | Manufacturer: TOYOTA, Model Year: 2019, Model line: RAV4, Model: TOYOTA RAV4 2019Pages: 728, PDF Size: 21.09 MB
Page 4 of 728

4TABLE OF CONTENTS
Home screen.................386
Entering letters and num- bers/list screen operation.................................... 387
Screen adjustment ........ 390
Linking multi-information dis- play and the system .... 391
5-3. Connectivity settings Registering/Connecting a Bluetooth
® device ....... 392
Setting Bluetooth
® details
.................................... 396
Wi-Fi
® Hotspot .............. 403
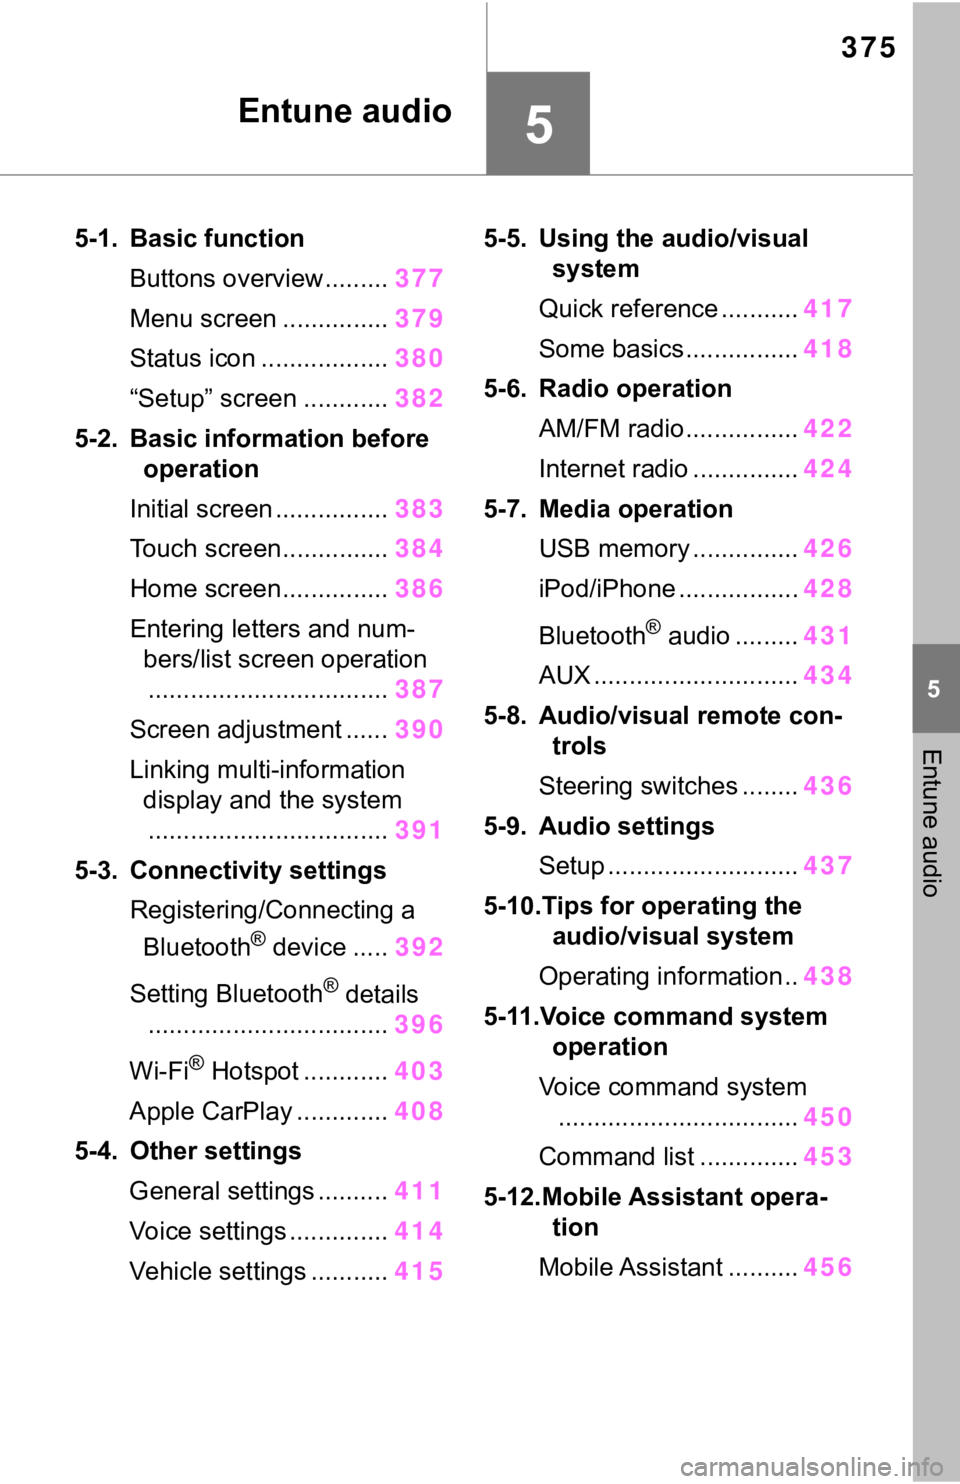
Apple CarPlay ............... 408
5-4. Other settings General settings ............ 411
Voice settings ................ 414
Vehicle settings ............. 415
5-5. Using the audio/visual sys- tem
Quick reference............. 417
Some basics ................. 418
5-6. Radio operation AM/FM radio ................. 422
Internet radio ................. 424
5-7. Media operation USB memory................. 426
iPod/iPhone................... 428
Bluetooth
® audio ........... 431
AUX............................... 434
5-8. Audio/visual remote con- trols
Steering switches .......... 4365-9. Audio settings
Setup ............................. 437
5-10.Tips for operating the audio/visual system
Operating information .... 438
5-11.Voice command system operation
Voice command system 450
Command list ................ 453
5-12.Mobile Assistant operation Mobile Assistant ............ 456
5-13.Phone operation (Hands- free system for cellular
phones)
Quick reference ............. 458
Some basics .................. 459
Placing a call using the Blue- tooth
® hands-free system
.................................... 463
Receiving a call using the Bluetooth
® hands-free sys-
tem .............................. 466
Talking on the Bluetooth
®
hands-free system ....... 467
Bluetooth
® phone message
function ........................ 469
5-14.Phone settings Setup ............................. 474
5-15.What to do if... (Blue- tooth
®)
Troubleshooting............. 484
5-16.Toyota Entune overview Toyota Entune ............... 488
Type A: Function achieved by using a smartphone or DCM.................................... 489
Page 375 of 728
375
5
5
Entune audio
Entune audio
5-1. Basic functionButtons overview......... 377
Menu screen ............... 379
Status icon .................. 380
“Setup” screen ............ 382
5-2. Basic information before operation
Initial screen ................ 383
Touch screen............... 384
Home screen............... 386
Entering letters and num- bers/list screen operation.................................. 387
Screen adjustment ...... 390
Linking multi-information display and the system
.................................. 391
5-3. Connectivity settings Registering/Connecting a Bluetooth
® device ..... 392
Setting Bluetooth
® details
.................................. 396
Wi-Fi
® Hotspot ............ 403
Apple CarPlay ............. 408
5-4. Other settings General settings .......... 411
Voice settings .............. 414
Vehicle settings ........... 4155-5. Using the audio/visual
system
Quick reference ........... 417
Some basics................ 418
5-6. Radio operation AM/FM radio................ 422
Internet radio ............... 424
5-7. Media operation USB memory ............... 426
iPod/iPhone ................. 428
Bluetooth
® audio ......... 431
AUX ............................. 434
5-8. Audio/visual remote con- trols
Steering switches ........ 436
5-9. Audio settings Setup ........................... 437
5-10.Tips for operating the audio/visual system
Operating information.. 438
5-11.Voice command system operation
Voice command system .................................. 450
Command list .............. 453
5-12.Mobile Assistant opera- tion
Mobile Assistant .......... 456
Page 408 of 728
4085-3. Connectivity settings
*: This function is not made avail-able in some countries or areas.
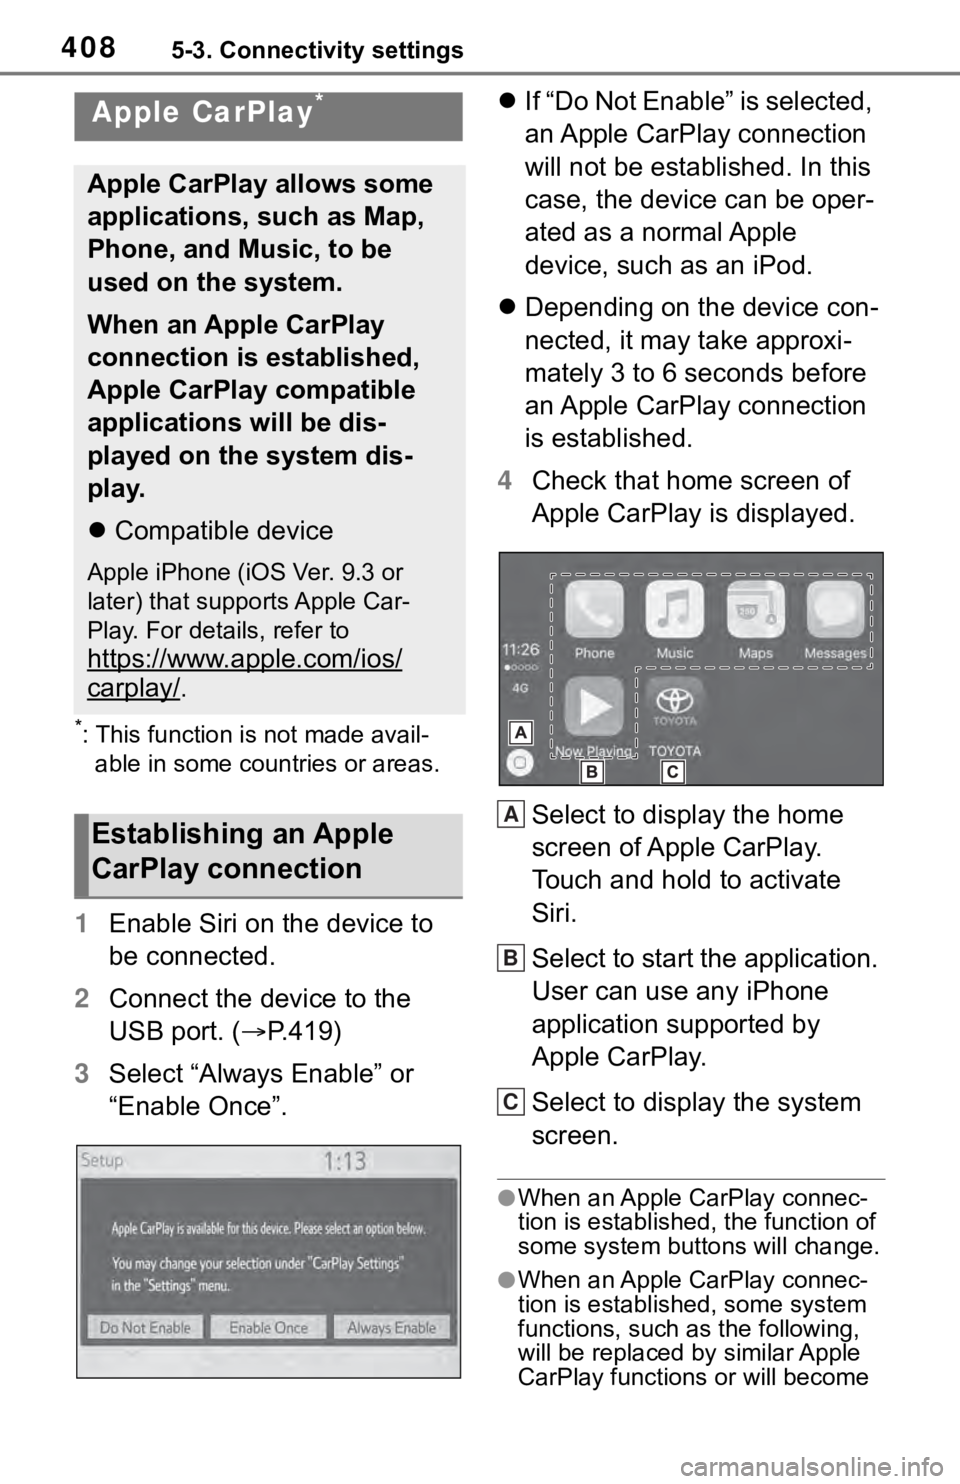
1 Enable Siri on the device to
be connected.
2 Connect the device to the
USB port. ( P.419)
3 Select “Always Enable” or
“Enable Once”.
If “Do Not Enable” is selected,
an Apple CarPlay connection
will not be established. In this
case, the device can be oper-
ated as a normal Apple
device, such as an iPod.
Depending on the device con-
nected, it may take approxi-
mately 3 to 6 seconds before
an Apple CarPlay connection
is established.
4 Check that home screen of
Apple CarPlay is displayed.
Select to display the home
screen of Apple CarPlay.
Touch and hold to activate
Siri.
Select to start the application.
User can use any iPhone
application supported by
Apple CarPlay.
Select to display the system
screen.
●When an Apple CarPlay connec-
tion is established, the function of
some system bu ttons will change.
●When an Apple CarPlay connec-
tion is established, some system
functions, such as the following,
will be replaced by similar Apple
CarPlay function s or will become
Apple CarPlay*
Apple CarPlay allows some
applications, such as Map,
Phone, and Music, to be
used on the system.
When an Apple CarPlay
connection is established,
Apple CarPlay compatible
applications will be dis-
played on the system dis-
play.
Compatible device
Apple iPhone (iOS Ver. 9.3 or
later) that supports Apple Car-
Play. For details, refer to
https://www.apple.com/ios/
carplay/.
Establishing an Apple
CarPlay connectionA
B
C
Page 409 of 728
4095-3. Connectivity settings
5
Entune audio
unavailable:
• iPod (Audio Playback)
• Hands-free Phone
• USB audio/USB video
• Bluetooth
® audio
• Bluetooth® phone
• Toyota Entune A pp Suite Connect
●Siri guidance volume level can be
changed on the voice settings
screen. (P.414)
●To disable Apple CarPlay while a
device is connected, set “Apple
CarPlay” on the general settings
screen to off. ( P.411)
●Apple CarPlay is an application
developed by Apple Inc. Its func-
tions and services may be termi-
nated or changed without notice
depending on the connected
device’s operation system, hard-
ware and software, or due to
changes in Apple CarPlay specifi-
cations.
●In some regions, speed limit infor-
mation is displayed on the route
guidance screen of the iOS 11 or
later map application. The dis-
played information is based on the
information in the map application,
so it may differ from the speed
limit information displayed on the
multi-information display.
●Use of the Apple CarPlay logo
means that a vehicle user inter-
face meets Apple performance
standards. Apple is not responsi-
ble for the operation of this vehicle
or its compliance with safety and
regulatory standards. Please note
that the use of this product with
iPhone or iPod may affect wire-
less performance.
●Apple CarPlay is a trademark of
Apple Inc.
If you are experiencing difficulti es with Apple CarPlay, check the fol-
lowing table.
WA R N I N G
●Do not connect iPhone or oper-
ate the controls while driving.
NOTICE
●Do not leave your iPhone in the
vehicle. In particular, high tem-
peratures inside the vehicle
may damage the iPhone.
●Do not push down on or apply
unnecessary pressure to the
iPhone while it is connected as
this may damage the iPhone or
its terminal.
●Do not insert foreign objects into
the port as this may damage the
iPhone or its terminal.
Troubleshooting
Page 410 of 728
4105-3. Connectivity settings
SymptomSolution
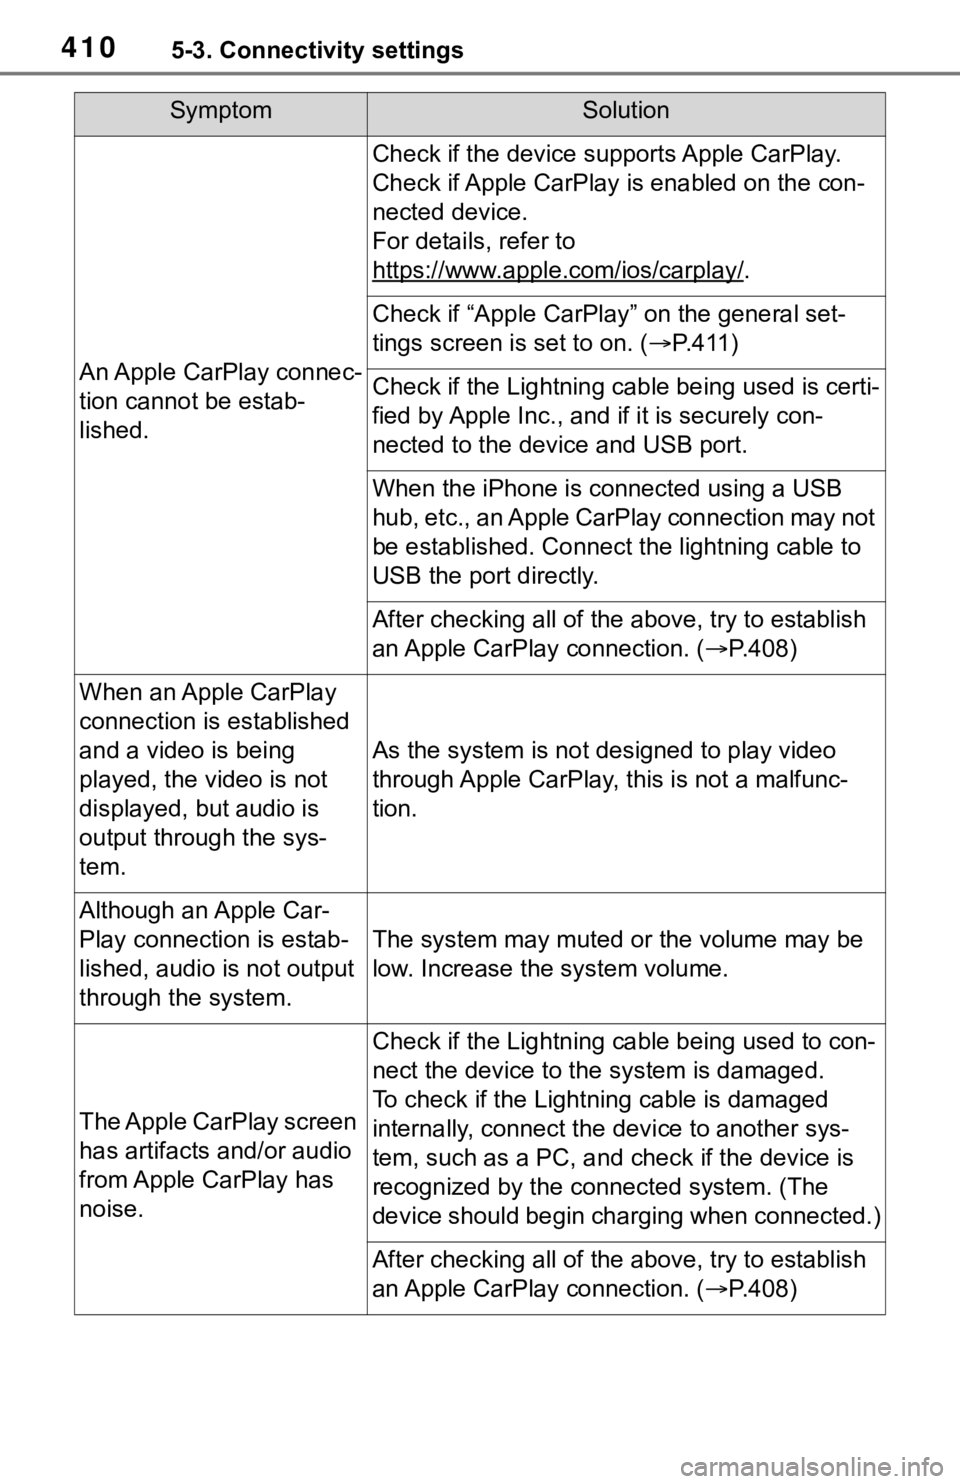
An Apple CarPlay connec-
tion cannot be estab-
lished.
Check if the device supports Apple CarPlay.
Check if Apple CarPlay is enabled on the con-
nected device.
For details, refer to
https://www.apple.com/ios/carplay/
.
Check if “Apple CarPlay” on the general set-
tings screen is set to on. (P.411)
Check if the Lightning cable being used is certi-
fied by Apple Inc., and i f it is securely con-
nected to the devic e and USB port.
When the iPhone is c onnected using a USB
hub, etc., an Apple CarPlay connection may not
be established. Connect the lightning cable to
USB the port directly.
After checking all of the above, try to establish
an Apple CarPlay connection. ( P.408)
When an Apple CarPlay
connection is established
and a video is being
played, the video is not
displayed, but audio is
output through the sys-
tem.
As the system is not designed to play video
through Apple CarPlay, this is not a malfunc-
tion.
Although an Apple Car-
Play connection is estab-
lished, audio is not output
through the system.
The system may muted or the volume may be
low. Increase the system volume.
The Apple CarPlay screen
has artifacts and/or audio
from Apple CarPlay has
noise.
Check if the Lightning cable being used to con-
nect the device to th e system is damaged.
To check if the Lightning cable is damaged
internally, connect the device to another sys-
tem, such as a PC, and check if the device is
recognized by the conn ected system. (The
device should begin charging when connected.)
After checking all of the above, try to establish
an Apple CarPlay connection. ( P.408)
Page 411 of 728
4115-4. Other settings
5
Entune audio
5-4.Other settings
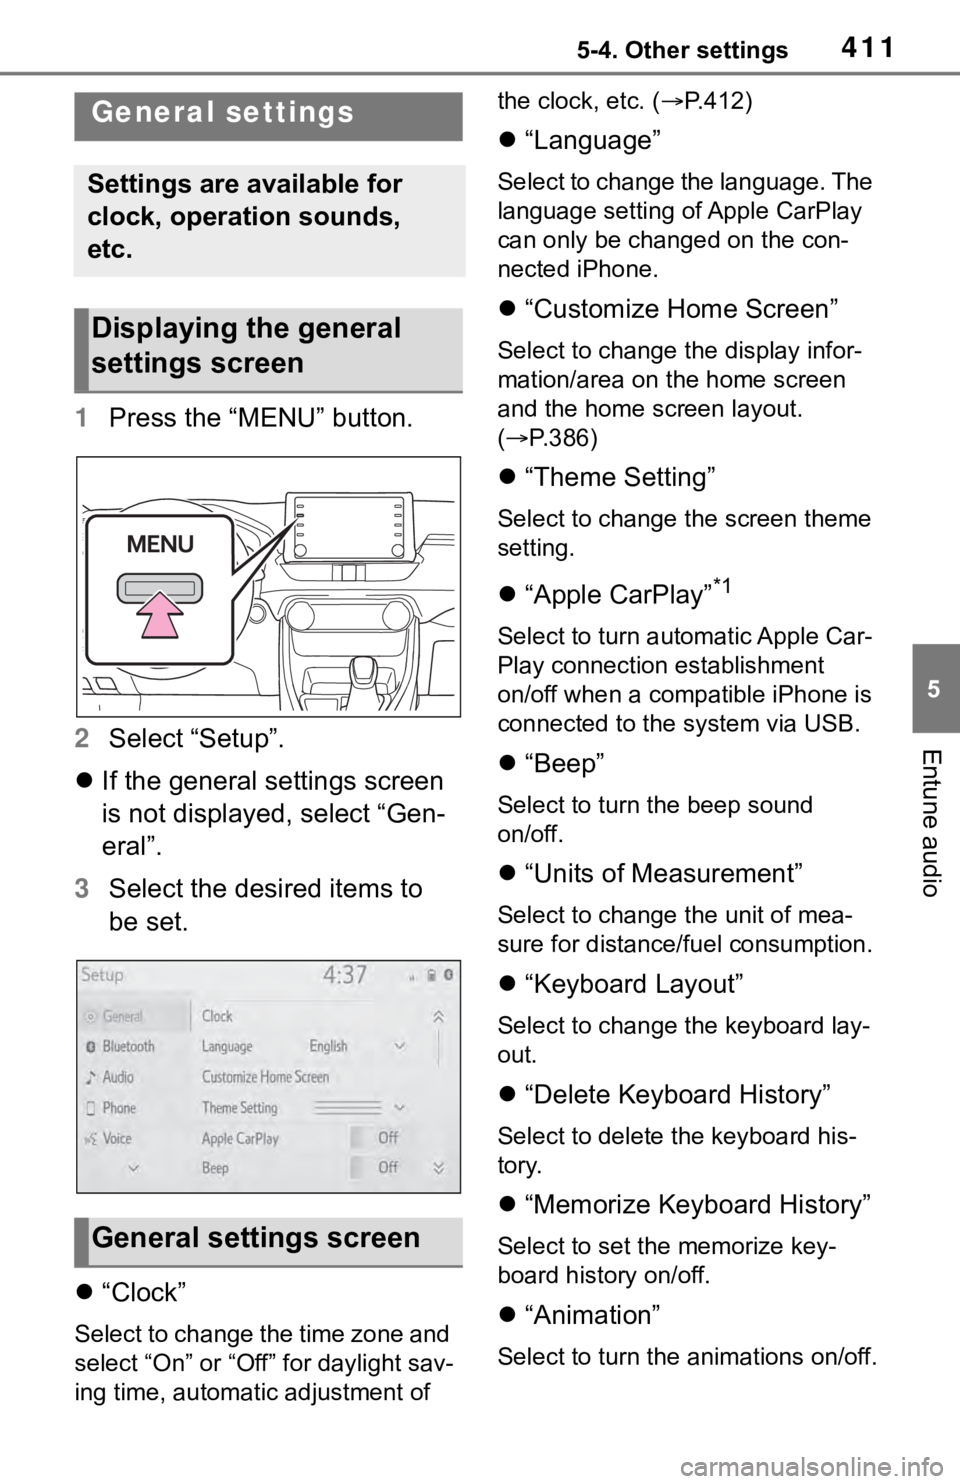
1Press the “MENU” button.
2 Select “Setup”.
If the general settings screen
is not displayed, select “Gen-
eral”.
3 Select the desired items to
be set.
“Clock”
Select to change the time zone and
select “On” or “Off” for daylight sav-
ing time, automatic adjustment of the clock, etc. (
P.412)
“Language”
Select to change the language. The
language setting of Apple CarPlay
can only be chan ged on the con-
nected iPhone.
“Customize Home Screen”
Select to change the display infor-
mation/area on the home screen
and the home screen layout.
( P.386)
“Theme Setting”
Select to change the screen theme
setting.
“Apple CarPlay”*1
Select to turn automatic Apple Car-
Play connection establishment
on/off when a compatible iPhone is
connected to the system via USB.
“Beep”
Select to turn the beep sound
on/off.
“Units of Measurement”
Select to change the unit of mea-
sure for distance/fuel consumption.
“Keyboard Layout”
Select to change the keyboard lay-
out.
“Delete Keyboard History”
Select to delete the keyboard his-
tory.
“Memorize Keyboard History”
Select to set the memorize key-
board history on/off.
“Animation”
Select to turn the animations on/off.
General settings
Settings are available for
clock, operation sounds,
etc.
Displaying the general
settings screen
General settings screen
Page 417 of 728
4175-5. Using the audio/visual system
5
Entune audio
5-5.Using the audio/visual system
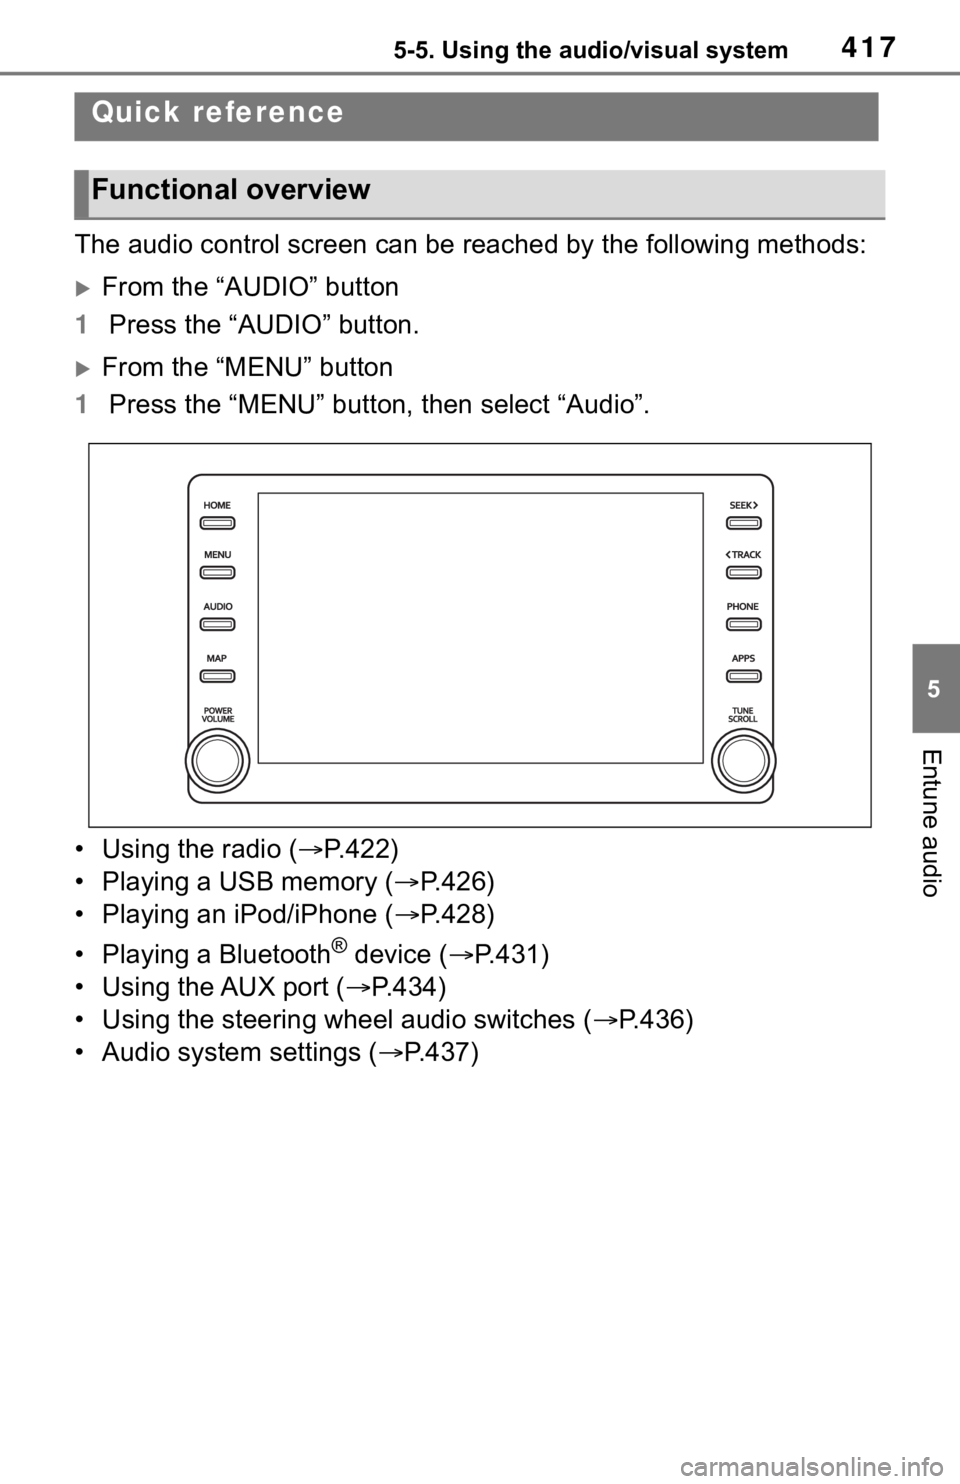
The audio control screen can be reached by the following methods:
From the “AUDIO” button
1 Press the “AUDIO” button.
From the “MENU” button
1 Press the “MENU” button, then select “Audio”.
• Using the radio ( P.422)
• Playing a USB memory ( P.426)
• Playing an iPod/iPhone ( P.428)
• Playing a Bluetooth
® device ( P.431)
• Using the AUX port ( P.434)
• Using the steering wheel audio switches ( P.436)
• Audio system settings ( P.437)
Quick reference
Functional overview
Page 418 of 728
4185-5. Using the audio/visual system
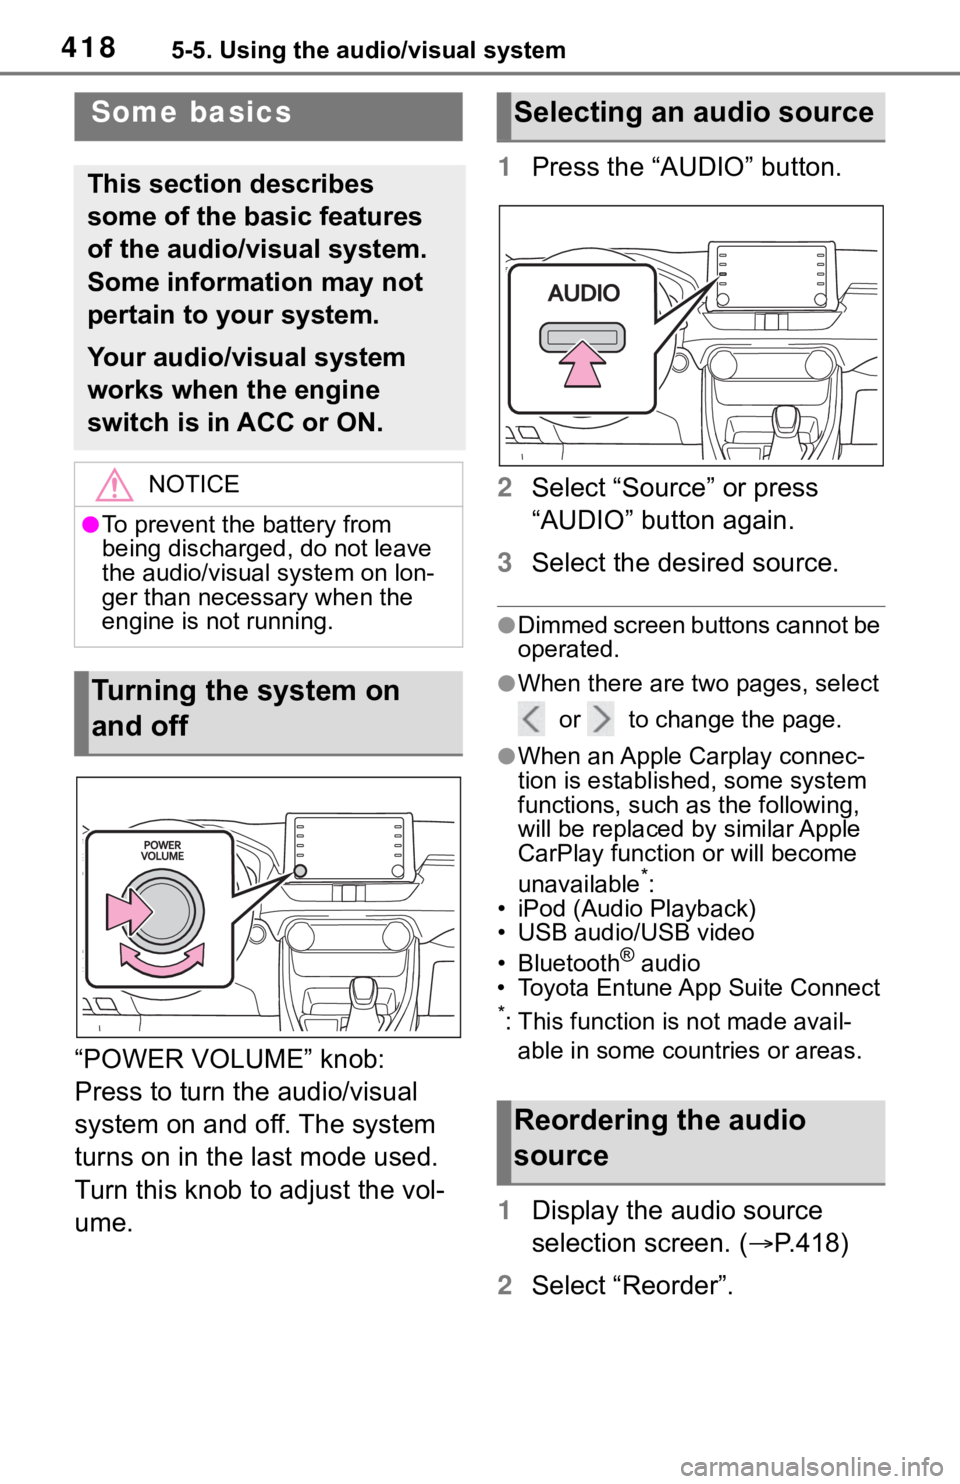
“POWER VOLUME” knob:
Press to turn the audio/visual
system on and off. The system
turns on in the last mode used.
Turn this knob to adjust the vol-
ume.1
Press the “AUDIO” button.
2 Select “Source” or press
“AUDIO” button again.
3 Select the desired source.
●Dimmed screen buttons cannot be
operated.
●When there are tw o pages, select
or to change the page.
●When an Apple Carplay connec-
tion is established, some system
functions, such as the following,
will be replaced by similar Apple
CarPlay function or will become
unavailable
*:
• iPod (Audio Playback)
• USB audio/USB video
• Bluetooth
® audio
• Toyota Entune App Suite Connect
*: This function is not made avail-
able in some countries or areas.
1 Display the audio source
selection screen. ( P.418)
2 Select “Reorder”.
Some basics
This section describes
some of the basic features
of the audio/visual system.
Some information may not
pertain to your system.
Your audio/visual system
works when the engine
switch is in ACC or ON.
NOTICE
●To prevent the battery from
being discharged, do not leave
the audio/visual system on lon-
ger than necessary when the
engine is not running.
Turning the system on
and off
Selecting an audio source
Reordering the audio
source
Page 419 of 728
4195-5. Using the audio/visual system
5
Entune audio
3Select the desired audio
source then or to reor-
der.
4 Select “OK”.
1 Connect a device.
Turn on the power of the
device if it is not turned on.
●The AUX port only supports audio
input.
●If a USB hub is plugged-in, two
devices can be connected at a
time.
●Even if a USB hub is used to con-
nect more than two USB devices,
only the first two connected
devices will be recognized.
●If a USB hub that has more than
two ports is connected to the USB
port, devices connected to the
USB hub may not charge or be
inoperable, as the supply of cur-
rent may be insufficient.
1 Display the audio control
screen. ( P.418)
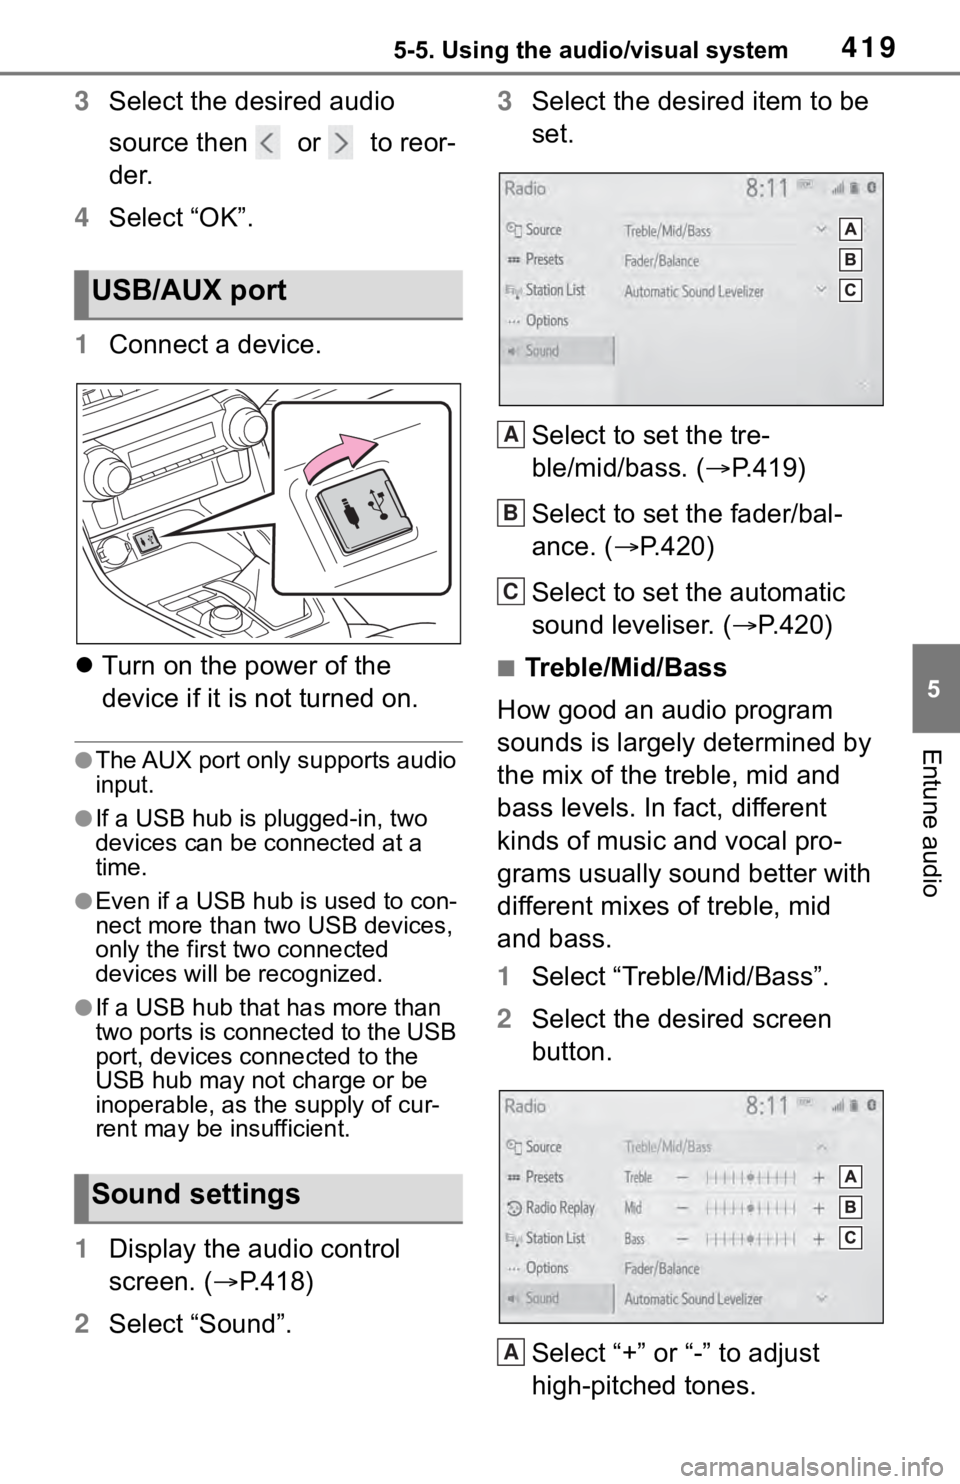
2 Select “Sound”. 3
Select the desired item to be
set.
Select to set the tre-
ble/mid/bass. ( P.419)
Select to set the fader/bal-
ance. ( P.420)
Select to set the automatic
sound leveliser. ( P.420)
■Treble/Mid/Bass
How good an audio program
sounds is largely determined by
the mix of the treble, mid and
bass levels. In fact, different
kinds of music and vocal pro-
grams usually sound better with
different mixes of treble, mid
and bass.
1 Select “Treble/Mid/Bass”.
2 Select the desired screen
button.
Select “+” or “-” to adjust
high-pitched tones.
USB/AUX port
Sound settings
A
B
C
A
Page 420 of 728
4205-5. Using the audio/visual system
Select “+” or “-” to adjust mid-
pitched tones.
Select “+” or “-” to adjust low-
pitched tones.
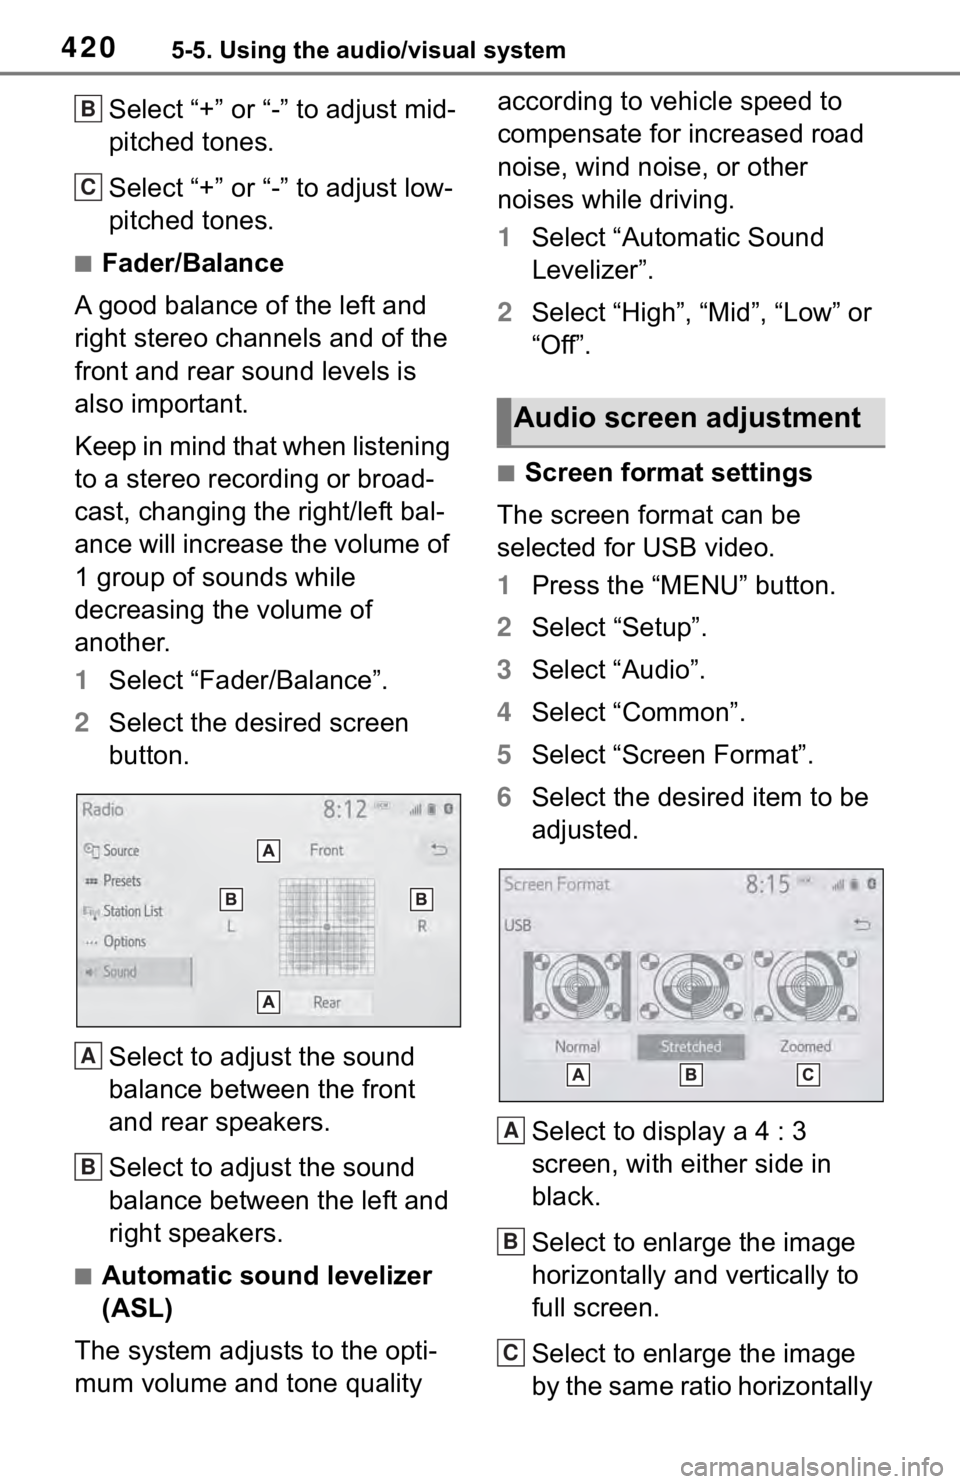
■Fader/Balance
A good balance of the left and
right stereo channels and of the
front and rear sound levels is
also important.
Keep in mind that when listening
to a stereo recording or broad-
cast, changing the right/left bal-
ance will increase the volume of
1 group of sounds while
decreasing the volume of
another.
1 Select “Fader/Balance”.
2 Select the desired screen
button.
Select to adjust the sound
balance between the front
and rear speakers.
Select to adjust the sound
balance between the left and
right speakers.
■Automatic sound levelizer
(ASL)
The system adjusts to the opti-
mum volume and tone quality according to vehicle speed to
compensate for increased road
noise, wind noise, or other
noises while driving.
1
Select “Automatic Sound
Levelizer”.
2 Select “High”, “Mid”, “Low” or
“Off”.
■Screen format settings
The screen format can be
selected for USB video.
1 Press the “MENU” button.
2 Select “Setup”.
3 Select “Audio”.
4 Select “Common”.
5 Select “Screen Format”.
6 Select the desired item to be
adjusted.
Select to display a 4 : 3
screen, with either side in
black.
Select to enlarge the image
horizontally and vertically to
full screen.
Select to enlarge the image
by the same ratio horizontally
B
C
A
B
Audio screen adjustment
A
B
C