heating TOYOTA RAV4 2019 Owners Manual (in English)
[x] Cancel search | Manufacturer: TOYOTA, Model Year: 2019, Model line: RAV4, Model: TOYOTA RAV4 2019Pages: 728, PDF Size: 21.09 MB
Page 83 of 728
832-1. Instrument cluster
2
Vehicle status information and indicators
reset. Trip meters “A” and “B” c an be used to record and displa y different
distances independently.
Shift position and shift range indicator
Displays the selected shift posit ion or selected shift range (P.200)
Engine coolant temperature gauge
Displays the engine c oolant temperature
■The meters and display illumi-
nate when
The engine switch is in ON.
■Outside temperature display
●In the following si tuations, the cor-
rect outside tempe rature may not
be displayed, or the display may
take longer than normal to
change.
• When stopped, or driving at low speeds (less than 12 mph [20
km/h])
• When the outside temperature has changed su ddenly (at the
entrance/exit of a garage, tunnel,
etc.)
●When “--” or “E” is displayed, the
system may be malfunctioning.
Take your vehicle to your Toyota
dealer.
●Displays the outside temperature
within the range of -40°F (-40°C)
to 122°F (50°C).
●When the outside temperature is
approximately 37°F (3°C) or
lower, the indicator will flash
for approximately 10 seconds,
then stay on.
■Liquid crystal display
P. 9 0
H
I
WA R N I N G
■The information display at
low temperatures
Allow the interior of the vehicle to
warm up before using the liquid
crystal information display. At
extremely low temperatures, the
display monitor may respond
slowly, and display changes may
be delayed.
For example, there is a lag
between the driver’s shifting and
the new gear number appearing
on the display. This lag could
cause the driver to downshift
again, causing rapid and exces-
sive engine braking and possibly
an accident resulting in death or
injury.
NOTICE
■To prevent damage to the
engine and its components
●Do not let the indicator needle
of the tachometer enter the red
zone, which indicates the maxi-
mum engine speed.
●The engine may be overheating
if the engine coolant tempera-
ture gauge is in the red zone
(“H”). In this case, immediately
stop the vehicle in a safe place,
and check the engine after it
has cooled completely.
( P.653)
Page 88 of 728
882-1. Instrument cluster
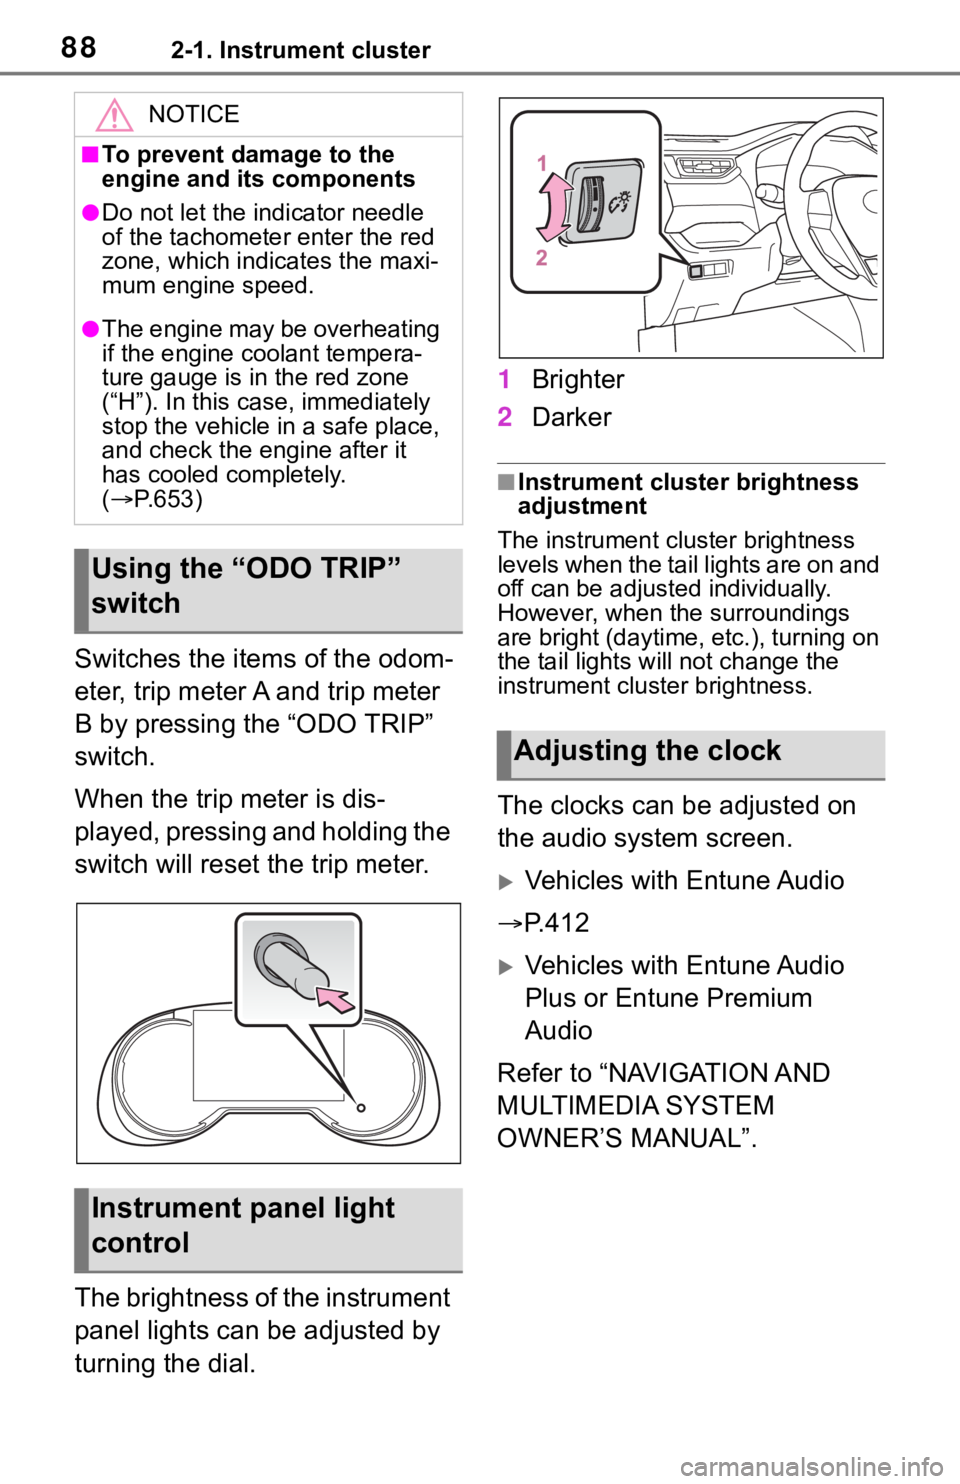
Switches the items of the odom-
eter, trip meter A and trip meter
B by pressing the “ODO TRIP”
switch.
When the trip meter is dis-
played, pressing and holding the
switch will reset the trip meter.
The brightness of the instrument
panel lights can be adjusted by
turning the dial.1
Brighter
2 Darker
■Instrument cluster brightness
adjustment
The instrument cluster brightness
levels when the tail lights are on and
off can be adjusted individually.
However, when the surroundings
are bright (daytime, etc.), turning on
the tail lights will not change the
instrument cluster brightness.
The clocks can be adjusted on
the audio system screen.
Vehicles with Entune Audio
P.412
Vehicles with Entune Audio
Plus or Entune Premium
Audio
Refer to “NAVIGATION AND
MULTIMEDIA SYSTEM
OWNER’S MANUAL”.
NOTICE
■To prevent damage to the
engine and its components
●Do not let the i ndicator needle
of the tachomete r enter the red
zone, which indicates the maxi-
mum engine speed.
●The engine may be overheating
if the engine coolant tempera-
ture gauge is in the red zone
(“H”). In this case, immediately
stop the vehicle in a safe place,
and check the engine after it
has cooled completely.
( P.653)
Using the “ODO TRIP”
switch
Instrument panel light
control
Adjusting the clock
Page 176 of 728
1764-1. Before driving
WA R N I N G
●Always apply the parking brake,
shift the shift lever to P, stop the
engine and lock the vehicle.
Do not leave the vehicle unat-
tended while the engine is run-
ning.
If the vehicle is parked with the
shift lever in P but the parking
brake is not set, the vehicle may
start to move, possibly leading
to an accident.
●Do not touch the exhaust pipes
while the engine is running or
immediately after turning the
engine off.
Doing so may cause burns.
■When taking a nap in the vehi-
cle
Always turn the engine off. Other-
wise, if you accidentally move the
shift lever or dep ress the acceler-
ator pedal, this could cause an
accident or fire due to engine
overheating. Additionally, if the
vehicle is parked in a poorly venti-
lated area, exhaust gases may
collect and enter the vehicle, lead-
ing to death or a serious health
hazard.
■When braking
●When the brakes a re wet, drive
more cautiously.
Braking distance increases
when the brakes are wet, and
this may cause one side of the
vehicle to brake differently than
the other side. Also, the parking
brake may not securely hold the
vehicle.
●If the brake booster device does
not operate, do not follow other
vehicles closely and avoid hills
or sharp turns t hat require brak-
ing.
In this case, braking is still pos-
sible, but the brake pedal
should be depressed more
firmly than usual. Also, the brak-
ing distance will increase. Have
your brakes fixed immediately.
●Do not pump the brake pedal if
the engine stalls.
Each push on the brake pedal
uses up the reserve for the
power-assisted brakes.
●The brake system consists of 2
individual hydraulic systems; if
one of the systems fails, the
other will still ope rate. In this
case, the brake pedal should be
depressed more firmly than
usual and the braking distance
will increase. Have your brakes
fixed immediately.
■If the vehicle becomes stuck
(AWD models)
Do not spin the wheels exces-
sively when any of the tires is up
in the air, or the vehicle is stuck in
sand, mud, etc. This may damage
the driveline components or pro-
pel the vehicle forward or back-
ward, causing an accident.
NOTICE
■When driving the vehicle
●Do not depress the accelerator
and brake pedals at the same
time during driving, as this may
restrain the engine output.
●Do not use the accelerator
pedal or depress the accelera-
tor and brake pedals at the
same time to hold the vehicle on
a hill.
Page 191 of 728

1914-1. Before driving
4
Driving
left. Move your hand to the
right to move the trailer to
right. (This is generally oppo-
site to reversing without a
trailer attached.) Avoid sharp
or prolonged turning. Have
someone guide you when
reversing to reduce the risk of
an accident.
As stopping distance is
increased when towing a
trailer, vehicle-to vehicle dis-
tance should be increased.
For each 10 mph (16 km/h) of
speed, allow at least one
vehicle and trailer length.
Avoid sudden braking as you
may skid, resulting in the
trailer jackknifing and a loss of
vehicle control. This is espe-
cially true on wet or slippery
surfaces.
Avoid jerky starts or sudden
acceleration.
Avoid jerky steering and
sharp turns, and slow down
before making turn.
Note that when making a turn,
the trailer wheels will be
closer than the vehicle wheels
to the inside of the turn. Com-
pensate by making a wider
than normal turning radius.
Slow down before making a
turn, in cross winds, on wet or
slippery surfaces, etc.
Increasing vehicle speed can
destabilize the trailer.
Take care when passing other
vehicles. Passing requires
considerable distance. After
passing a vehicle, do not for-
get the length of your trailer,
and be sure you have plenty
of room before changing
lanes.
To maintain engine braking
efficiency and charging sys-
tem performance when using
engine braking, do not put the
transmission in D. If in the S
mode, the transmission shift
range position must be in 6 or
lower.
Instability happens more fre-
quently when descending
steep or long downhill grades.
Before descending, slow
down and downshift. Do not
make sudden downshifts
while descending steep or
long downhill grades.
Avoid holding the brake pedal
down too long or applying the
brakes too frequently. This
could cause the brakes to
overheat and result in
reduced braking efficiency.
Due to the added load of the
trailer, your vehicle’s engine
may overheat on hot days (at
temperatures over 85°F
[30°C]) when driving up a long
or steep grade. If the engine
coolant temperature gauge
indicates overheating, imme-
diately turn off the air condi-
Page 197 of 728
1974-2. Driving procedures
4
Driving
engine switch mode.
■If the engine does not start
●The engine immobilizer system
may not have been deactivated.
( P. 7 0 )
Contact your Toyota dealer.
●If a message related to start-up is
shown on the multi-information
display, read the message and fol-
low the instructions.
■If the battery is discharged
The engine cannot be started using
the smart key system. Refer to
P.649 to restart the engine.
■Electronic key battery depletion
P. 1 0 2
■Conditions affecting operation
P. 1 3 0
■Note for the entry function
P. 1 3 1
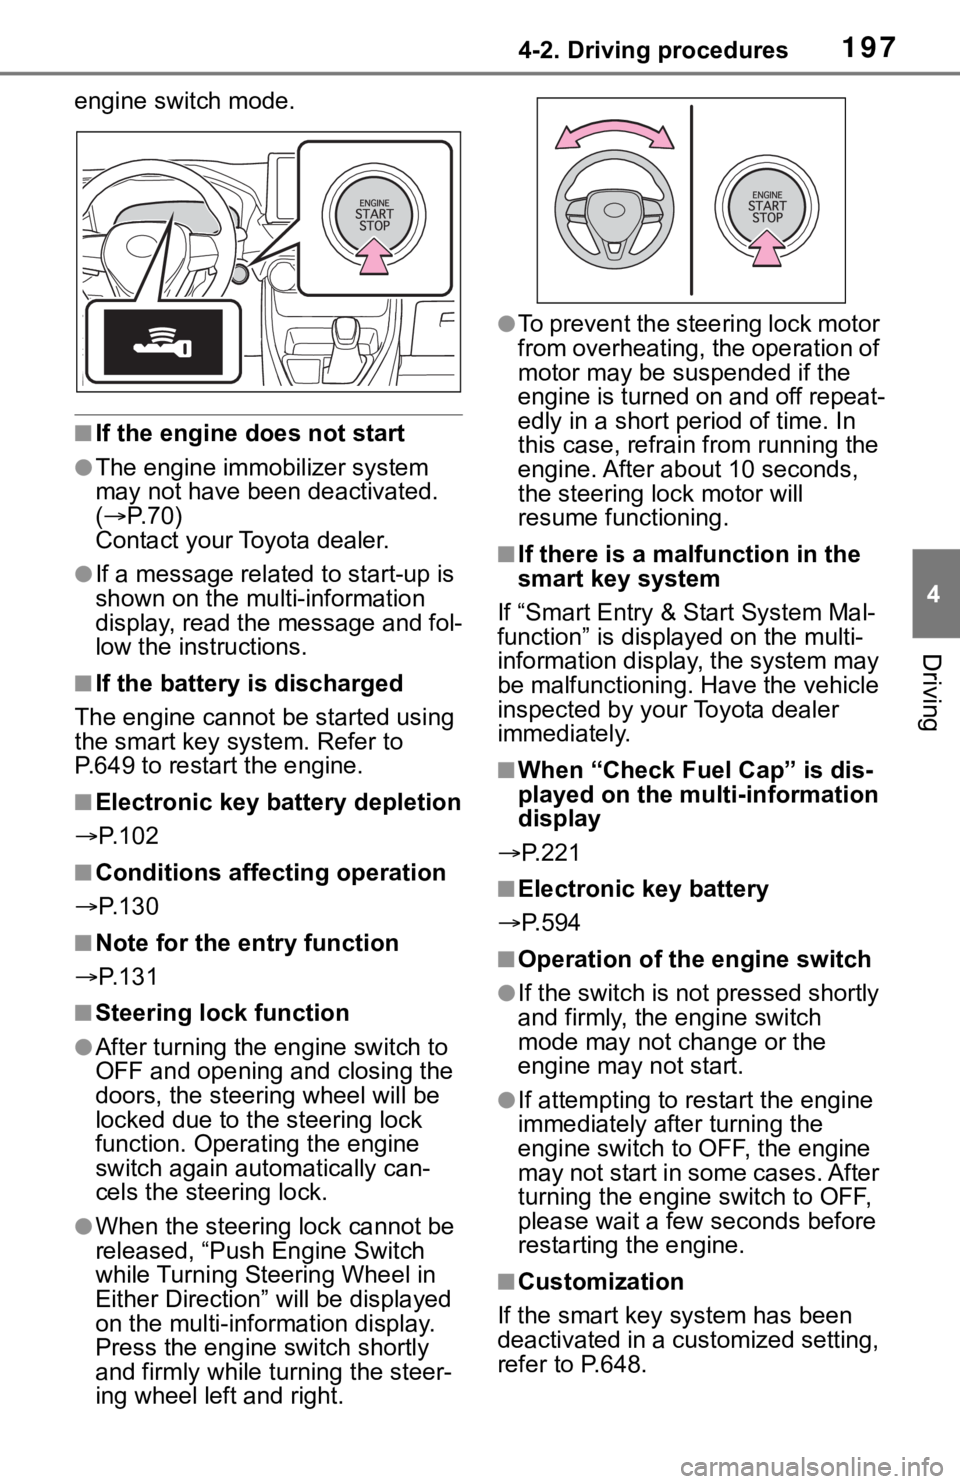
■Steering lock function
●After turning the engine switch to
OFF and opening and closing the
doors, the steer ing wheel will be
locked due to the steering lock
function. Operating the engine
switch again automatically can-
cels the steering lock.
●When the steering lock cannot be
released, “Push Engine Switch
while Turning Steering Wheel in
Either Direction” will be displayed
on the multi-information display.
Press the engine switch shortly
and firmly while turning the steer-
ing wheel left and right.
●To prevent the steering lock motor
from overheating, the operation of
motor may be suspended if the
engine is turned on and off repeat-
edly in a short period of time. In
this case, refrain from running the
engine. After about 10 seconds,
the steering lo ck motor will
resume functioning.
■If there is a malfunction in the
smart key system
If “Smart Entry & Start System Mal-
function” is displayed on the multi-
information display, the system may
be malfunctioning. Have the vehicle
inspected by your Toyota dealer
immediately.
■When “Check Fuel Cap” is dis-
played on the multi-information
display
P.221
■Electronic key battery
P.594
■Operation of the engine switch
●If the switch is not pressed shortly
and firmly, the engine switch
mode may not change or the
engine may not start.
●If attempting to res tart the engine
immediately after turning the
engine switch to OFF, the engine
may not start in some cases. After
turning the engine switch to OFF,
please wait a few seconds before
restarting the engine.
■Customization
If the smart key system has been
deactivated in a customized setting,
refer to P.648.
Page 206 of 728
2064-2. Driving procedures
brake will be released, and
the parking brake indicator
light and parking brake lamp
will turn off.
When the shift position is
shifted to P, the parking brake
will be set, and the parking
brake indicator light and park-
ing brake lamp will turn on.
Operate the shift lever with the
vehicle stopped and the brake
pedal depressed.
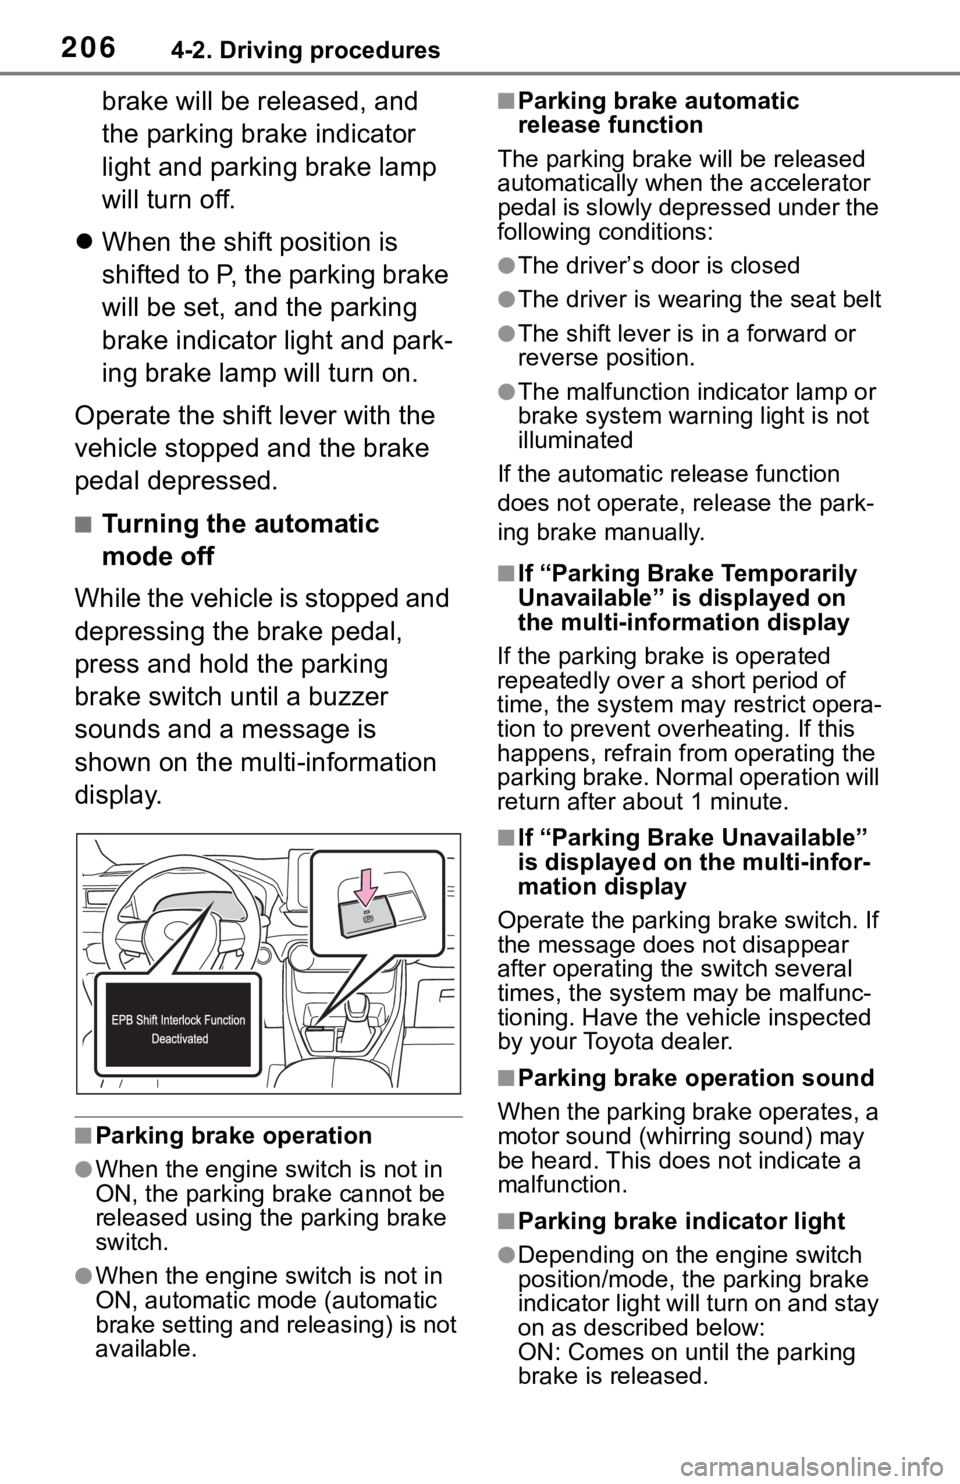
■Turning the automatic
mode off
While the vehicle is stopped and
depressing the brake pedal,
press and hold the parking
brake switch until a buzzer
sounds and a message is
shown on the multi-information
display.
■Parking brake operation
●When the engine switch is not in
ON, the parking brake cannot be
released using the parking brake
switch.
●When the engine switch is not in
ON, automatic mode (automatic
brake setting and releasing) is not
available.
■Parking brake automatic
release function
The parking brake will be released
automatically when the accelerator
pedal is slowly depressed under the
following conditions:
●The driver’s door is closed
●The driver is wearing the seat belt
●The shift lever is in a forward or
reverse position.
●The malfunction in dicator lamp or
brake system warning light is not
illuminated
If the automatic release function
does not operate, release the park-
ing brake manually.
■If “Parking Brake Temporarily
Unavailable” is displayed on
the multi-info rmation display
If the parking brake is operated
repeatedly over a short period of
time, the system may restrict opera-
tion to prevent ove rheating. If this
happens, refrain from operating the
parking brake. Normal operation will
return after about 1 minute.
■If “Parking Brake Unavailable”
is displayed on the multi-infor-
mation display
Operate the parking brake switch. If
the message does not disappear
after operating the switch several
times, the system may be malfunc-
tioning. Have the vehicle inspected
by your Toyota dealer.
■Parking brake operation sound
When the parking brake operates, a
motor sound (whirr ing sound) may
be heard. This does not indicate a
malfunction.
■Parking brake indicator light
●Depending on the engine switch
position/mode, the parking brake
indicator light will turn on and stay
on as described below:
ON: Comes on until the parking
brake is released.
Page 207 of 728
2074-2. Driving procedures
4
Driving
Not in ON: Stays on for approxi-
mately 15 seconds.
●When the engine switch is turned
off with the parking brake set, the
parking brake indicator light will
stay on for about 15 seconds. This
does not indicate a malfunction.
■When the parking brake switch
malfunctions
Automatic mode (automatic brake
setting and releas ing) will be turned
on automatically.
■Parking the vehicle
P. 1 7 1
■Parking brake engaged warning
buzzer
A buzzer will sound if the vehicle is
driven with the parking brake
engaged. “Parking Brake ON” is dis-
played on the multi-information dis-
play (with the v ehicle reaching a
speed of 5 km/h [3 mph]).
■If the brake system warning
light comes on
P. 6 2 2
■Usage in winter time
P. 3 6 8
WA R N I N G
■When parking the vehicle
Do not leave a child in the vehicle
alone. The parking brake may be
released unintentionally and there
is the danger of the vehicle mov-
ing that may lead to an accident
resulting in death or serious injury.
■Parking brake switch
Do not set any o bjects near the
parking brake switch. Objects
may interfere with the switch and
may lead the parking brake to
unexpectedly operate.
NOTICE
■When parking the vehicle
Before you leave the vehicle, shift
the shift position to P, set the park-
ing brake and make sure that the
vehicle does not move.
■When the system malfunc-
tions
Stop the vehicle in a safe place
and check the warning messages.
■When the parking brake can-
not be released due to a mal-
function
Driving the vehicle with the park-
ing brake set will lead to brake
components overheating, which
may affect braking performance
and increase brake wear. Have
the vehicle inspected by your Toy-
ota dealer immediately if this
occurs.
Page 352 of 728
3524-5. Using the driving support systems
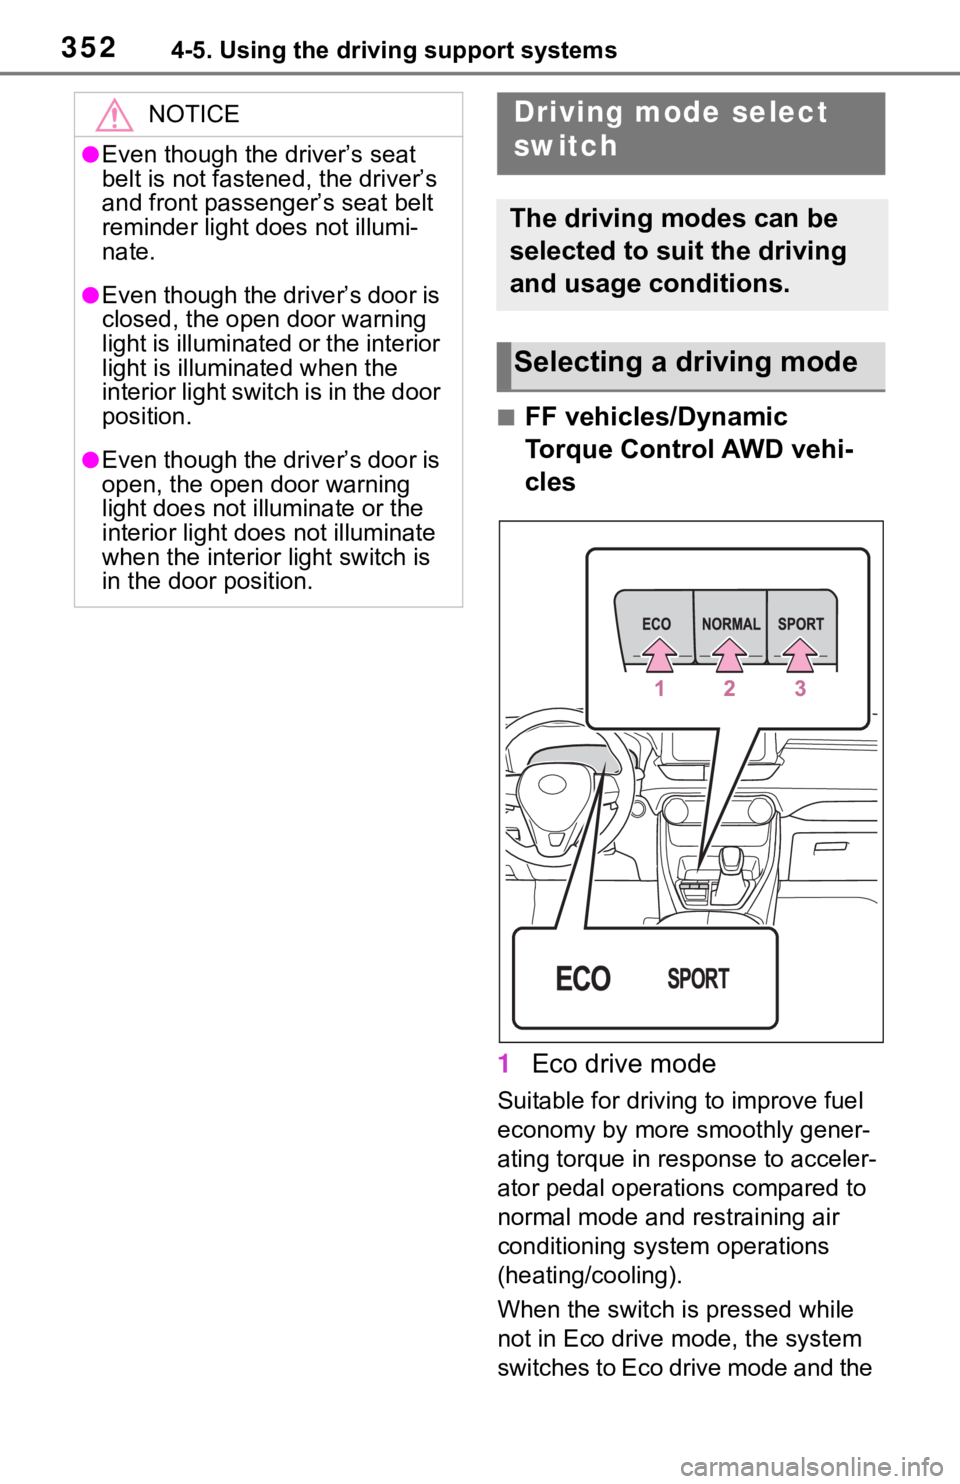
■FF vehicles/Dynamic
Torque Control AWD vehi-
cles
1 Eco drive mode
Suitable for drivi ng to improve fuel
economy by more smoothly gener-
ating torque in response to acceler-
ator pedal operations compared to
normal mode and restraining air
conditioning system operations
(heating/cooling).
When the switch is pressed while
not in Eco drive mode, the system
switches to Eco drive mode and the
NOTICE
●Even though the driver’s seat
belt is not fastened, the driver’s
and front passenger’s seat belt
reminder light does not illumi-
nate.
●Even though the driver’s door is
closed, the open door warning
light is illuminated or the interior
light is illuminated when the
interior light switch is in the door
position.
●Even though the driver’s door is
open, the open door warning
light does not illuminate or the
interior light does not illuminate
when the interior light switch is
in the door position.
Driving mode select
switch
The driving modes can be
selected to suit the driving
and usage conditions.
Selecting a driving mode
Page 353 of 728
3534-5. Using the driving support systems
4
Driving
Eco drive mode indicator illumi-
nates on the multi-information dis-
play.
2Normal mode
Suitable for normal driving.
The driving mode returns to normal
mode if the switch is pressed while
in Eco drive mode or sport mode.
3Sport mode
Controls the steering feeling and
engine to create an acceleration
response that is su itable for sporty
driving. Suitable for when crisp
handling is desired, such as when
driving on mountainous roads.
When the switch is pressed while
not in sport mode, the system
switches to sport mode and the
sport mode indicator illuminates on
the multi-information display.
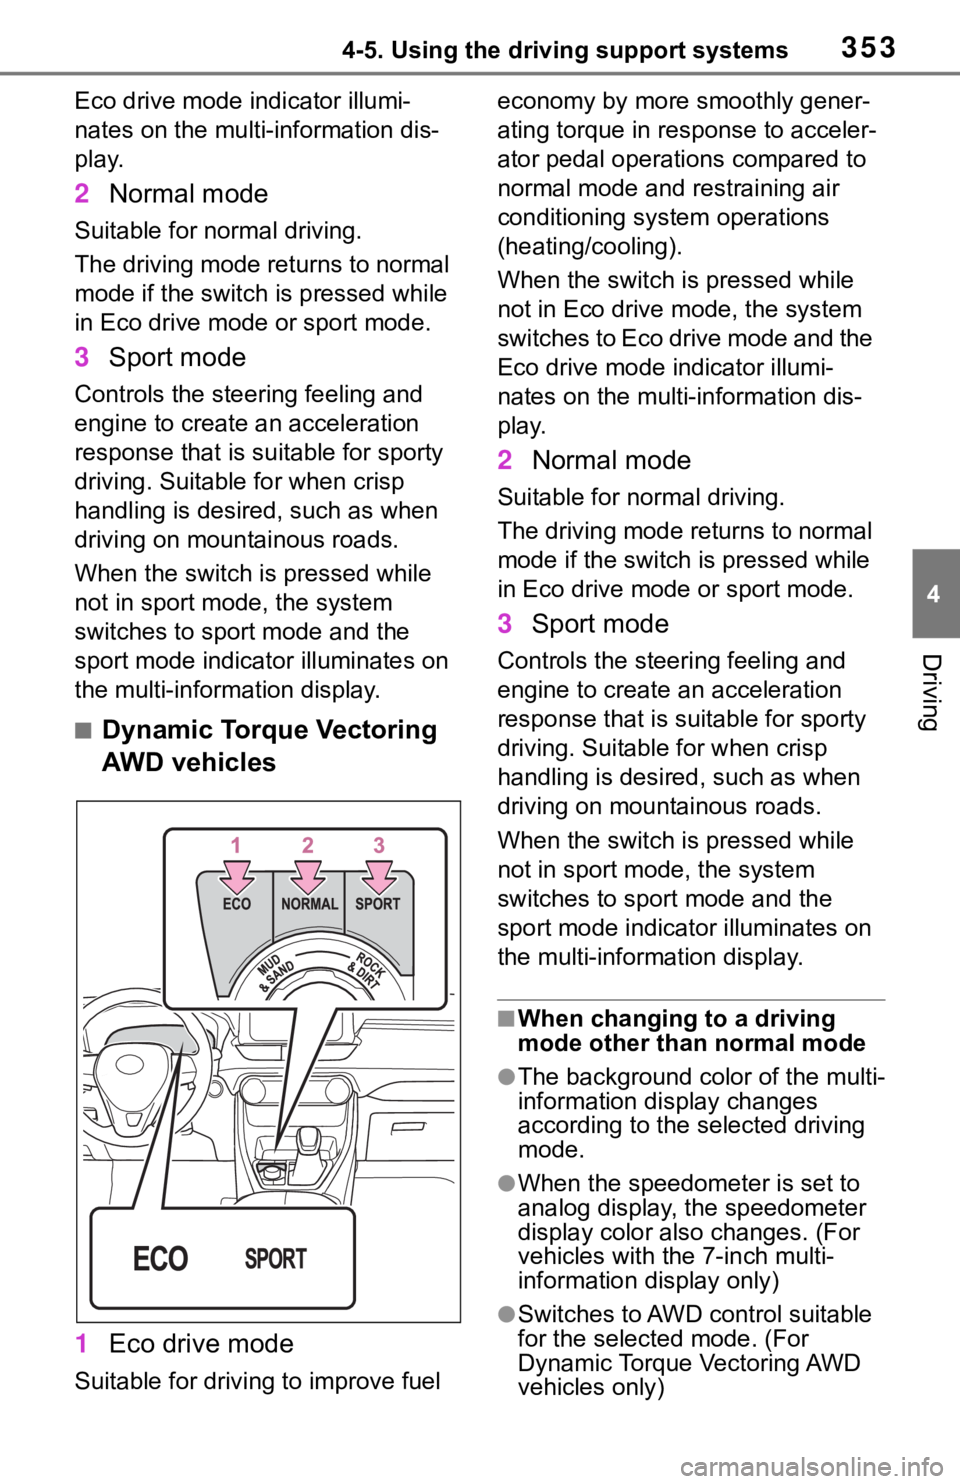
■Dynamic Torque Vectoring
AWD vehicles
1 Eco drive mode
Suitable for driving to improve fuel economy by more
smoothly gener-
ating torque in response to acceler-
ator pedal operations compared to
normal mode and restraining air
conditioning system operations
(heating/cooling).
When the switch is pressed while
not in Eco drive mode, the system
switches to Eco drive mode and the
Eco drive mode i ndicator illumi-
nates on the multi-information dis-
play.
2 Normal mode
Suitable for n ormal driving.
The driving mode returns to normal
mode if the switch i s pressed while
in Eco drive mode or sport mode.
3 Sport mode
Controls the steering feeling and
engine to create an acceleration
response that is suitable for sporty
driving. Suitable for when crisp
handling is desired, such as when
driving on mountainous roads.
When the switch is pressed while
not in sport mode, the system
switches to sport mode and the
sport mode indicat or illuminates on
the multi-information display.
■When changing to a driving
mode other than normal mode
●The background color of the multi-
information display changes
according to the selected driving
mode.
●When the speedometer is set to
analog display, the speedometer
display color also changes. (For
vehicles with the 7-inch multi-
information di splay only)
●Switches to AWD control suitable
for the selected mode. (For
Dynamic Torque Vectoring AWD
vehicles only)
Page 354 of 728
3544-5. Using the driving support systems
■Air conditioning system opera-
tion in Eco drive mode
In Eco drive mode, heating/cooling
operations and the fan speed is con-
trolled to improve fuel efficiency.
Perform the following procedures to
increase the air conditioning perfor-
mance.
●Vehicles with automatic air condi-
tioning system: Turn eco air condi-
tioning mode off ( P.510)
●Adjust the fan speed ( P.504,
510)
●Cancel Eco drive mode
■Canceling a driving mode
●Sport mode is automatically can-
celed and the driving mode
returns to normal mode when the
engine switch is turned off.
●Normal mode and Eco drive mode
are not canceled until another
driving mode is sel ected. (Even if
the engine switch is turned off,
normal mode and Eco drive mode
will not be a utomatically can-
celed.)
Multi-terrain Select
(AWD vehicles)
Multi-terrain Select is a sys-
tem that improves drivabil-
ity in off-road situations.
When driving over muddy,
sandy or rough road sur-
faces, the system selects a
suitable driving mode to
switch AWD, brake and
drive force control to per-
form control suitable for the
road condition.
WA R N I N G
■Before using Multi-terrain
Select
Make sure to observe the follow-
ing precautions. Failure to
observe these precautions may
result in an unexp ected accident.
●Check that the Mud & Sand and
Rock & Dirt indicators are illumi-
nated before driving. Multi-ter-
rain Select will not operate
when the indicators are off.
●Do not rely solely upon the
Multi-terrain Select. This func-
tion is not inten ded to expand
the limits of the vehicle. If the
system is continuously used for
a long period of time, the load
on related parts increases and
the system may be unable to
operate normally, which may
lead to an accident. Thoroughly
check the road c onditions and
driving route before driving, and
drive with caution.