stop start TOYOTA RAV4 2020 (in English) Workshop Manual
[x] Cancel search | Manufacturer: TOYOTA, Model Year: 2020, Model line: RAV4, Model: TOYOTA RAV4 2020Pages: 736, PDF Size: 30.79 MB
Page 494 of 736
4945-15. What to do if... (Bluetooth®)
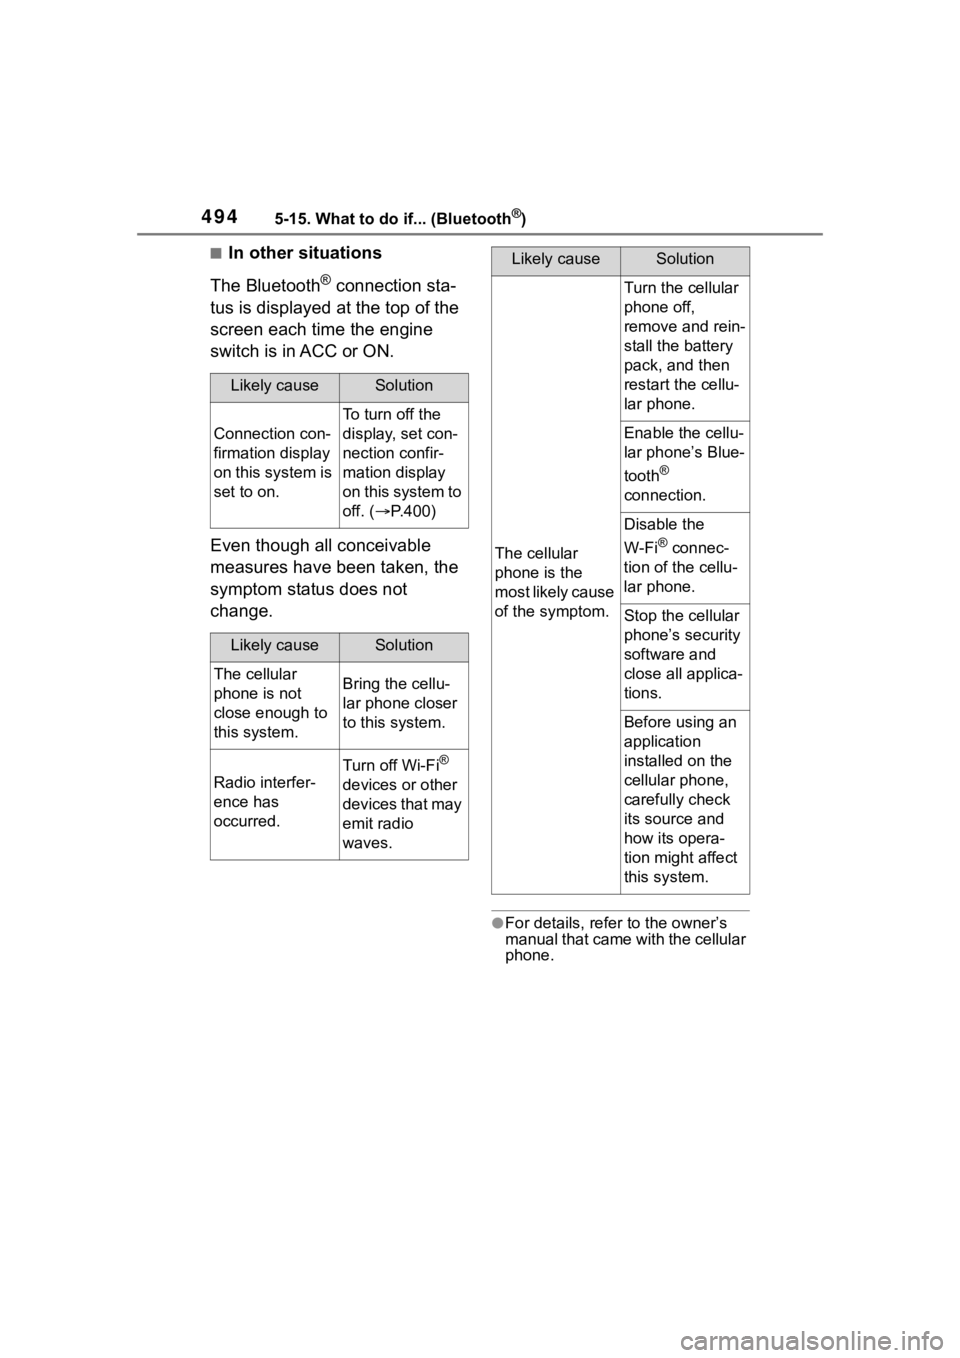
■In other situations
The Bluetooth
® connection sta-
tus is displayed at the top of the
screen each time the engine
switch is in ACC or ON.
Even though all conceivable
measures have been taken, the
symptom status does not
change.
●For details, refer to the owner’s
manual that came with the cellular
phone.
Likely causeSolution
Connection con-
firmation display
on this system is
set to on.
To turn off the
display, set con-
nection confir-
mation display
on this system to
off. ( P.400)
Likely causeSolution
The cellular
phone is not
close enough to
this system.Bring the cellu-
lar phone closer
to this system.
Radio interfer-
ence has
occurred.
Turn off Wi-Fi®
devices or other
devices that may
emit radio
waves.
The cellular
phone is the
most likely cause
of the symptom.
Turn the cellular
phone off,
remove and rein-
stall the battery
pack, and then
restart the cellu-
lar phone.
Enable the cellu-
lar phone’s Blue-
tooth
®
connection.
Disable the
W-Fi
® connec-
tion of the cellu-
lar phone.
Stop the cellular
phone’s security
software and
close all applica-
tions.
Before using an
application
installed on the
cellular phone,
carefully check
its source and
how its opera-
tion might affect
this system.
Likely causeSolution
Page 512 of 736

5126-1. Using the air conditioning system and defogger
gers switch is on, the indicator illu-
minates on the rear window
defogger and outside rear view mir-
ror defoggers switch.
The defoggers will automatically
turn off after a while.
■For quick cooling
Press the “MAX A/C” switch.
The air conditioning will automati-
cally turn on.
At this time, the fo llowing will occur:
●The recirculated air mode will be
set
●The windshield defogger will turn
off
●The air flow mode will change to
the upper body mode
■Operation of the air condition-
ing system in Eco drive mode
In Eco drive mode, the air condition-
ing system is controlled to prioritize
fuel efficiency by regulating the
engine speed and compressor oper-
ation to restrict t he heating/cooling
capacity.
To improve air conditioning perfor-
mance, perform t he following opera-
tions:
●Adjust the fan speed
●Adjust the temperature setting
●Turn off Eco drive mode ( P.351)
■Fogging up of the windows
●The windows will easily fog up
when the humidity in the vehicle is
high. Turning the “A/C” switch on
will dehumidify the air from the
outlets and defog the windshield
effectively.
●If you turn the “A/C” switch off, the
windows may fog up more easily.
●The windows may fog up if the
recirculated air mode is used.
■When driving on dusty roads
Close all windows. If dust thrown up by the vehicle is still drawn into the
vehicle after closing the windows, it
is recommended that the air intake
mode be set to outside air mode and
the fan speed to a
ny setting except
off.
■Outside/recirculated air mode
Setting to the recir culated air mode
temporarily is recommended in pre-
venting dirty air from entering the
vehicle interior and helping to cool
the vehicle when the outside air
temperature is high.
■When the outside temperature
falls to nearly 32°F (0°C)
The dehumidification function may
not operate even when the “A/C”
switch is pressed.
■Ventilation and air conditioning
odors
●To let fresh air in, set the air condi-
tioning system to the outside air
mode.
●During use, various odors from
inside and outside the vehicle may
enter into and accumulate in the
air conditioning system. This may
then cause odor to be emitted
from the vents.
●To reduce potential odors from
occurring:
It is recommended that the air
conditioning system be set to out-
side air mode prior to turning the
vehicle off.
●When parking, the system auto-
matically switches to outside air
mode to encourage better air cir-
culation throughout the vehicle,
helping to reduce odors that occur
when starting the vehicle.
■Air conditioning system opera-
tions when the engine is
stopped due to the Stop & Start
system (vehicles with Stop &
Start system)
When the engine is stopped due to
the Stop & Start syst em operations,
the air conditioning cooling, heating
Page 513 of 736
5136-1. Using the air conditioning system and defogger
6
Interior features
and dehumidification functions turn
off and only ambient temperature air
is blown, and there is a possibility
that the blowing of ambient tem-
perature air will stop . To prevent the
air conditioning system from turning
off, press the Stop & Start cancel
switch to deactivate the system.
■When the windshield is fogged
up and the engine is stopped
due to the Stop & Start system
(vehicles with Stop & Start sys-
tem)
Press the windshield defogger
switch to restart the engine and
defog the windshield.
If the windshield continuously fogs
up, press the Stop & Start cancel
switch and refrain from using the
Stop & Start system.
■When an odor c omes from the
air conditioning system while
the engine is stopped due to the
Stop & Start system (vehicles
with Stop & Start system)
Press the Stop & Start cancel switch
to restart the engine.
■Air conditioning filter
P. 5 9 9
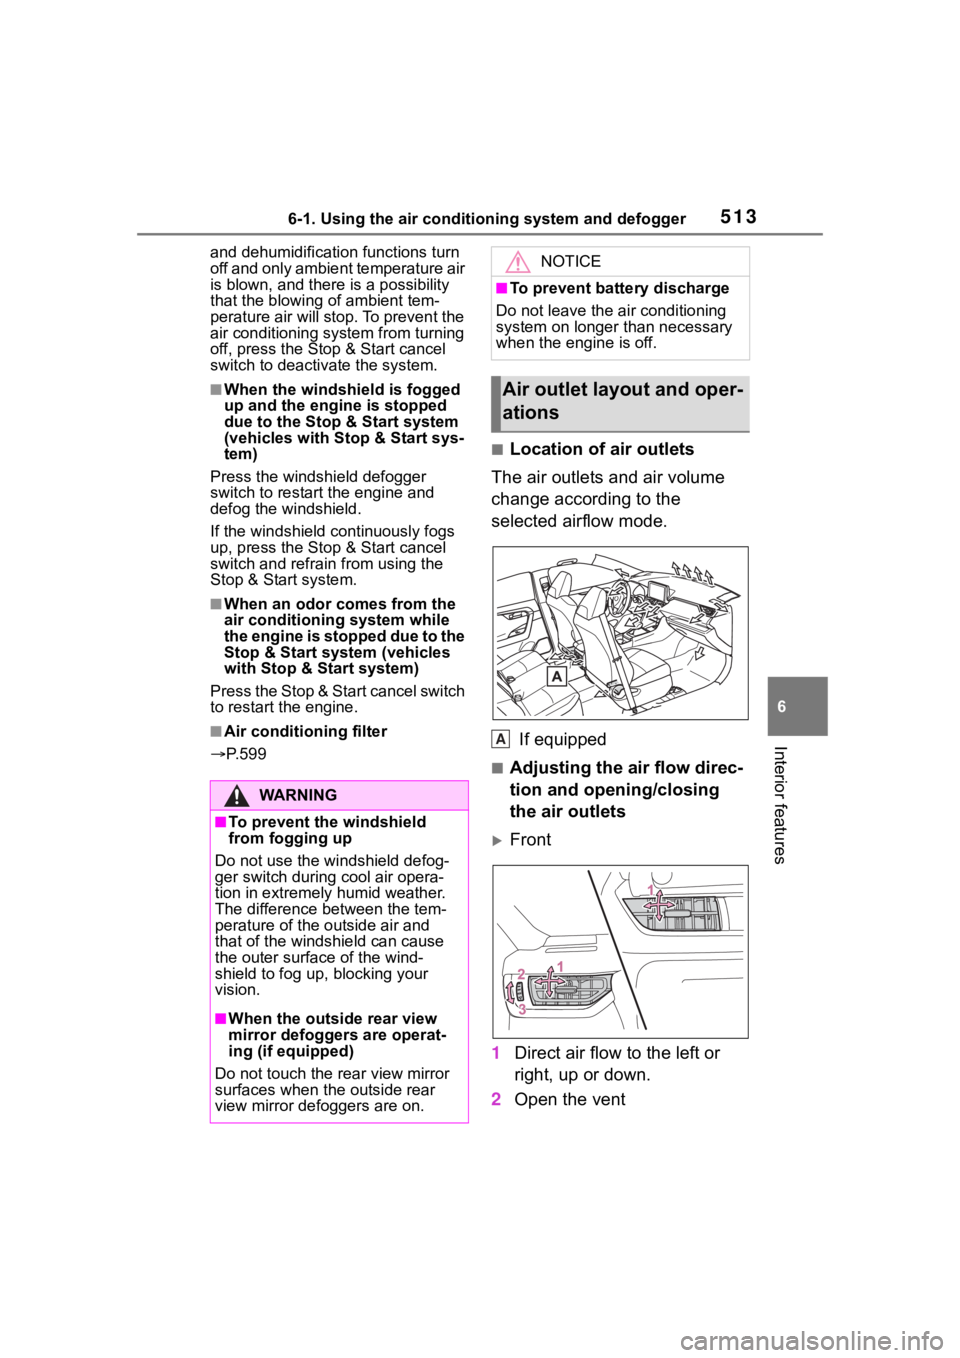
■Location of air outlets
The air outlets and air volume
change according to the
selected airflow mode.
If equipped
■Adjusting the air flow direc-
tion and opening/closing
the air outlets
Front
1 Direct air flow to the left or
right, up or down.
2 Open the vent
WA R N I N G
■To prevent the windshield
from fogging up
Do not use the windshield defog-
ger switch during cool air opera-
tion in extremely humid weather.
The difference between the tem-
perature of the outside air and
that of the windshield can cause
the outer surface of the wind-
shield to fog up, blocking your
vision.
■When the outside rear view
mirror defoggers are operat-
ing (if equipped)
Do not touch the rear view mirror
surfaces when the outside rear
view mirror defoggers are on.
NOTICE
■To prevent battery discharge
Do not leave the air conditioning
system on longer than necessary
when the engine is off.
Air outlet lay out and oper-
ations
A
Page 518 of 736

5186-1. Using the air conditioning system and defogger
operation controlled to restrict
heating/cooling capacity
• Fan speed restr icted when auto-
matic mode is selected
●To improve air co nditioning perfor-
mance, perform the following
operations:
• Adjust the fan speed
• Turn off Eco drive mode ( P.351)
• Turn off Eco air conditioning mode
●When the driving mode is set to
Eco driving mode, the Eco air con-
ditioning mode will be turned on
automatically. Even in this case,
the Eco air conditioning mode can
be turned off by pressing the Eco
air conditioning mode switch.
■When the outside temperature
falls to nearly 32°F (0°C)
The dehumidification function may
not operate even when “A/C” switch
is pressed.
■Ventilation and air conditioning
odors
●To let fresh air in, set the air condi-
tioning system to the outside air
mode.
●During use, various odors from
inside and outside the vehicle may
enter into and a ccumulate in the
air conditioning system. This may
then cause odor to be emitted
from the vents.
●To reduce potential odors from
occurring:
• It is recommended that the air conditioning system be set to out-
side air mode prior to turning the
vehicle off.
• The start timing of the blower may
be delayed for a short period of
time immediately after the air con-
ditioning system is started in auto-
matic mode.
●When parking, the system auto-
matically switches to outside air
mode to encourage better air cir-
culation throughout the vehicle,
helping to reduce odors that occur
when starting the vehicle.
■Air conditioning system opera-
tions when the engine is
stopped due to the Stop & Start
system (vehicles with Stop &
Start system)
When the engine is stopped due to
Stop & Start system operations, the
automatic air conditioning cooling,
heating and dehumidification func-
tions turn off and the fan speed is
decreased according to the outside
temperature etc. or air blowing
stops. To stop the air conditioning
system from turning off, press the
Stop & Start cancel switch and
refrain from using the Stop & Start
system.
■When the windshield is fogged
up and the engine is stopped
due to the Stop & Start system
(vehicles with Stop & Start sys-
tem)
Press the windshield defogger
switch to restart the engine and
defog the windshield.
If the windshield continuously fogs
up, press the Stop & Start cancel
switch and refrain from using the
Stop & Start system.
■When an odor comes from the
air conditioning system while
the engine is stopped due to the
Stop & Start system (vehicles
with Stop & Start system)
Press the Stop & Start cancel switch
to restart the engine.
■Air conditioning filter
P.599
■Customization
Some functions can be customized.
(Customizable features: P.697)
Page 520 of 736
5206-1. Using the air conditioning system and defogger
operation. When the mode has
been switched manually, auto-
matic airflow control stops oper-
ating.
Press on the air condition-
ing operation panel and switch
the airflow.
Indicator illuminated: Airflow
to the front seats only
Indicator off: Airflow to all the
seats
■Operation of automatic airflow
control
●In order to maintain a comfortable
interior, airflow ma y be directed to
seats without pa ssengers immedi-
ately after the e ngine is started
and at other times depending on
the outside temperature.
●After the engine is started, if pas-
sengers move around inside or
enter/exit the vehicle, the system
cannot accurately detect the pres-
ence of passengers and automatic
airflow control will not operate.
■Operation of manual airflow
control
Even if the function is manually
switched to directi ng airflow to only
the front seats, whe n a rear seat is
occupied, it may automatically direct
airflow to all seats.
■To return to automatic airflow
control
1 With the indicator off, turn the
engine switch off.
2 After 60 minutes or more elapse,
turn the engine switch to ON.
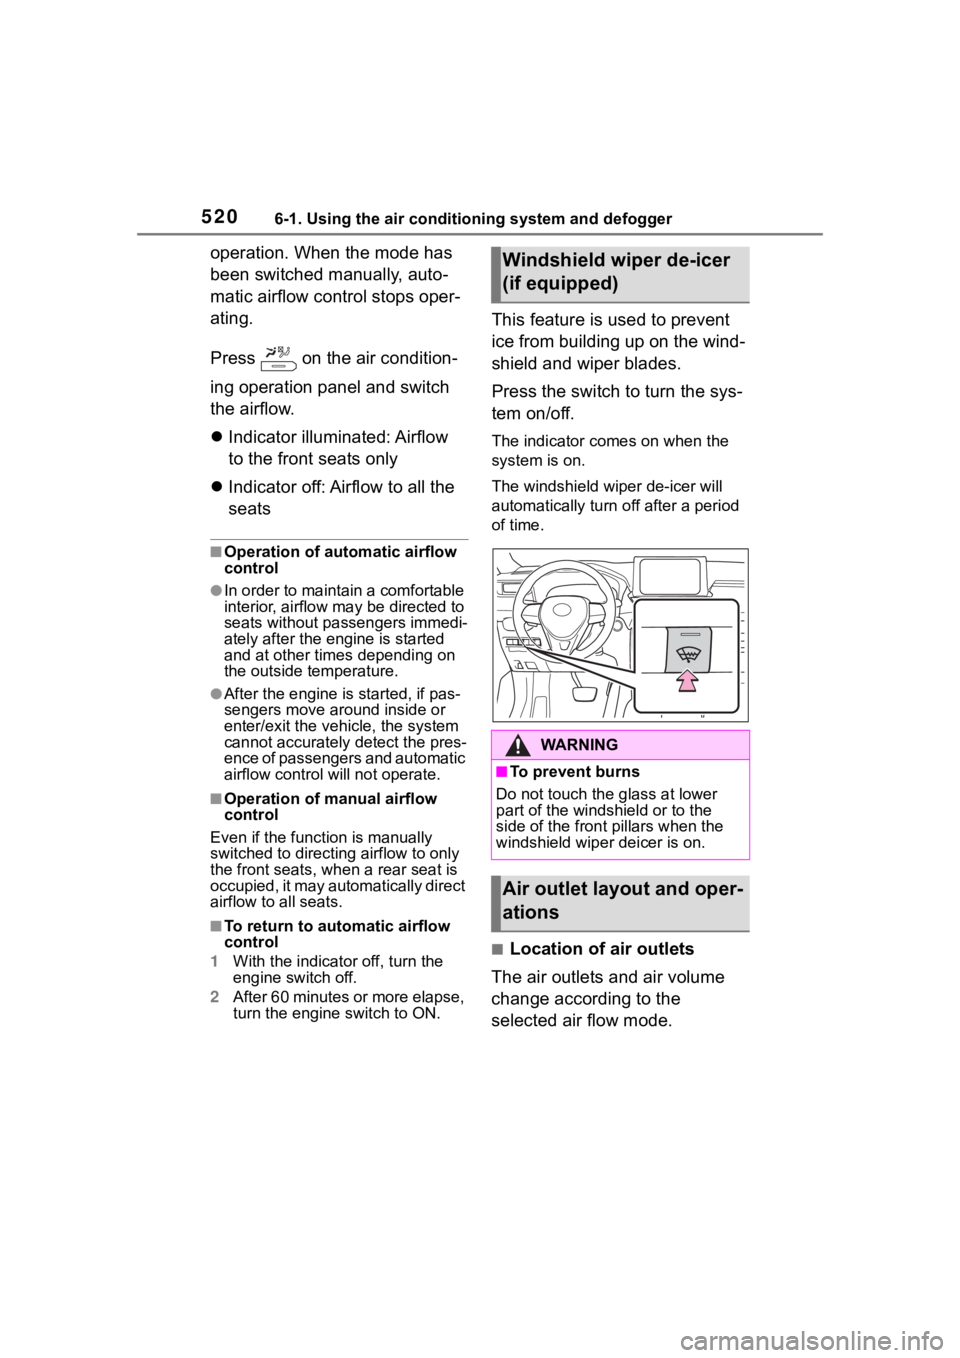
This feature is used to prevent
ice from building up on the wind-
shield and wiper blades.
Press the switch to turn the sys-
tem on/off.
The indicator comes on when the
system is on.
The windshield wiper de-icer will
automatically turn off after a period
of time.
■Location of air outlets
The air outlets and air volume
change according to the
selected air flow mode.
Windshield wiper de-icer
(if equipped)
WA R N I N G
■To prevent burns
Do not touch the glass at lower
part of the windshield or to the
side of the front p illars when the
windshield wiper deicer is on.
Air outlet lay out and oper-
ations
Page 541 of 736
5416-4. Using the other interior features
6
Interior features
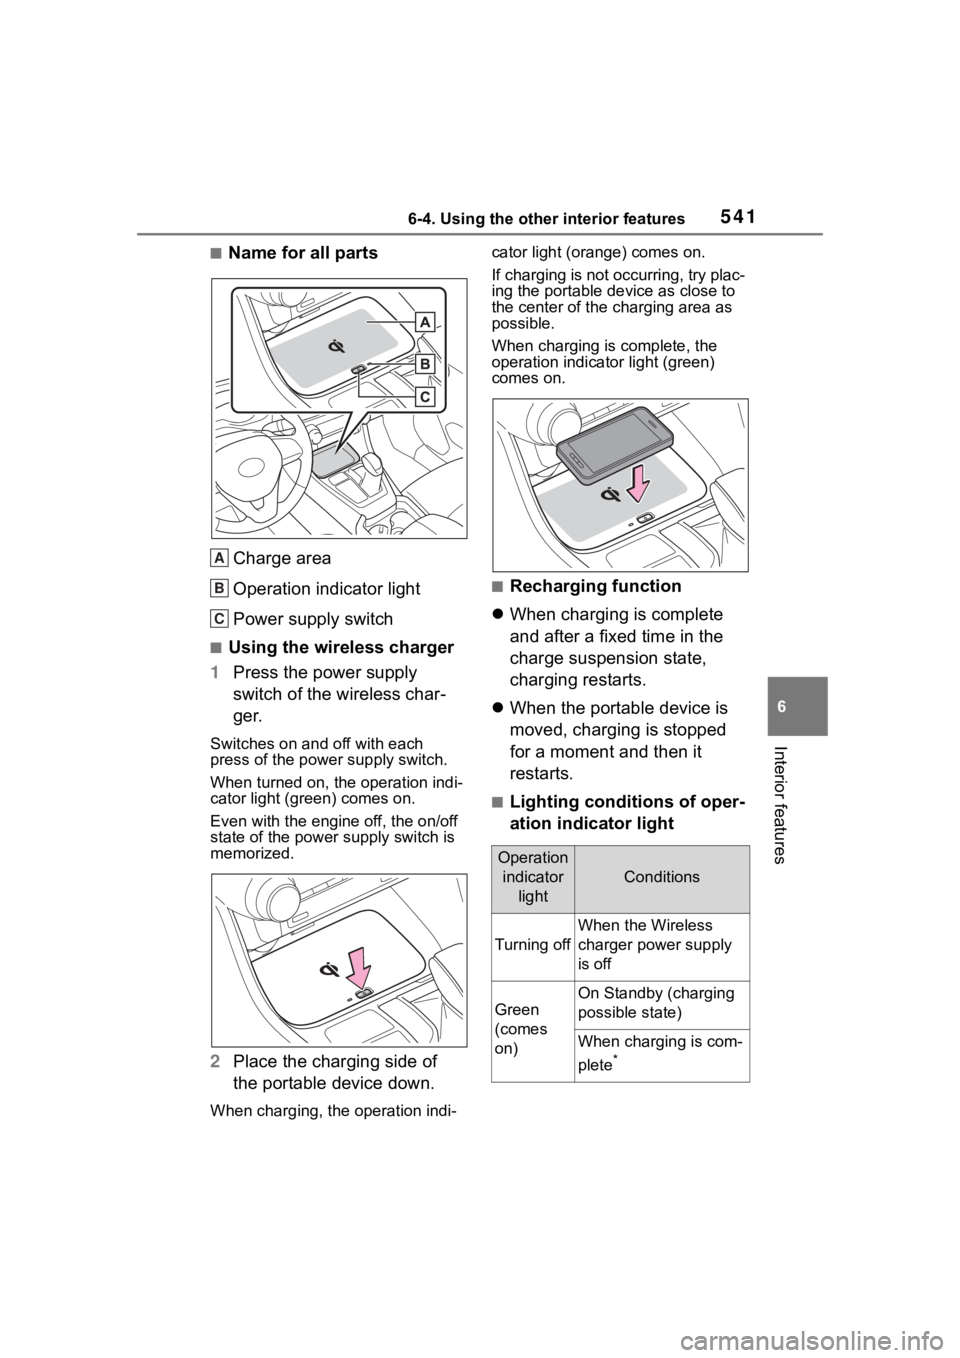
■Name for all partsCharge area
Operation indicator light
Power supply switch
■Using the wireless charger
1 Press the power supply
switch of the wireless char-
ger.
Switches on and off with each
press of the power supply switch.
When turned on, the operation indi-
cator light (green) comes on.
Even with the engine off, the on/off
state of the power supply switch is
memorized.
2 Place the charging side of
the portable device down.
When charging, the operation indi- cator light (orange) comes on.
If charging is not occurring, try plac-
ing the portable device as close to
the center of the charging area as
possible.
When charging is complete, the
operation indicator light (green)
comes on.
■Recharging function
When charging is complete
and after a fixed time in the
charge suspension state,
charging restarts.
When the portable device is
moved, charging is stopped
for a moment and then it
restarts.
■Lighting conditions of oper-
ation indicator light
A
B
C
Operation
indicator light
Conditions
Turning off
When the Wireless
charger power supply
is off
Green
(comes
on)
On Standby (charging
possible state)
When charging is com-
plete
*
Page 542 of 736
5426-4. Using the other interior features
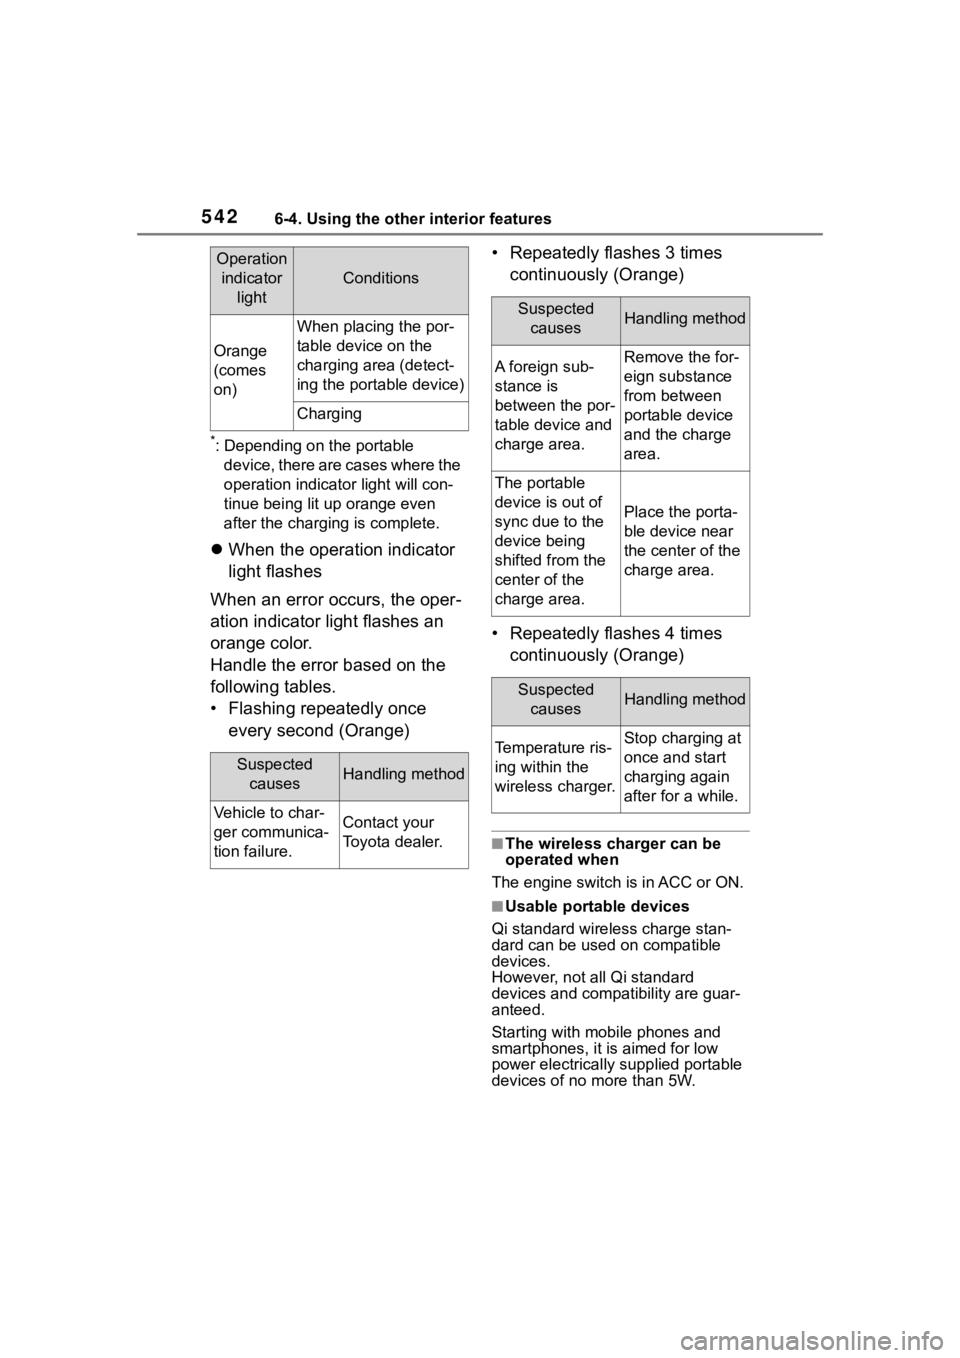
*: Depending on the portable device, there are cases where the
operation indicator light will con-
tinue being lit up orange even
after the charging is complete.
When the operation indicator
light flashes
When an error occurs, the oper-
ation indicator light flashes an
orange color.
Handle the error based on the
following tables.
• Flashing repeatedly once every second (Orange) • Repeatedly flashes 3 times
continuously (Orange)
• Repeatedly flashes 4 times continuously (Orange)
■The wireless charger can be
operated when
The engine switch i s in ACC or ON.
■Usable portable devices
Qi standard wireless charge stan-
dard can be used on compatible
devices.
However, not all Qi standard
devices and compat ibility are guar-
anteed.
Starting with mobile phones and
smartphones, it is aimed for low
power electrically supplied portable
devices of no more than 5W.
Orange
(comes
on)
When placing the por-
table device on the
charging area (detect-
ing the portable device)
Charging
Suspected
causesHandling method
Vehicle to char-
ger communica-
tion failure.Contact your
Toyota dealer.
Operation indicator light
Conditions
Suspected causesHandling method
A foreign sub-
stance is
between the por-
table device and
charge area.Remove the for-
eign substance
from between
portable device
and the charge
area.
The portable
device is out of
sync due to the
device being
shifted from the
center of the
charge area.
Place the porta-
ble device near
the center of the
charge area.
Suspected causesHandling method
Temperature ris-
ing within the
wireless charger.Stop charging at
once and start
charging again
after for a while.
Page 553 of 736
5536-4. Using the other interior features
6
Interior features
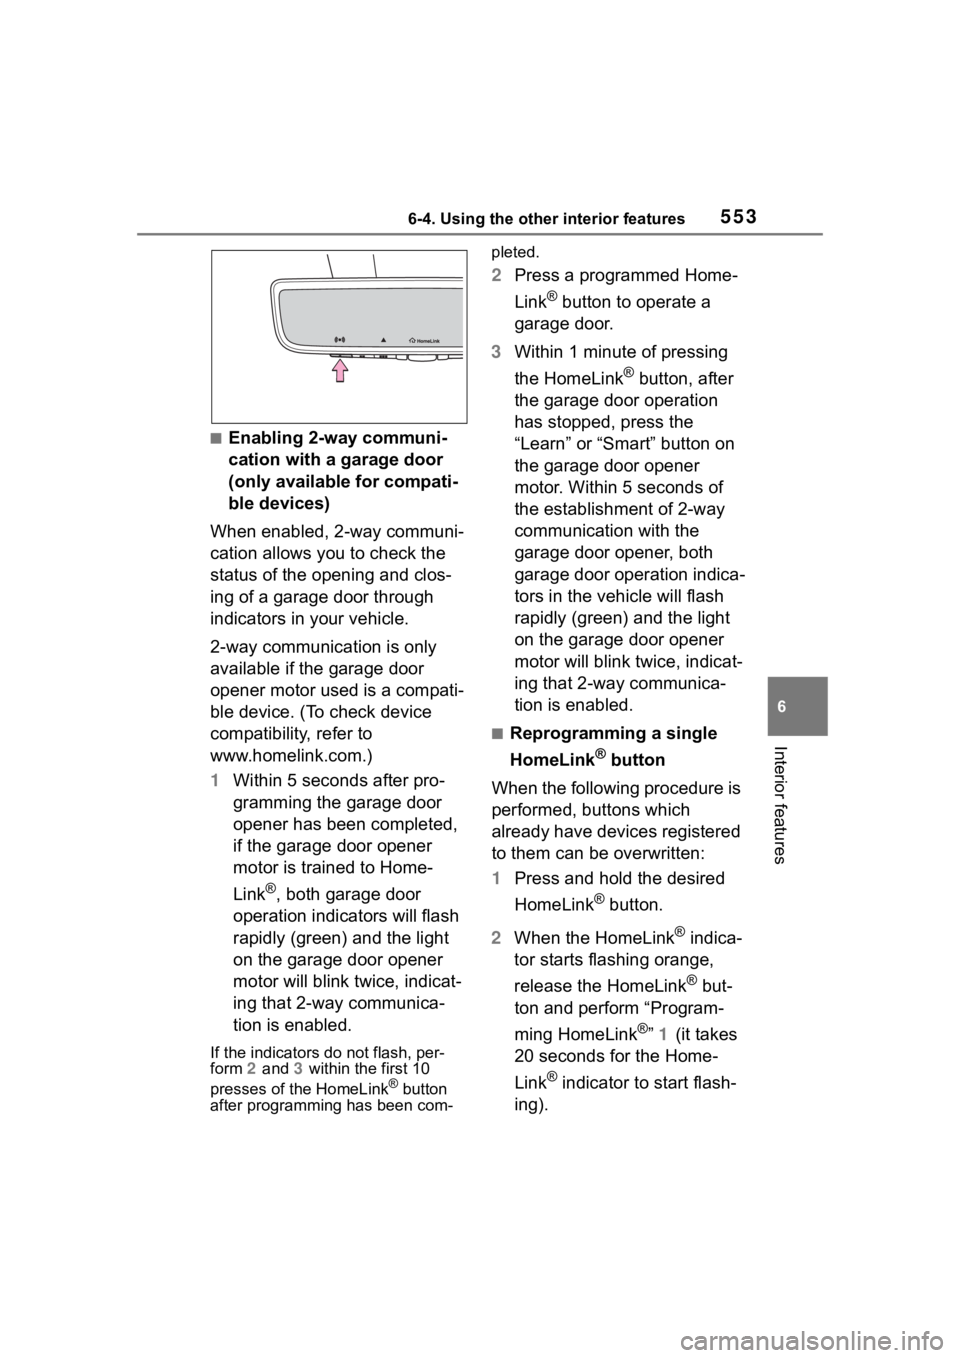
■Enabling 2-way communi-
cation with a garage door
(only available for compati-
ble devices)
When enabled, 2-way communi-
cation allows you to check the
status of the opening and clos-
ing of a garage door through
indicators in your vehicle.
2-way communication is only
available if the garage door
opener motor used is a compati-
ble device. (To check device
compatibility, refer to
www.homelink.com.)
1 Within 5 seconds after pro-
gramming the garage door
opener has been completed,
if the garage door opener
motor is trained to Home-
Link
®, both garage door
operation indicators will flash
rapidly (green) and the light
on the garage door opener
motor will blink twice, indicat-
ing that 2-way communica-
tion is enabled.
If the indicators do not flash, per-
form 2 and 3 within the first 10
presses of the HomeLink
® button
after programming has been com- pleted.
2
Press a programmed Home-
Link
® button to operate a
garage door.
3 Within 1 minute of pressing
the HomeLink
® button, after
the garage door operation
has stopped, press the
“Learn” or “Smart” button on
the garage door opener
motor. Within 5 seconds of
the establishment of 2-way
communication with the
garage door opener, both
garage door operation indica-
tors in the vehicle will flash
rapidly (green) and the light
on the garage door opener
motor will blink twice, indicat-
ing that 2-way communica-
tion is enabled.
■Reprogramming a single
HomeLink
® button
When the following procedure is
performed, buttons which
already have devices registered
to them can be overwritten:
1 Press and hold the desired
HomeLink
® button.
2 When the HomeLink
® indica-
tor starts flashing orange,
release the HomeLink
® but-
ton and perform “Program-
ming HomeLink
®” 1 (it takes
20 seconds for the Home-
Link
® indicator to start flash-
ing).
Page 603 of 736
6037-3. Do-it-yourself maintenance
7
Maintenance and care
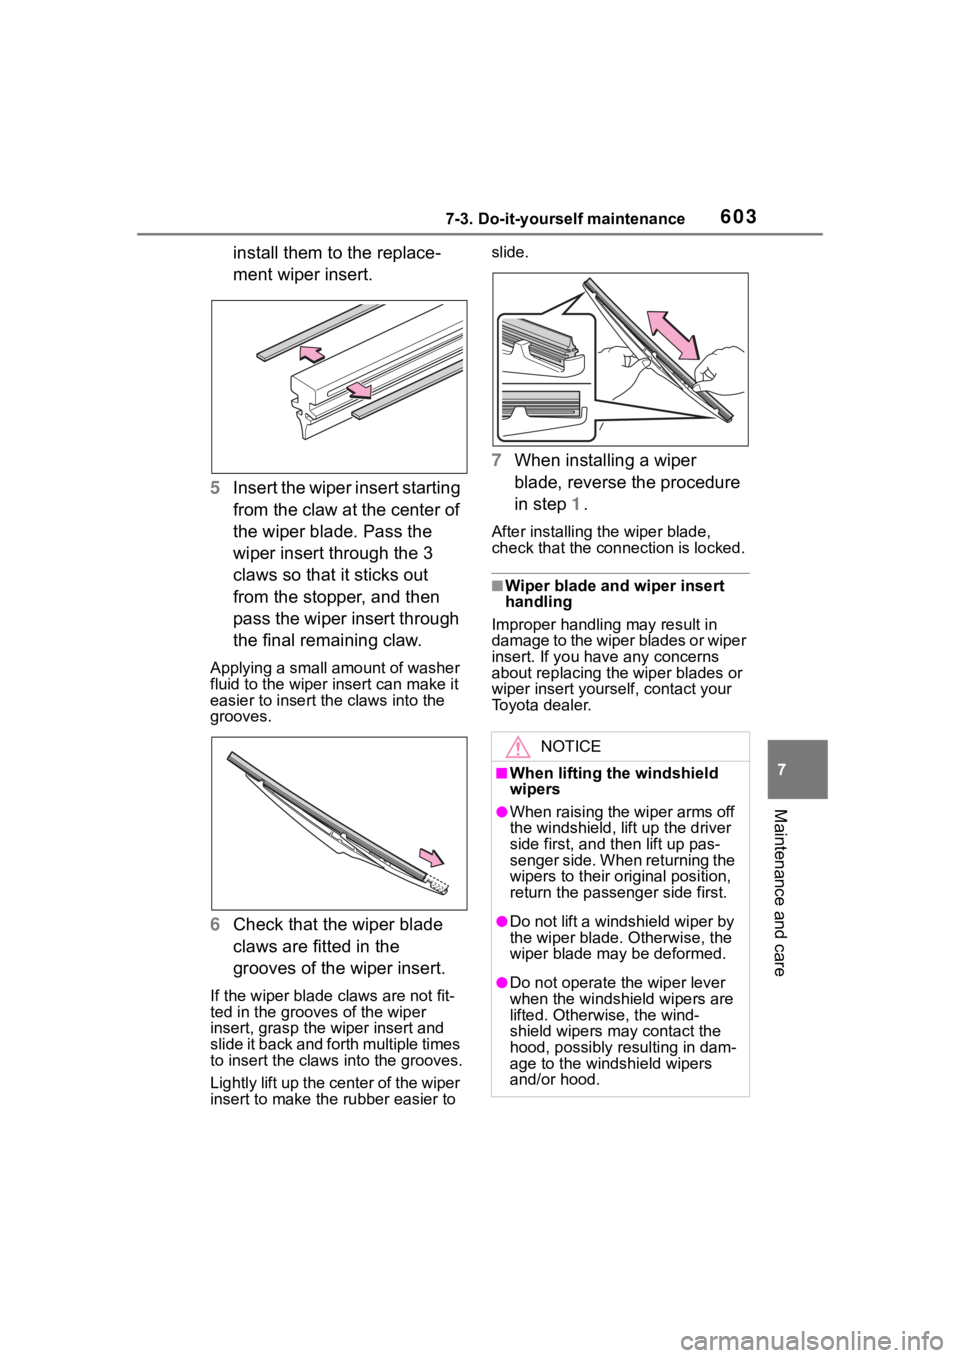
install them to the replace-
ment wiper insert.
5 Insert the wiper insert starting
from the claw at the center of
the wiper blade. Pass the
wiper insert through the 3
claws so that it sticks out
from the stopper, and then
pass the wiper insert through
the final remaining claw.
Applying a small amount of washer
fluid to the wiper insert can make it
easier to insert the claws into the
grooves.
6Check that the wiper blade
claws are fitted in the
grooves of the wiper insert.
If the wiper blade claws are not fit-
ted in the grooves of the wiper
insert, grasp the wiper insert and
slide it back and fo rth multiple times
to insert the claws into the grooves.
Lightly lift up the center of the wiper
insert to make the rubber easier to slide.
7
When installing a wiper
blade, reverse the procedure
in step 1.
After installing the wiper blade,
check that the connection is locked.
■Wiper blade and wiper insert
handling
Improper handling may result in
damage to the wiper blades or wiper
insert. If you have any concerns
about replacing the wiper blades or
wiper insert yourself, contact your
Toyota dealer.
NOTICE
■When lifting the windshield
wipers
●When raising the wiper arms off
the windshield, lift up the driver
side first, and then lift up pas-
senger side. When returning the
wipers to their original position,
return the passenger side first.
●Do not lift a windshield wiper by
the wiper blade. Otherwise, the
wiper blade may be deformed.
●Do not operate the wiper lever
when the windshield wipers are
lifted. Otherwise, the wind-
shield wipers may contact the
hood, possibly resulting in dam-
age to the windshield wipers
and/or hood.
Page 617 of 736
617
8
8
When trouble arises
When trouble arises
8-1. Essential informationEmergency flashers .... 618
If your vehicle has to be stopped in an emergency.................................. 618
If the vehicle is trapped in rising water ................ 619
8-2. Steps to take in an emer- gency
If your vehicle needs to be towed......................... 621
If you think something is wrong ........................ 626
Fuel pump shut off system .................................. 627
If a warning light turns on or a warning buzzer sounds
.................................. 628
If a warning message is dis- played........................ 639
If you have a flat tire.... 642
If the engine will not start .................................. 651
If you lose your keys ... 653
If the electronic key does not operate properly (vehi-
cles with smart key sys-
tem) ........................... 653
If the vehicle battery is dis- charged ..................... 655
If your vehicle overheats .................................. 659If the vehicle becomes stuck
.................................. 661