warning TOYOTA RAV4 PHEV 2021 Owners Manual
[x] Cancel search | Manufacturer: TOYOTA, Model Year: 2021, Model line: RAV4 PHEV, Model: TOYOTA RAV4 PHEV 2021Pages: 666, PDF Size: 161.28 MB
Page 321 of 666
319
5
5-2. Driving procedures
Driving
power switch to OF F, the hybrid sys-
tem may not start in some cases. After turning the power switch to OFF,
please wait a few seconds before
restarting the hybrid system.
■Customization
If the smart entry & start system has
been deactivated in a customized set -
ting, refer to P.605.
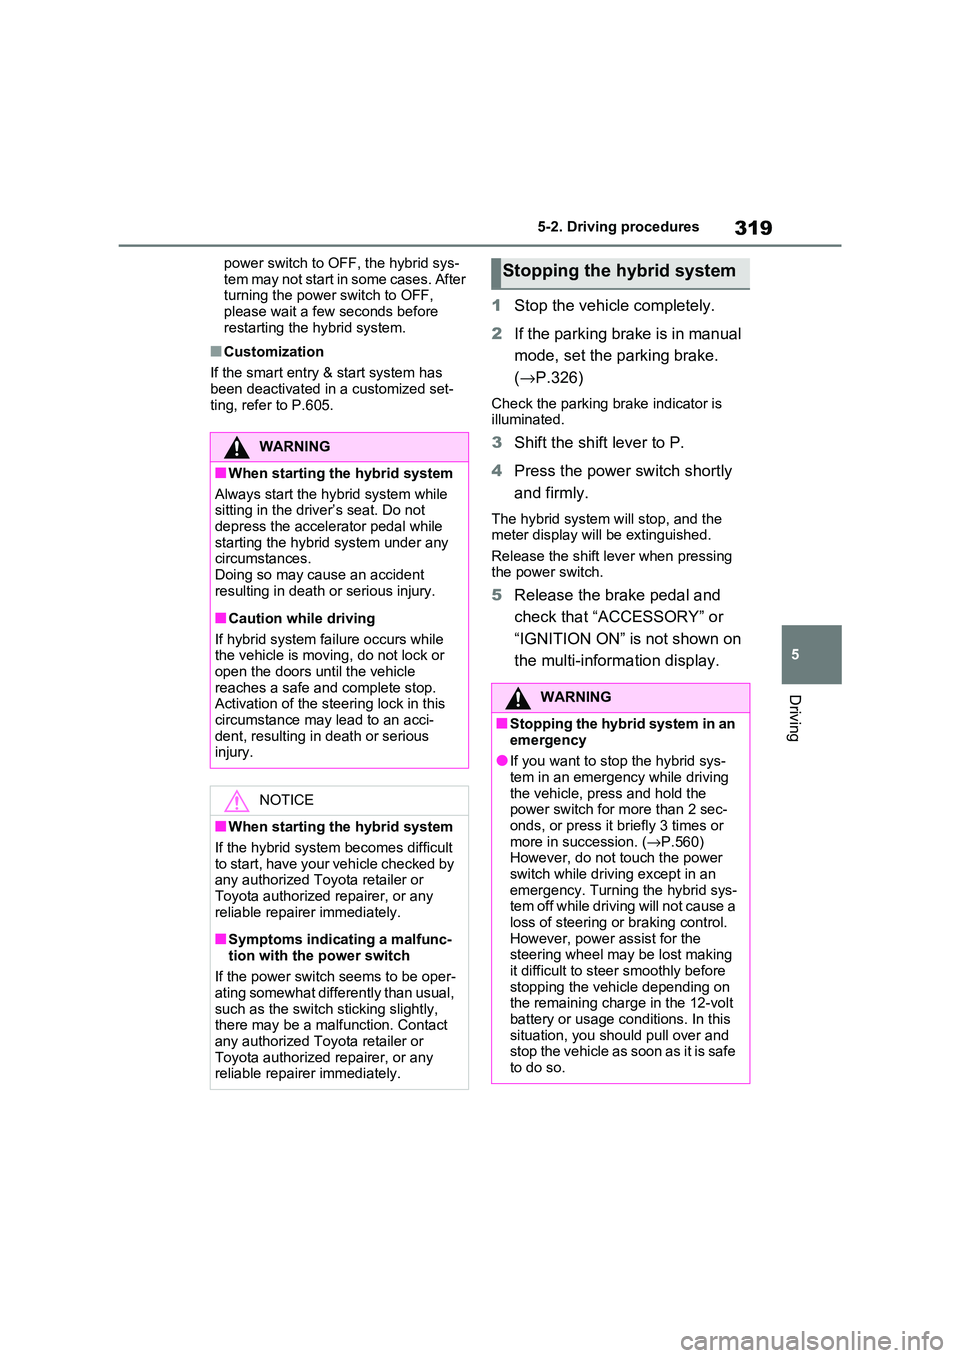
1 Stop the vehicle completely.
2 If the parking brake is in manual
mode, set the parking brake.
( →P.326)
Check the parking brake indicator is
illuminated.
3 Shift the shift lever to P.
4 Press the power switch shortly
and firmly.
The hybrid system w ill stop, and the meter display will be extinguished.
Release the shift lever when pressing
the power switch.
5 Release the brake pedal and
check that “ACCESSORY” or
“IGNITION ON” is not shown on
the multi-inform ation display.
WARNING
■When starting the hybrid system
Always start the hyb rid system while
sitting in the drive r’s seat. Do not
depress the accelerator pedal while starting the hybri d system under any
circumstances.
Doing so may cause an accident resulting in death or serious injury.
■Caution while driving
If hybrid system fai lure occurs while
the vehicle is moving, do not lock or
open the doors until the vehicle reaches a safe and complete stop.
Activation of the steering lock in this
circumstance may lead to an acci - dent, resulting in death or serious
injury.
NOTICE
■When starting the hybrid system
If the hybrid system becomes difficult
to start, have your vehicle checked by
any authorized Toyo ta retailer or Toyota authorized repairer, or any
reliable repairer immediately.
■Symptoms indicating a malfunc -
tion with the power switch
If the power switch seems to be oper - ating somewhat differently than usual,
such as the switch sticking slightly,
there may be a malfunction. Contact any authorized Toyo ta retailer or
Toyota authorized repairer, or any
reliable repairer immediately.
Stopping the hybrid system
WARNING
■Stopping the hybrid system in an
emergency
●If you want to sto p the hybrid sys- tem in an emergency while driving
the vehicle, press and hold the
power switch for more than 2 sec- onds, or press it b riefly 3 times or
more in succession. ( →P.560)
However, do not touch the power switch while driving except in an
emergency. Turning the hybrid sys -
tem off while driving will not cause a loss of steering or braking control.
However, power assist for the
steering wheel may be lost making it difficult to st eer smoothly before
stopping the vehi cle depending on
the remaining charge in the 12-volt battery or usage co nditions. In this
situation, you should pull over and
stop the vehicle as soon as it is safe to do so.
Page 322 of 666
3205-2. Driving procedures
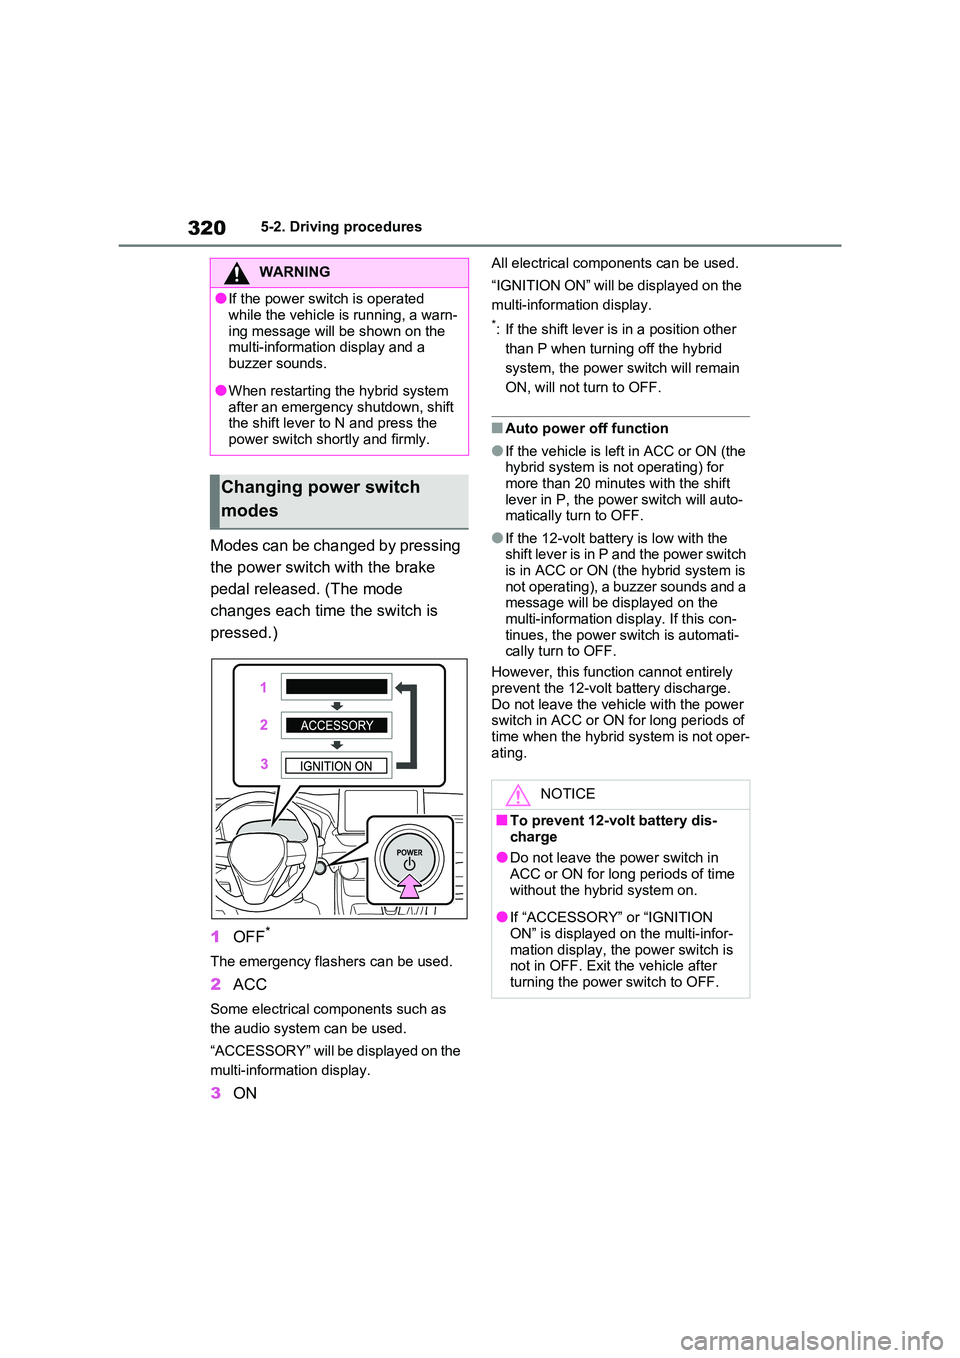
Modes can be changed by pressing
the power switch with the brake
pedal released. (The mode
changes each time the switch is
pressed.)
1 OFF*
The emergency flashers can be used.
2ACC
Some electrical components such as
the audio system can be used.
“ACCESSORY” will be displayed on the
multi-information display.
3 ON
All electrical components can be used.
“IGNITION ON” will be displayed on the
multi-information display.
*: If the shift lever is in a position other
than P when turning off the hybrid
system, the power s witch will remain
ON, will not turn to OFF.
■Auto power off function
●If the vehicle is le ft in ACC or ON (the hybrid system is no t operating) for
more than 20 minutes with the shift
lever in P, the power switch will auto - matically turn to OFF.
●If the 12-volt batte ry is low with the shift lever is in P and the power switch
is in ACC or ON (t he hybrid system is
not operating), a buzzer sounds and a message will be displayed on the
multi-information dis play. If this con-
tinues, the power switch is automati - cally turn to OFF.
However, this functi on cannot entirely
prevent the 12-volt battery discharge. Do not leave the vehicle with the power
switch in ACC or ON for long periods of
time when the hybrid system is not oper - ating.
WARNING
●If the power switch is operated
while the vehicle is running, a warn -
ing message will be shown on the multi-information display and a
buzzer sounds.
●When restarting the hybrid system
after an emergency shutdown, shift
the shift lever to N and press the
power switch shortly and firmly.
Changing power switch
modes
NOTICE
■To prevent 12-volt battery dis -
charge
●Do not leave the power switch in ACC or ON for long periods of time
without the hybr id system on.
●If “ACCESSORY” or “IGNITION
ON” is displayed on the multi-infor -
mation display, the power switch is not in OFF. Exit the vehicle after
turning the power switch to OFF.
Page 324 of 666
3225-2. Driving procedures
shifting to 5 or 4. ( →P.323, 324)
●When switching the driving mode to
sport mode while driving in D position.
( →P.434)
■Restraining sudden start (Drive- Start Control)
→ P.301
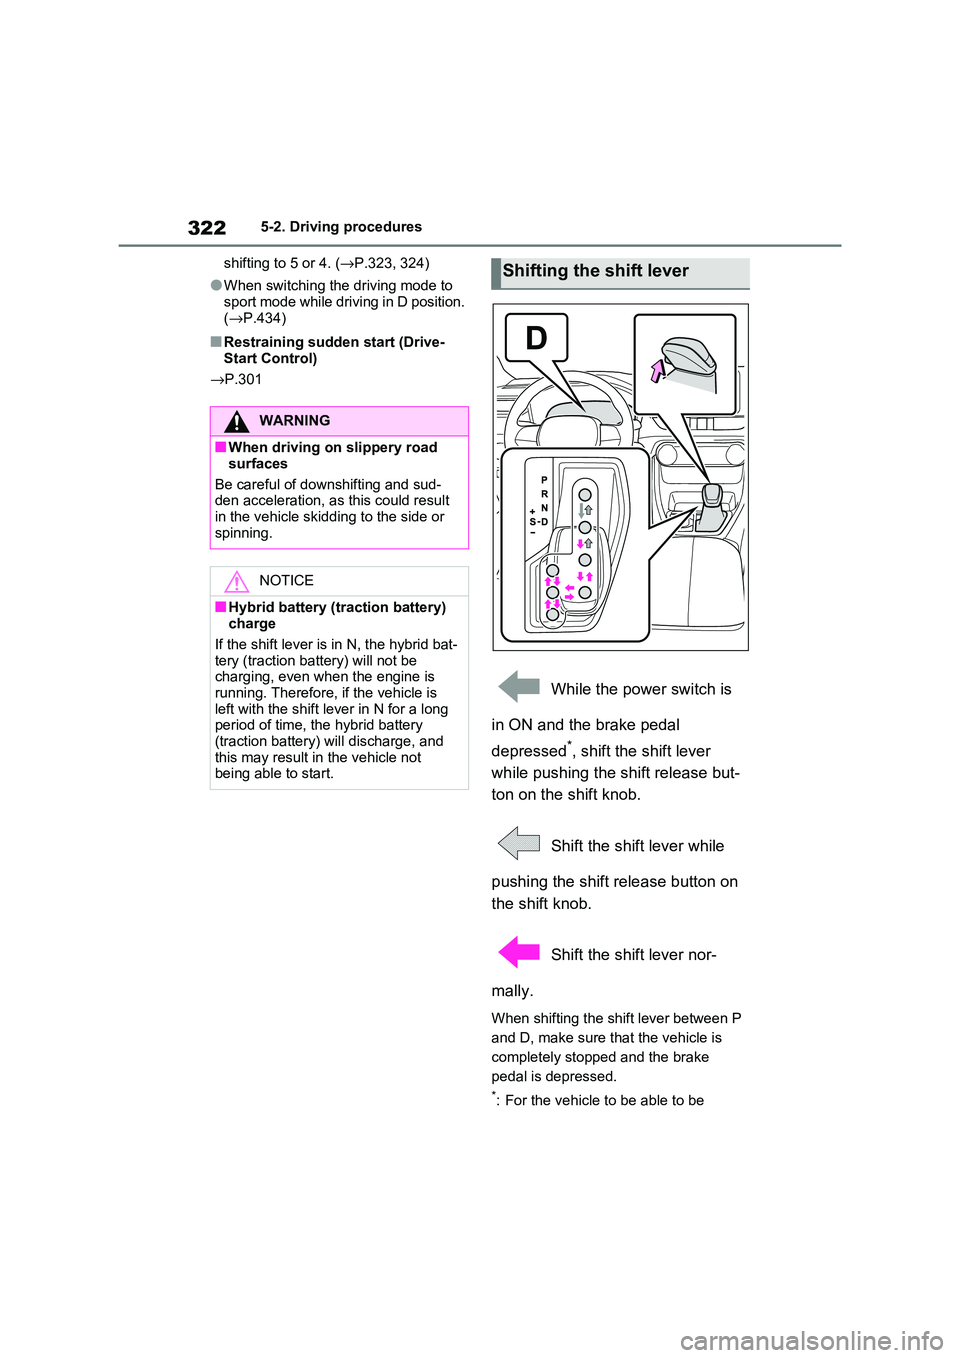
While the power switch is
in ON and the brake pedal
depressed*, shift the shift lever
while pushing the shift release but -
ton on the shift knob.
Shift the shift lever while
pushing the shift release button on
the shift knob.
Shift the shift lever nor -
mally.
When shifting the shift lever between P
and D, make sure that the vehicle is
completely stopped and the brake
pedal is depressed.
*: For the vehicle to be able to be
WARNING
■When driving on slippery road
surfaces
Be careful of down shifting and sud-
den acceleration, as this could result
in the vehicle skidding to the side or spinning.
NOTICE
■Hybrid battery ( traction battery) charge
If the shift lever is in N, the hybrid bat -
tery (traction battery) will not be charging, even when the engine is
running. Therefore, if the vehicle is
left with the shift le ver in N for a long
period of tim e, the hybrid battery (traction battery) will discharge, and
this may result in the vehicle not
being able to start.
Shifting the shift lever
Page 325 of 666
323
5
5-2. Driving procedures
Driving
shifted from P, the brake pedal must
be depressed before the shift release
button is pushed. If the shift release
button is pushed first, the shift lock
will not be released.
■Shift lock system
The shift lock system is a system to pre- vent accidental operation of the shift
lever in starting.
The shift lever can be shifted from P only when the power switch is in ON, the
brake pedal is depressed and the shift
release button is pushed.
■If the shift lever cannot be shifted from P
First, check whether the brake pedal is
being depressed. If the shift lever cannot be shifted even
though the brake pedal is depressed
and the shift releas e button is pushed, there may be a problem with the shift
lock system. Have the vehicle inspected
by any authorized T oyota retailer or Toyota authorized repairer, or any reli -
able repairer immediately.
The following steps may be used as an emergency measure to ensure that the
shift lever ca n be shifted.
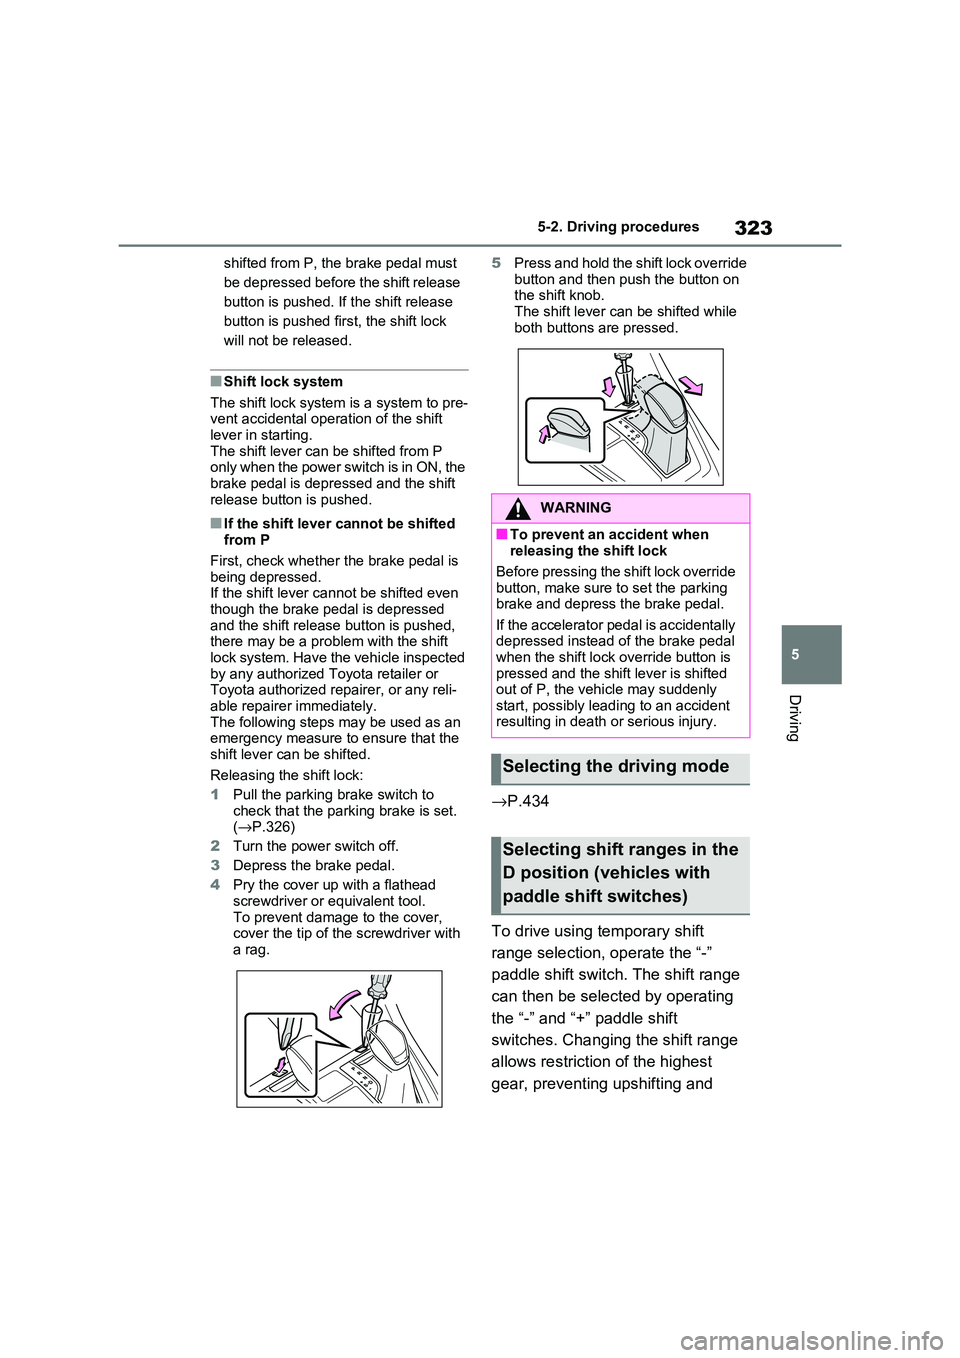
Releasing the shift lock:
1 Pull the parking brake switch to
check that the park ing brake is set. ( →P.326)
2 Turn the power switch off.
3 Depress the brake pedal.
4 Pry the cover up with a flathead
screwdriver or equivalent tool.
To prevent damage to the cover, cover the tip of the screwdriver with
a rag.
5 Press and hold the shift lock override
button and then push the button on the shift knob.
The shift lever can be shifted while
both buttons are pressed.
→ P.434
To drive using temporary shift
range selection, operate the “-”
paddle shift switch. The shift range
can then be selected by operating
the “-” and “+” paddle shift
switches. Changing the shift range
allows restriction of the highest
gear, preventing upshifting and
WARNING
■To prevent an accident when releasing the shift lock
Before pressing the shift lock override
button, make sure to set the parking brake and depress the brake pedal.
If the accelerator pedal is accidentally
depressed instead of the brake pedal when the shift lock override button is
pressed and the shift lever is shifted
out of P, the vehicle may suddenly start, possibly leading to an accident
resulting in death or serious injury.
Selecting the driving mode
Selecting shift ranges in the
D position (vehicles with
paddle shift switches)
Page 326 of 666
3245-2. Driving procedures
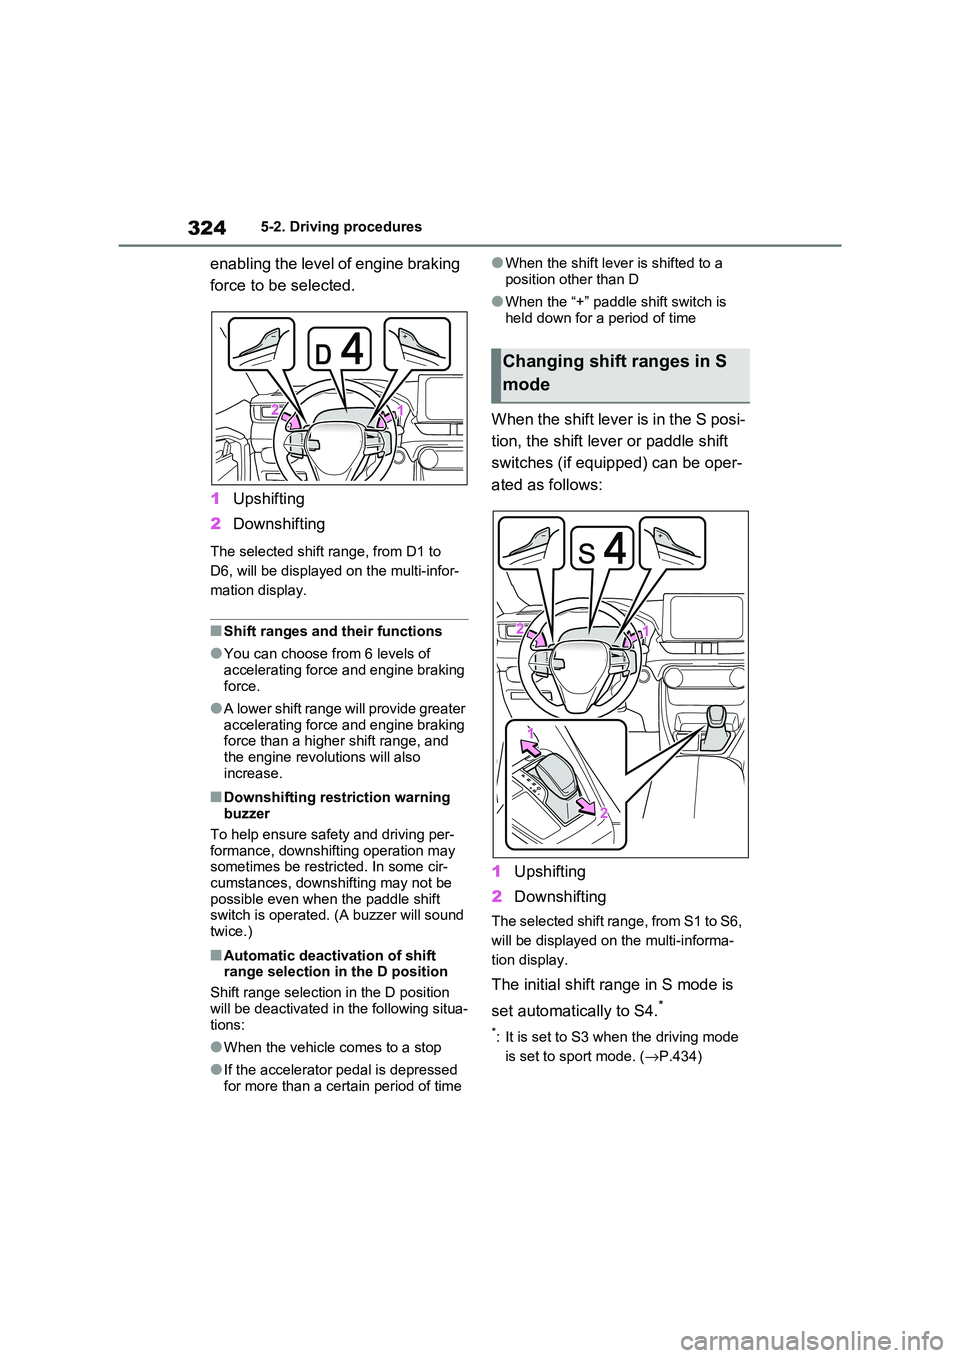
enabling the level of engine braking
force to be selected.
1 Upshifting
2 Downshifting
The selected shift range, from D1 to
D6, will be displayed on the multi-infor -
mation display.
■Shift ranges and their functions
●You can choose from 6 levels of
accelerating force and engine braking force.
●A lower shift range will provide greater accelerating force and engine braking
force than a higher shift range, and
the engine revolutions will also increase.
■Downshifting restriction warning
buzzer
To help ensure safe ty and driving per- formance, downshifting operation may
sometimes be restricted. In some cir -
cumstances, downshifting may not be possible even when the paddle shift
switch is operated. (A buzzer will sound
twice.)
■Automatic deacti vation of shift
range selection i n the D position
Shift range selection in the D position
will be deactivated in the following situa -
tions:
●When the vehicle comes to a stop
●If the accelerator pedal is depressed
for more than a cert ain period of time
●When the shift lever is shifted to a
position other than D
●When the “+” paddle shift switch is
held down for a period of time
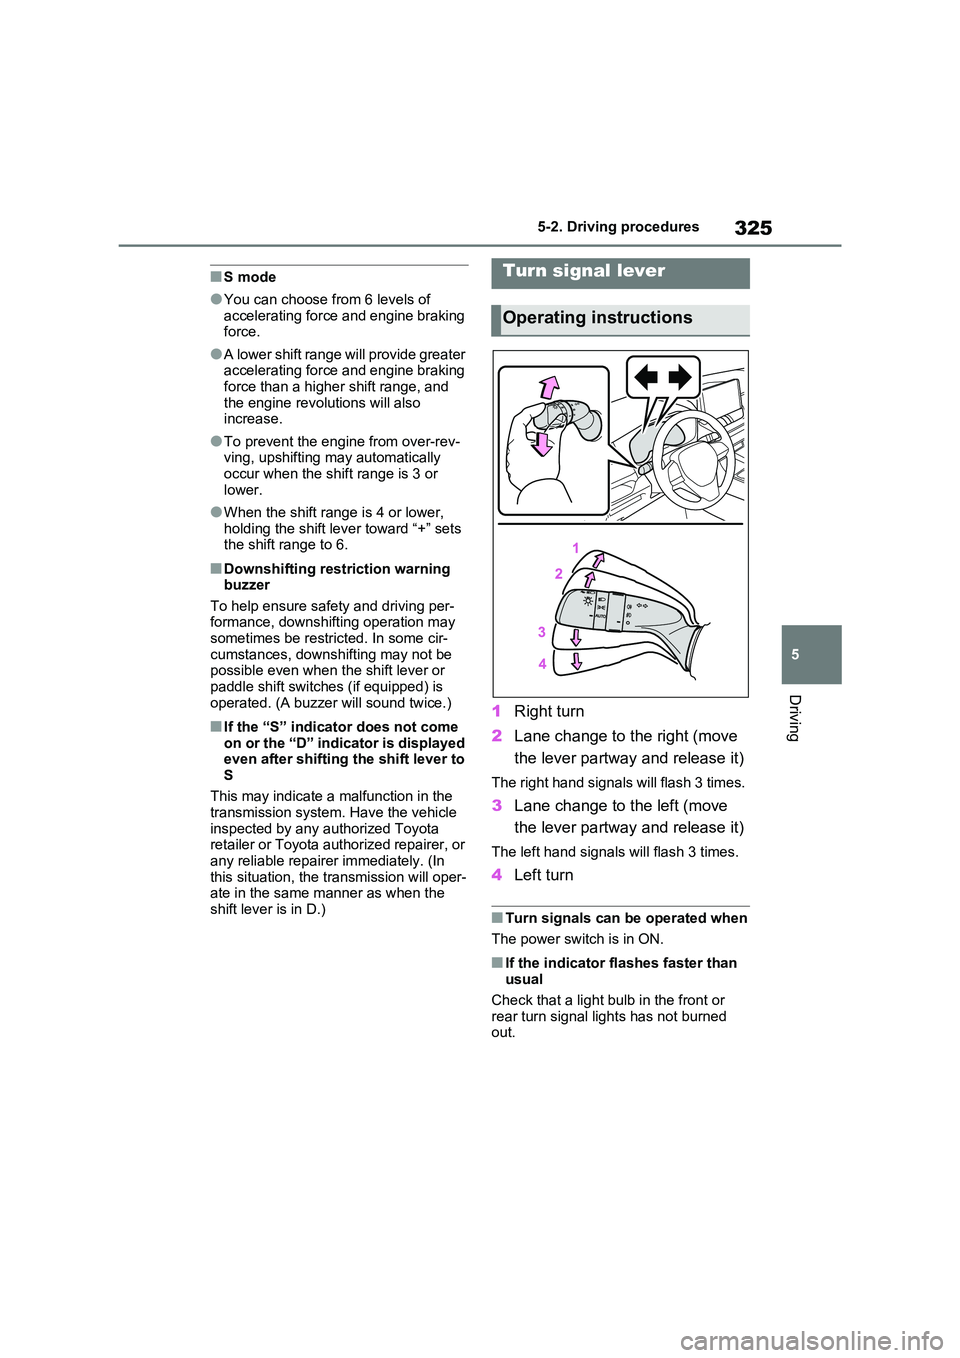
When the shift lever is in the S posi -
tion, the shift lev er or paddle shift
switches (if equipped) can be oper -
ated as follows:
1 Upshifting
2 Downshifting
The selected shift range, from S1 to S6,
will be displayed on the multi-informa -
tion display.
The initial shift range in S mode is
set automatically to S4.*
*: It is set to S3 when the driving mode
is set to sport mode. ( →P.434)
Changing shift ranges in S
mode
Page 327 of 666
325
5
5-2. Driving procedures
Driving
■S mode
●You can choose from 6 levels of
accelerating force and engine braking force.
●A lower shift range will provide greater accelerating force and engine braking
force than a higher shift range, and
the engine revolutions will also increase.
●To prevent the eng ine from over-rev- ving, upshifting may automatically
occur when the shif t range is 3 or
lower.
●When the shift range is 4 or lower,
holding the shift le ver toward “+” sets the shift range to 6.
■Downshifting restriction warning
buzzer
To help ensure safe ty and driving per- formance, downshifting operation may
sometimes be restricted. In some cir -
cumstances, downshifting may not be possible even when the shift lever or
paddle shift switches (if equipped) is
operated. (A buzze r will sound twice.)
■If the “S” indicator does not come on or the “D” indicator is displayed
even after shifting t he shift lever to
S
This may indicate a malfunction in the transmission system. Have the vehicle
inspected by any authorized Toyota
retailer or Toyota authorized repairer, or any reliable repairer immediately. (In
this situation, the transmission will oper -
ate in the same manner as when the shift lever is in D.)
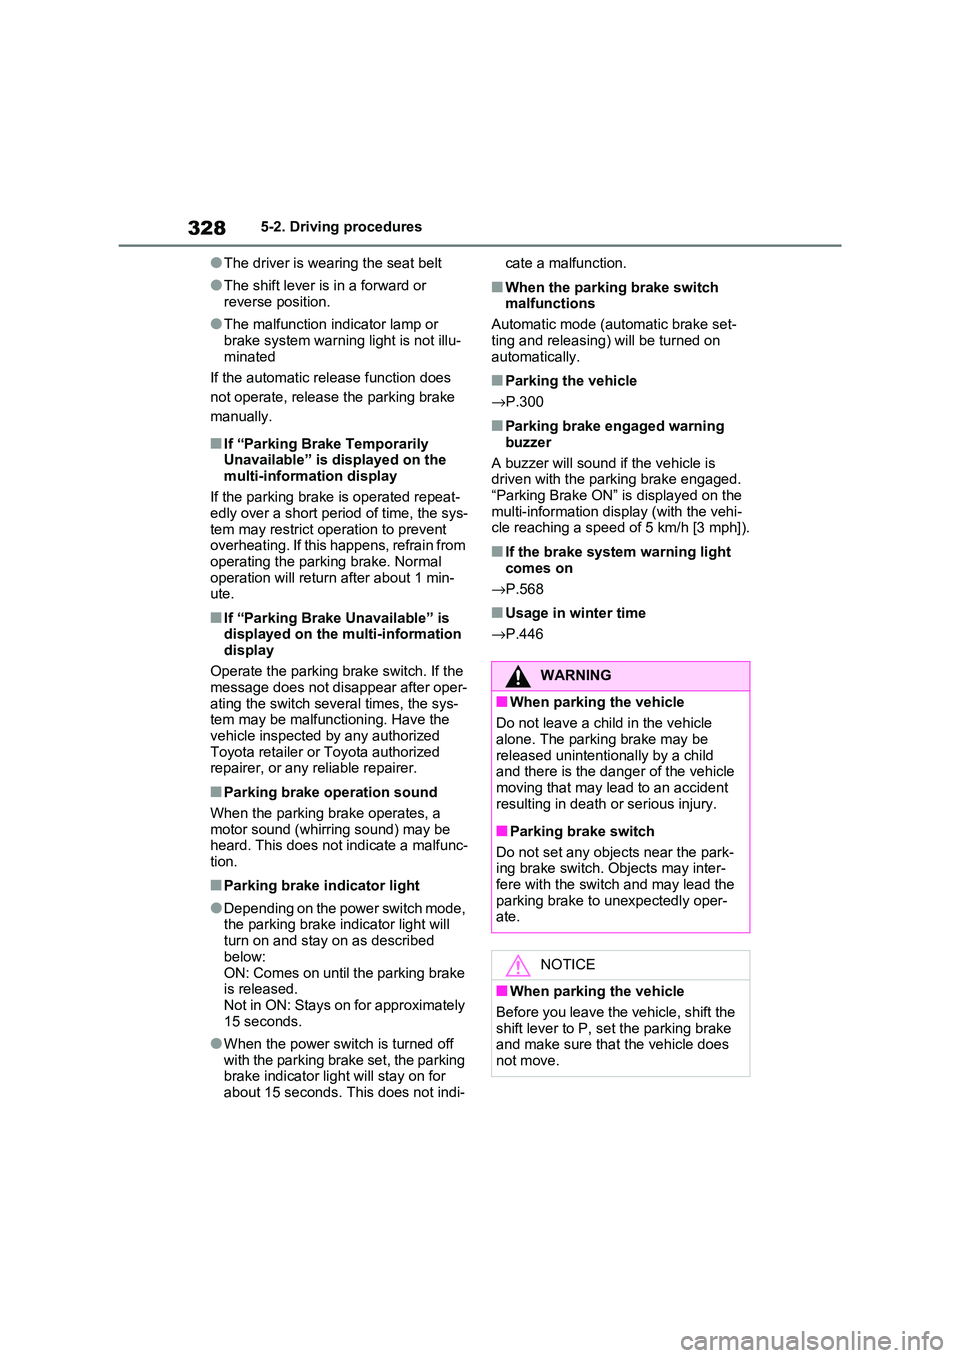
1 Right turn
2 Lane change to the right (move
the lever partway and release it)
The right hand signals will flash 3 times.
3 Lane change to the left (move
the lever partway and release it)
The left hand signals will flash 3 times.
4 Left turn
■Turn signals can be operated when
The power switch is in ON.
■If the indicator flashes faster than
usual
Check that a light b ulb in the front or rear turn signal lights has not burned
out.
Turn signal lever
Operating instructions
Page 330 of 666
3285-2. Driving procedures
●The driver is wearing the seat belt
●The shift lever is in a forward or
reverse position.
●The malfunction indicator lamp or
brake system warning light is not illu -
minated
If the automatic release function does
not operate, release the parking brake
manually.
■If “Parking Brake Temporarily Unavailable” is displayed on the
multi-information display
If the parking brake is operated repeat - edly over a short period of time, the sys -
tem may restrict oper ation to prevent
overheating. If this happens, refrain from operating the parking brake. Normal
operation will return after about 1 min-
ute.
■If “Parking Brake Unavailable” is displayed on the multi-information
display
Operate the parking brake switch. If the message does not di sappear after oper-
ating the switch several times, the sys -
tem may be malfunctioning. Have the vehicle inspected by any authorized
Toyota retailer or Toyota authorized
repairer, or any reliable repairer.
■Parking brake operation sound
When the parking brake operates, a
motor sound (whirring sound) may be
heard. This does not indicate a malfunc - tion.
■Parking brake indicator light
●Depending on the power switch mode, the parking brake in dicator light will
turn on and stay on as described
below:
ON: Comes on until the parking brake is released.
Not in ON: Stays on for approximately
15 seconds.
●When the power switch is turned off
with the parking brake set, the parking brake indicator li ght will stay on for
about 15 seconds. This does not indi -
cate a malfunction.
■When the parking brake switch
malfunctions
Automatic mode (automatic brake set -
ting and releasing) will be turned on
automatically.
■Parking the vehicle
→ P.300
■Parking brake engaged warning
buzzer
A buzzer will sound if the vehicle is driven with the pa rking brake engaged.
“Parking Brake ON” is displayed on the
multi-information display (with the vehi - cle reaching a speed of 5 km/h [3 mph]).
■If the brake system warning light
comes on
→ P.568
■Usage in winter time
→ P.446
WARNING
■When parking the vehicle
Do not leave a child in the vehicle
alone. The parking brake may be released unintentionally by a child
and there is the dang er of the vehicle
moving that may lead to an accident resulting in death or serious injury.
■Parking brake switch
Do not set any objects near the park -
ing brake switch. Objects may inter-
fere with the switch and may lead the parking brake to unexpectedly oper -
ate.
NOTICE
■When parking the vehicle
Before you leave the vehicle, shift the
shift lever to P, set the parking brake
and make sure that the vehicle does not move.
Page 331 of 666
329
5
5-2. Driving procedures
Driving
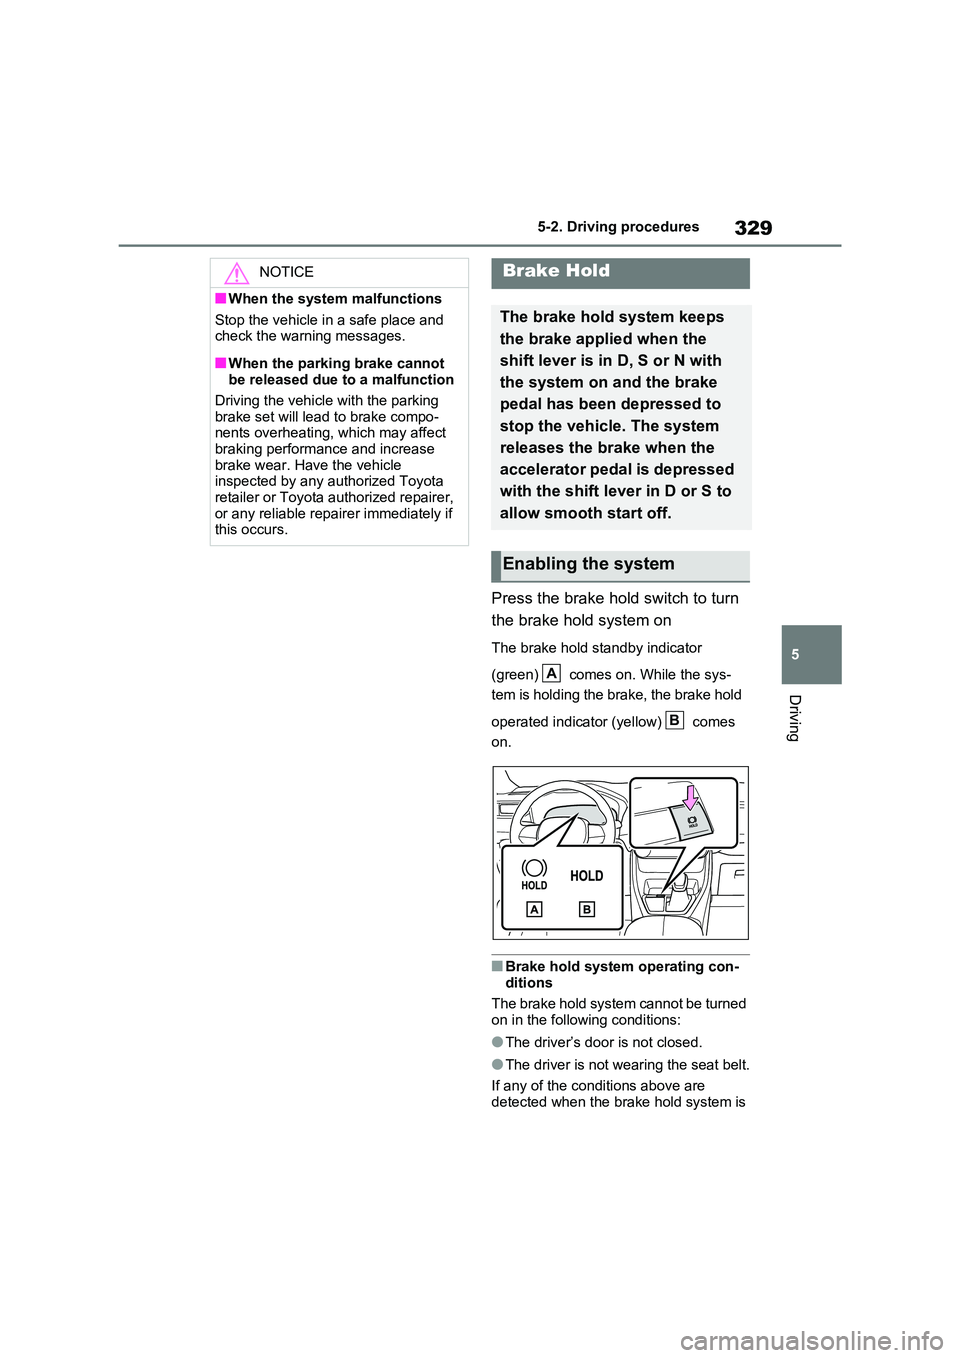
Press the brake hold switch to turn
the brake hold system on
The brake hold standby indicator
(green) comes on. While the sys -
tem is holding the brake, the brake hold
operated indicator (yellow) comes
on.
■Brake hold system operating con -
ditions
The brake hold system cannot be turned
on in the following conditions:
●The driver’s door is not closed.
●The driver is not wearing the seat belt.
If any of the conditions above are
detected when the brake hold system is
NOTICE
■When the system malfunctions
Stop the vehicle in a safe place and
check the warning messages.
■When the parking brake cannot
be released due to a malfunction
Driving the vehicle with the parking
brake set will lead to brake compo -
nents overheating, w hich may affect
braking performance and increase brake wear. Have the vehicle
inspected by any authorized Toyota
retailer or Toyota authorized repairer, or any reliable repairer immediately if
this occurs.
Brake Hold
The brake hold system keeps
the brake applied when the
shift lever is in D, S or N with
the system on and the brake
pedal has been depressed to
stop the vehicle. The system
releases the brake when the
accelerator pedal is depressed
with the shift lever in D or S to
allow smooth start off.
Enabling the system
A
B
Page 332 of 666
3305-2. Driving procedures
enabled, the system will turn off and the
brake hold standby indicator light will go off. In addition, if any of the conditions
are detected while th e system is holding
the brake, a warning buzzer will sound and a message wi ll be shown on the
multi-information display. The parking
brake will then be set automatically.
■Brake hold function
●If the brake pedal is left released for a
period of about 3 minutes after the system has started ho lding the brake,
the parking brake will be set automati -
cally. In this case, a warning buzzer sounds and a message is shown on
the multi-information display.
●To turn the system o ff while the sys-
tem is holding the brake, firmly
depress the brak e pedal and press the button again.
●The brake hold func tion may not hold the vehicle when the vehicle is on a
steep incline. In this situation, it may
be necessary for the driver to apply the brakes. A warning buzzer will
sound and the multi -information dis-
play will inform the dr iver of this situa- tion. If a warning message is shown
on the multi-informa tion display, read
the message and follow the instruc - tions.
■When the parking brake is set auto -
matically while the system is hold -
ing the brakes
Perform any of the following operations
to release the parking brake:
●Depress the accelerator pedal. (The
parking brake will not be released
automatically if the seat belt is not fas - tened.)
●Operate the parking brake switch with
the brake pedal depressed.
Make sure that the parking brake indica -
tor light goes off. ( →P.326)
■When an inspection at any autho-
rized Toyota retailer or Toyota authorized repairer, or any reliable
repairer is necessary
When the brake hold standby indicator (green) does not illuminate even when
the brake hold switch is pressed with the
brake hold system ope rating conditions met, the system may b e malfunctioning.
Have the vehicle i nspected at any
authorized Toyota r etailer or Toyota authorized repairer, or any reliable
repairer.
■If “Brake Hold Malfunction Press
Brake to Deactivate Visit Your Dealer” or “Brake Hold Malfunction
Visit Your Dealer” is displayed on
the multi-information display
The system may be malfunctioning.
Have the vehicle inspected by any
authorized Toyota r etailer or Toyota authorized repairer, or any reliable
repairer.
■Warning messages and buzzers
Warning messages and buzzers are used to indicate a system malfunction or
to inform the driver of the need for cau -
tion. If a warning message is shown on the multi-information display, read the
message and follow the instructions.
■If the brake hold operated indicator
flashes
→ P.574
WARNING
■When the vehicle is on a steep
incline
When using the brake hold system on a steep incline, exercise caution. The
brake hold function may not hold the
vehicle in such a situation.
■When stopped on a slippery road
The system cannot stop the vehicle when the gripping ab ility of the tires
has been exceeded. Do not use the
system when stopped on a slippery road.
Page 336 of 666
3345-3. Operating the lights and wipers
*: If equipped
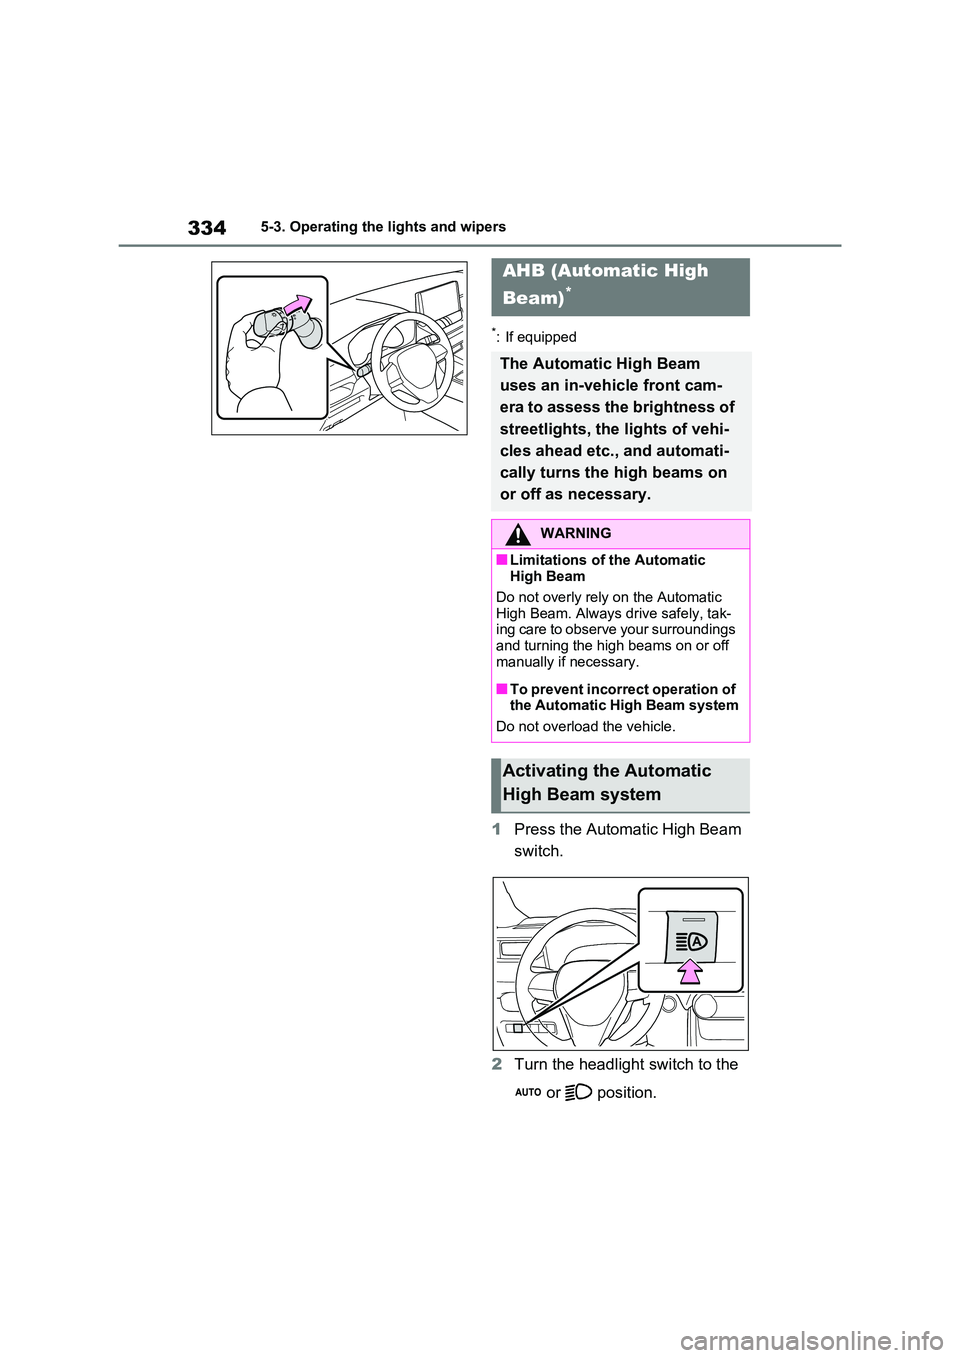
1Press the Automatic High Beam
switch.
2 Turn the headlight switch to the
or position.
AHB (Automatic High
Beam)*
The Automati c High Beam
uses an in-vehicle front cam -
era to assess the brightness of
streetlights, the lights of vehi -
cles ahead etc., and automati -
cally turns the high beams on
or off as necessary.
WARNING
■Limitations of the Automatic
High Beam
Do not overly rely on the Automatic High Beam. Always drive safely, tak -
ing care to observe your surroundings
and turning the high beams on or off manually if necessary.
■To prevent incorrect operation of the Automatic Hi gh Beam system
Do not overload the vehicle.
Activating the Automatic
High Beam system