stop start TOYOTA RAV4 PLUG-IN HYBRID 2021 User Guide
[x] Cancel search | Manufacturer: TOYOTA, Model Year: 2021, Model line: RAV4 PLUG-IN HYBRID, Model: TOYOTA RAV4 PLUG-IN HYBRID 2021Pages: 666, PDF Size: 161.28 MB
Page 105 of 666

103
2
2-1. Plug-in hybrid system
Plug-in hybrid system
■When starting off, depress the
accelerator pedal smoothly to
accelerate
As a guide, acce lerate up to
approximately 20 km/h (12mph) in
the first 5 seconds.
Electrical and fuel efficiency can be
improved just by using the ECO
Accelerator Guidance displayed on
the multi-informat ion display and
taking care to start off gently.
( →P.182)
When the driving mode is set to Eco
drive mode, depressing the accelerator
pedal generates smooth torque that
makes it easier to operate the accelera -
tor gently.
■Maintain sufficient vehicle-to-
vehicle distance and do not
accelerate or decelerate
unnecessarily
Try to maintain a fixed speed while
driving. Driving at a short vehicle-
to-vehicle distance will result in
repeating wasteful acceleration and
deceleration, which will worsen the
electrical and fuel efficiency.
■Release the accelerator pedal
early before stopping the vehi -
cle, such as at a traffic light
The regenerative brake will operate
to convert the kinetic energy of the
vehicle into electrical energy, which
will charge the hyb rid battery (trac-
tion battery).
The regeneration status can be
checked from the Hybrid System
Indicator. ( →P.177)
When the brake pedal is depressed
lightly during deceleration, the
regeneration amount increases,
enabling more electrical energy to
be recovered.
If the brake pedal is depressed too
strongly, the recovered amount indica -
tor will reach the maximum level and
the upper limit of the recoverable
energy will be exceeded. Therefore, be
sure to operate the brake pedal early.
■Use the air co nditioning sys-
tem appropriately, and also
utilize the heated steering
wheel (if equipped) and seat
heaters
In EV mode, the vehicle is cooled
and heated by electrical energy.
(Except in extremely cold tempera -
tures of approximately -10°C (14°F)
or less.)
Preventing excessive cooling or
heating of the vehicle will reduce
power consumption and improve
electrical efficiency.
The heated steering wheel (if
equipped) and seat heaters are effi -
cient heating device that directly
warm the body using less electric
power.
When used together with the air condi -
tioning system, a low temperature set-
ting can be used to improve electrical
and fuel efficiency.
■Check the tire pressure
If the tire pressure is lower than the
specified value, i t will worsen the
electrical and fuel efficiency.
Page 124 of 666
1222-2. Charging
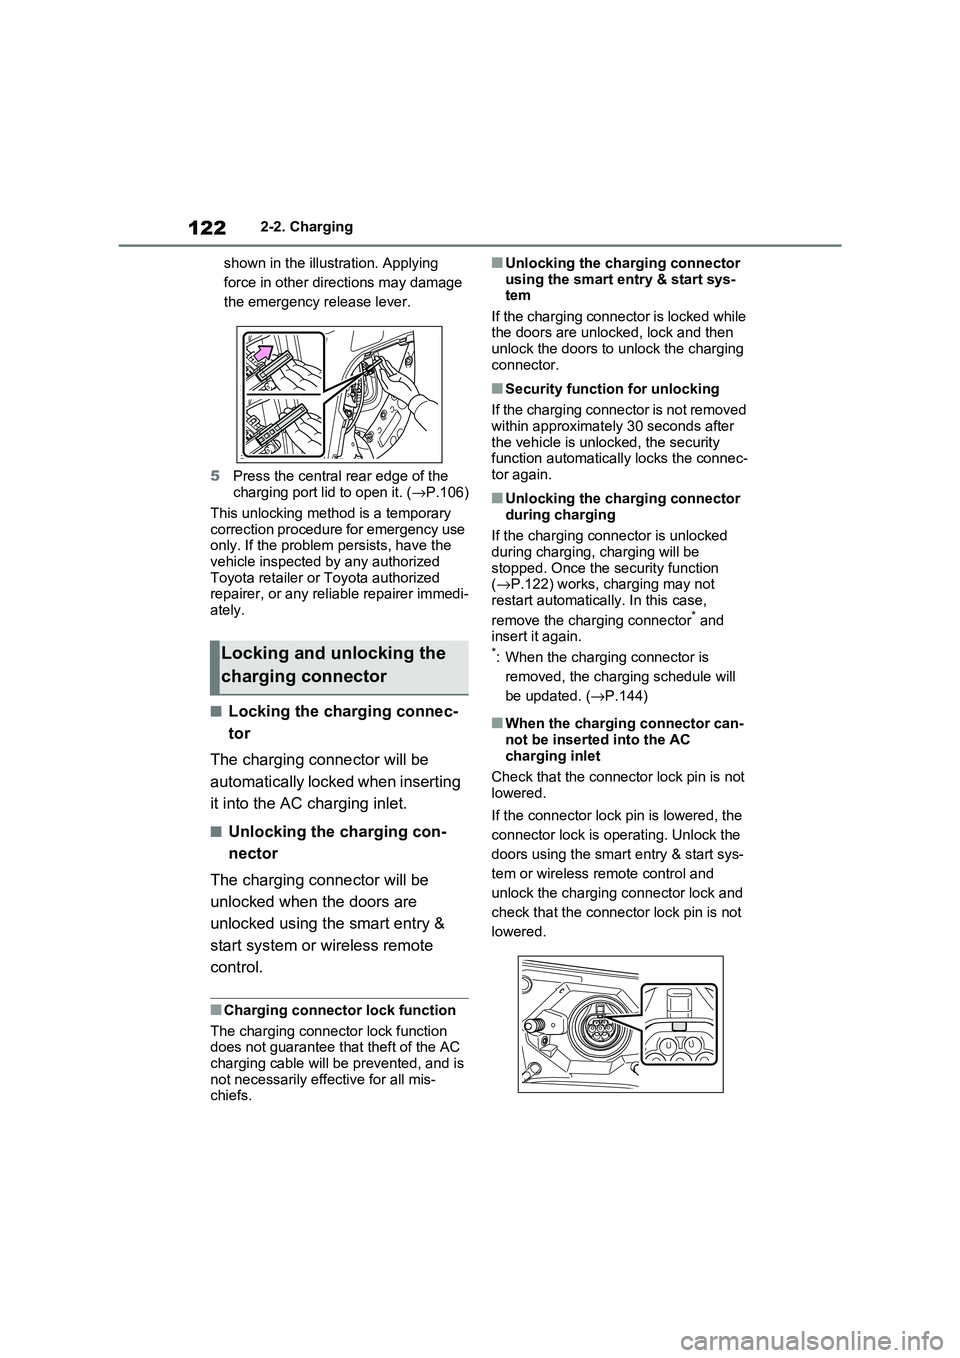
shown in the illustration. Applying
force in other directions may damage
the emergency release lever.
5 Press the central rear edge of the charging port lid to open it. ( →P.106)
This unlocking method is a temporary
correction procedure for emergency use only. If the problem persists, have the
vehicle inspected by any authorized
Toyota retailer or Toyota authorized repairer, or any reli able repairer immedi-
ately.
■Locking the charging connec -
tor
The charging connector will be
automatically locked when inserting
it into the AC c harging inlet.
■Unlocking the charging con-
nector
The charging connector will be
unlocked when the doors are
unlocked using the smart entry &
start system or wireless remote
control.
■Charging connector lock function
The charging connector lock function
does not guarantee t hat theft of the AC
charging cable will be prevented, and is not necessari ly effective for all mis-
chiefs.
■Unlocking the charging connector
using the smart entry & start sys- tem
If the charging connector is locked while
the doors are unlocked, lock and then unlock the doors to u nlock the charging
connector.
■Security function for unlocking
If the charging connector is not removed within approximately 30 seconds after
the vehicle is unloc ked, the security
function automatica lly locks the connec- tor again.
■Unlocking the charging connector
during charging
If the charging connector is unlocked during charging, charging will be
stopped. Once the security function
( →P.122) works, charging may not restart automatically. In this case,
remove the charging connector* and
insert it again.*: When the charging connector is
removed, the charging schedule will
be updated. ( →P.144)
■When the charging connector can- not be inserted into the AC
charging inlet
Check that the connect or lock pin is not lowered.
If the connector lock pin is lowered, the
connector lock is operating. Unlock the
doors using the smar t entry & start sys-
tem or wireless re mote control and
unlock the charging connector lock and
check that the connect or lock pin is not
lowered.
Locking and unlocking the
charging connector
Page 131 of 666
129
2
2-2. Charging
Plug-in hybrid system
■Hybrid battery (traction bat -
tery) warming control (Green -
land only)
This control operates after the AC
charging cable remains connected
to the vehicle for 3 days and “Bat -
tery Heater” autom atically stops. It
automatically insulates the hybrid
battery (traction battery) in
extremely low temperatures.
This control stops 31 days after
the AC charging cable is con -
nected, even if it is still con -
nected to the vehicle.
When this control operates,
charging schedule settings are
ignored and charging starts.
■“Battery Cooler”
When the hybrid battery (traction
battery) is hot and the AC charging
cable is connected to the vehicle,
this function cools the hybrid bat -
tery (traction battery) before
charging is carried out.
“Battery Cooler” will operate when
the “Battery Cooler” of the
“Charging Settings” on the multi-
information di splay is on. (→P.187)
■Traction battery heating and cool-
ing system (“Battery Heater” and “Battery Cooler”)
●The system operates when the hybrid battery (traction battery) is below or
above a certain temperature.
●The system may operate when
charging is not being performed.
●When the charging schedule is used
( →P.144), this function will operate
according to the charging schedule.
■“Battery Heater”
●When “Battery Heat er” is operating,
the charging indi cator illuminates.
●When the AC charging cable is
removed from the v ehicle or remains
connected to the ve hicle for approxi- mately 3 days, t he system automati-
cally stops.
●When “Battery Heat er” is operating
during charging, the charging time
may be longer than normal.
●If the outside temperature becomes
high while “Batter y Heater” is operat- ing, charging may complete earlier
than the “Departure” time set.
( →P.144)
●When the traction battery is almost
completely charged , “Battery Cooler” may not be implemented.
●When the following operations are performed while “Battery Heater” is
operating, the hybrid battery (traction
battery) heating operation stops. • The shift lever is changed to any posi-
tion other than P
• The Remote Air Conditioning System is operated ( →P.460)
●“Battery Heater” may operate even when the hybrid battery (traction bat -
tery) is fully charged depending on the
temperature of the hybrid battery (traction battery).
• The remaining charge of the hybrid
battery (traction battery) decreases when “Battery Heater” operates. The
charging operation may start again to
charge the hybrid battery (traction bat - tery).
• “Charging Stopped Due to Pulled
Charging Connector” may be shown
when the charging connector is removed while recharging. ( →P.160)
■“Battery Cooler”
●The charging indicator is illuminated while “Battery Cooler” is on standby or
operating.
●“Battery Cooler” is i mplemented for a
Page 134 of 666

1322-2. Charging
where charging cannot be per-
formed occurs.
When a message is displayed, follow
the instructions displayed on the
screen. ( →P.160)
■Multi-information display during
charging
If approximately 100 seconds elapse
after the power switch is turned to ON
during charging, the power switch will automatically turn off and the display will
disappear.
■Safety functions
●The hybrid system wi ll not start while the AC charging cable is attached to
the vehicle, even if the power switch is
operated.
●If the AC charging cable is connected
while the “READY” indicator is illumi- nated, the hybrid system will stop
automatically and dr iving will not be
possible.
Things to know before
charging
Make sure to read the follow -
ing precautions before con -
necting the AC c harging cable
to the vehicle and charging the
hybrid battery (traction bat -
tery).
WARNING
■Caution when charging
People with implantable cardiac pace -
makers or cardiac resynchronization
therapy-pacemakers should not carry out the charging procedure. Ask
someone else to do it.
●Do not approach the charger and
AC charging cable while charging.
Charging procedure may affect the operation of such devices.
●Do not remain in the vehicle during charging.
Charging procedure may affect the
operation of such devices.
●Do not enter the vehicle even to
take something out of the luggage compartment.
Charging procedure may affect the
operation of such devices.
Page 138 of 666
1362-2. Charging
→P.133
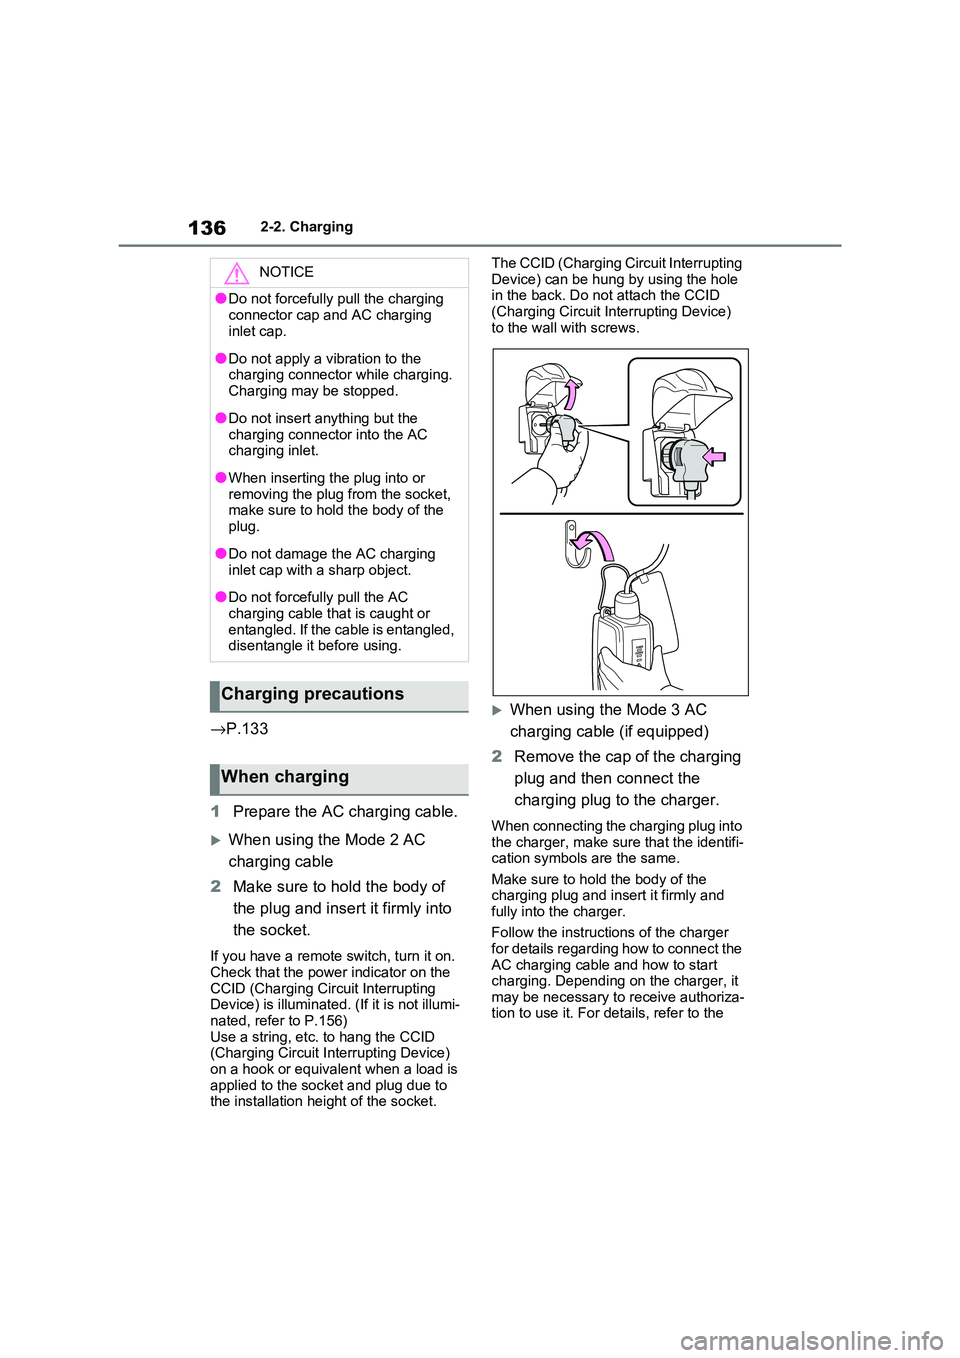
1 Prepare the AC charging cable.
When using the Mode 2 AC
charging cable
2 Make sure to hold the body of
the plug and insert it firmly into
the socket.
If you have a remote switch, turn it on.
Check that the power indicator on the
CCID (Charging Circuit Interrupting Device) is illuminated . (If it is not illumi-
nated, refer to P.156)
Use a string, etc. to hang the CCID (Charging Circuit Interrupting Device)
on a hook or equivalent when a load is
applied to the socket and plug due to the installation hei ght of the socket.
The CCID (Charging Circuit Interrupting
Device) can be hung by using the hole in the back. Do not attach the CCID
(Charging Circuit In terrupting Device)
to the wall with screws.
When using the Mode 3 AC
charging cable (if equipped)
2 Remove the cap of the charging
plug and then connect the
charging plug to the charger.
When connecting the charging plug into the charger, make su re that the identifi-
cation symbols are the same.
Make sure to hold the body of the charging plug and insert it firmly and
fully into the charger.
Follow the instructions of the charger for details regarding how to connect the
AC charging cable and how to start
charging. Depending on the charger, it may be necessary to receive authoriza-
tion to use it. For details, refer to the
NOTICE
●Do not forcefully pull the charging
connector cap and AC charging
inlet cap.
●Do not apply a vi bration to the
charging connector while charging. Charging may be stopped.
●Do not insert anything but the
charging connector into the AC charging inlet.
●When inserting the plug into or removing the plug from the socket,
make sure to hold the body of the
plug.
●Do not damage t he AC charging
inlet cap with a sharp object.
●Do not forcefully pull the AC
charging cable that is caught or entangled. If the cable is entangled,
disentangle i t before using.
Charging precautions
When charging
Page 140 of 666
1382-2. Charging
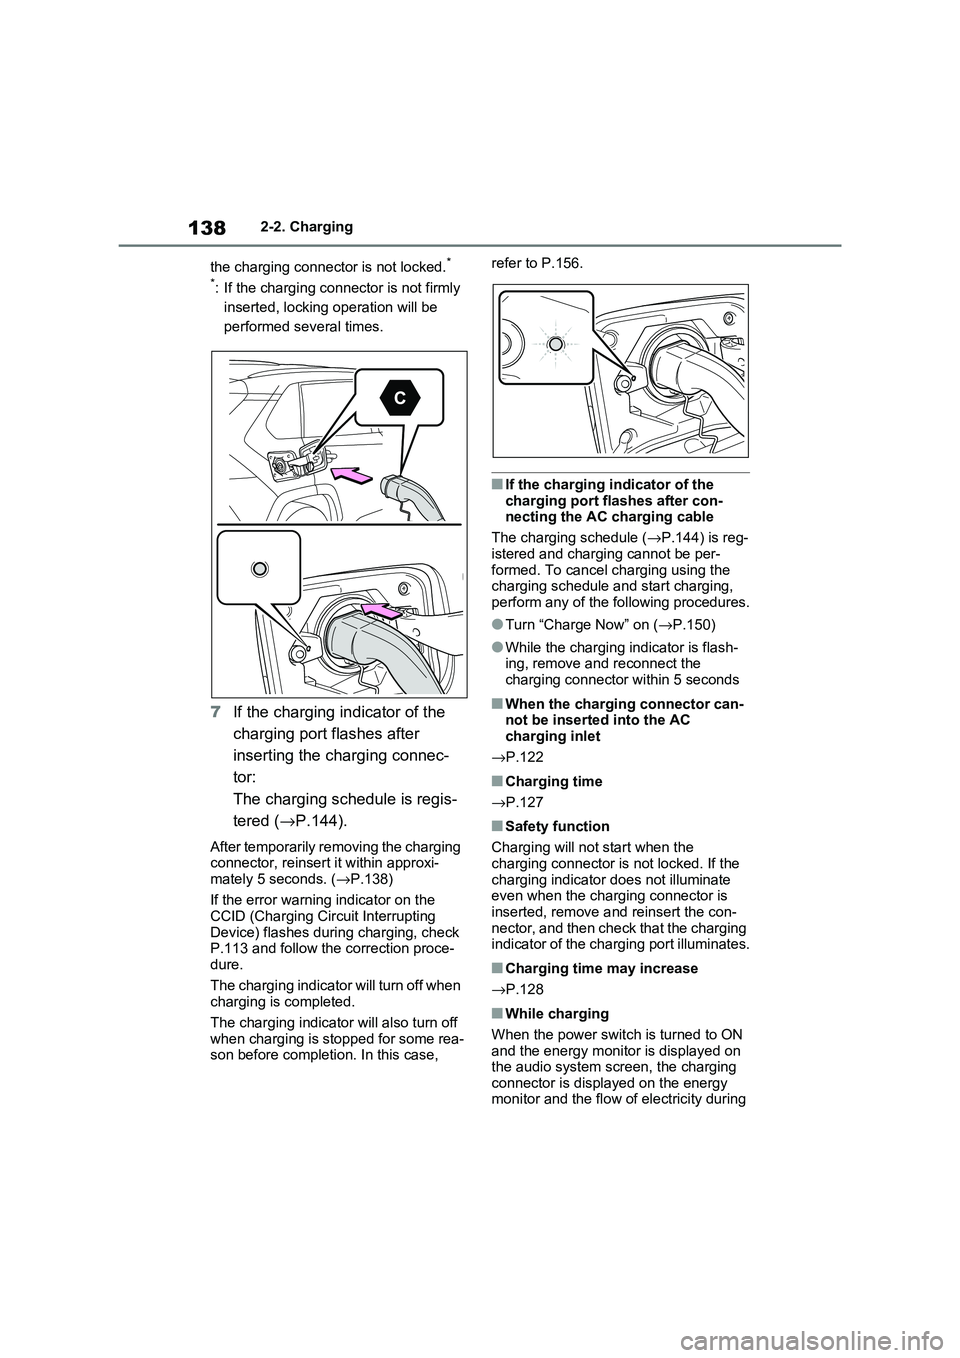
the charging connector is not locked.*
*: If the charging connector is not firmly
inserted, locking operation will be
performed se veral times.
7If the charging indicator of the
charging port flashes after
inserting the charging connec -
tor:
The charging schedule is regis -
tered ( →P.144).
After temporarily removing the charging connector, reinsert it within approxi -
mately 5 seconds. ( →P.138)
If the error warning indicator on the CCID (Charging Circuit Interrupting
Device) flashes during charging, check
P.113 and follow the correction proce - dure.
The charging indicator will turn off when
charging is completed.
The charging indicator will also turn off
when charging is stopped for some rea -
son before completi on. In this case,
refer to P.156.
■If the charging indicator of the
charging port flashes after con - necting the AC charging cable
The charging schedule ( →P.144) is reg-
istered and charging cannot be per - formed. To cancel charging using the
charging schedule and start charging,
perform any of the following procedures.
●Turn “Charge Now” on ( →P.150)
●While the charging indicator is flash-
ing, remove and reconnect the
charging connector within 5 seconds
■When the charging connector can - not be inserted into the AC
charging inlet
→ P.122
■Charging time
→ P.127
■Safety function
Charging will not start when the
charging connector is not locked. If the charging indicator does not illuminate
even when the charging connector is
inserted, remove a nd reinsert the con- nector, and then check that the charging
indicator of the charging port illuminates.
■Charging time may increase
→ P.128
■While charging
When the power switch is turned to ON and the energy monitor is displayed on
the audio system scr een, the charging
connector is displayed on the energy monitor and the flow of electricity during
Page 141 of 666
139
2
2-2. Charging
Plug-in hybrid system
charging is displayed ( →P.195).
■Charging at a public charging sta-
tion with authenti cation function
When a door is unlocked during
charging, the charging connector is
unlocked and chargi ng will be stopped. In this case, the charging station
authentication is canceled and charging
may not be able to restart. Reconnect the charging connector and perform
authentication for the charging station.
■Protection function of AC charging
inlet overheating (vehicles with 6.6 kW onboard traction battery char -
ger)
By installing a temperature sensor to the AC charging inlet, prevents parts from
melting when the temperature rises due
to foreign matter ent ering the charging connector. When a certain temperature
increase is detected, charging is
stopped immediately and a message is displayed on the multi-information dis -
play. After the temperature has
decreased, charging resumes by per - forming the operation to start charging
again.
WARNING
■When charging
Observe the following precautions.
Failure to do so may cause an unex -
pected accident, resulting in death or
serious injury.
●Connect to a power source suitable
for charging. ( →P.124)
●Check that the AC charging cable,
plug and socket are free of foreign
matter.
●Before charging, check that the AC
charging inlet is not deformed, damaged or corroded, and check
that the inlet is fr ee of foreign mat-
ter such as dirt , snow and ice. If there is dirt or dust in these areas,
remove completely before inserting
the charging connector.
●Before inserting the charging plug into the charger, make sure there is
no dirt or dust on the terminal
areas. If there is dirt or dust in these areas, remove completely before
inserting the charging plug.
●Do not get the terminals of the AC
charging inlet wet.
●Only use sockets where the plug
can be securely inserted.
●Do not bundle or wind the AC
charging cable while charging, as
doing so may result in overheating.
●Do not touch the te rminals of the
charging connector and AC charging inlet with a sharp metal
objects (needles etc.) or hands, or
short them with foreign objects.
●When charging ou tdoors, make
sure to connect to a rain-tight socket for outdoor u se. Ensure the
rain-tight cover closes completely. If
the rain-tight cover cannot be closed, install a rain-tight cover that
will close.
●In order to stop charging at the
charging station, f ollow the instruc-
tions of the charger.
●If any heat, smoke , odors, noise or
other abnormaliti es are noticed during charging, stop charging
immediately.
●Do not insert the plug if the socket
is submerged in water or snow.
●When charging while it is raining or
snowing, do not connect or discon -
nect the plug if your hands are wet.
Also, do not get the plug or outlet wet.
●Do not charge the vehicle during a lightning storm.
●Prevent the AC charging cable from being caught in the door or back
door.
Page 142 of 666
1402-2. Charging
WARNING
●Do not let the wheels on the AC
charging cable, plug, charging con -
nector and CCID (C harging Circuit Interrupting Device).
●Firmly insert the plug into the socket.
●Do not use an ex tension cord and
converting adaptor.
●Close the hood bef ore using the
charging system. The cooling fan may start operating
suddenly. Touching or getting close
to rotating parts such as the fan may cause your hands or clothes
(especially a neckt ie or scarf) to
become caught and result in a seri - ous injury.
●After connecting the charging cable, confirm that it is not wound
around anything.
●If the power indica tor on the CCID
(Charging Circuit Interrupting
Device) does not illuminate after plugging the AC charging cable into
the socket-outlet, unplug it immedi -
ately.
■If the error warnin g indicator on the CCID (Charging Circuit Inter -
rupting Device) illuminates or
flashes during charging
There may be an electrical leakage in
the power source path, or there may
be a malfunction in the AC charging cable or CCID (Cha rging Circuit Inter-
rupting Device). Refer to P.112 and
follow the correcti on procedure. If the error warning indicator does not turn
off even after performing the correc -
tion procedure, immediately stop charging, remove the AC charging
cable and contact any authorized
Toyota retailer or Toyota authorized repairer, or any reliable repairer. Con -
tinuing to charge the vehicle in that
condition may le ad to unforeseen accidents or serious injury.
■Onboard traction battery charger
The onboard traction battery charger
is located under the rear seats. Make
sure to observe the following precau- tions regarding the onboard traction
battery charger. Failure to observe
these precautions may result in death or serious injury such as burns and
electric shocks.
●The onboard traction battery char - ger is hot during charging. Do not
touch the onboard traction battery
charger, as doing so may result in burns.
●Do not disassemble, repair or mod - ify the onboard traction battery
charger. When the onboard traction
battery charger needs to be repaired, consult any authorized
Toyota retailer or Toyota authorized
repairer, or any reliable repairer.
Page 154 of 666
1522-2. Charging
the settings are confirmed
●The vehicle starts off
●A display with a high er priority than that of the charging schedule setting
is shown
■“Next Event”
After charging completes, the “Next Event” displayed on the multi-informa -
tion display will no t change until the AC
charging cable is removed, even after charging is performed according to the
“Next Event” schedule.
■To return to original setting after
changing “Next Event” setting
Turning the setting of “Charge Now” on
and then off can return the setting of
“Next Event” to its original setting.
■When “Next Event” is changed while charging
●When the charging mode is “Depar - ture”, the current charging is inter -
rupted or continued depending on the
remaining time until the charging is completed.
●When the charging mode is “Start”, the current charging is interrupted, the
next charging will start at the set time.
■When the power switch is turned
off
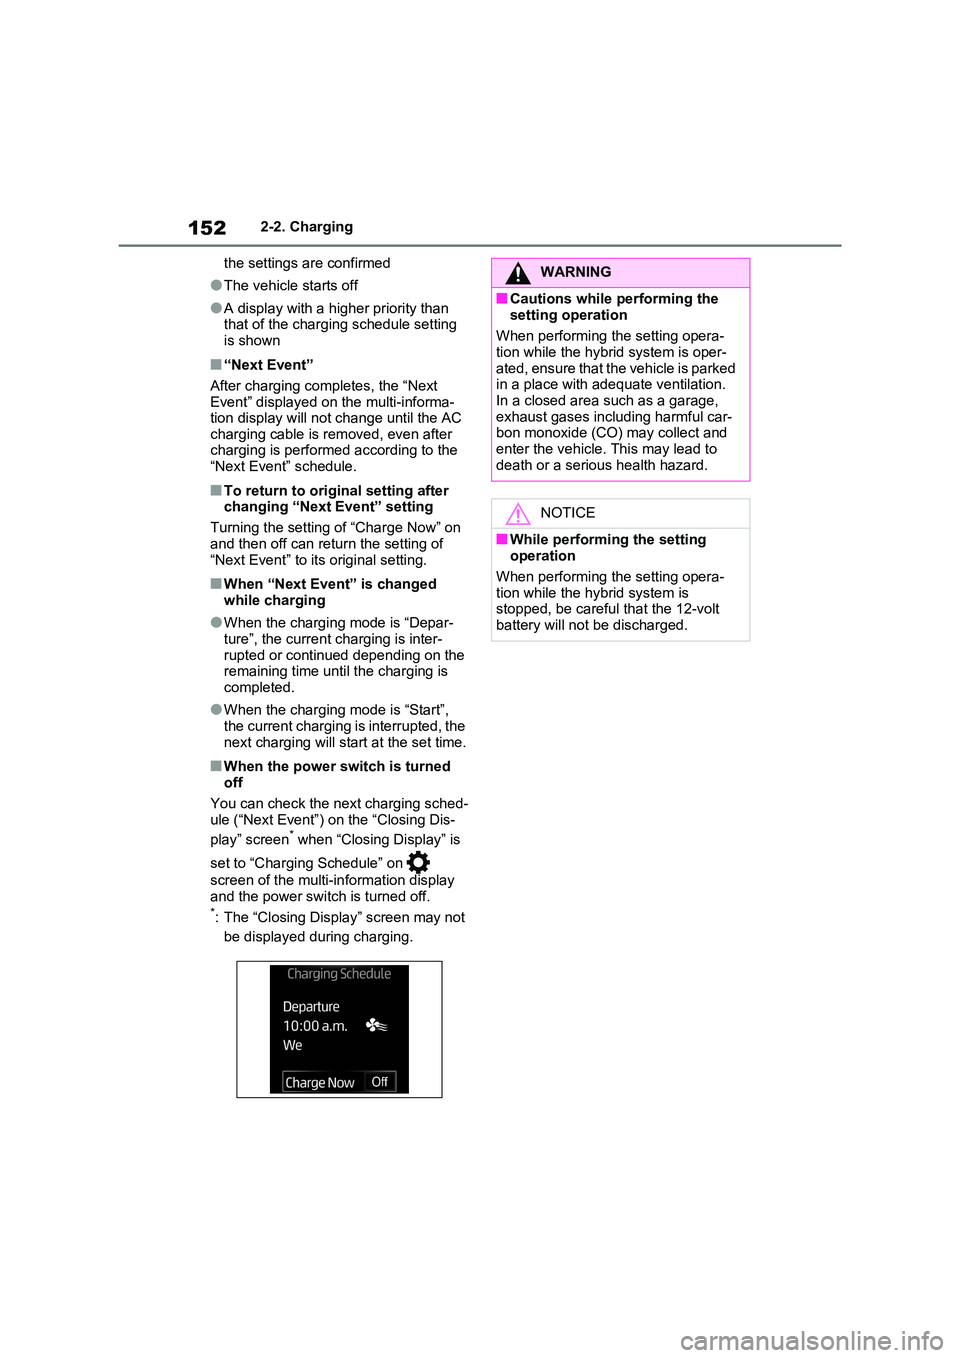
You can check the next charging sched -
ule (“Next Event”) on the “Closing Dis -
play” screen* when “Closing Display” is
set to “Charging Schedule” on
screen of the multi-in formation display
and the power switc h is turned off.*: The “Closing Display” screen may not
be displayed during charging.
WARNING
■Cautions while performing the
setting operation
When performing the setting opera- tion while the hybrid system is oper -
ated, ensure that the vehicle is parked
in a place with adequate ventilation. In a closed area such as a garage,
exhaust gases including harmful car -
bon monoxide (CO) may collect and
enter the vehicle. This may lead to death or a serious health hazard.
NOTICE
■While performing the setting operation
When performing the setting opera-
tion while the hybrid system is stopped, be careful that the 12-volt
battery will not be discharged.
Page 155 of 666
153
2
2-2. Charging
Plug-in hybrid system
1 Connect the AC charging cable
to the vehicle and start charging
2 Turn the power switch on during
charging
The setting screen of “My Room Mode”
is displayed automat ically on the multi-
information display.
3 Press or of the meter
control switches, select “Yes”,
and then press .
“My Room Mode” starts and systems
such as the air conditioning system and
audio system can be used inside the vehicle.
When not using “My Room Mode”,
select “No”, and then press .
To stop “My Room Mode”, turn the
power switch off.
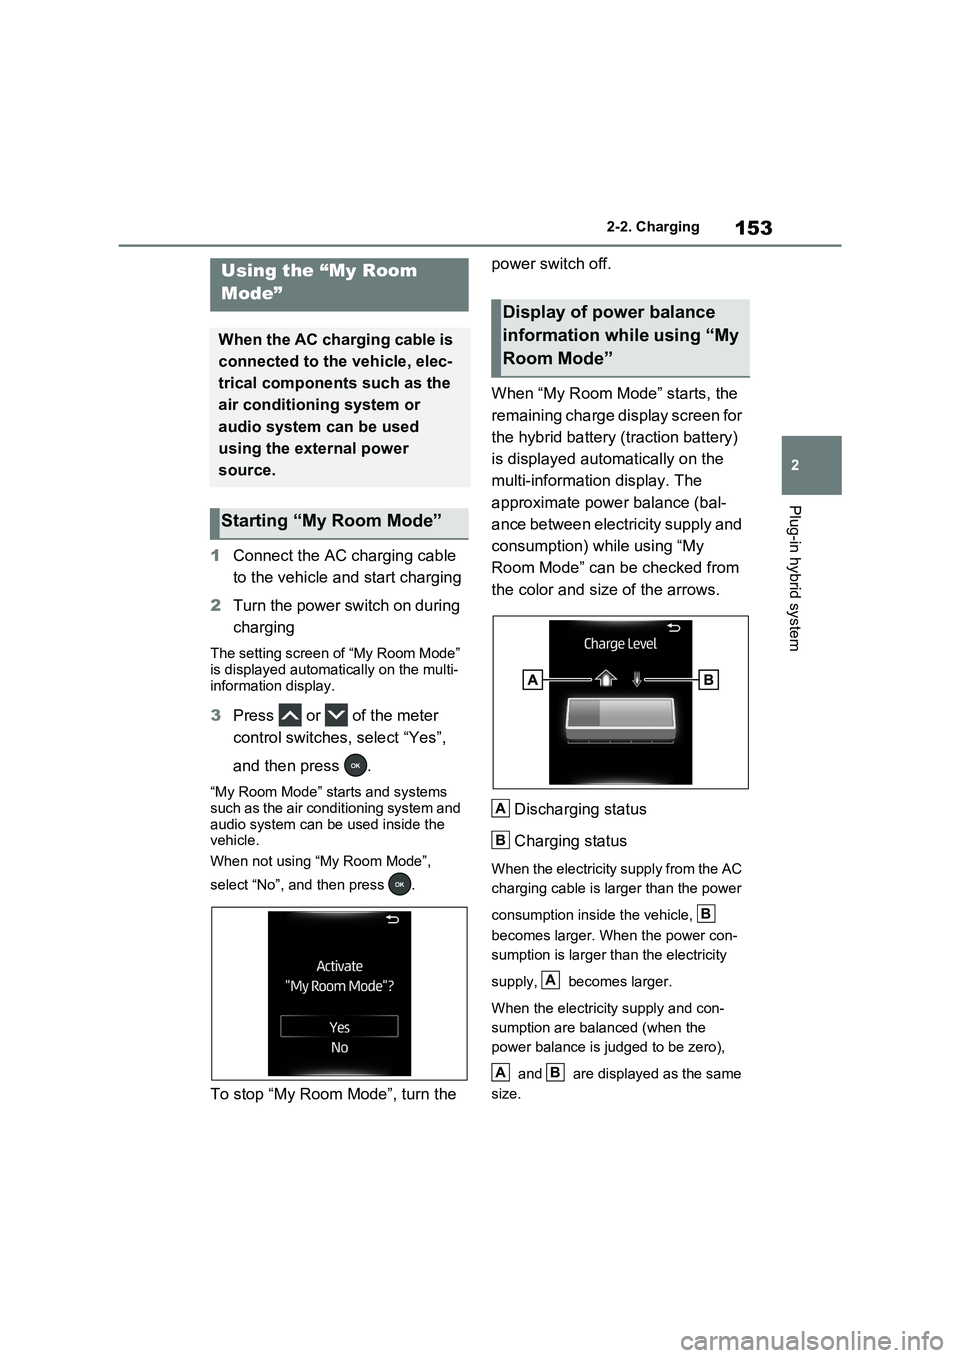
When “My Room Mode” starts, the
remaining charge display screen for
the hybrid battery (traction battery)
is displayed automatically on the
multi-information display. The
approximate power balance (bal -
ance between electricity supply and
consumption) while using “My
Room Mode” can be checked from
the color and size of the arrows.
Discharging status
Charging status
When the electricity supply from the AC
charging cable is larger than the power
consumption inside the vehicle,
becomes larger. When the power con -
sumption is larger than the electricity
supply, becomes larger.
When the electricity supply and con -
sumption are balanced (when the
power balance is judged to be zero),
and are displayed as the same
size.
Using the “My Room
Mode”
When the AC charging cable is
connected to the vehicle, elec -
trical components such as the
air conditioning system or
audio system can be used
using the external power
source.
Starting “My Room Mode”
Display of power balance
information while using “My
Room Mode”
A
B
B
A
AB