inflation pressure TOYOTA RAV4 PLUG-IN HYBRID 2023 Owner's Manual
[x] Cancel search | Manufacturer: TOYOTA, Model Year: 2023, Model line: RAV4 PLUG-IN HYBRID, Model: TOYOTA RAV4 PLUG-IN HYBRID 2023Pages: 718, PDF Size: 167.55 MB
Page 543 of 718
541
8
8-2. Steps to take in an emergency
When trouble arises
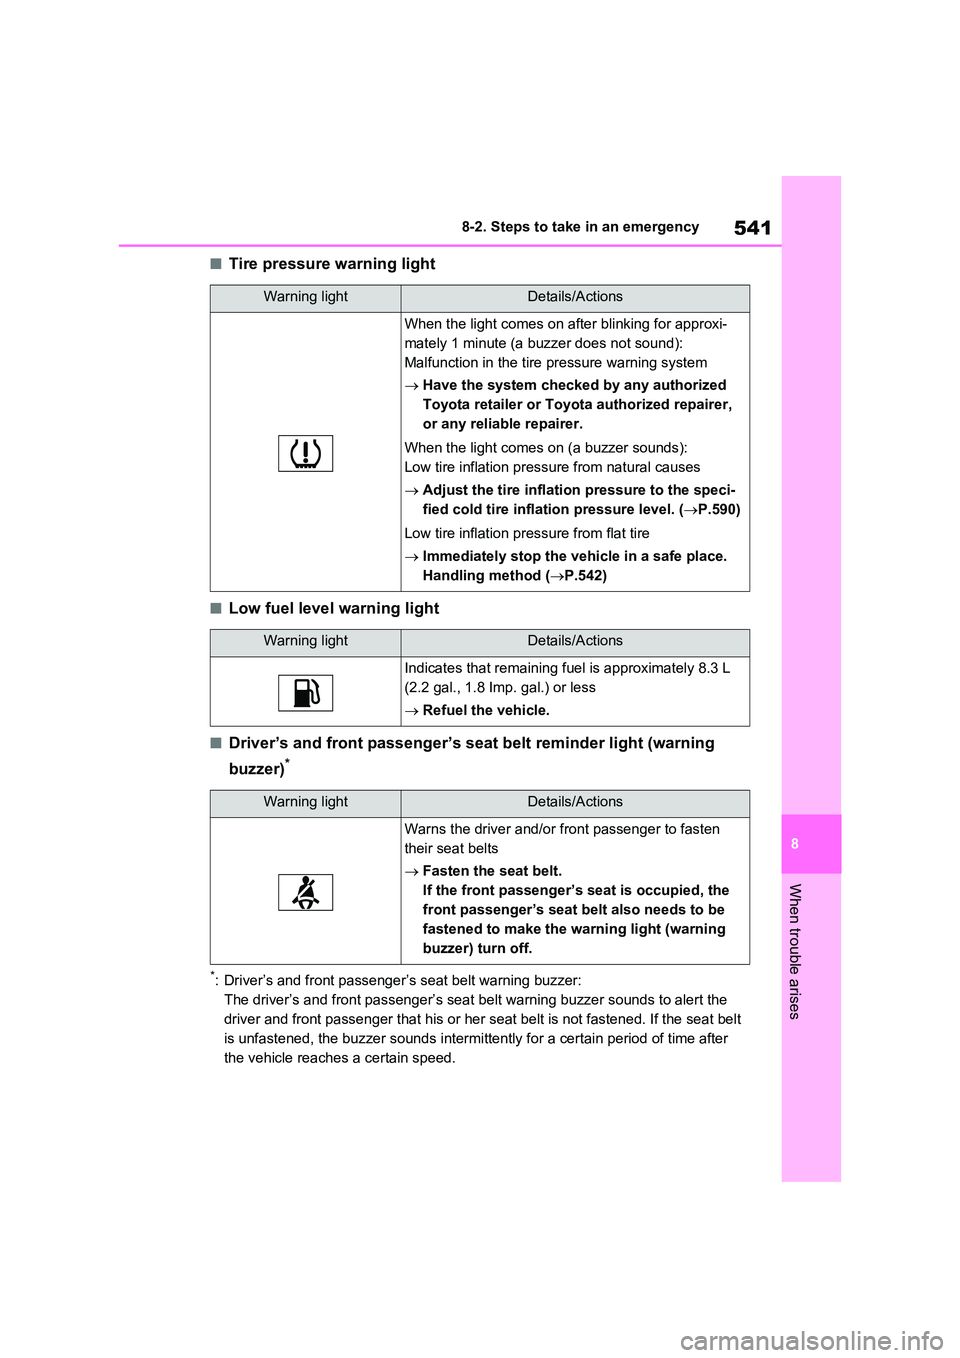
■Tire pressure warning light
■Low fuel level warning light
■Driver’s and front passenger’s seat belt reminder light (warning
buzzer)*
*: Driver’s and front passenger’s seat belt warning buzzer:
The driver’s and front passenger’s seat belt warning buzzer sounds to alert the
driver and front passenger that his or her seat belt is not fastened. If the seat belt
is unfastened, the buzzer sounds intermittently for a certain period of time after
the vehicle reaches a certain speed.
Warning lightDetails/Actions
When the light comes on after blinking for approxi-
mately 1 minute (a buzzer does not sound):
Malfunction in the tire pressure warning system
Have the system checked by any authorized
Toyota retailer or Toyota authorized repairer,
or any reliable repairer.
When the light comes on (a buzzer sounds):
Low tire inflation pressure from natural causes
Adjust the tire inflation pressure to the speci-
fied cold tire inflation pressure level. ( P.590)
Low tire inflation pressure from flat tire
Immediately stop the vehicle in a safe place.
Handling method ( P.542)
Warning lightDetails/Actions
Indicates that remaining fuel is approximately 8.3 L
(2.2 gal., 1.8 Imp. gal.) or less
Refuel the vehicle.
Warning lightDetails/Actions
Warns the driver and/or front passenger to fasten
their seat belts
Fasten the seat belt.
If the front passenger’s seat is occupied, the
front passenger’s seat belt also needs to be
fastened to make the warning light (warning
buzzer) turn off.
Page 545 of 718
543
8
8-2. Steps to take in an emergency
When trouble arises
If the tire pressure warning light
comes on
1 After the temperature of the tires has lowered sufficiently, check the infla-tion pressure of each tire and adjust
them to the specified level.
2 If the warning light does not turn off even after several minutes have elapsed, check that the inflation
pressure of each tire is at the speci- fied level and perform initialization. ( P.492)
■The tire pressure warning light may
come on due to natural causes
The tire pressure warning light may come on due to natural causes such as
natural air leaks and tire inflation pres- sure changes caused by temperature. In this case, adjusting the tire inflation
pressure will turn off the warning light (after a few minutes).
■When a tire is replaced with a com-pact spare tire (vehicles with com-
pact spare tire)
The compact spare tire is not equipped with a tire pressure warning valve and
transmitter. If a tire goes flat, the tire pressure warning light will not turn off even though the flat tire has been
replaced with the spare tire. Replace the spare tire with the standard tire and adjust the tire inflation pressure. The tire
pressure warning light will go off after a few minutes.
■Conditions that the tire pressure warning system may not function
properly
P.490
WARNING
■If a warning light comes on or a
warning buzzer sounds when a
warning message is shown on
the multi-information display*
Check and follow the message shown
on the multi-information display.
Failure to do so may result in death or serious injury.*: Warning lights illuminate in red or
yellow and the warning buzzer
beeps once or sounds continu-
ously.
■When the electric power steer- ing system warning light comes on
When the light comes on yellow, the assist to the power steering is restricted. When the light comes on
red, the assist to the power steering is lost and handling operations of the steering wheel become extremely
heavy. If the steering wheel becomes heavier than usual when operating, hold firmly
and operate using more force than usual.
■If the tire pressure warning light comes on
Be sure to observe the following pre-
cautions. Failure to do so could cause a loss of vehicle control and result in death or serious injury.
●Stop your vehicle in a safe place as soon as possible. Adjust the tire inflation pressure immediately.
●If the tire pressure warning light comes on even after tire inflation
pressure adjustment, it is probable that you have a flat tire. Check the tires. If a tire is flat, change it with
the spare tire and have the flat tire repaired by the nearest authorized Toyota retailer or Toyota authorized
repairer, or any reliable repairer.
Page 555 of 718
553
8
8-2. Steps to take in an emergency
When trouble arises
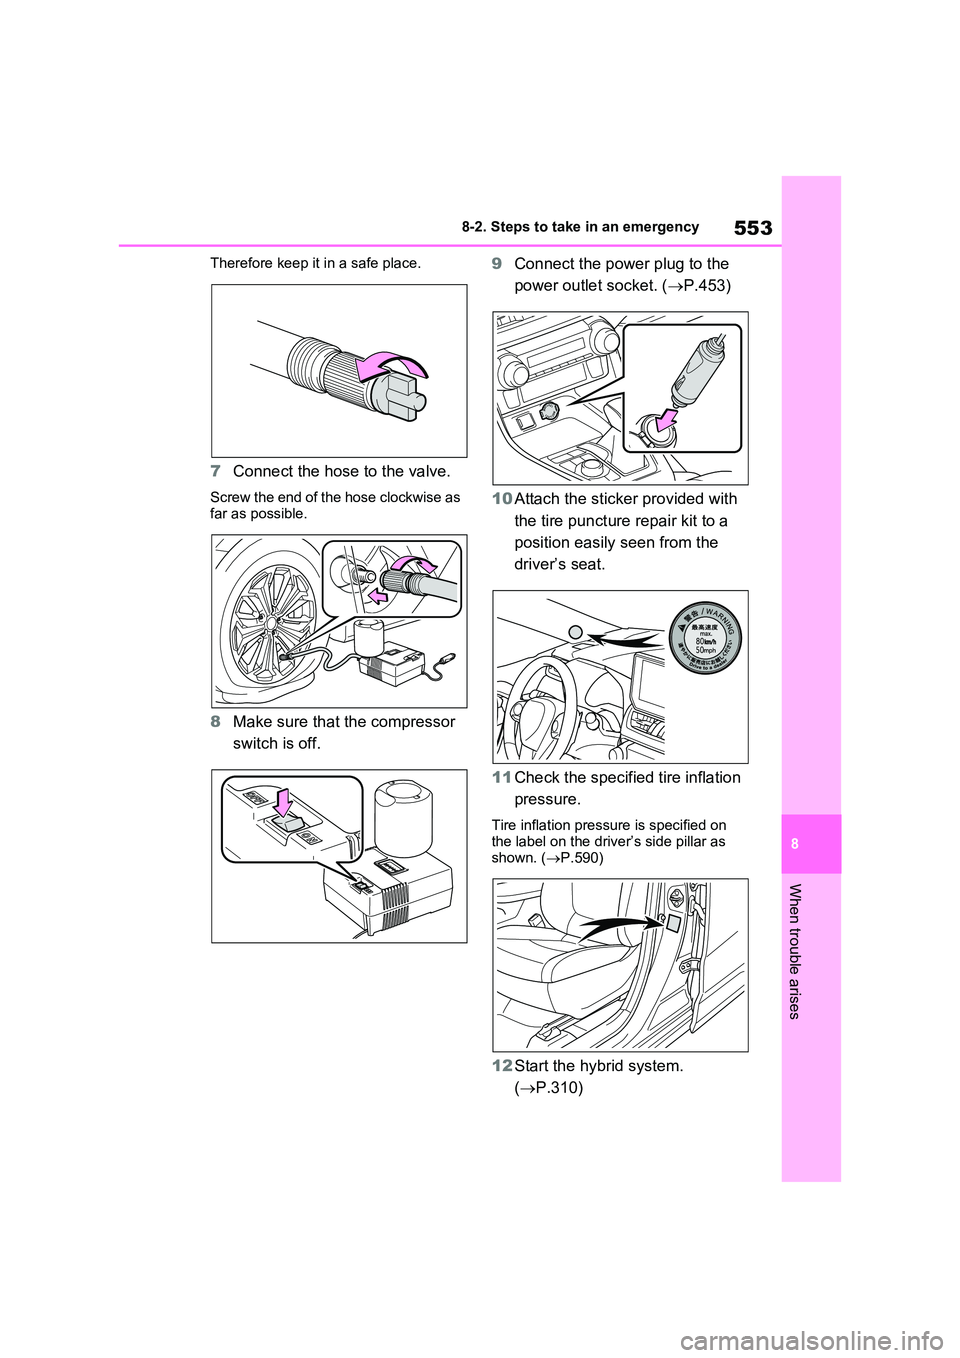
Therefore keep it in a safe place.
7 Connect the hose to the valve.
Screw the end of the hose clockwise as
far as possible.
8 Make sure that the compressor
switch is off.
9 Connect the power plug to the
power outlet socket. ( P.453)
10 Attach the sticker provided with
the tire puncture repair kit to a
position easily seen from the
driver’s seat.
11 Check the specified tire inflation
pressure.
Tire inflation pressure is specified on the label on the driver’s side pillar as
shown. ( P.590)
12Start the hybrid system.
( P.310)
Page 556 of 718
5548-2. Steps to take in an emergency
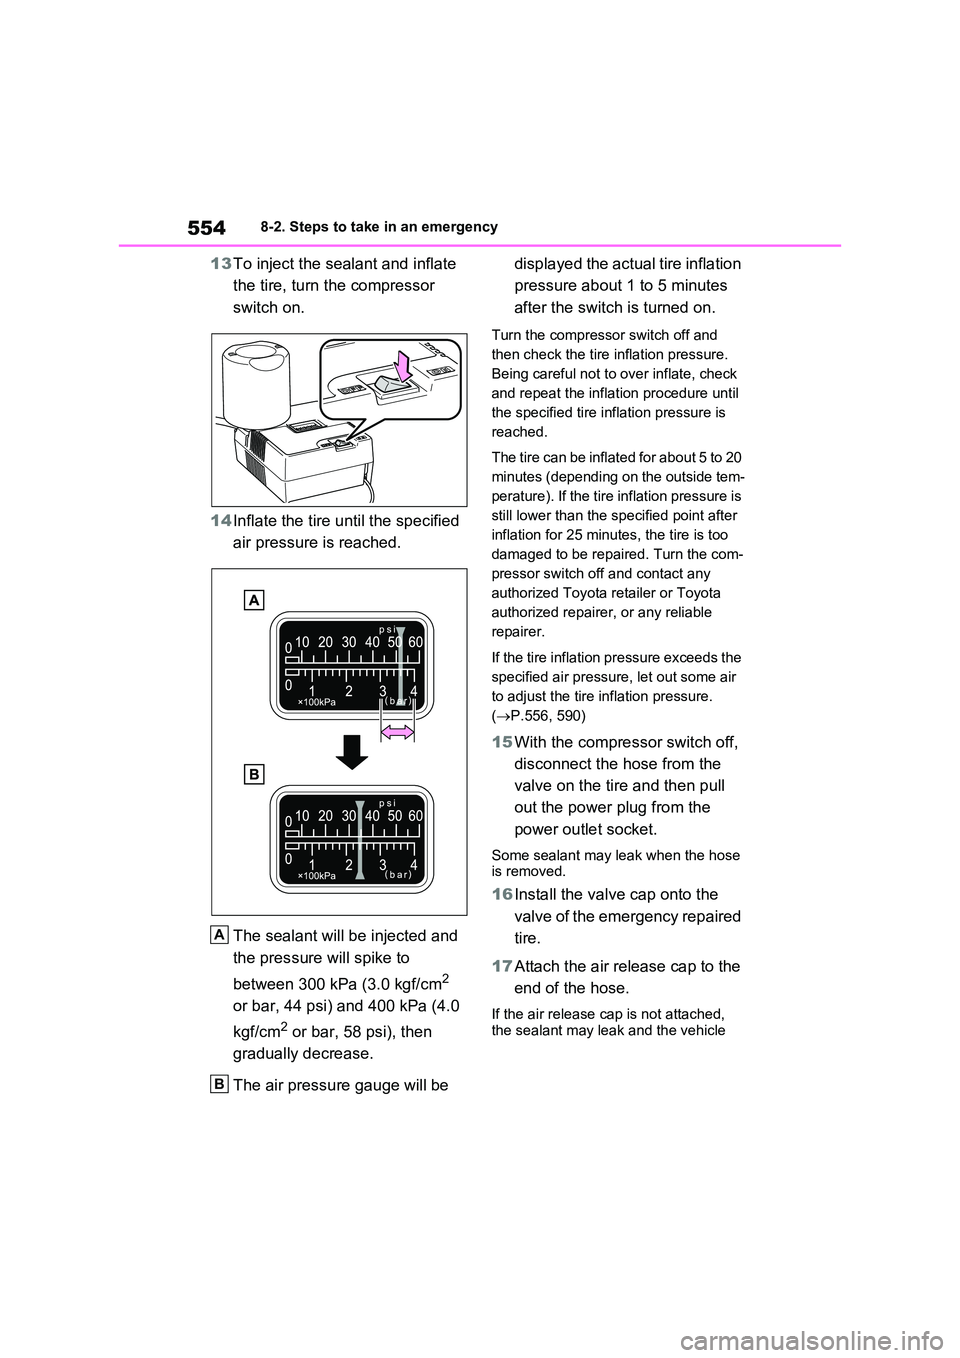
13To inject the sealant and inflate
the tire, turn the compressor
switch on.
14 Inflate the tire until the specified
air pressure is reached.
The sealant will be injected and
the pressure will spike to
between 300 kPa (3.0 kgf/cm2
or bar, 44 psi) and 400 kPa (4.0
kgf/cm2 or bar, 58 psi), then
gradually decrease.
The air pressure gauge will be
displayed the actual tire inflation
pressure about 1 to 5 minutes
after the switch is turned on.
Turn the compressor switch off and
then check the tire inflation pressure.
Being careful not to over inflate, check
and repeat the inflation procedure until
the specified tire inflation pressure is
reached.
The tire can be inflated for about 5 to 20
minutes (depending on the outside tem-
perature). If the tire inflation pressure is
still lower than the specified point after
inflation for 25 minutes, the tire is too
damaged to be repaired. Turn the com-
pressor switch off and contact any
authorized Toyota retailer or Toyota
authorized repairer, or any reliable
repairer.
If the tire inflation pressure exceeds the
specified air pressure, let out some air
to adjust the tire inflation pressure.
( P.556, 590)
15With the compressor switch off,
disconnect the hose from the
valve on the tire and then pull
out the power plug from the
power outlet socket.
Some sealant may leak when the hose is removed.
16 Install the valve cap onto the
valve of the emergency repaired
tire.
17 Attach the air release cap to the
end of the hose.
If the air release cap is not attached, the sealant may leak and the vehicle
A
B
Page 557 of 718
555
8
8-2. Steps to take in an emergency
When trouble arises
may get dirty.
18 Temporarily store the bottle in
the luggage compartment while
it is connected to the compres-
sor.
19 To spread the liquid sealant
evenly within the tire, immedi-
ately drive safely for about 5 km
(3 miles) below 80 km/h (50
mph).
20 After driving, stop your vehicle in
a safe place on a hard, flat sur-
face and reconnect the repair
kit.
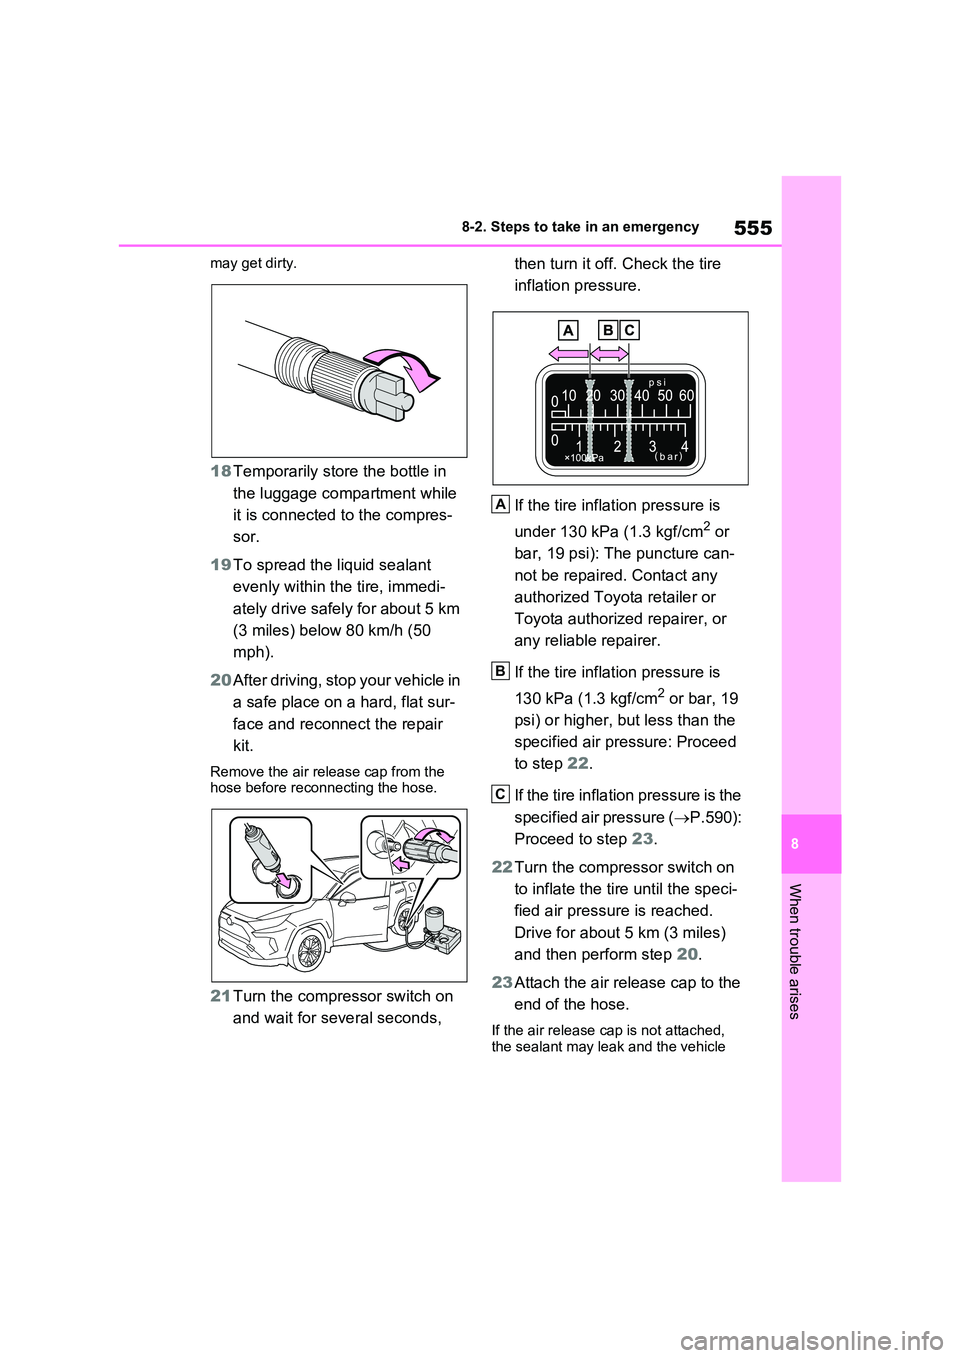
Remove the air release cap from the hose before reconnecting the hose.
21 Turn the compressor switch on
and wait for several seconds,
then turn it off. Check the tire
inflation pressure.
If the tire inflation pressure is
under 130 kPa (1.3 kgf/cm2 or
bar, 19 psi): The puncture can-
not be repaired. Contact any
authorized Toyota retailer or
Toyota authorized repairer, or
any reliable repairer.
If the tire inflation pressure is
130 kPa (1.3 kgf/cm2 or bar, 19
psi) or higher, but less than the
specified air pressure: Proceed
to step 22.
If the tire inflation pressure is the
specified air pressure ( P.590):
Proceed to step 23.
22 Turn the compressor switch on
to inflate the tire until the speci-
fied air pressure is reached.
Drive for about 5 km (3 miles)
and then perform step 20.
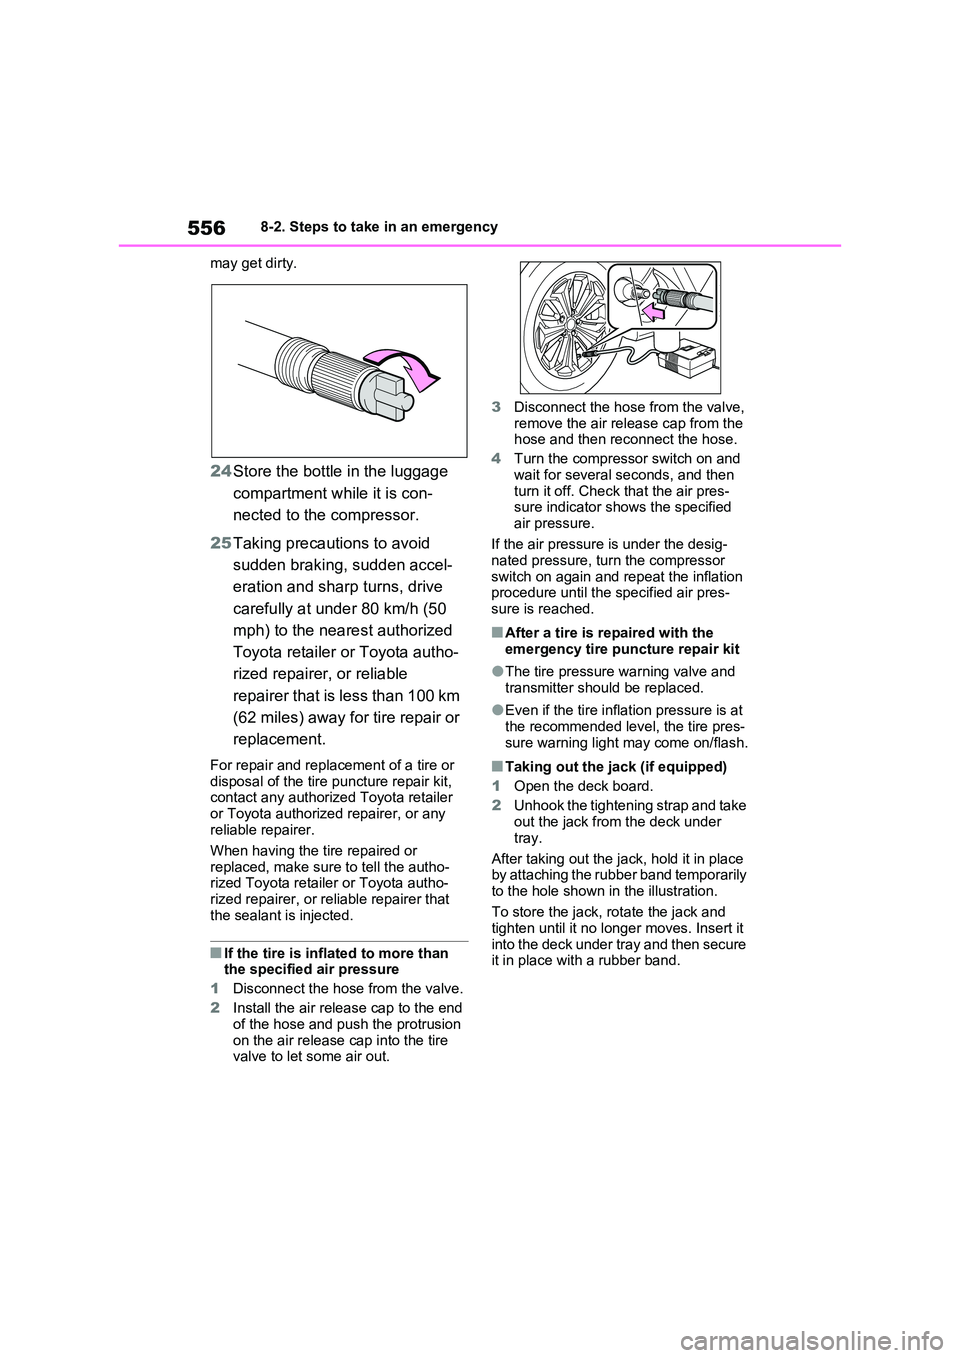
23 Attach the air release cap to the
end of the hose.
If the air release cap is not attached,
the sealant may leak and the vehicle
A
B
C
Page 558 of 718
5568-2. Steps to take in an emergency
may get dirty.
24 Store the bottle in the luggage
compartment while it is con-
nected to the compressor.
25 Taking precautions to avoid
sudden braking, sudden accel-
eration and sharp turns, drive
carefully at under 80 km/h (50
mph) to the nearest authorized
Toyota retailer or Toyota autho-
rized repairer, or reliable
repairer that is less than 100 km
(62 miles) away for tire repair or
replacement.
For repair and replacement of a tire or disposal of the tire puncture repair kit, contact any authorized Toyota retailer
or Toyota authorized repairer, or any reliable repairer.
When having the tire repaired or
replaced, make sure to tell the autho- rized Toyota retailer or Toyota autho-rized repairer, or reliable repairer that
the sealant is injected.
■If the tire is inflated to more than the specified air pressure
1 Disconnect the hose from the valve.
2 Install the air release cap to the end of the hose and push the protrusion
on the air release cap into the tire valve to let some air out.
3 Disconnect the hose from the valve, remove the air release cap from the hose and then reconnect the hose.
4 Turn the compressor switch on and
wait for several seconds, and then turn it off. Check that the air pres-sure indicator shows the specified
air pressure.
If the air pressure is under the desig- nated pressure, turn the compressor
switch on again and repeat the inflation procedure until the specified air pres-sure is reached.
■After a tire is repaired with the
emergency tire puncture repair kit
●The tire pressure warning valve and
transmitter should be replaced.
●Even if the tire inflation pressure is at
the recommended level, the tire pres- sure warning light may come on/flash.
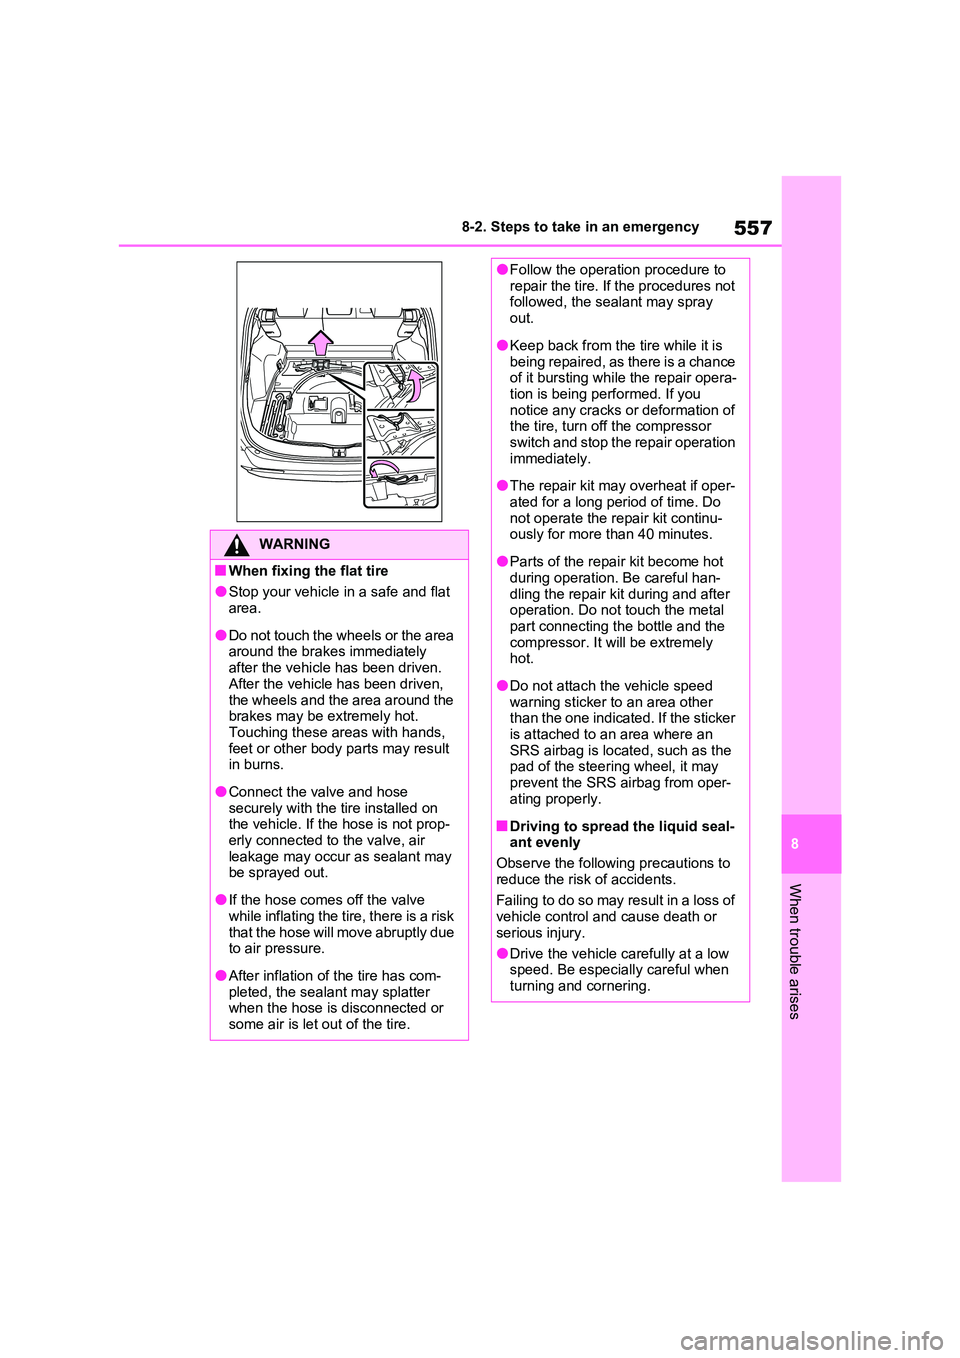
■Taking out the jack (if equipped)
1 Open the deck board.
2 Unhook the tightening strap and take out the jack from the deck under
tray.
After taking out the jack, hold it in place by attaching the rubber band temporarily
to the hole shown in the illustration.
To store the jack, rotate the jack and tighten until it no longer moves. Insert it
into the deck under tray and then secure it in place with a rubber band.
Page 559 of 718
557
8
8-2. Steps to take in an emergency
When trouble arises
WARNING
■When fixing the flat tire
●Stop your vehicle in a safe and flat area.
●Do not touch the wheels or the area around the brakes immediately
after the vehicle has been driven. After the vehicle has been driven,
the wheels and the area around the brakes may be extremely hot. Touching these areas with hands,
feet or other body parts may result in burns.
●Connect the valve and hose securely with the tire installed on the vehicle. If the hose is not prop-
erly connected to the valve, air leakage may occur as sealant may be sprayed out.
●If the hose comes off the valve while inflating the tire, there is a risk
that the hose will move abruptly due to air pressure.
●After inflation of the tire has com-pleted, the sealant may splatter when the hose is disconnected or
some air is let out of the tire.
●Follow the operation procedure to repair the tire. If the procedures not followed, the sealant may spray
out.
●Keep back from the tire while it is
being repaired, as there is a chance of it bursting while the repair opera-tion is being performed. If you
notice any cracks or deformation of the tire, turn off the compressor switch and stop the repair operation
immediately.
●The repair kit may overheat if oper-
ated for a long period of time. Do not operate the repair kit continu-ously for more than 40 minutes.
●Parts of the repair kit become hot during operation. Be careful han-
dling the repair kit during and after operation. Do not touch the metal part connecting the bottle and the
compressor. It will be extremely hot.
●Do not attach the vehicle speed warning sticker to an area other than the one indicated. If the sticker
is attached to an area where an SRS airbag is located, such as the pad of the steering wheel, it may
prevent the SRS airbag from oper- ating properly.
■Driving to spread the liquid seal-ant evenly
Observe the following precautions to
reduce the risk of accidents.
Failing to do so may result in a loss of vehicle control and cause death or
serious injury.
●Drive the vehicle carefully at a low speed. Be especially careful when
turning and cornering.
Page 560 of 718
5588-2. Steps to take in an emergency
WARNING
●If the vehicle does not drive straight or you feel a pull through the steer-
ing wheel, stop the vehicle and check the following.
• Tire condition. The tire may have
separated from the wheel.
• Tire inflation pressure. If the tire
inflation pressure is 130 kPa (1.3
kgf/cm2 or bar, 19 psi) or less, the tire may be severely damaged.
NOTICE
■When performing an emergency repair
●A tire should only be repaired with
the emergency tire puncture repair kit if the damage is caused by a sharp object such as nail or screw
passing through the tire tread. Do not remove the sharp object from the tire. Removing the object
may widen the opening and disen- able emergency repair with the
repair kit.
●The repair kit is not waterproof.
Make sure that the repair kit is not exposed to water, such as when it is being used in the rain.
●Do not put the repair kit directly onto dusty ground such as sand at
the side of the road. If the repair kit vacuums up dust etc., a malfunc-tion may occur.
●Make sure to stand the kit with the bottle vertical. The kit cannot work
properly if it is laid on its side.
■Precautions for the emergency
tire puncture repair kit
●The repair kit power source should be 12 V DC suitable for vehicle use.
Do not connect the repair kit to any other source.
●If fuel splatters on the repair kit, the repair kit may deteriorate. Take care not to allow fuel to contact it.
●Place the repair kit in a storage to prevent it from being exposed to dirt
or water.
●Store the repair kit in the luggage
compartment out of reach of chil- dren.
●Do not disassemble or modify the repair kit. Do not subject parts such as the air pressure indicator to
impacts. This may cause a mal- function.
■To avoid damage to the tire pres-sure warning valves and trans-mitters
When a tire is repaired with liquid sealants, the tire pressure warning valve and transmitter may not operate
properly. If a liquid sealant is used, contact any authorized Toyota retailer or Toyota authorized repairer, or any
reliable repairer or other qualified ser- vice shop as soon as possible. After use of liquid sealant, make sure to
replace the tire pressure warning valve and transmitter when repairing or replacing the tire. ( P.488)
Page 566 of 718
5648-2. Steps to take in an emergency
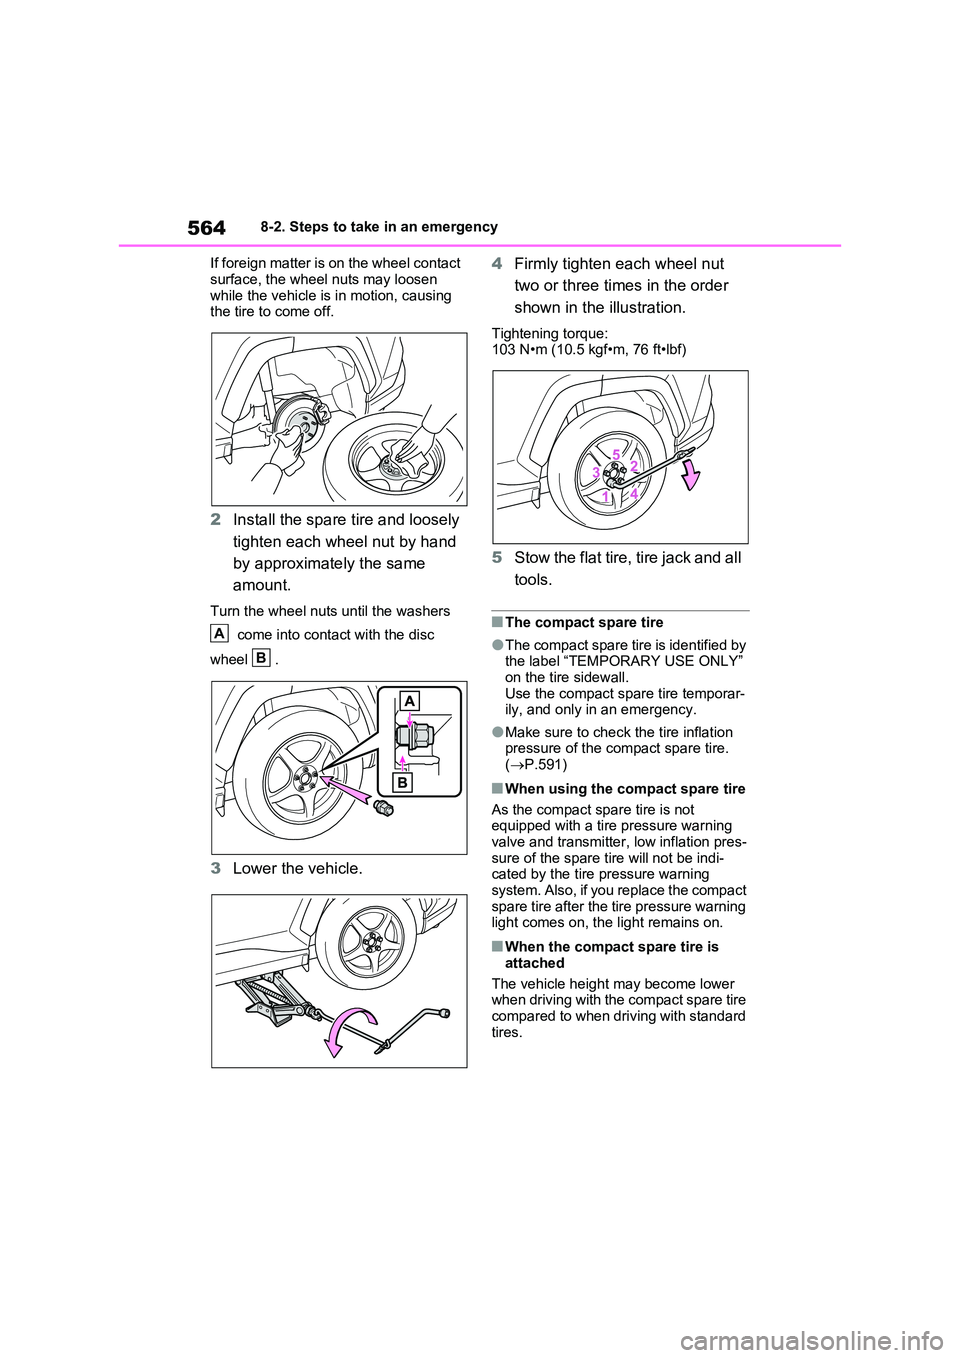
If foreign matter is on the wheel contact
surface, the wheel nuts may loosen while the vehicle is in motion, causing the tire to come off.
2 Install the spare tire and loosely
tighten each wheel nut by hand
by approximately the same
amount.
Turn the wheel nuts until the washers
come into contact with the disc
wheel .
3 Lower the vehicle.
4 Firmly tighten each wheel nut
two or three times in the order
shown in the illustration.
Tightening torque: 103 N•m (10.5 kgf•m, 76 ft•lbf)
5 Stow the flat tire, tire jack and all
tools.
■The compact spare tire
●The compact spare tire is identified by the label “TEMPORARY USE ONLY”
on the tire sidewall. Use the compact spare tire temporar-ily, and only in an emergency.
●Make sure to check the tire inflation pressure of the compact spare tire.
( P.591)
■When using the compact spare tire
As the compact spare tire is not equipped with a tire pressure warning
valve and transmitter, low inflation pres- sure of the spare tire will not be indi-cated by the tire pressure warning
system. Also, if you replace the compact spare tire after the tire pressure warning light comes on, the light remains on.
■When the compact spare tire is
attached
The vehicle height may become lower when driving with the compact spare tire
compared to when driving with standard tires.
A
B
Page 592 of 718
5909-1. Specifications
*: The fluid capacity is the quantity of reference.
If replacement is necessary, contact any authorized Toyota retailer or Toyota
authorized repairer, or any reliable repairer.
*: Minimum pedal clearance when depressed with a force of 300 N (30.5 kgf, 67.4
lbf) while the hybrid system is operating.
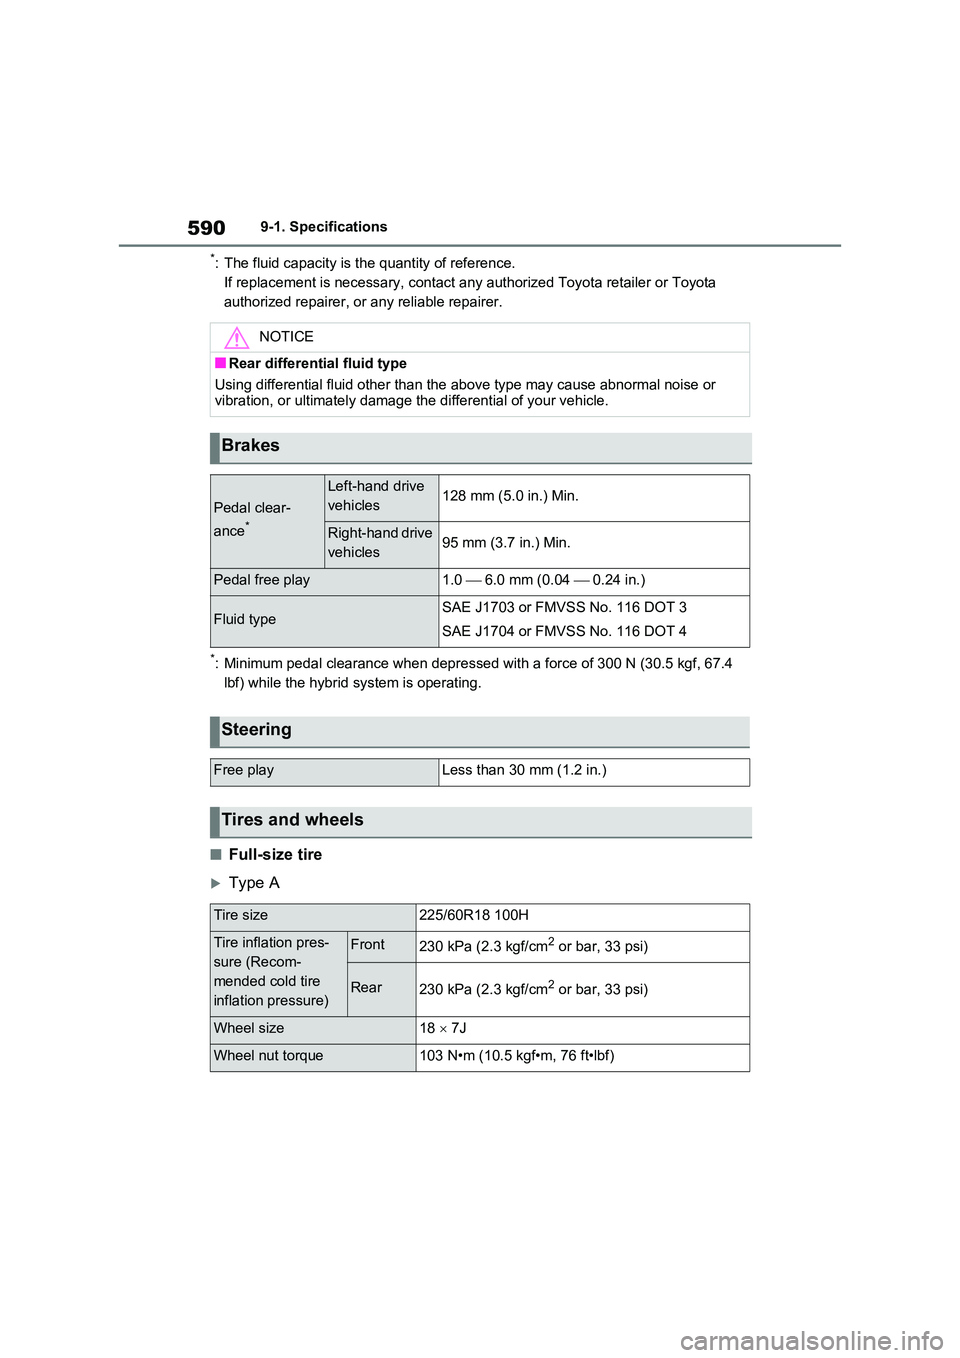
■Full-size tire
Type A
NOTICE
■Rear differential fluid type
Using differential fluid other than the above type may cause abnormal noise or vibration, or ultimately damage the differential of your vehicle.
Brakes
Pedal clear-
ance*
Left-hand drive
vehicles128 mm (5.0 in.) Min.
Right-hand drive
vehicles95 mm (3.7 in.) Min.
Pedal free play1.0 6.0 mm (0.04 0.24 in.)
Fluid typeSAE J1703 or FMVSS No. 116 DOT 3
SAE J1704 or FMVSS No. 116 DOT 4
Steering
Free playLess than 30 mm (1.2 in.)
Tires and wheels
Tire size225/60R18 100H
Tire inflation pres-
sure (Recom-
mended cold tire
inflation pressure)
Front230 kPa (2.3 kgf/cm2 or bar, 33 psi)
Rear230 kPa (2.3 kgf/cm2 or bar, 33 psi)
Wheel size18 7J
Wheel nut torque103 N•m (10.5 kgf•m, 76 ft•lbf)