headlights TOYOTA RAV4 PLUG-IN HYBRID 2023 Owners Manual
[x] Cancel search | Manufacturer: TOYOTA, Model Year: 2023, Model line: RAV4 PLUG-IN HYBRID, Model: TOYOTA RAV4 PLUG-IN HYBRID 2023Pages: 718, PDF Size: 167.55 MB
Page 15 of 718
13Pictorial index
Precautions against winter season ................................................. P.422
To prevent freezing (windshield wiper de-icer)
*1............................. P.435
Precautions against car wash ......................................................... P.467
Replacing the wiper insert............................................................... P.508
Fuel filler door ............................................................................... P.336
Refueling method ............................................................................ P.336
Fuel type/fuel tank capacity ............................................................ P.586
Charging port ................................................................................ P.106
Charging method ............................................................................ P.127
Tires ............................................................................................... P.487
Tire size/inflation pressure .............................................................. P.590
Winter tires/tire chain ...................................................................... P.422
Checking/rotation/tire pressure warning system ............................. P.487
Coping with flat tires................................................................ P.548, 559
Hood ............................................................................................... P.476
Opening .......................................................................................... P.476
Engine oil ........................................................................................ P.587
Coping with overheat ...................................................................... P.578
Warning messages ......................................................................... P.544
Headlights/front position lights/daytime running lights ........... P.326
Turn signal lights .......................................................................... P.319
Front fog lights.............................................................................. P.331
Stop lights/tail lights..................................................................... P.326
Tail lights ....................................................................................... P.326
Back-up lights
Shifting the shift lever to R .............................................................. P.315
Light bulbs of the exterior lights for driving
(Replacing method: P.516, Watts: P.591)
E
F
G
H
I
J
K
L
M
Page 18 of 718
16Pictorial index
Energy monitor................................................................................ P.226
When the warning messages are displayed ................................... P.544
Turn signal lever ........................................................................... P.319
Headlight switch ........................................................................... P.326
Headlights/front position lights/tail lights/
license plate lights/daytime running lights....................................... P.326
Front fog lights/rear fog light ........................................................... P.331
Windshield wiper and washer switch ......................................... P.332
Rear window wiper and washer switch ...................................... P.334
Usage...................................................................................... P.332, 334
Adding washer fluid......................................................................... P.483
Warning messages ......................................................................... P.544
Emergency flasher switch............................................................ P.526
Hood lock release lever ................................................................ P.476
Tilt and telescopic steering lock release lever........................... P.266
Adjustment ...................................................................................... P.266
Air conditioning system ............................................................... P.430
Usage.............................................................................................. P.430
Rear window defogger .................................................................... P.432
Audio system
*
Fuel filler door opener switch ...................................................... P.337
*: Refer to “Multimedia owner’s manual”.
E
F
G
H
I
J
K
L
Page 26 of 718
24Pictorial index
Energy monitor................................................................................ P.226
When the warning messages are displayed ................................... P.544
Turn signal lever ........................................................................... P.319
Headlight switch ........................................................................... P.326
Headlights/front position lights/tail lights/
license plate lights/daytime running lights....................................... P.326
Front fog lights/rear fog light ........................................................... P.331
Windshield wiper and washer switch ......................................... P.332
Rear window wiper and washer switch ........................................... P.334
Usage...................................................................................... P.332, 334
Adding washer fluid......................................................................... P.483
Warning messages ......................................................................... P.544
Emergency flasher switch............................................................ P.526
Hood lock release lever ................................................................ P.476
Tilt and telescopic steering control lever ................................... P.266
Adjustment ...................................................................................... P.266
Air conditioning system ............................................................... P.430
Usage.............................................................................................. P.430
Rear window defogger .................................................................... P.432
Audio system
*
Fuel filler door opener switch ...................................................... P.337
*: Refer to “Multimedia owner’s manual”.
E
F
G
H
I
J
K
L
Page 135 of 718
133
2 2-2. Charging
Plug-in hybrid system
When charging with a charger,
follow the procedures for using
each charger.
When charging using a public
charging facility, check the set-
ting of the charging schedule
function.
• When the charging schedule is regis-
tered, temporarily turn off the function
or turn “Charge Now” on. (P.150,
156, 162)
• When the charging schedule is set to
on, charging will not start even if the
AC charging cable is connected.
Also, charging fee may occur due to
connection of the AC charging cable.
Before charging, always check the
following items.
The parking brake is applied.
(P.320)
Lights such as the headlights,
emergency flashers and interior
lights etc. are turned off.
If these light switches are turned on,
then these features will consume elec-
tricity, and charging time will increase.
The power switch is turned to
OFF. (P.313)
Before charging, make sure that
each part of the AC charging cable
is in good condition. (P.117)
■During charging
●The charging starting time may differ
depending on the state of the vehicle,
but this does not indicate a malfunc-
tion.
●Cooling fan sounds may be heard
from near the rear seat. (P.99)
●During charging, sounds may be
heard from near the hybrid battery
(traction battery) in accordance with
the operation of the air conditioning
system or “Battery Cooler” (P.128).
●During and after charging, the rear
seat and its surrounding area in which
the onboard traction battery charger is
installed may get warm.
●The surface of the CCID (Charging
Circuit Interrupting Device) may
become hot, but this does not indicate
a malfunction. (When using Mode 2
AC charging cable.)
●Depending on radio wave conditions,
interference may be heard on the
radio.
●The current charging condition and
the estimated time until charging will
complete can be checked on the
multi-information display.
■Capacity reduction of the hybrid
battery (traction battery)
The capacity of the hybrid battery (trac-
tion battery) will decline gradually when
the hybrid battery (traction battery) is in
use. The rate at which it declines will dif-
fer in accordance with environmental
conditions and the way in which the
vehicle is used. Observing the following
can help suppress battery capacity
decline.
●Avoid parking the vehicle in areas with
a high temperature under direct sun-
light when the hybrid battery (traction
battery) is fully charged.
●Avoid accelerating and decelerating
frequently and suddenly when EV
driving.
●Avoid frequent driving near the top
Confirm the following before
charging
Inspecting the AC charging
cable
Page 167 of 718
165
2 2-2. Charging
Plug-in hybrid system
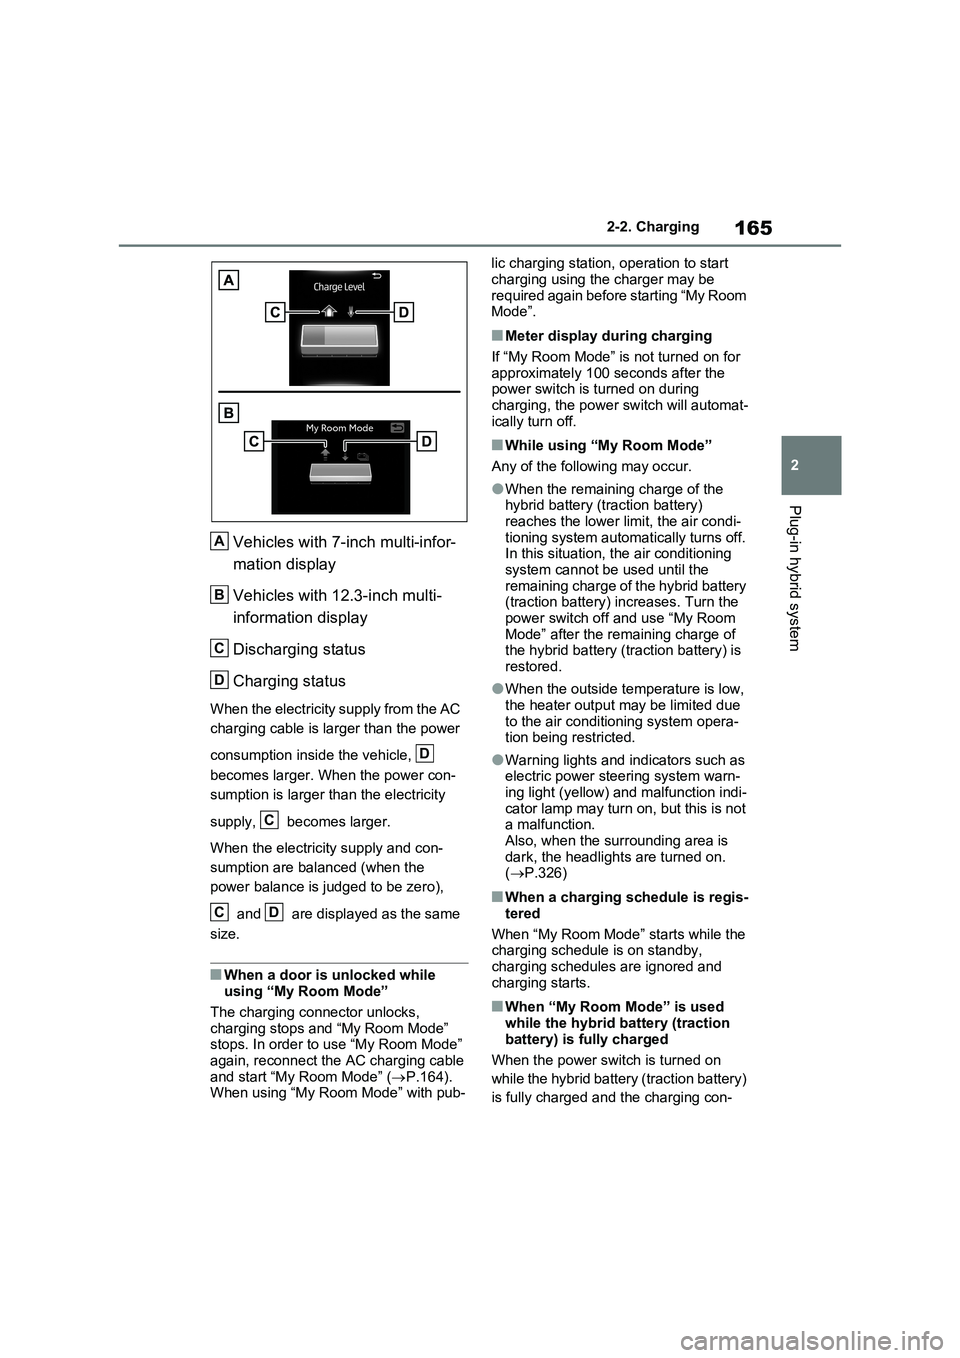
Vehicles with 7-inch multi-infor-
mation display
Vehicles with 12.3-inch multi-
information display
Discharging status
Charging status
When the electricity supply from the AC
charging cable is larger than the power
consumption inside the vehicle,
becomes larger. When the power con-
sumption is larger than the electricity
supply, becomes larger.
When the electricity supply and con-
sumption are balanced (when the
power balance is judged to be zero),
and are displayed as the same
size.
■When a door is unlocked while
using “My Room Mode”
The charging connector unlocks,
charging stops and “My Room Mode”
stops. In order to use “My Room Mode”
again, reconnect the AC charging cable
and start “My Room Mode” (P.164).
When using “My Room Mode” with pub-lic charging station, operation to start
charging using the charger may be
required again before starting “My Room
Mode”.
■Meter display during charging
If “My Room Mode” is not turned on for
approximately 100 seconds after the
power switch is turned on during
charging, the power switch will automat-
ically turn off.
■While using “My Room Mode”
Any of the following may occur.
●When the remaining charge of the
hybrid battery (traction battery)
reaches the lower limit, the air condi-
tioning system automatically turns off.
In this situation, the air conditioning
system cannot be used until the
remaining charge of the hybrid battery
(traction battery) increases. Turn the
power switch off and use “My Room
Mode” after the remaining charge of
the hybrid battery (traction battery) is
restored.
●When the outside temperature is low,
the heater output may be limited due
to the air conditioning system opera-
tion being restricted.
●Warning lights and indicators such as
electric power steering system warn-
ing light (yellow) and malfunction indi-
cator lamp may turn on, but this is not
a malfunction.
Also, when the surrounding area is
dark, the headlights are turned on.
(P.326)
■When a charging schedule is regis-
tered
When “My Room Mode” starts while the
charging schedule is on standby,
charging schedules are ignored and
charging starts.
■When “My Room Mode” is used
while the hybrid battery (traction
battery) is fully charged
When the power switch is turned on
while the hybrid battery (traction battery)
is fully charged and the charging con-
A
B
C
D
D
C
CD
Page 179 of 718
177
2 2-2. Charging
Plug-in hybrid system
■If “Charging Stopped High Energy Use See Owner’s Manual” is
shown
■If “Charging System Malfunction See Owner’s Manual” is shown
■If “The Traction Battery Temp is low System put priority on
charging to preserve battery condition” is shown (Greenland only)
Likely causeCorrection procedure
Power is being consumed by electrical
components of vehicle
Check the following items, and then carry
out charging again.
If the headlights and audio are turned
on, turn them off.
Turn the power switch off.
If charging cannot be carried out, even
after performing the above, the auxiliary
battery may not be sufficiently charged.
Operate the hybrid system for approxi-
mately 15 minutes or more to charge the
auxiliary battery.
Likely causeCorrection procedure
Malfunction occurred in charging system
Have the vehicle inspected by any autho-
rized Toyota retailer or Toyota authorized
repairer, or any reliable repairer.
Likely causeCorrection procedure
The Hybrid battery (traction battery)
warming control was operated (P.128)
When the hybrid battery (traction battery)
warming control operates, the charging
schedule is not used and charging is per-
formed.
This is a control to protect the hybrid bat-
tery (traction battery), and not a malfunc-
tion.
Page 212 of 718
2103-1. Instrument cluster
■Suggestion to enable the
power back door (if equipped)
If the power back door system is
disabled on the screen and the
power back door switch on the
instrument panel is operated, a
suggestion message will be dis-
played asking if you wish to enable
the power back door system. To
enable the power back door sys-
tem, select “Yes”.
After enabling the power back door sys-
tem, press the power back door switch
again to open or close the power back
door.
■Suggestion to turn off the
headlights
If the headlights are left on for a
certain amount of time after the
power switch has been turned off, a
suggestion message will be dis-
played.
■Suggestion to close the power
windows (linked to windshield
wiper operation)
If the windshield wipers are oper-
ated with a power window open, a
suggestion message will be dis-
played asking if you wish to close
the power windows. To close all of
the power windows, select “Yes”.
■Suggestion to close the power
windows (driving at high
speeds)
If the vehicle speed exceeds a cer-
tain speed with a power window
open, a suggestion message will be displayed asking if you wish to
close the power windows. To close
all of the power windows, select
“Yes”.
■Customization
The Convenience Services (Suggestion
function) can be turned on/off. (Custom-
izable features: P.596)
Page 223 of 718
221
3 3-1. Instrument cluster
Vehicle status information and indicators
Displays suggestions to the driver
in the following situations. To select
a response to a displayed sugges-
tion, use the meter control
switches.
■Suggestion to enable the
power back door (if equipped)
If the power back door system is
disabled on the screen and the
power back door switch on the
instrument panel is operated, a
suggestion message will be dis-
played asking if you wish to enable
the power back door system. To
enable the power back door sys-
tem, select “Yes”. After enabling
the power back door system, press
the power back door switch again
to open or close the power back
door.
■Suggestion to turn off the
headlights
If the headlights are left on for a
certain amount of time with the
headlight switch in after the
power switch has been turned off, a
suggestion message will be dis-
played asking if you wish to turn the
headlights off.
To turn the headlights off, select
“Yes”.
If a front door is opened after the power
switch is turned off, this suggestion
message will not be displayed.
■Suggestion to close the power
windows (linked to windshield
wiper operation)
If the windshield wipers are oper-
ated with a power window open, a
suggestion message will be dis-
played asking if you wish to close
the power windows.
To close all of the power windows,
select “Yes”.
■Suggestion to close the power
windows (driving at high
speeds)
If the vehicle speed exceeds a cer-
tain speed with a power window
open, a suggestion message will be
displayed asking if you wish to
close the power windows. To close
all of the power windows, select
“Yes”.
■Customization
Some functions can be customized.
(Customizable features: P.594)
Convenience Services (Sug-
gestion function)
Page 269 of 718
267
4
4-4. Adjusting the steering wheel and mirrors
Before driving
*: If equipped
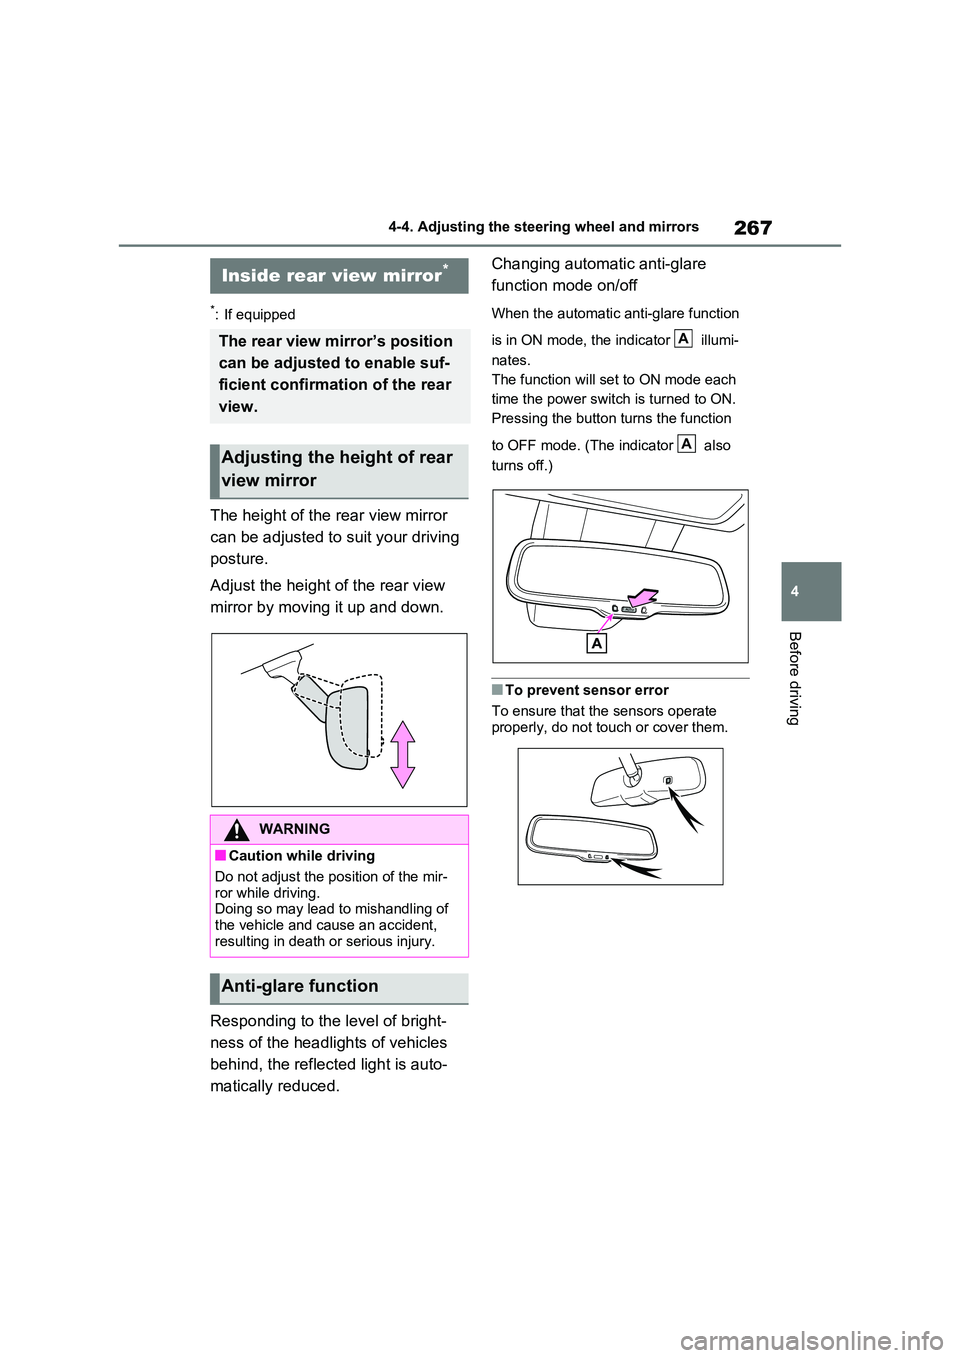
The height of the rear view mirror
can be adjusted to suit your driving
posture.
Adjust the height of the rear view
mirror by moving it up and down.
Responding to the level of bright-
ness of the headlights of vehicles
behind, the reflected light is auto-
matically reduced.
Changing automatic anti-glare
function mode on/off
When the automatic anti-glare function
is in ON mode, the indicator illumi-
nates.
The function will set to ON mode each
time the power switch is turned to ON.
Pressing the button turns the function
to OFF mode. (The indicator also
turns off.)
■To prevent sensor error
To ensure that the sensors operate
properly, do not touch or cover them.
Inside rear view mirror*
The rear view mirror’s position
can be adjusted to enable suf-
ficient confirmation of the rear
view.
Adjusting the height of rear
view mirror
WARNING
■Caution while driving
Do not adjust the position of the mir- ror while driving.Doing so may lead to mishandling of
the vehicle and cause an accident, resulting in death or serious injury.
Anti-glare function
A
A
Page 272 of 718
2704-4. Adjusting the steering wheel and mirrors
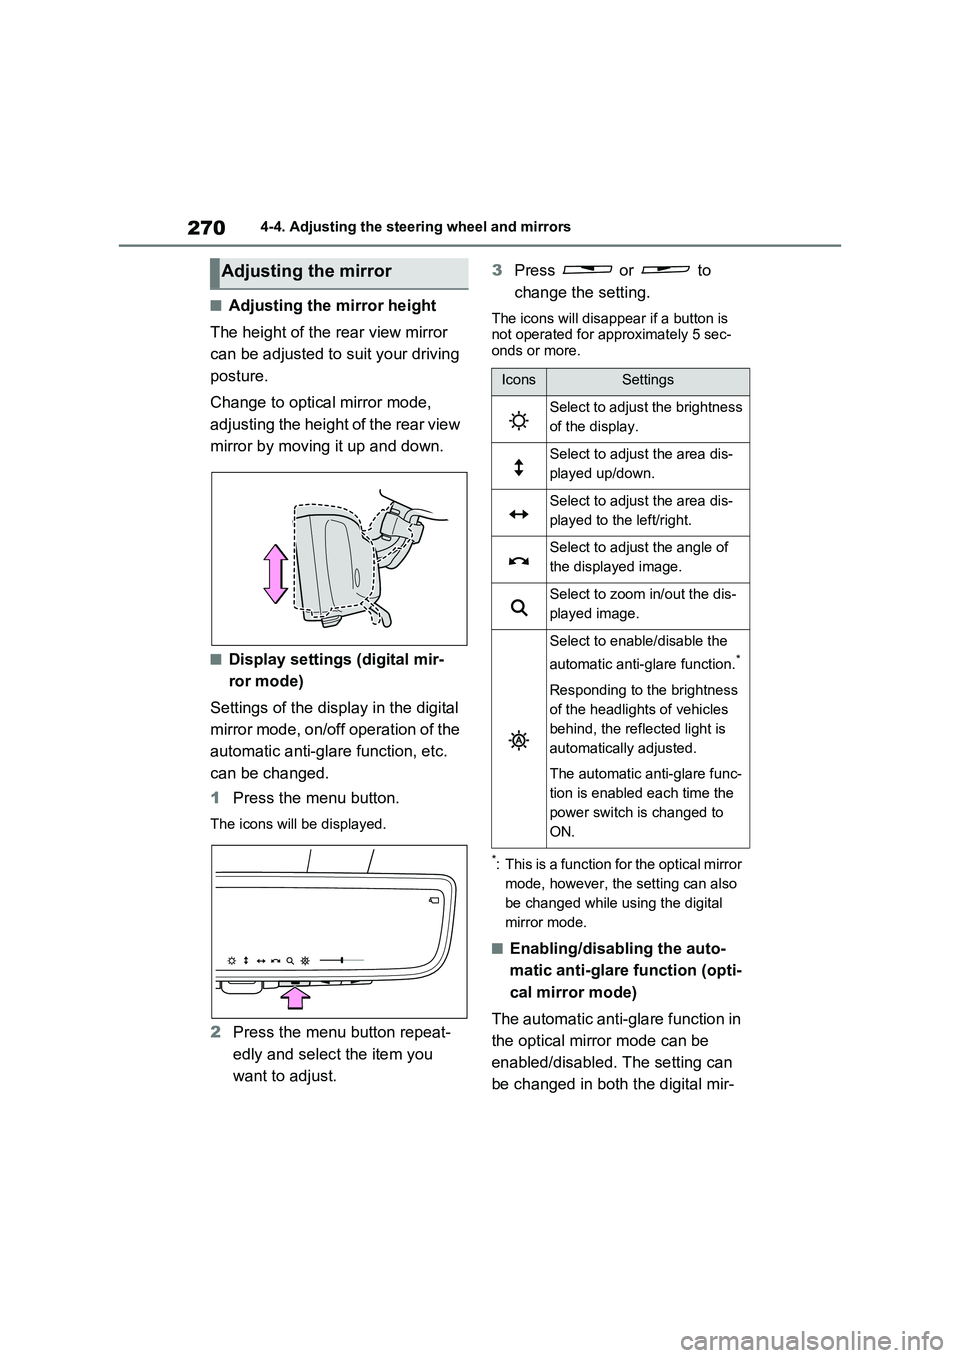
■Adjusting the mirror height
The height of the rear view mirror
can be adjusted to suit your driving
posture.
Change to optical mirror mode,
adjusting the height of the rear view
mirror by moving it up and down.
■Display settings (digital mir-
ror mode)
Settings of the display in the digital
mirror mode, on/off operation of the
automatic anti-glare function, etc.
can be changed.
1Press the menu button.
The icons will be displayed.
2Press the menu button repeat-
edly and select the item you
want to adjust.3Press or to
change the setting.
The icons will disappear if a button is
not operated for approximately 5 sec-
onds or more.
*: This is a function for the optical mirror
mode, however, the setting can also
be changed while using the digital
mirror mode.
■Enabling/disabling the auto-
matic anti-glare function (opti-
cal mirror mode)
The automatic anti-glare function in
the optical mirror mode can be
enabled/disabled. The setting can
be changed in both the digital mir-
Adjusting the mirror
IconsSettings
Select to adjust the brightness
of the display.
Select to adjust the area dis-
played up/down.
Select to adjust the area dis-
played to the left/right.
Select to adjust the angle of
the displayed image.
Select to zoom in/out the dis-
played image.
Select to enable/disable the
automatic anti-glare function.
*
Responding to the brightness
of the headlights of vehicles
behind, the reflected light is
automatically adjusted.
The automatic anti-glare func-
tion is enabled each time the
power switch is changed to
ON.