TOYOTA SIENNA 2007 Service Repair Manual
Manufacturer: TOYOTA, Model Year: 2007, Model line: SIENNA, Model: TOYOTA SIENNA 2007Pages: 3000, PDF Size: 52.26 MB
Page 2531 of 3000
BRAKE CONTROL – VEHICLE STABILITY CONTROL SYSTEMBC–169
BC
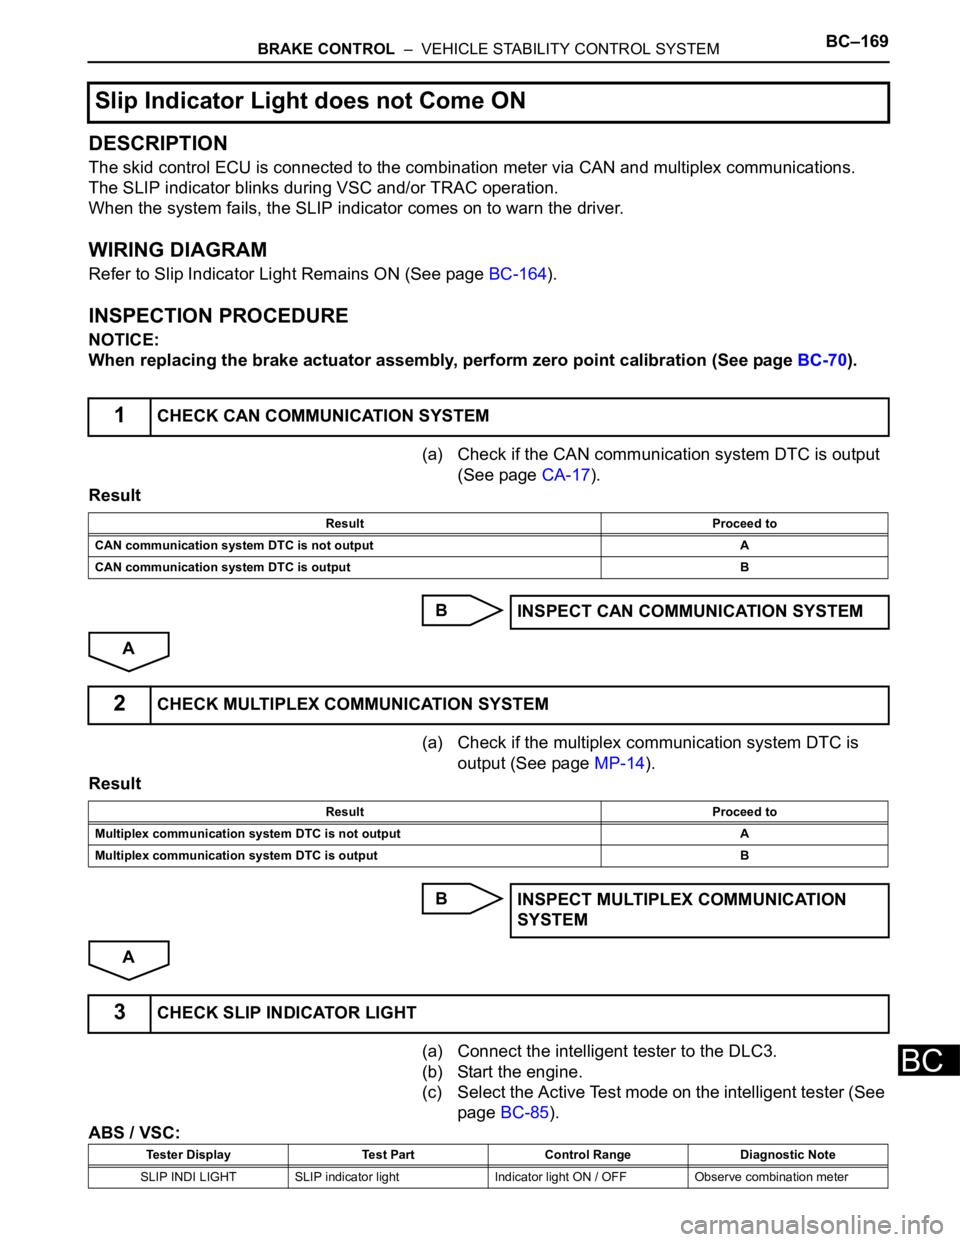
DESCRIPTION
The skid control ECU is connected to the combination meter via CAN and multiplex communications.
The SLIP indicator blinks during VSC and/or TRAC operation.
When the system fails, the SLIP indicator comes on to warn the driver.
WIRING DIAGRAM
Refer to Slip Indicator Light Remains ON (See page BC-164).
INSPECTION PROCEDURE
NOTICE:
When replacing the brake actuator assembly, perform zero point calibration (See page BC-70).
(a) Check if the CAN communication system DTC is output
(See page CA-17).
Result
B
A
(a) Check if the multiplex communication system DTC is
output (See page MP-14).
Result
B
A
(a) Connect the intelligent tester to the DLC3.
(b) Start the engine.
(c) Select the Active Test mode on the intelligent tester (See
page BC-85).
ABS / VSC:
Slip Indicator Light does not Come ON
1CHECK CAN COMMUNICATION SYSTEM
Result Proceed to
CAN communication system DTC is not output A
CAN communication system DTC is output B
INSPECT CAN COMMUNICATION SYSTEM
2CHECK MULTIPLEX COMMUNICATION SYSTEM
Result Proceed to
Multiplex communication system DTC is not output A
Multiplex communication system DTC is output B
INSPECT MULTIPLEX COMMUNICATION
SYSTEM
3CHECK SLIP INDICATOR LIGHT
Tester Display Test Part Control Range Diagnostic Note
SLIP INDI LIGHT SLIP indicator light Indicator light ON / OFF Observe combination meter
Page 2532 of 3000
BC–170BRAKE CONTROL – VEHICLE STABILITY CONTROL SYSTEM
BC
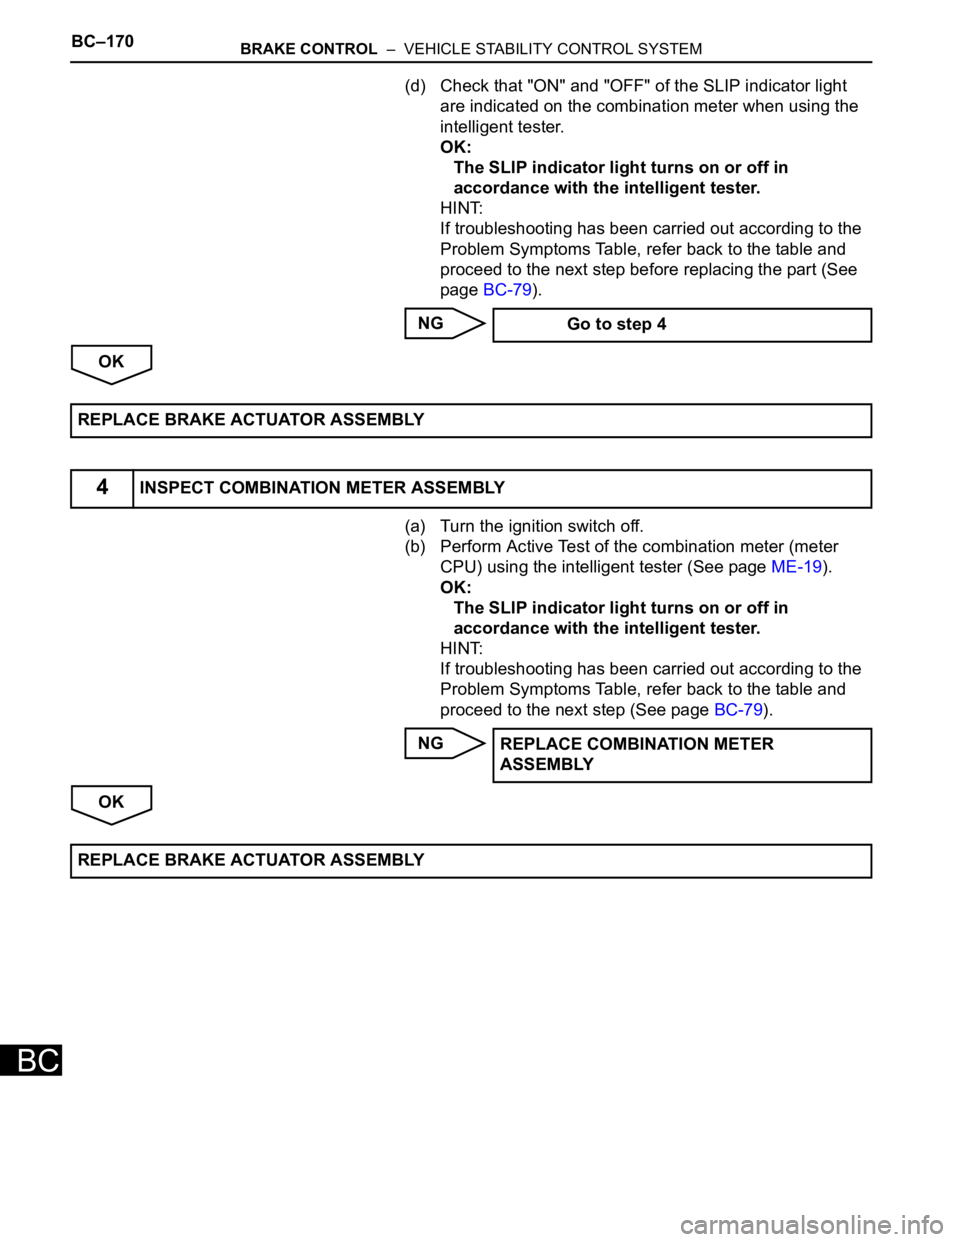
(d) Check that "ON" and "OFF" of the SLIP indicator light
are indicated on the combination meter when using the
intelligent tester.
OK:
The SLIP indicator light turns on or off in
accordance with the intelligent tester.
HINT:
If troubleshooting has been carried out according to the
Problem Symptoms Table, refer back to the table and
proceed to the next step before replacing the part (See
page BC-79).
NG
OK
(a) Turn the ignition switch off.
(b) Perform Active Test of the combination meter (meter
CPU) using the intelligent tester (See page ME-19).
OK:
The SLIP indicator light turns on or off in
accordance with the intelligent tester.
HINT:
If troubleshooting has been carried out according to the
Problem Symptoms Table, refer back to the table and
proceed to the next step (See page BC-79).
NG
OK Go to step 4
REPLACE BRAKE ACTUATOR ASSEMBLY
4INSPECT COMBINATION METER ASSEMBLY
REPLACE COMBINATION METER
ASSEMBLY
REPLACE BRAKE ACTUATOR ASSEMBLY
Page 2533 of 3000
BRAKE CONTROL – VEHICLE STABILITY CONTROL SYSTEMBC–171
BC
DESCRIPTION
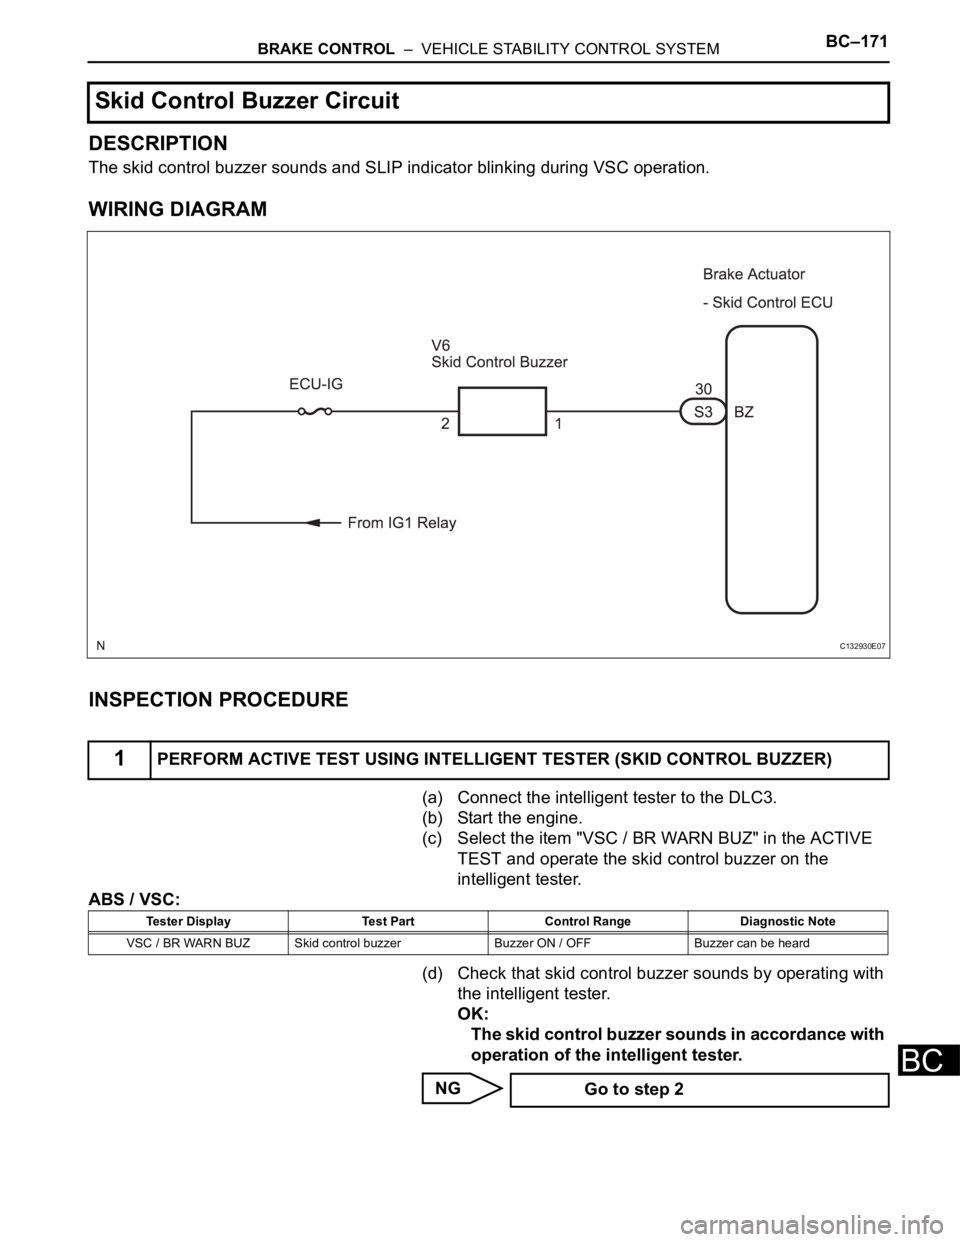
The skid control buzzer sounds and SLIP indicator blinking during VSC operation.
WIRING DIAGRAM
INSPECTION PROCEDURE
(a) Connect the intelligent tester to the DLC3.
(b) Start the engine.
(c) Select the item "VSC / BR WARN BUZ" in the ACTIVE
TEST and operate the skid control buzzer on the
intelligent tester.
ABS / VSC:
(d) Check that skid control buzzer sounds by operating with
the intelligent tester.
OK:
The skid control buzzer sounds in accordance with
operation of the intelligent tester.
NG
Skid Control Buzzer Circuit
1PERFORM ACTIVE TEST USING INTELLIGENT TESTER (SKID CONTROL BUZZER)
C132930E07
Tester Display Test Part Control Range Diagnostic Note
VSC / BR WARN BUZ Skid control buzzer Buzzer ON / OFF Buzzer can be heard
Go to step 2
Page 2534 of 3000
BC–172BRAKE CONTROL – VEHICLE STABILITY CONTROL SYSTEM
BC
OK
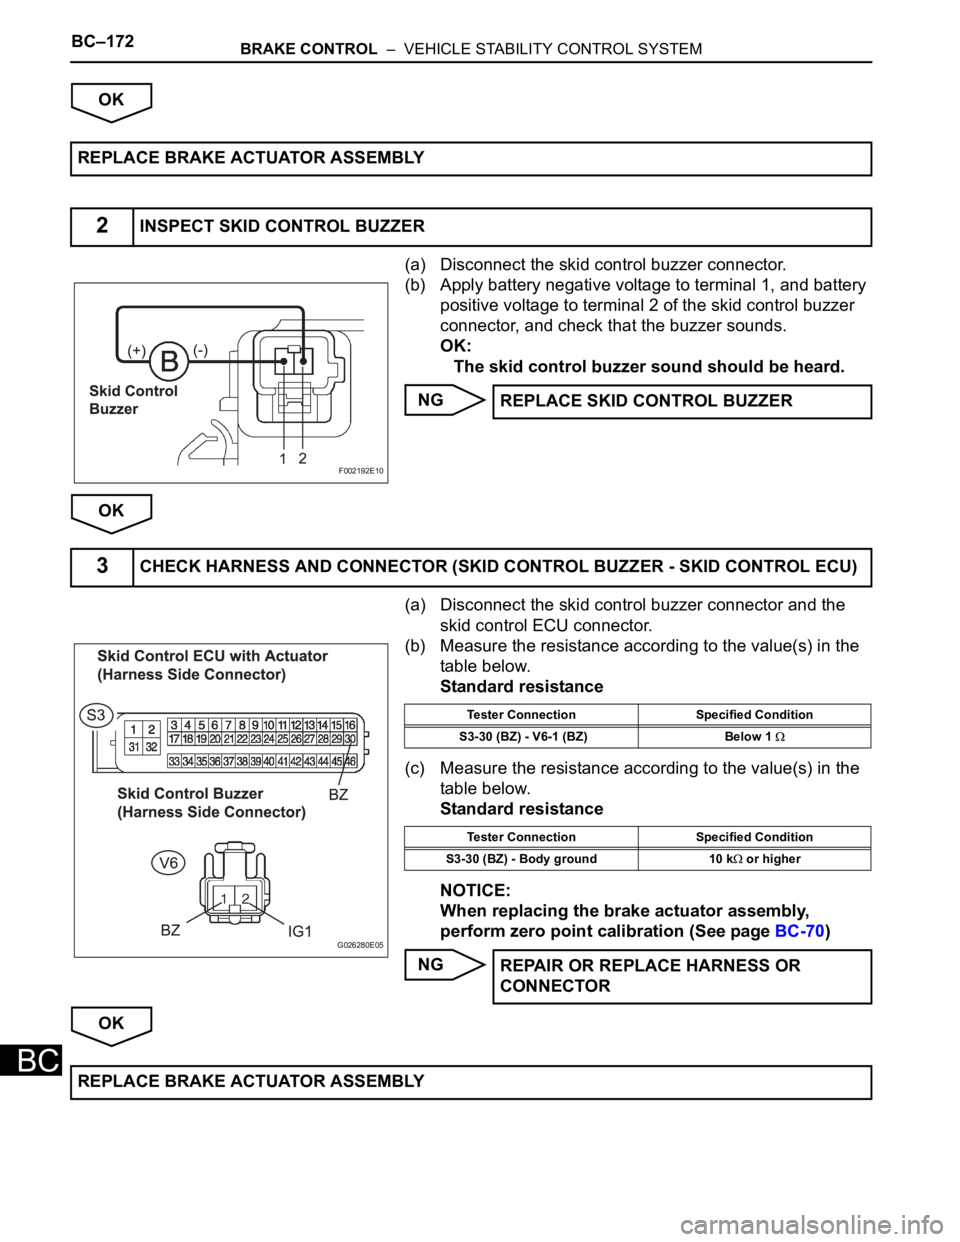
(a) Disconnect the skid control buzzer connector.
(b) Apply battery negative voltage to terminal 1, and battery
positive voltage to terminal 2 of the skid control buzzer
connector, and check that the buzzer sounds.
OK:
The skid control buzzer sound should be heard.
NG
OK
(a) Disconnect the skid control buzzer connector and the
skid control ECU connector.
(b) Measure the resistance according to the value(s) in the
table below.
Standard resistance
(c) Measure the resistance according to the value(s) in the
table below.
Standard resistance
NOTICE:
When replacing the brake actuator assembly,
perform zero point calibration (See page BC-70)
NG
OK REPLACE BRAKE ACTUATOR ASSEMBLY
2INSPECT SKID CONTROL BUZZER
F002192E10
REPLACE SKID CONTROL BUZZER
3CHECK HARNESS AND CONNECTOR (SKID CONTROL BUZZER - SKID CONTROL ECU)
G026280E05
Tester Connection Specified Condition
S3-30 (BZ) - V6-1 (BZ) Below 1
Tester Connection Specified Condition
S3-30 (BZ) - Body ground 10 k
or higher
REPAIR OR REPLACE HARNESS OR
CONNECTOR
REPLACE BRAKE ACTUATOR ASSEMBLY
Page 2535 of 3000
BRAKE CONTROL – VEHICLE STABILITY CONTROL SYSTEMBC–173
BC
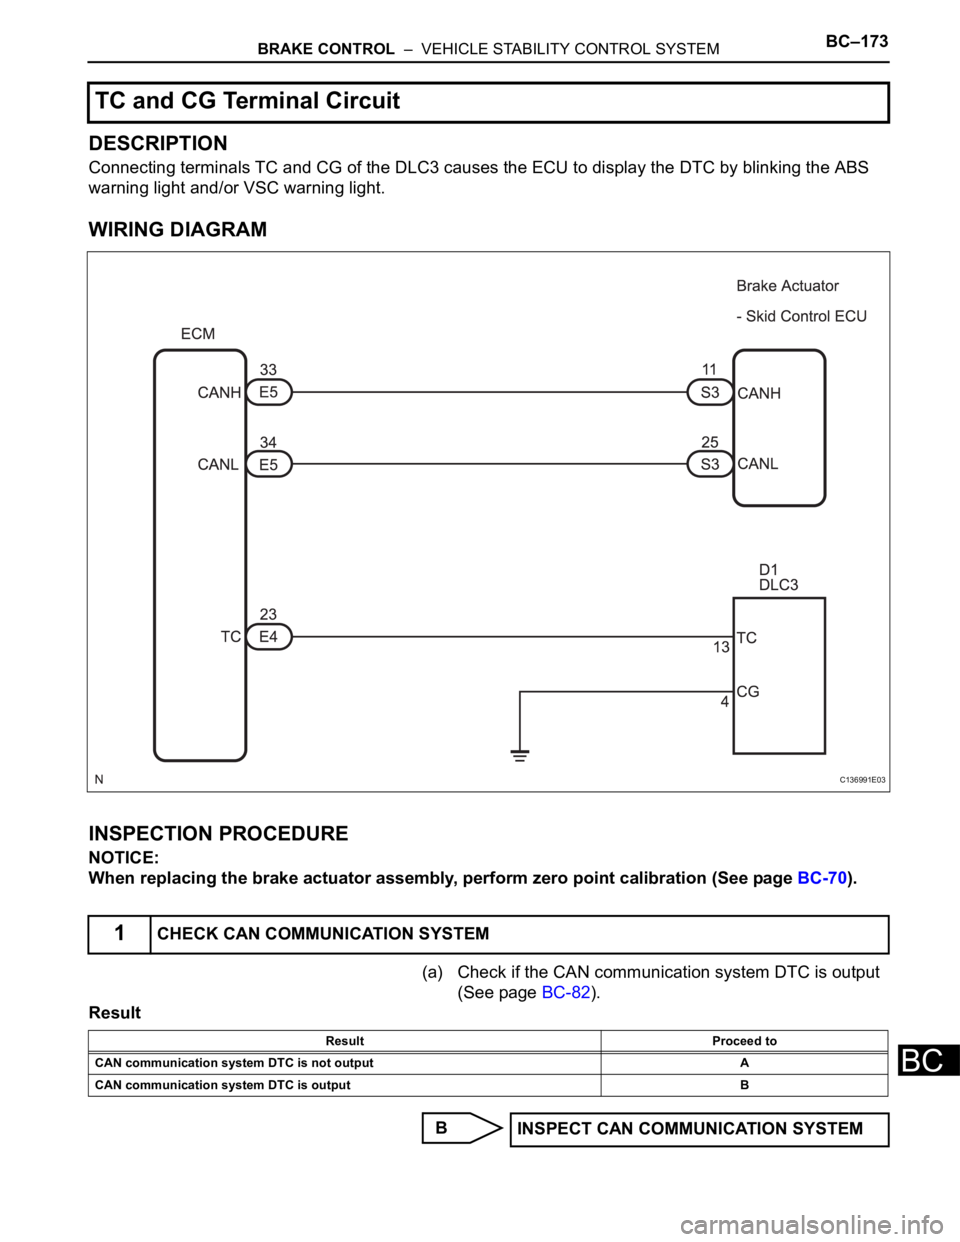
DESCRIPTION
Connecting terminals TC and CG of the DLC3 causes the ECU to display the DTC by blinking the ABS
warning light and/or VSC warning light.
WIRING DIAGRAM
INSPECTION PROCEDURE
NOTICE:
When replacing the brake actuator assembly, perform zero point calibration (See page BC-70).
(a) Check if the CAN communication system DTC is output
(See page BC-82).
Result
B
TC and CG Terminal Circuit
1CHECK CAN COMMUNICATION SYSTEM
C136991E03
Result Proceed to
CAN communication system DTC is not output A
CAN communication system DTC is output B
INSPECT CAN COMMUNICATION SYSTEM
Page 2536 of 3000
BC–174BRAKE CONTROL – VEHICLE STABILITY CONTROL SYSTEM
BC
A
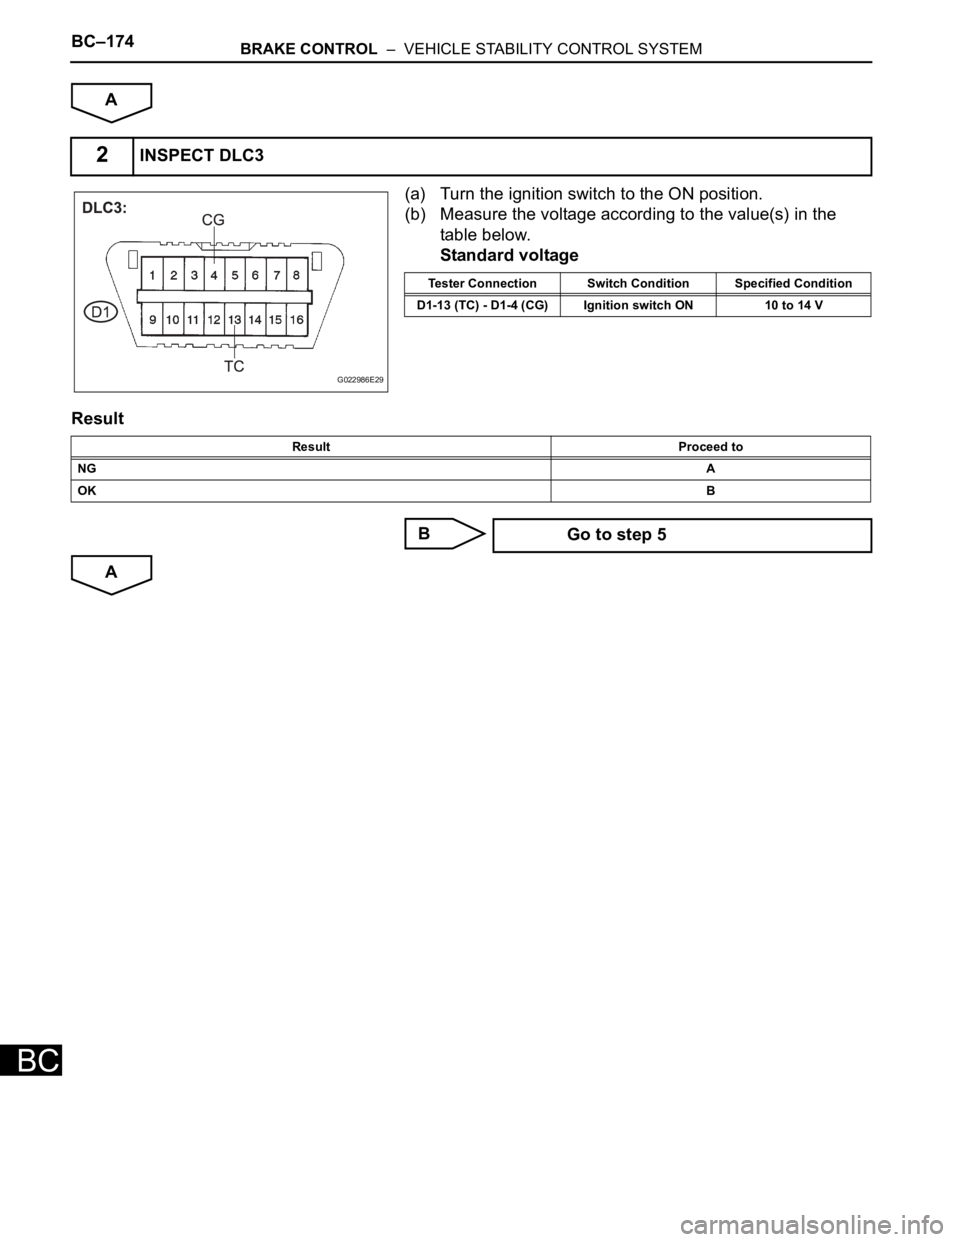
(a) Turn the ignition switch to the ON position.
(b) Measure the voltage according to the value(s) in the
table below.
Standard voltage
Result
B
A
2INSPECT DLC3
G022986E29
Tester Connection Switch Condition Specified Condition
D1-13 (TC) - D1-4 (CG) Ignition switch ON 10 to 14 V
Result Proceed to
NGA
OKB
Go to step 5
Page 2537 of 3000
BRAKE CONTROL – VEHICLE STABILITY CONTROL SYSTEMBC–175
BC
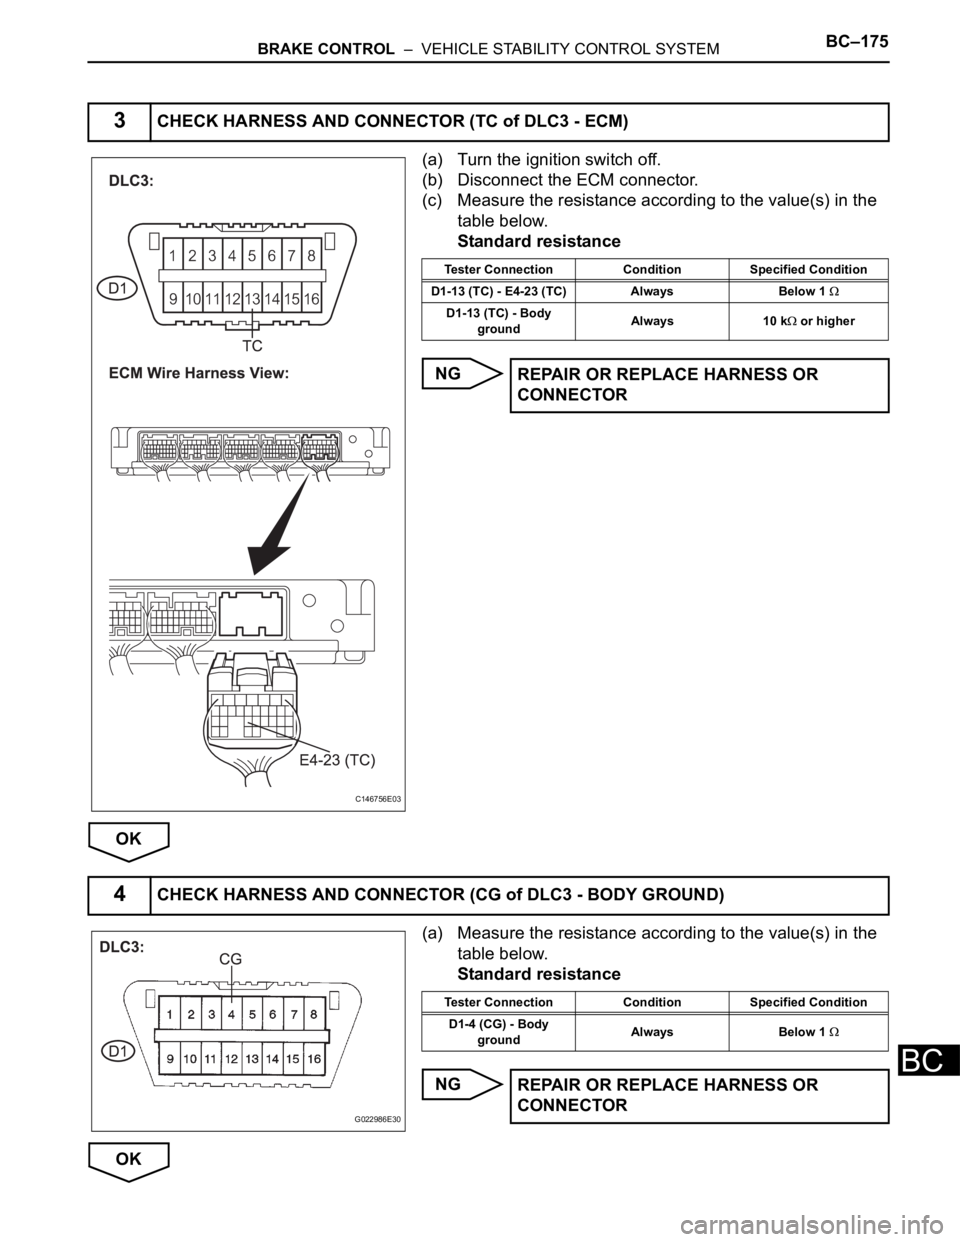
(a) Turn the ignition switch off.
(b) Disconnect the ECM connector.
(c) Measure the resistance according to the value(s) in the
table below.
Standard resistance
NG
OK
(a) Measure the resistance according to the value(s) in the
table below.
Standard resistance
NG
OK
3CHECK HARNESS AND CONNECTOR (TC of DLC3 - ECM)
C146756E03
Tester Connection Condition Specified Condition
D1-13 (TC) - E4-23 (TC) Always Below 1
D1-13 (TC) - Body
groundAlways 10 k or higher
REPAIR OR REPLACE HARNESS OR
CONNECTOR
4CHECK HARNESS AND CONNECTOR (CG of DLC3 - BODY GROUND)
G022986E30
Tester Connection Condition Specified Condition
D1-4 (CG) - Body
groundAlways Below 1
REPAIR OR REPLACE HARNESS OR
CONNECTOR
Page 2538 of 3000
BC–176BRAKE CONTROL – VEHICLE STABILITY CONTROL SYSTEM
BC
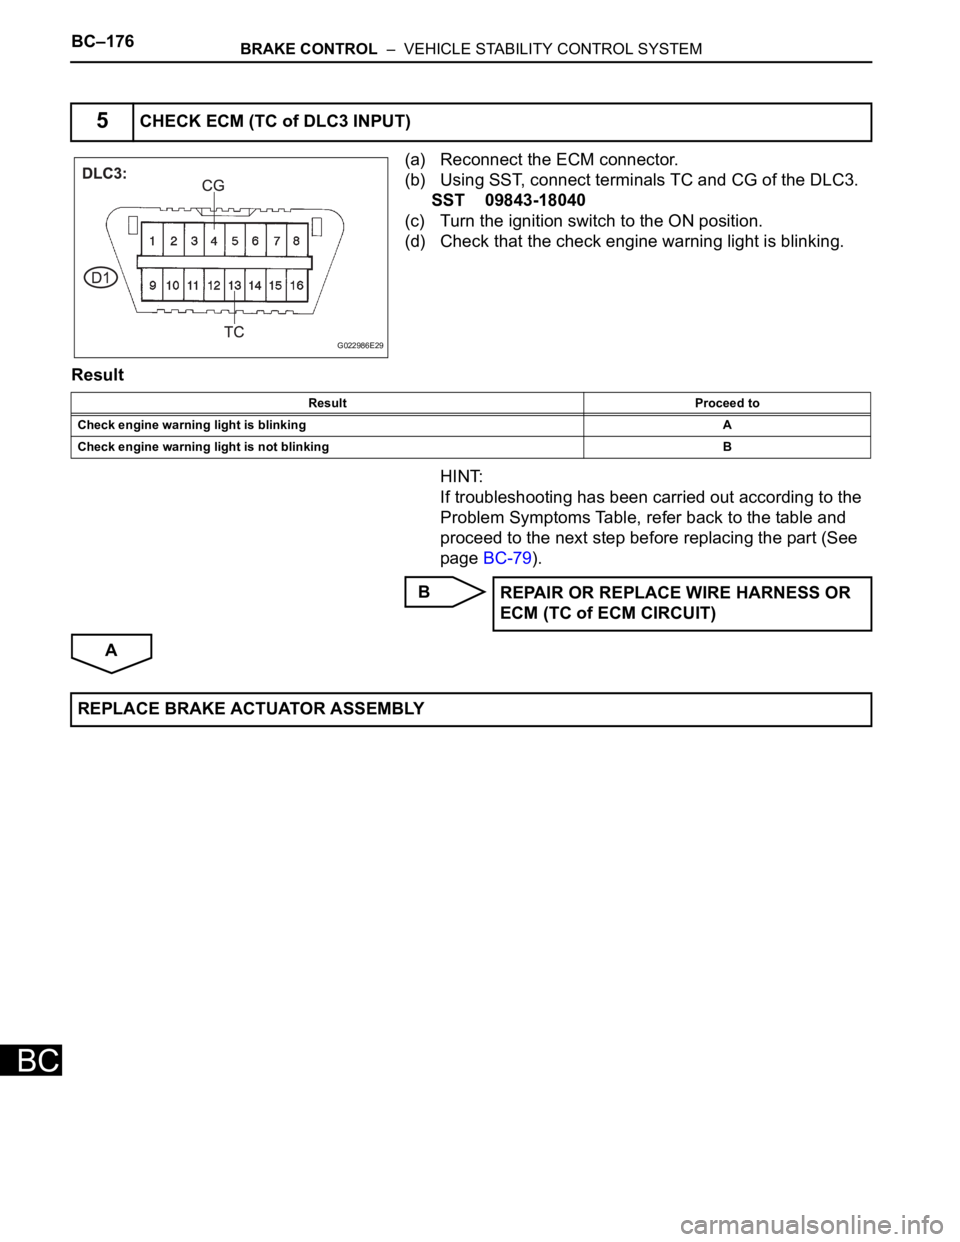
(a) Reconnect the ECM connector.
(b) Using SST, connect terminals TC and CG of the DLC3.
SST 09843-18040
(c) Turn the ignition switch to the ON position.
(d) Check that the check engine warning light is blinking.
Result
HINT:
If troubleshooting has been carried out according to the
Problem Symptoms Table, refer back to the table and
proceed to the next step before replacing the part (See
page BC-79).
B
A
5CHECK ECM (TC of DLC3 INPUT)
G022986E29
Result Proceed to
Check engine warning light is blinkingA
Check engine warning light is not blinking B
REPAIR OR REPLACE WIRE HARNESS OR
ECM (TC of ECM CIRCUIT)
REPLACE BRAKE ACTUATOR ASSEMBLY
Page 2539 of 3000
BRAKE CONTROL – VEHICLE STABILITY CONTROL SYSTEMBC–177
BC
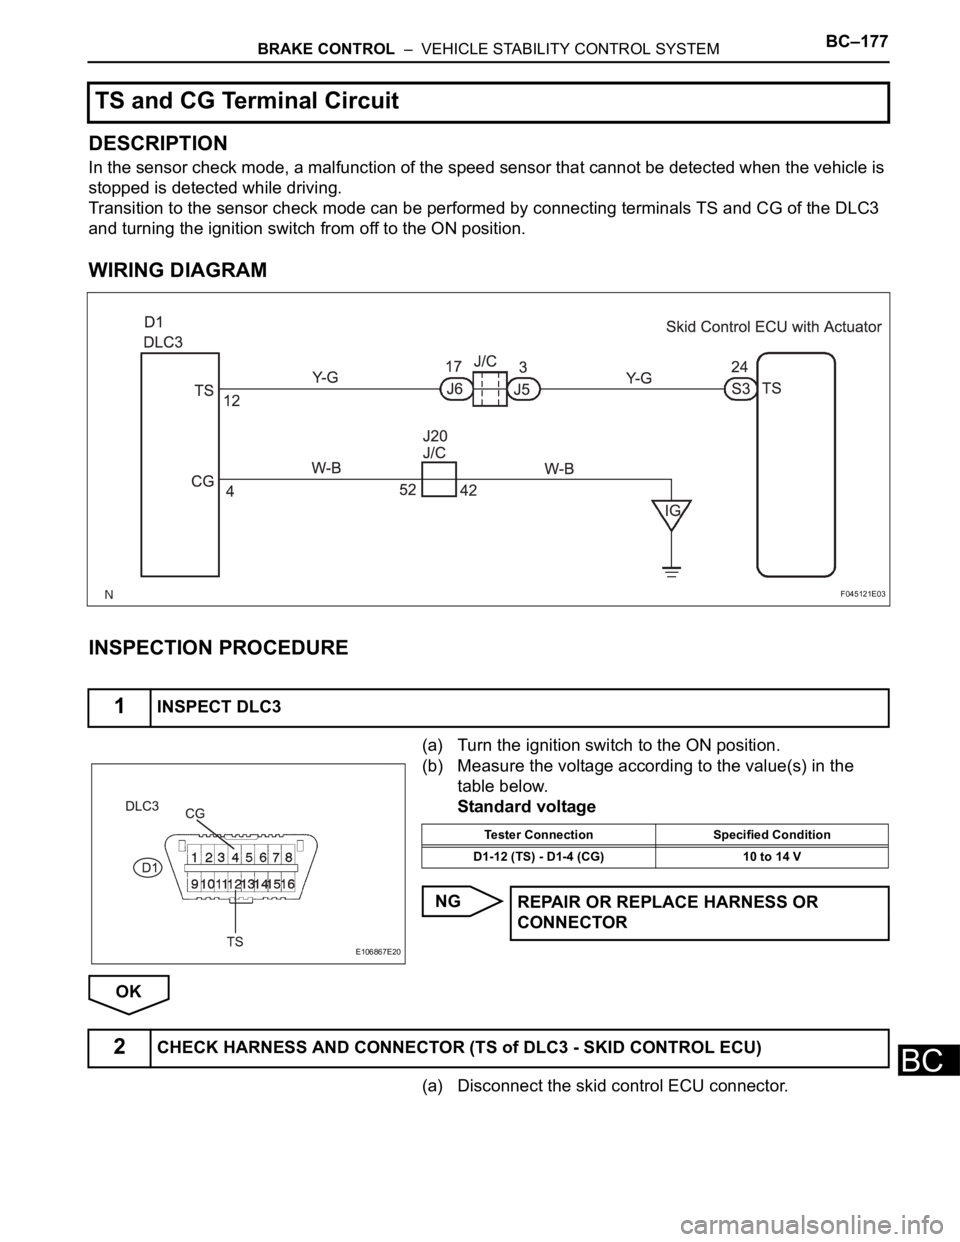
DESCRIPTION
In the sensor check mode, a malfunction of the speed sensor that cannot be detected when the vehicle is
stopped is detected while driving.
Transition to the sensor check mode can be performed by connecting terminals TS and CG of the DLC3
and turning the ignition switch from off to the ON position.
WIRING DIAGRAM
INSPECTION PROCEDURE
(a) Turn the ignition switch to the ON position.
(b) Measure the voltage according to the value(s) in the
table below.
Standard voltage
NG
OK
(a) Disconnect the skid control ECU connector.
TS and CG Terminal Circuit
1INSPECT DLC3
F045121E03
E106867E20
Tester Connection Specified Condition
D1-12 (TS) - D1-4 (CG) 10 to 14 V
REPAIR OR REPLACE HARNESS OR
CONNECTOR
2CHECK HARNESS AND CONNECTOR (TS of DLC3 - SKID CONTROL ECU)
Page 2540 of 3000
BC–178BRAKE CONTROL – VEHICLE STABILITY CONTROL SYSTEM
BC
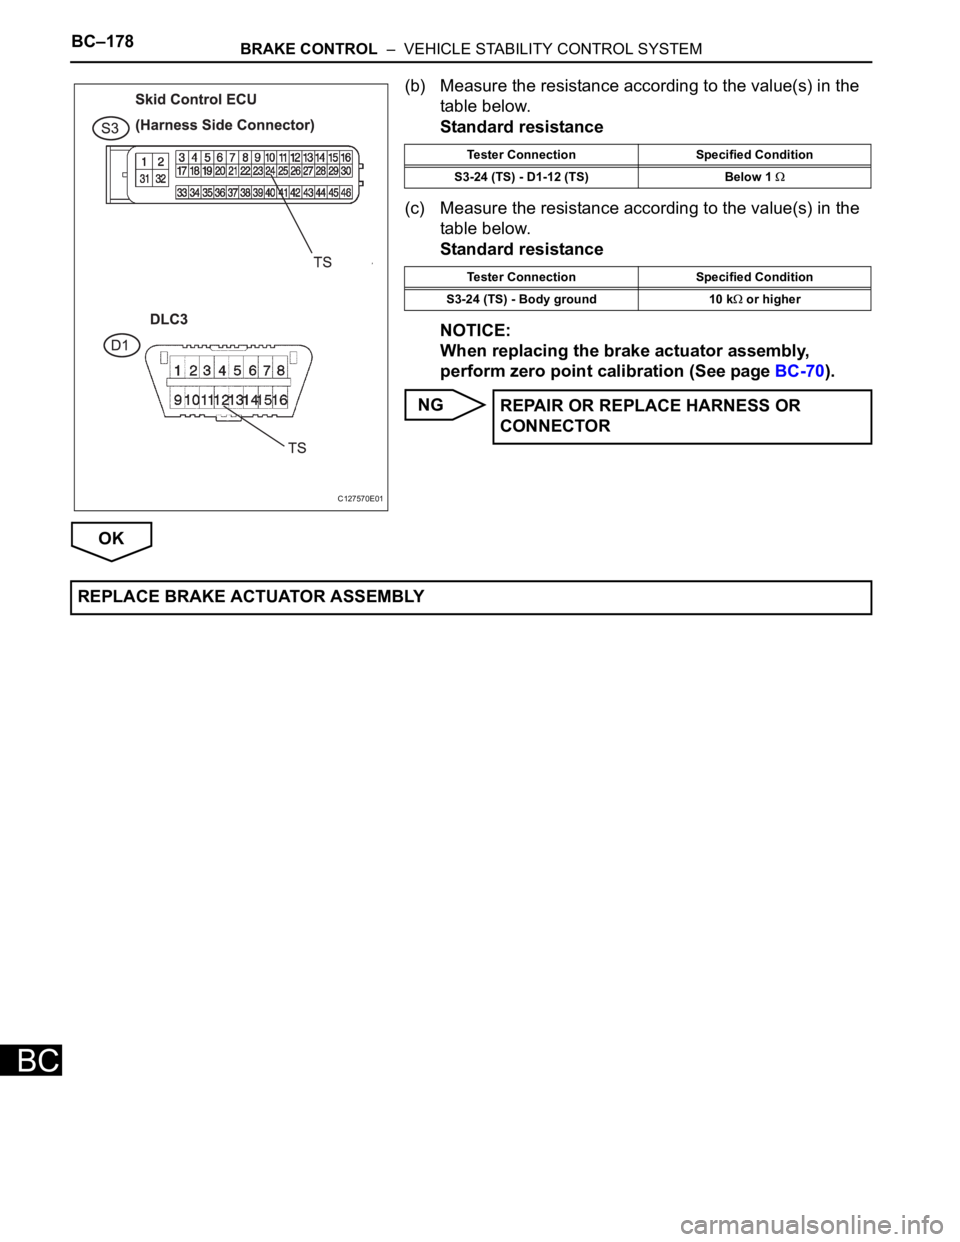
(b) Measure the resistance according to the value(s) in the
table below.
Standard resistance
(c) Measure the resistance according to the value(s) in the
table below.
Standard resistance
NOTICE:
When replacing the brake actuator assembly,
perform zero point calibration (See page BC-70).
NG
OK
C127570E01
Tester Connection Specified Condition
S3-24 (TS) - D1-12 (TS) Below 1
Tester Connection Specified Condition
S3-24 (TS) - Body ground 10 k
or higher
REPAIR OR REPLACE HARNESS OR
CONNECTOR
REPLACE BRAKE ACTUATOR ASSEMBLY