ECU TOYOTA SIENNA HYBRID 2021 (in English) Manual PDF
[x] Cancel search | Manufacturer: TOYOTA, Model Year: 2021, Model line: SIENNA HYBRID, Model: TOYOTA SIENNA HYBRID 2021Pages: 601, PDF Size: 32.07 MB
Page 392 of 601
3915-4. Using the other interior features
5
Interior features
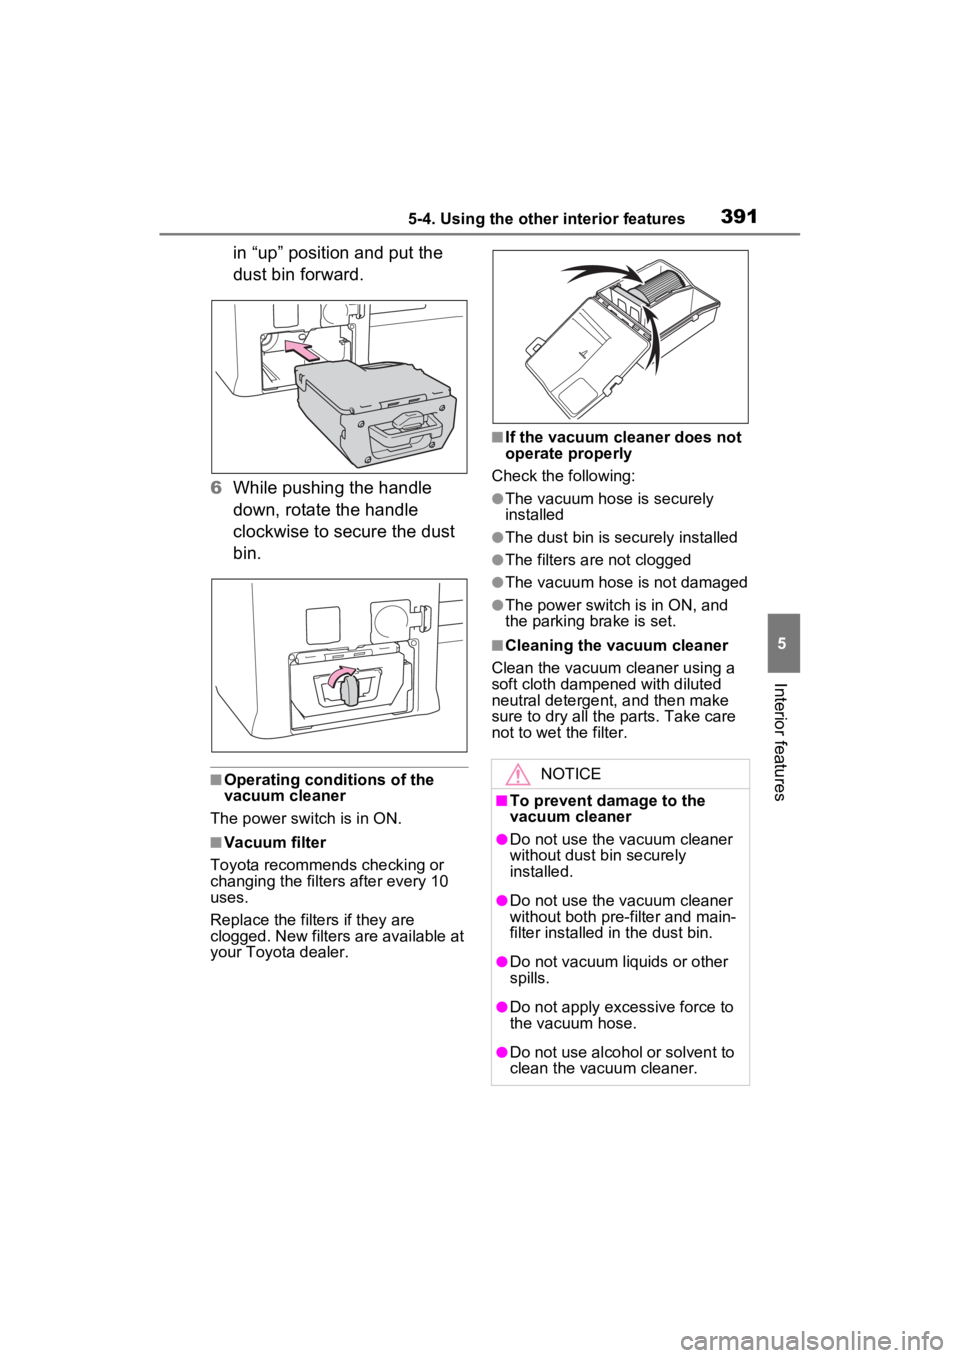
in “up” position and put the
dust bin forward.
6 While pushing the handle
down, rotate the handle
clockwise to secure the dust
bin.
■Operating conditions of the
vacuum cleaner
The power swit ch is in ON.
■Vacuum filter
Toyota recommends checking or
changing the filters after every 10
uses.
Replace the filters if they are
clogged. New filters are available at
your Toyota dealer.
■If the vacuum cle aner does not
operate properly
Check the following:
●The vacuum hose is securely
installed
●The dust bin is securely installed
●The filters are not clogged
●The vacuum hose is not damaged
●The power switch is in ON, and
the parking brake is set.
■Cleaning the vacuum cleaner
Clean the vacuum cleaner using a
soft cloth dampened with diluted
neutral detergent, and then make
sure to dry all the parts. Take care
not to wet the filter.
NOTICE
■To prevent damage to the
vacuum cleaner
●Do not use the vacuum cleaner
without dust bin securely
installed.
●Do not use the vacuum cleaner
without both pre-filter and main-
filter installed in the dust bin.
●Do not vacuum liquids or other
spills.
●Do not apply excessive force to
the vacuum hose.
●Do not use alcohol or solvent to
clean the vacuum cleaner.
Page 393 of 601
3925-4. Using the other interior features
*: If equipped
The HomeLink® wireless control
system in your vehicle has 3
buttons which can be pro-
grammed to operate 3 different
devices. Refer to the program-
ming methods on the following
pages to determine the method
which is appropriate for the
device.
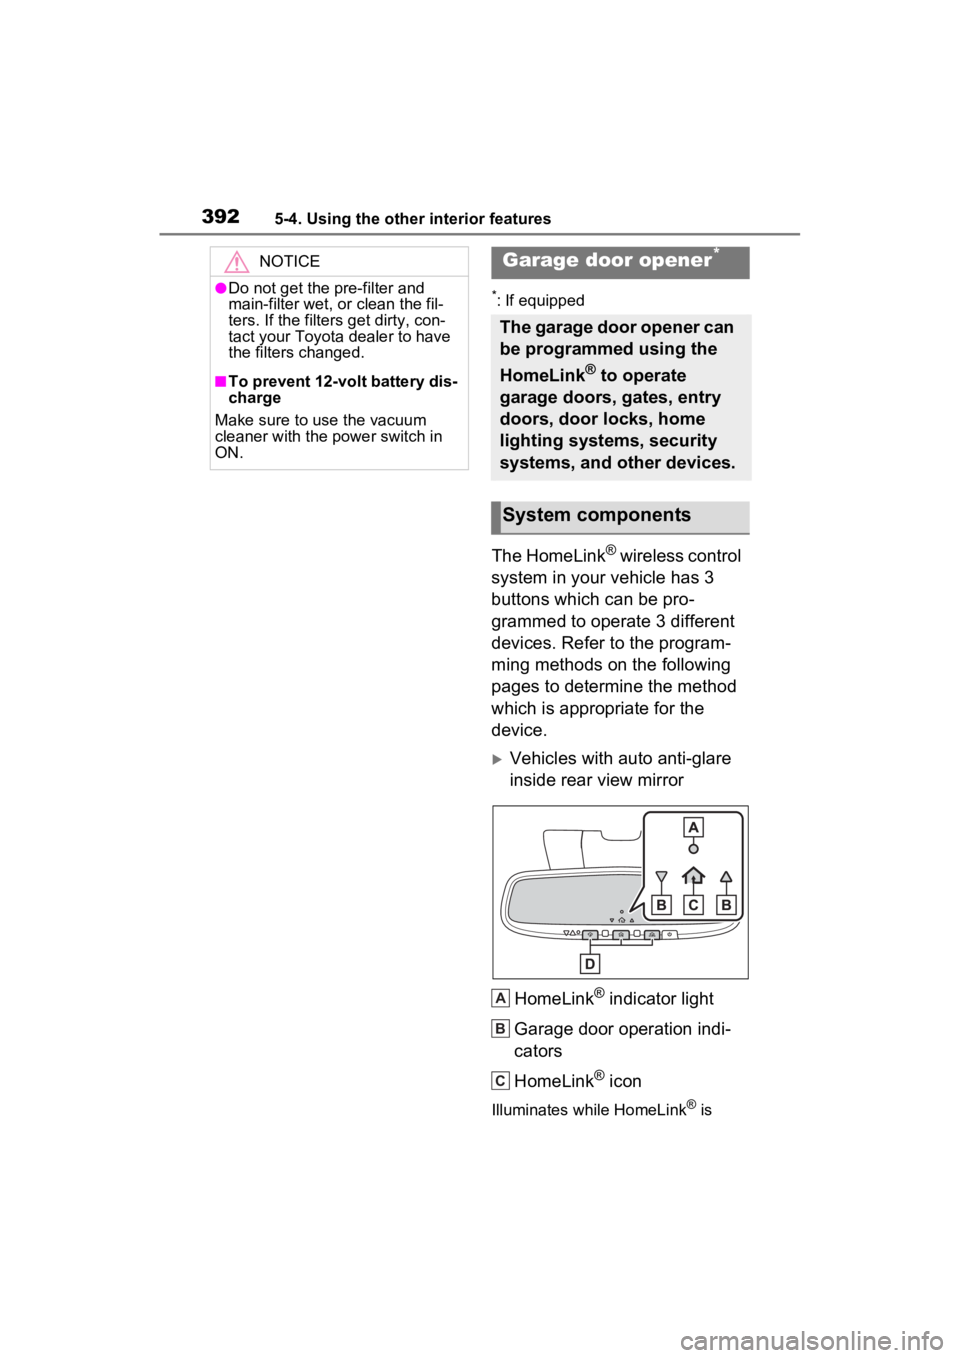
Vehicles with auto anti-glare
inside rear view mirror
HomeLink
® indicator light
Garage door operation indi-
cators
HomeLink
® icon
Illuminates while HomeLink® is
NOTICE
●Do not get the pre-filter and
main-filter wet, or clean the fil-
ters. If the filters get dirty, con-
tact your Toyota dealer to have
the filters changed.
■To prevent 12-volt battery dis-
charge
Make sure to use the vacuum
cleaner with the power switch in
ON.
Garage door opener*
The garage door opener can
be programmed using the
HomeLink
® to operate
garage doors, gates, entry
doors, door locks, home
lighting systems, security
systems, and other devices.
System components
A
B
C
Page 409 of 601
4086-2. Maintenance
Exhaust sys-
temThere should not
be any fumes or
strange sounds.
Radiator/con-
denser
The radiator and
condenser should
be free from for-
eign objects.
( P.420)
Washer fluid
Is there sufficient
washer fluid?
( P.421)
Luggage compartment
ItemsCheck points
12-volt batteryCheck the connec-
tions. ( P.422)
Vehicle interior
ItemsCheck points
Accelerator
pedal
• The accelerator
pedal should
move smoothly
(without uneven
pedal effort or
catching).
Hybrid trans-
mission “Park”
mechanism
• When parked on a slope and the
shift lever is in P,
is the vehicle
securely
stopped?
ItemsCheck points
Brake pedal
• Does the brake pedal move
smoothly?
• Does the brake pedal have
appropriate
clearance from
the floor?
( P.524)
• Does the brake pedal have the
correct amount
of free play?
( P.524)
Brakes
• The vehicle
should not pull to
one side when
the brakes are
applied.
• The brakes should work
effectively.
• The brake pedal should not feel
spongy.
• The brake pedal should not get
too close to the
floor when the
brakes are
applied.
Head
restraints
• Do the head restraints move
smoothly and
lock securely?
Indica-
tors/buzzers
• Do the indica-tors and buzzers
function prop-
erly?
Lights• Do all the lights come on?
ItemsCheck points
Page 410 of 601
4096-2. Maintenance
6
Maintenance and care
Parking brake
• Does the park-ing brake oper-
ate normally?
• When parked on a slope and the
parking brake is
on, is the vehicle
securely
stopped?
Seat belts
• Do the seat belts operate
smoothly?
• The seat belts should not be
damaged.
Seats
• Do the seat con-trols operate
properly?
Steering wheel
• Does the steer-ing wheel rotate
smoothly?
• Does the steer- ing wheel have
the correct
amount of free
play?
• There should not be any strange
sounds coming
from the steer-
ing wheel.
ItemsCheck pointsVehicle exterior
ItemsCheck points
Doors
• Do the doors operate
smoothly?
Engine hood
• Does the engine hood lock system
work properly?
Fluid leaks
• There should not be any signs of
fluid leakage
after the vehicle
has been parked.
Tires
• Is the tire infla-tion pressure
correct?
• The tires should not be damaged
or excessively
worn.
• Have the tires been rotated
according to the
maintenance
schedule?
• The wheel nuts should not be
loose.
Windshield
wipers/rear
window wiper
• The wiper blades should not show
any signs of
cracking, split-
ting, wear, con-
tamination or
deformation.
• The wiper blades should clear the
windshield/rear
window without
streaking or skip-
ping.
Page 415 of 601
4146-3. Do-it-yourself maintenance
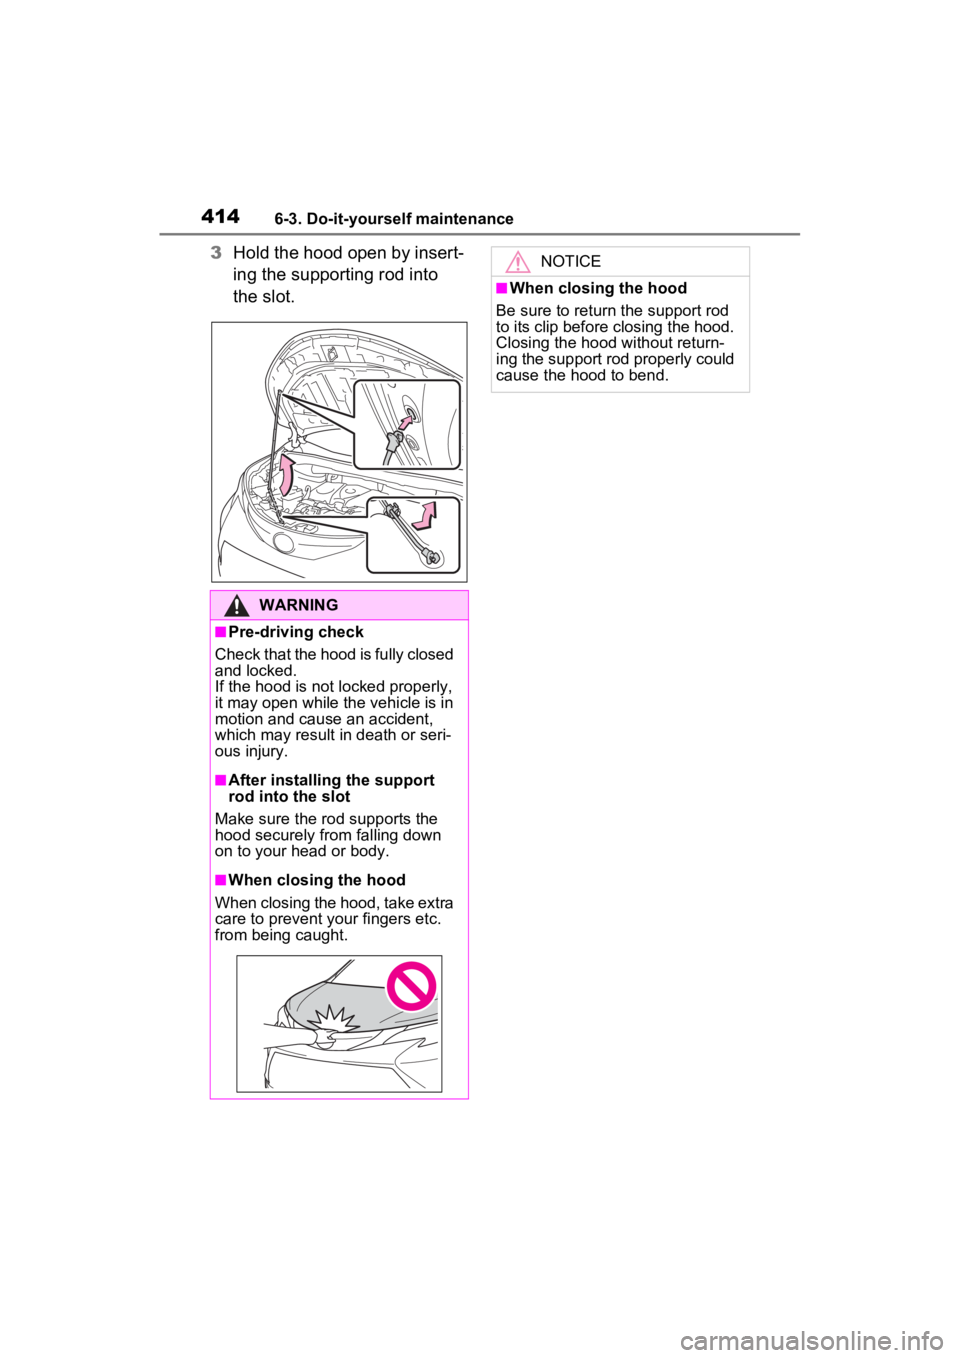
3Hold the hood open by insert-
ing the supporting rod into
the slot.
WARNING
■Pre-driving check
Check that the hood is fully closed
and locked.
If the hood is not locked properly,
it may open while the vehicle is in
motion and cause an accident,
which may result in death or seri-
ous injury.
■After installing the support
rod into the slot
Make sure the rod supports the
hood securely from falling down
on to your head or body.
■When closing the hood
When closing the hood, take extra
care to prevent y our fingers etc.
from being caught.
NOTICE
■When closing the hood
Be sure to return the support rod
to its clip before closing the hood.
Closing the hood without return-
ing the support rod properly could
cause the hood to bend.
Page 451 of 601
4506-3. Do-it-yourself maintenance
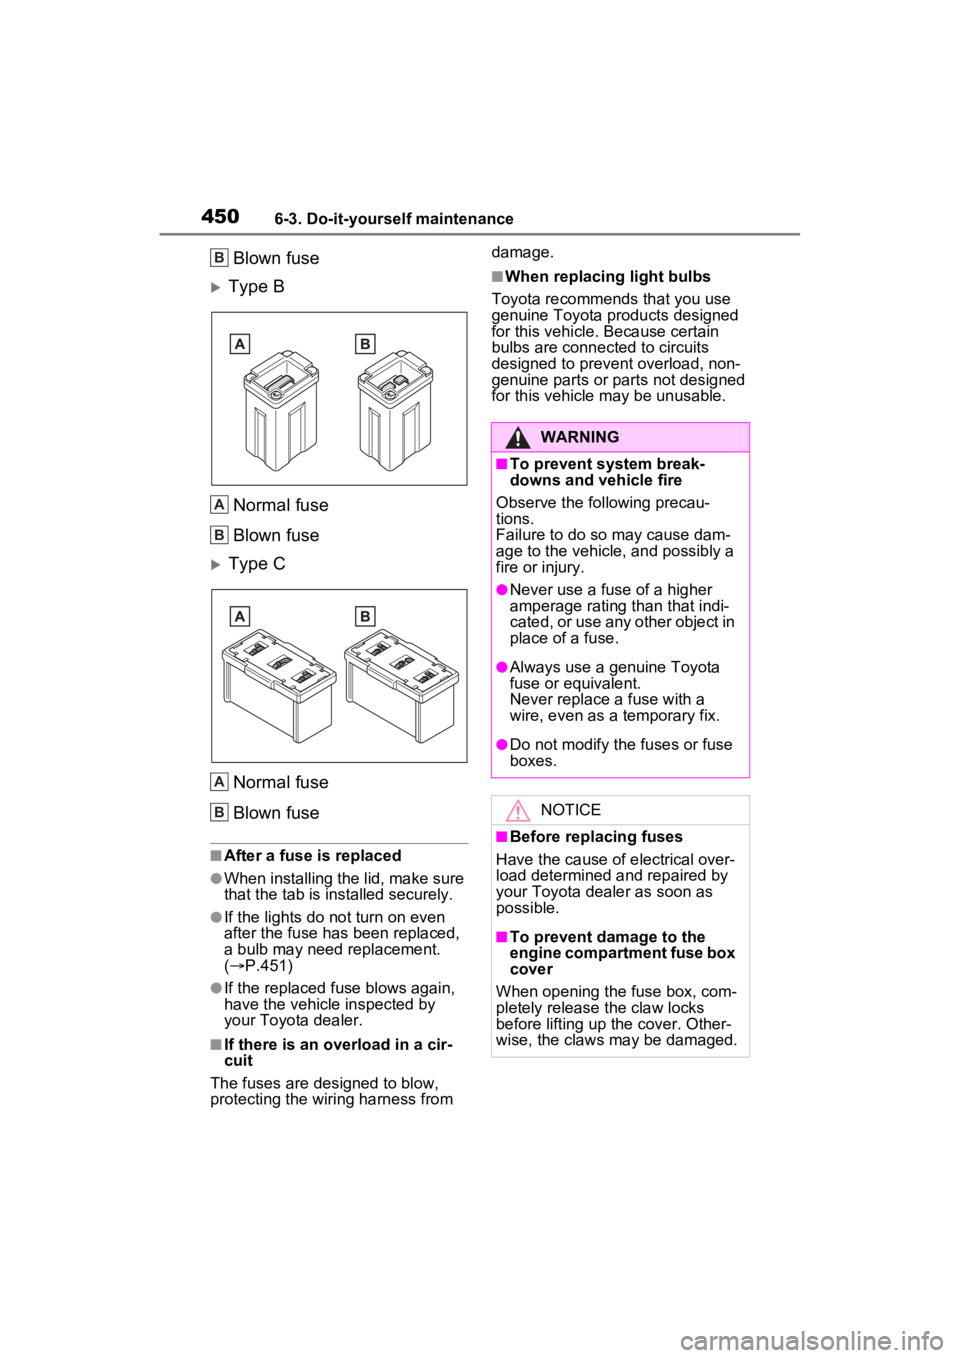
Blown fuse
Type B
Normal fuse
Blown fuse
Type CNormal fuse
Blown fuse
■After a fuse is replaced
●When installing the lid, make sure
that the tab is installed securely.
●If the lights do n ot turn on even
after the fuse has been replaced,
a bulb may need replacement.
( P.451)
●If the replaced fuse blows again,
have the vehicle inspected by
your Toyota dealer.
■If there is an overload in a cir-
cuit
The fuses are designed to blow,
protecting the wiring harness from damage.
■When replacing light bulbs
Toyota recommends that you use
genuine Toyota products designed
for this vehicle. Because certain
bulbs are connected to circuits
designed to prevent overload, non-
genuine parts or parts not designed
for this vehicle may be unusable.
B
A
B
A
B
WARNING
■To prevent system break-
downs and vehicle fire
Observe the following precau-
tions.
Failure to do so may cause dam-
age to the vehicle, and possibly a
fire or injury.
●Never use a fuse of a higher
amperage rating than that indi-
cated, or use any other object in
place of a fuse.
●Always use a genuine Toyota
fuse or equivalent.
Never replace a fuse with a
wire, even as a temporary fix.
●Do not modify the fuses or fuse
boxes.
NOTICE
■Before replacing fuses
Have the cause of electrical over-
load determined and repaired by
your Toyota dealer as soon as
possible.
■To prevent damage to the
engine compartment fuse box
cover
When opening the fuse box, com-
pletely release the claw locks
before lifting up the cover. Other-
wise, the claws may be damaged.
Page 453 of 601
4526-3. Do-it-yourself maintenance
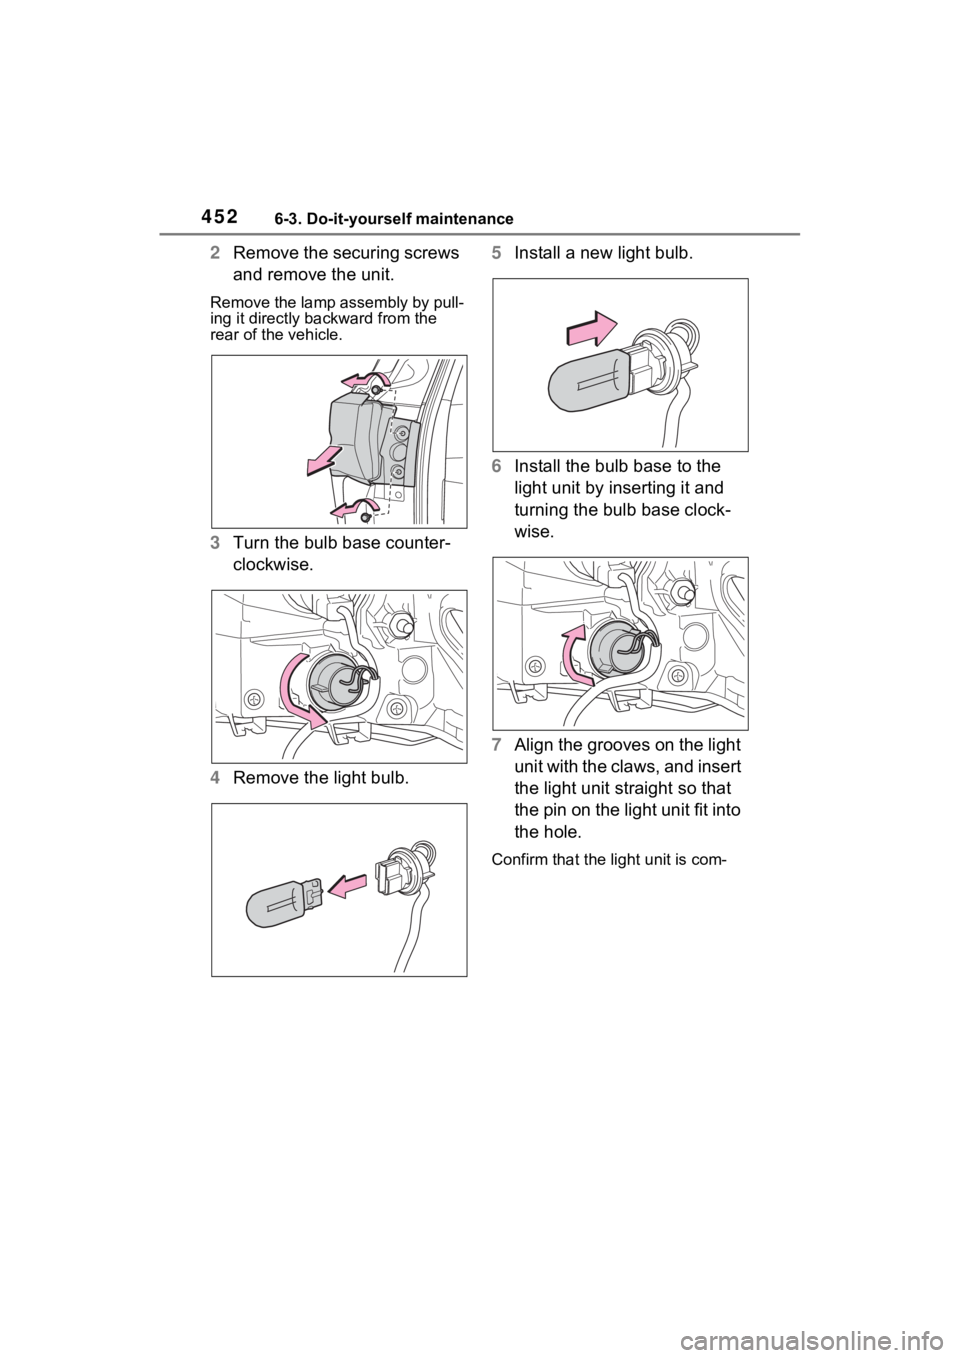
2Remove the securing screws
and remove the unit.
Remove the lamp assembly by pull-
ing it directly backward from the
rear of the vehicle.
3Turn the bulb base counter-
clockwise.
4 Remove the light bulb. 5
Install a new light bulb.
6 Install the bulb base to the
light unit by inserting it and
turning the bulb base clock-
wise.
7 Align the grooves on the light
unit with the claws, and insert
the light unit straight so that
the pin on the light unit fit into
the hole.
Confirm that the light unit is com-
Page 454 of 601
4536-3. Do-it-yourself maintenance
6
Maintenance and care
pletely secured.
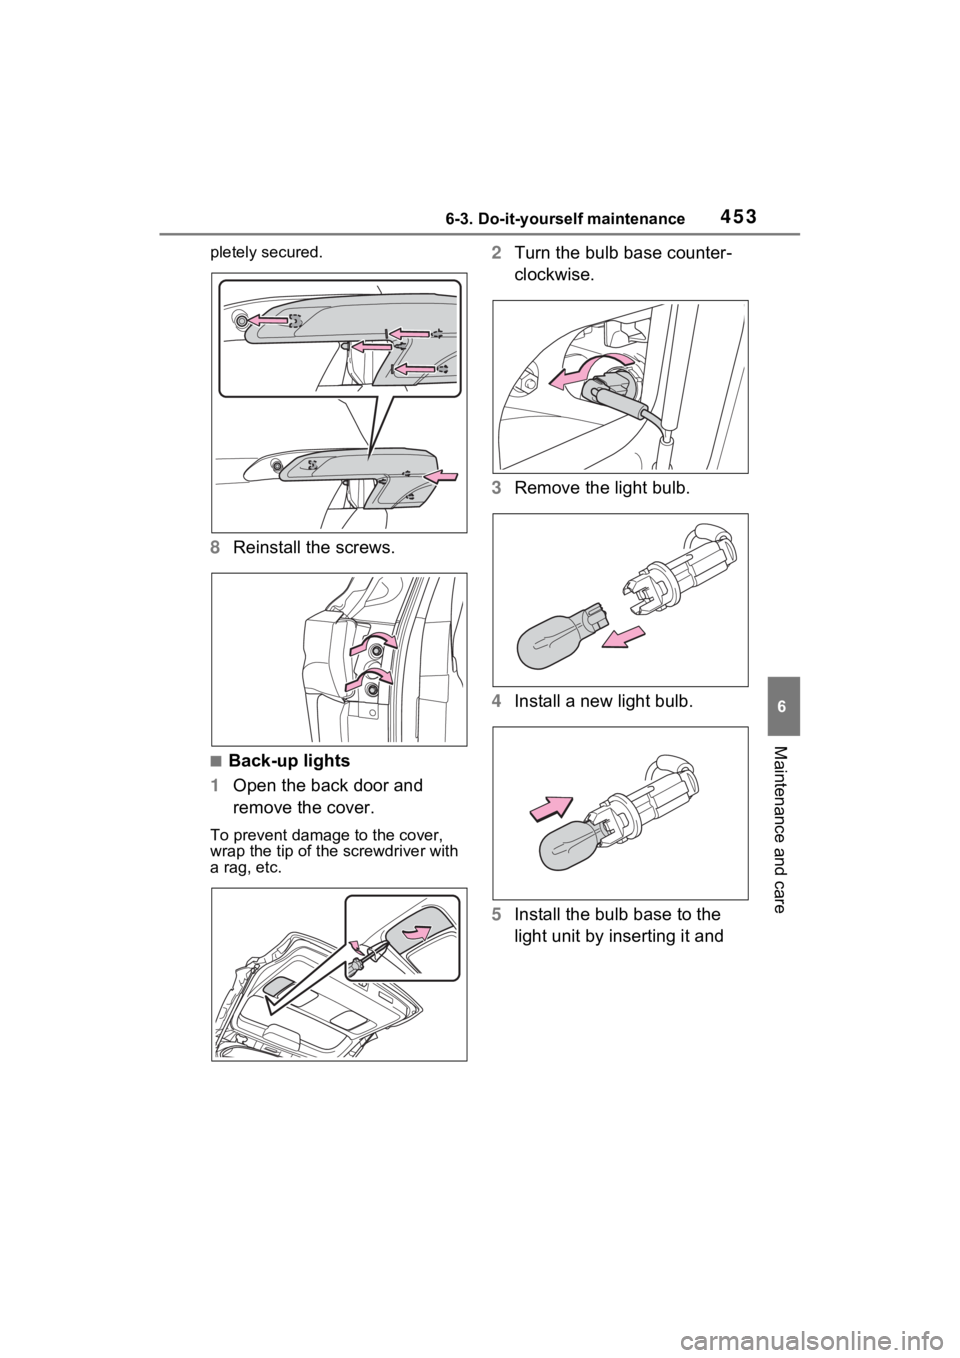
8Reinstall the screws.
■Back-up lights
1 Open the back door and
remove the cover.
To prevent damag e to the cover,
wrap the tip of the screwdriver with
a rag, etc.
2 Turn the bulb base counter-
clockwise.
3 Remove the light bulb.
4 Install a new light bulb.
5 Install the bulb base to the
light unit by inserting it and
Page 456 of 601
4556-3. Do-it-yourself maintenance
6
Maintenance and care
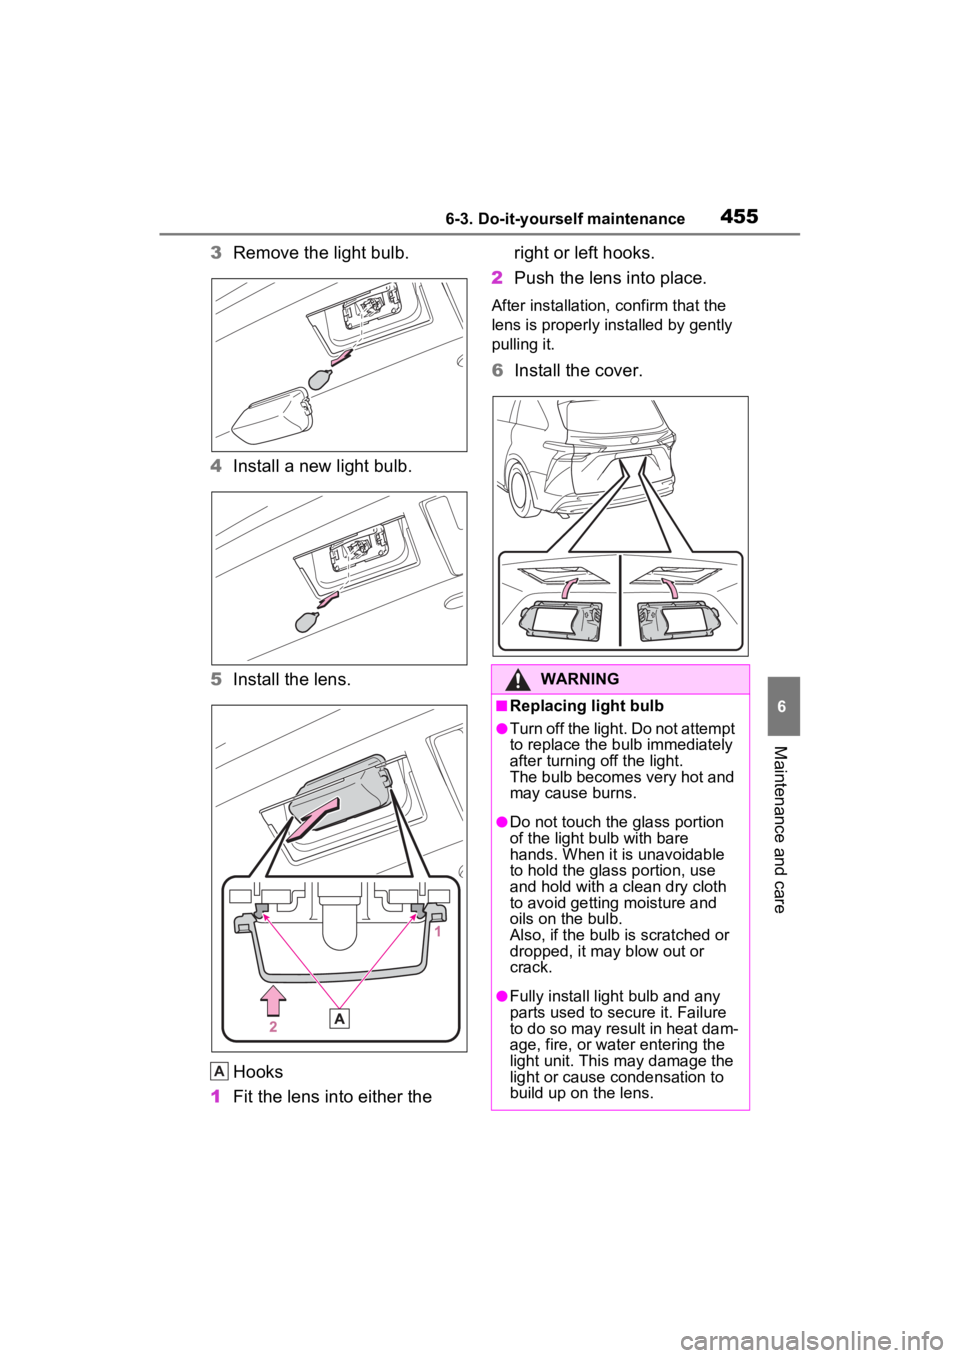
3Remove the light bulb.
4 Install a new light bulb.
5 Install the lens.
Hooks
1 Fit the lens into either the right or left hooks.
2 Push the lens into place.
After installation, confirm that the
lens is properly installed by gently
pulling it.
6Install the cover.
A
WARNING
■Replacing light bulb
●Turn off the light. Do not attempt
to replace the bu lb immediately
after turning off the light.
The bulb becomes very hot and
may cause burns.
●Do not touch the glass portion
of the light bulb with bare
hands. When it is unavoidable
to hold the glass portion, use
and hold with a clean dry cloth
to avoid getting moisture and
oils on the bulb.
Also, if the bulb is scratched or
dropped, it may blow out or
crack.
●Fully install light bulb and any
parts used to secure it. Failure
to do so may result in heat dam-
age, fire, or water entering the
light unit. This may damage the
light or cause condensation to
build up on the lens.
Page 460 of 601
4597-1. Essential information
7
When trouble arises
1Steadily step on the brake
pedal with both feet and
firmly depress it.
Do not pump the brake pedal
repeatedly as this will increase the
effort required to slow the vehicle.
2Shift the shift lever to N.
If the shift lever is shifted to N
3 After slowing down, stop the
vehicle in a safe place by the
road.
4 Stop the hybrid system.
If the shift lever cannot be
shifted to N
3 Keep depressing the brake
pedal with both feet to reduce
vehicle speed as much as
possible.
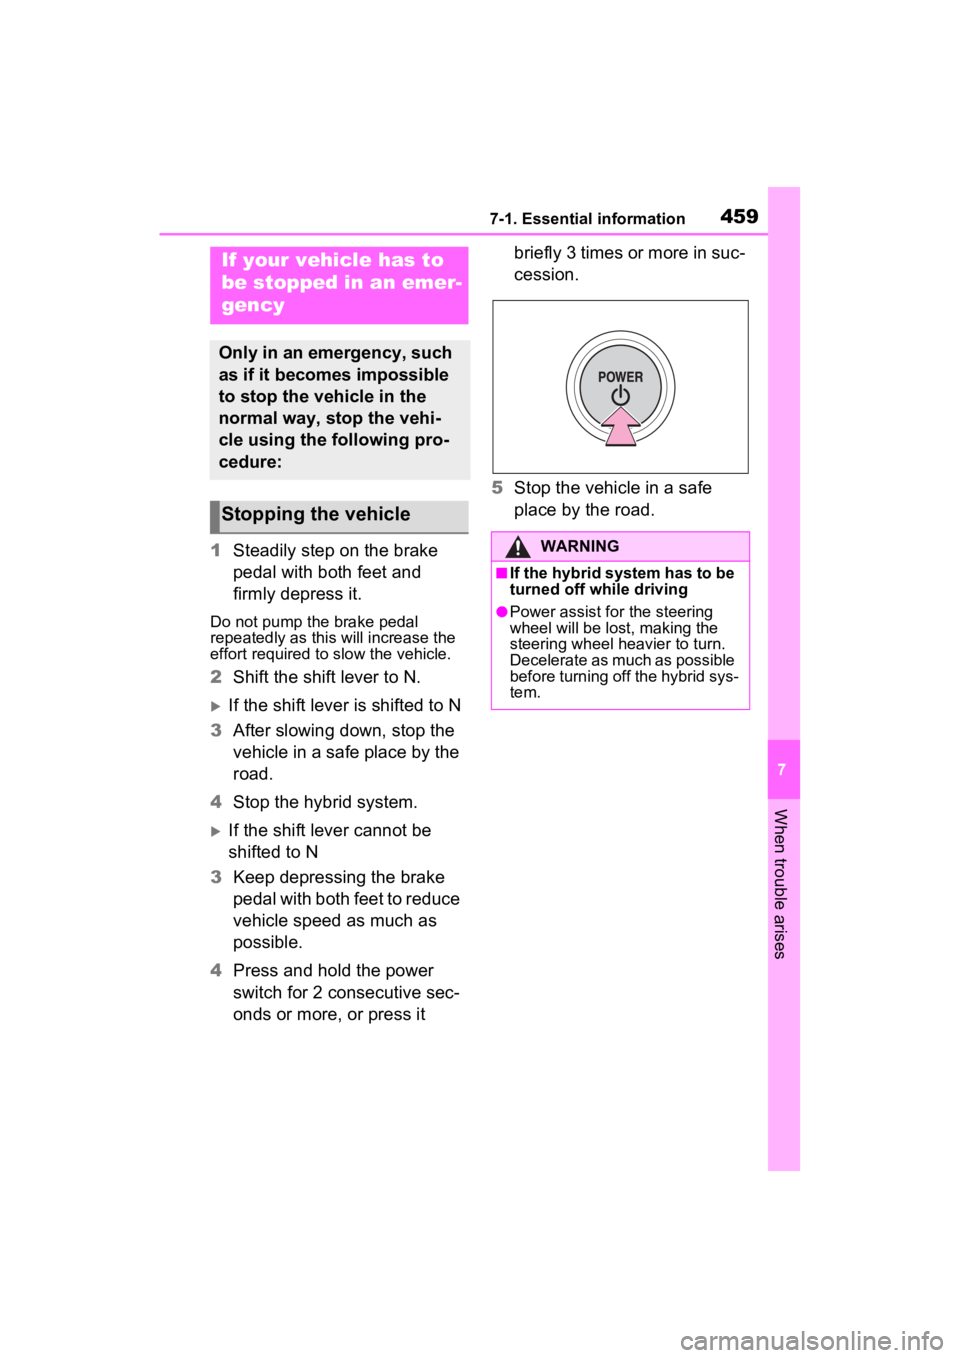
4 Press and hold the power
switch for 2 consecutive sec-
onds or more, or press it briefly 3 times or more in suc-
cession.
5 Stop the vehicle in a safe
place by the road.
If your vehicle has to
be stopped in an emer-
gency
Only in an emergency, such
as if it becomes impossible
to stop the vehicle in the
normal way, stop the vehi-
cle using the following pro-
cedure:
Stopping the vehicle
WARNING
■If the hybrid system has to be
turned off while driving
●Power assist for the steering
wheel will be lost, making the
steering wheel heavier to turn.
Decelerate as much as possible
before turning off the hybrid sys-
tem.