TOYOTA SUPRA 1986 Service Repair Manual
Manufacturer: TOYOTA, Model Year: 1986, Model line: SUPRA, Model: TOYOTA SUPRA 1986Pages: 878, PDF Size: 20 MB
Page 431 of 878
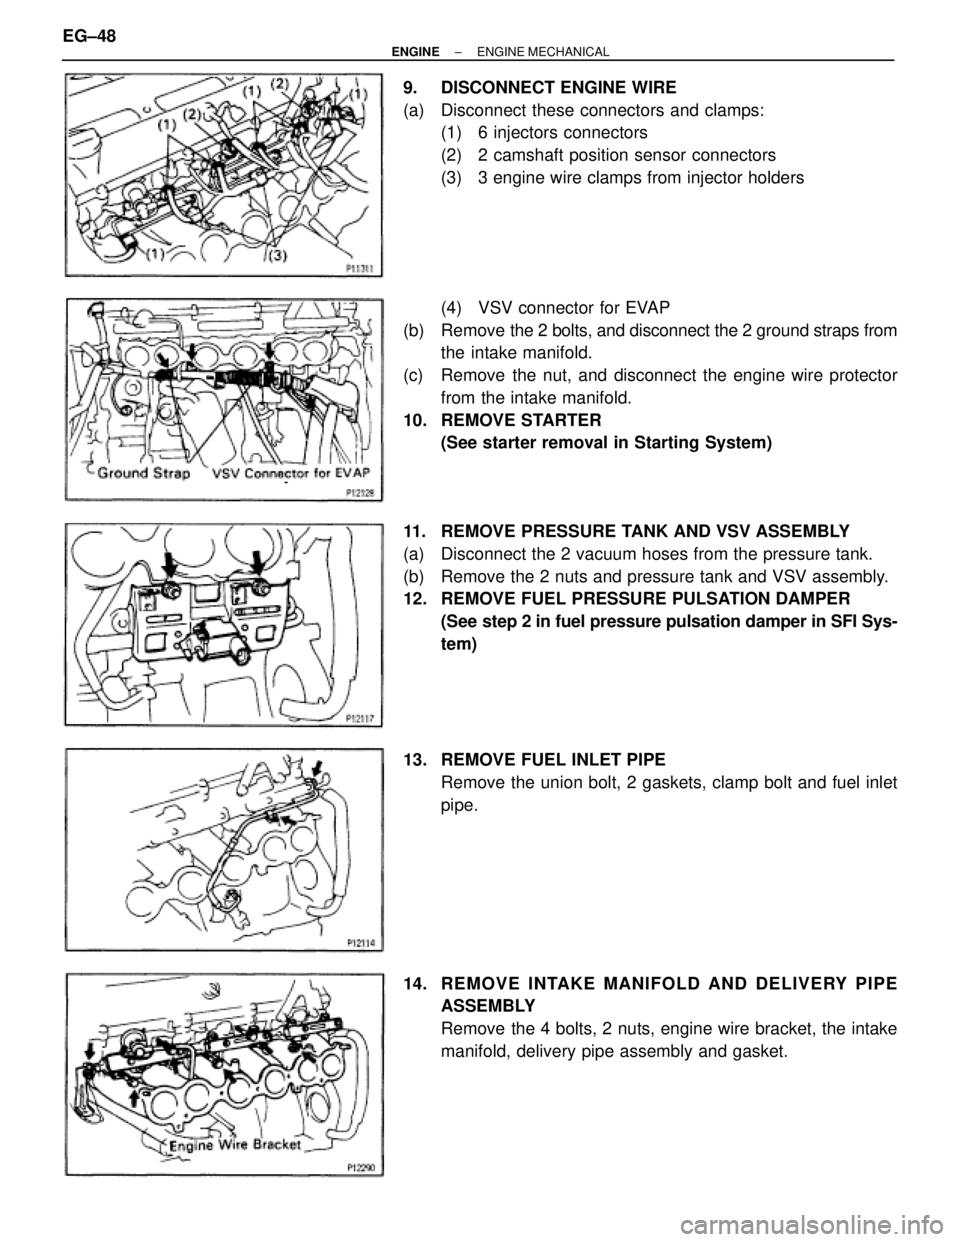
9. DISCONNECT ENGINE WIRE
(a) Disconnect these connectors and clamps:
(1) 6 injectors connectors
(2) 2 camshaft position sensor connectors
(3) 3 engine wire clamps from injector holders
(4) VSV connector for EVAP
(b) Remove the 2 bolts, and disconnect the 2 ground straps from
the intake manifold.
(c) Remove the nut, and disconnect the engine wire protector
from the intake manifold.
10. REMOVE STARTER
(See starter removal in Starting System)
11. REMOVE PRESSURE TANK AND VSV ASSEMBLY
(a) Disconnect the 2 vacuum hoses from the pressure tank.
(b) Remove the 2 nuts and pressure tank and VSV assembly.
12. REMOVE FUEL PRESSURE PULSATION DAMPER
(See step 2 in fuel pressure pulsation damper in SFI Sys-
tem)
13. REMOVE FUEL INLET PIPE
Remove the union bolt, 2 gaskets, clamp bolt and fuel inlet
pipe.
14. RE MO V E INTAKE MANIFO LD AND DE LIV E RY PIP E
ASSEMBLY
Remove the 4 bolts, 2 nuts, engine wire bracket, the intake
manifold, delivery pipe assembly and gasket. EG±48
± ENGINEENGINE MECHANICAL
Page 432 of 878
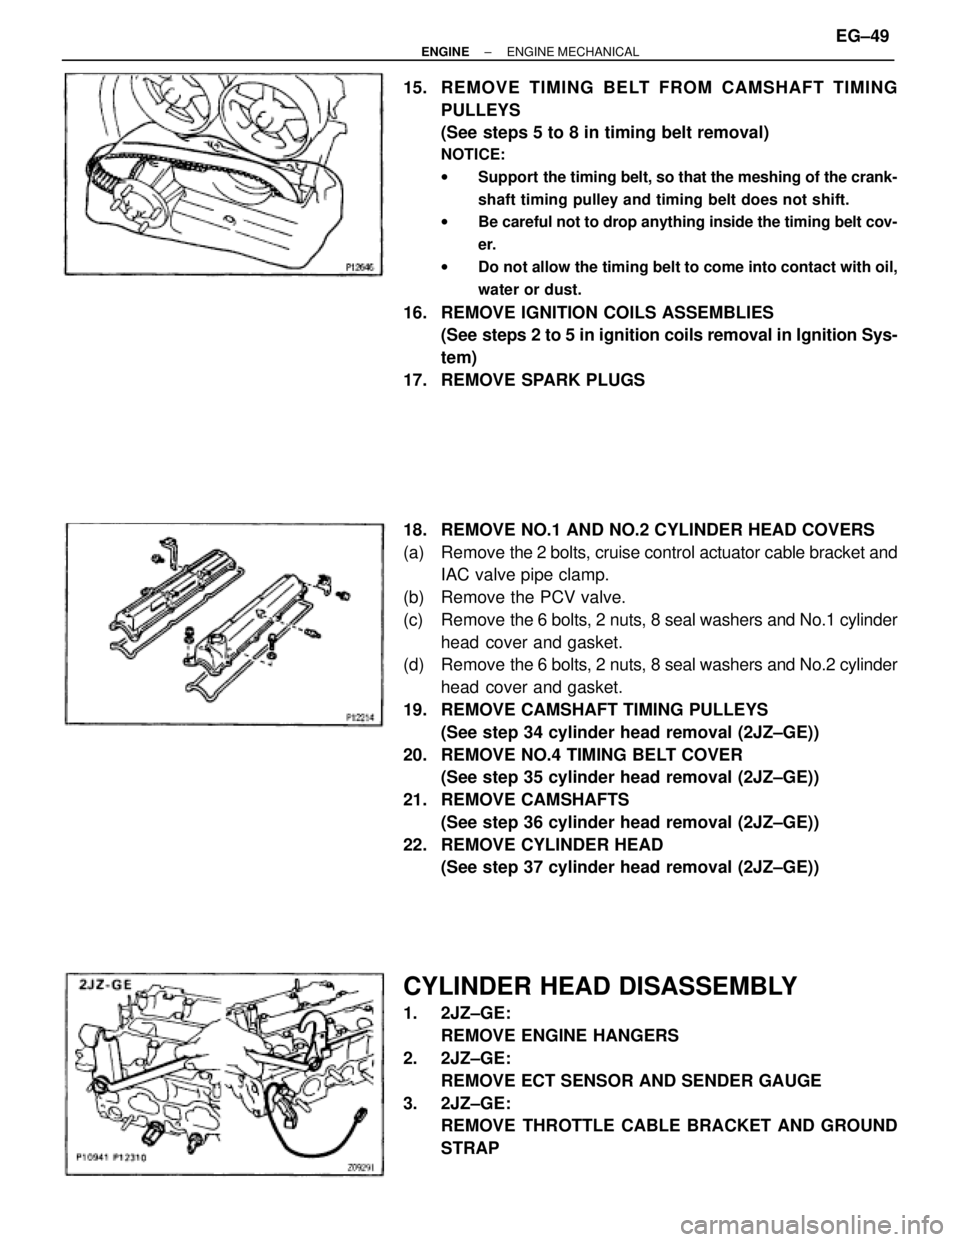
15. REMOVE TIMING BELT FROM CAMSHAFT TIMING
PULLEYS
(See steps 5 to 8 in timing belt removal)
NOTICE:
wSupport the timing belt, so that the meshing of the crank-
shaft timing pulley and timing belt does not shift.
wBe careful not to drop anything inside the timing belt cov-
er.
wDo not allow the timing belt to come into contact with oil,
water or dust.
16. REMOVE IGNITION COILS ASSEMBLIES
(See steps 2 to 5 in ignition coils removal in Ignition Sys-
tem)
17. REMOVE SPARK PLUGS
18. REMOVE NO.1 AND NO.2 CYLINDER HEAD COVERS
(a) Remove the 2 bolts, cruise control actuator cable bracket and
IAC valve pipe clamp.
(b) Remove the PCV valve.
(c) Remove the 6 bolts, 2 nuts, 8 seal washers and No.1 cylinder
head cover and gasket.
(d) Remove the 6 bolts, 2 nuts, 8 seal washers and No.2 cylinder
head cover and gasket.
19. REMOVE CAMSHAFT TIMING PULLEYS
(See step 34 cylinder head removal (2JZ±GE))
20. REMOVE NO.4 TIMING BELT COVER
(See step 35 cylinder head removal (2JZ±GE))
21. REMOVE CAMSHAFTS
(See step 36 cylinder head removal (2JZ±GE))
22. REMOVE CYLINDER HEAD
(See step 37 cylinder head removal (2JZ±GE))
CYLINDER HEAD DISASSEMBLY
1. 2JZ±GE:
REMOVE ENGINE HANGERS
2. 2JZ±GE:
REMOVE ECT SENSOR AND SENDER GAUGE
3. 2JZ±GE:
REMOVE THROTTLE CABLE BRACKET AND GROUND
STRAP
± ENGINEENGINE MECHANICALEG±49
Page 433 of 878
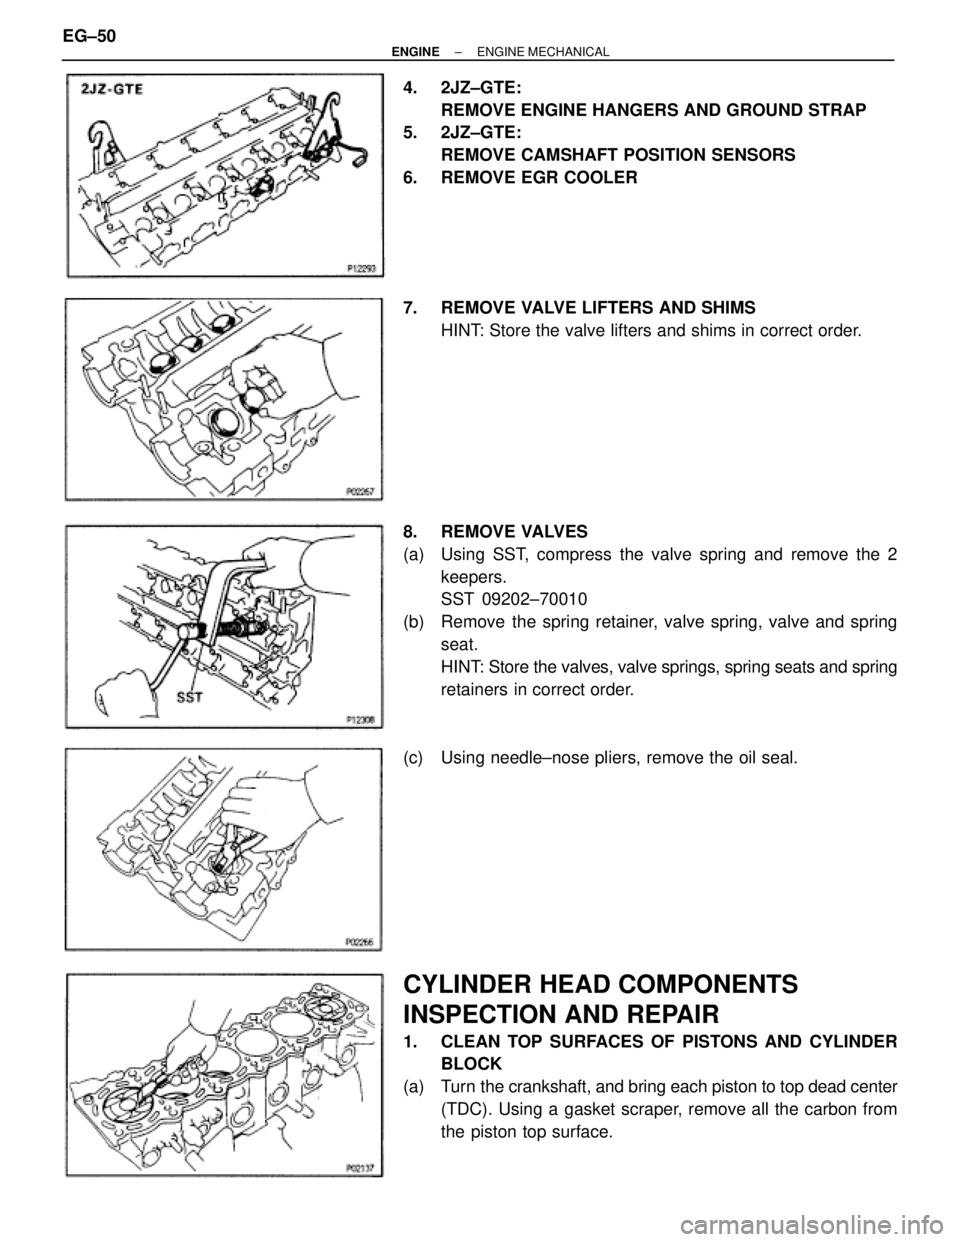
4. 2JZ±GTE:
REMOVE ENGINE HANGERS AND GROUND STRAP
5. 2JZ±GTE:
REMOVE CAMSHAFT POSITION SENSORS
6. REMOVE EGR COOLER
7. REMOVE VALVE LIFTERS AND SHIMS
HINT: Store the valve lifters and shims in correct order.
8. REMOVE VALVES
(a) Using SST, compress the valve spring and remove the 2
keepers.
SST 09202±70010
(b) Remove the spring retainer, valve spring, valve and spring
seat.
HINT: Store the valves, valve springs, spring seats and spring
retainers in correct order.
(c) Using needle±nose pliers, remove the oil seal.
CYLINDER HEAD COMPONENTS
INSPECTION AND REPAIR
1. CLEAN TOP SURFACES OF PISTONS AND CYLINDER
BLOCK
(a) Turn the crankshaft, and bring each piston to top dead center
(TDC). Using a gasket scraper, remove all the carbon from
the piston top surface. EG±50
± ENGINEENGINE MECHANICAL
Page 434 of 878
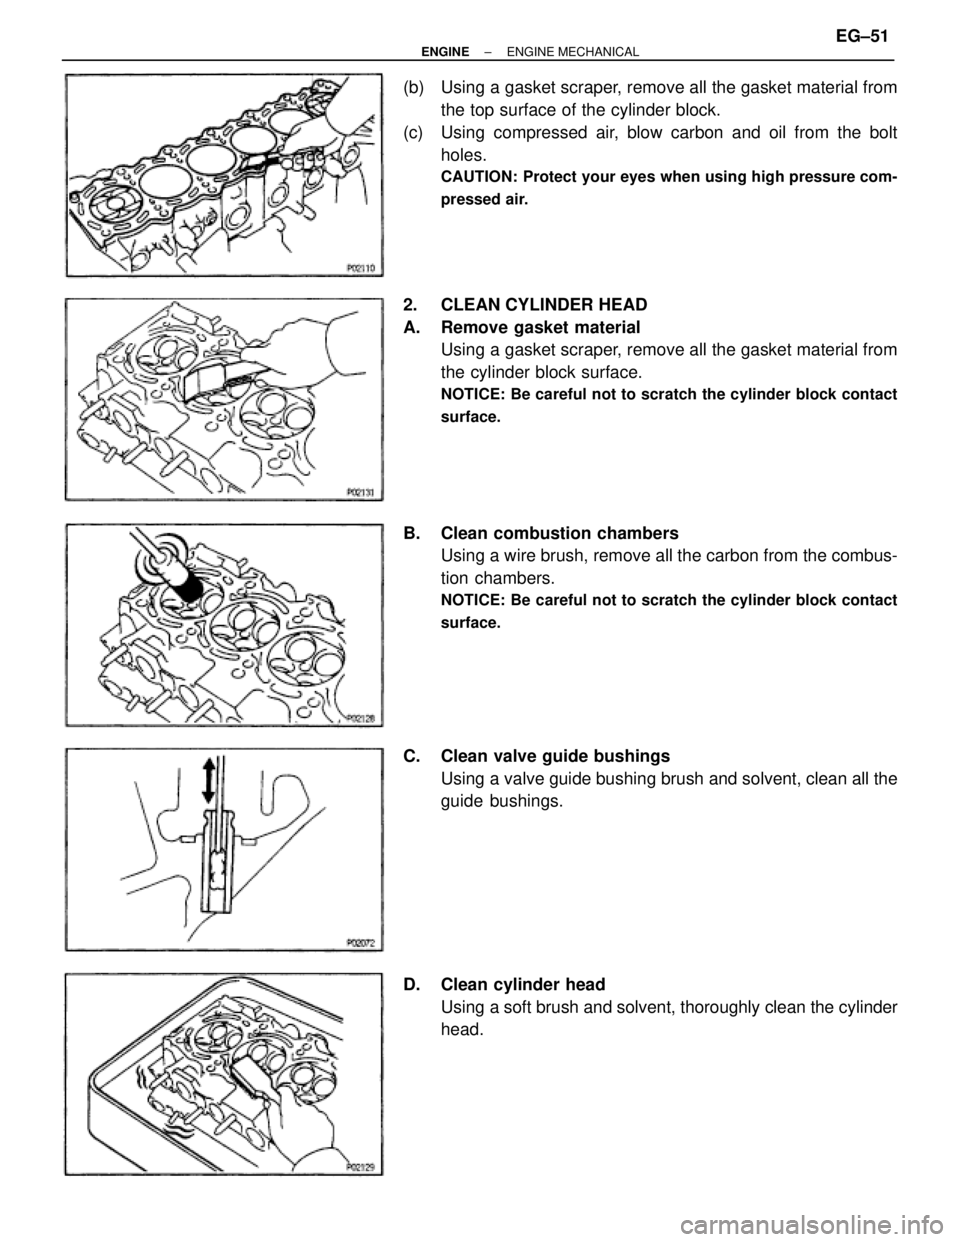
(b) Using a gasket scraper, remove all the gasket material from
the top surface of the cylinder block.
(c) Using compressed air, blow carbon and oil from the bolt
holes.
CAUTION: Protect your eyes when using high pressure com-
pressed air.
2. CLEAN CYLINDER HEAD
A. Remove gasket material
Using a gasket scraper, remove all the gasket material from
the cylinder block surface.
NOTICE: Be careful not to scratch the cylinder block contact
surface.
B. Clean combustion chambers
Using a wire brush, remove all the carbon from the combus-
tion chambers.
NOTICE: Be careful not to scratch the cylinder block contact
surface.
C. Clean valve guide bushings
Using a valve guide bushing brush and solvent, clean all the
guide bushings.
D. Clean cylinder head
Using a soft brush and solvent, thoroughly clean the cylinder
head.
± ENGINEENGINE MECHANICALEG±51
Page 435 of 878
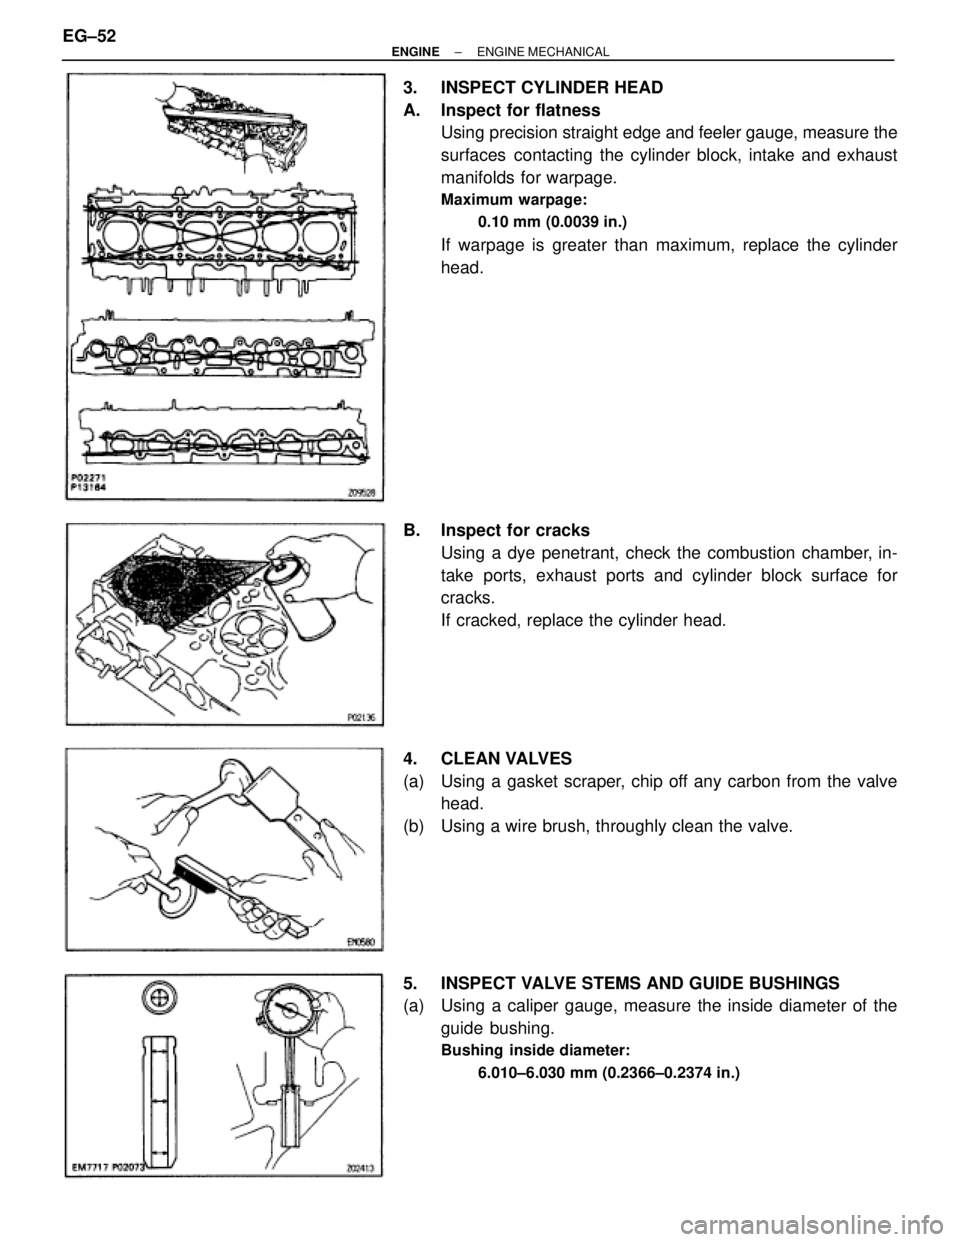
3. INSPECT CYLINDER HEAD
A. Inspect for flatness
Using precision straight edge and feeler gauge, measure the
surfaces contacting the cylinder block, intake and exhaust
manifolds for warpage.
Maximum warpage:
0.10 mm (0.0039 in.)
If warpage is greater than maximum, replace the cylinder
head.
B. Inspect for cracks
Using a dye penetrant, check the combustion chamber, in-
take ports, exhaust ports and cylinder block surface for
cracks.
If cracked, replace the cylinder head.
4. CLEAN VALVES
(a) Using a gasket scraper, chip off any carbon from the valve
head.
(b) Using a wire brush, throughly clean the valve.
5. INSPECT VALVE STEMS AND GUIDE BUSHINGS
(a) Using a caliper gauge, measure the inside diameter of the
guide bushing.
Bushing inside diameter:
6.010±6.030 mm (0.2366±0.2374 in.)
EG±52± ENGINEENGINE MECHANICAL
Page 436 of 878
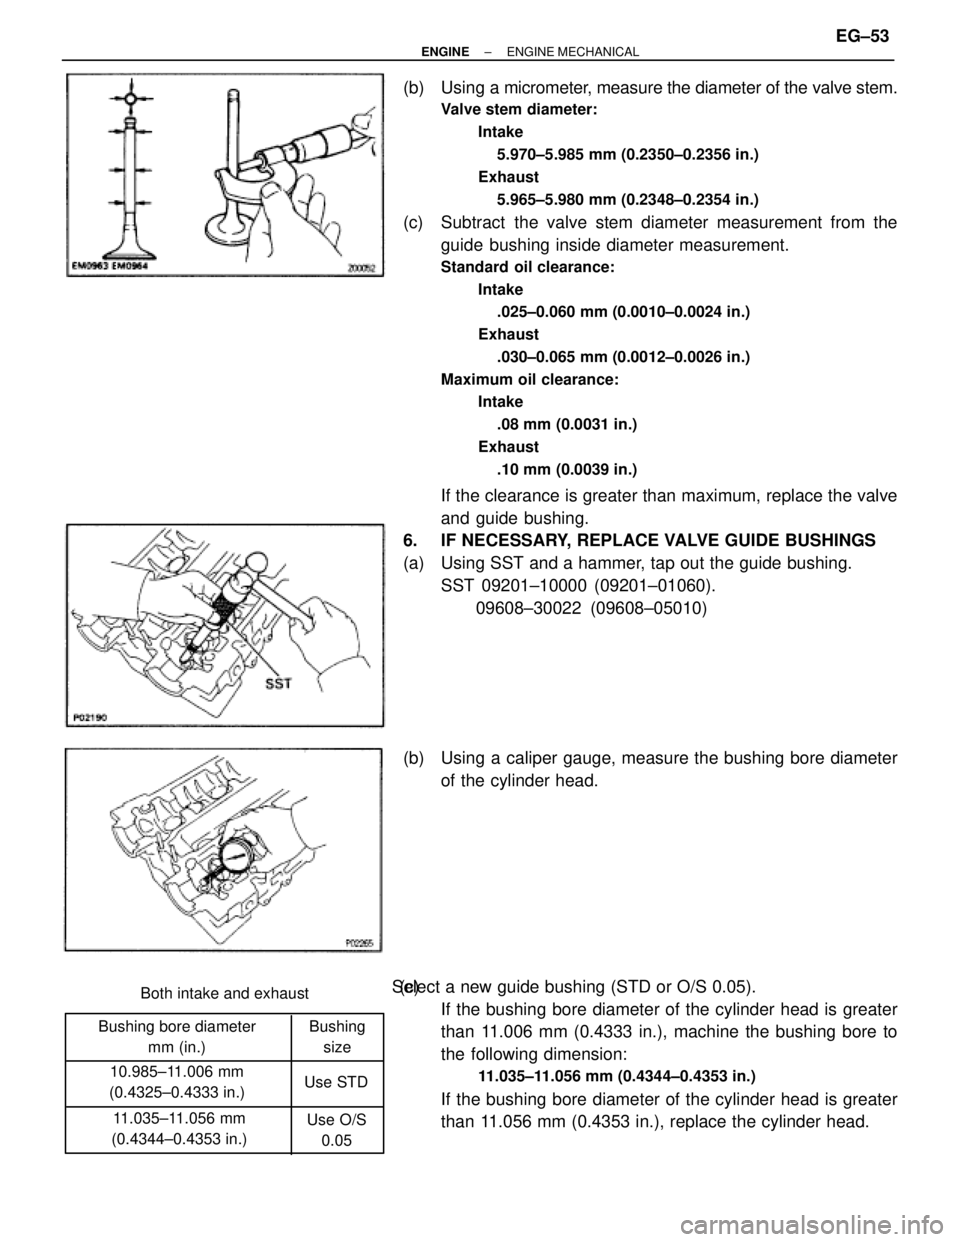
Bushing bore diameter
mm (in.)
10.985±11.006 mm
(0.4325±0.4333 in.)Both intake and exhaust
11.035±11.056 mm
(0.4344±0.4353 in.)Bushing
size
Use STD
Use O/S
0.05
(b) Using a micrometer, measure the diameter of the valve stem.
Valve stem diameter:
Intake
5.970±5.985 mm (0.2350±0.2356 in.)
Exhaust
5.965±5.980 mm (0.2348±0.2354 in.)
(c) Subtract the valve stem diameter measurement from the
guide bushing inside diameter measurement.
Standard oil clearance:
Intake
.025±0.060 mm (0.0010±0.0024 in.)
Exhaust
.030±0.065 mm (0.0012±0.0026 in.)
Maximum oil clearance:
Intake
.08 mm (0.0031 in.)
Exhaust
.10 mm (0.0039 in.)
If the clearance is greater than maximum, replace the valve
and guide bushing.
6. IF NECESSARY, REPLACE VALVE GUIDE BUSHINGS
(a) Using SST and a hammer, tap out the guide bushing.
SST 09201±10000 (09201±01060).
09608±30022 (09608±05010)
(b) Using a caliper gauge, measure the bushing bore diameter
of the cylinder head.
(c) Select a new guide bushing (STD or O/S 0.05).
If the bushing bore diameter of the cylinder head is greater
than 11.006 mm (0.4333 in.), machine the bushing bore to
the following dimension:
11.035±11.056 mm (0.4344±0.4353 in.)
If the bushing bore diameter of the cylinder head is greater
than 11.056 mm (0.4353 in.), replace the cylinder head.
± ENGINEENGINE MECHANICALEG±53
Page 437 of 878
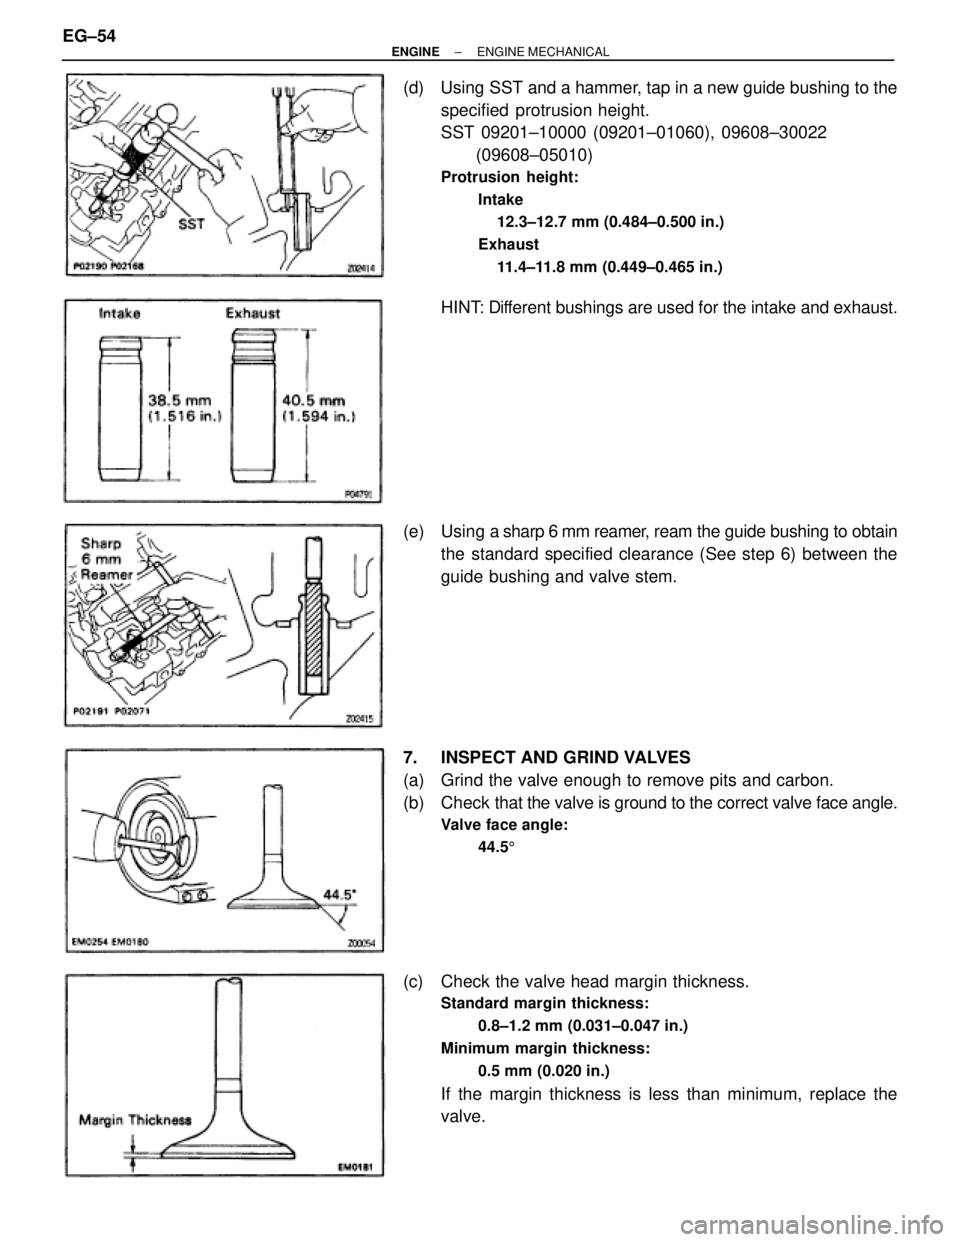
(d) Using SST and a hammer, tap in a new guide bushing to the
specified protrusion height.
SST 09201±10000 (09201±01060), 09608±30022
(09608±05010)
Protrusion height:
Intake
12.3±12.7 mm (0.484±0.500 in.)
Exhaust
11.4±11.8 mm (0.449±0.465 in.)
HINT: Different bushings are used for the intake and exhaust.
(e) Using a sharp 6 mm reamer, ream the guide bushing to obtain
the standard specified clearance (See step 6) between the
guide bushing and valve stem.
7. INSPECT AND GRIND VALVES
(a) Grind the valve enough to remove pits and carbon.
(b) Check that the valve is ground to the correct valve face angle.
Valve face angle:
44.55
(c) Check the valve head margin thickness.
Standard margin thickness:
0.8±1.2 mm (0.031±0.047 in.)
Minimum margin thickness:
0.5 mm (0.020 in.)
If the margin thickness is less than minimum, replace the
valve. EG±54
± ENGINEENGINE MECHANICAL
Page 438 of 878
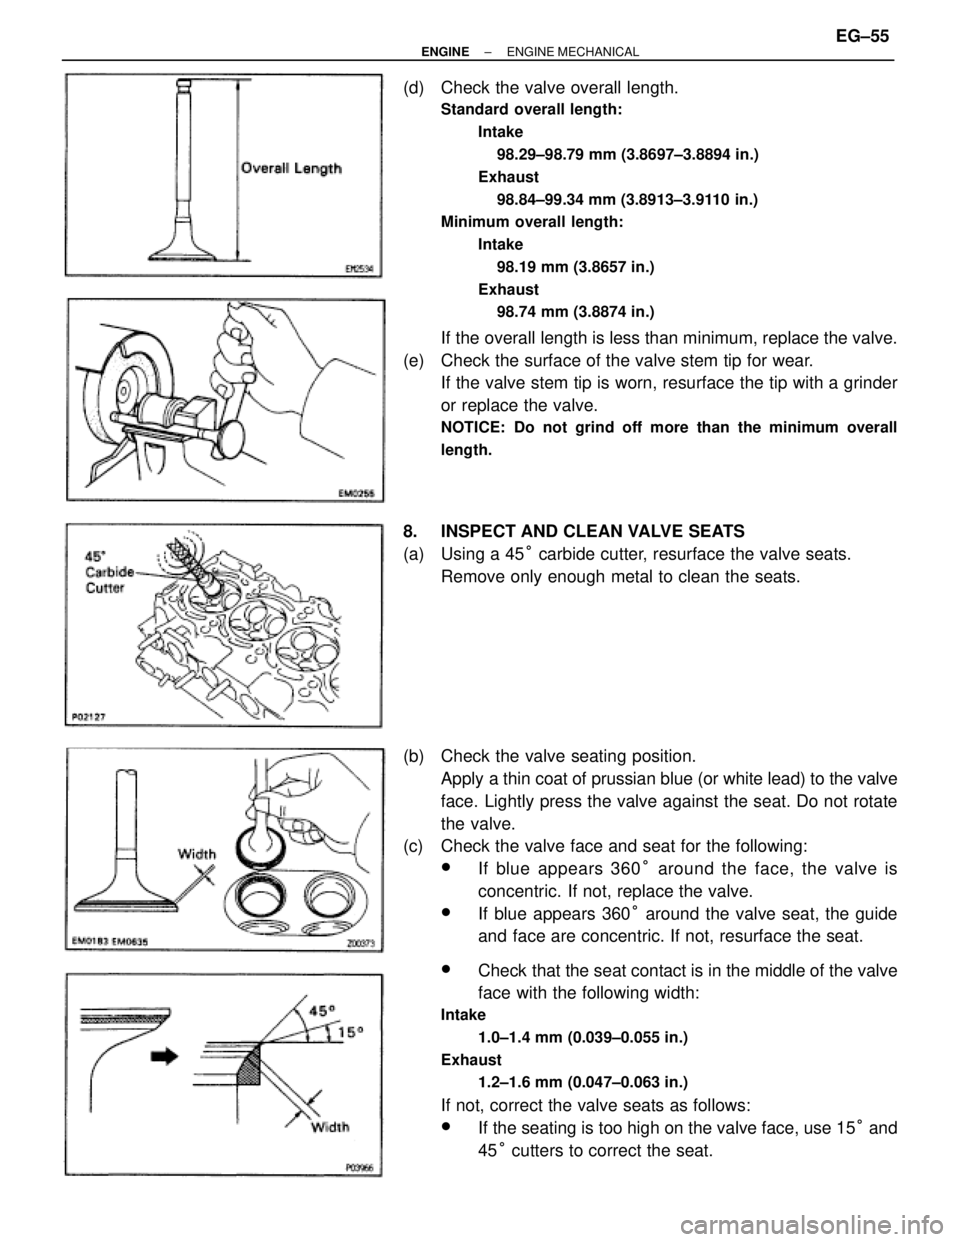
(d) Check the valve overall length.
Standard overall length:
Intake
98.29±98.79 mm (3.8697±3.8894 in.)
Exhaust
98.84±99.34 mm (3.8913±3.9110 in.)
Minimum overall length:
Intake
98.19 mm (3.8657 in.)
Exhaust
98.74 mm (3.8874 in.)
If the overall length is less than minimum, replace the valve.
(e) Check the surface of the valve stem tip for wear.
If the valve stem tip is worn, resurface the tip with a grinder
or replace the valve.
NOTICE: Do not grind off more than the minimum overall
length.
8. INSPECT AND CLEAN VALVE SEATS
(a) Using a 45° carbide cutter, resurface the valve seats.
Remove only enough metal to clean the seats.
(b) Check the valve seating position.
Apply a thin coat of prussian blue (or white lead) to the valve
face. Lightly press the valve against the seat. Do not rotate
the valve.
(c) Check the valve face and seat for the following:
wIf blue appears 360° around the face, the valve is
concentric. If not, replace the valve.
wIf blue appears 360° around the valve seat, the guide
and face are concentric. If not, resurface the seat.
wCheck that the seat contact is in the middle of the valve
face with the following width:
Intake
1.0±1.4 mm (0.039±0.055 in.)
Exhaust
1.2±1.6 mm (0.047±0.063 in.)
If not, correct the valve seats as follows:
wIf the seating is too high on the valve face, use 15° and
45° cutters to correct the seat.
± ENGINEENGINE MECHANICALEG±55
Page 439 of 878
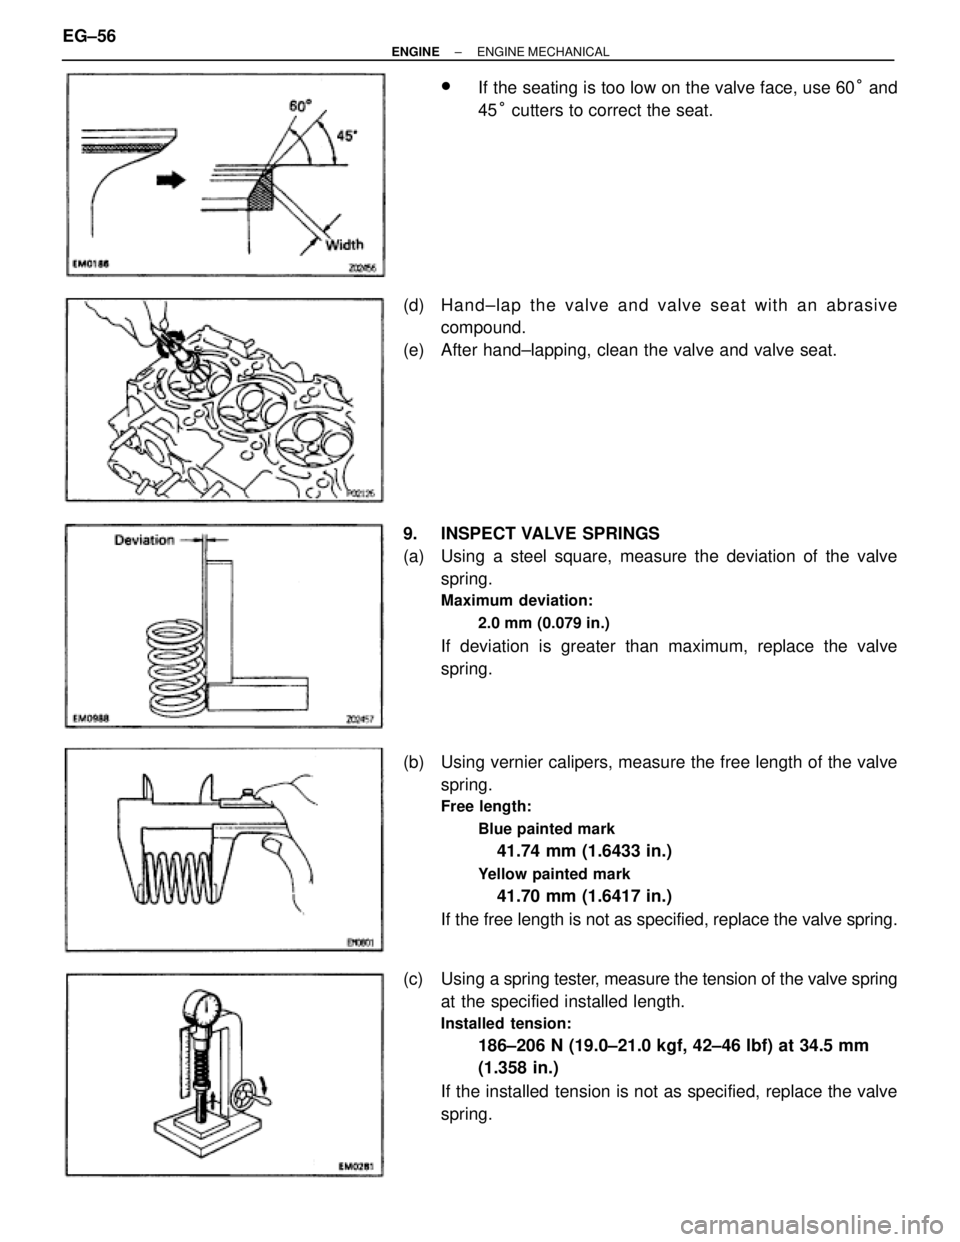
wIf the seating is too low on the valve face, use 60° and
45° cutters to correct the seat.
(d) Hand±lap the valve and valve seat with an abrasive
compound.
(e) After hand±lapping, clean the valve and valve seat.
9. INSPECT VALVE SPRINGS
(a) Using a steel square, measure the deviation of the valve
spring.
Maximum deviation:
2.0 mm (0.079 in.)
If deviation is greater than maximum, replace the valve
spring.
(b) Using vernier calipers, measure the free length of the valve
spring.
Free length:
Blue painted mark
41.74 mm (1.6433 in.)
Yellow painted mark
41.70 mm (1.6417 in.)
If the free length is not as specified, replace the valve spring.
(c) Using a spring tester, measure the tension of the valve spring
at the specified installed length.
Installed tension:
186±206 N (19.0±21.0 kgf, 42±46 lbf) at 34.5 mm
(1.358 in.)
If the installed tension is not as specified, replace the valve
spring. EG±56
± ENGINEENGINE MECHANICAL
Page 440 of 878
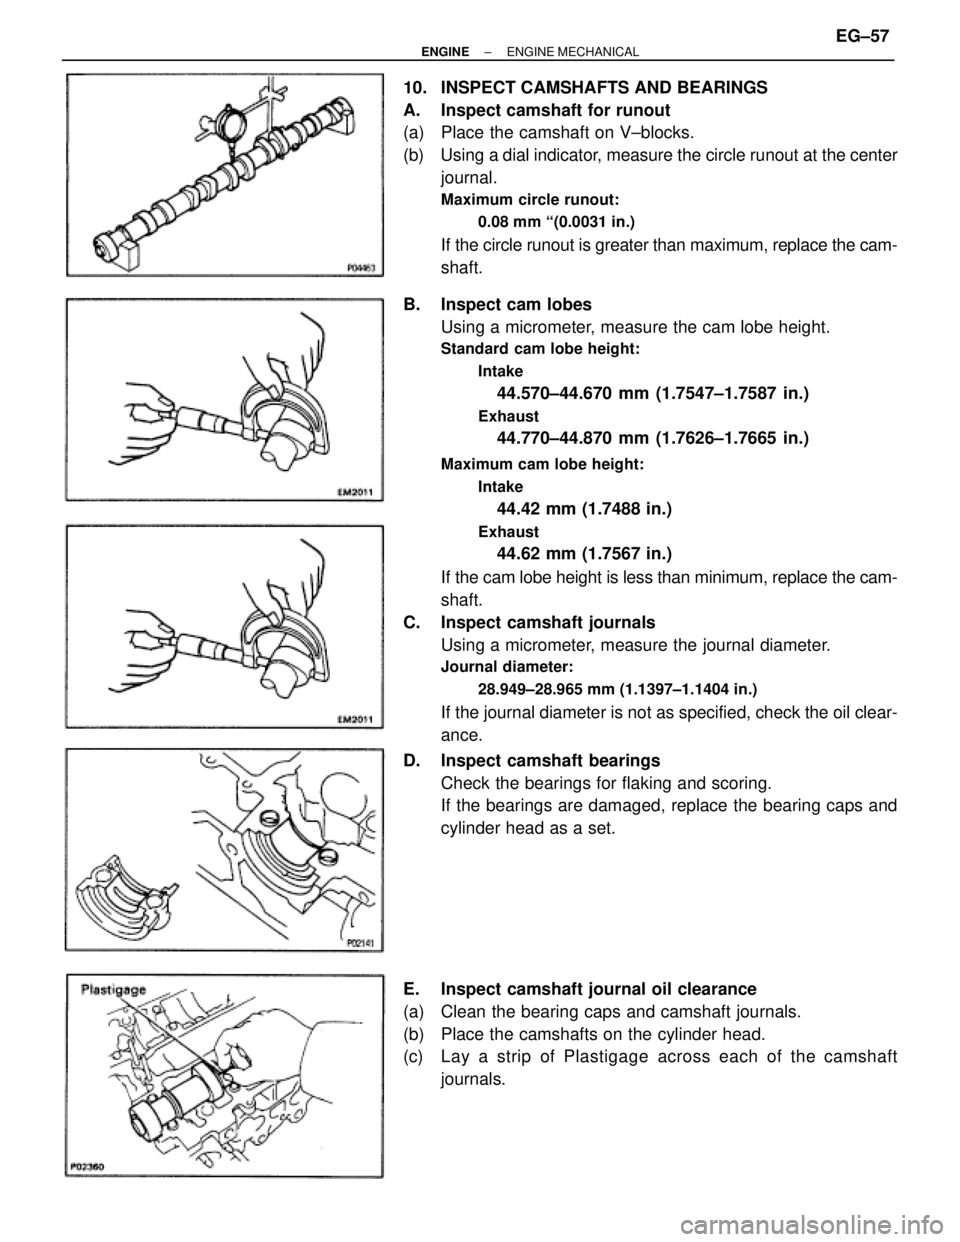
10. INSPECT CAMSHAFTS AND BEARINGS
A. Inspect camshaft for runout
(a) Place the camshaft on V±blocks.
(b) Using a dial indicator, measure the circle runout at the center
journal.
Maximum circle runout:
0.08 mm ª(0.0031 in.)
If the circle runout is greater than maximum, replace the cam-
shaft.
B. Inspect cam lobes
Using a micrometer, measure the cam lobe height.
Standard cam lobe height:
Intake
44.570±44.670 mm (1.7547±1.7587 in.)
Exhaust
44.770±44.870 mm (1.7626±1.7665 in.)
Maximum cam lobe height:
Intake
44.42 mm (1.7488 in.)
Exhaust
44.62 mm (1.7567 in.)
If the cam lobe height is less than minimum, replace the cam-
shaft.
C. Inspect camshaft journals
Using a micrometer, measure the journal diameter.
Journal diameter:
28.949±28.965 mm (1.1397±1.1404 in.)
If the journal diameter is not as specified, check the oil clear-
ance.
D. Inspect camshaft bearings
Check the bearings for flaking and scoring.
If the bearings are damaged, replace the bearing caps and
cylinder head as a set.
E. Inspect camshaft journal oil clearance
(a) Clean the bearing caps and camshaft journals.
(b) Place the camshafts on the cylinder head.
(c) Lay a strip of Plastigage across each of the camshaft
journals.
± ENGINEENGINE MECHANICALEG±57