seat memory TOYOTA SUPRA 2020 Owners Manual (in English)
[x] Cancel search | Manufacturer: TOYOTA, Model Year: 2020, Model line: SUPRA, Model: TOYOTA SUPRA 2020Pages: 356, PDF Size: 6.04 MB
Page 22 of 356
222-1. QUICK REFERENCE
Supra Owner's Manual
■Activating the voice activa-
tion system
1 Press the button on the
steering wheel.
2 Wait for the signal.
3 Say the command.
If no other commands are possi-
ble, operate the function via Toy-
ota Supra Command.
■Terminating the voice acti-
vation system 1
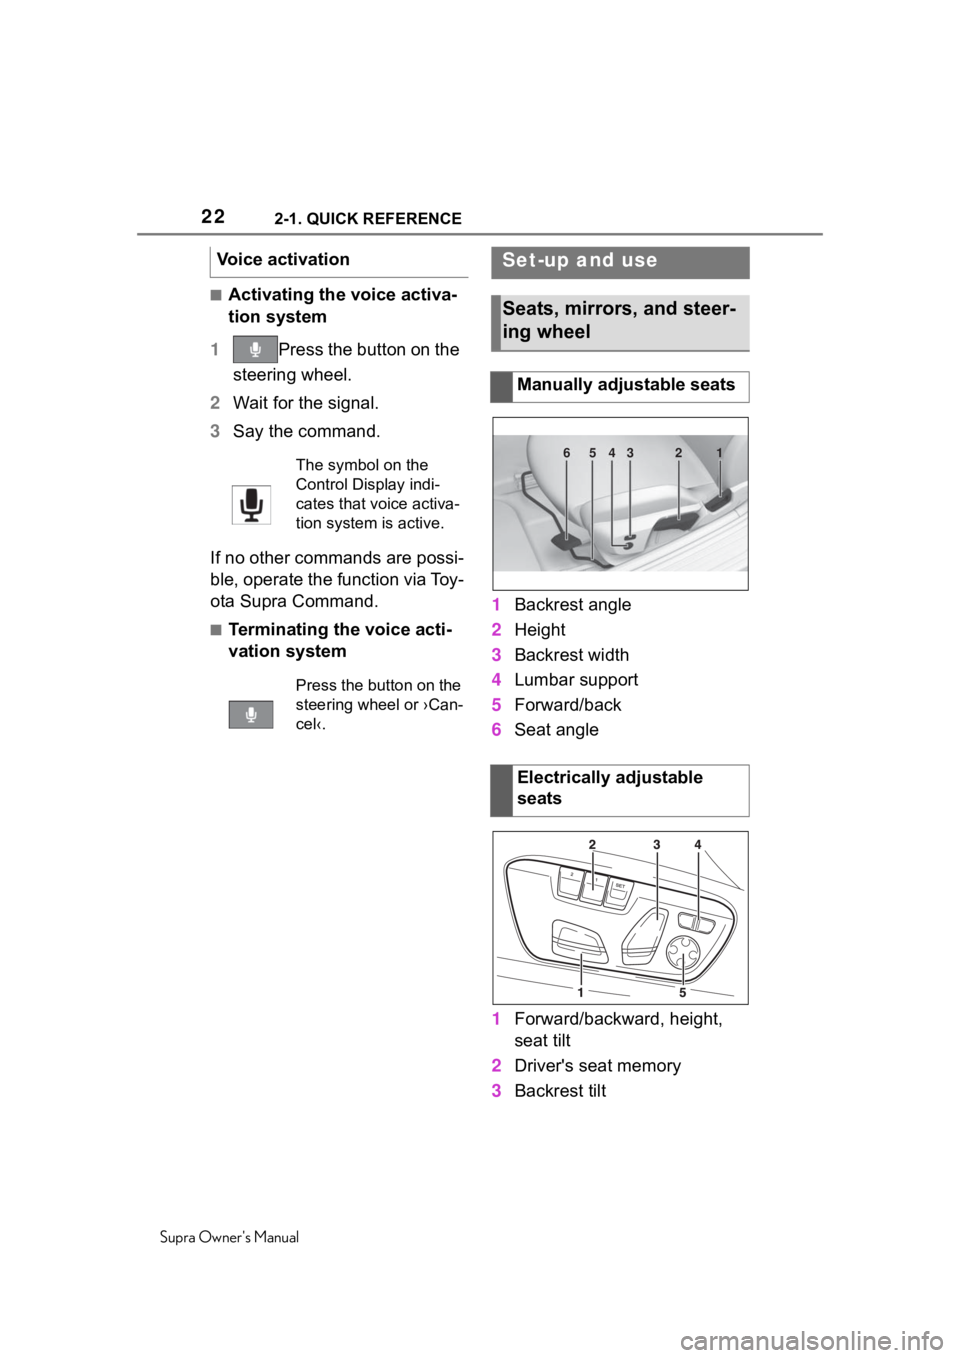
Backrest angle
2 Height
3 Backrest width
4 Lumbar support
5 Forward/back
6 Seat angle
1 Forward/backward, height,
seat tilt
2 Driver's seat memory
3 Backrest tilt
Voice activation
The symbol on the
Control Display indi-
cates that voice activa-
tion system is active.
Press the button on the
steering wheel or ›Can-
cel‹.
Set-up and use
Seats, mirrors, and steer-
ing wheel
Manually adjustable seats
Electrically adjustable
seats
654321
Page 23 of 356
232-1. QUICK REFERENCE
Supra Owner's Manual
2
QUICK REFERENCE
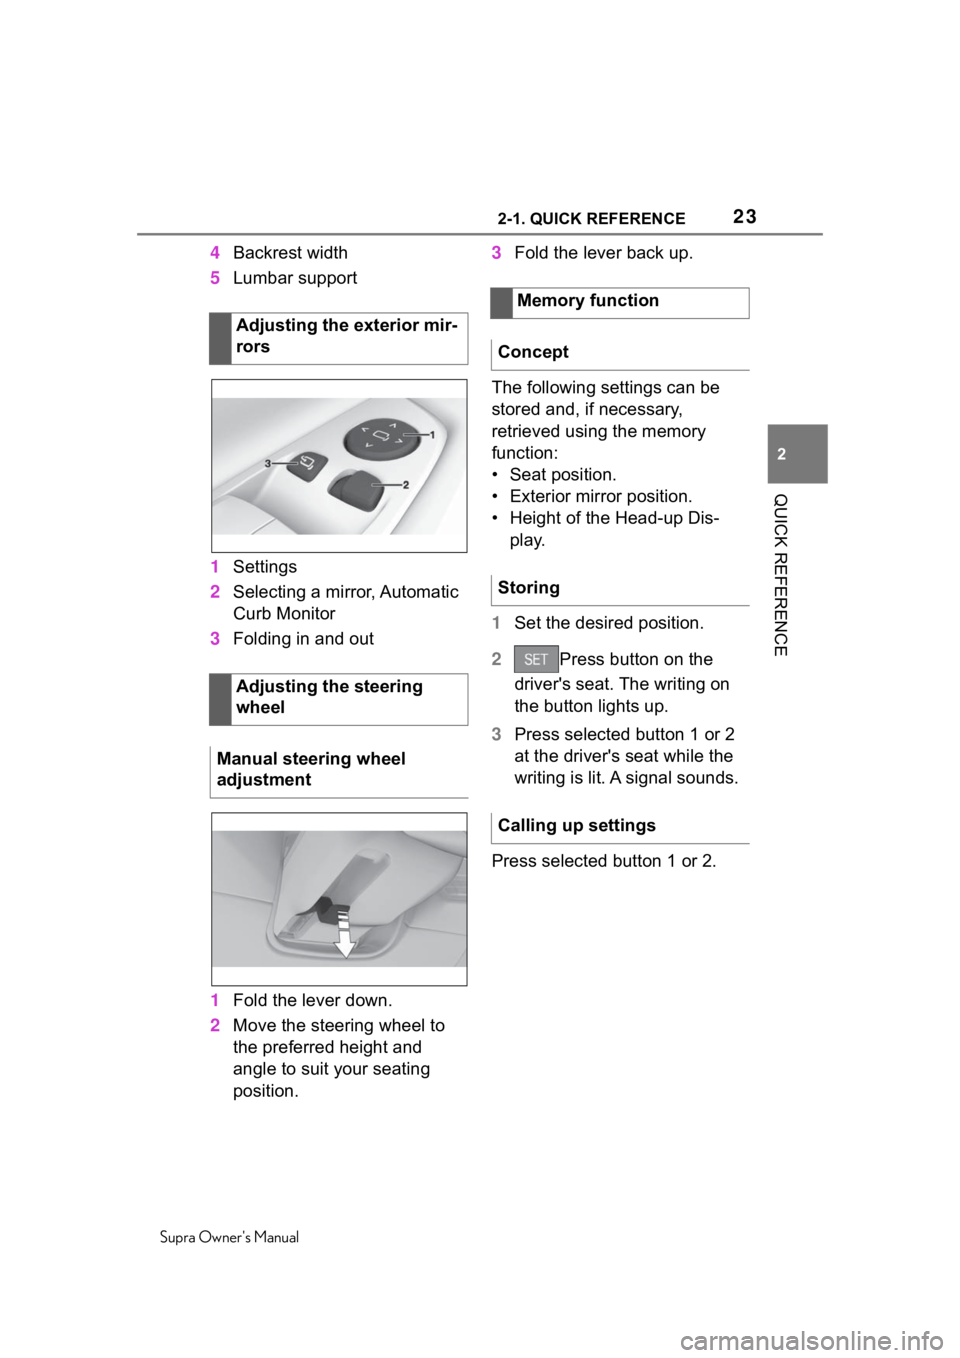
4 Backrest width
5 Lumbar support
1 Settings
2 Selecting a mirror, Automatic
Curb Monitor
3 Folding in and out
1 Fold the lever down.
2 Move the steering wheel to
the preferred height and
angle to suit your seating
position. 3
Fold the lever back up.
The following settings can be
stored and, if necessary,
retrieved using the memory
function:
• Seat position.
• Exterior mirror position.
• Height of the Head-up Dis- play.
1 Set the desired position.
2 Press button on the
driver's seat. The writing on
the button lights up.
3 Press selected button 1 or 2
at the driver's seat while the
writing is lit. A signal sounds.
Press selected button 1 or 2.
Adjusting the exterior mir-
rors
Adjusting the steering
wheel
Manual steering wheel
adjustment
Memory function
Concept
Storing
Calling up settings
Page 65 of 356
653-1. AT A GLANCE
Supra Owner's Manual
3
AT A GLANCE
The settings for the following
systems and functions are
stored in the active driver profile.
The scope of storable settings
depends on country and equip-
ment.
• Unlocking and locking.
• Lights.
• Climate control.
•Radio.
• Instrument cluster.
• Programmable memory but- tons.
• Volumes, tone.
• Control Display.
•TV.
• Parking Sensors.
• Rearview camera.
• Head-up Display.
• Sport mode switch.
• Seat position, exterior mirror position.
Both the positions saved via the
seat memory and the last position
set are saved.
• Toyota Supra Safety.
Regardless of the remote con-
trol in use, a different driver pro-
file may be activated. This
allows you to call up personal
vehicle settings, even if you did
not unlock the vehicle with your
own remote control. Via Toyota Supra Command:
1
"My Vehicle"
2 "Driver profiles"
3 Select driver profile.
4 "OK"
• All settings stored in the called-up driver profile are
automatically applied.
• The called-up driver profile is assigned to the remote con-
trol being used at the time.
• If the driver profile is already assigned to a different remote
control, this driver profile will
apply to both remote controls.
The guest profile is for individual
settings that are stored in none
of the three personal driver pro-
files.
Via Toyota Supra Command:
1 "My Vehicle"
2 "Driver profiles"
3 "Drive off (guest)"
4 "OK"
The guest profile cannot be
renamed. It is not assigned to
the current remote control.
A personal name can be
assigned to the active driver
profile to avoid confusion
between the driver profiles.
Adjusting
Profile management
Selecting a driver profile
Guest profile
Renaming a driver profile
Page 91 of 356
914-1. CONTROLS
Supra Owner's Manual
4
CONTROLS
Only the driver's door and the fuel
filler flap are unlocked. Pressing
again unlocks the entire vehicle.
• "All doors"
The entire vehicle is unlocked.
Depending on the vehicle equip-
ment and country version, this
setting may not be offered.
Via Toyota Supra Command:
1 "My Vehicle"
2 "Vehicle settings"
3 "Doors/Key"
4 "Tailgate" or "Tail-
gate and door(s)"
5 Select desired setting:
• "Tailgate"
The trunk lid is opened.
• "Tailgate and door(s)"
The trunk lid is opened and the
doors are unlocked.
Via Toyota Supra Command:
1 "My Vehicle"
2 "Driver profiles"
3 Select driver profile.
The setting can be made for the
driver profile marked with this sym-
bol.
4 "Last seat position automatic"
When the vehicle is unlocked,
the driver's seat and exterior
mirrors resume their last set positions.
The most recent position is inde-
pendent of the positions saved
via the seat memory.
Via Toyota Supra Command:
1
"My Vehicle"
2 "Vehicle settings"
3 "Doors/Key"
4 Deactivate or activate the
desired confirmation signals:
• "Flash for lock/unlock"
Unlocking is signaled by two
flashes, locking by one.
Via Toyota Supra Command:
1 "My Vehicle"
2 "Vehicle settings"
3 "Doors/Key"
4 Select desired setting:
• "Lock automatically"
The vehicle locks automatically
after a short period of time if no
door is opened after unlocking.
• "Lock after starting to drive"
The vehicle locks automatically
after you drive off.
Via Toyota Supra Command:
1 "My Vehicle"
2 "Vehicle settings"
Trunk lid
Adjusting the last seat and
mirror position
Confirmation signals from
the vehicle
Automatic locking
Automatic unlocking
Page 98 of 356
984-1. CONTROLS
Supra Owner's Manual
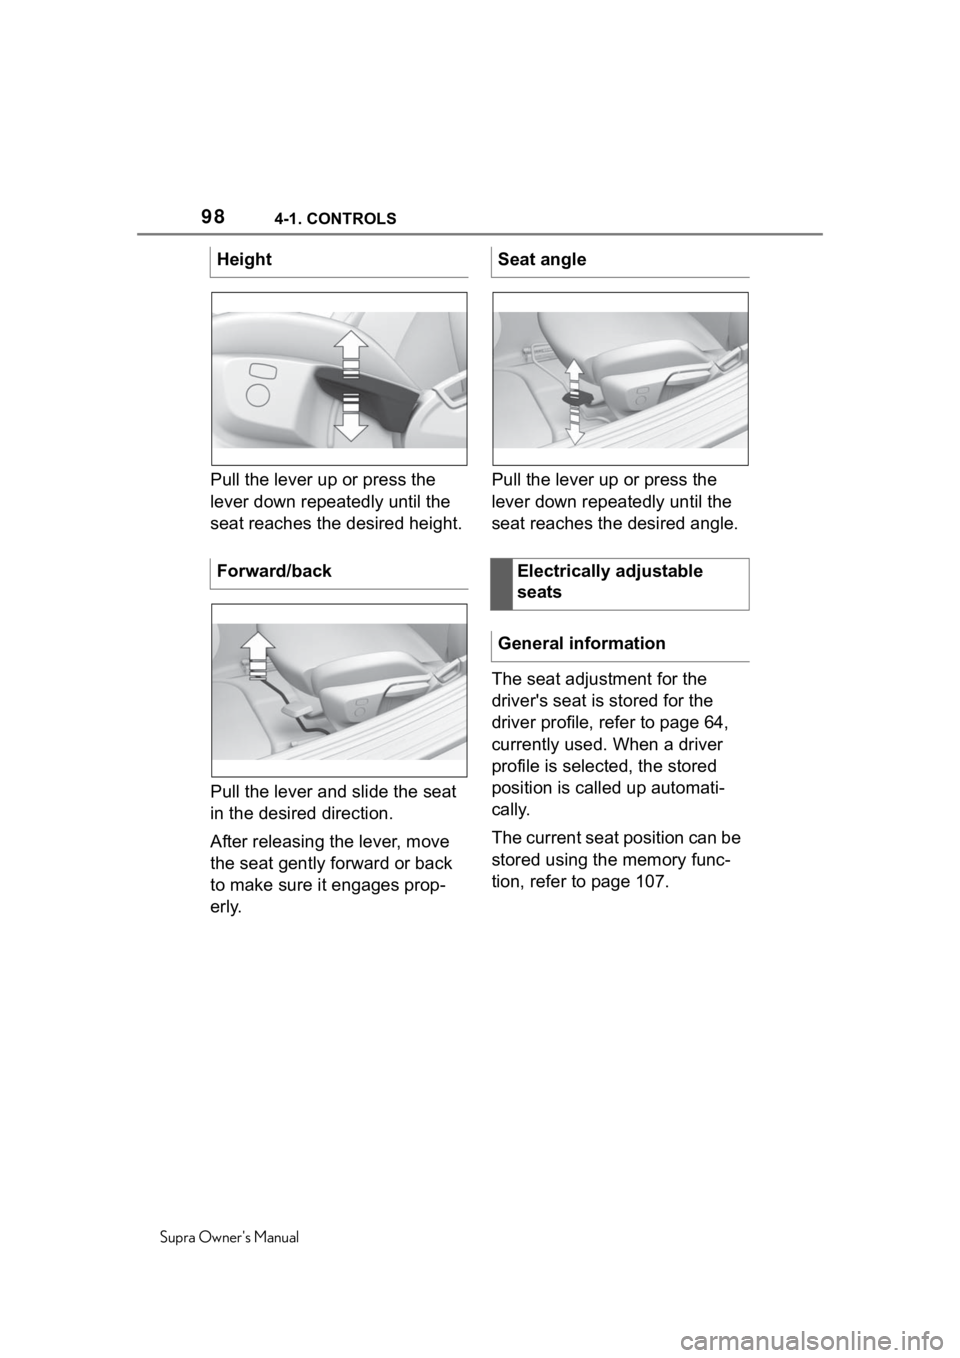
Pull the lever up or press the
lever down repeatedly until the
seat reaches the desired height.
Pull the lever and slide the seat
in the desired direction.
After releasing the lever, move
the seat gently forward or back
to make sure it engages prop-
erly.Pull the lever up or press the
lever down repeatedly until the
seat reaches the desired angle.
The seat adjustment for the
driver's seat is stored for the
driver profile, refer to page 64,
currently used. When a driver
profile is selected, the stored
position is called up automati-
cally.
The current seat position can be
stored using the memory func-
tion, refer to page 107.
Height
Forward/back
Seat angle
Electrically adjustable
seats
General information
Page 99 of 356
994-1. CONTROLS
Supra Owner's Manual
4
CONTROLS
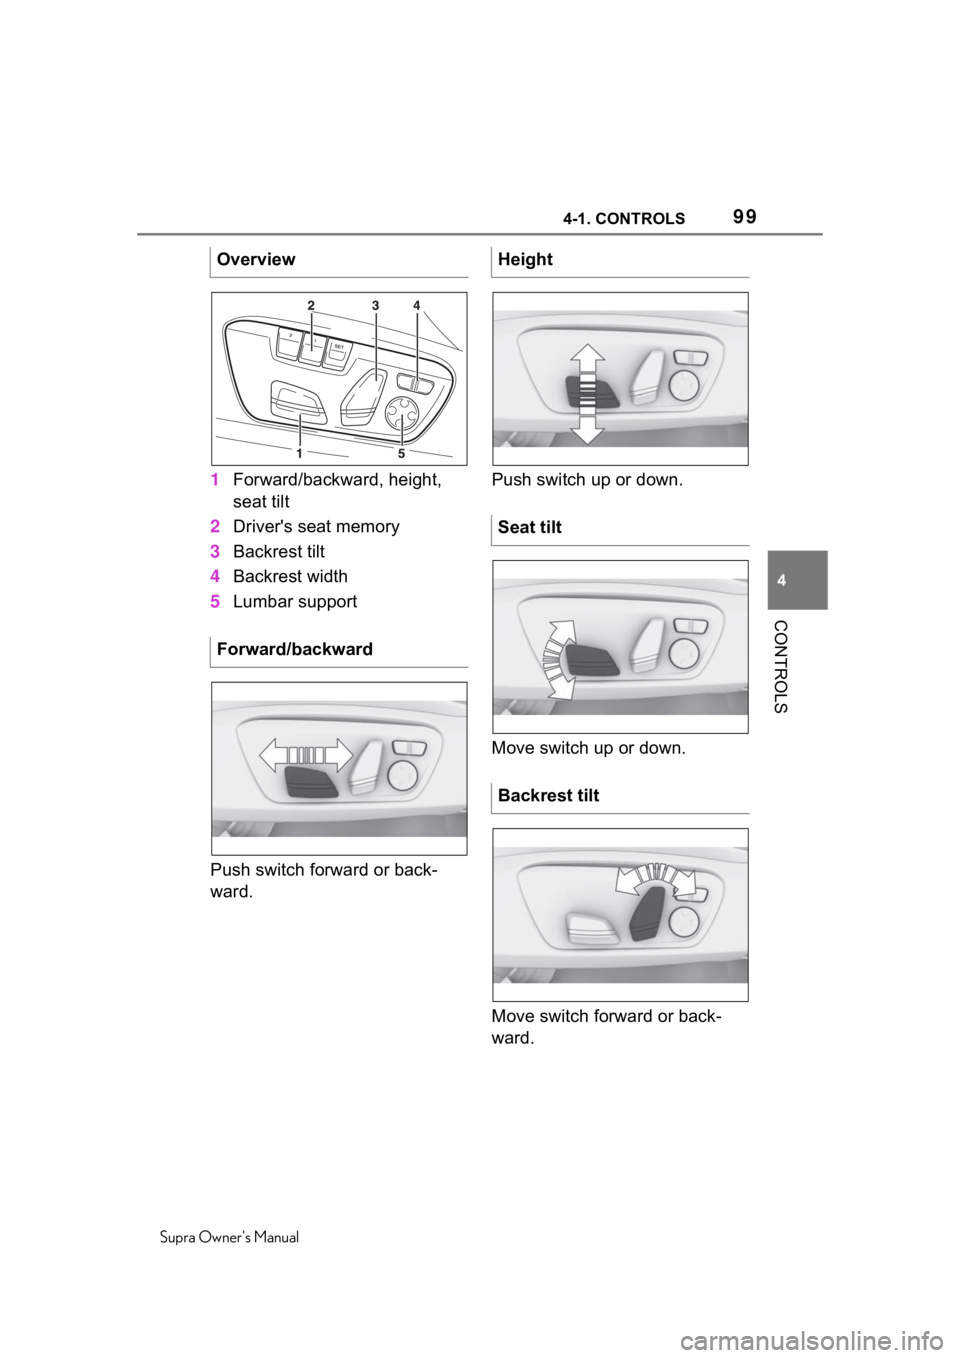
1 Forward/backward, height,
seat tilt
2 Driver's seat memory
3 Backrest tilt
4 Backrest width
5 Lumbar support
Push switch forward or back-
ward. Push switch up or down.
Move switch up or down.
Move switch forward or back-
ward.
Overview
Forward/backward
Height
Seat tilt
Backrest tilt
Page 107 of 356
1074-1. CONTROLS
Supra Owner's Manual
4
CONTROLS
The interior mirror is dimmed
automatically.
Photocells are used for control:
• In the mirror glass.
• On the back of the mirror.
• Keep the photocells clean.
• Do not cover the area between the interior mirror
and the windshield. 1
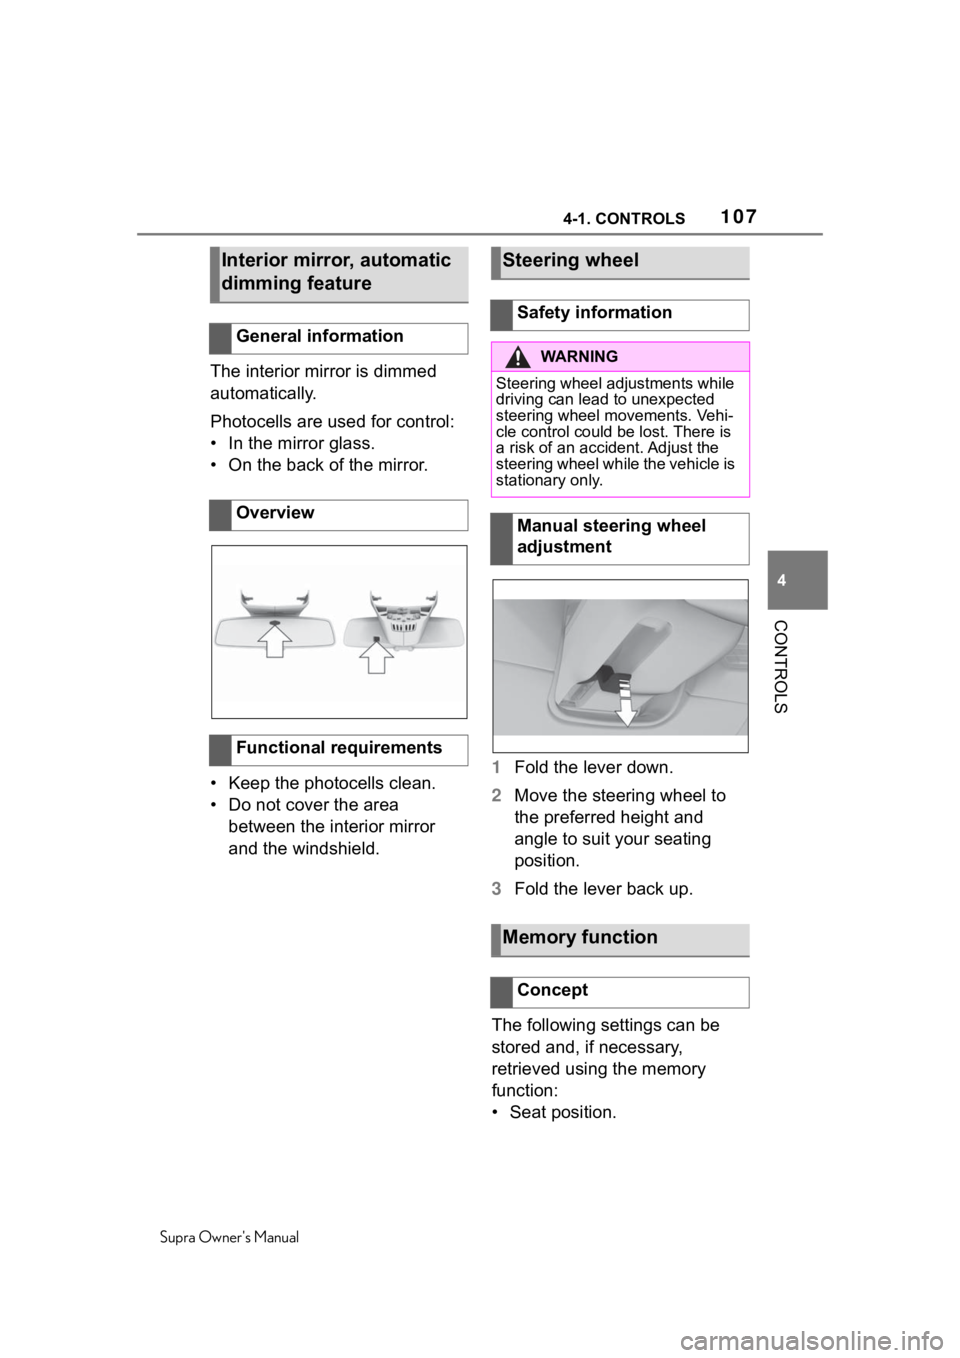
Fold the lever down.
2 Move the steering wheel to
the preferred height and
angle to suit your seating
position.
3 Fold the lever back up.
The following settings can be
stored and, if necessary,
retrieved using the memory
function:
• Seat position.
Interior mirror, automatic
dimming feature
General information
Overview
Functional requirements
Steering wheel
Safety information
WA R N I N G
Steering wheel adjustments while
driving can lead to unexpected
steering wheel movements. Vehi-
cle control could be lost. There is
a risk of an accident. Adjust the
steering wheel while the vehicle is
stationary only.
Manual steering wheel
adjustment
Memory function
Concept
Page 108 of 356
1084-1. CONTROLS
Supra Owner's Manual
• Exterior mirror position.
• Height of the Head-up Dis-play.
Two memory locations with dif-
ferent settings can be set for
each driver profile, refer to page
64.
The following settings are not
stored:
• Backrest width.
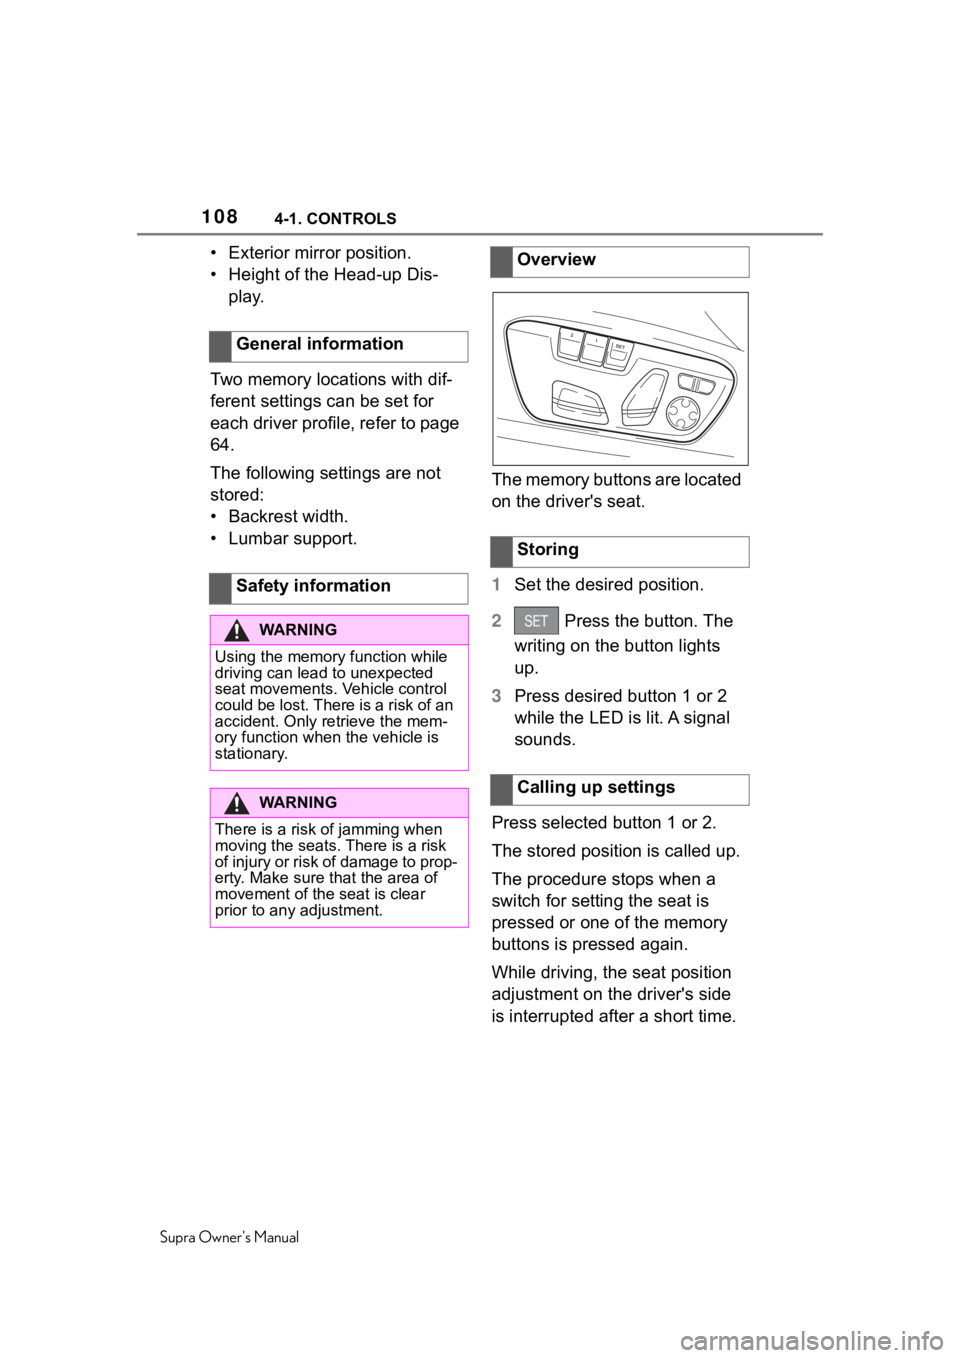
• Lumbar support. The memory buttons are located
on the driver's seat.
1
Set the desired position.
2 Press the button. The
writing on the button lights
up.
3 Press desired button 1 or 2
while the LED is lit. A signal
sounds.
Press selected button 1 or 2.
The stored position is called up.
The procedure stops when a
switch for setting the seat is
pressed or one of the memory
buttons is pressed again.
While driving, the seat position
adjustment on the driver's side
is interrupted after a short time.
General information
Safety information
WA R N I N G
Using the memory
function while
driving can lead to unexpected
seat movements. Vehicle control
could be lost. There is a risk of an
accident. Only retrieve the mem-
ory function when the vehicle is
stationary.
WA R N I N G
There is a risk of jamming when
moving the seats. There is a risk
of injury or risk of damage to prop-
erty. Make sure that the area of
movement of the seat is clear
prior to any adjustment.
Overview
Storing
Calling up settings
Page 113 of 356
1134-1. CONTROLS
Supra Owner's Manual
4
CONTROLS
forward until the best possible
belt guide position is reached.
Adjustable backrest width:
before installing a child restraint
system in the front passenger
seat, open the backrest width
completely. Do not change the
backrest width again and do not
call up a memory position.
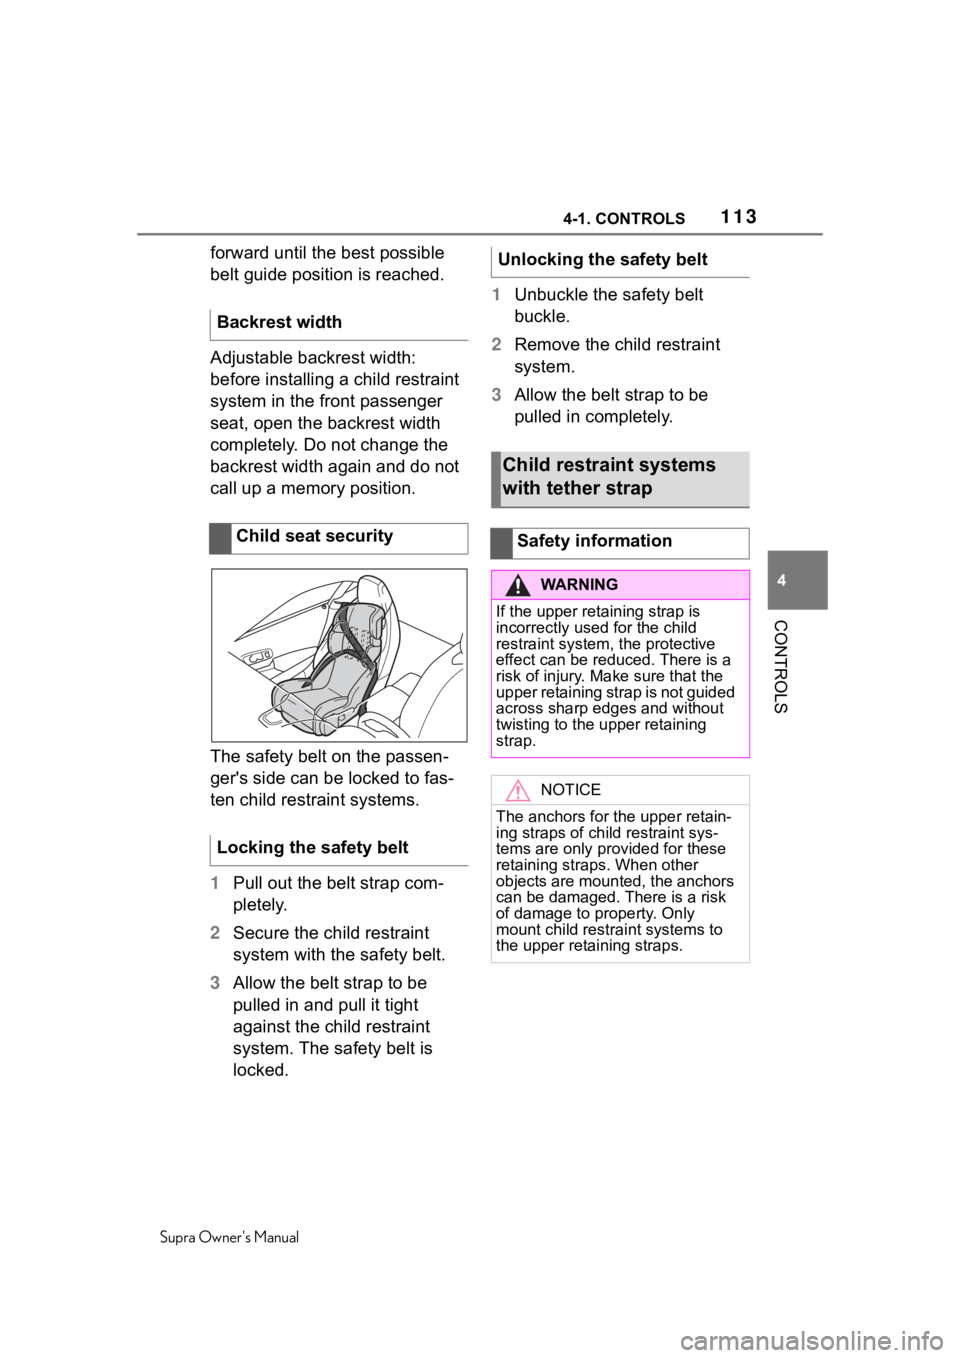
The safety belt on the passen-
ger's side can be locked to fas-
ten child restraint systems.
1 Pull out the belt strap com-
pletely.
2 Secure the child restraint
system with the safety belt.
3 Allow the belt strap to be
pulled in and pull it tight
against the child restraint
system. The safety belt is
locked. 1
Unbuckle the safety belt
buckle.
2 Remove the child restraint
system.
3 Allow the belt strap to be
pulled in completely.
Backrest width
Child seat security
Locking the safety beltUnlocking the safety belt
Child restraint systems
with tether strap
Safety information
WA R N I N G
If the upper retaining strap is
incorrectly used for the child
restraint system, the protective
effect can be reduced. There is a
risk of injury. Mak e sure that the
upper retaining strap is not guided
across sharp edges and without
twisting to the upper retaining
strap.
NOTICE
The anchors for the upper retain-
ing straps of child restraint sys-
tems are only provided for these
retaining straps. When other
objects are mounted, the anchors
can be damaged. There is a risk
of damage to p roperty. Only
mount child restr aint systems to
the upper retaining straps.
Page 151 of 356
1514-1. CONTROLS
Supra Owner's Manual
4
CONTROLS
1 "My vehicle"
2 "System settings"
3 "Displays"
4 "Head-up display"
5 "Brightness"
6 Turn the Controller until the
desired brightness is set.
7 Press the Controller.
When the low beams are
switched on, the brightness of
the Head-up Display can be
additionally influenced using the
instrument lighting.
Via Toyota Supra Command:
1 "My vehicle"
2 "System settings"
3 "Displays"
4 "Head-up display"
5 "Height"
6 Turn the Controller until the
desired height is reached.
7 Press the Controller.
The setting is stored for the
driver profile currently used.
The height of the Head-up Dis-
play can also be stored using
the memory function, refer to
page 107.
The Head-up Display view can
be rotated. Via Toyota Supra Command:
1
"My vehicle"
2 "System settings"
3 "Displays"
4 "Head-up display"
5 "Rotation"
6 Turn the Controller until the
desired setting is selected.
7 Press the Controller.
The visibility of the displays in
the Head-up Display is influ-
enced by the following factors:
Seat position.
Objects on the cover of the
Head-up Display.
Sunglasses with certain polar-
ization filters.
Wet roads.
Unfavorable light conditions.
If the image is distorted, have
the basic settings checked by
your Toyota dealer.
The windshield is part of the
system.
The shape of the windshield
makes it possible to display a
precise image.
A film in the windshield prevents
double images from being gen-
erated.
Adjusting the height
Setting the rotation
Visibility of the display
Special windshield