display TOYOTA TACOMA 2012 Accessories, Audio & Navigation (in English)
[x] Cancel search | Manufacturer: TOYOTA, Model Year: 2012, Model line: TACOMA, Model: TOYOTA TACOMA 2012Pages: 131, PDF Size: 5.2 MB
Page 45 of 131
45
1. AUDIO SYSTEM OPERATION
2
AUDIO SYSTEM
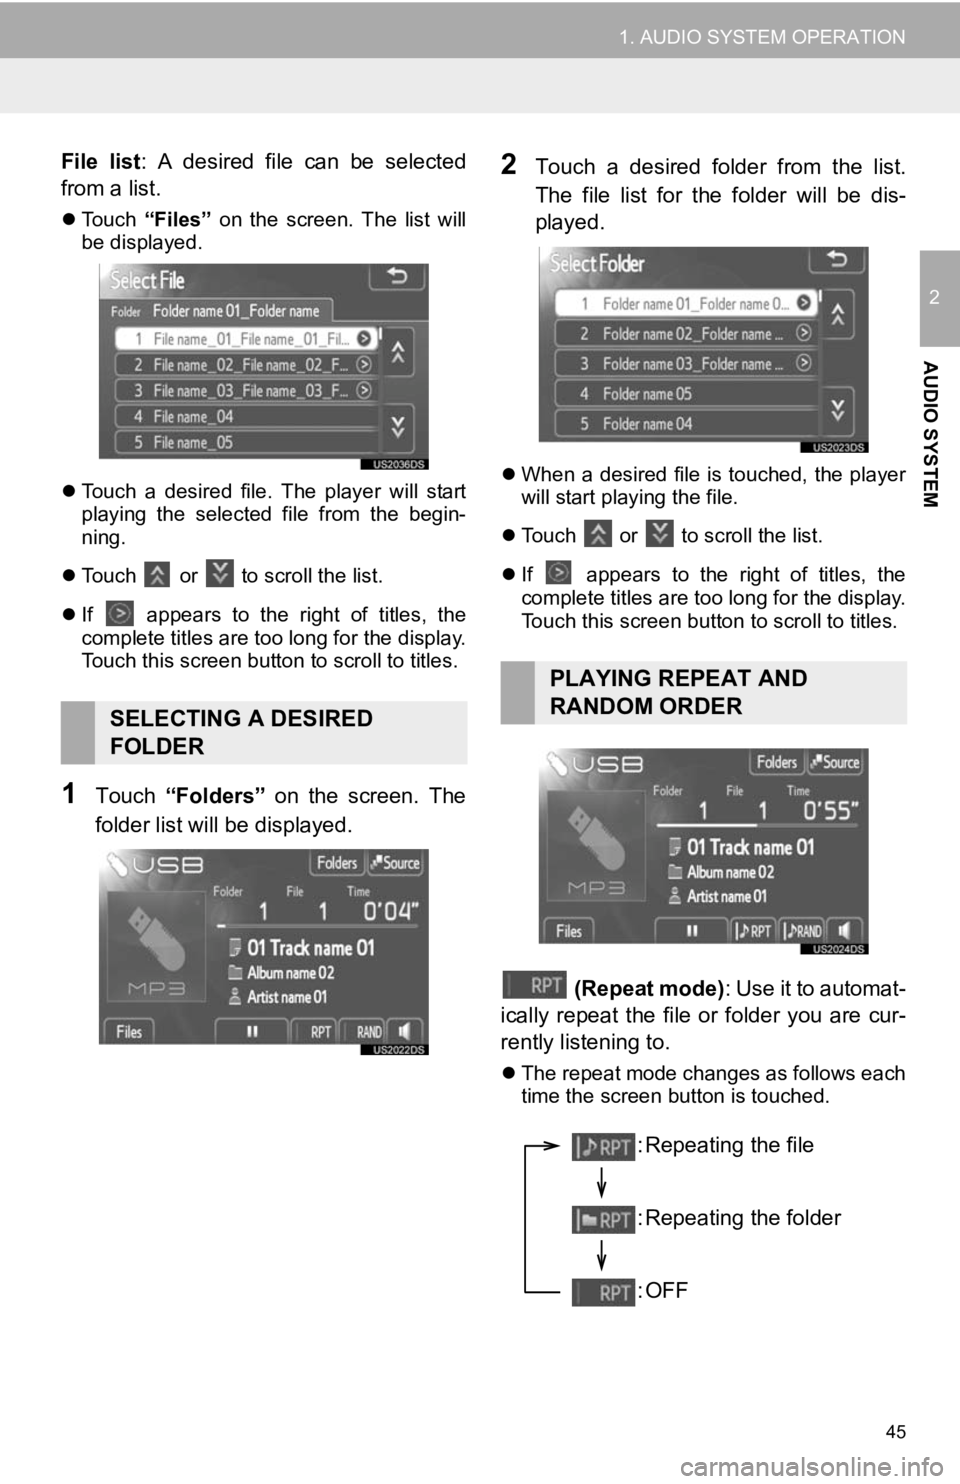
File list: A desired file can be selected
from a list.
Touch “Files” on the screen. The list will
be displayed.
Touch a desired file. The player will start
playing the selected file from the begin-
ning.
Touch
or to scroll the list.
If
appears to the right of titles, the
complete titles are too long for the display.
Touch this screen button to scroll to titles.
1Touch “Folders” on the screen. The
folder list will be displayed.
2Touch a desired folder from the list.
The file list for the folder will be dis-
played.
When a desired file is touched, the player
will start playing the file.
Touch
or to scroll the list.
If
appears to the right of titles, the
complete titles are too long for the display.
Touch this screen button to scroll to titles.
(Repeat mode) : Use it to automat-
ically repeat the file or folder you are cur-
rently listening to.
The repeat mode changes as follows each
time the screen button is touched.
SELECTING A DESIRED
FOLDER
PLAYING REPEAT AND
RANDOM ORDER
: Repeating the file
: Repeating the folder
:OFF
Page 48 of 131
48
1. AUDIO SYSTEM OPERATION
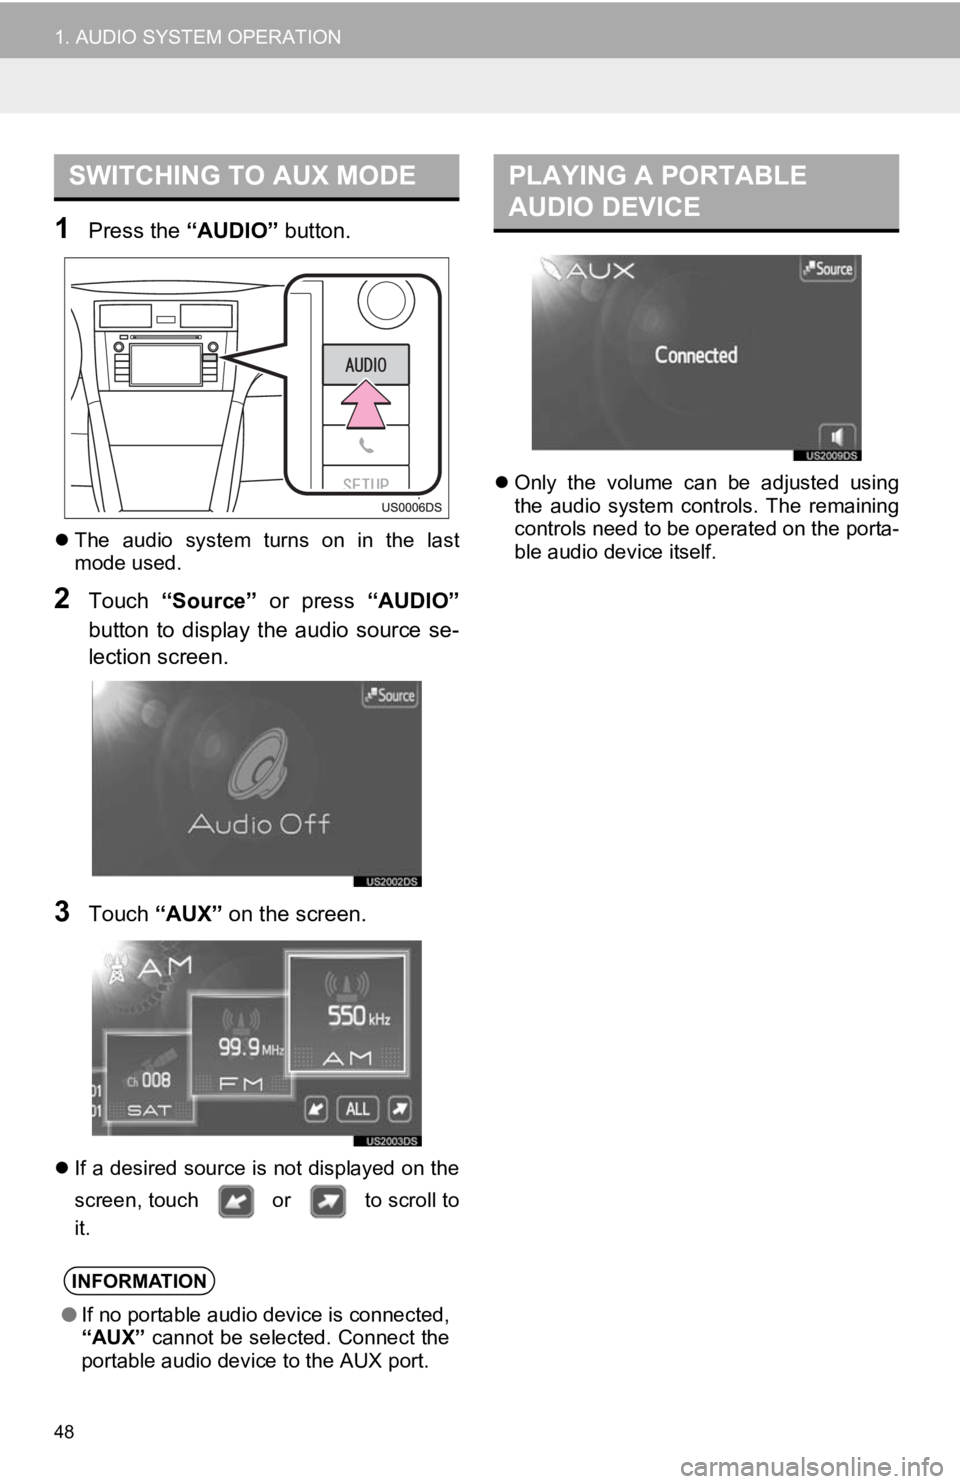
1Press the “AUDIO” button.
The audio system turns on in the last
mode used.
2Touch “Source” or press “AUDIO”
button to display the audio source se-
lection screen.
3Touch “AUX” on the screen.
If a desired source is not displayed on the
screen, touch or to scroll to
it.
Only the volume can be adjusted using
the audio system controls. The remaining
controls need to be operated on the porta-
ble audio device itself.
SWITCHING TO AUX MODE
INFORMATION
●If no portable audio device is connected,
“AUX” cannot be selected. Connect the
portable audio device to the AUX port.
PLAYING A PORTABLE
AUDIO DEVICE
Page 50 of 131
50
1. AUDIO SYSTEM OPERATION
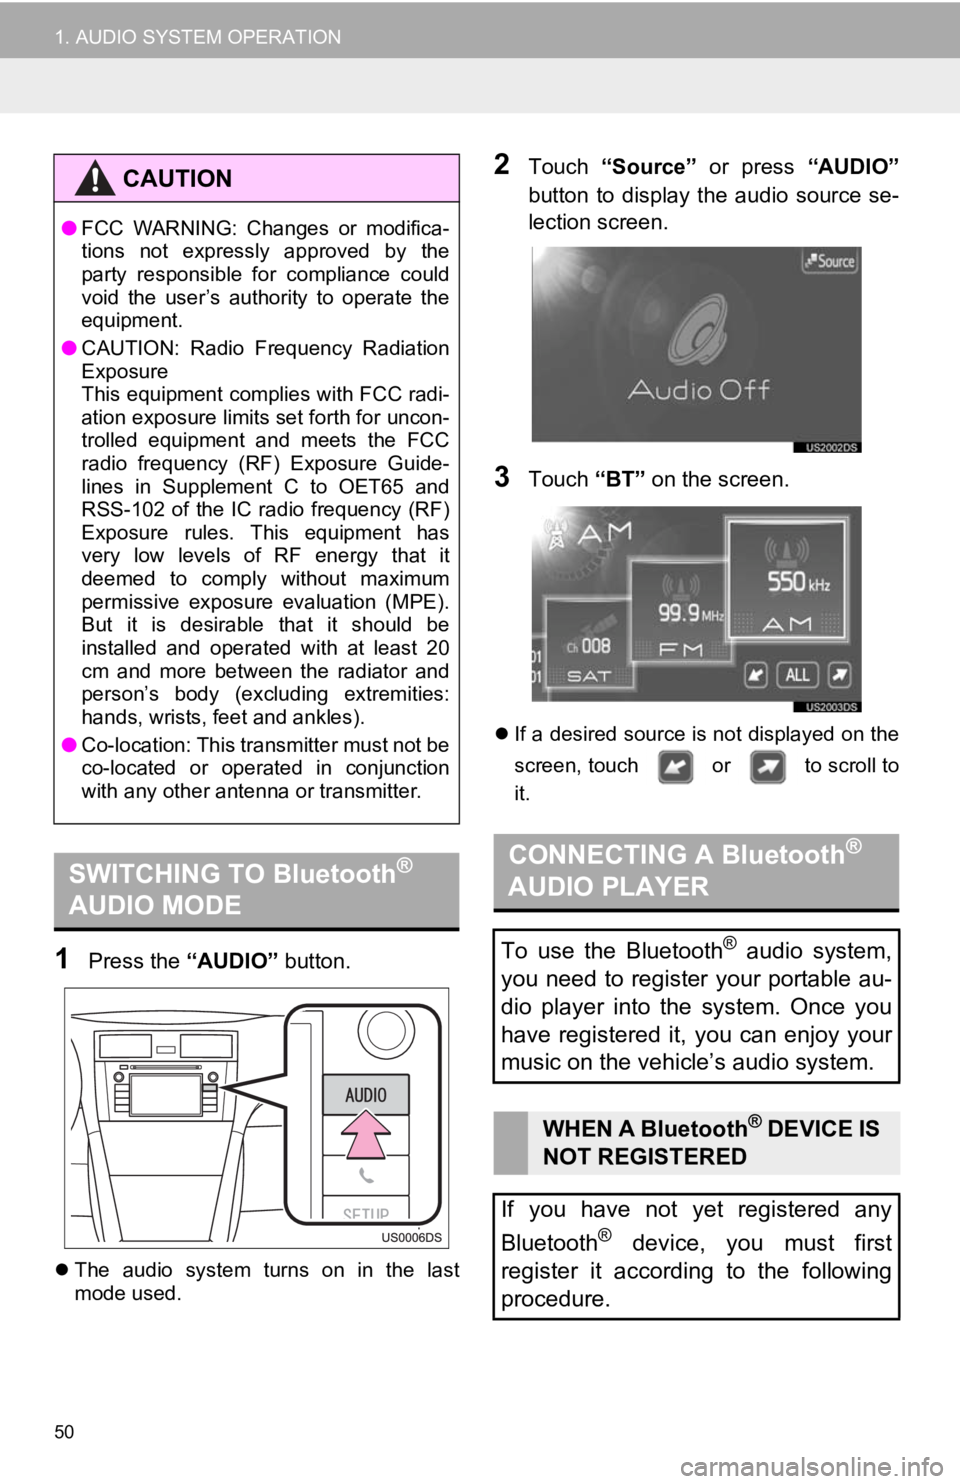
1Press the “AUDIO” button.
The audio system turns on in the last
mode used.
2Touch “Source” or press “AUDIO”
button to display the audio source se-
lection screen.
3Touch “BT” on the screen.
If a desired source is not displayed on the
screen, touch or to scroll to
it.
CAUTION
●FCC WARNING: Changes or modifica-
tions not expressly approved by the
party responsible for compliance could
void the user’s authority to operate the
equipment.
● CAUTION: Radio Frequency Radiation
Exposure
This equipment complies with FCC radi-
ation exposure limits set forth for uncon-
trolled equipment and meets the FCC
radio frequency (RF) Exposure Guide-
lines in Supplement C to OET65 and
RSS-102 of the IC radio frequency (RF)
Exposure rules. This equipment has
very low levels of RF energy that it
deemed to comply without maximum
permissive exposure evaluation (MPE).
But it is desirable that it should be
installed and operated with at least 20
cm and more between the radiator and
person’s body (excluding extremities:
hands, wrists, feet and ankles).
● Co-location: This transmitter must not be
co-located or operated in conjunction
with any other antenna or transmitter.
SWITCHING TO Bluetooth®
AUDIO MODECONNECTING A Bluetooth®
AUDIO PLAYER
To use the Bluetooth® audio system,
you need to register your portable au-
dio player into the system. Once you
have registered it, you can enjoy your
music on the vehicle’s audio system.
WHEN A Bluetooth® DEVICE IS
NOT REGISTERED
If you have not yet registered any
Bluetooth
® device, you must first
register it according to the following
procedure.
Page 51 of 131
51
1. AUDIO SYSTEM OPERATION
2
AUDIO SYSTEM
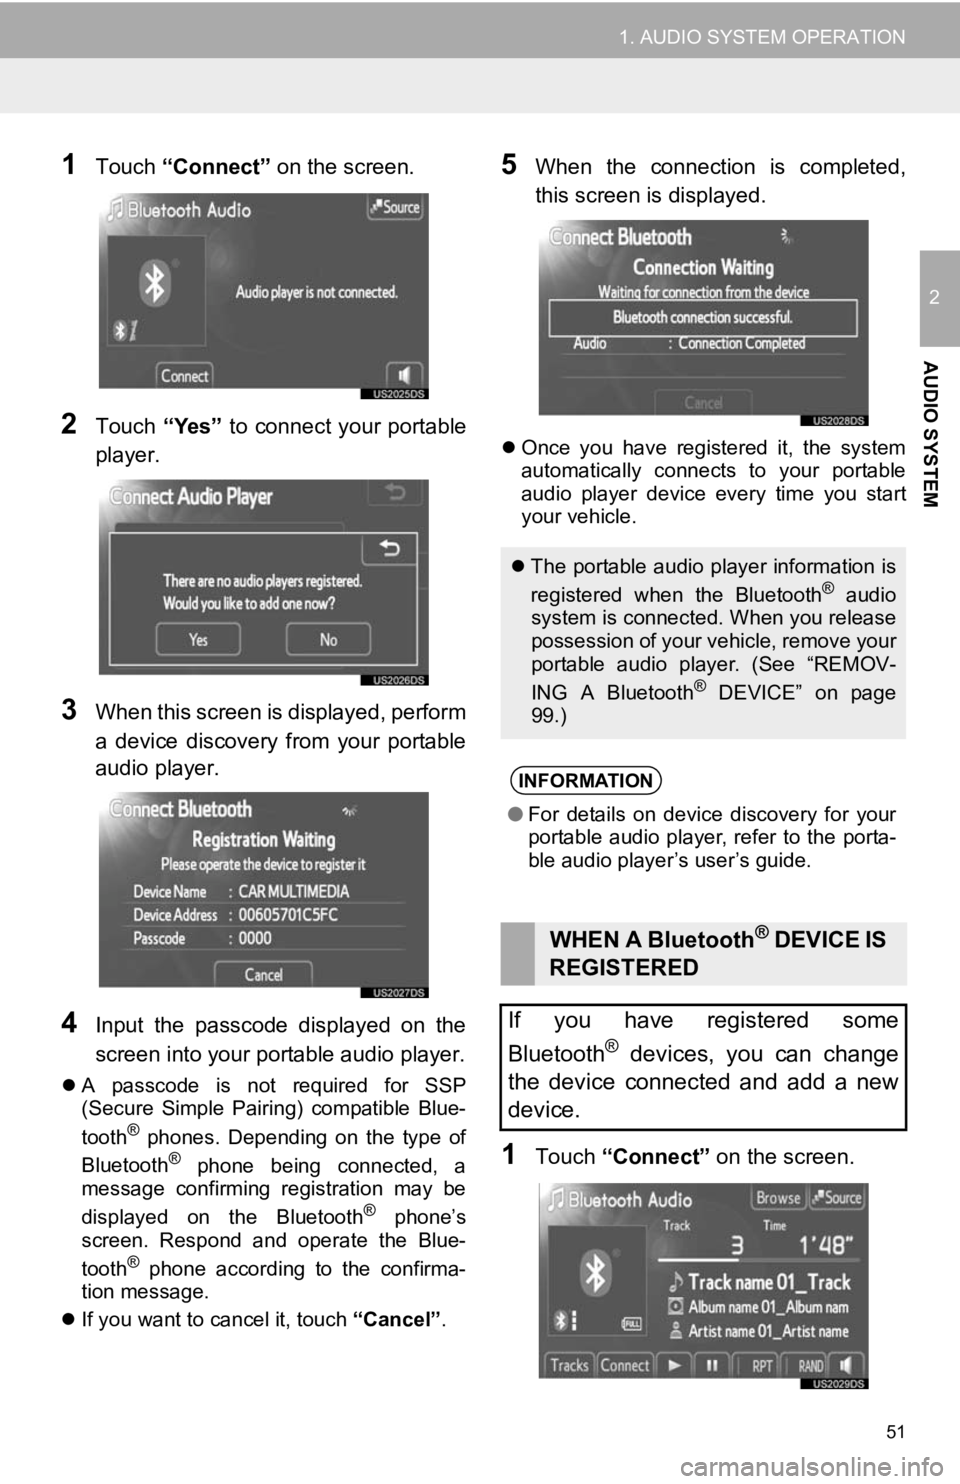
1Touch “Connect” on the screen.
2Touch “Yes” to connect your portable
player.
3When this screen is displayed, perform
a device discovery from your portable
audio player.
4Input the passcode displayed on the
screen into your portable audio player.
A passcode is not required for SSP
(Secure Simple Pairing) compatible Blue-
tooth
® phones. Depending on the type of
Bluetooth® phone being connected, a
message confirming registration may be
displayed on the Bluetooth
® phone’s
screen. Respond and operate the Blue-
tooth
® phone according to the confirma-
tion message.
If you want to cancel it, touch “Cancel”.
5When the connection is completed,
this screen is displayed.
Once you have registered it, the system
automatically connects to your portable
audio player device every time you start
your vehicle.
1Touch “Connect” on the screen.
The portable audio player information is
registered when the Bluetooth® audio
system is connected. When you release
possession of your vehicle, remove your
portable audio player. (See “REMOV-
ING A Bluetooth
® DEVICE” on page
99.)
INFORMATION
● For details on device discovery for your
portable audio player, refer to the porta-
ble audio player’s user’s guide.
WHEN A Bluetooth® DEVICE IS
REGISTERED
If you have registered some
Bluetooth
® devices, you can change
the device connected and add a new
device.
Page 52 of 131
52
1. AUDIO SYSTEM OPERATION
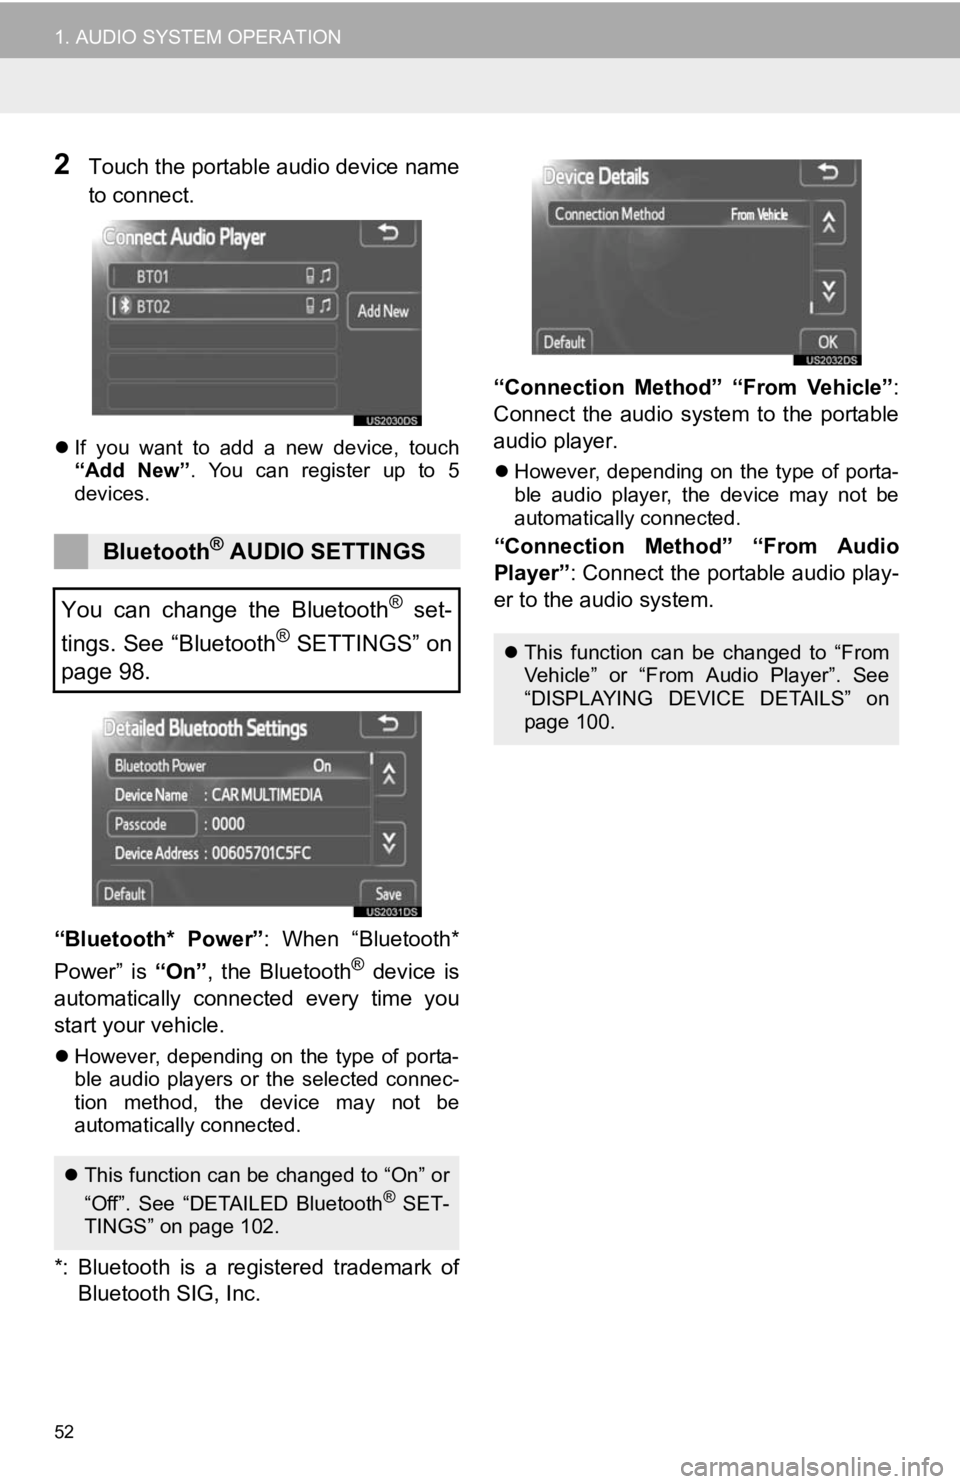
2Touch the portable audio device name
to connect.
If you want to add a new device, touch
“Add New” . You can register up to 5
devices.
“Bluetooth* Power” : When “Bluetooth*
Power” is “On”, the Bluetooth® device is
automatically connected every time you
start your vehicle.
However, depending on the type of porta-
ble audio players or the selected connec-
tion method, the device may not be
automatically connected.
*: Bluetooth is a re gistered trademark of
Bluetooth SIG, Inc. “Connection Method” “From Vehicle”
:
Connect the audio system to the portable
audio player.
However, depending on the type of porta-
ble audio player, the device may not be
automatically connected.
“Connection Method” “From Audio
Player” : Connect the portable audio play-
er to the audio system.Bluetooth® AUDIO SETTINGS
You can change the Bluetooth
® set-
tings. See “Bluetooth
® SETTINGS” on
page 98.
This function can be changed to “On” or
“Off”. See “DETAILED Bluetooth® SET-
TINGS” on page 102.
This function can be changed to “From
Vehicle” or “From Audio Player”. See
“DISPLAYING DEVICE DETAILS” on
page 100.
Page 53 of 131
53
1. AUDIO SYSTEM OPERATION
2
AUDIO SYSTEM
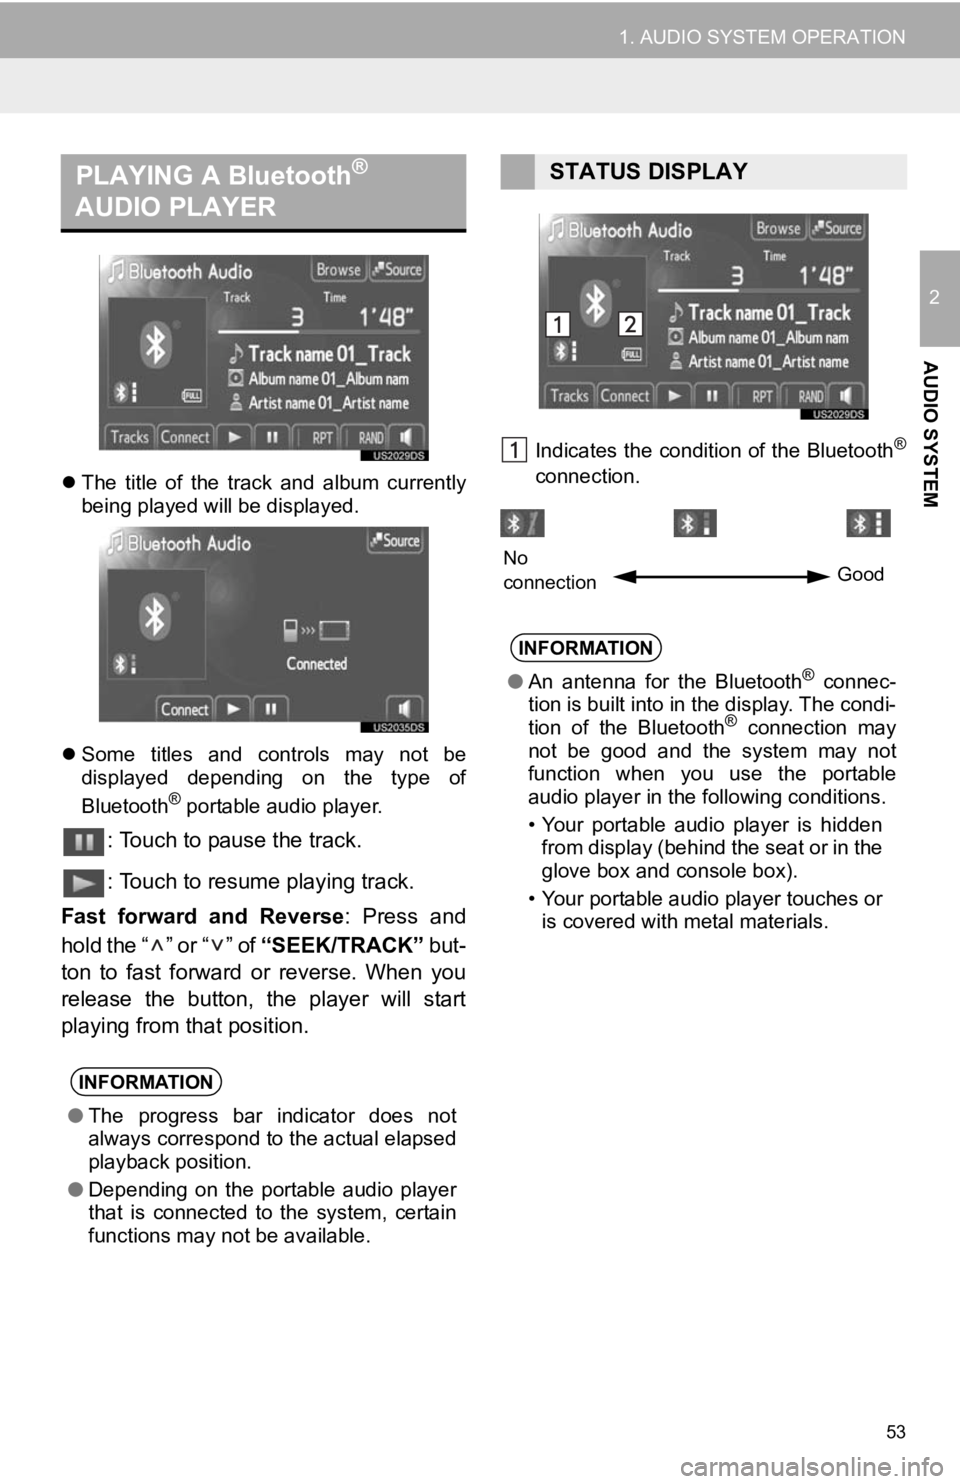
The title of the track and album currently
being played will be displayed.
Some titles and controls may not be
displayed depending on the type of
Bluetooth
® portable audio player.
: Touch to pause the track.
: Touch to resume playing track.
Fast forward and Reverse : Press and
hold the “ ” or “ ” of “SEEK/TRACK” but-
ton to fast forward or reverse. When you
release the button, the player will start
playing from that position.
Indicates the condition of the Bluetooth®
connection.
PLAYING A Bluetooth®
AUDIO PLAYER
INFORMATION
● The progress bar indicator does not
always correspond to the actual elapsed
playback position.
● Depending on the portable audio player
that is connected to the system, certain
functions may not be available.
STATUS DISPLAY
INFORMATION
●An antenna for the Bluetooth® connec-
tion is built into in the display. The condi-
tion of the Bluetooth
® connection may
not be good and the system may not
function when you use the portable
audio player in the following conditions.
• Your portable audio player is hidden from display (behind the seat or in the
glove box and console box).
• Your portable audio player touches or is covered with metal materials.
No
connection Good
Page 54 of 131
54
1. AUDIO SYSTEM OPERATION
Indicates the amount of battery charge
left.
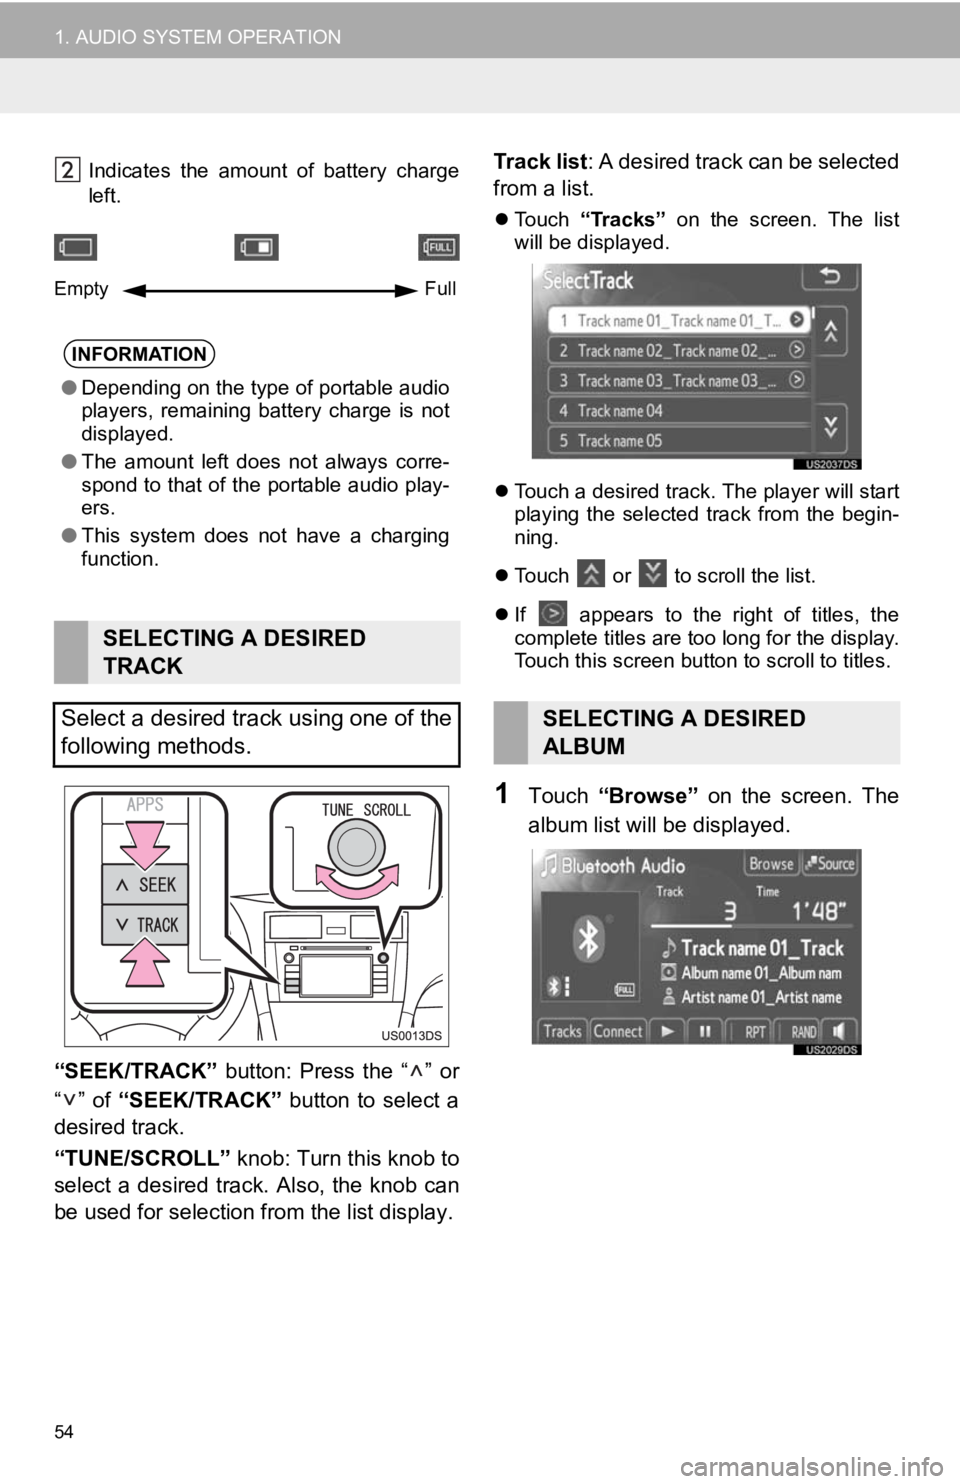
“SEEK/TRACK” button: Press the “ ” or
“” of “SEEK/TRACK” button to select a
desired track.
“TUNE/SCROLL” knob: Turn this knob to
select a desired track. Also, the knob can
be used for selection from the list display. Track list
: A desired track can be selected
from a list.
Touch “Tracks” on the screen. The list
will be displayed.
Touch a desired track. The player will start
playing the selected track from the begin-
ning.
Touch
or to scroll the list.
If
appears to the right of titles, the
complete titles are too long for the display.
Touch this screen button to scroll to titles.
1Touch “Browse” on the screen. The
album list will be displayed.
INFORMATION
● Depending on the type of portable audio
players, remaining battery charge is not
displayed.
● The amount left does not always corre-
spond to that of the portable audio play-
ers.
● This system does not have a charging
function.
SELECTING A DESIRED
TRACK
Select a desired track using one of the
following methods.
Empty Full
SELECTING A DESIRED
ALBUM
Page 55 of 131
55
1. AUDIO SYSTEM OPERATION
2
AUDIO SYSTEM
2Touch a desired album from the list.
The track list for the album will be dis-
played.
When a desired track is touched, the
player will start playing the track.
Touch
or to scroll the list.
If
appears to the right of titles, the
complete titles are too long for the display.
Touch this screen button to scroll to titles.
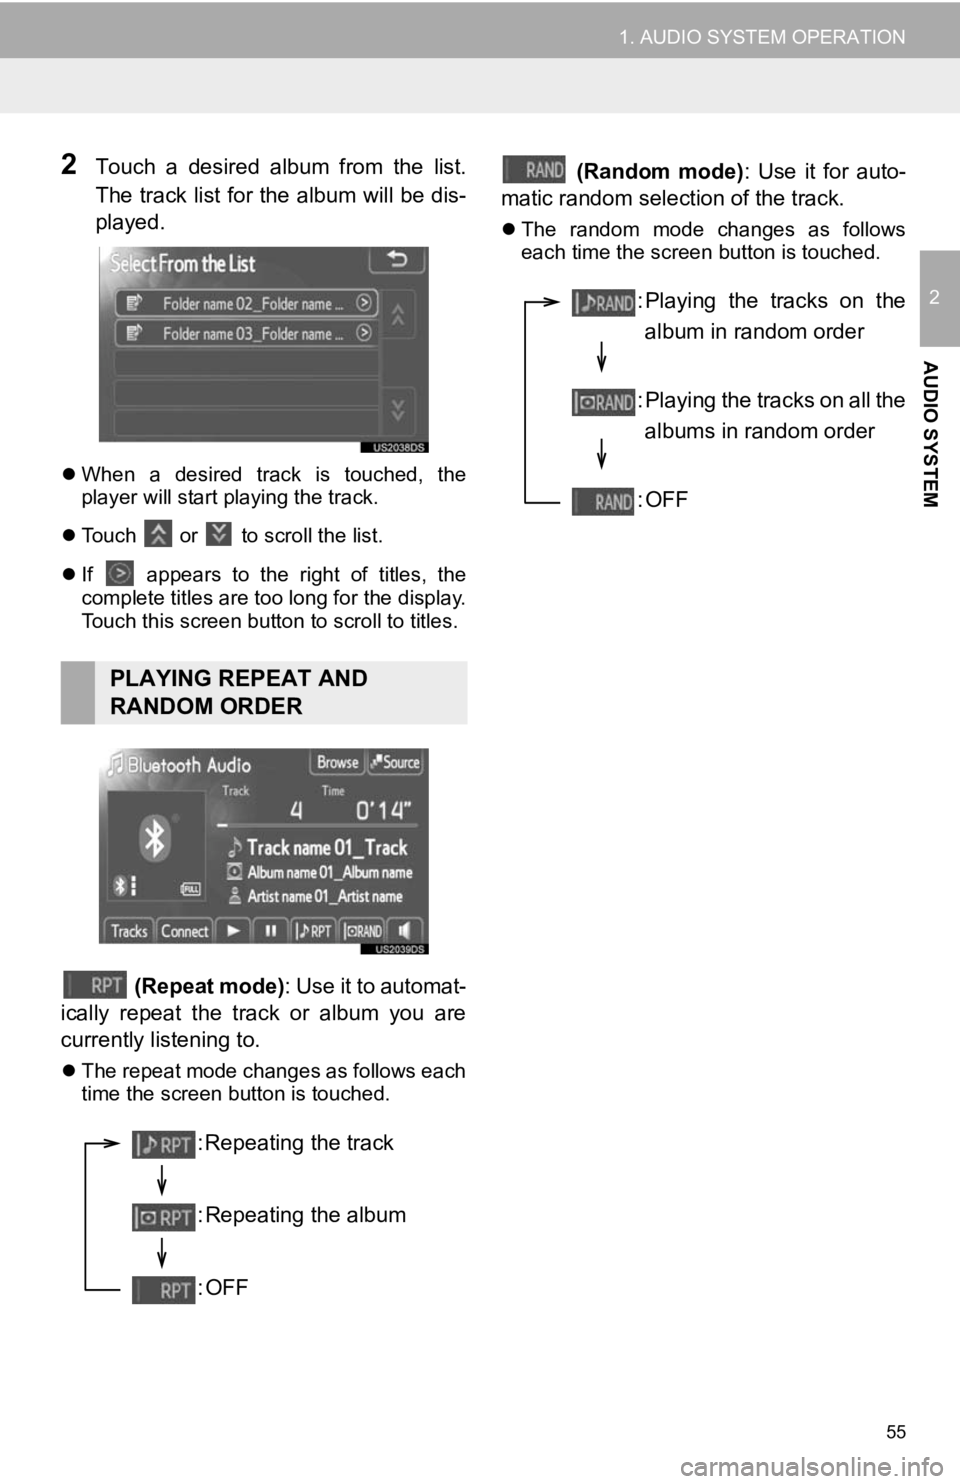
(Repeat mode) : Use it to automat-
ically repeat the track or album you are
currently listening to.
The repeat mode changes as follows each
time the screen button is touched.
(Random mode) : Use it for auto-
matic random selection of the track.
The random mode changes as follows
each time the screen button is touched.
PLAYING REPEAT AND
RANDOM ORDER
: Repeating the track
: Repeating the album
:OFF
: Playing the tracks on the
album in random order
: Playing the tracks on all the albums in random order
:OFF
Page 63 of 131
63
1. AUDIO SYSTEM OPERATION
2
AUDIO SYSTEM
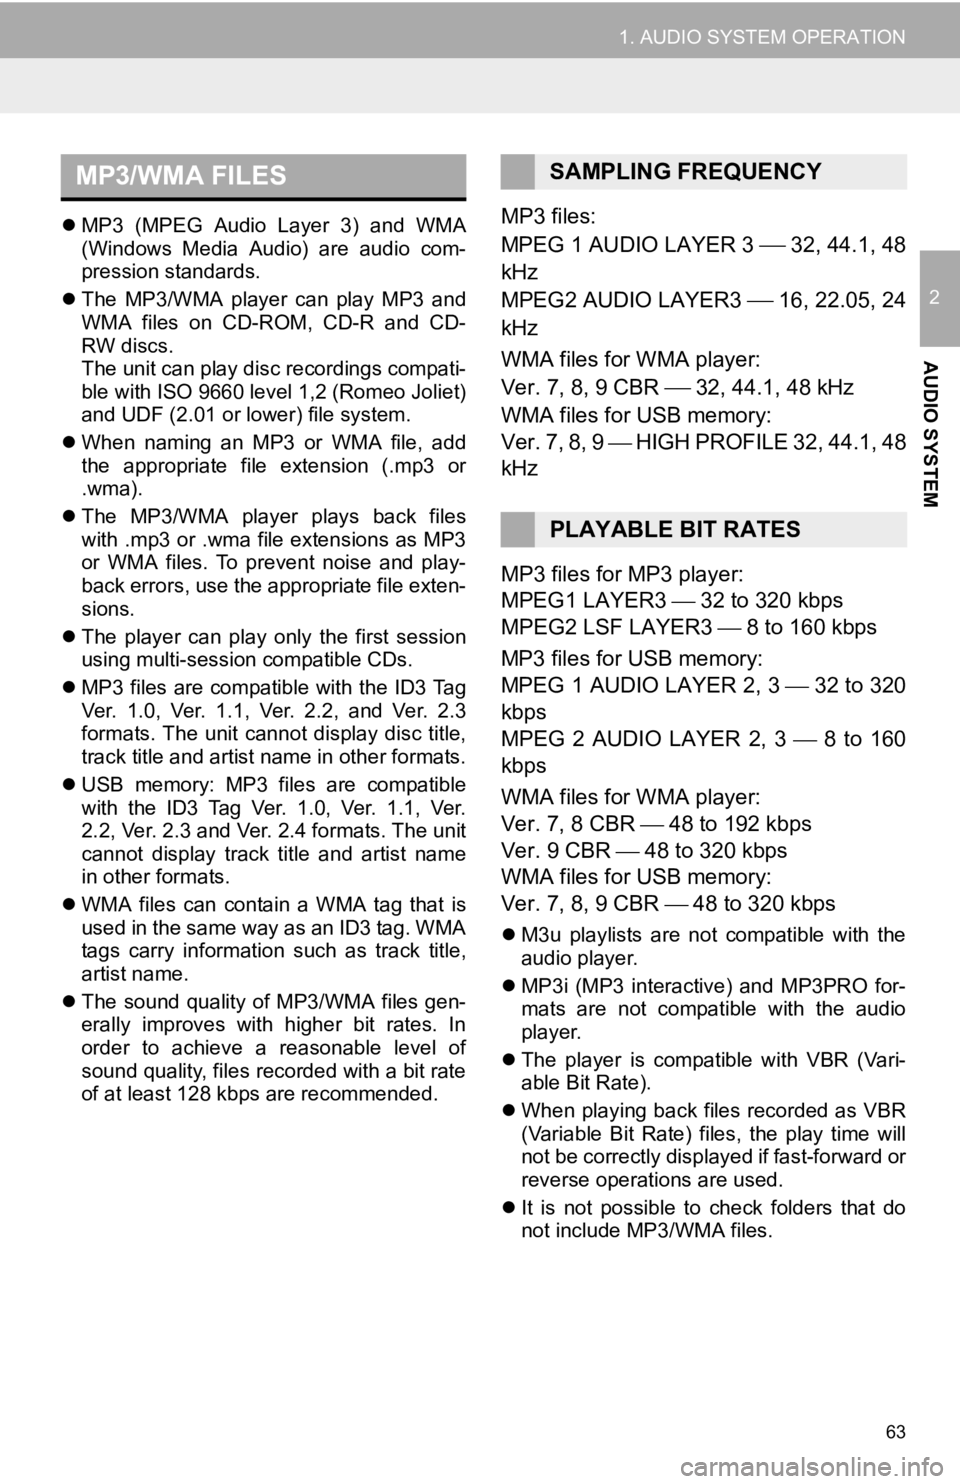
MP3 (MPEG Audio Layer 3) and WMA
(Windows Media Audio) are audio com-
pression standards.
The MP3/WMA player can play MP3 and
WMA files on CD-ROM, CD-R and CD-
RW discs.
The unit can play disc recordings compati-
ble with ISO 9660 level 1,2 (Romeo Joliet)
and UDF (2.01 or lower) file system.
When naming an MP3 or WMA file, add
the appropriate file extension (.mp3 or
.wma).
The MP3/WMA player plays back files
with .mp3 or .wma file extensions as MP3
or WMA files. To prevent noise and play-
back errors, use the appropriate file exten-
sions.
The player can play only the first session
using multi-session compatible CDs.
MP3 files are compatible with the ID3 Tag
Ver. 1.0, Ver. 1.1, Ver. 2.2, and Ver. 2.3
formats. The unit cannot display disc title,
track title and artist name in other formats.
USB memory: MP3 files are compatible
with the ID3 Tag Ver. 1.0, Ver. 1.1, Ver.
2.2, Ver. 2.3 and Ver. 2.4 formats. The unit
cannot display track title and artist name
in other formats.
WMA files can contain a WMA tag that is
used in the same way as an ID3 tag. WMA
tags carry information such as track title,
artist name.
The sound quality of MP3/WMA files gen-
erally improves with higher bit rates. In
order to achieve a reasonable level of
sound quality, files recorded with a bit rate
of at least 128 kbps are recommended.MP3 files:
MPEG 1 AUDIO LAYER 3
32, 44.1, 48
kHz
MPEG2 AUDIO LAYER3
16, 22.05, 24
kHz
WMA files for WMA player:
Ver. 7, 8, 9 CBR
32, 44.1, 48 kHz
WMA files for USB memory:
Ver. 7, 8, 9 HIGH PROFILE 32, 44.1, 48
kHz
MP3 files for MP3 player:
MPEG1 LAYER3 32 to 320 kbps
MPEG2 LSF LAYER3 8 to 160 kbps
MP3 files for USB memory:
MPEG 1 AUDIO LAYER 2, 3 32 to 320
kbps
MPEG 2 AUDIO LAYER 2, 3 8 to 160
kbps
WMA files for WMA player:
Ver. 7, 8 CBR 48 to 192 kbps
Ver. 9 CBR 48 to 320 kbps
WMA files for USB memory:
Ver. 7, 8, 9 CBR 48 to 320 kbps
M3u playlists are not compatible with the
audio player.
MP3i (MP3 interactive) and MP3PRO for-
mats are not compatible with the audio
player.
The player is compatible with VBR (Vari-
able Bit Rate).
When playing back files recorded as VBR
(Variable Bit Rate) files, the play time will
not be correctly displayed if fast-forward or
reverse operations are used.
It is not possible to check folders that do
not include MP3/WMA files.
MP3/WMA FILESSAMPLING FREQUENCY
PLAYABLE BIT RATES
Page 67 of 131
3
67
1
2
3
4
5
6
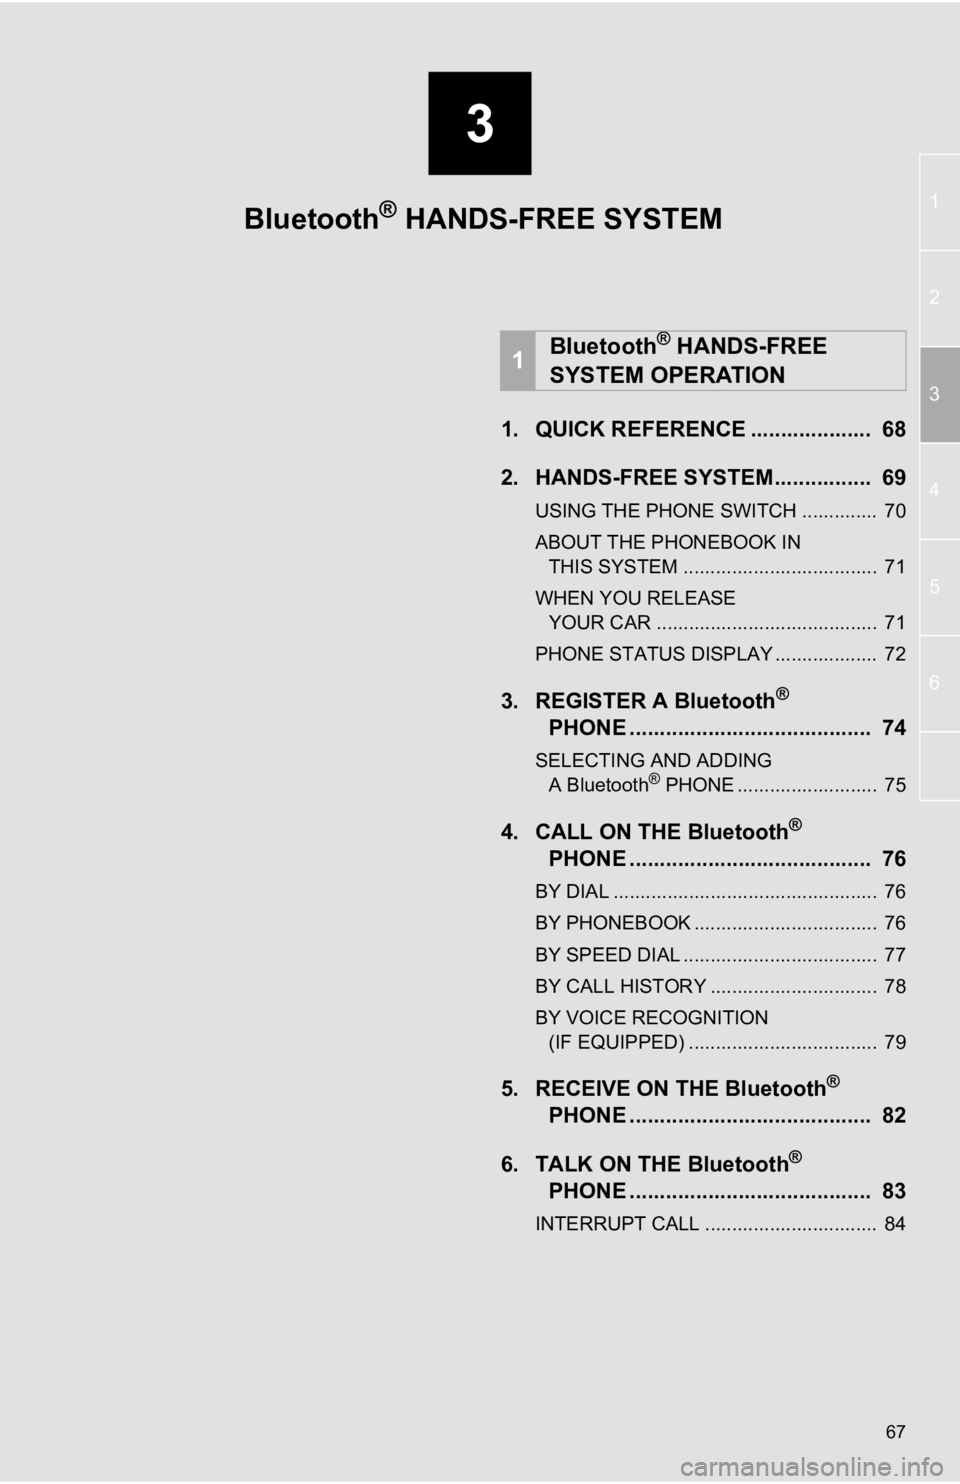
1. QUICK REFERENCE .................... 68
2. HANDS-FREE SYSTEM................ 69
USING THE PHONE SWITCH .............. 70
ABOUT THE PHONEBOOK IN
THIS SYSTEM .................................... 71
WHEN YOU RELEASE YOUR CAR ......................................... 71
PHONE STATUS DISPLAY ................... 72
3. REGISTER A Bluetooth®
PHONE ........................................ 74
SELECTING AND ADDING
A Bluetooth® PHONE .......................... 75
4. CALL ON THE Bluetooth®
PHONE ........................................ 76
BY DIAL ................................................. 76
BY PHONEBOOK .................................. 76
BY SPEED DIAL .................................... 77
BY CALL HISTORY ............................... 78
BY VOICE RECOGNITION
(IF EQUIPPED) ................................... 79
5. RECEIVE ON THE Bluetooth®
PHONE ........................................ 82
6. TALK ON THE Bluetooth
®
PHONE ........................................ 83
INTERRUPT CALL ................................ 84
1Bluetooth® HANDS-FREE
SYSTEM OPERATION
Bluetooth® HANDS-FREE SYSTEM