diff TOYOTA TACOMA 2017 (in English) Repair Manual
[x] Cancel search | Manufacturer: TOYOTA, Model Year: 2017, Model line: TACOMA, Model: TOYOTA TACOMA 2017Pages: 640, PDF Size: 11.07 MB
Page 386 of 640
3866-1. Using the air conditioning system
■Ventilation and air conditioning odors
●To let fresh air in, set the air conditioning system to the outside air m\
ode.
● During use, various odors from inside and outside the vehicle may enter into
and accumulate in the air conditioning system. This may then cause odor to
be emitted from the vents.
● To reduce potential odors from occurring:
• It is recommended that the air conditioning system be set to outside air
mode prior to turning the vehicle off.
• The start timing of the blower may be delayed for a short period of time immediately after the air conditioning system is started in automatic
mode.
■ Air conditioning filter
→P. 482
WARNING
■To prevent the windshield from fogging up
● Do not use
during cool air operation in extremely humid weather.
The difference between the temperature of the outside air and that of the
windshield can cause the outer surface of the windshield to fog up, block-
ing your vision.
■ To prevent burns
Do not touch the rear view mirror surf aces when the outside rear view mirror
defoggers are on.
NOTICE
■ To prevent battery discharge
Do not leave the air conditioning system on longer than necessary when the
engine is stopped.
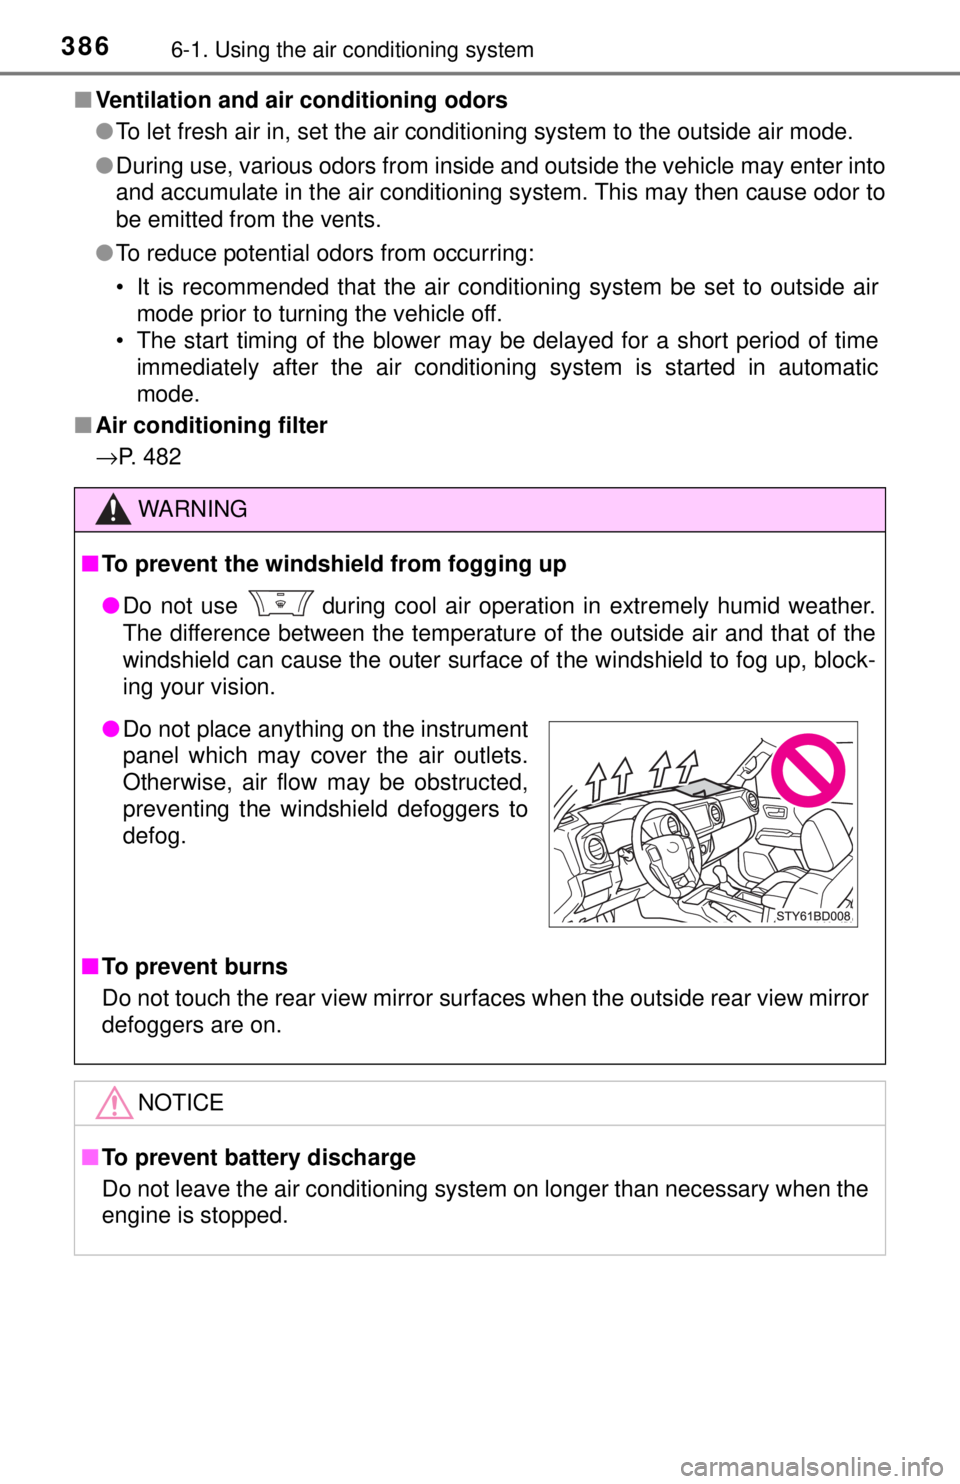
● Do not place anything on the instrument
panel which may cover the air outlets.
Otherwise, air flow may be obstructed,
preventing the windshield defoggers to
defog.
Page 425 of 640
4256-4. Other interior features
6
Interior features
Garage door opener∗
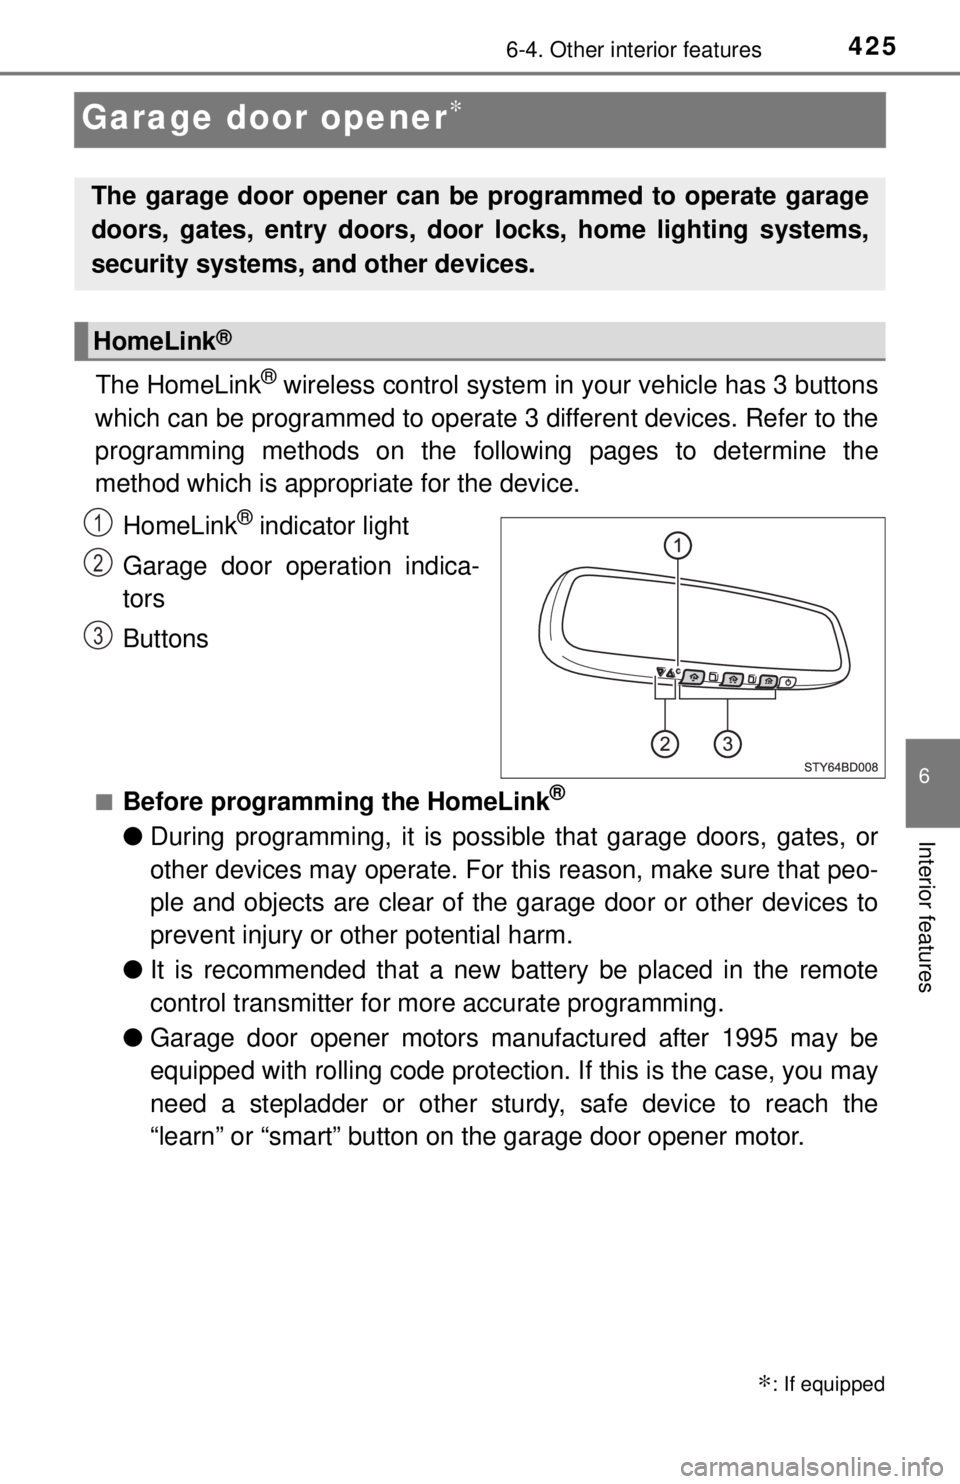
The HomeLink® wireless control system in your vehicle has 3 buttons
which can be programmed to operate 3 different devices. Refer to the
programming methods on the foll owing pages to determine the
method which is appr opriate for the device.
HomeLink
® indicator light
Garage door operation indica-
tors
Buttons
■Before programming the HomeLink®
● During programming, it is possible that garage doors, gates, or
other devices may operate. For this reason, make sure that peo-
ple and objects are clear of the garage door or other devices to
prevent injury or other potential harm.
● It is recommended that a new battery be placed in the remote
control transmitter for more accurate programming.
● Garage door opener motors manufactured after 1995 may be
equipped with rolling code protection. If this is the case, you may
need a stepladder or other sturdy, safe device to reach the
“learn” or “smart” button on the garage door opener motor.
∗: If equipped
The garage door opener can be programmed to operate garage
doors, gates, entry doors, door locks, home lighting systems,
security systems, and other devices.
HomeLink®
1
2
3
Page 430 of 640
4306-4. Other interior features
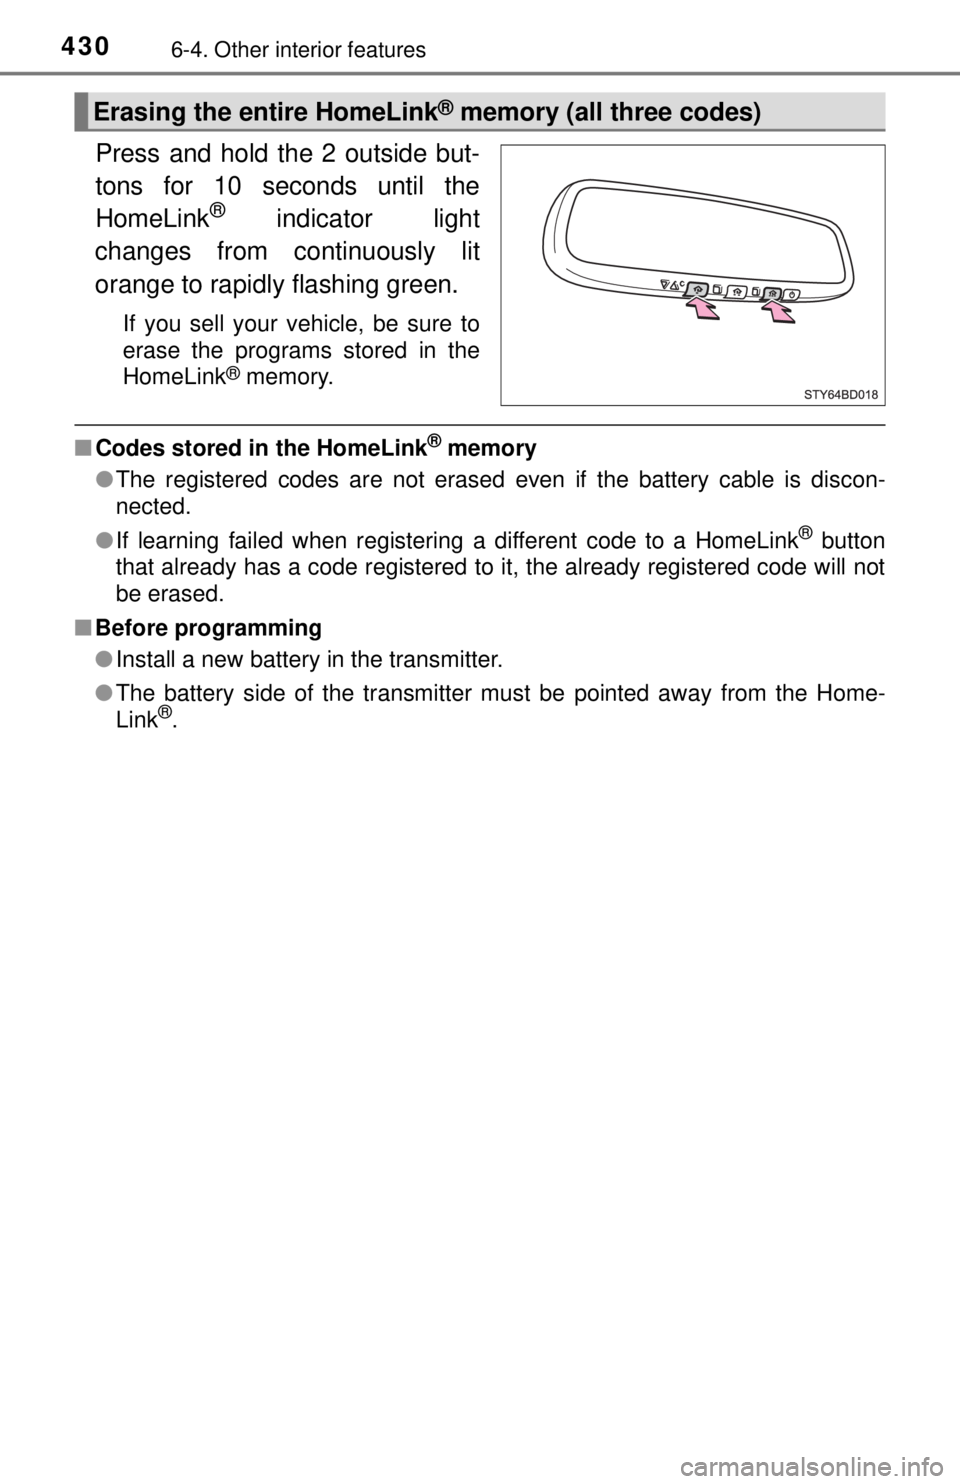
Press and hold the 2 outside but-
tons for 10 seconds until the
HomeLink
® indicator light
changes from continuously lit
orange to rapidly flashing green.
If you sell your vehicle, be sure to
erase the programs stored in the
HomeLink
® memory.
■ Codes stored in the HomeLink® memory
● The registered codes are not erased even if the battery cable is discon-
nected.
● If learning failed when registering a different code to a HomeLink
® button
that already has a code registered to it, the already registered code will not
be erased.
■ Before programming
●Install a new battery in the transmitter.
● The battery side of the transmitter must be pointed away from the Home-
Link
®.
Erasing the entire HomeLink® memory (all three codes)
Page 456 of 640
4567-3. Do-it-yourself maintenance
With the engine at operating temperature and turned off, check the oil
level on the dipstick.
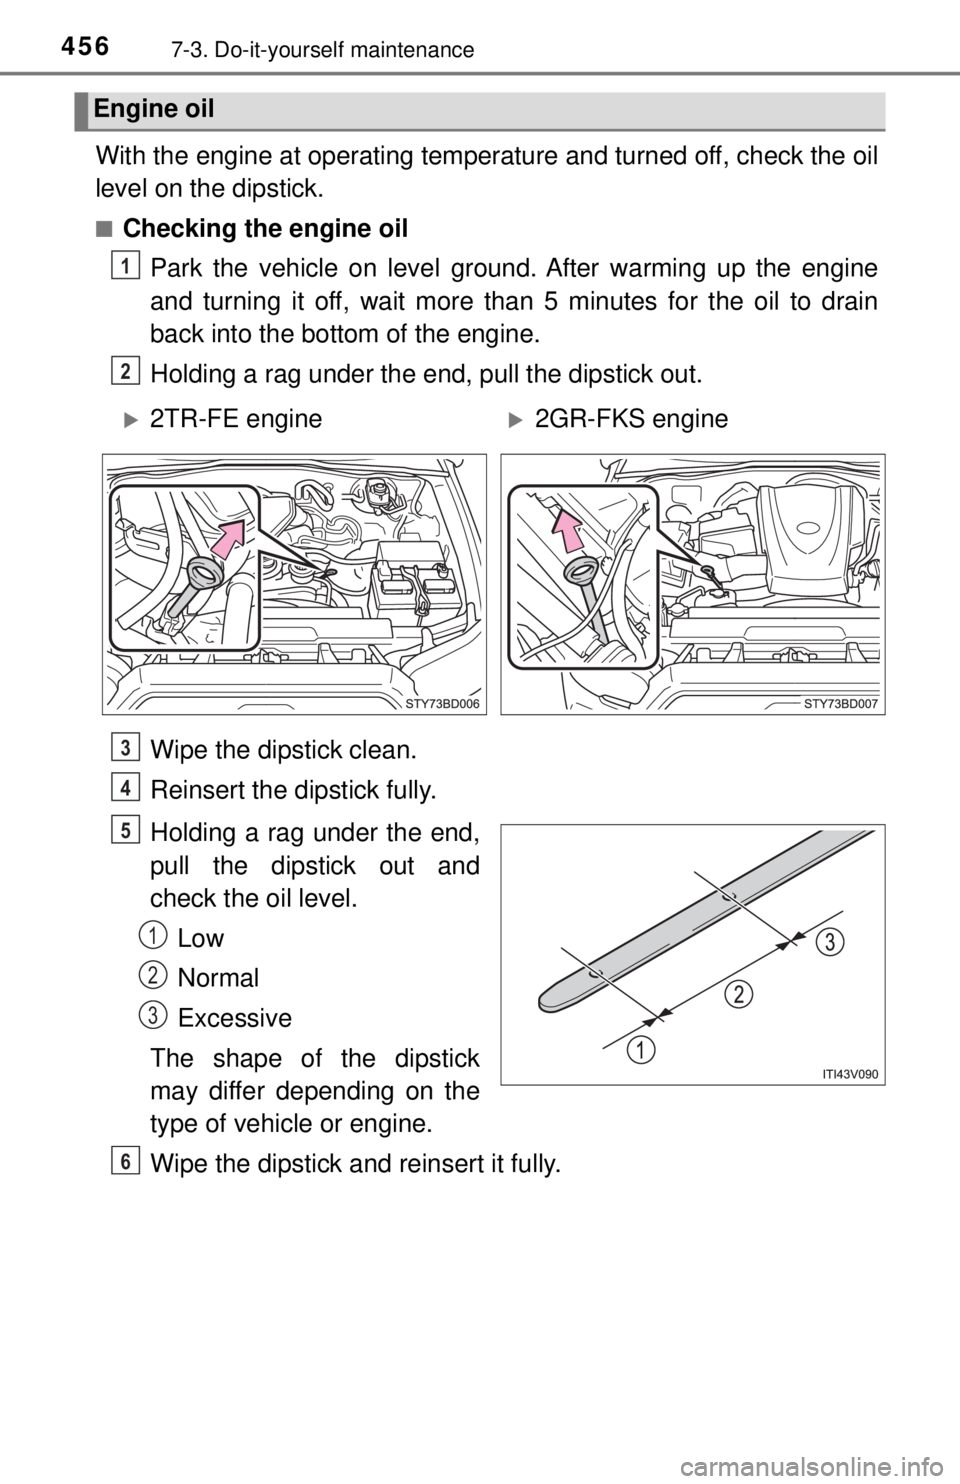
■Checking the engine oilPark the vehicle on level ground. After warming up the engine
and turning it off, wait more than 5 minutes for the oil to drain
back into the bottom of the engine.
Holding a rag under the end, pull the dipstick out.
Wipe the dipstick clean.
Reinsert the dipstick fully.
Holding a rag under the end,
pull the dipstick out and
check the oil level.Low
Normal
Excessive
The shape of the dipstick
may differ depending on the
type of vehicle or engine.
Wipe the dipstick and reinsert it fully.
Engine oil
1
2
2TR-FE engine2GR-FKS engine
3
4
5
1
2
3
6
Page 474 of 640

4747-3. Do-it-yourself maintenance
■Tire pressure warning system certification (if equipped)
For vehicles sold in U.S.A.
FCC ID: HYQ23AAK
FCC ID: PAXPMVC015
NOTE:
This device complies with part 15 of the FCC Rules. Operation is subject
to the following two conditions: (1) This device may not cause harmful
interference, and (2) this device must accept any interference received,
including interference that may cause undesired operation.
FCC WARNING:
Changes or modifications not ex pressly approved by the party
responsible for compliance could void the user’s authority to operate the
equipment.
For vehicles sold in Canada
Model: PMV-C015
NOTE:
This device complies with Indust ry Canada licence-exempt RSS
standard(s). Operation is subject to the following two conditions: (1) this
device may not cause interference, a nd (2) this device must accept any
interference, including interference that may cause undesired operation
of the device.
WARNING
■When inspecting or replacing tires
Observe the following precautions to prevent accidents.
Failure to do so may cause damage to parts of the drive train as well as
dangerous handling characteristics, which may lead to an accident
resulting in death or serious injury.
●Do not mix tires of different makes, models or tread patterns.
Also, do not mix tires of remarkably different treadwear.
●Do not use tire sizes other than those recommended by Toyota.
●Do not mix differently constructed ti res (radial, bias-belted or bias-ply
tires).
●Do not mix summer, all season and snow tires.
●Do not use tires that have been used on another vehicle.
Do not use tires if you do not know how they were used previously.
■When initializing the tire pressure warning system (if equipped)
Do not operate the tire pressure warning reset switch without first
adjusting the tire inflation pressure to the specified level. Otherwise, the
tire pressure warning light may not come on even if the tire inflation
pressure is low, or it may come on when the tire inflation pressure is
actually normal.
Page 478 of 640
4787-3. Do-it-yourself maintenance
■Instructions for checking tire inflation pressure
When checking tire inflation pressure, observe the following:
●Check only when the tires are cold.
If your vehicle has been parked for at least 3 hours or has not been
driven for more than 1 mile or 1.5 km, you will get an accurate cold tire
inflation pressure reading.
●Always use a tire pressure gauge.
It is difficult to judge if a tire is properly inflated based only on its appear-
ance.
●It is normal for the tire inflation pressure to be higher after driving as
heat is generated in the tire. Do no t reduce tire inflation pressure after
driving.
●Never exceed the vehicle capacity weight.
Passengers and luggage weight should be placed so that the vehicle is
balanced.
WARNING
■Proper inflation is critical to save tire performance
Keep your tires properly inflated.
If the tires are not properly inflated, the following conditions may occur
which could lead to an accident resulting in death or serious injury:
●Excessive wear
●Uneven wear
●Poor handling
●Possibility of blowouts resu lting from overheated tires
●Air leaking from between tire and wheel
●Wheel deformation and/or tire damage
●Greater possibility of tire damage while driving (due to road hazards,
expansion joints, sharp edges in the road, etc.)
NOTICE
■When inspecting and adjusting tire inflation pressure
Be sure to put the tire valve caps back on.
If a valve cap is not installed, dirt or moisture may get into the valve and
cause an air leak, resulting in decreased tire inflation pressure.
Page 479 of 640
4797-3. Do-it-yourself maintenance
7
Maintenance and care
Wheels
When replacing wheels, care should be taken to ensure that they are
equivalent to those removed in load capacity, diameter, rim width and
inset
*.
Replacement wheels are available at your Toyota dealer.
*: Conventionally referred to as “offset”.
Toyota does not recommend using the following:
● Wheels of different sizes or types
● Used wheels
● Bent wheels that have been straightened
● Use only Toyota wheel nuts and wrenches designed for use with
your aluminum wheels.
● When rotating, repairing or changi ng your tires, check that the
wheel nuts are still tight after driving 1000 miles (1600 km).
● Be careful not to damage the aluminum wheels when using tire
chains.
● Use only Toyota genuine balance we ights or equivalent and a plas-
tic or rubber hammer when balancing your wheels.
If a wheel is bent, cracked or heavily corroded, it should be
replaced. Otherwise, the tire may separate from the wheel or
cause a loss of handling control.
Wheel selection
Aluminum wheel precautions (if equipped)
Page 480 of 640
4807-3. Do-it-yourself maintenance
■When replacing wheels (vehicles with the tire pressure warning sys-
tem)
The wheels of your vehicle are equipped with tire pressure warning
valves and transmitters that allow the tire pressure warning system to
provide advance warning in the event of a loss in tire inflation pressure.
Whenever wheels are replaced, tire pressure warning valves and trans-
mitters must be installed. ( →P. 467)
WARNING
■When replacing wheels
●Do not use wheels that are a different size from those recommended in
the Owner’s Manual, as this may result in a loss of handling control.
●Never use an inner tube in a leak ing wheel which is designed for a
tubeless tire. Doing so may result in an accident, causing death or seri-
ous injury.
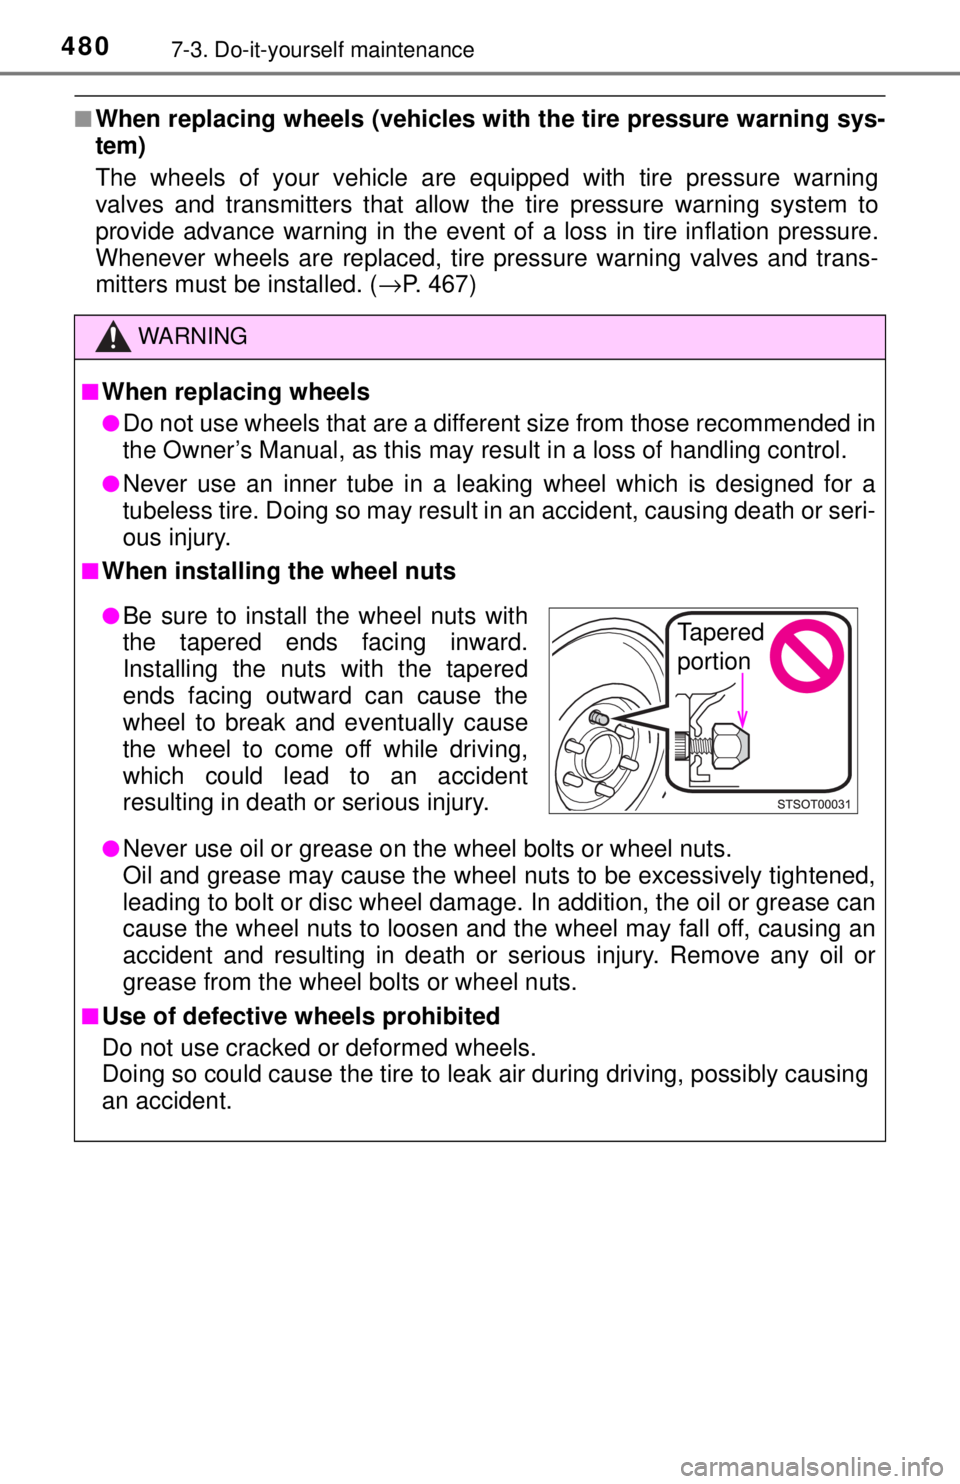
■When installing the wheel nuts
●Never use oil or grease on the wheel bolts or wheel nuts.
Oil and grease may cause the wheel nuts to be excessively tightened,
leading to bolt or disc wheel damage. In addition, the oil or grease can
cause the wheel nuts to loosen and the wheel may fall off, causing an
accident and resulting in death or serious injury. Remove any oil or
grease from the wheel bolts or wheel nuts.
■Use of defective wheels prohibited
Do not use cracked or deformed wheels.
Doing so could cause the tire to leak air during driving, possibly causing
an accident.
●Be sure to install the wheel nuts with
the tapered ends facing inward.
Installing the nuts with the tapered
ends facing outward can cause the
wheel to break and eventually cause
the wheel to come off while driving,
which could lead to an accident
resulting in death or serious injury.Tapered
portion
Page 491 of 640
4917-3. Do-it-yourself maintenance
7
Maintenance and care
Light bulbs
Check the wattage of the light bulb to be replaced. (→P. 580)
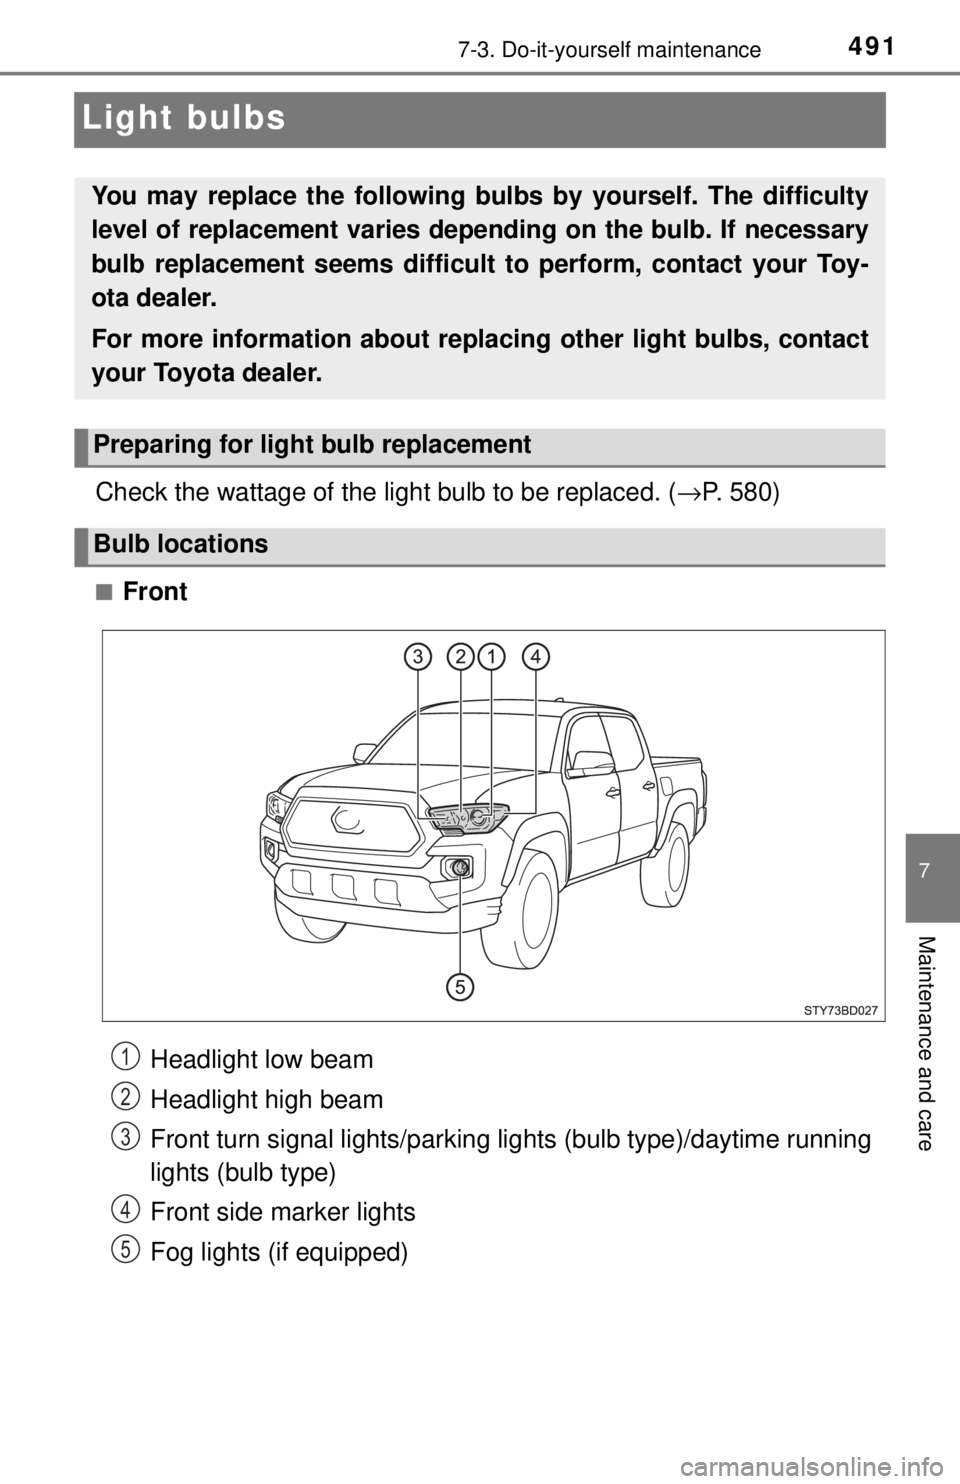
■Front
You may replace the following bulbs by yourself. The difficulty
level of replacement varies de pending on the bulb. If necessary
bulb replacement seems difficult to perform, contact your Toy-
ota dealer.
For more information about replacing other light bulbs, contact
your Toyota dealer.
Preparing for light bulb replacement
Bulb locations
Headlight low beam
Headlight high beam
Front turn signal lights/parking li ghts (bulb type)/daytime running
lights (bulb type)
Front side marker lights
Fog lights (if equipped)1
2
3
4
5
Page 509 of 640
5098-2. Steps to take in an emergency
8
When trouble arises
If a tow truck is not available in an emergency, your vehicle may be
temporarily towed using cables or chains secured to the emergency
towing hook(s). This should only be attempted on hard surfaced roads
for at most 50 miles (80 km) at under 18 mph (30 km/h).
A driver must be in the vehicle to steer and operate the brakes. The
vehicle’s wheels, drivetrain, axles, steering and brakes must be in
good condition.
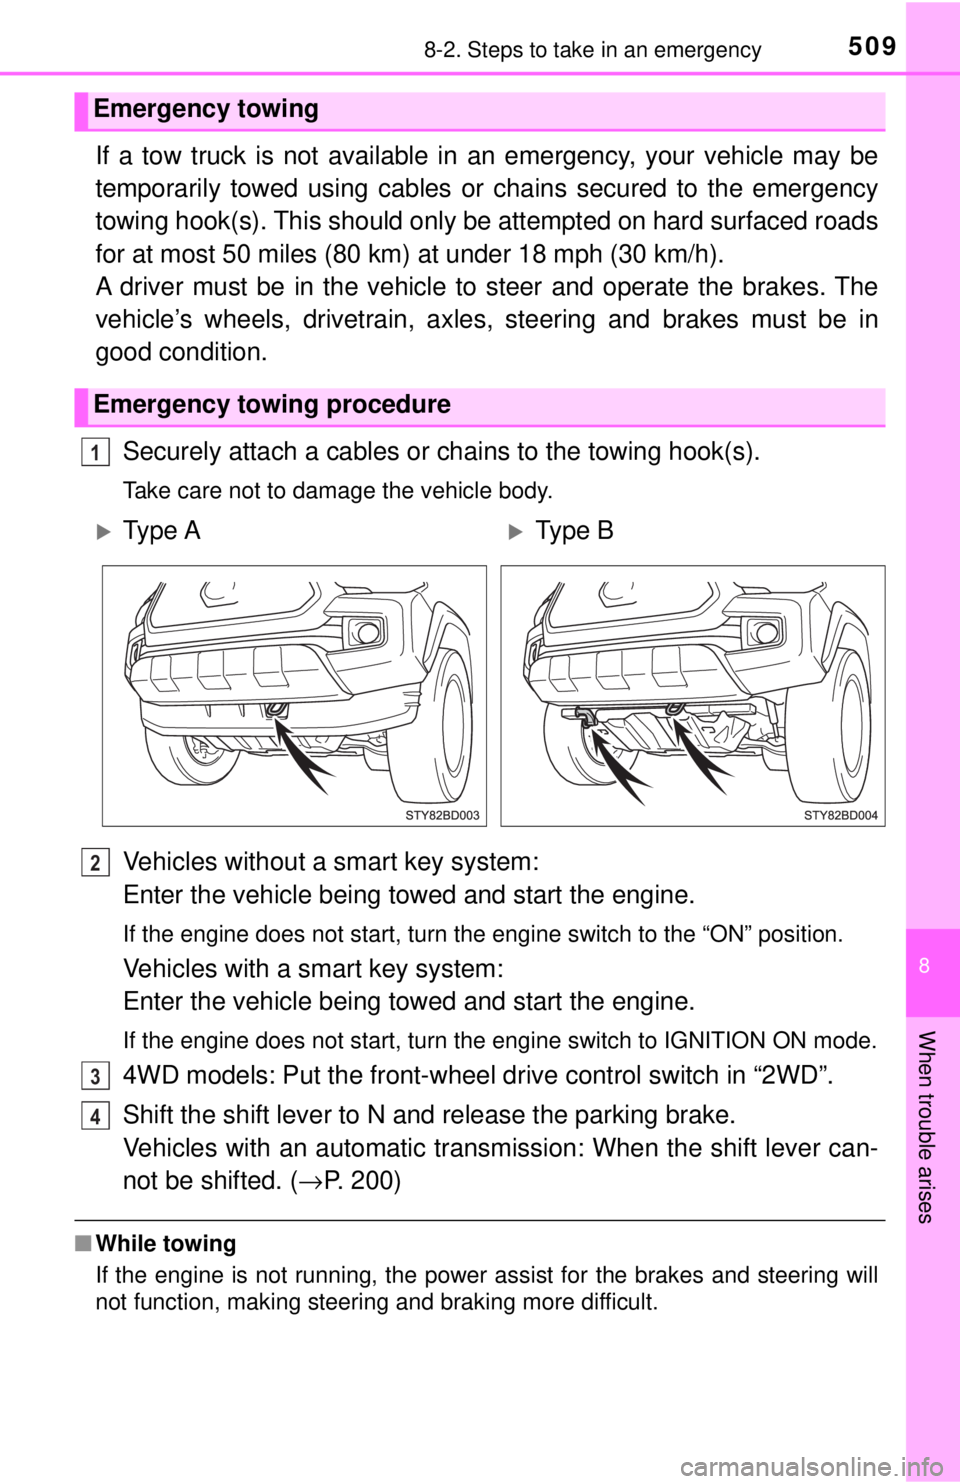
Securely attach a cables or chains to the towing hook(s).
Take care not to damage the vehicle body.
Vehicles without a smart key system:
Enter the vehicle being towed and start the engine.
If the engine does not start, turn the engine switch to the “ON” p\
osition.
Vehicles with a smart key system:
Enter the vehicle being towed and start the engine.
If the engine does not start, turn the engine switch to IGNITION ON mode\
.
4WD models: Put the front-wheel dr ive control switch in “2WD”.
Shift the shift lever to N and release the parking brake.
Vehicles with an automatic transmission: When the shift lever can-
not be shifted. (→ P. 200)
■While towing
If the engine is not running, the power assist for the brakes and steering will
not function, making steering and braking more difficult.
Emergency towing
Emergency towing procedure
1
Ty p e AType B
2
3
4