TOYOTA VENZA 2010 Owners Manual (in English)
Manufacturer: TOYOTA, Model Year: 2010, Model line: VENZA, Model: TOYOTA VENZA 2010Pages: 664, PDF Size: 11.44 MB
Page 251 of 664
251
2-5. Driving information
2
When driving
VENZA_U (OM73007U)
■
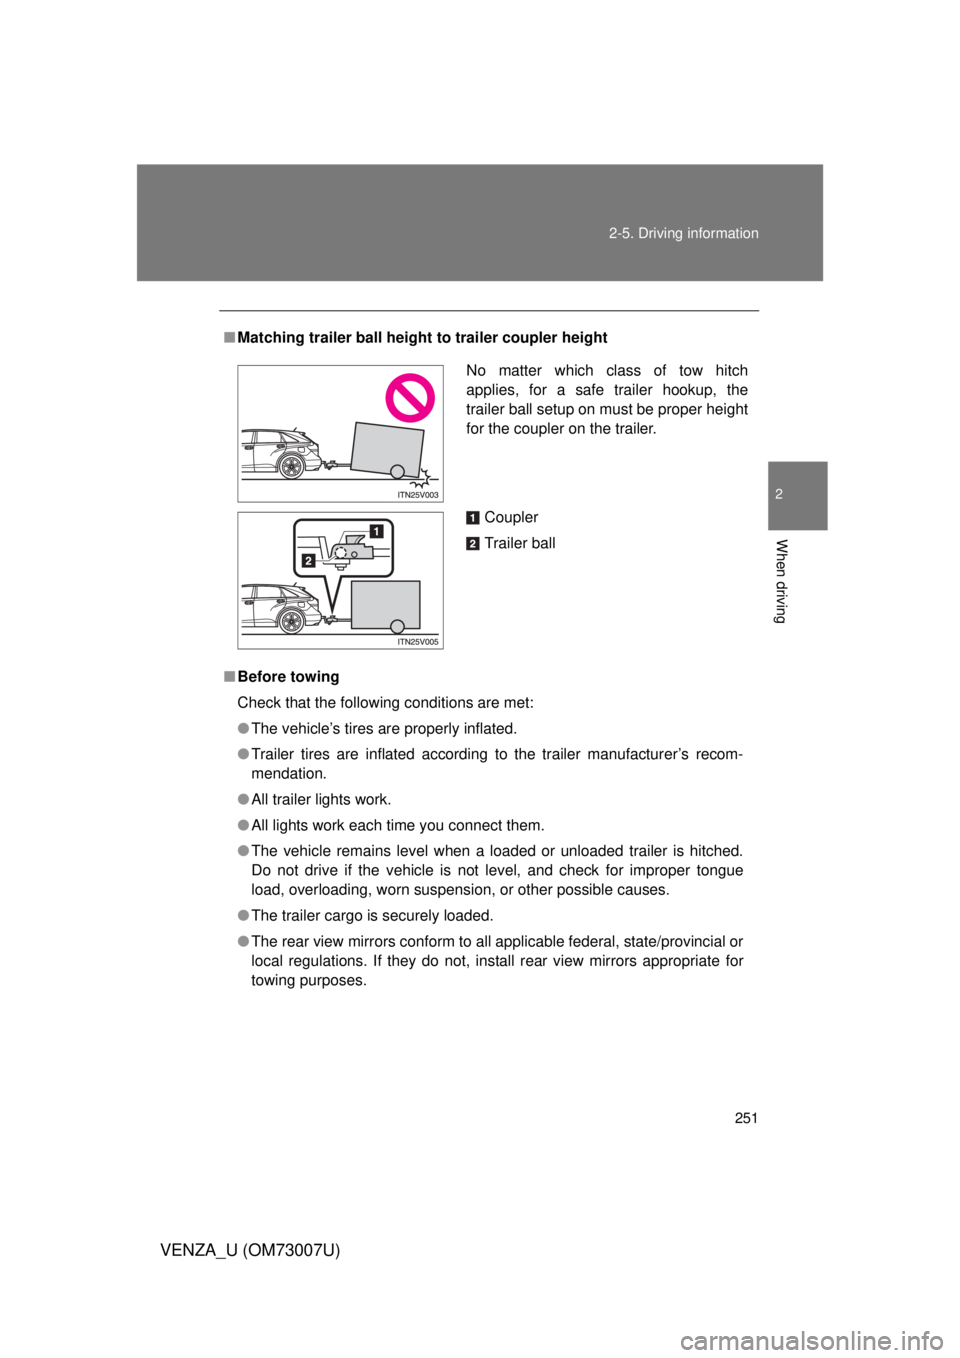
Matching trailer ball height to trailer coupler height
■ Before towing
Check that the following conditions are met:
● The vehicle’s tires are properly inflated.
● Trailer tires are inflated according to the trailer manufacturer’s recom-
mendation.
● All trailer lights work.
● All lights work each time you connect them.
● The vehicle remains level when a loaded or unloaded trailer is hitched.
Do not drive if the vehicle is not level, and check for improper tongue
load, overloading, worn suspension, or other possible causes.
● The trailer cargo is securely loaded.
● The rear view mirrors conform to all applicable federal, state/provincial or
local regulations. If they do not, install rear view mirrors appropriate for
towing purposes.
No matter which class of tow hitch
applies, for a safe trailer hookup, the
trailer ball setup on must be proper height
for the coupler on the trailer.
Coupler
Trailer ball
Page 252 of 664

252 2-5. Driving information
VENZA_U (OM73007U)
■Break-in schedule
If your vehicle is new or equipped with any new power train components
(such as an engine, transmission, differential and wheel bearing), Toyota
recommends that you do not tow a trailer until it has been driven for over 500
miles (800 km).
However, avoid full throttle acceleration.
■ Maintenance
● If you tow a trailer, your vehicle will require more frequent maintenance
due to the additional load. (See “Scheduled Maintenance Guide” or
“Owner’s Manual Supplement”.)
● Retighten the fixing bolts of the towing ball after approximately 600 miles
(1000 km) of trailer towing.
CAUTION
■Trailer towing precautions
● Follow all the instructions described in this section. Failure to do so could
cause an accident resulting in death or serious injury.
● Exceeding the towing capacity, GVWR or GAWR can cause an accident
resulting in death or serious personal injuries.
Page 253 of 664
253
2-5. Driving information
2
When driving
VENZA_U (OM73007U)
CAUTION
■
To avoid accident or injury
● Do not exceed the trailer hitch assembly weight, gross vehicle weight,
gross axle weight and trailer tongue load capacities.
● Never load more weight in the back than in the front of the trailer. About
60% of the load should be in the front half of the trailer, and the remaining
40% in the rear.
● Do not exceed 45 mph (72 km/h) or the posted towing speed limit, which-
ever is lower. As instability (swaying) of the towing vehicle-trailer combina-
tion increases as speed increases, exceeding 45 mph (72 km/h) may
cause loss of control.
● Do not use cruise control when you are towing.
● Slow down and downshift before descending steep or long downhill
grades. Do not make sudden downshifts.
● Avoid holding the brake pedal down too long or applying the brakes too
frequently. This could cause the brakes to overheat and result in reduced
braking efficiency.
● Do not tow the vehicle with the compact spare tire installed.
■ Hitches
● If you wish to install a trailer hitch, contact your Toyota dealer.
● Use only a hitch that conforms to the gross trailer weight requirement.
● Follow the directions supplied by the hitch manufacturer.
● Lubricate the hitch ball with a light coat of grease.
● Remove the trailer hitch whenever you are not towing a trailer. After
removing the hitch, seal any mounting hole in the vehicle body to prevent
entry of any substances into the vehicle.
Page 254 of 664
254 2-5. Driving information
VENZA_U (OM73007U)
CAUTION
■When towing a trailer
● If the gross trailer weight exceeds 1000 lb. (450 kg), trailer brakes are
required. Toyota recommends trailers with brakes that conform to all appli-
cable federal and state/provincial regulations.
● Never tap into your vehicle’s hydraulic system, as this will lower the vehi-
cle’s braking effectiveness.
● Never tow a trailer without using a safety chain securely attached to both
the trailer and the vehicle. If damage occurs to the coupling unit or hitch
ball, there is danger of the trailer wandering into another lane.
NOTICE
■When installing a trailer hitch
● Use only the position recommended by your Toyota dealer. Do not install
the trailer hitch on the bumper; this may cause body damage.
● Do not use axle-mounted hitches, as they can cause damage to the axle
housing, wheel bearings, wheels or tires.
■ Safety chain
A safety chain must always be used between the towing vehicle and the
trailer. Leave sufficient slack in the chain for turns. The chain should cross
under the trailer tongue to prevent the tongue from dropping to the ground in
the case that it becomes damaged or separated. For the correct safety chain
installation procedure, ask your Toyota dealer.
■ Do not directly splice trailer lights
Directly splicing trailer lights may damage your vehicle’s electrical system
and cause a malfunction.
Page 255 of 664
255
2-5. Driving information
2
When driving
VENZA_U (OM73007U)
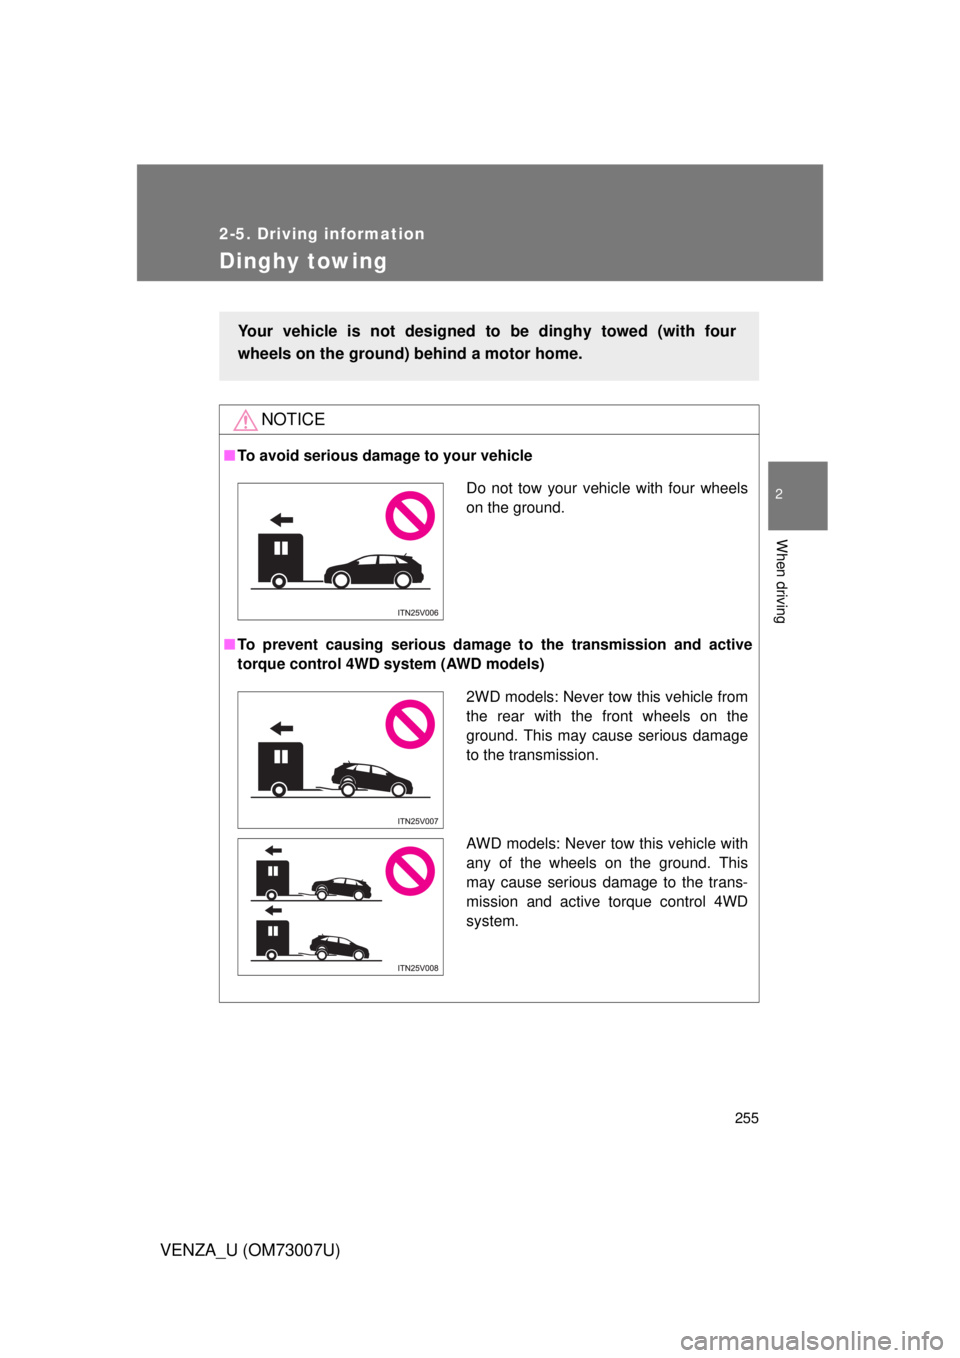
Dinghy towing
NOTICE
■To avoid serious damage to your vehicle
■ To prevent causing serious damage to the transmission and active
torque control 4WD system (AWD models)
Your vehicle is not designed to be dinghy towed (with four
wheels on the ground) behind a motor home.
Do not tow your vehicle with four wheels
on the ground.
2WD models: Never tow this vehicle from
the rear with the front wheels on the
ground. This may cause serious damage
to the transmission.
AWD models: Never tow this vehicle with
any of the wheels on the ground. This
may cause serious damage to the trans-
mission and active torque control 4WD
system.
Page 256 of 664
256
VENZA_U (OM73007U)
3-1. Using the air conditioning system and defogger
Automatic air conditioning system ........................... 258
Manual air conditioning system ........................... 268
Rear window defogger ..... 274 3-2. Using the audio system
Audio system type............ 276
Using the radio ................. 280
Using the CD player ......... 289
Playing back MP3 and WMA discs ..................... 299
Operating an iPod ............ 309
Operating a USB memory ................. 316
Optimal use of the audio system ........................... 324
Using the AUX adapter .... 329
Using the steering switches ......................... 330
3-3. Using the Bluetooth
® audio
system
Bluetooth
® audio
system ........................... 334
Using the Bluetooth
®
audio system .................. 337
Operating a Bluetooth
®
enabled portable
player ............................. 344
Setting up a Bluetooth
®
enabled portable
player ............................. 346
Bluetooth
® audio system
setup .............................. 351
Interior features3
Page 257 of 664
Interior features3
257
VENZA_U (OM73007U)
3-4. Using the rear seat entertainment system
Rear seat entertainment system features ............. 352
Using the DVD player (DVD video) ................... 361
Using the DVD player (video CD)...................... 370
Using the DVD player (audio CD/CD text) ........ 373
Using the DVD player (MP3 discs) .................... 374
Using the video mode ...... 376
Changing the initial settings .......................... 378
3-5. Using the hands-free system (for cellular phone)
Hands-free system (for cellular phone) ......... 387
Using the hands-free system ........................... 390
Making a phone call ......... 399
Setting a cellular phone ... 405
Security and system setup .............................. 412
Using the phone book ...... 417 3-6. Using the interior lights
Interior lights list ............... 426
• Personal/interior light main switch .................... 427
• Personal/interior lights and luggage
compartment light .......... 428
3-7. Using the storage features List of storage features .... 430
• Glove box....................... 431
• Console boxes ............... 432
• Overhead console .......... 434
• Cup holders ................... 435
• Bottle holders ................. 437
• Auxiliary boxes ............... 438
3-8. Other interior features Sun visors ........................ 441
Vanity mirror..................... 442
Power outlets ................... 443
Seat heaters..................... 446
Armrest ............................ 448
Floor mats ........................ 449
Luggage compartment features .......................... 450
Garage door opener......... 452
Compass .......................... 459
Page 258 of 664
258
VENZA_U (OM73007U)
3-1. Using the air conditioning system and defogger
Automatic air conditioning system
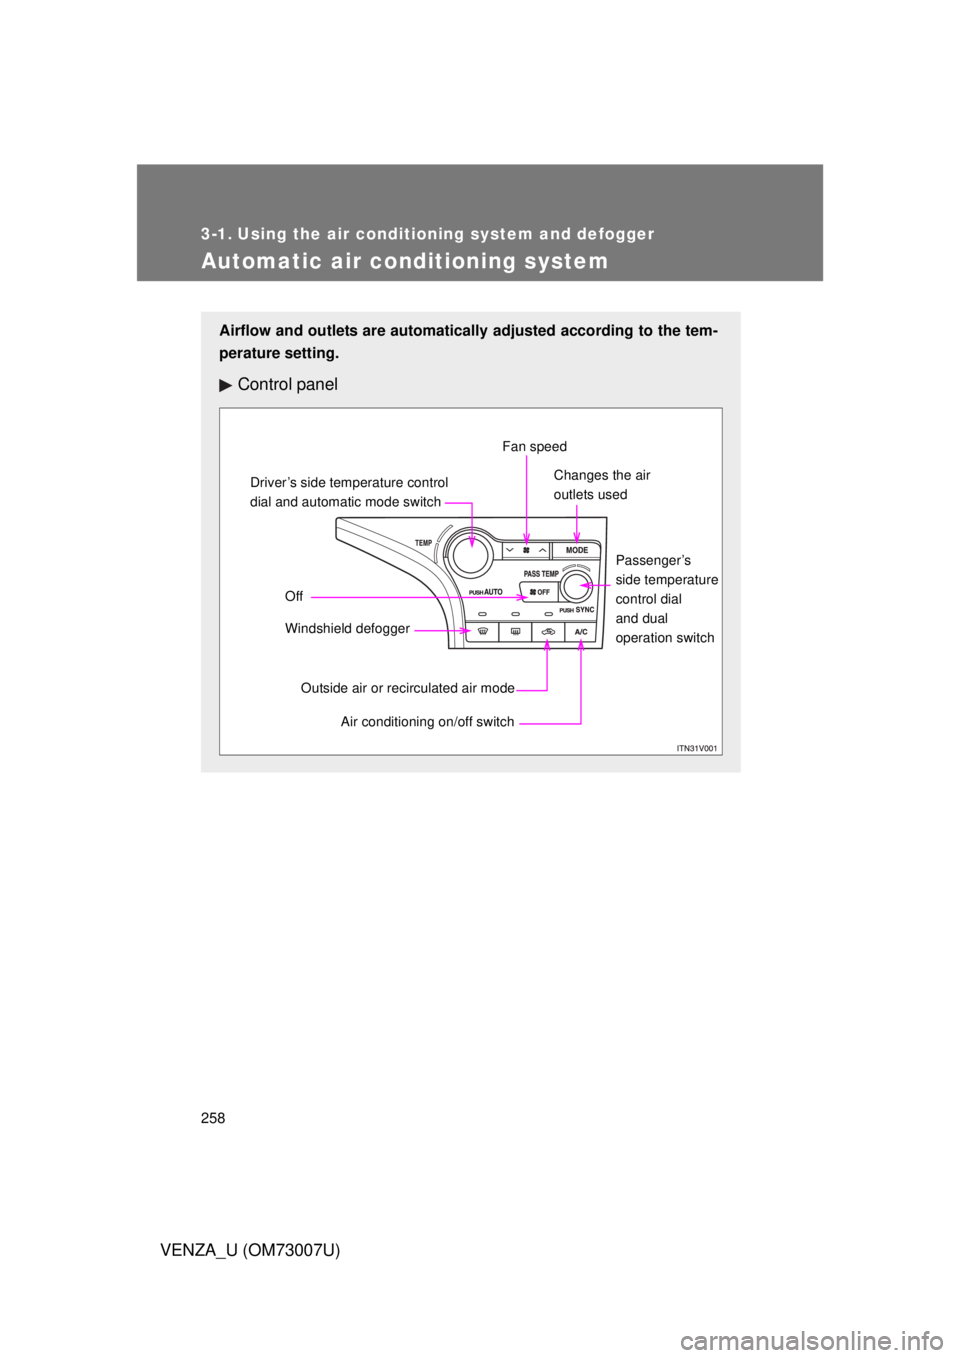
Airflow and outlets are automatically adjusted according to the tem-
perature setting.
Control panel
Driver’s side temperature control
dial and automatic mode switch
Off
Windshield defogger
Outside air or recirculated air mode Air conditioning on/off switch
Fan speed
Changes the air
outlets used
Passenger’s
side temperature
control dial
and dual
operation switch
Page 259 of 664
259
3-1. Using the air conditioning system
and defogger
3
Interior features
VENZA_U (OM73007U)
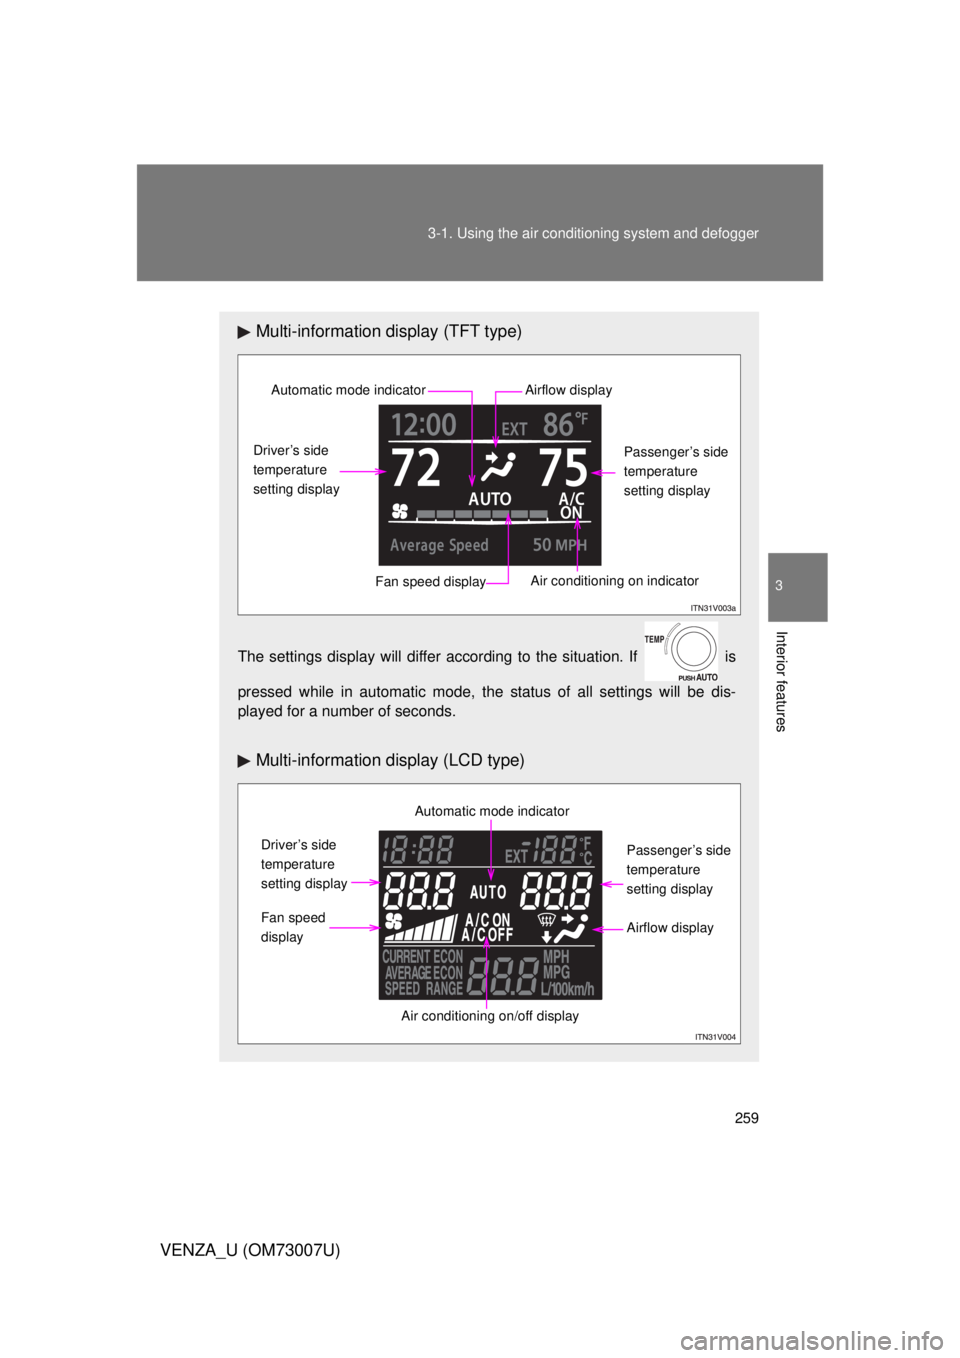
Multi-information display (TFT type)
The settings display will differ according to the situation. If is
pressed while in automatic mode, the status of all settings will be dis-
played for a number of seconds.
Multi-information display (LCD type)
Automatic mode indicator
Driver’s side
temperature
setting display
Fan speed display
Air conditioning on indicator
Passenger’s side
temperature
setting display
Airflow display
Automatic mode indicator
Driver’s side
temperature
setting display
Fan speed
display
Air conditioning on/off display
Passenger’s side
temperature
setting display
Airflow display
Page 260 of 664
260 3-1. Using the air conditioning system and defogger
VENZA_U (OM73007U)
Using the automatic mode
Press .
The air conditioning system will begin to operate. In outside air or
recirculated air mode, air outlets, fan speed and air conditioning on/
off are automatically adjusted according to the temperature setting.
“AUTO” will be displayed on the multi-information display, along with
the temperature setting. The settings that are automatically adjusted
by the system are not displayed. When only “AUTO” and the temper-
ature settings are displayed, may be pressed a second
time to temporarily display all system settings.
Turn the temperature control dial clockwise (warm) or coun-
terclockwise (cool).
The temperature for the driver’s and front passenger’s seats can be
set separately.
STEP1
STEP2