USB TOYOTA VENZA 2014 Accessories, Audio & Navigation (in English)
[x] Cancel search | Manufacturer: TOYOTA, Model Year: 2014, Model line: VENZA, Model: TOYOTA VENZA 2014Pages: 363, PDF Size: 21.59 MB
Page 7 of 363
7
1
2
3
4
5
6
7
8
9
VENZA_Navi_OM73020U_(U)
13.05.13 14:12
1. PHONE OPERATION .................... 130
QUICK REFERENCE .......................... 130
PHONE (HANDS-FREE SYSTEM
FOR CELLULAR PHONE) ................ 132
REGISTER A Bluetooth
® PHONE ....... 137
CALL ON THE Bluetooth® PHONE ..... 142
RECEIVE ON THE Bluetooth®
PHONE ............................................. 149
TALK ON THE Bluetooth
® PHONE ..... 150
Bluetooth® PHONE MESSAGE
FUNCTION........................................ 153
2. SETUP ........................................... 156
PHONE SETTINGS ............................. 156
Bluetooth® SETTINGS ........................ 178
1. AUDIO/VIDEO SYSTEM
OPERATION ................................ 192
QUICK REFERENCE .......................... 192
SOME BASICS .................................... 194
RADIO OPERATION ........................... 200
HD Radio™ TECHNOLOGY
INFORMATION ................................. 203
RADIO OPERATION (XM Satellite
Radio BROADCAST) ........................ 208
RADIO OPERATION (INTERNET RADIO
BROADCAST)................................... 214
DVD PLAYER OPERATION ................ 215
USB MEMORY OPERATION .............. 237
iPod OPERATION ............................... 242
Bluetooth
® AUDIO OPERATION ......... 246
AUDIO/VIDEO REMOTE
CONTROLS
(STEERING SWITCHES) ................. 256
AUDIO/VIDEO SYSTEM
OPERATING HINTS ......................... 257
2. SETUP ........................................... 267
AUDIO SETTINGS .............................. 267
1. VOICE COMMAND SYSTEM
OPERATION................................ 270
VOICE COMMAND SYSTEM .............. 270
NATURAL SPEECH INFORMATION
(ENGLISH ONLY) ............................. 276
EXPANDED VOICE COMMANDS....... 278
COMMAND LIST ................................. 279
1. INFORMATION DISPLAY ............. 284
FUEL CONSUMPTION ........................ 284
MAP DATABASE VERSION AND
COVERAGE AREA ........................... 286
2. XM FUNCTION-OVERVIEW ......... 288
XM SERVICES .................................... 288
3. XM FUNCTION OPERATION ....... 289
XM Sports ............................................ 289
XM Stocks ............................................ 292
XM Fuel Prices..................................... 295
XM NavWeather™ ............................... 298
XM NavTraffic
®.................................... 301
4. SETUP........................................... 304
XM SETTINGS..................................... 304
4PHONE
5AUDIO/VIDEO SYSTEM
6VOICE COMMAND SYSTEM
7INFORMATION
Page 48 of 363
48
2. SETUP
VENZA_Navi_OM73020U_(U)
13.05.13 14:12
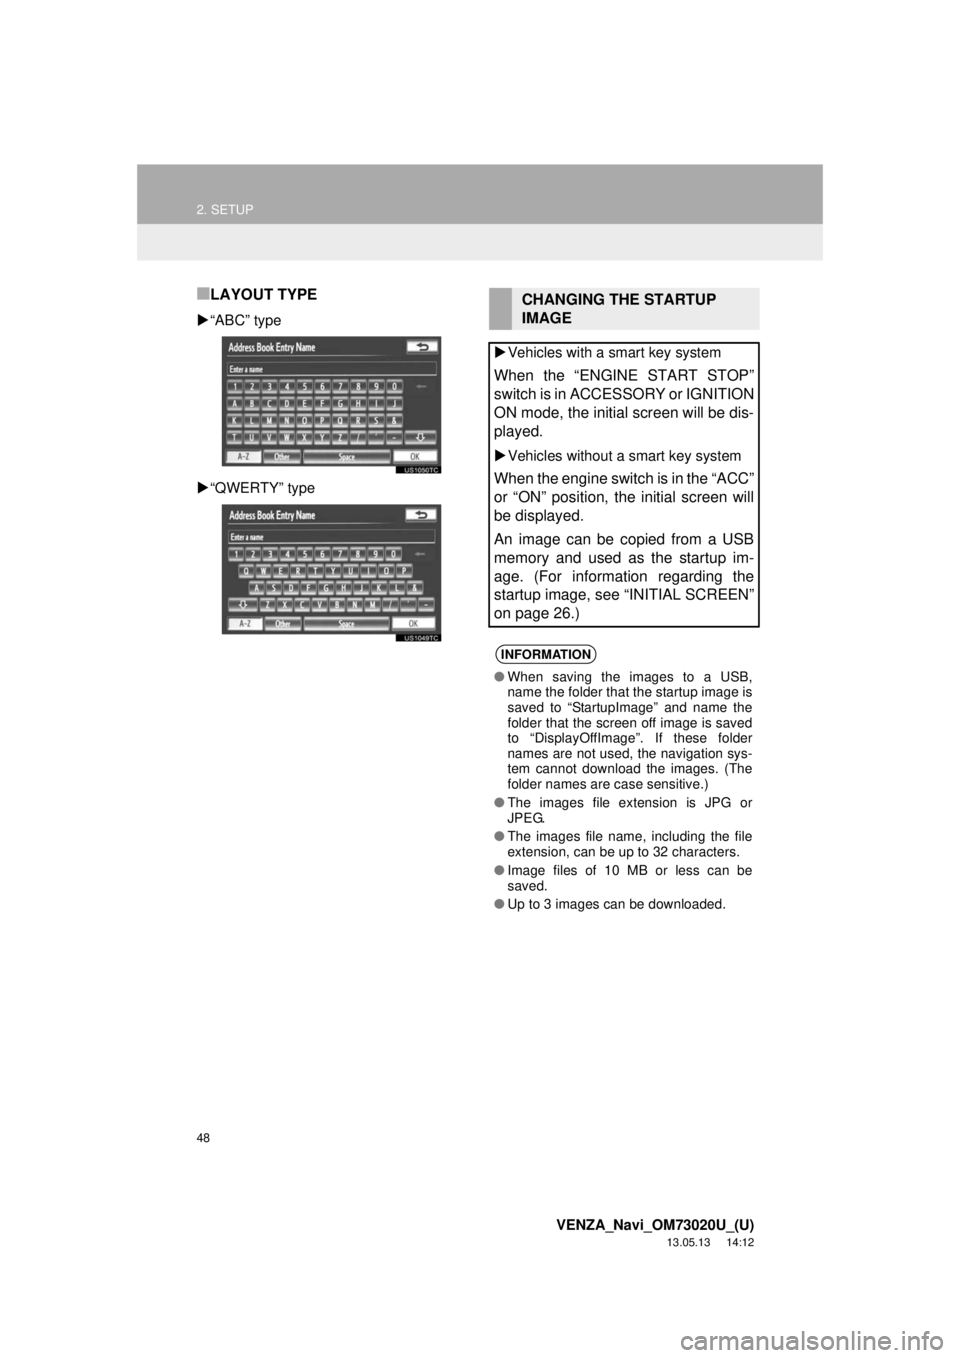
■LAYOUT TYPE
“ABC” type
“QWERTY” type
CHANGING THE STARTUP
IMAGE
Vehicles with a smart key system
When the “ENGINE START STOP”
switch is in ACCESSORY or IGNITION
ON mode, the initial screen will be dis-
played.
Vehicles without a smart key system
When the engine switch is in the “ACC”
or “ON” position, the initial screen will
be displayed.
An image can be copied from a USB
memory and used as the startup im-
age. (For information regarding the
startup image, see “INITIAL SCREEN”
on page 26.)
INFORMATION
●When saving the images to a USB,
name the folder that the startup image is
saved to “StartupImage” and name the
folder that the screen off image is saved
to “DisplayOffImage”. If these folder
names are not used, the navigation sys-
tem cannot download the images. (The
folder names are case sensitive.)
●The images file extension is JPG or
JPEG.
●The images file name, including the file
extension, can be up to 32 characters.
●Image files of 10 MB or less can be
saved.
●Up to 3 images can be downloaded.
Page 49 of 363
49
2. SETUP
2
BASIC FUNCTION
VENZA_Navi_OM73020U_(U)
13.05.13 14:12
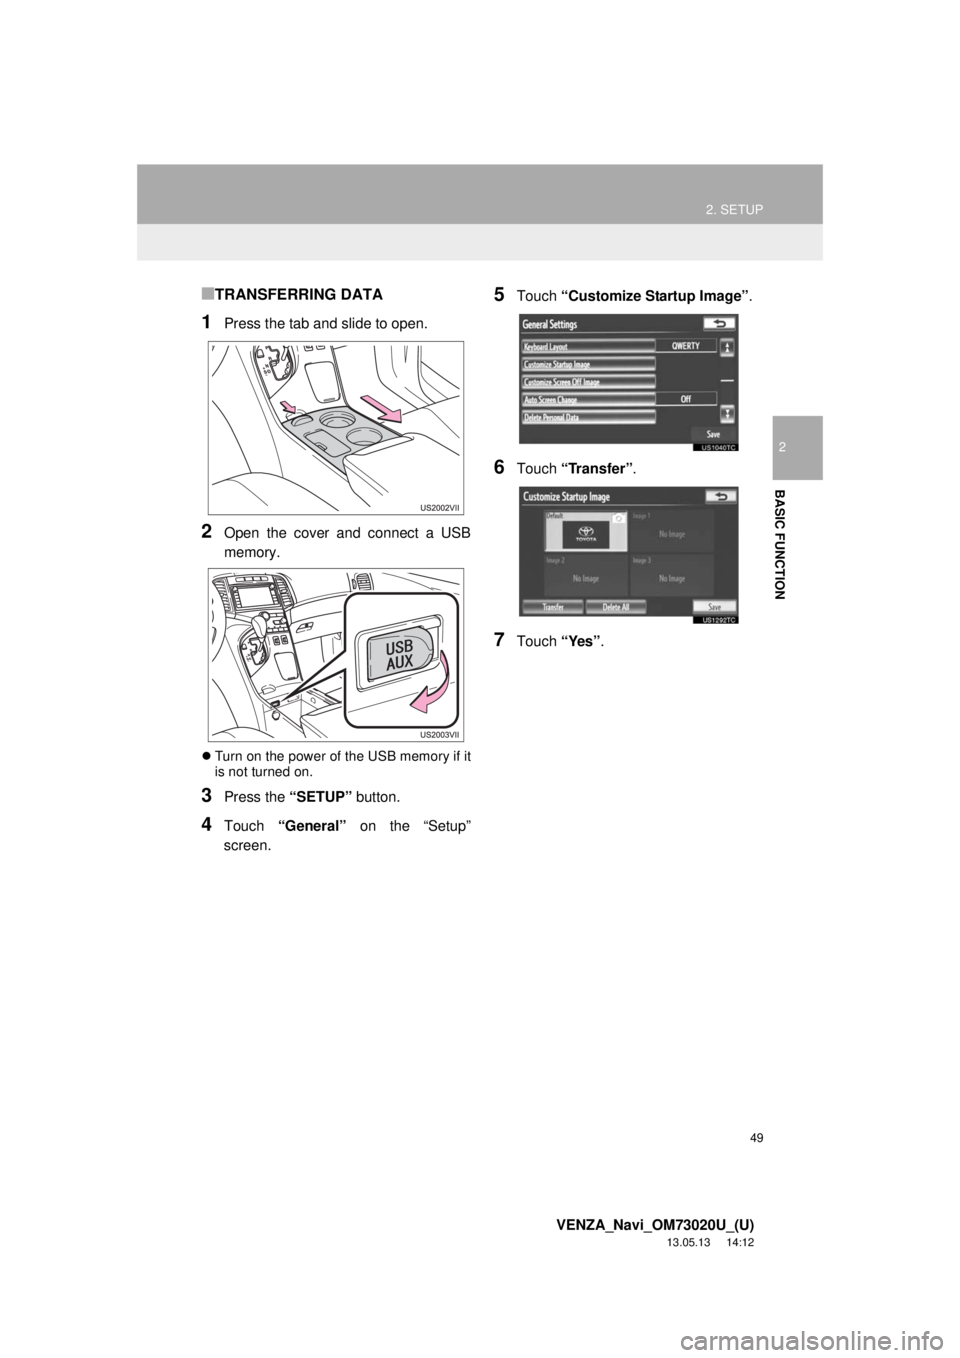
■TRANSFERRING DATA
1Press the tab and slide to open.
2Open the cover and connect a USB
memory.
Turn on the power of the USB memory if it
is not turned on.
3Press the “SETUP” button.
4Touch “General” on the “Setup”
screen.
5Touch “Customize Startup Image”.
6Touch “Transfer”.
7Touch “Yes”.
Page 50 of 363
50
2. SETUP
VENZA_Navi_OM73020U_(U)
13.05.13 14:12
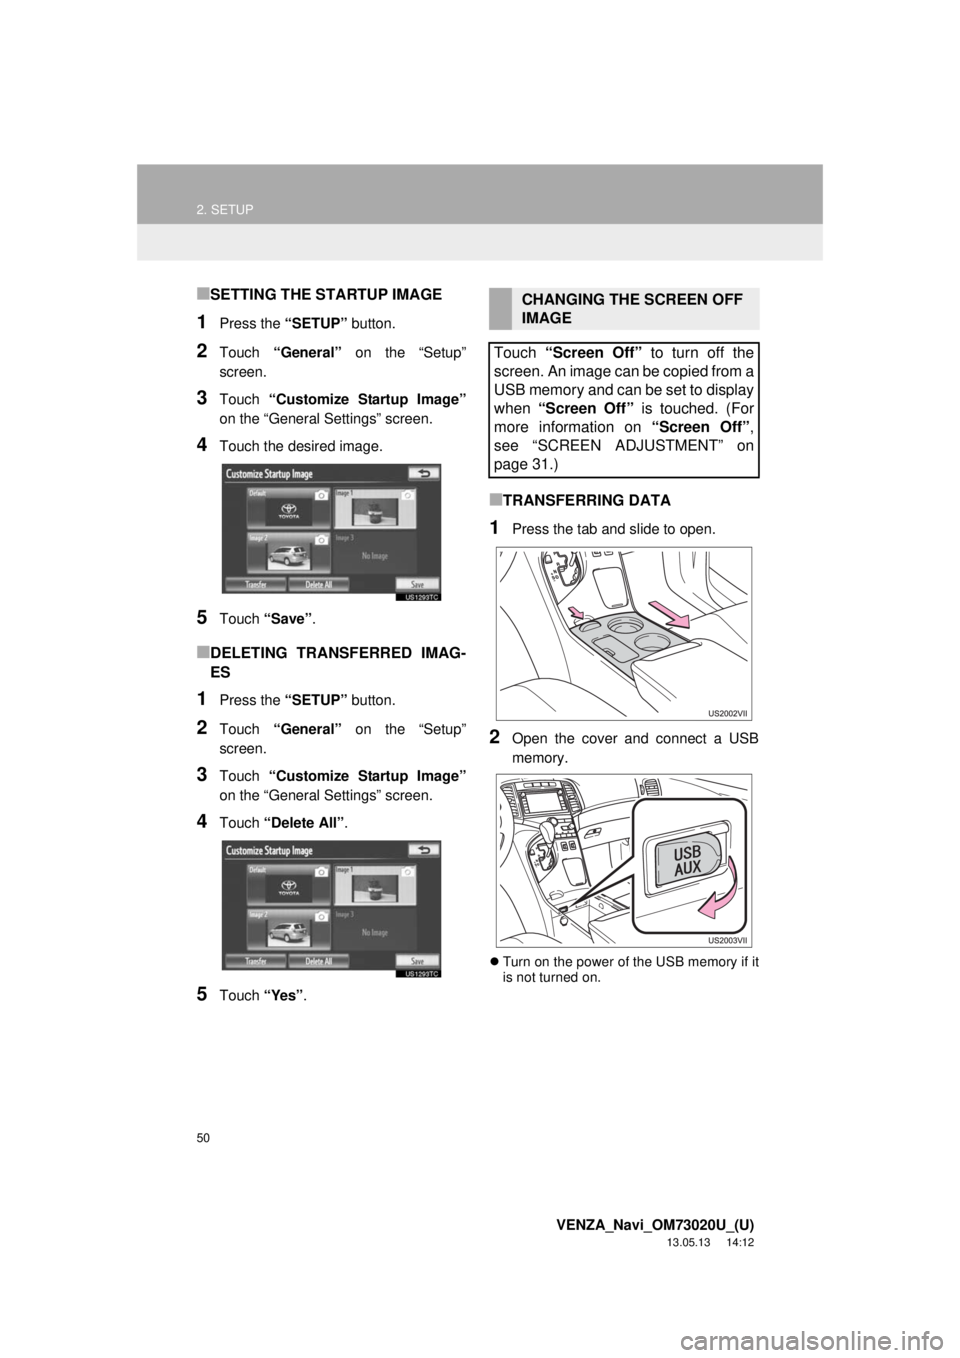
■SETTING THE STARTUP IMAGE
1Press the “SETUP” button.
2Touch “General” on the “Setup”
screen.
3Touch “Customize Startup Image”
on the “General Settings” screen.
4Touch the desired image.
5Touch “Save”.
■DELETING TRANSFERRED IMAG-
ES
1Press the “SETUP” button.
2Touch “General” on the “Setup”
screen.
3Touch “Customize Startup Image”
on the “General Settings” screen.
4Touch “Delete All”.
5Touch “Yes”.
■TRANSFERRING DATA
1Press the tab and slide to open.
2Open the cover and connect a USB
memory.
Turn on the power of the USB memory if it
is not turned on.
CHANGING THE SCREEN OFF
IMAGE
Touch “Screen Off” to turn off the
screen. An image can be copied from a
USB memory and can be set to display
when “Screen Off” is touched. (For
more information on “Screen Off”,
see “SCREEN ADJUSTMENT” on
page 31.)
Page 190 of 363
190
VENZA_Navi_OM73020U_(U)
13.05.09 20:08
1. QUICK REFERENCE .................. 192
2. SOME BASICS ............................ 194
VOICE COMMAND SYSTEM .............. 195
AUDIO SPLIT SCREEN DISPLAY ....... 195
TURNING THE SYSTEM ON AND OFF..................................... 195
SWITCHING BETWEEN FUNCTIONS ...................................... 196
DSP CONTROL ................................... 197
TONE AND BALANCE ......................... 197
SELECTING SCREEN SIZE ................ 198
DVD PLAYER....................................... 199
AUX PORT ........................................... 199
USB PORT ........................................... 199
3. RADIO OPERATION ... ................ 200
LISTENING TO THE RADIO ................ 200
PRESETTING A STATION .................. 200
SELECTING A STATION ..................... 201
RADIO BROADCAST DATA
SYSTEM ............................................ 201
TRAFFIC ANNOUNCEMENT .............. 202
4. HD Radio™ TECHNOLOGY INFORMATION .......................... 203
USING HD Radio™ TECHNOLOGY.... 203
AVAILABLE HD Radio™
TECHNOLOGY.................................. 204
TROUBLESHOOTING GUIDE ............. 206
1AUDIO/VIDEO SYSTEM
OPERATION
5
AUDIO/VIDEO SYSTEM
Page 191 of 363
5
191
1
2
3
4
5
6
7
8
9
VENZA_Navi_OM73020U_(U)
13.05.09 20:08
5. RADIO OPERATION(XM Satellite Radio
BROADCAST) ........... .................208
HOW TO SUBSCRIBE TO AN
XM Satellite Radio............................. 208
DISPLAYING THE RADIO ID .............. 209
LISTENING TO SATELLITE RADIO ............................................... 209
CHANNEL CATEGORY ...................... 210
PRESETTING A CHANNEL ................ 210
SELECTING A CHANNEL ................... 210
DISPLAYING THE TITLE AND NAME ....................................... 211
IF THE SATELLITE RADIO TUNER MALFUNCTIONS .............................. 212
6. RADIO OPERATION (INTERNET RADIO
BROADCAST) ........... ................ 214
LISTENING TO INTERNET RADIO .... 214
7. DVD PLAYER OPERATION ........ 215
INSERTING A DISC ............................ 215
EJECTING A DISC .............................. 215
PLAYING A DISC ................................ 216
PLAYING AN AUDIO DISC ................. 217
PLAYING AN MP3/WMA DISC ........... 219
OPERATING A DVD DISC .................. 222
PLAYING A DVD DISC ....................... 223
DVD OPTIONS .................................... 225
IF THE PLAYER MALFUNCTIONS..... 234
DVD PLAYER AND DVD VIDEO
DISC INFORMATION ....................... 234
8. USB MEMORY OPERATION ...... 237
CONNECTING A USB MEMORY ........ 237
PLAYING A USB MEMORY ................ 238
9. iPod OPERATION ....................... 242
CONNECTING iPod............................. 242
PLAYING iPod ..................................... 243
10. Bluetooth® AUDIO
OPERATI
ON ............................. 246
CONNECTING A Bluetooth® AUDIO
PLAYER ............................................ 249
PLAYING Bluetooth
® AUDIO ............... 251
11. AUDIO/VIDEO REMOTE CONTROLS
(STEERING SWITCHES) ........... 256
12. AUDIO/VIDEO SYSTEM OPERATING HINTS.................. 257
RADIO RECEPTION............................ 257
iPod ...................................................... 258
USB MEMORY .................................... 259
CARING FOR YOUR DVD PLAYER
AND DISC ......................................... 259
MP3/WMA FILES ................................. 261
CD-R AND CD-RW DISCS .................. 263
TERMS ................................................ 263
1. AUDIO SETTINGS ...................... 267
HD Radio™ SYSTEM SETTINGS ....... 267
iPod SETTINGS ................................... 268
2SETUP
AUDIO/VIDEO SYSTEM
Page 196 of 363
196
1. AUDIO/VIDEO SYSTEM OPERATION
VENZA_Navi_OM73020U_(U)
13.05.13 14:12
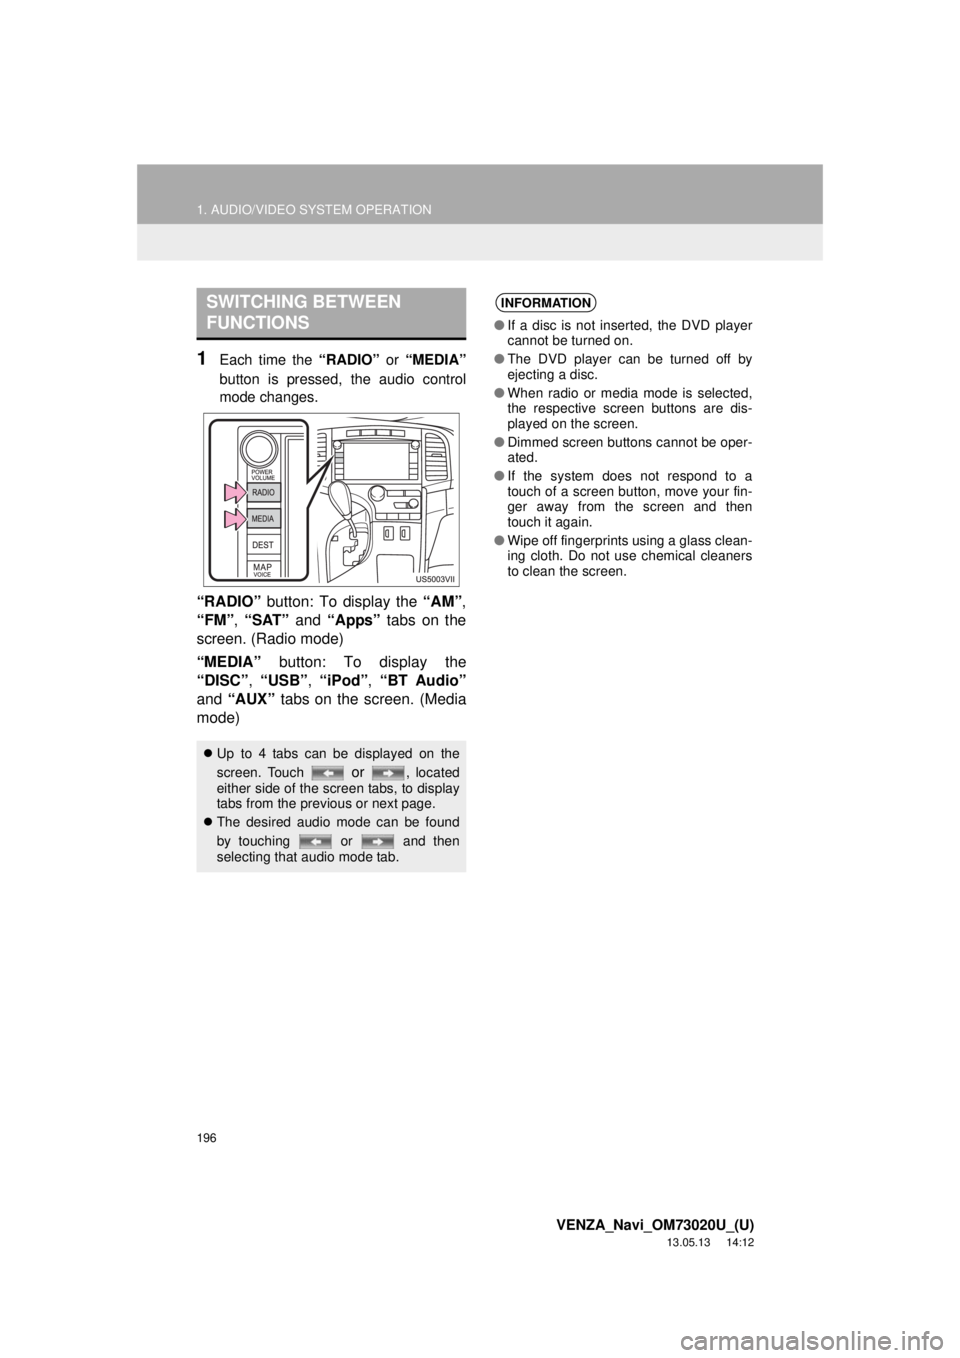
1Each time the “RADIO” or “MEDIA”
button is pressed, the audio control
mode changes.
“RADIO” button: To display the “AM”,
“FM”, “SAT” and “Apps” tabs on the
screen. (Radio mode)
“MEDIA” button: To display the
“DISC”, “USB”, “iPod”, “BT Audio”
and “AUX” tabs on the screen. (Media
mode)
SWITCHING BETWEEN
FUNCTIONS
Up to 4 tabs can be displayed on the
screen. Touch
or , located
either side of the screen tabs, to display
tabs from the previous or next page.
The desired audio mode can be found
by touching or and then
selecting that audio mode tab.
INFORMATION
●If a disc is not inserted, the DVD player
cannot be turned on.
●The DVD player can be turned off by
ejecting a disc.
●When radio or media mode is selected,
the respective screen buttons are dis-
played on the screen.
●Dimmed screen buttons cannot be oper-
ated.
●If the system does not respond to a
touch of a screen button, move your fin-
ger away from the screen and then
touch it again.
●Wipe off fingerprints using a glass clean-
ing cloth. Do not use chemical cleaners
to clean the screen.
Page 199 of 363
199
1. AUDIO/VIDEO SYSTEM OPERATION
5
AUDIO/VIDEO SYSTEM
VENZA_Navi_OM73020U_(U)
13.05.13 14:12
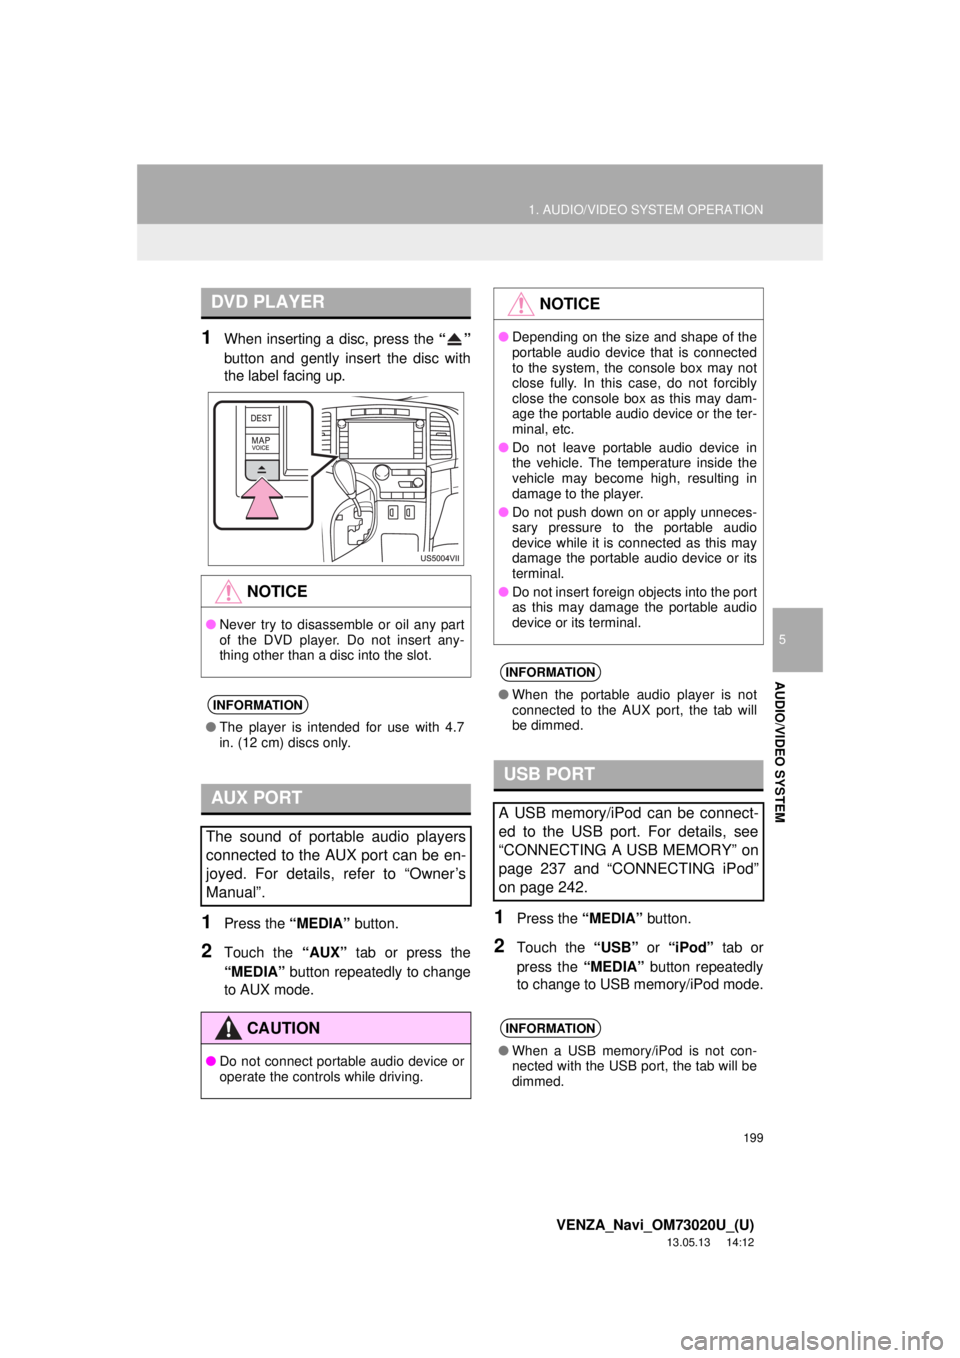
1When inserting a disc, press the “”
button and gently insert the disc with
the label facing up.
1Press the “MEDIA” button.
2Touch the “AUX” tab or press the
“MEDIA” button repeatedly to change
to AUX mode.
1Press the “MEDIA” button.
2Touch the “USB” or “iPod” tab or
press the “MEDIA” button repeatedly
to change to USB memory/iPod mode.
DVD PLAYER
NOTICE
●Never try to disassemble or oil any part
of the DVD player. Do not insert any-
thing other than a disc into the slot.
INFORMATION
●The player is intended for use with 4.7
in. (12 cm) discs only.
AUX PORT
The sound of portable audio players
connected to the AUX port can be en-
joyed. For details, refer to “Owner’s
Manual”.
CAUTION
●Do not connect portable audio device or
operate the controls while driving.
NOTICE
●Depending on the size and shape of the
portable audio device that is connected
to the system, the console box may not
close fully. In this case, do not forcibly
close the console box as this may dam-
age the portable audio device or the ter-
minal, etc.
●Do not leave portable audio device in
the vehicle. The temperature inside the
vehicle may become high, resulting in
damage to the player.
●Do not push down on or apply unneces-
sary pressure to the portable audio
device while it is connected as this may
damage the portable audio device or its
terminal.
●Do not insert foreign objects into the port
as this may damage the portable audio
device or its terminal.
INFORMATION
●When the portable audio player is not
connected to the AUX port, the tab will
be dimmed.
USB PORT
A USB memory/iPod can be connect-
ed to the USB port. For details, see
“CONNECTING A USB MEMORY” on
page 237 and “CONNECTING iPod”
on page 242.
INFORMATION
●When a USB memory/iPod is not con-
nected with the USB port, the tab will be
dimmed.
Page 214 of 363
214
1. AUDIO/VIDEO SYSTEM OPERATION
VENZA_Navi_OM73020U_(U)
13.05.13 14:12
6. RADIO OPERATION (INTERNET RADIO BROADCAST)
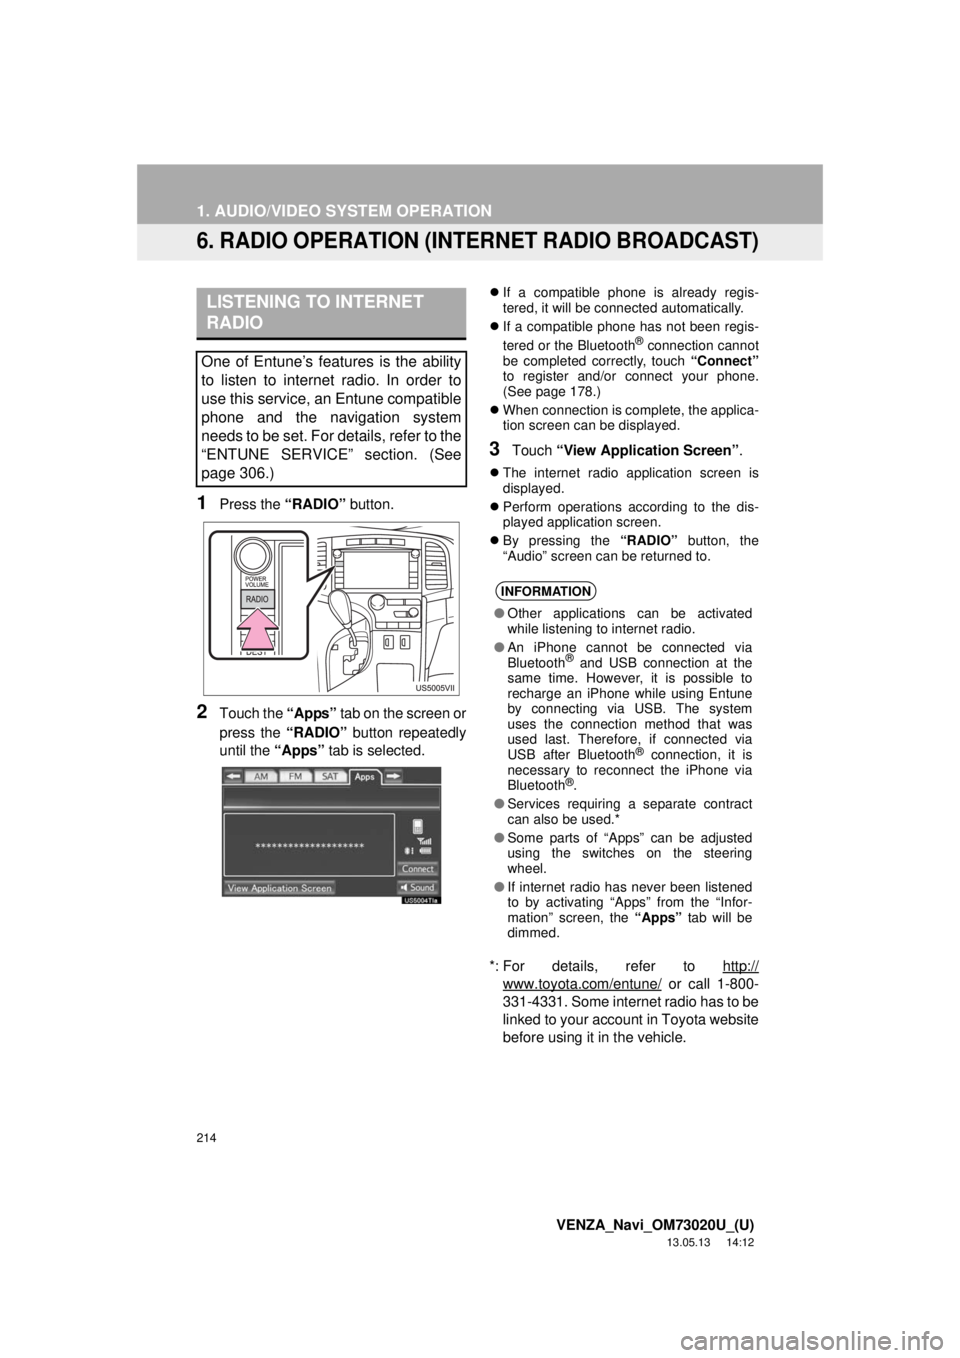
1Press the “RADIO” button.
2Touch the “Apps” tab on the screen or
press the “RADIO” button repeatedly
until the “Apps” tab is selected.
If a compatible phone is already regis-
tered, it will be connected automatically.
If a compatible phone has not been regis-
tered or the Bluetooth
® connection cannot
be completed correctly, touch “Connect”
to register and/or connect your phone.
(See page 178.)
When connection is complete, the applica-
tion screen can be displayed.
3Touch “View Application Screen”.
The internet radio application screen is
displayed.
Perform operations according to the dis-
played application screen.
By pressing the “RADIO” button, the
“Audio” screen can be returned to.
*: For details, refer to http://
www.toyota.com/entune/ or call 1-800-
331-4331. Some internet radio has to be
linked to your account in Toyota website
before using it in the vehicle.
LISTENING TO INTERNET
RADIO
One of Entune’s features is the ability
to listen to internet radio. In order to
use this service, an Entune compatible
phone and the navigation system
needs to be set. For details, refer to the
“ENTUNE SERVICE” section. (See
page 306.)
INFORMATION
●Other applications can be activated
while listening to internet radio.
●An iPhone cannot be connected via
Bluetooth
® and USB connection at the
same time. However, it is possible to
recharge an iPhone while using Entune
by connecting via USB. The system
uses the connection method that was
used last. Therefore, if connected via
USB after Bluetooth
® connection, it is
necessary to reconnect the iPhone via
Bluetooth
®.
●Services requiring a separate contract
can also be used.*
●Some parts of “Apps” can be adjusted
using the switches on the steering
wheel.
●If internet radio has never been listened
to by activating “Apps” from the “Infor-
mation” screen, the “Apps” tab will be
dimmed.
Page 237 of 363
237
1. AUDIO/VIDEO SYSTEM OPERATION
5
AUDIO/VIDEO SYSTEM
VENZA_Navi_OM73020U_(U)
13.05.13 14:12
8. USB MEMORY OPERATION
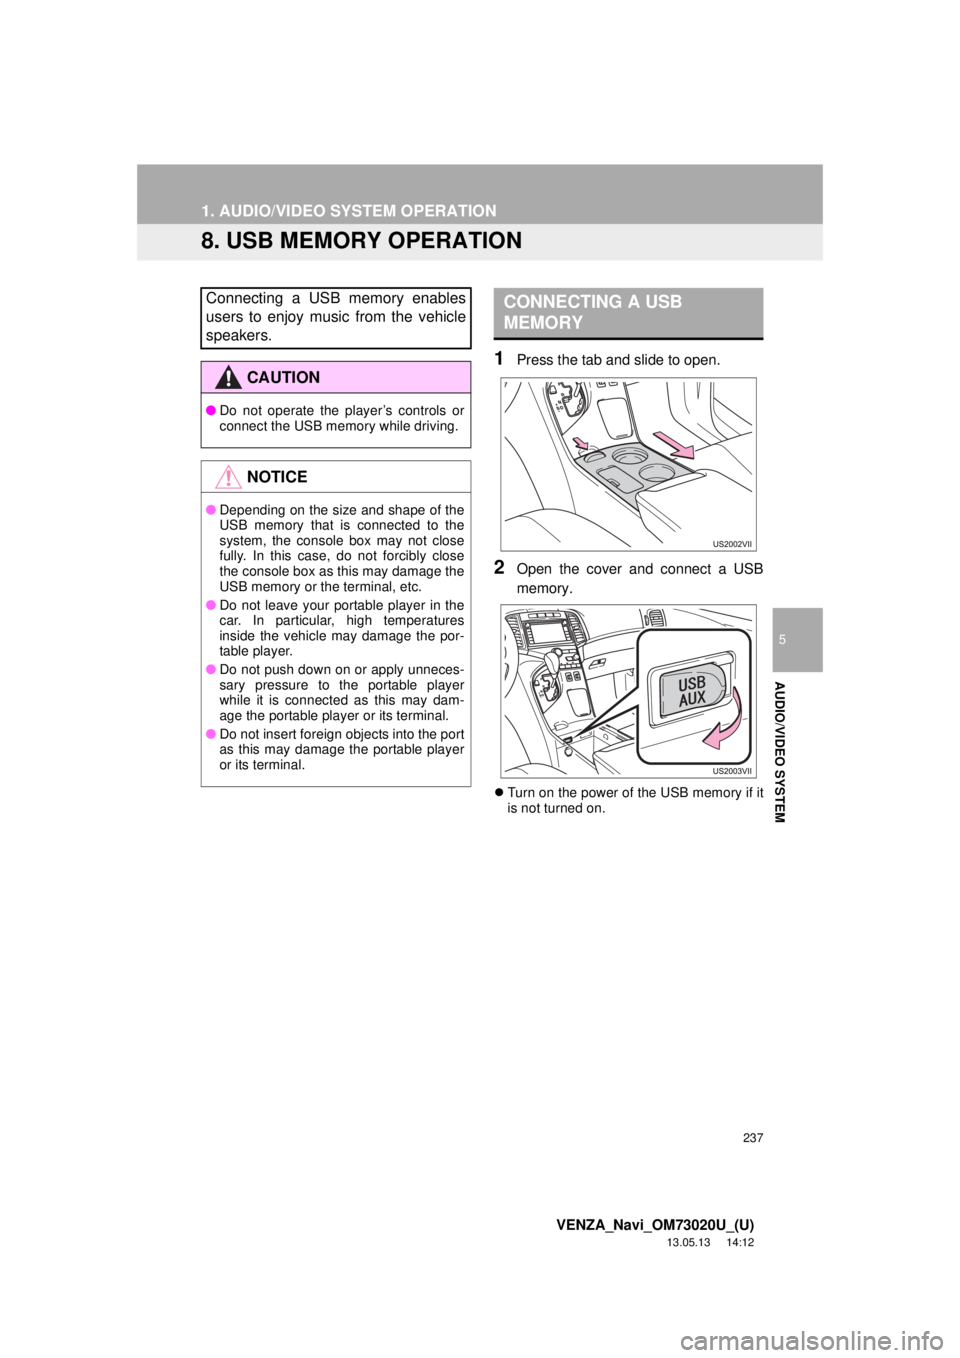
1Press the tab and slide to open.
2Open the cover and connect a USB
memory.
Turn on the power of the USB memory if it
is not turned on.
Connecting a USB memory enables
users to enjoy music from the vehicle
speakers.
CAUTION
●Do not operate the player’s controls or
connect the USB memory while driving.
NOTICE
●Depending on the size and shape of the
USB memory that is connected to the
system, the console box may not close
fully. In this case, do not forcibly close
the console box as this may damage the
USB memory or the terminal, etc.
●Do not leave your portable player in the
car. In particular, high temperatures
inside the vehicle may damage the por-
table player.
●Do not push down on or apply unneces-
sary pressure to the portable player
while it is connected as this may dam-
age the portable player or its terminal.
●Do not insert foreign objects into the port
as this may damage the portable player
or its terminal.
CONNECTING A USB
MEMORY