TOYOTA VENZA 2014 Accessories, Audio & Navigation (in English)
Manufacturer: TOYOTA, Model Year: 2014, Model line: VENZA, Model: TOYOTA VENZA 2014Pages: 48, PDF Size: 3.27 MB
Page 11 of 48
128-8673b
11 of 48
- 1 -
QUICK START GUIDEOperating the DVD SystemThe Seat Top DVD System can be operated using the touch
screen or the Remote Control.
1. Apply power to the Seat Top DVD Rear Seat Entertainment
System by placing the vehicle in the ACC or ON mode using
the power (ignition) switch.
2. Turn on the passenger side monitor (M1) using the Power
button on the top of the monitor or on the Remote
Control*.
3. Insert a DVD, CD or MP3 disc into the disc slot (disc label
towards viewer).
4. The disc will start playing.
5. Tilt the monitor to a comfortable viewing position.
6. When the DVD menu appears, touch the menu item on the
screen or select the menu item using the Remote Control.
Use the cursor keys to highlight a menu item and press the
ENTER or PLAY button on the Remote Control.
7. Each wireless headphone has a channel select switch. When
sitting in front of the passenger side monitor (M1), use the
“1” switch setting. When sitting in front of the driver side
monitor (M2), use the “2” switch setting. Set the headphone
to the proper channel and press the Power On/Off button.
The power indicator will light up red. Turn the volume down
to its lowest setting before putting the headphones on your
head. Increase the volume to a comfortable listening level.8. If audio playback through the vehicle radio is preferred, set
the radio to AUX mode. Verify that nothing is connected
to the radio’s AUX jack. The passenger side monitor (M1)
provides audio to the vehicle radio.
Note: If there is a device plugged into the radio’s AUX jack, it
will override the DVD audio.
9. Turn on the driver side monitor (M2) using the power button
on the top of the monitor or on the Remote Control*.
10. Tilt the monitor to a comfortable viewing position.
11. Select M1 using the touch screen or the SOURCE button on
the Remote Control to view program material playing on the
passenger side monitor, or select from the other available
sources: DVD for the M2 Monitor or AUX.
*Note: To operate the passenger side monitor with the
Remote Control, press the M1 button on the Remote
Control. To operate the driver side monitor, press the
M2 button on the Remote Control.
Page 12 of 48
128-8673b
12 of 48
- 2 -
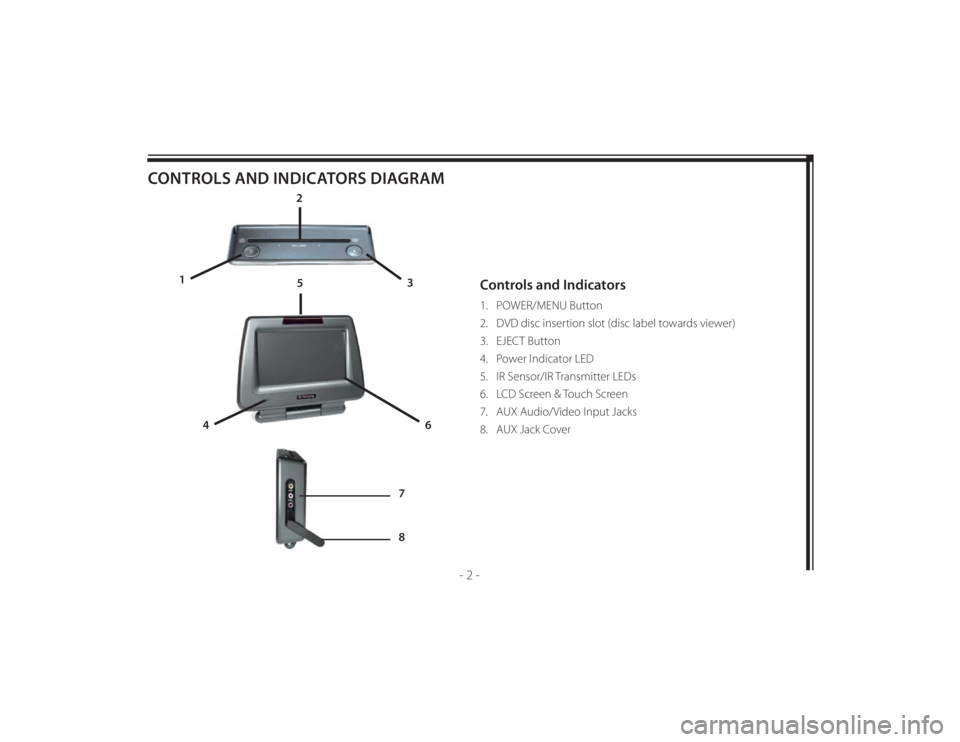
CONTROLS AND INDICATORS DIAGRAM
Controls and Indicators1. POWER/MENU Button
2. DVD disc insertion slot (disc label towards viewer)
3. EJECT Button
4. Power Indicator LED
5. IR Sensor/IR Transmitter LEDs
6. LCD Screen & Touch Screen
7. AUX Audio/Video Input Jacks
8. AUX Jack Cover
2
3 1
4
6
5
7
8
Page 13 of 48
128-8673b
13 of 48
- 3 -
SEAT TOP DVD SYSTEM OVERVIEW1. The Seat Top DVD system is a versatile audio / video system
which includes two monitors, each with a built-in DVD
player and a touch screen interface.
2. The passenger side monitor (M1) is comprised of a 7”
LCD touch screen monitor with a built-in DVD player that
allows the user to select from DVD, M2, or AUX sources.
The passenger side monitor has a built-in infrared audio
transmitter for use with the supplied two-channel wireless
headphones. The passenger side monitor also has the
ability to provide the audio source for output to allow audio
playback through the vehicle radio.
3. The driver side monitor (M2) is comprised of a 7” LCD touch
screen monitor with built-in DVD player that allows the
user to select from DVD, M1, or AUX sources. The driver side
monitor has a built-in infrared audio transmitter for use with
the supplied two channel wireless headphones.
4. The monitors will display all of the system functions with the
comprehensive On Screen Display (OSD).
5. Seat Top DVD System includes two wireless IR headphones.
The headphones have a channel select switch that allows
the users to receive audio from either the passenger side
monitor or the driver side monitor. To receive audio from
the passenger side monitor, move the channel select switch
to the “1” position. To receive audio from the driver side
monitor, move the channel select switch to the “2” position.6. Each monitor uses a separate set of Remote Control IR
codes. The passenger side monitor will only respond to the
Remote Control unit when the Monitor Select (M1) button
is pressed on remote control. The driver side monitor will
only respond to the Remote Control unit when the Monitor
Select (M2) button on remote control is pressed.
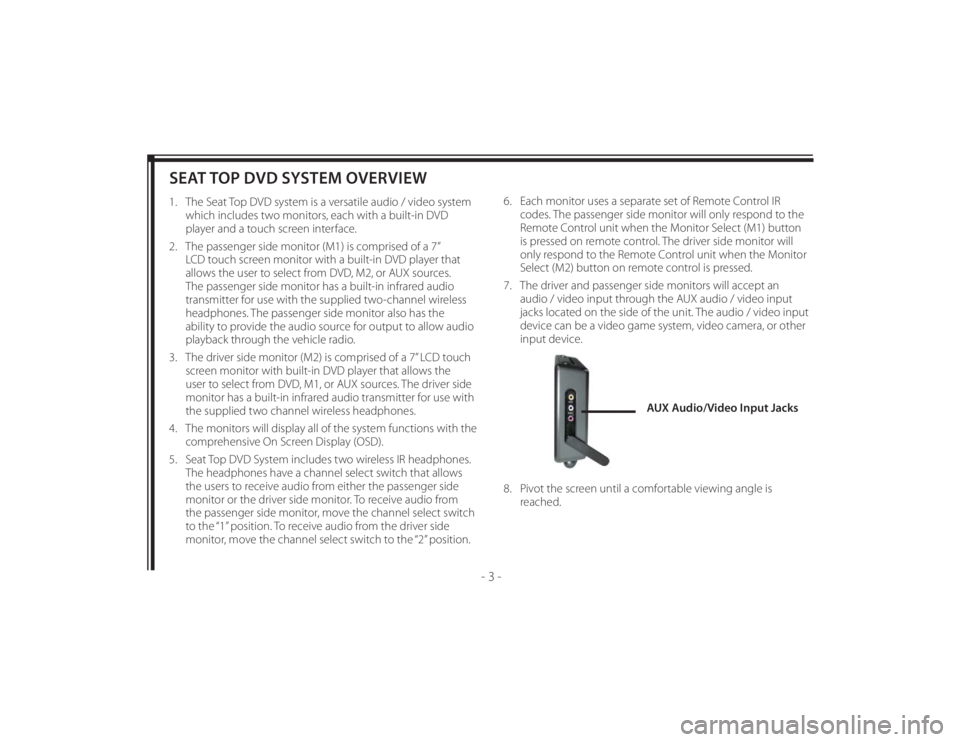
7. The driver and passenger side monitors will accept an
audio / video input through the AUX audio / video input
jacks located on the side of the unit. The audio / video input
device can be a video game system, video camera, or other
input device.
8. Pivot the screen until a comfortable viewing angle is
reached.
AUX Audio/Video Input Jacks
Page 14 of 48
128-8673b
14 of 48
- 4 -
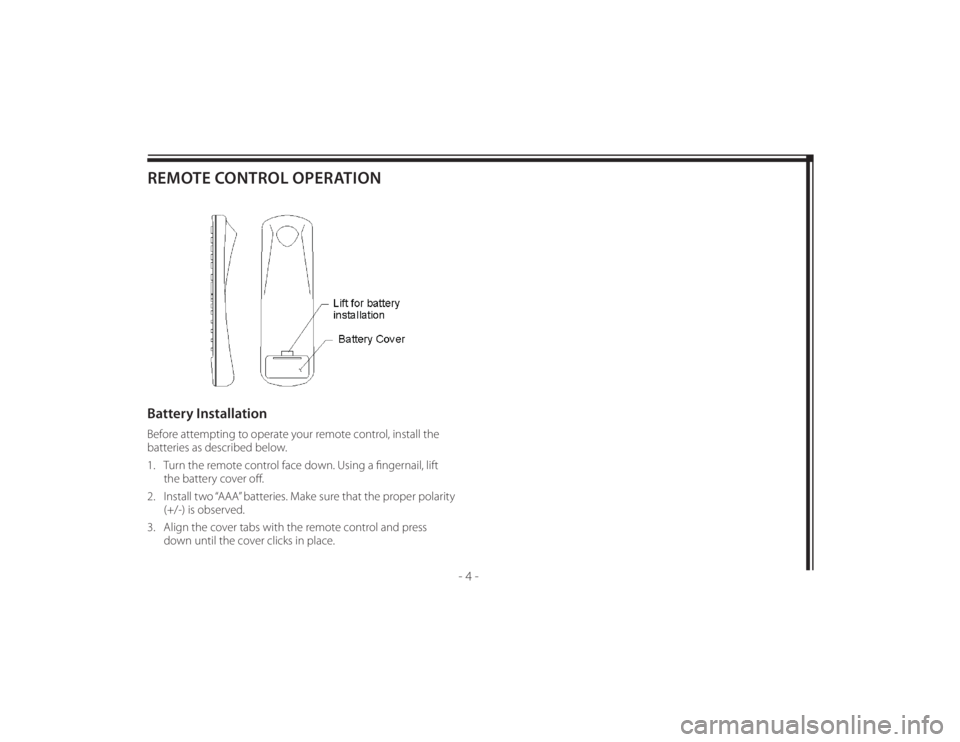
REMOTE CONTROL OPERATIONBattery InstallationBefore attempting to operate your remote control, install the
batteries as described below.
1. Turn the remote control face down. Using a fi ngernail, lift
the battery cover off .
2. Install two “AAA” batteries. Make sure that the proper polarity
(+/-) is observed.
3. Align the cover tabs with the remote control and press
down until the cover clicks in place.
Page 15 of 48
128-8673b
15 of 48
- 5 -
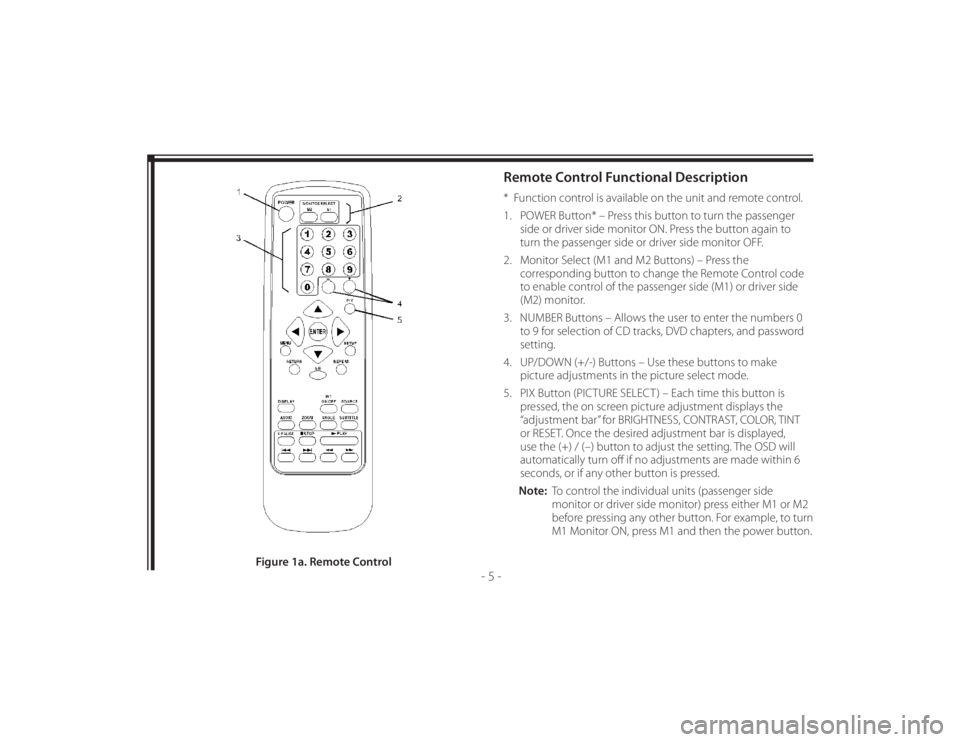
Remote Control Functional Description* Function control is available on the unit and remote control.
1. POWER Button* – Press this button to turn the passenger
side or driver side monitor ON. Press the button again to
turn the passenger side or driver side monitor OFF.
2. Monitor Select (M1 and M2 Buttons) – Press the
corresponding button to change the Remote Control code
to enable control of the passenger side (M1) or driver side
(M2) monitor.
3. NUMBER Buttons – Allows the user to enter the numbers 0
to 9 for selection of CD tracks, DVD chapters, and password
setting.
4. UP/DOWN (+/-) Buttons – Use these buttons to make
picture adjustments in the picture select mode.
5. PIX Button (PICTURE SELECT ) – Each time this button is
pressed, the on screen picture adjustment displays the
“adjustment bar” for BRIGHTNESS, CONTRAST, COLOR, TINT
or RESET. Once the desired adjustment bar is displayed,
use the (+) / (–) button to adjust the setting. The OSD will
automatically turn off if no adjustments are made within 6
seconds, or if any other button is pressed.
Note: To control the individual units (passenger side
monitor or driver side monitor) press either M1 or M2
before pressing any other button. For example, to turn
M1 Monitor ON, press M1 and then the power button.
Figure 1a. Remote Control
Page 16 of 48
128-8673b
16 of 48
- 6 -
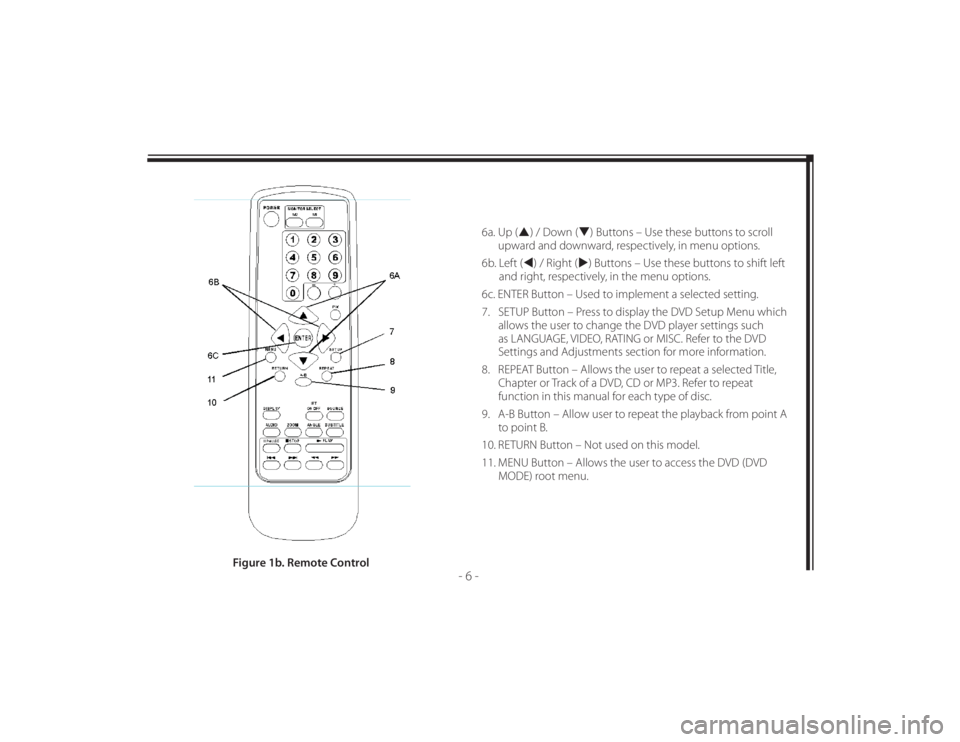
6a. Up () / Down () Buttons – Use these buttons to scroll
upward and downward, respectively, in menu options.
6b. Left () / Right () Buttons – Use these buttons to shift left
and right, respectively, in the menu options.
6c. ENTER Button – Used to implement a selected setting.
7. SETUP Button – Press to display the DVD Setup Menu which
allows the user to change the DVD player settings such
as LANGUAGE, VIDEO, RATING or MISC. Refer to the DVD
Settings and Adjustments section for more information.
8. REPEAT Button – Allows the user to repeat a selected Title,
Chapter or Track of a DVD, CD or MP3. Refer to repeat
function in this manual for each type of disc.
9. A-B Button – Allow user to repeat the playback from point A
to point B.
10. RETURN Button – Not used on this model.
11. MENU Button – Allows the user to access the DVD (DVD
MODE) root menu.
Figure 1b. Remote Control
Page 17 of 48
128-8673b
17 of 48
- 7 -
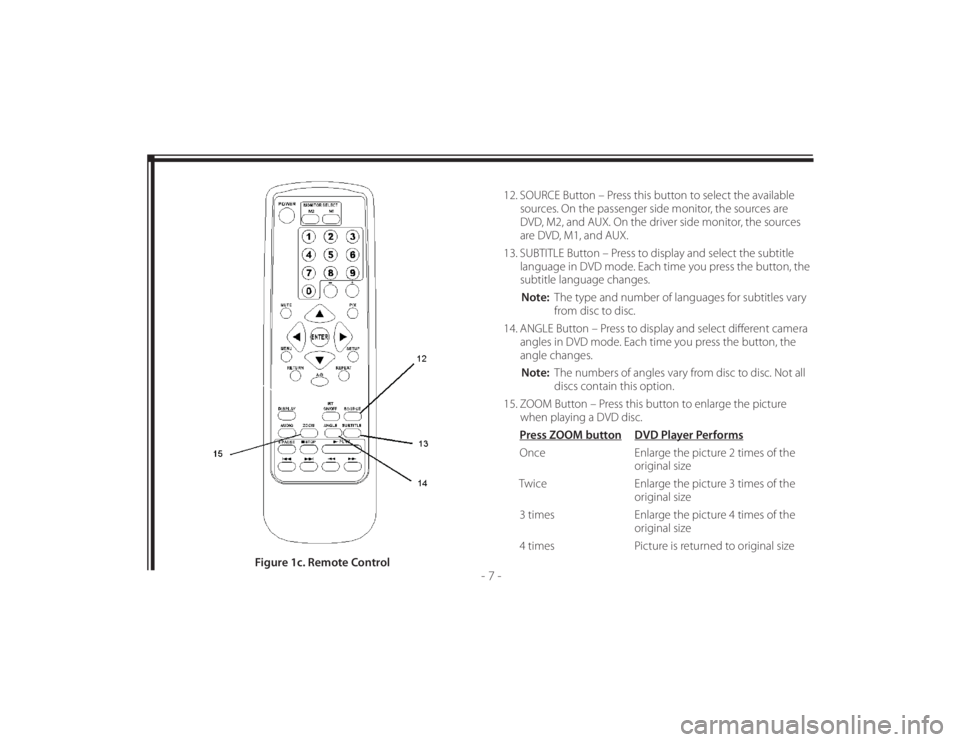
12. SOURCE Button – Press this button to select the available
sources. On the passenger side monitor, the sources are
DVD, M2, and AUX. On the driver side monitor, the sources
are DVD, M1, and AUX.
13. SUBTITLE Button – Press to display and select the subtitle
language in DVD mode. Each time you press the button, the
subtitle language changes.
Note: The type and number of languages for subtitles vary
from disc to disc.
14. ANGLE Button – Press to display and select diff erent camera
angles in DVD mode. Each time you press the button, the
angle changes.
Note: The numbers of angles vary from disc to disc. Not all
discs contain this option.
15. ZOOM Button – Press this button to enlarge the picture
when playing a DVD disc.
Press ZOOM button DVD Player Performs
Once Enlarge the picture 2 times of the
original size
Twice Enlarge the picture 3 times of the
original size
3 times Enlarge the picture 4 times of the
original size
4 times Picture is returned to original size
Figure 1c. Remote Control
Page 18 of 48
128-8673b
18 of 48
- 8 -
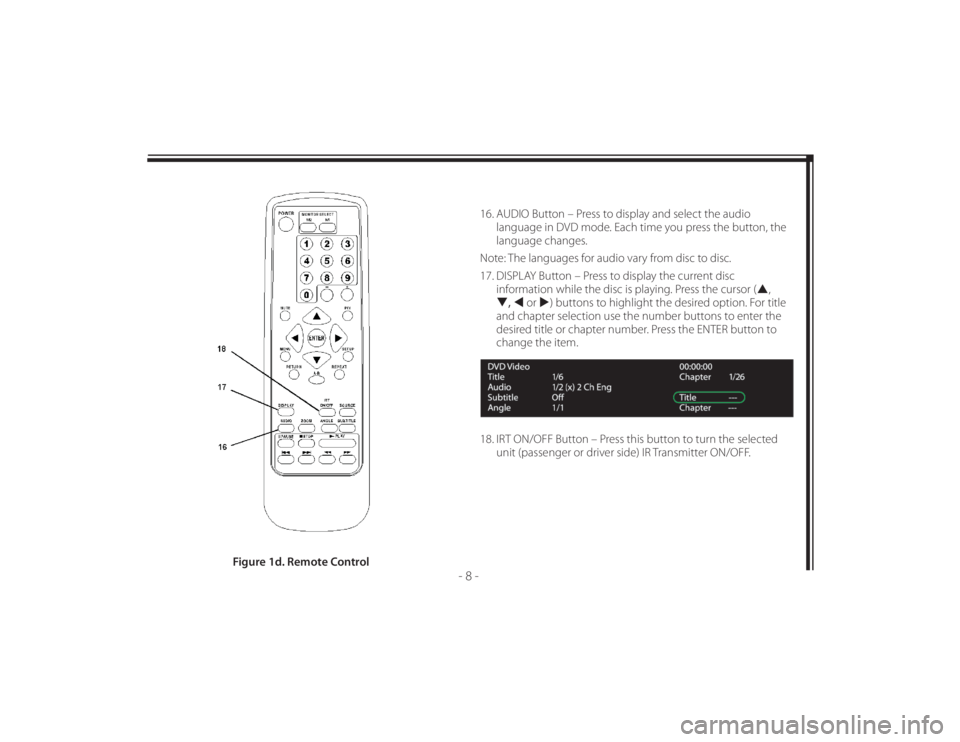
16. AUDIO Button – Press to display and select the audio
language in DVD mode. Each time you press the button, the
language changes.
Note: The languages for audio vary from disc to disc.
17. DISPLAY Button – Press to display the current disc
information while the disc is playing. Press the cursor (,
, or ) buttons to highlight the desired option. For title
and chapter selection use the number buttons to enter the
desired title or chapter number. Press the ENTER button to
change the item.
18. IRT ON/OFF Button – Press this button to turn the selected
unit (passenger or driver side) IR Transmitter ON/OFF.
Figure 1d. Remote Control
Page 19 of 48
128-8673b
19 of 48
- 9 -
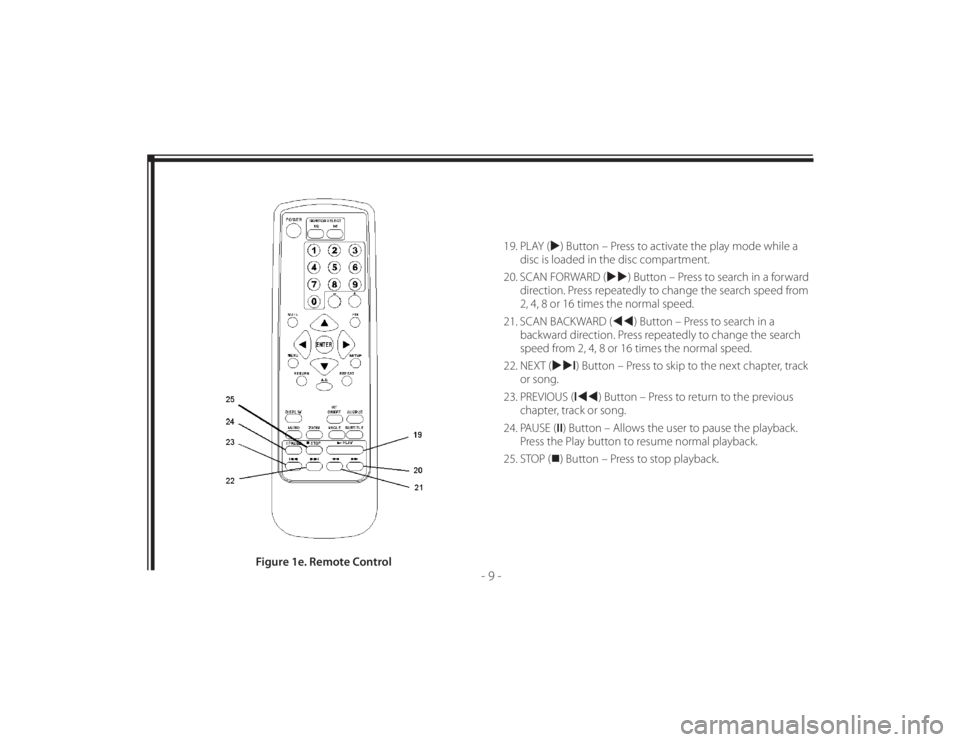
19. PLAY () Button – Press to activate the play mode while a
disc is loaded in the disc compartment.
20. SCAN FORWARD () Button – Press to search in a forward
direction. Press repeatedly to change the search speed from
2, 4, 8 or 16 times the normal speed.
21. SCAN BACKWARD () Button – Press to search in a
backward direction. Press repeatedly to change the search
speed from 2, 4, 8 or 16 times the normal speed.
22. NEXT (l) Button – Press to skip to the next chapter, track
or song.
23. PREVIOUS (l) Button – Press to return to the previous
chapter, track or song.
24. PAUSE (II) Button – Allows the user to pause the playback.
Press the Play button to resume normal playback.
25. STOP () Button – Press to stop playback.
Figure 1e. Remote Control
Page 20 of 48
128-8673b
20 of 48
- 10 -
WIRELESS HEADPHONES OPERATIONThe system includes built-in infrared transmitters for use with
Wireless Headphones. The passenger side monitor (M1) IR
transmitter transmits on channel 1. The driver side monitor (M2)
IR transmitter transmits on channel 2. A channel select switch
on the headphones allows the user to select the audio from
either the passenger side monitor or the driver side monitor.Wireless Headphone Special Features• Automatic level control prevents input signal overloading.
• Uses high frequency infrared light to assure a clean signal for
clear reception.
• Adjustable Headphone Band.
• Dual Channel.
• Auto shutoff after 3.5 minutes of no Audio Signal.
• Fold-fl at ear pieces rotate 90° to facilitate storing in seat back
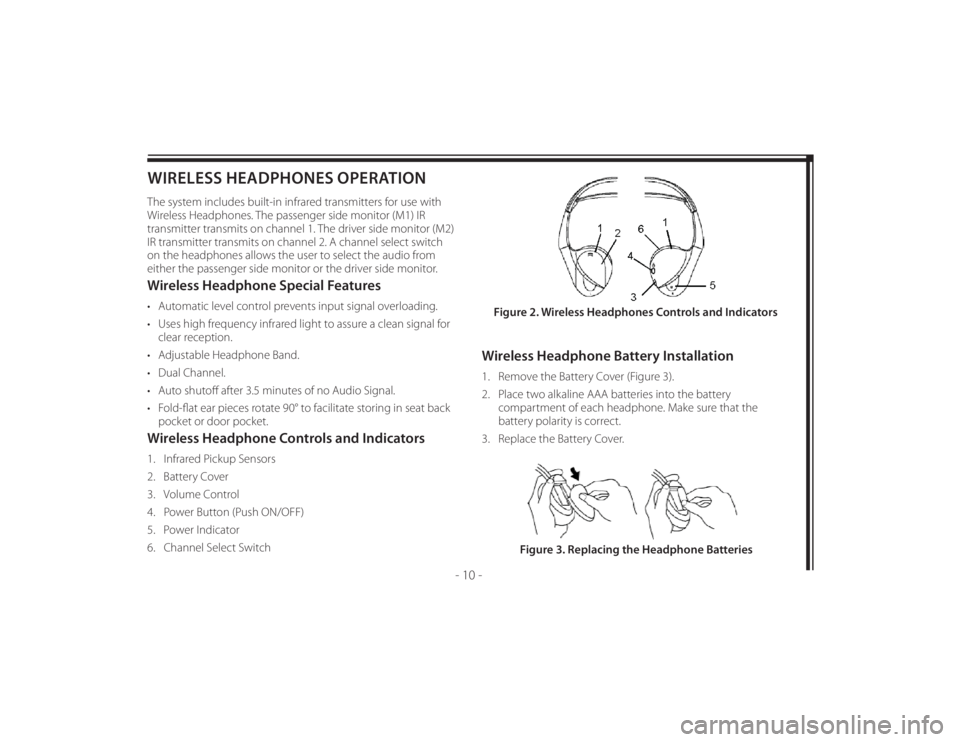
pocket or door pocket.Wireless Headphone Controls and Indicators1. Infrared Pickup Sensors
2. Battery Cover
3. Volume Control
4. Power Button (Push ON/OFF)
5. Power Indicator
6. Channel Select Switch
Wireless Headphone Battery Installation1. Remove the Battery Cover (Figure 3).
2. Place two alkaline AAA batteries into the battery
compartment of each headphone. Make sure that the
battery polarity is correct.
3. Replace the Battery Cover.Figure 2. Wireless Headphones Controls and Indicators
Figure 3. Replacing the Headphone Batteries