TOYOTA VENZA 2014 Accessories, Audio & Navigation (in English)
Manufacturer: TOYOTA, Model Year: 2014, Model line: VENZA, Model: TOYOTA VENZA 2014Pages: 228, PDF Size: 3.73 MB
Page 161 of 228
161
5
Bluetooth
® HANDS-FREE SYSTEM
1. BASIC INFORMATION BEFORE OPERATION
3. CONNECTING A Bluetooth® PHONE
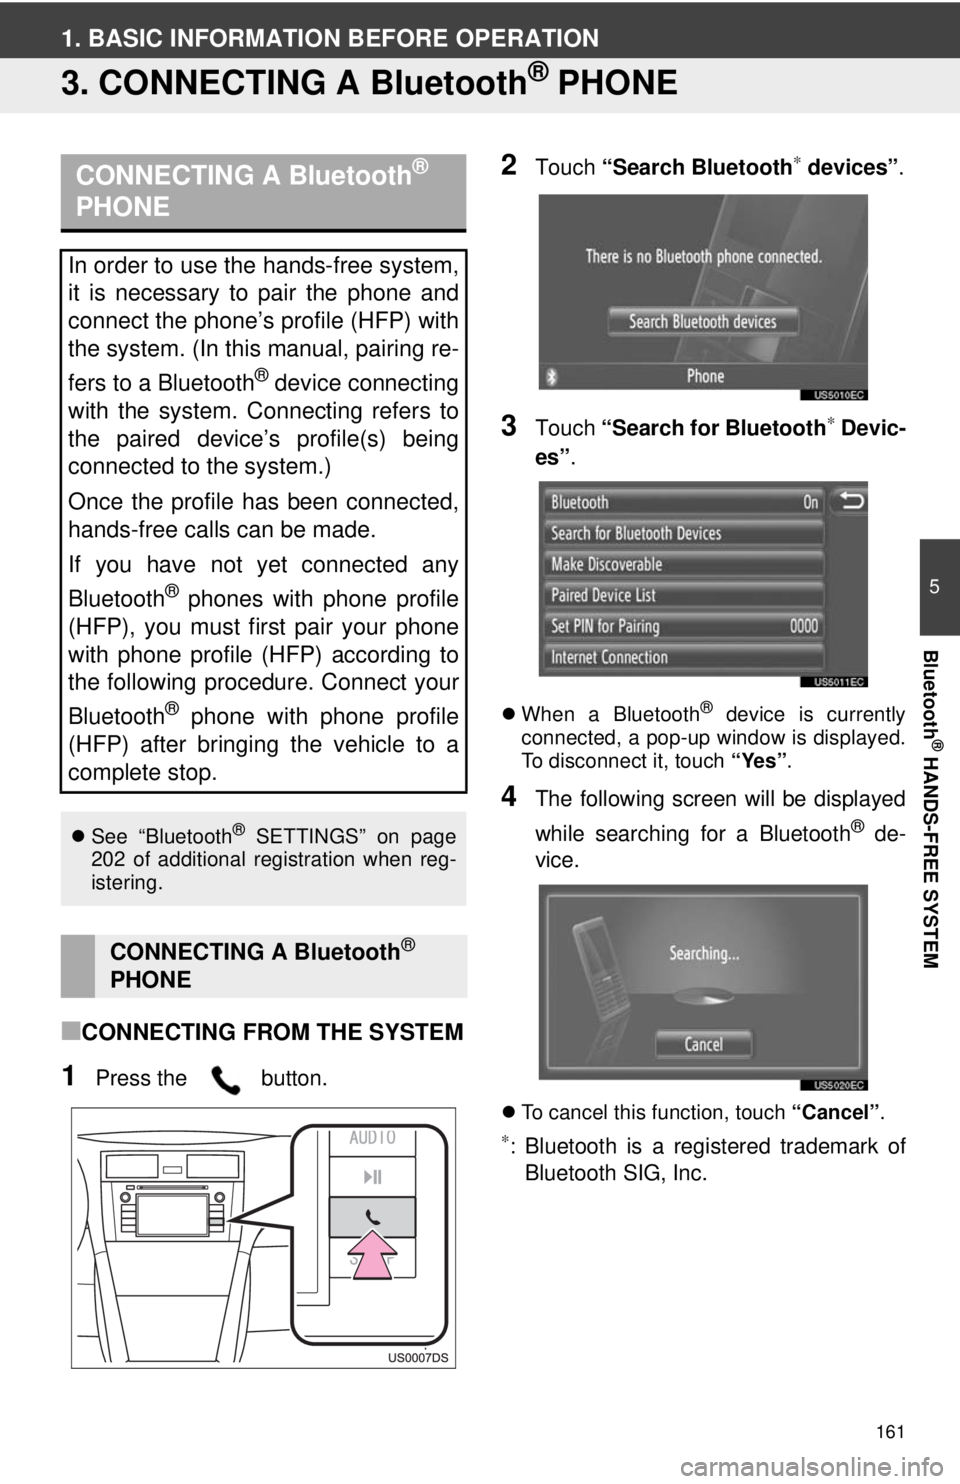
■CONNECTING FROM THE SYSTEM
1Press the button.
2Touch “Search Bluetooth∗ devices” .
3Touch “Search for Bluetooth∗ Devic-
es” .
When a Bluetooth® device is currently
connected, a pop-up window is displayed.
To disconnect it, touch “Yes”.
4The following screen will be displayed
while searching for a Bluetooth
® de-
vice.
To cancel this function, touch “Cancel”.
∗: Bluetooth is a registered trademark of
Bluetooth SIG, Inc.
CONNECTING A Bluetooth®
PHONE
In order to use the hands-free system,
it is necessary to pair the phone and
connect the phone’s profile (HFP) with
the system. (In this manual, pairing re-
fers to a Bluetooth
® device connecting
with the system. Connecting refers to
the paired device’s profile(s) being
connected to the system.)
Once the profile has been connected,
hands-free calls can be made.
If you have not yet connected any
Bluetooth
® phones with phone profile
(HFP), you must first pair your phone
with phone profile (HFP) according to
the following procedure. Connect your
Bluetooth
® phone with phone profile
(HFP) after bringing the vehicle to a
complete stop.
See “Bluetooth® SETTINGS” on page
202 of additional registration when reg-
istering.
CONNECTING A Bluetooth®
PHONE
Page 162 of 228
162
1. BASIC INFORMATION BEFORE OPERATION
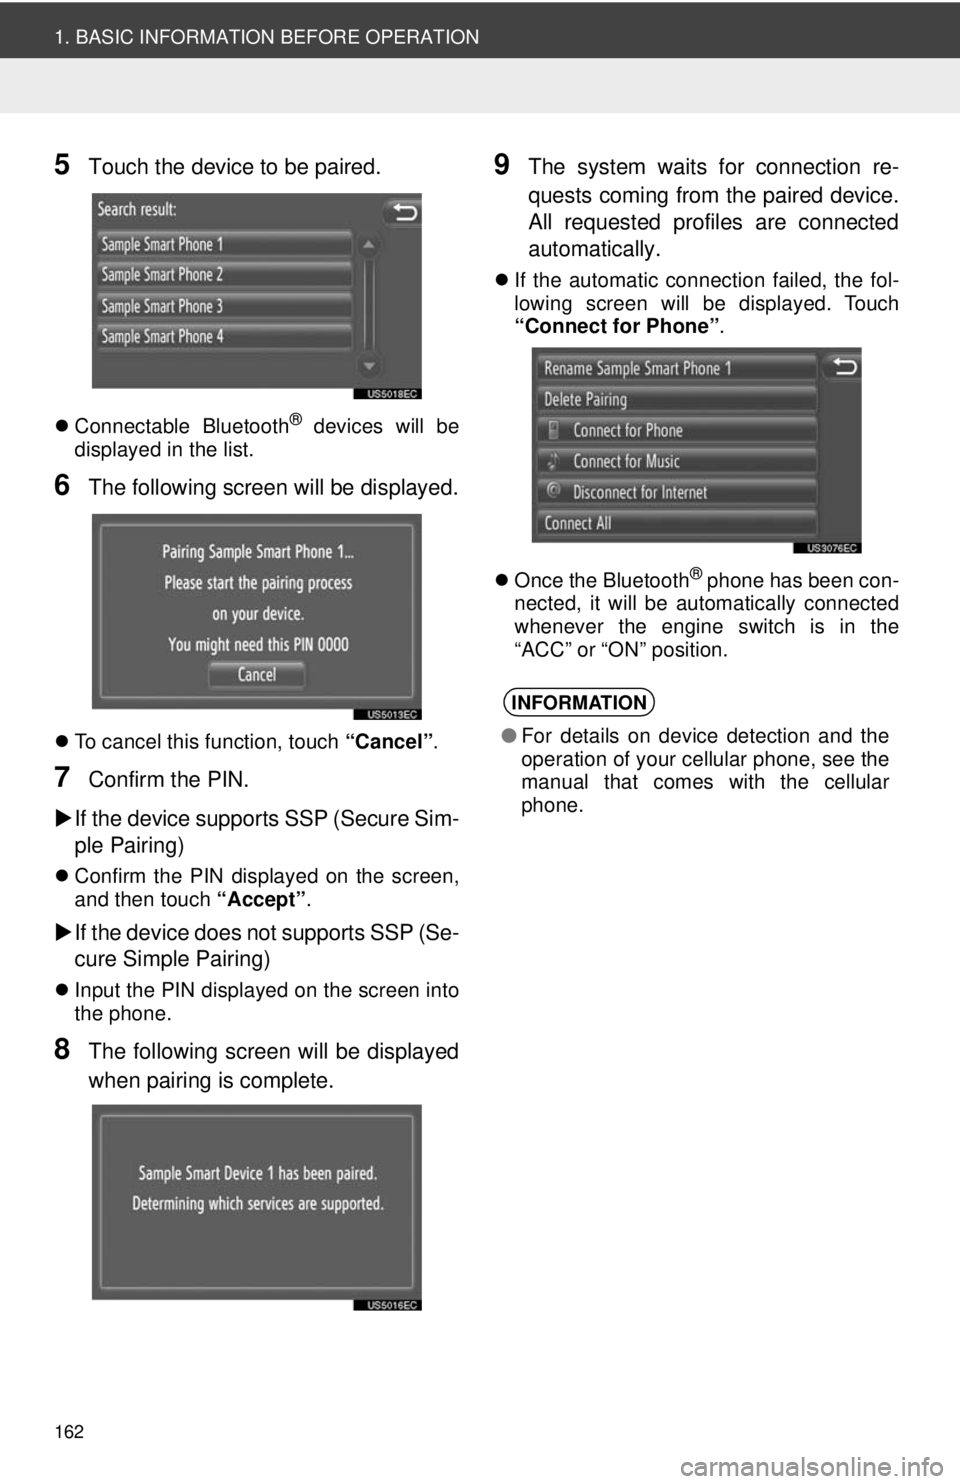
5Touch the device to be paired.
Connectable Bluetooth® devices will be
displayed in the list.
6The following screen will be displayed.
To cancel this function, touch “Cancel”.
7Confirm the PIN.
If the device supports SSP (Secure Sim-
ple Pairing)
Confirm the PIN displayed on the screen,
and then touch “Accept”.
If the device does not supports SSP (Se-
cure Simple Pairing)
Input the PIN displayed on the screen into
the phone.
8The following screen will be displayed
when pairing is complete.
9The system waits for connection re-
quests coming from the paired device.
All requested profiles are connected
automatically.
If the automatic connection failed, the fol-
lowing screen will be displayed. Touch
“Connect for Phone” .
Once the Bluetooth
® phone has been con-
nected, it will be automatically connected
whenever the engine switch is in the
“ACC” or “ON” position.
INFORMATION
● For details on device detection and the
operation of your cellular phone, see the
manual that comes with the cellular
phone.
Page 163 of 228
163
1. BASIC INFORMATION BEFORE OPERATION
5
Bluetooth
® HANDS-FREE SYSTEM
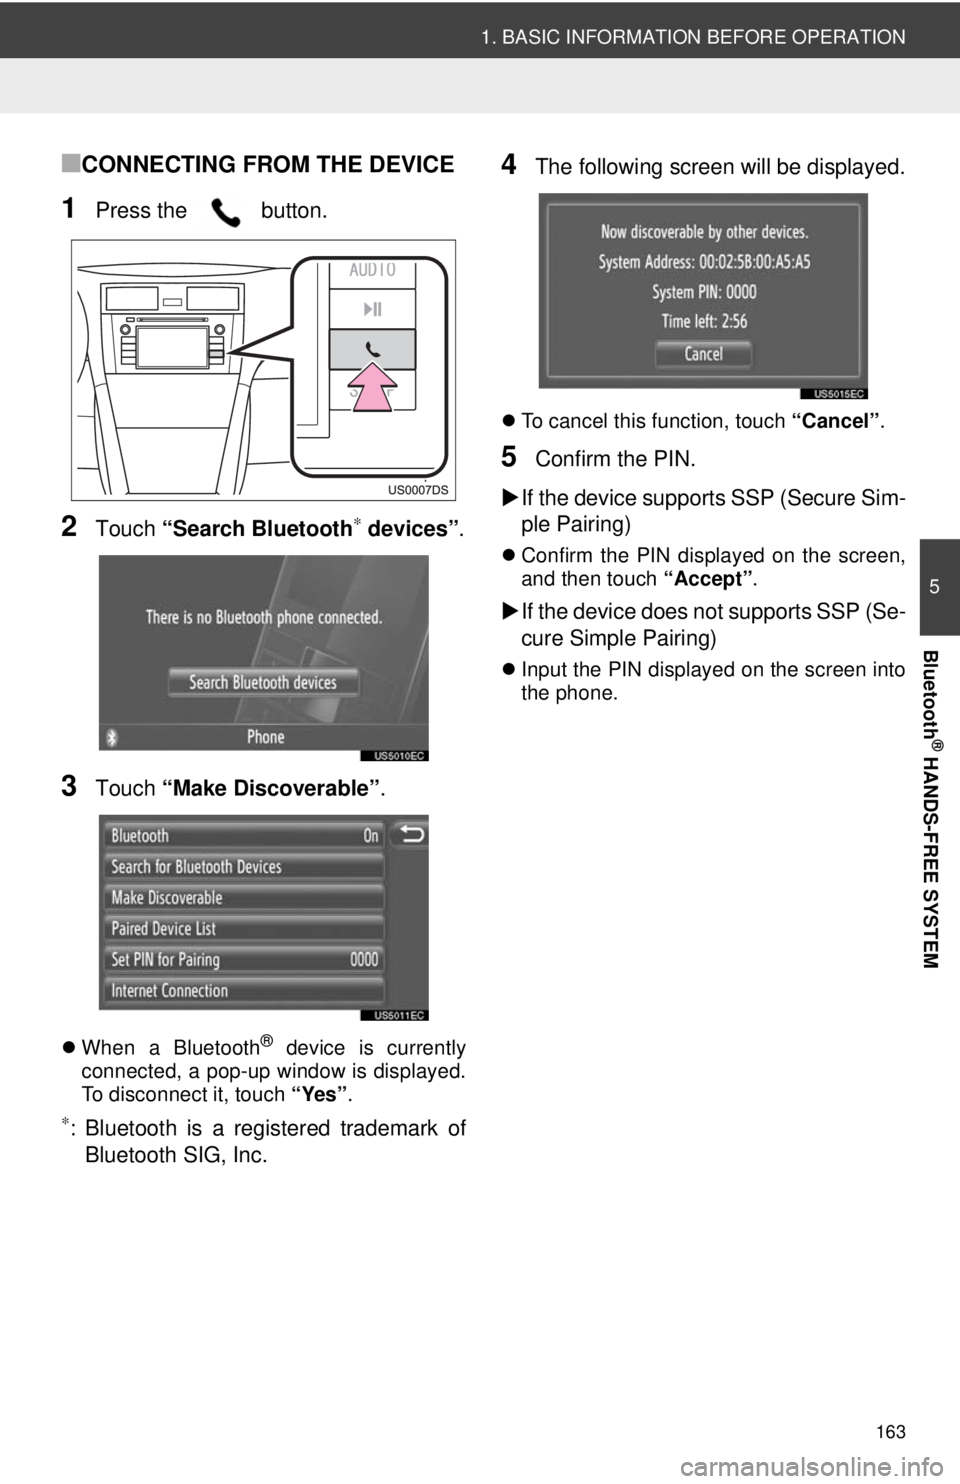
■CONNECTING FROM THE DEVICE
1Press the button.
2Touch “Search Bluetooth∗ devices” .
3Touch “Make Discoverable” .
When a Bluetooth® device is currently
connected, a pop-up window is displayed.
To disconnect it, touch “Yes”.
∗: Bluetooth is a registered trademark of
Bluetooth SIG, Inc.
4The following screen will be displayed.
To cancel this function, touch “Cancel”.
5Confirm the PIN.
If the device supports SSP (Secure Sim-
ple Pairing)
Confirm the PIN displayed on the screen,
and then touch “Accept”.
If the device does not supports SSP (Se-
cure Simple Pairing)
Input the PIN displayed on the screen into
the phone.
Page 164 of 228
164
1. BASIC INFORMATION BEFORE OPERATION
If the Bluetooth® phone is disconnected
on purpose, such as it was turned off, this
does not happen. Reconnect it manually
using either of the following methods:
• Select the Bluetooth
® phone again. (See
page 206.)
• Connect the phone profile. (See page 203.)
RECONNECTING THE
Bluetooth® PHONE
If a Bluetooth
® phone is disconnected
due to poor reception from the
Bluetooth
® network when the engine
switch is in the “ACC” or “ON” position,
the system will automatically
reconnect the Bluetooth
® phone.
Page 165 of 228
165
5
Bluetooth
® HANDS-FREE SYSTEM
1. BASIC INFORMATION BEFORE OPERATION
4. REGISTERING A ENTRY
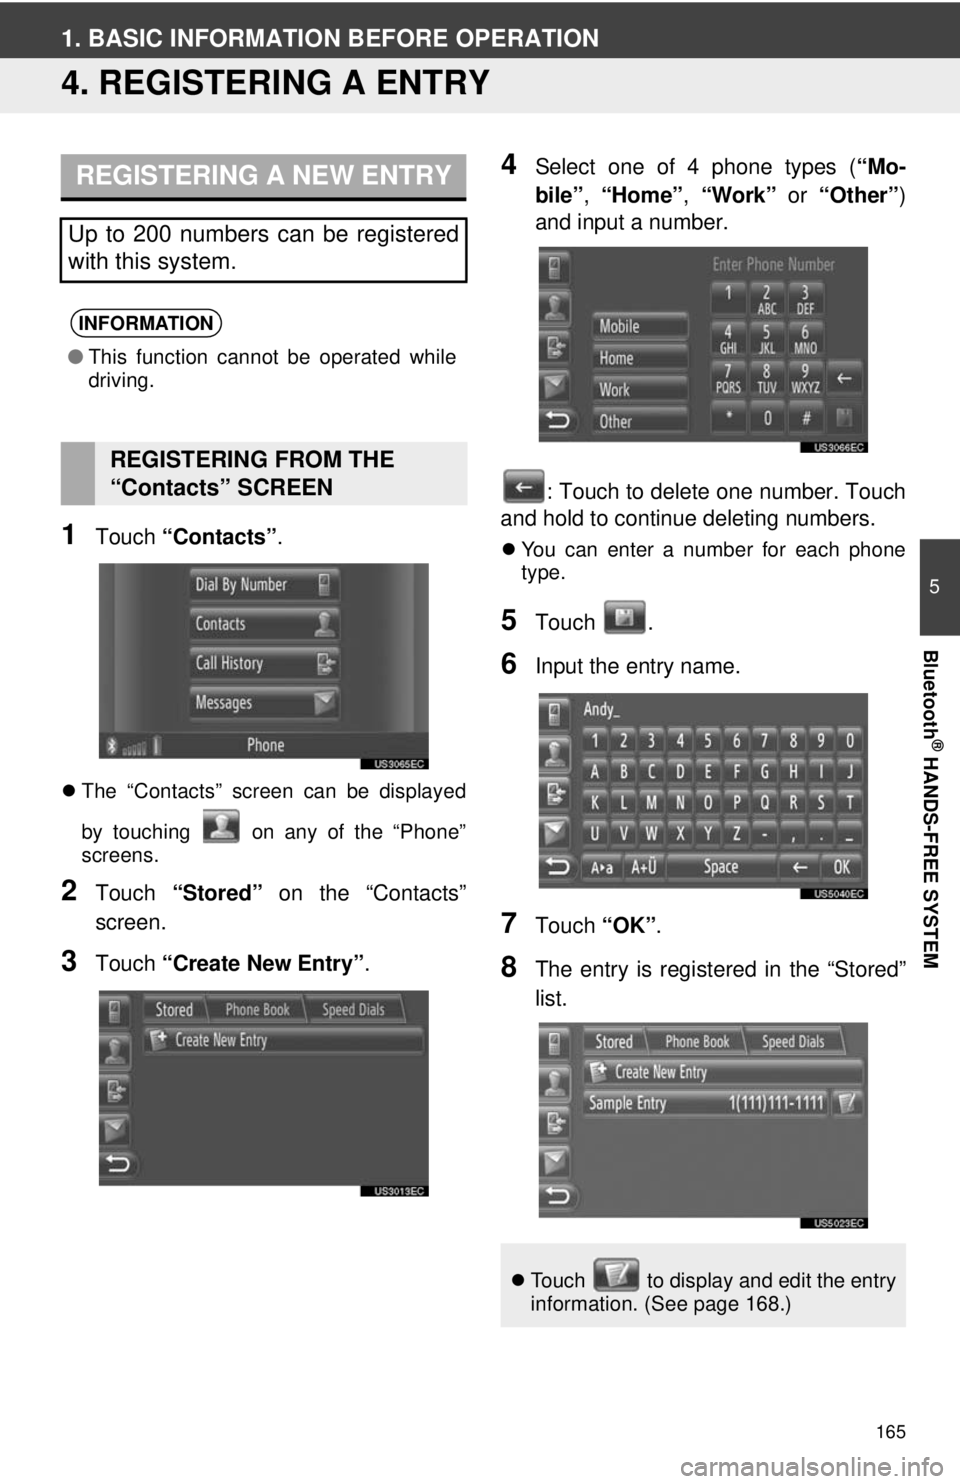
1Touch “Contacts” .
The “Contacts” screen can be displayed
by touching on any of the “Phone”
screens.
2Touch “Stored” on the “Contacts”
screen.
3Touch “Create New Entry” .
4Select one of 4 phone types ( “Mo-
bile” , “Home” , “Work” or “Other” )
and input a number.
: Touch to delete one number. Touch
and hold to continue deleting numbers.
You can enter a number for each phone
type.
5Touch .
6Input the entry name.
7Touch “OK”.
8The entry is registered in the “Stored”
list.
REGISTERING A NEW ENTRY
Up to 200 numbers can be registered
with this system.
INFORMATION
●This function cannot be operated while
driving.
REGISTERING FROM THE
“Contacts” SCREEN
Touch to display and edit the entry
information. (See page 168.)
Page 166 of 228
166
1. BASIC INFORMATION BEFORE OPERATION
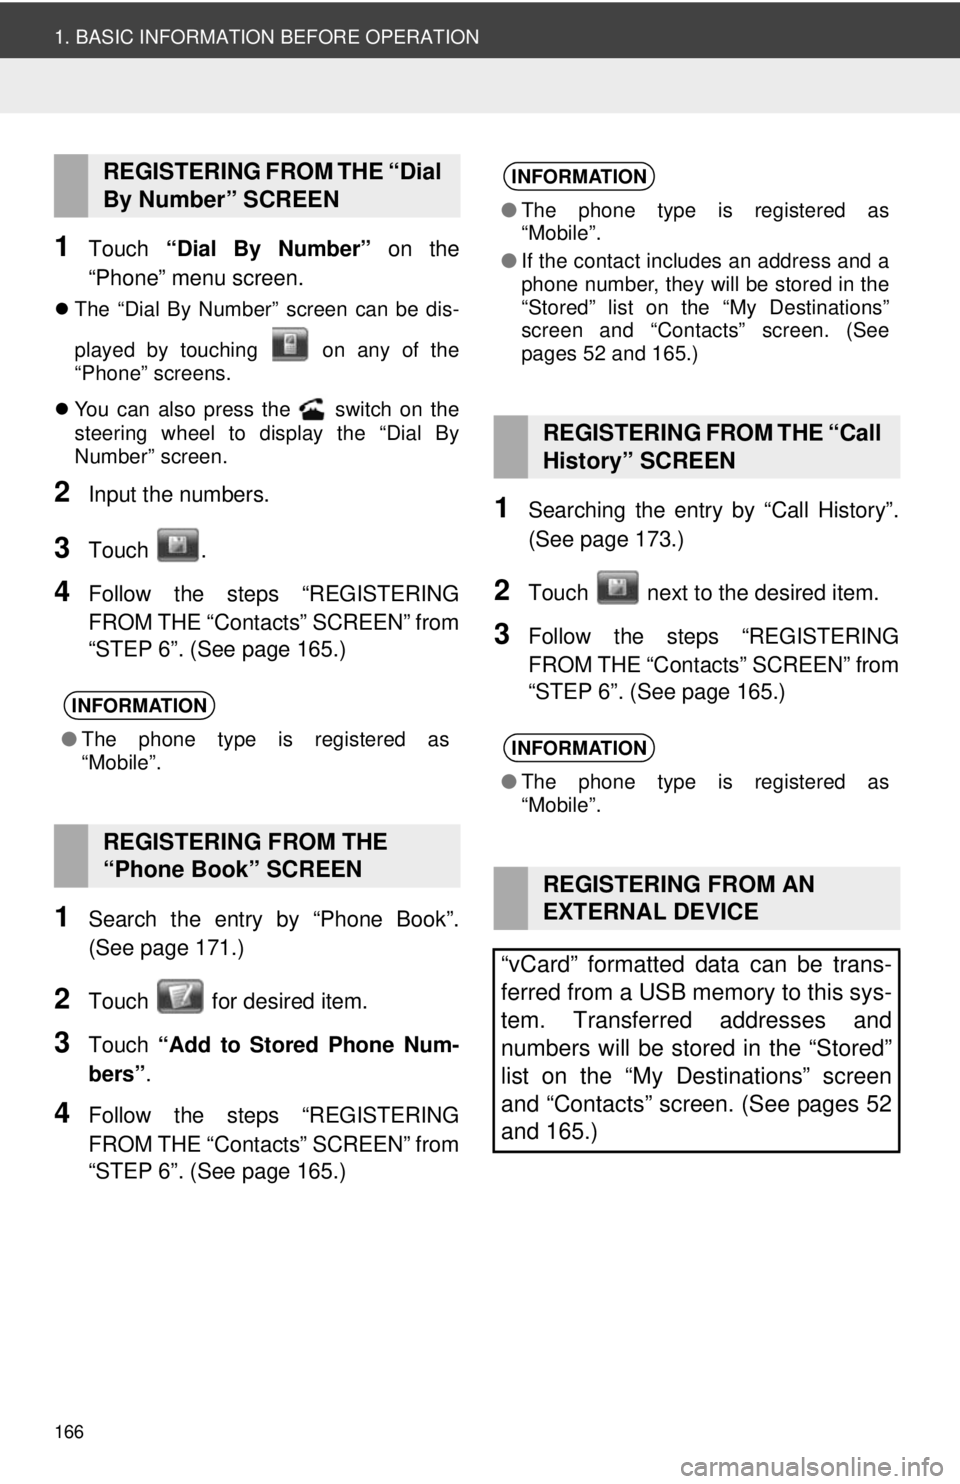
1Touch “Dial By Number” on the
“Phone” menu screen.
The “Dial By Number” screen can be dis-
played by touching on any of the
“Phone” screens.
You can also press the switch on the
steering wheel to display the “Dial By
Number” screen.
2Input the numbers.
3Touch .
4Follow the steps “REGISTERING
FROM THE “Contacts” SCREEN” from
“STEP 6”. (See page 165.)
1Search the entry by “Phone Book”.
(See page 171.)
2Touch for desired item.
3Touch “Add to Stored Phone Num-
bers” .
4Follow the steps “REGISTERING
FROM THE “Contacts” SCREEN” from
“STEP 6”. (See page 165.)
1Searching the entry by “Call History”.
(See page 173.)
2Touch next to the desired item.
3Follow the steps “REGISTERING
FROM THE “Contacts” SCREEN” from
“STEP 6”. (See page 165.)
REGISTERING FROM THE “Dial
By Number” SCREEN
INFORMATION
●The phone type is registered as
“Mobile”.
REGISTERING FROM THE
“Phone Book” SCREEN
INFORMATION
●The phone type is registered as
“Mobile”.
● If the contact includes an address and a
phone number, they will be stored in the
“Stored” list on the “My Destinations”
screen and “Contacts” screen. (See
pages 52 and 165.)
REGISTERING FROM THE “Call
History” SCREEN
INFORMATION
●The phone type is registered as
“Mobile”.
REGISTERING FROM AN
EXTERNAL DEVICE
“vCard” formatted data can be trans-
ferred from a USB memory to this sys-
tem. Transferred addresses and
numbers will be stored in the “Stored”
list on the “My Destinations” screen
and “Contacts” screen. (See pages 52
and 165.)
Page 167 of 228
167
1. BASIC INFORMATION BEFORE OPERATION
5
Bluetooth
® HANDS-FREE SYSTEM
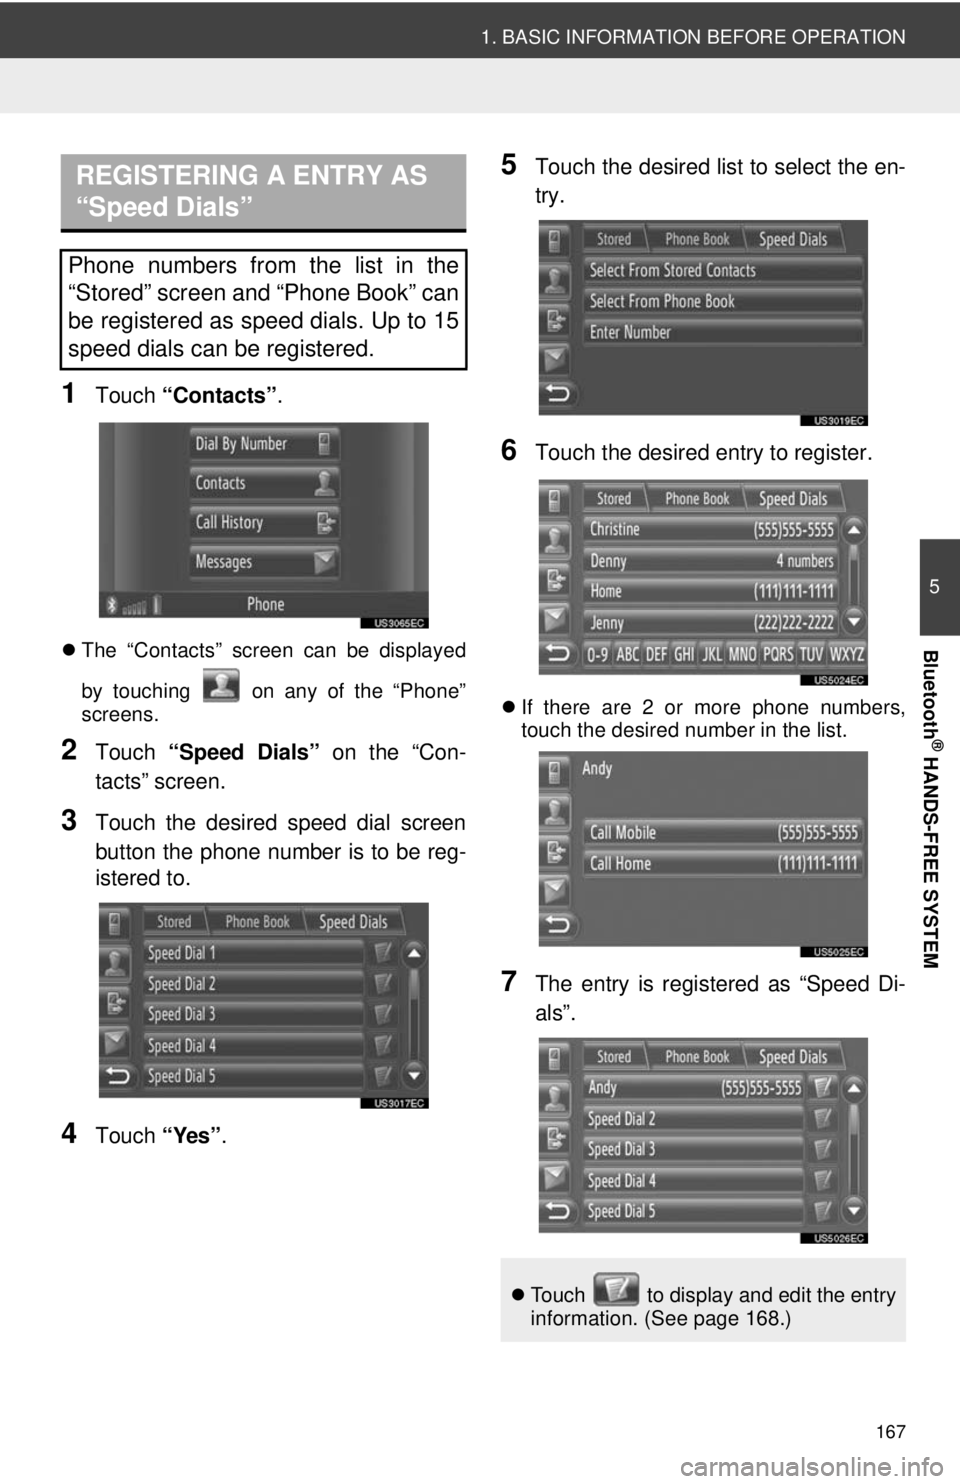
1Touch “Contacts” .
The “Contacts” screen can be displayed
by touching on any of the “Phone”
screens.
2Touch “Speed Dials” on the “Con-
tacts” screen.
3Touch the desired speed dial screen
button the phone number is to be reg-
istered to.
4Touch “Yes”.
5Touch the desired list to select the en-
try.
6Touch the desired entry to register.
If there are 2 or more phone numbers,
touch the desired number in the list.
7The entry is registered as “Speed Di-
als”.
REGISTERING A ENTRY AS
“Speed Dials”
Phone numbers from the list in the
“Stored” screen and “Phone Book” can
be registered as speed dials. Up to 15
speed dials can be registered.
Touch to display and edit the entry
information. (See page 168.)
Page 168 of 228
168
1. BASIC INFORMATION BEFORE OPERATION
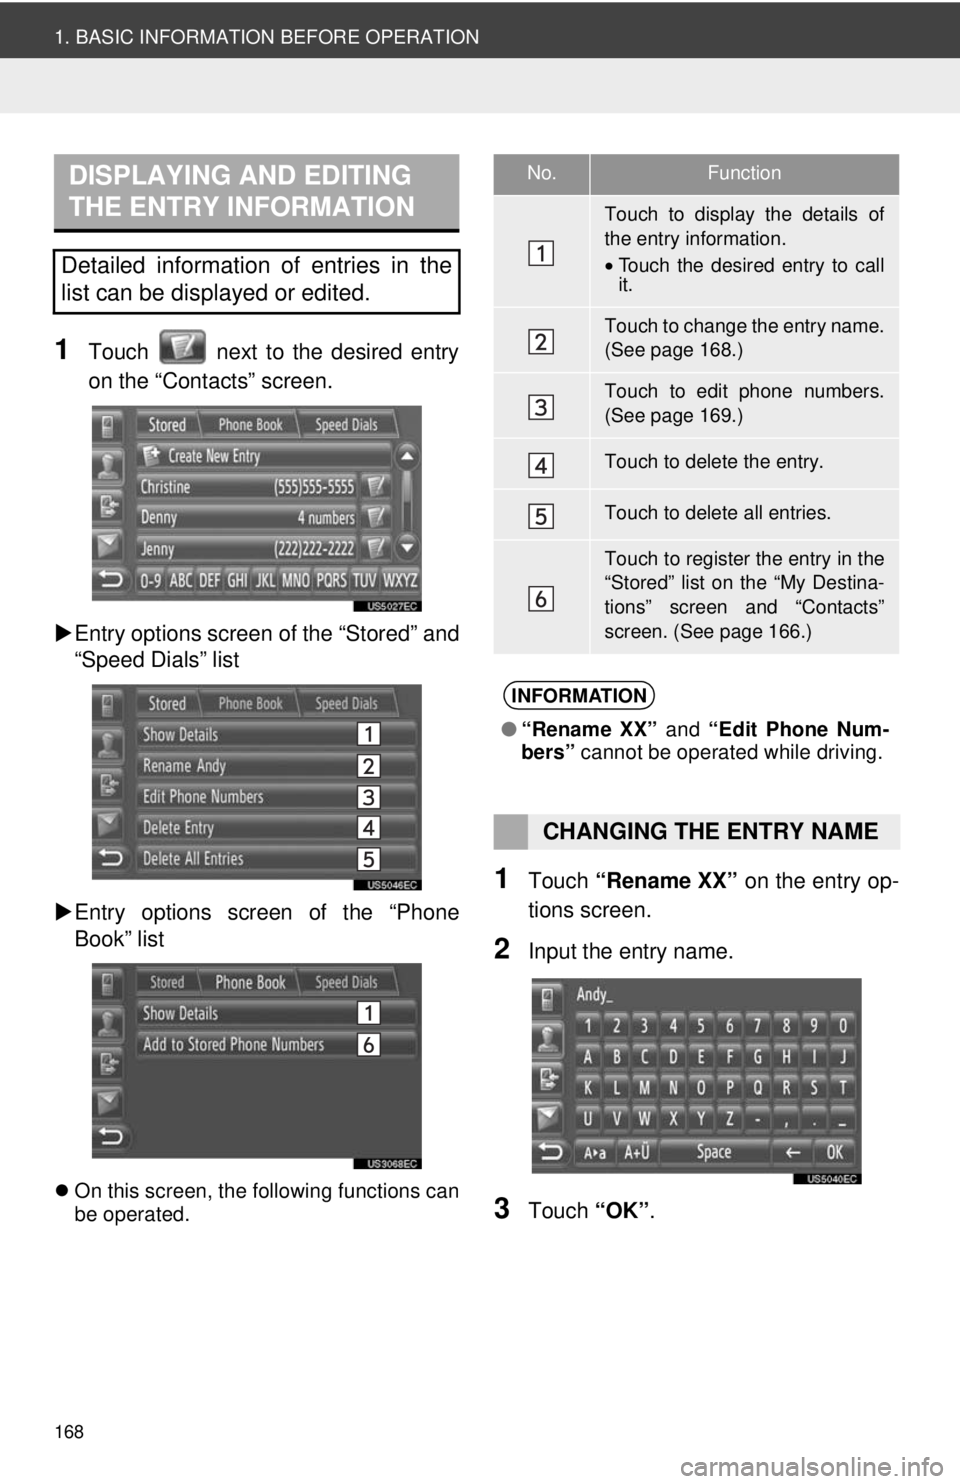
1Touch next to the desired entry
on the “Contacts” screen.
Entry options screen of the “Stored” and
“Speed Dials” list
Entry options screen of the “Phone
Book” list
On this screen, the following functions can
be operated.
1Touch “Rename XX” on the entry op-
tions screen.
2Input the entry name.
3Touch “OK”.
DISPLAYING AND EDITING
THE ENTRY INFORMATION
Detailed information of entries in the
list can be displayed or edited.
No.Function
Touch to display the details of
the entry information.
•Touch the desired entry to call
it.
Touch to change the entry name.
(See page 168.)
Touch to edit phone numbers.
(See page 169.)
Touch to delete the entry.
Touch to delete all entries.
Touch to register the entry in the
“Stored” list on the “My Destina-
tions” screen and “Contacts”
screen. (See page 166.)
INFORMATION
● “Rename XX” and “Edit Phone Num-
bers” cannot be operated while driving.
CHANGING THE ENTRY NAME
Page 169 of 228
169
1. BASIC INFORMATION BEFORE OPERATION
5
Bluetooth
® HANDS-FREE SYSTEM
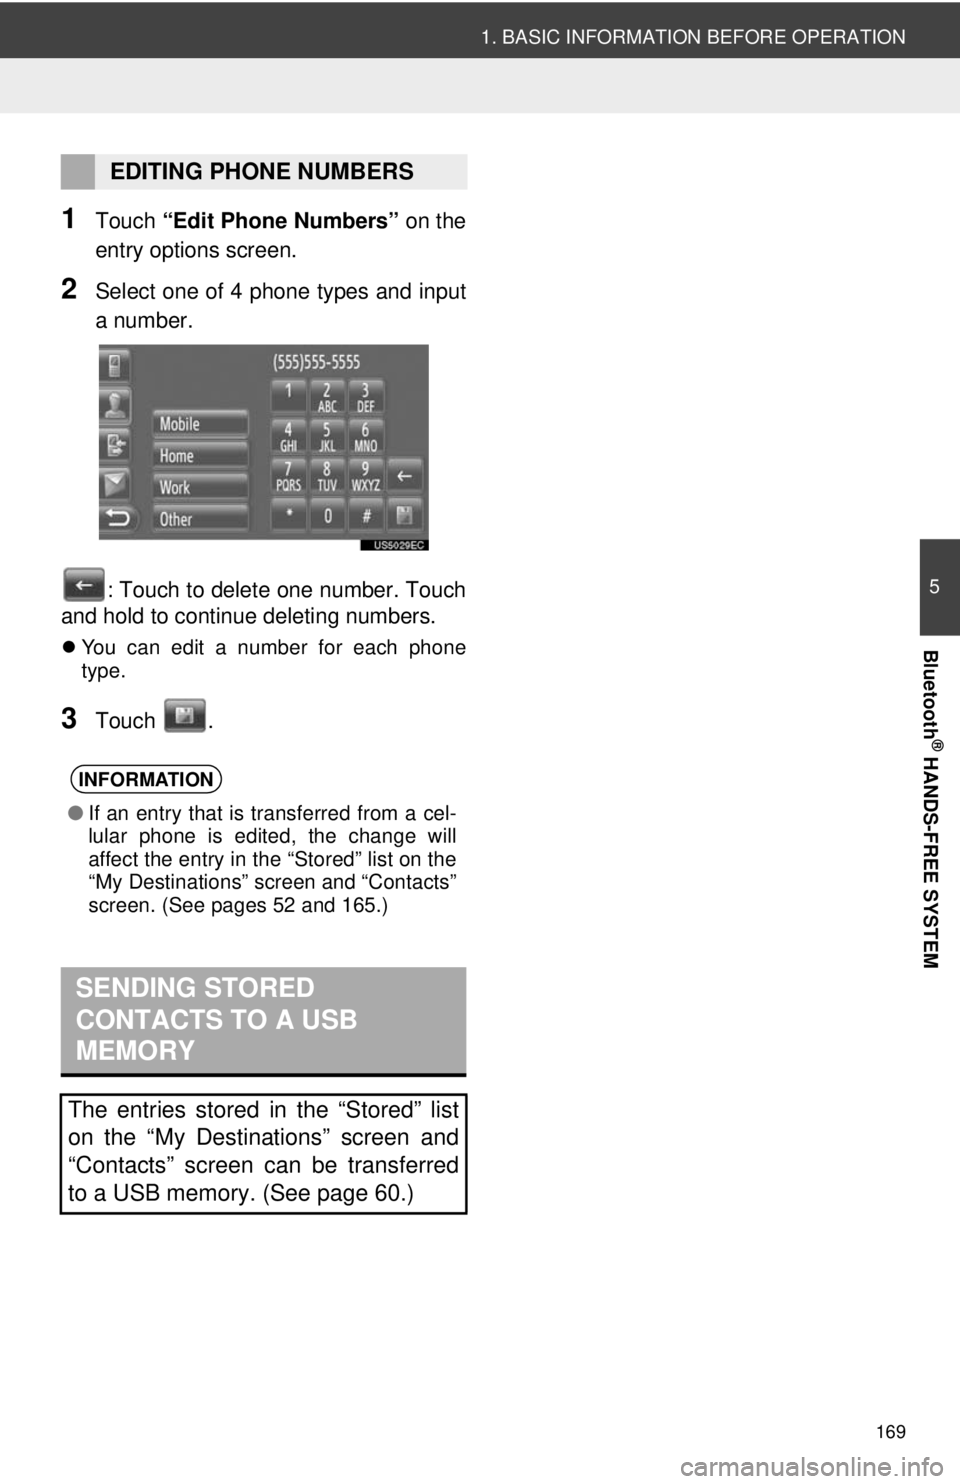
1Touch “Edit Phone Numbers” on the
entry options screen.
2Select one of 4 phone types and input
a number.
: Touch to delete one number. Touch
and hold to continue deleting numbers.
You can edit a number for each phone
type.
3Touch .
EDITING PHONE NUMBERS
INFORMATION
●If an entry that is transferred from a cel-
lular phone is edited, the change will
affect the entry in the “Stored” list on the
“My Destinations” screen and “Contacts”
screen. (See pages 52 and 165.)
SENDING STORED
CONTACTS TO A USB
MEMORY
The entries stored in the “Stored” list
on the “My Destinations” screen and
“Contacts” screen can be transferred
to a USB memory. (See page 60.)
Page 170 of 228
170
2. TELEPHONE OPERATION
1. CALLING ON A Bluetooth® PHONE
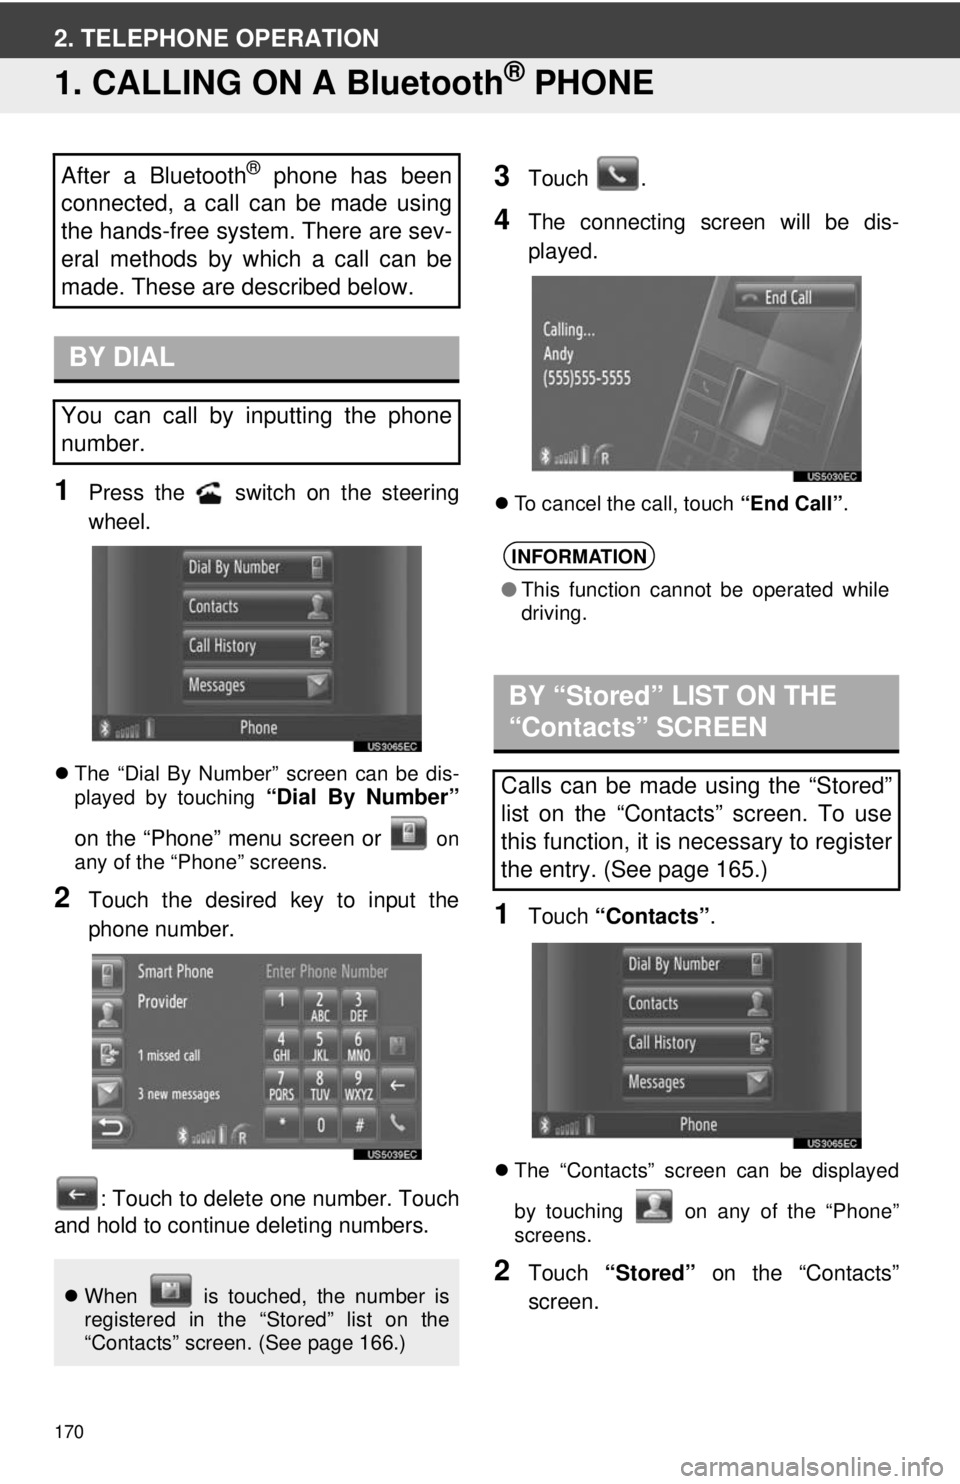
1Press the switch on the steering
wheel.
The “Dial By Number” screen can be dis-
played by touching “Dial By Number”
on the “Phone” menu screen or
on
any of the “Phone” screens.
2Touch the desired key to input the
phone number.
: Touch to delete one number. Touch
and hold to continue deleting numbers.
3Touch .
4The connecting screen will be dis-
played.
To cancel the call, touch “End Call”.
1Touch “Contacts” .
The “Contacts” screen can be displayed
by touching on any of the “Phone”
screens.
2Touch “Stored” on the “Contacts”
screen.
After a Bluetooth® phone has been
connected, a call can be made using
the hands-free system. There are sev-
eral methods by which a call can be
made. These are described below.
BY DIAL
You can call by inputting the phone
number.
When is touched, the number is
registered in the “Stored” list on the
“Contacts” screen. (See page 166.)
INFORMATION
●This function cannot be operated while
driving.
BY “Stored” LIST ON THE
“Contacts” SCREEN
Calls can be made using the “Stored”
list on the “Contacts” screen. To use
this function, it is necessary to register
the entry. (See page 165.)