TOYOTA VENZA 2014 Accessories, Audio & Navigation (in English)
Manufacturer: TOYOTA, Model Year: 2014, Model line: VENZA, Model: TOYOTA VENZA 2014Pages: 228, PDF Size: 3.73 MB
Page 191 of 228
191
7
VEHICLE INFORMATION
1. VEHICLE INFORMATION
2. FUEL CONSUMPTION∗
Energy monitor
Trip consumption
History
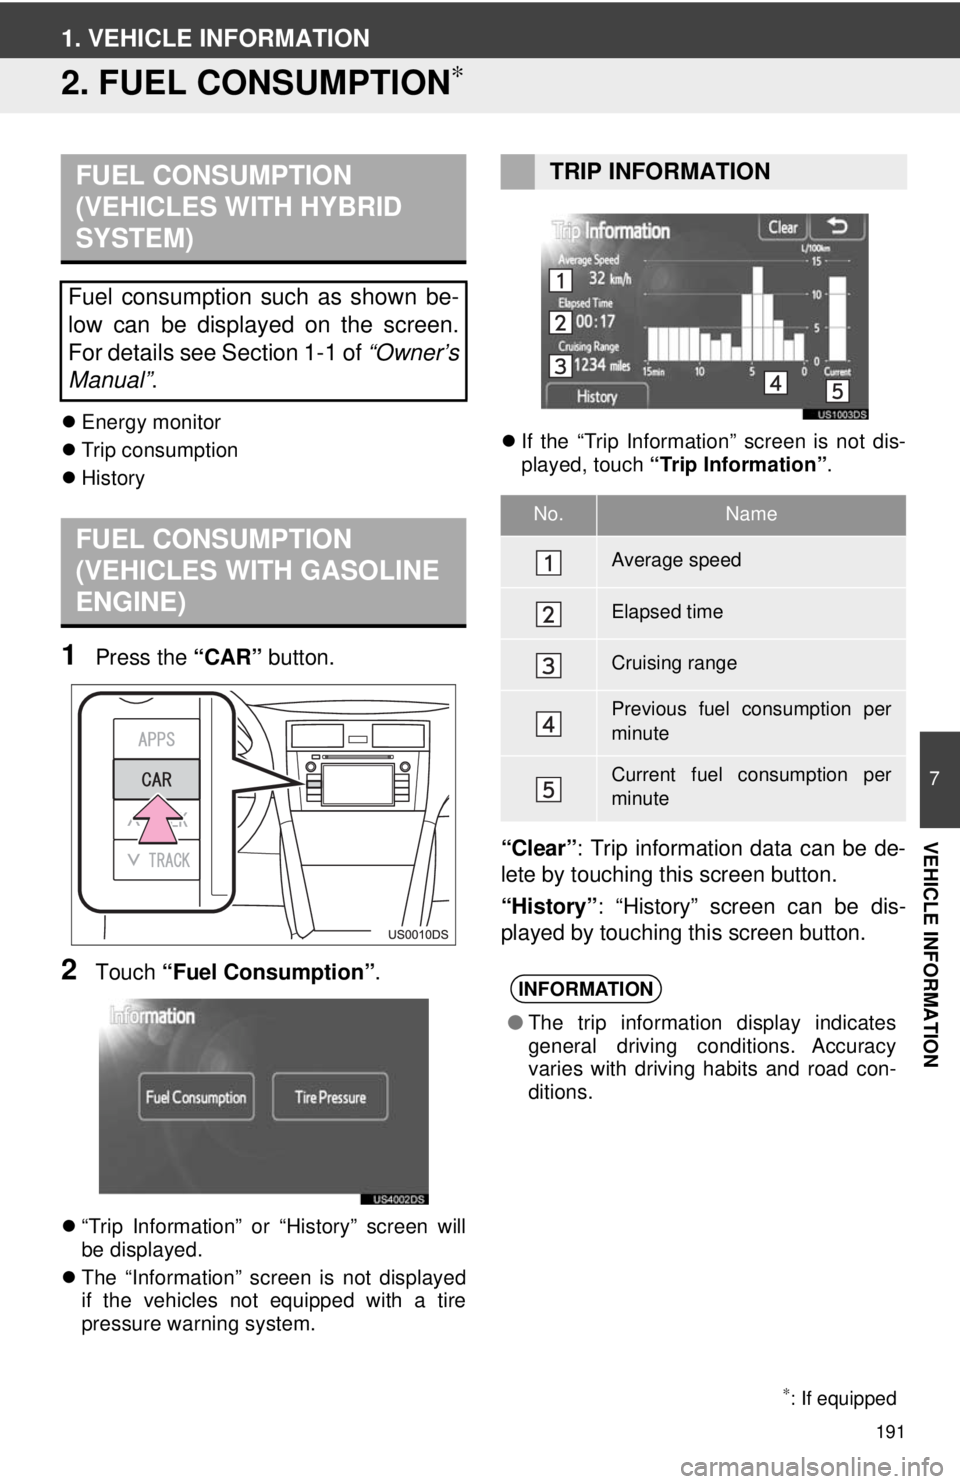
1Press the “CAR” button.
2Touch “Fuel Consumption” .
“Trip Information” or “History” screen will
be displayed.
The “Information” screen is not displayed
if the vehicles not equipped with a tire
pressure warning system.
If the “Trip Information” screen is not dis-
played, touch “Trip Information” .
“Clear”: Trip information data can be de-
lete by touching this screen button.
“History” : “History” screen can be dis-
played by touching this screen button.
FUEL CONSUMPTION
(VEHICLES WITH HYBRID
SYSTEM)
Fuel consumption such as shown be-
low can be displayed on the screen.
For details see Section 1-1 of “Owner’s
Manual” .
FUEL CONSUMPTION
(VEHICLES WITH GASOLINE
ENGINE)
∗: If equipped
TRIP INFORMATION
No.Name
Average speed
Elapsed time
Cruising range
Previous fuel consumption per
minute
Current fuel consumption per
minute
INFORMATION
●The trip information display indicates
general driving conditions. Accuracy
varies with driving habits and road con-
ditions.
Page 192 of 228
192
1. VEHICLE INFORMATION
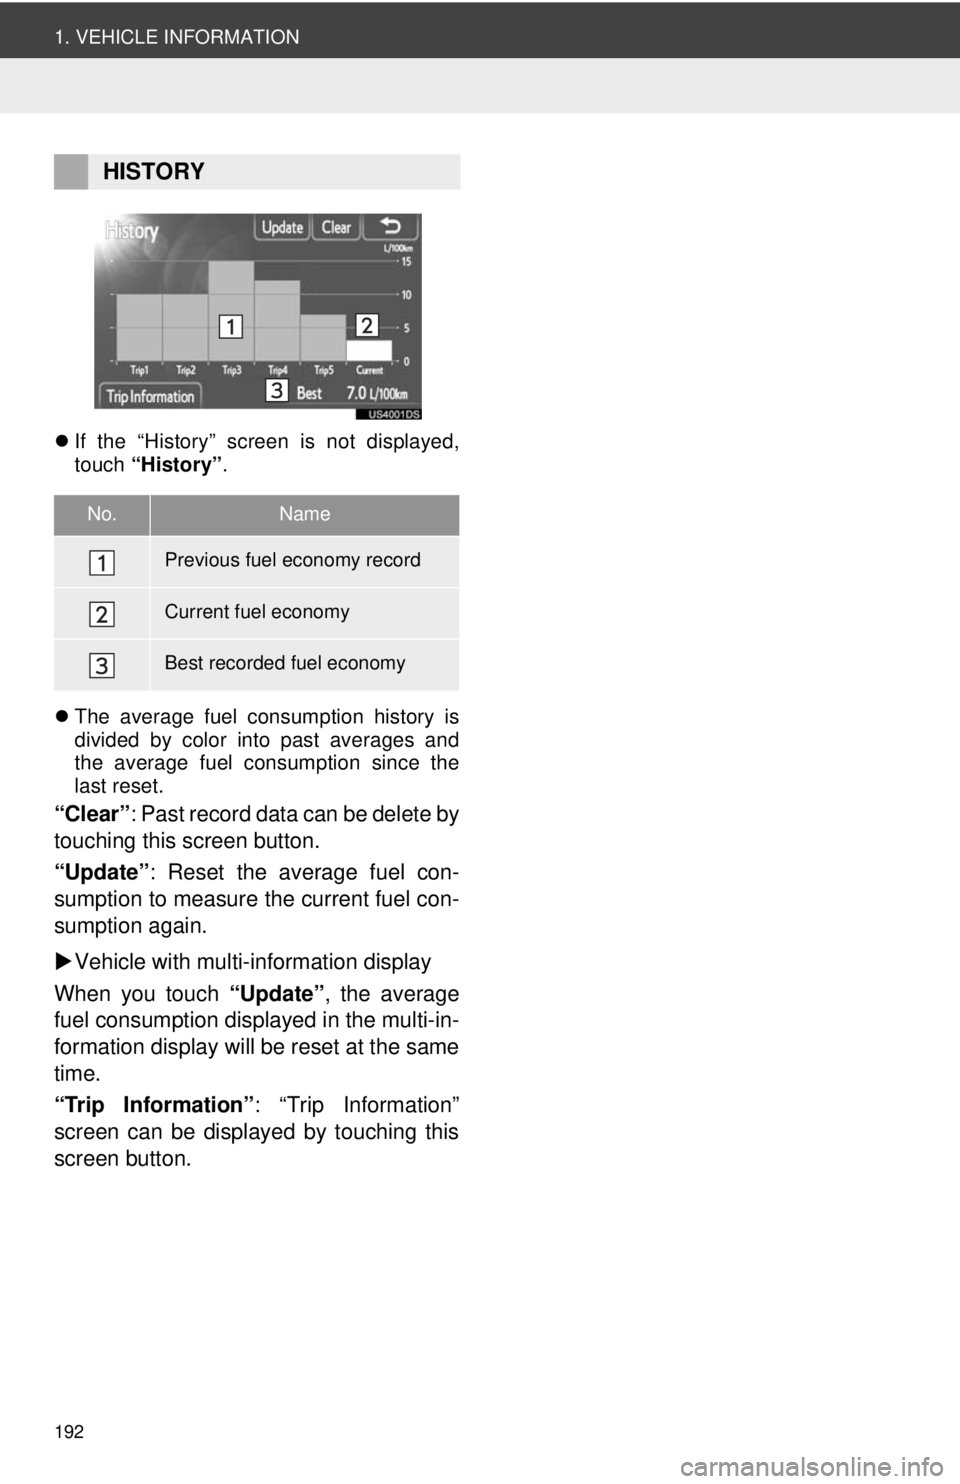
If the “History” screen is not displayed,
touch “History” .
The average fuel consumption history is
divided by color into past averages and
the average fuel consumption since the
last reset.
“Clear” : Past record data can be delete by
touching this screen button.
“Update” : Reset the average fuel con-
sumption to measure the current fuel con-
sumption again.
Vehicle with multi-information display
When you touch “Update”, the average
fuel consumption displa yed in the multi-in-
formation display will be reset at the same
time.
“Trip Information” : “Trip Information”
screen can be displayed by touching this
screen button.
HISTORY
No.Name
Previous fuel economy record
Current fuel economy
Best recorded fuel economy
Page 193 of 228
193
7
VEHICLE INFORMATION
1. VEHICLE INFORMATION
3. TIRE PRESSURE WARNING SYSTEM∗
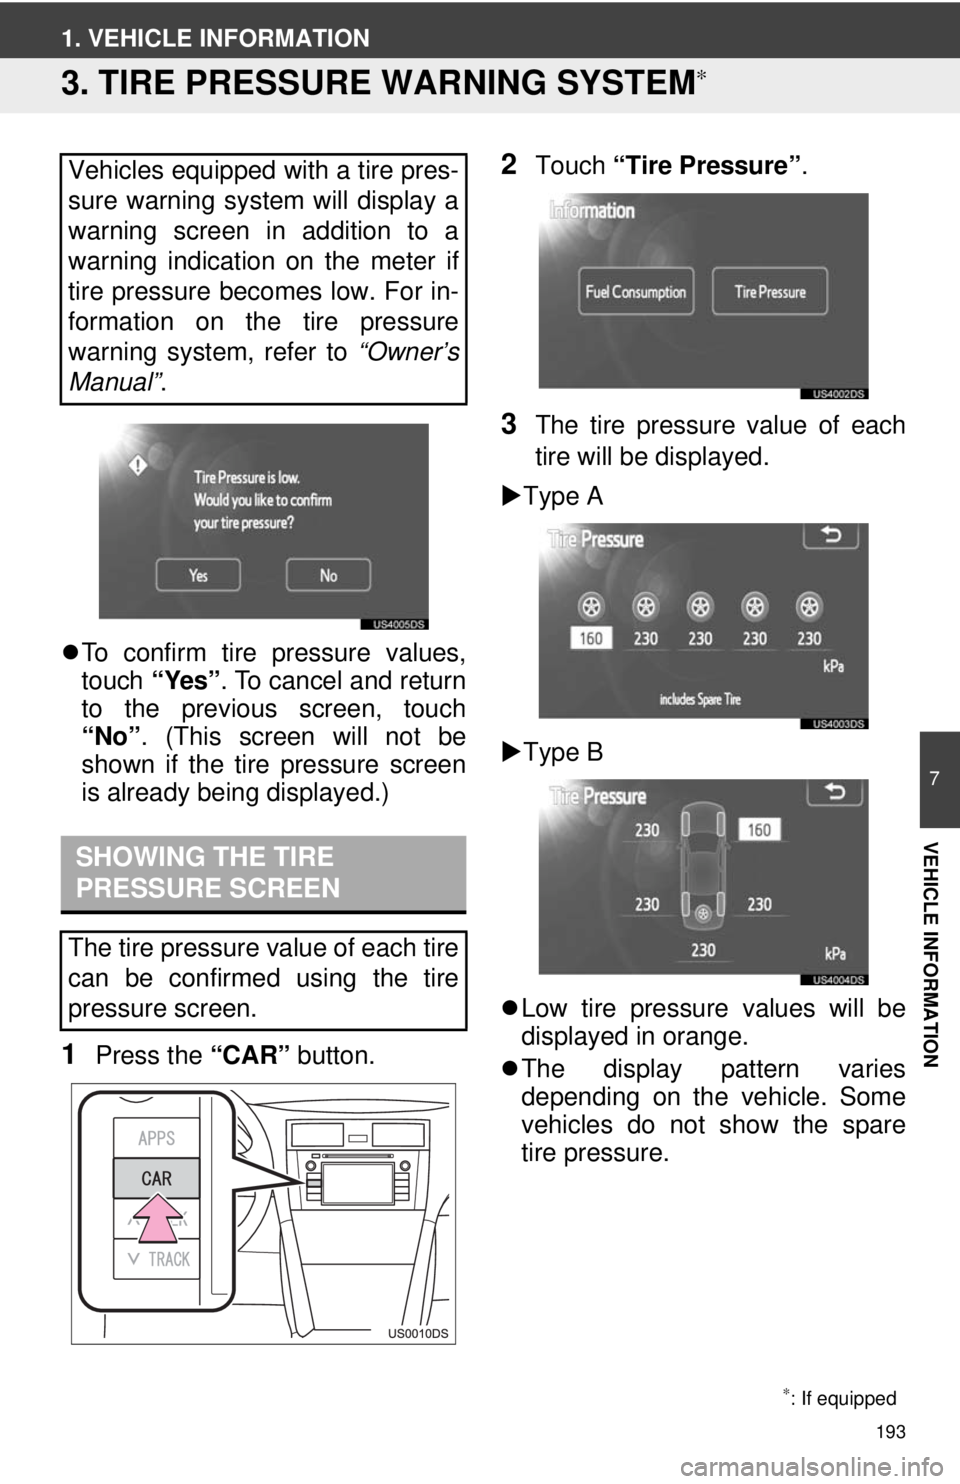
To confirm tire pressure values,
touch “Yes”. To cancel and return
to the previous screen, touch
“No” . (This screen will not be
shown if the tire pressure screen
is already being displayed.)
1Press the “CAR” button.
2Touch “Tire Pressure”.
3The tire pressure value of each
tire will be displayed.
Type A
Type B
Low tire pressure values will be
displayed in orange.
The display pattern varies
depending on the vehicle. Some
vehicles do not show the spare
tire pressure.
Vehicles equipped with a tire pres-
sure warning system will display a
warning screen in addition to a
warning indication on the meter if
tire pressure becomes low. For in-
formation on the tire pressure
warning system, refer to
“Owner’s
Manual” .
SHOWING THE TIRE
PRESSURE SCREEN
The tire pressure value of each tire
can be confirmed using the tire
pressure screen.
∗: If equipped
Page 194 of 228
194
1. VEHICLE INFORMATION
Page 195 of 228
8
195
1
2
3
4
5
6
7
8
9
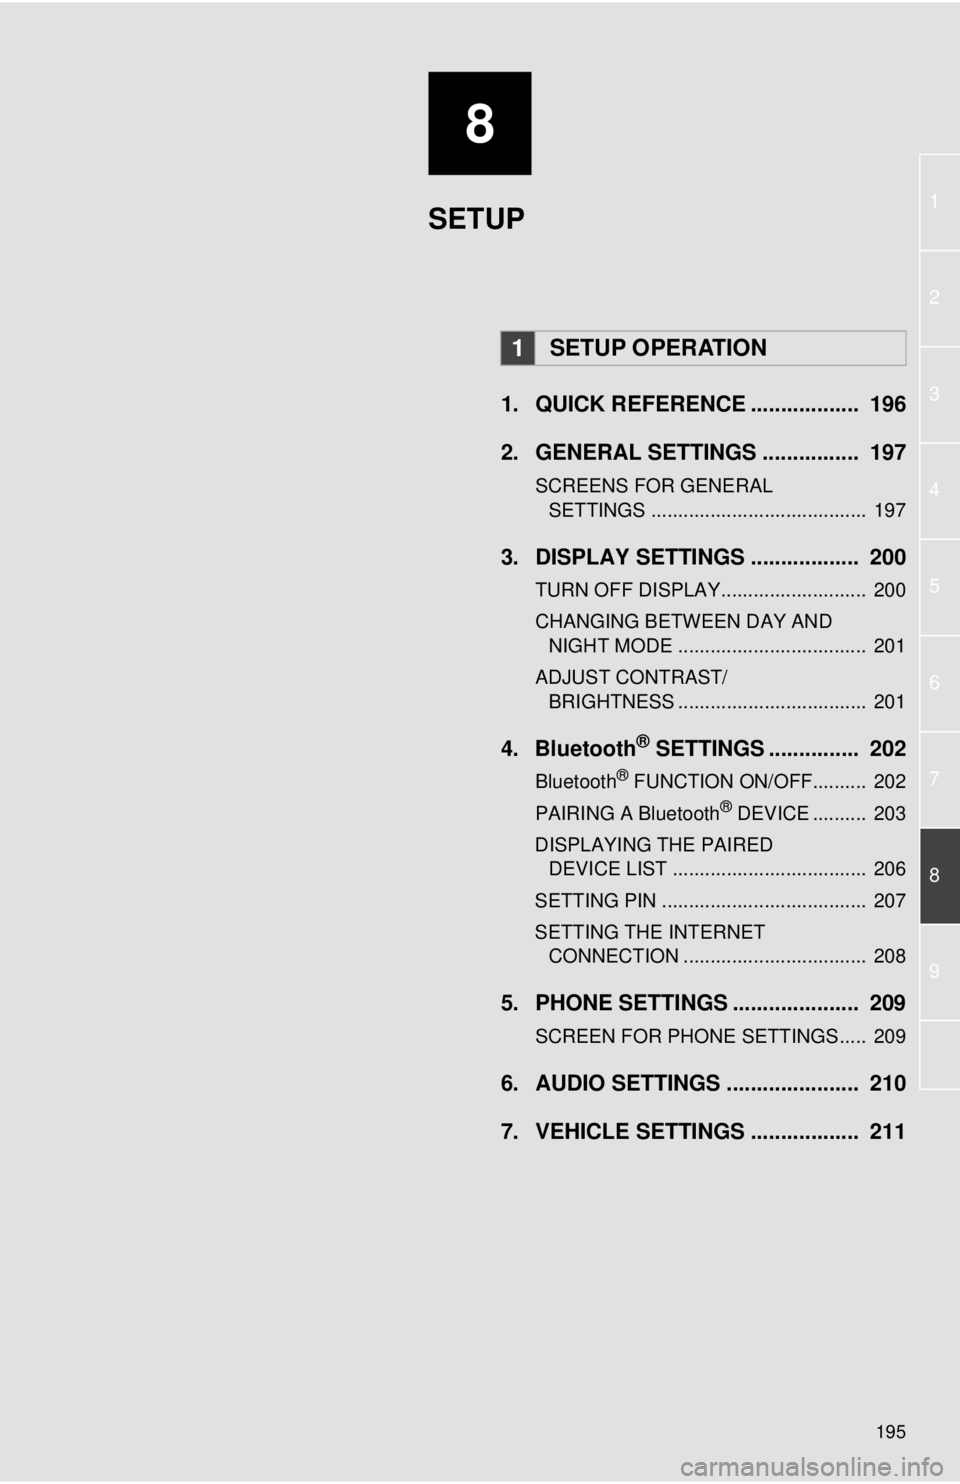
1. QUICK REFERENCE .................. 196
2. GENERAL SETTINGS ................ 197
SCREENS FOR GENERAL SETTINGS ........................................ 197
3. DISPLAY SETTINGS .................. 200
TURN OFF DISPLAY........................... 200
CHANGING BETWEEN DAY AND NIGHT MODE ................................... 201
ADJUST CONTRAST/ BRIGHTNESS ................................... 201
4. Bluetooth® SETTINGS ............... 202
Bluetooth® FUNCTION ON/OFF.......... 202
PAIRING A Bluetooth® DEVICE .......... 203
DISPLAYING THE PAIRED DEVICE LIST .................................... 206
SETTING PIN ...................................... 207
SETTING THE INTERNET CONNECTION .................................. 208
5. PHONE SETTINGS ..................... 209
SCREEN FOR PHONE SETTINGS..... 209
6. AUDIO SETTINGS ...................... 210
7. VEHICLE SETTINGS .................. 211
1SETUP OPERATION
SETUP
Page 196 of 228
196
1. SETUP OPERATION
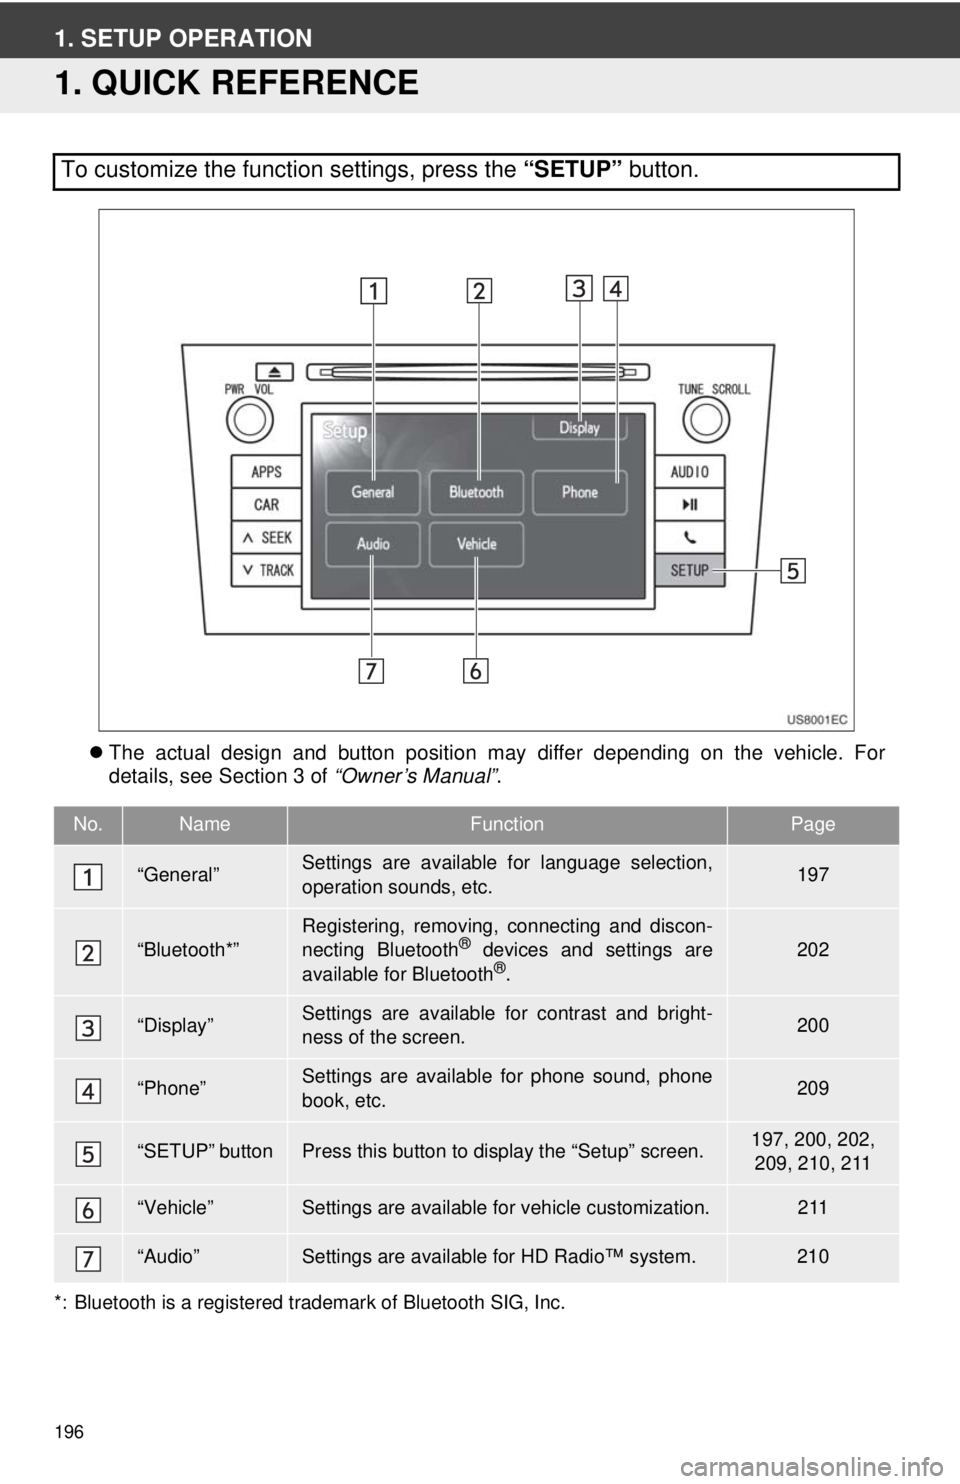
1. QUICK REFERENCE
The actual design and button position may differ depending on the vehicle. For
details, see Section 3 of “Owner’s Manual”.
*: Bluetooth is a registered trademark of Bluetooth SIG, Inc.
To customize the function settings, press the “SETUP” button.
No.NameFunctionPage
“General”Settings are available for language selection,
operation sounds, etc.197
“Bluetooth*”Registering, removing, connecting and discon-
necting Bluetooth® devices and settings are
available for Bluetooth®.
202
“Display”Settings are available for contrast and bright-
ness of the screen.200
“Phone”Settings are available for phone sound, phone
book, etc.209
“SETUP” buttonPress this button to display the “Setup” screen.197, 200, 202, 209, 210, 211
“Vehicle”Settings are available for vehicle customization.211
“Audio”Settings are available for HD Radio™ system.210
Page 197 of 228
197
8
SETUP
1. SETUP OPERATION
2. GENERAL SETTINGS
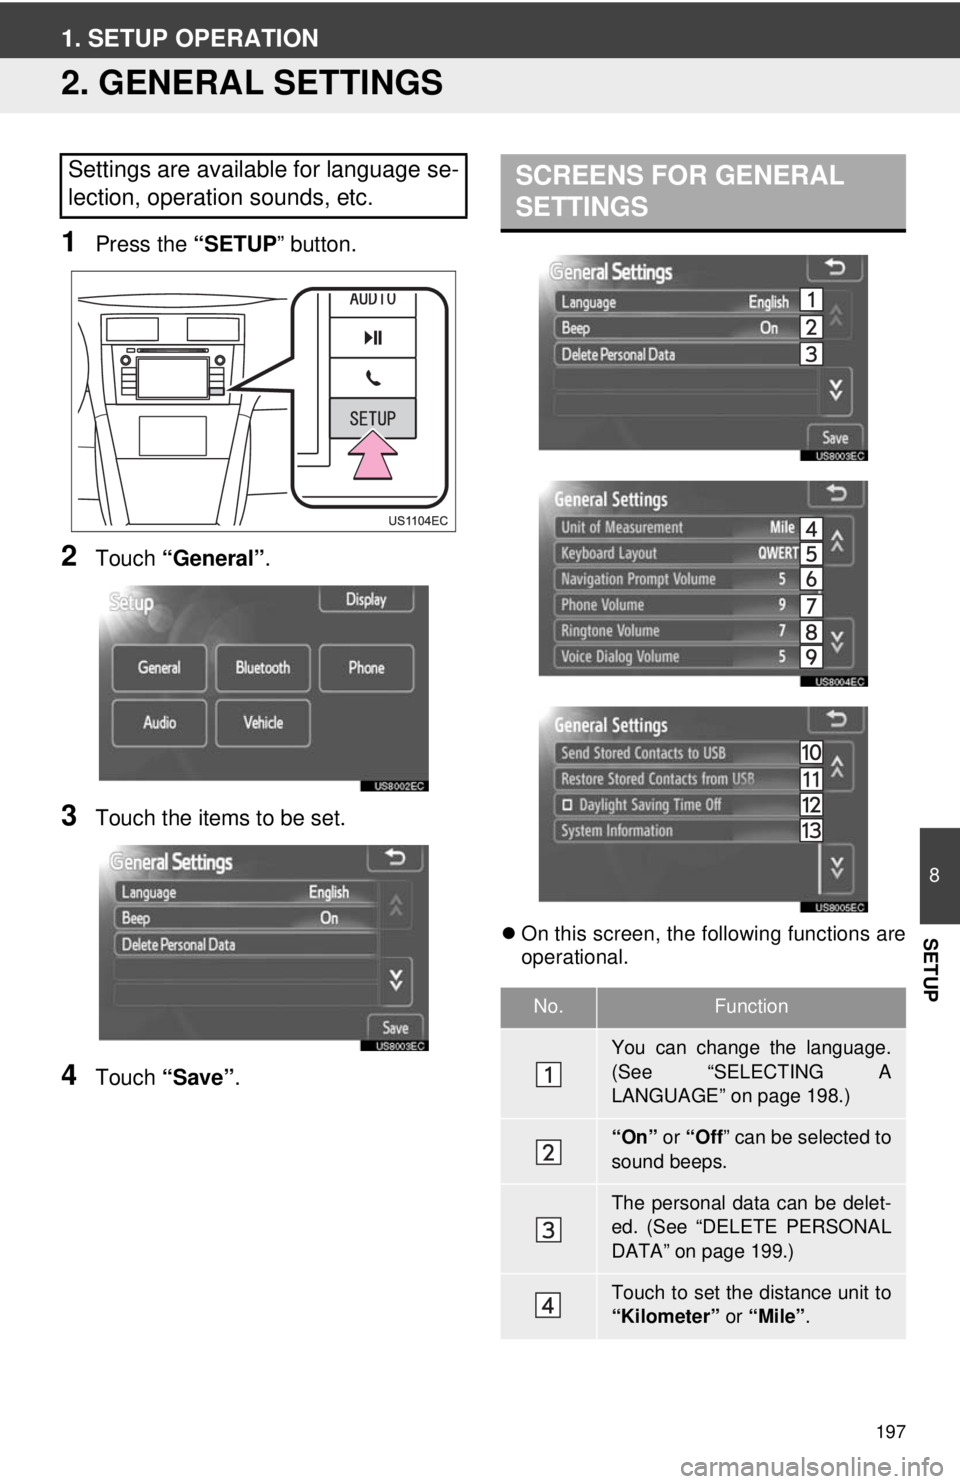
1Press the “SETUP” button.
2Touch “General” .
3Touch the items to be set.
4Touch “Save” .
On this screen, the following functions are
operational.
Settings are available for language se-
lection, operation sounds, etc.SCREENS FOR GENERAL
SETTINGS
No.Function
You can change the language.
(See “SELECTING A
LANGUAGE” on page 198.)
“On” or “Off ” can be selected to
sound beeps.
The personal data can be delet-
ed. (See “DELETE PERSONAL
DATA” on page 199.)
Touch to set the distance unit to
“Kilometer” or “Mile”.
Page 198 of 228
198
1. SETUP OPERATION
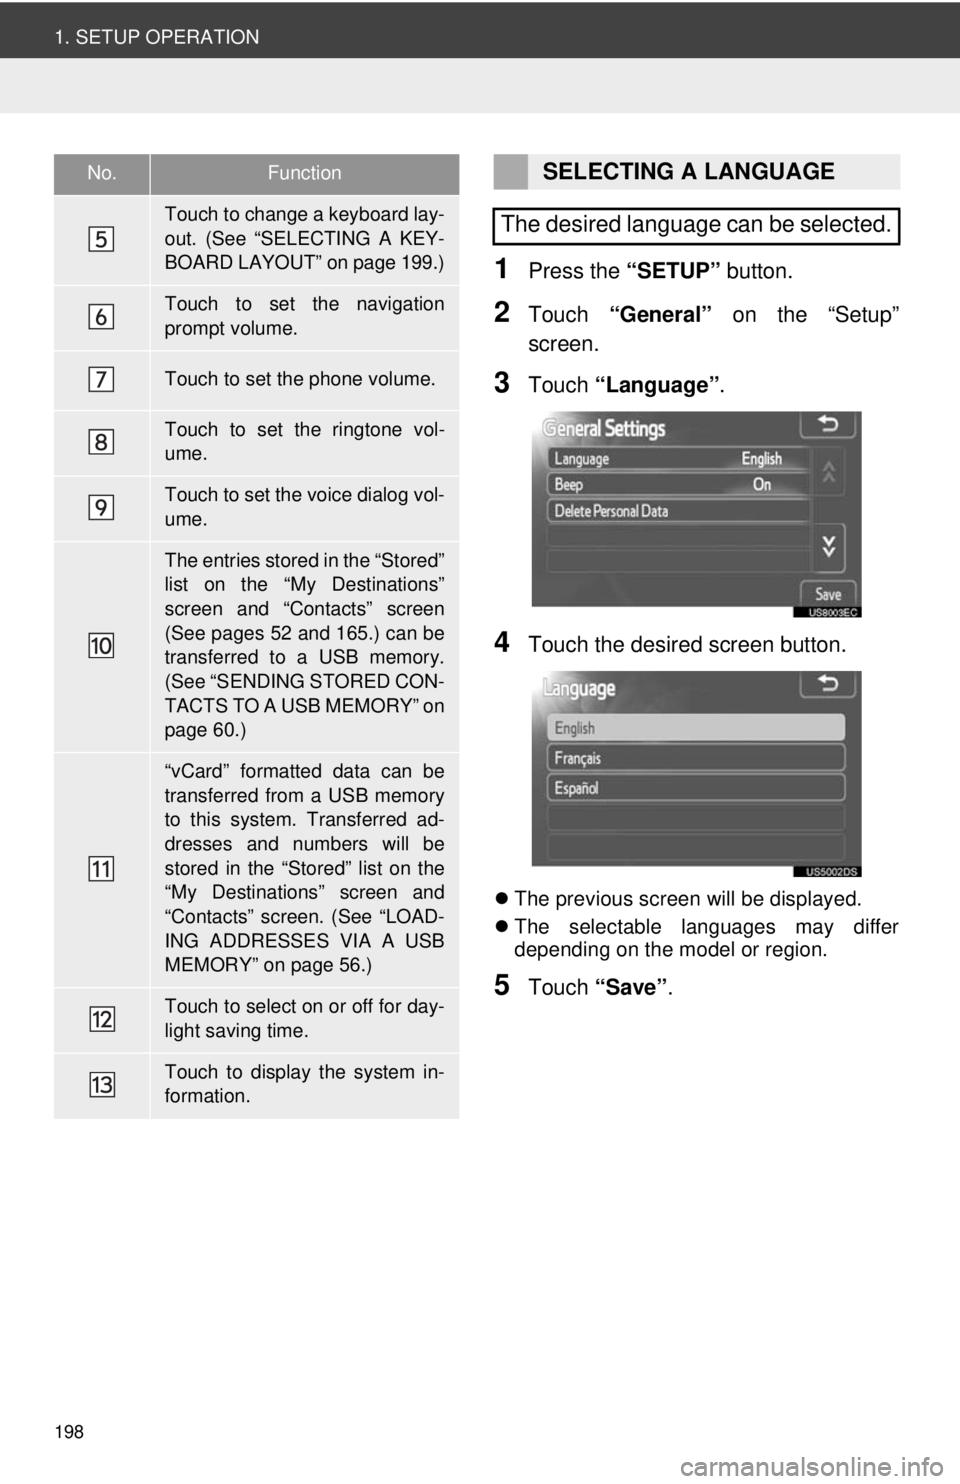
1Press the “SETUP” button.
2Touch “General” on the “Setup”
screen.
3Touch “Language” .
4Touch the desired screen button.
The previous screen will be displayed.
The selectable languages may differ
depending on the model or region.
5Touch “Save” .
Touch to change a keyboard lay-
out. (See “SELECTING A KEY-
BOARD LAYOUT” on page 199.)
Touch to set the navigation
prompt volume.
Touch to set the phone volume.
Touch to set the ringtone vol-
ume.
Touch to set the voice dialog vol-
ume.
The entries stored in the “Stored”
list on the “My Destinations”
screen and “Contacts” screen
(See pages 52 and 165.) can be
transferred to a USB memory.
(See “SENDING STORED CON-
TACTS TO A USB MEMORY” on
page 60.)
“vCard” formatted data can be
transferred from a USB memory
to this system. Transferred ad-
dresses and numbers will be
stored in the “Stored” list on the
“My Destinations” screen and
“Contacts” screen. (See “LOAD-
ING ADDRESSES VIA A USB
MEMORY” on page 56.)
Touch to select on or off for day-
light saving time.
Touch to display the system in-
formation.
No.FunctionSELECTING A LANGUAGE
The desired language can be selected.
Page 199 of 228
199
1. SETUP OPERATION
8
SETUP
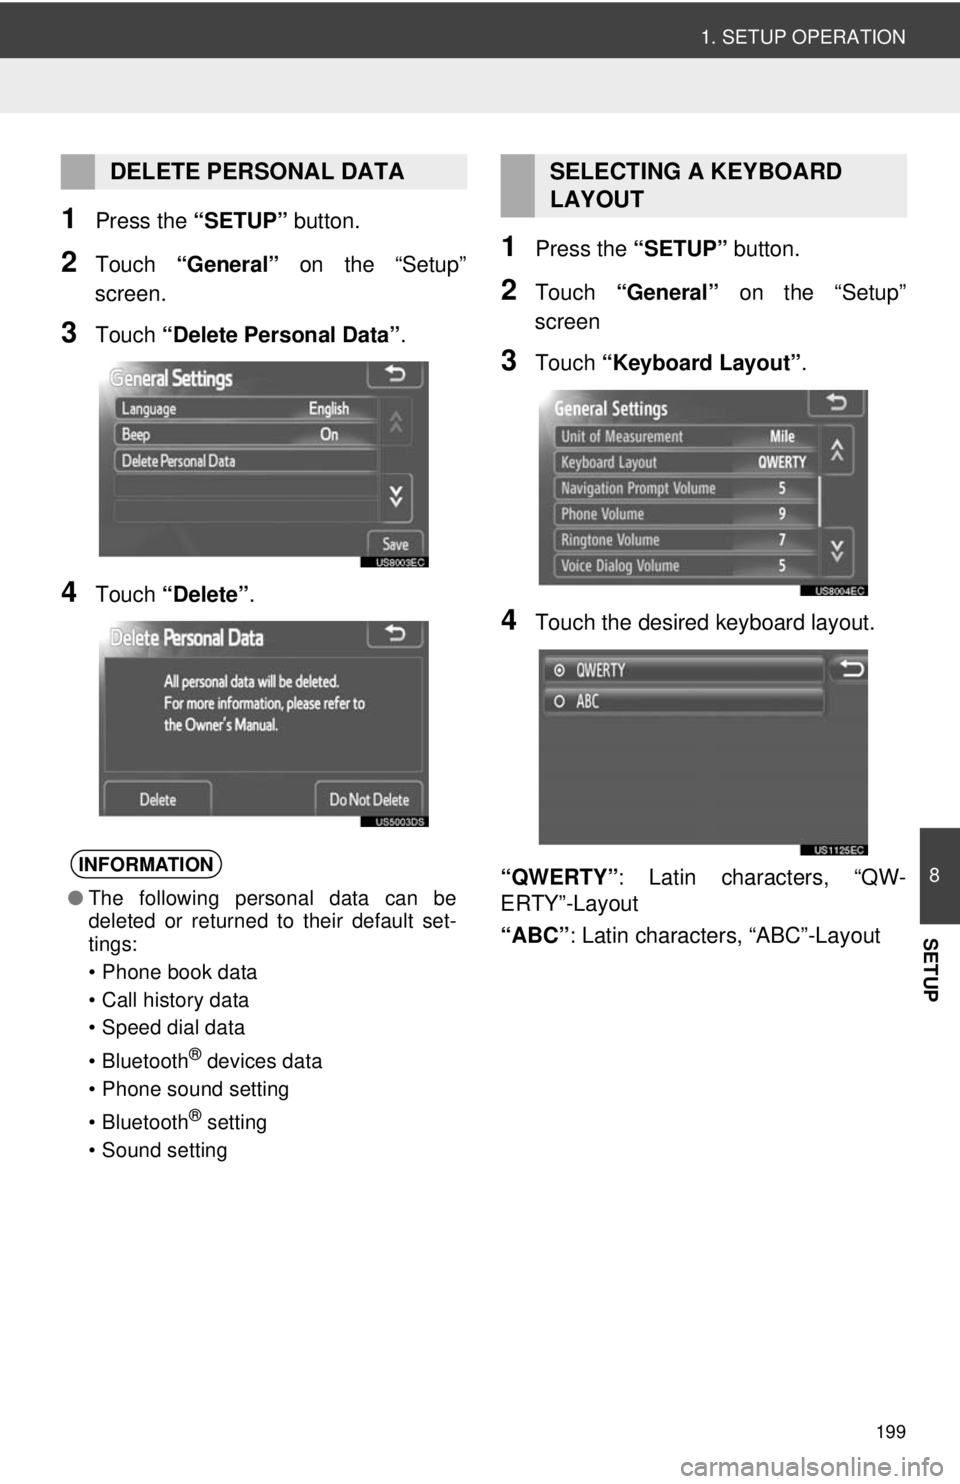
1Press the “SETUP” button.
2Touch “General” on the “Setup”
screen.
3Touch “Delete Personal Data” .
4Touch “Delete” .
1Press the “SETUP” button.
2Touch “General” on the “Setup”
screen
3Touch “Keyboard Layout” .
4Touch the desired keyboard layout.
“QWERTY” : Latin characters, “QW-
ERTY”-Layout
“ABC” : Latin characters, “ABC”-Layout
DELETE PERSONAL DATA
INFORMATION
●The following personal data can be
deleted or returned to their default set-
tings:
• Phone book data
• Call history data
• Speed dial data
• Bluetooth
® devices data
• Phone sound setting
• Bluetooth
® setting
• Sound setting
SELECTING A KEYBOARD
LAYOUT
Page 200 of 228
200
1. SETUP OPERATION
3. DISPLAY SETTINGS
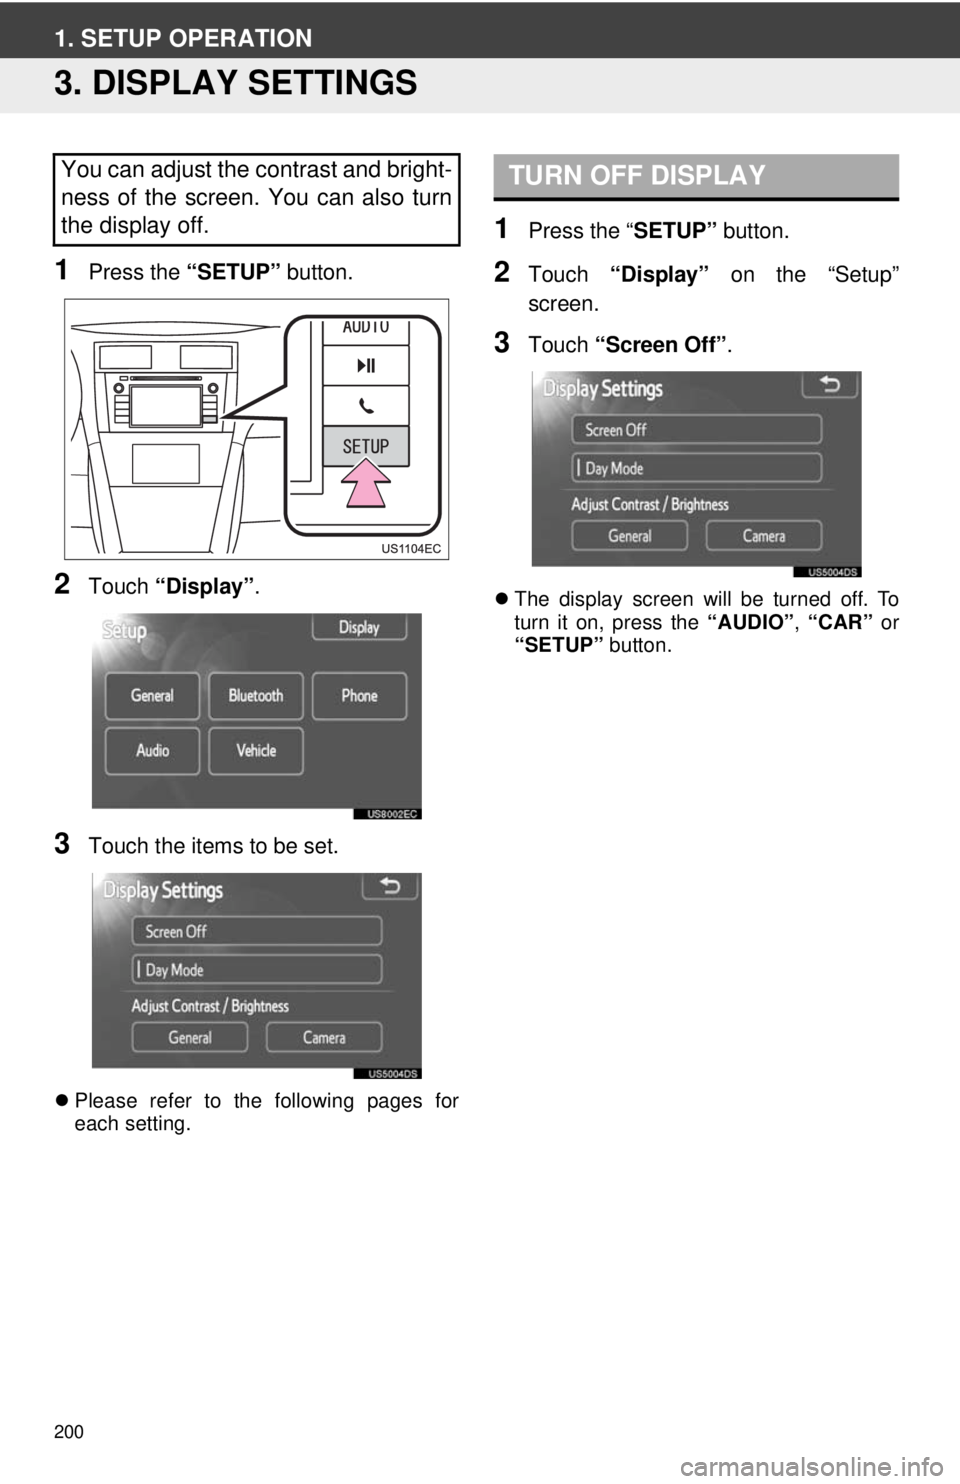
1Press the “SETUP” button.
2Touch “Display” .
3Touch the items to be set.
Please refer to the following pages for
each setting.
1Press the “ SETUP” button.
2Touch “Display” on the “Setup”
screen.
3Touch “Screen Off” .
The display screen will be turned off. To
turn it on, press the “AUDIO”, “CAR” or
“SETUP” button.
You can adjust the contrast and bright-
ness of the screen. You can also turn
the display off.TURN OFF DISPLAY