TOYOTA VERSO 2017 Owners Manual
VERSO 2017
TOYOTA
TOYOTA
https://www.carmanualsonline.info/img/14/60767/w960_60767-0.png
TOYOTA VERSO 2017 Owners Manual
Trending: CD player, child seat, navigation, child lock, heating, wheel, brakes
Page 581 of 668
5
581
5-2. Steps to take in an emergency
When trouble arises
VERSO_EE_OM64517E
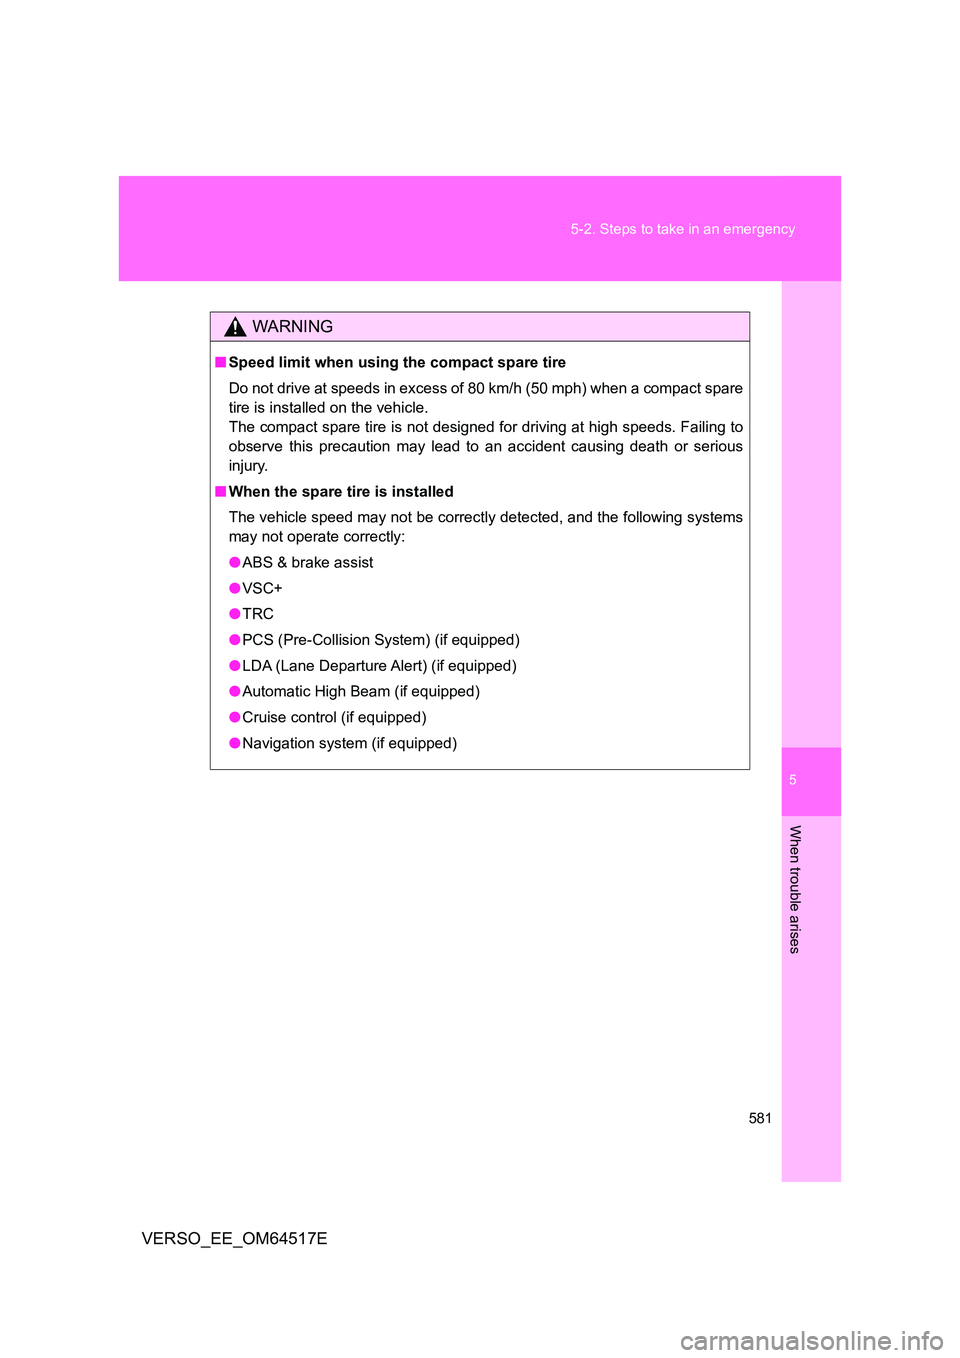
WARNING
■ Speed limit when using the compact spare tire
Do not drive at speeds in excess of 80 km/h (50 mph) when a compact spare
tire is installed on the vehicle.
The compact spare tire is not designed for driving at high speeds. Failing to
observe this precaution may lead to an accident causing death or serious
injury.
■ When the spare tire is installed
The vehicle speed may not be correctly detected, and the following systems
may not operate correctly:
● ABS & brake assist
● VSC+
● TRC
● PCS (Pre-Collision System) (if equipped)
● LDA (Lane Departure Alert) (if equipped)
● Automatic High Beam (if equipped)
● Cruise control (if equipped)
● Navigation system (if equipped)
Page 582 of 668
582
5-2. Steps to take in an emergency
VERSO_EE_OM64517E
NOTICE
■ Do not drive the vehicle with a flat tire
Do not continue driving with a flat tire.
Driving even a short distance with a flat tire can damage the tire and the
wheel beyond repair.
■ Be careful when driving over bumps with the compact spare tire
installed on the vehicle
The vehicle becomes lower when driving with the compact spare tire com-
pared to when driving with standard tires. Be careful when driving over
uneven road surfaces.
■ Driving with tire chains and the compact spare tire
Do not fit tire chains to the compact spare tire.
Tire chains may damage the vehicle body and adversely affect driving per-
formance.
■ When replacing the tires (vehicles with the tire pressure warning sys-
tem)
When removing or fitting the wheels, tires or the tire pressure warning valve
and transmitter, contact any authorized Toyota dealer or repairer, or another
duly qualified and equipped professional as the tire pressure warning valve
and transmitter may be damaged if not handled correctly.
Page 583 of 668
5
583
5-2. Steps to take in an emergency
When trouble arises
VERSO_EE_OM64517E
If you have a flat tire (vehicles with emergency tire puncture repair kit)
Your vehicle is not equipped with a spare tire, but instead is
equipped with an emergency tire puncture repair kit.
A puncture caused by a nail or screw passing through the tire tread
can be repaired temporarily using the emergency tire puncture repair
kit. (The kit contains a bottle of sealant. The sealant can be used only
once to temporarily repair one ti re without removing the nail or
screw from the tire.) Depending on the damage, this kit cannot be
used to repair the tire. ( P. 586)
After temporarily repairing the tire with the kit, have the tire repaired
or replaced by any authorized Toyota dealer or repairer, or another
duly qualified and equipped professional. Repairs conducted using
the emergency tire puncture repair kit are only a temporary measure.
Have the tire repaired and replaced as soon as possible.
■ Before repairing the vehicle
● Stop the vehicle in a safe place on a hard, flat surface.
● Set the parking brake.
● Shift the lever to “P” (Multidrive) or “N” (manual transmission).
● Stop the engine.
● Turn on the emergency flashers. (P. 532)
Page 584 of 668
584
5-2. Steps to take in an emergency
VERSO_EE_OM64517E
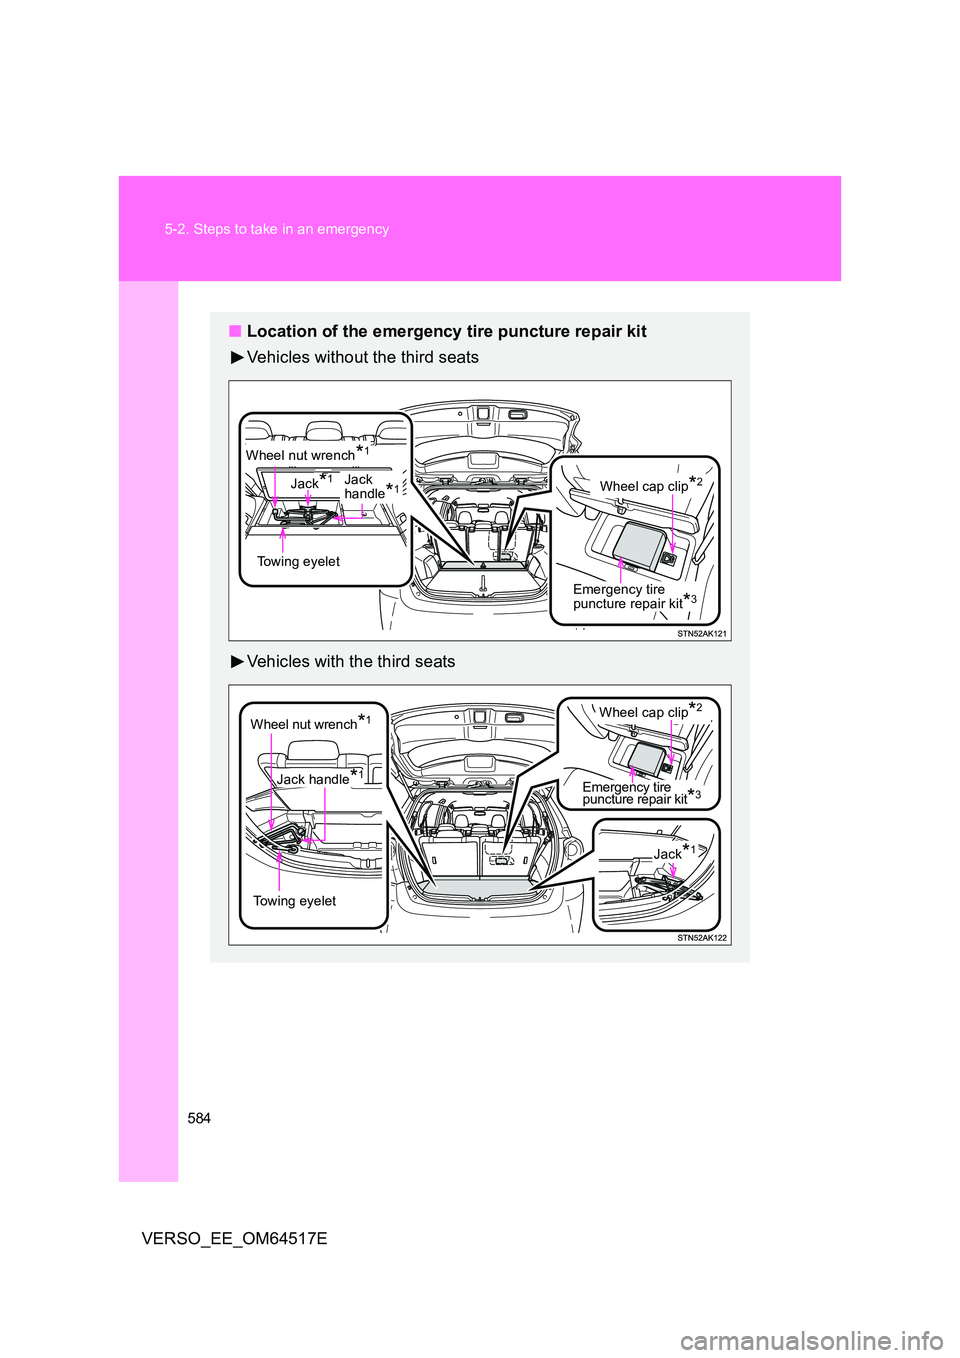
■ Location of the emergency tire puncture repair kit
Vehicles without the third seats
Vehicles with the third seats
Emergency tire puncture repair kit*3
Towing eyelet
Jack*1Wheel cap clip*2
Wheel nut wrench*1
Jackhandle*1
Emergency tire puncture repair kit*3
Towing eyelet
Wheel nut wrench*1
Jack handle*1
Wheel cap clip*2
Jack*1
Page 585 of 668
5
585
5-2. Steps to take in an emergency
When trouble arises
VERSO_EE_OM64517E
*1: Use of the jack, jack handle and wheel nut wrench. (if equipped)
( P. 566)
A jack, jack handle and wheel nut wrench can be purchased at any
authorized Toyota dealer or repairer, or another duly qualified and
equipped professional.
*2: Use of the wheel cap clip. (if equipped) ( P. 482)
*3: The emergency tire puncture repair kit is located in the auxiliary box
(type C). ( P. 4 0 6 )
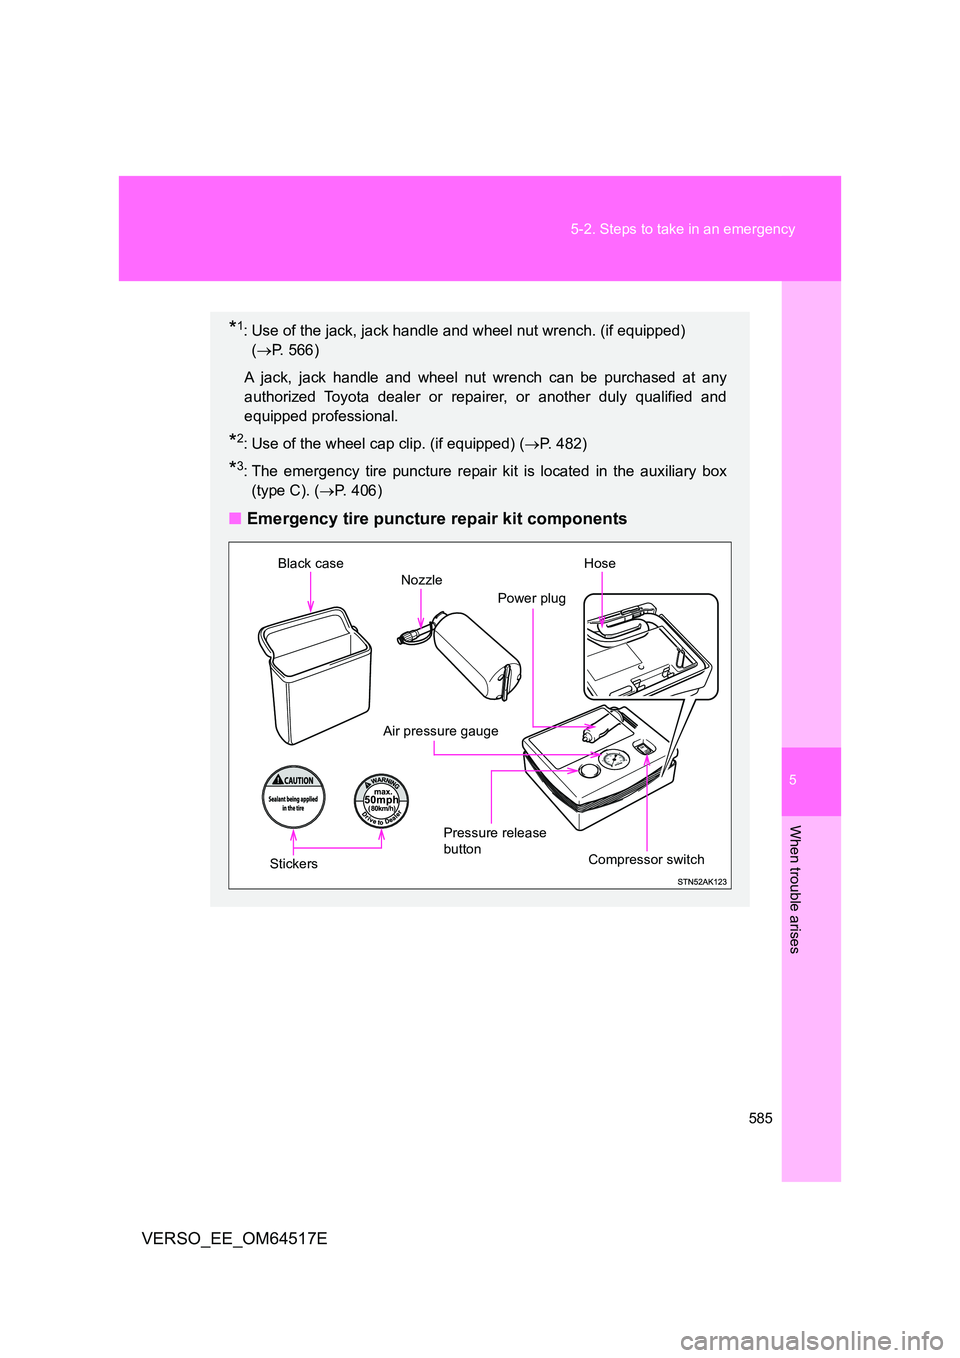
■Emergency tire puncture repair kit components
Compressor switch
Air pressure gauge
Power plug
Black case
Stickers
Pressure release
button
Nozzle
Hose
Page 586 of 668
586
5-2. Steps to take in an emergency
VERSO_EE_OM64517E
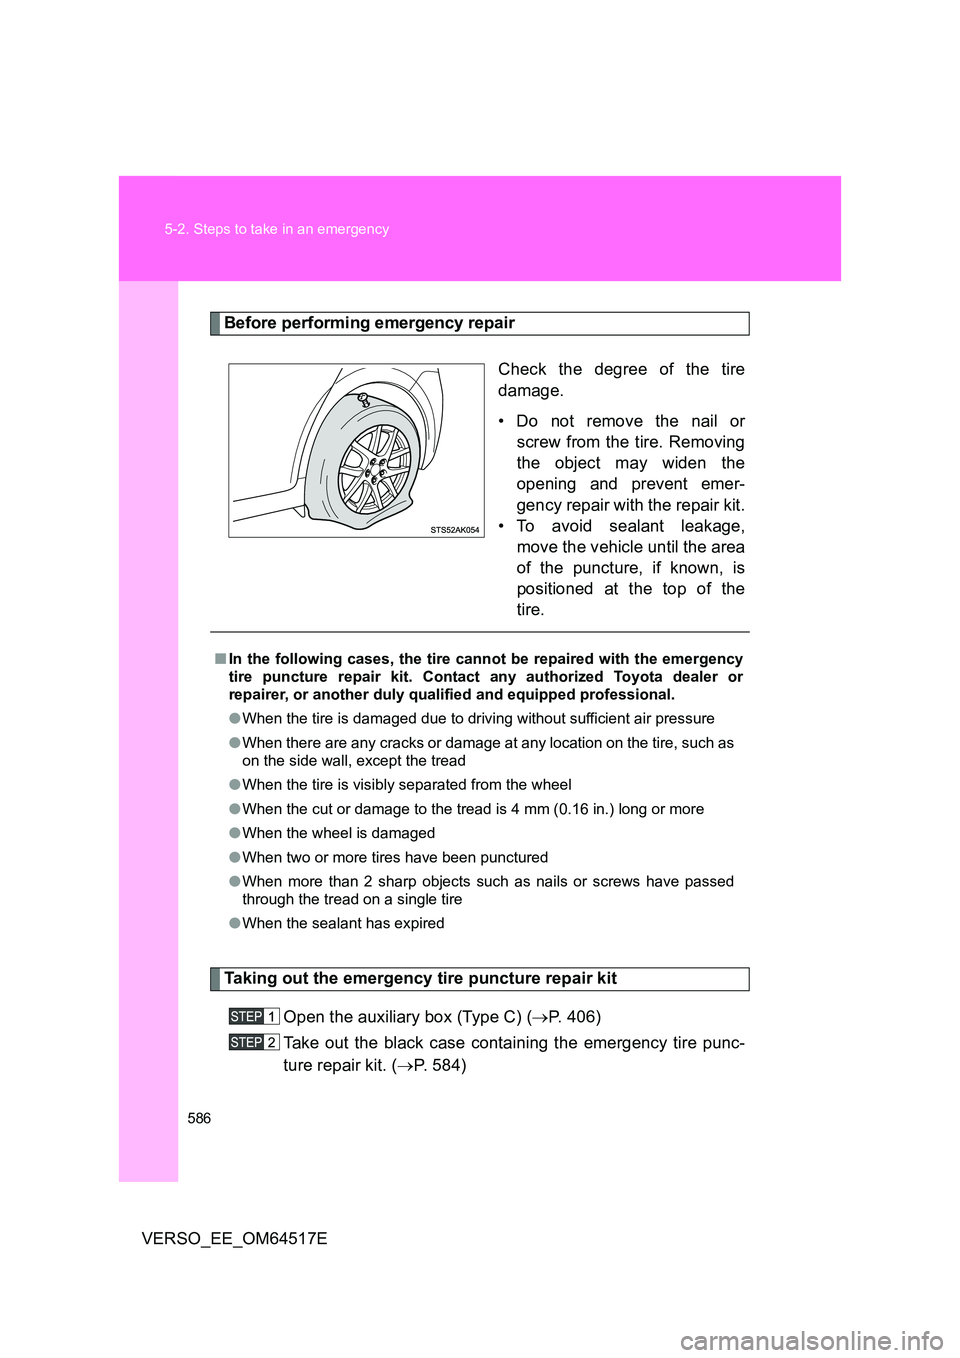
Before performing emergency repair
Check the degree of the tire
damage.
• Do not remove the nail or
screw from the tire. Removing
the object may widen the
opening and prevent emer-
gency repair with the repair kit.
• To avoid sealant leakage,
move the vehicle until the area
of the puncture, if known, is
positioned at the top of the
tire.
Taking out the emergency tire puncture repair kit
Open the auxiliary box (Type C) ( P. 406)
Take out the black case containing the emergency tire punc-
ture repair kit. ( P. 584)
■In the following cases, the tire cannot be repaired with the emergency
tire puncture repair kit. Contact any authorized Toyota dealer or
repairer, or another duly qualified and equipped professional.
● When the tire is damaged due to driving without sufficient air pressure
● When there are any cracks or damage at any location on the tire, such as
on the side wall, except the tread
● When the tire is visibly separated from the wheel
● When the cut or damage to the tread is 4 mm (0.16 in.) long or more
● When the wheel is damaged
● When two or more tires have been punctured
● When more than 2 sharp objects such as nails or screws have passed
through the tread on a single tire
● When the sealant has expired
Page 587 of 668
5
587
5-2. Steps to take in an emergency
When trouble arises
VERSO_EE_OM64517E
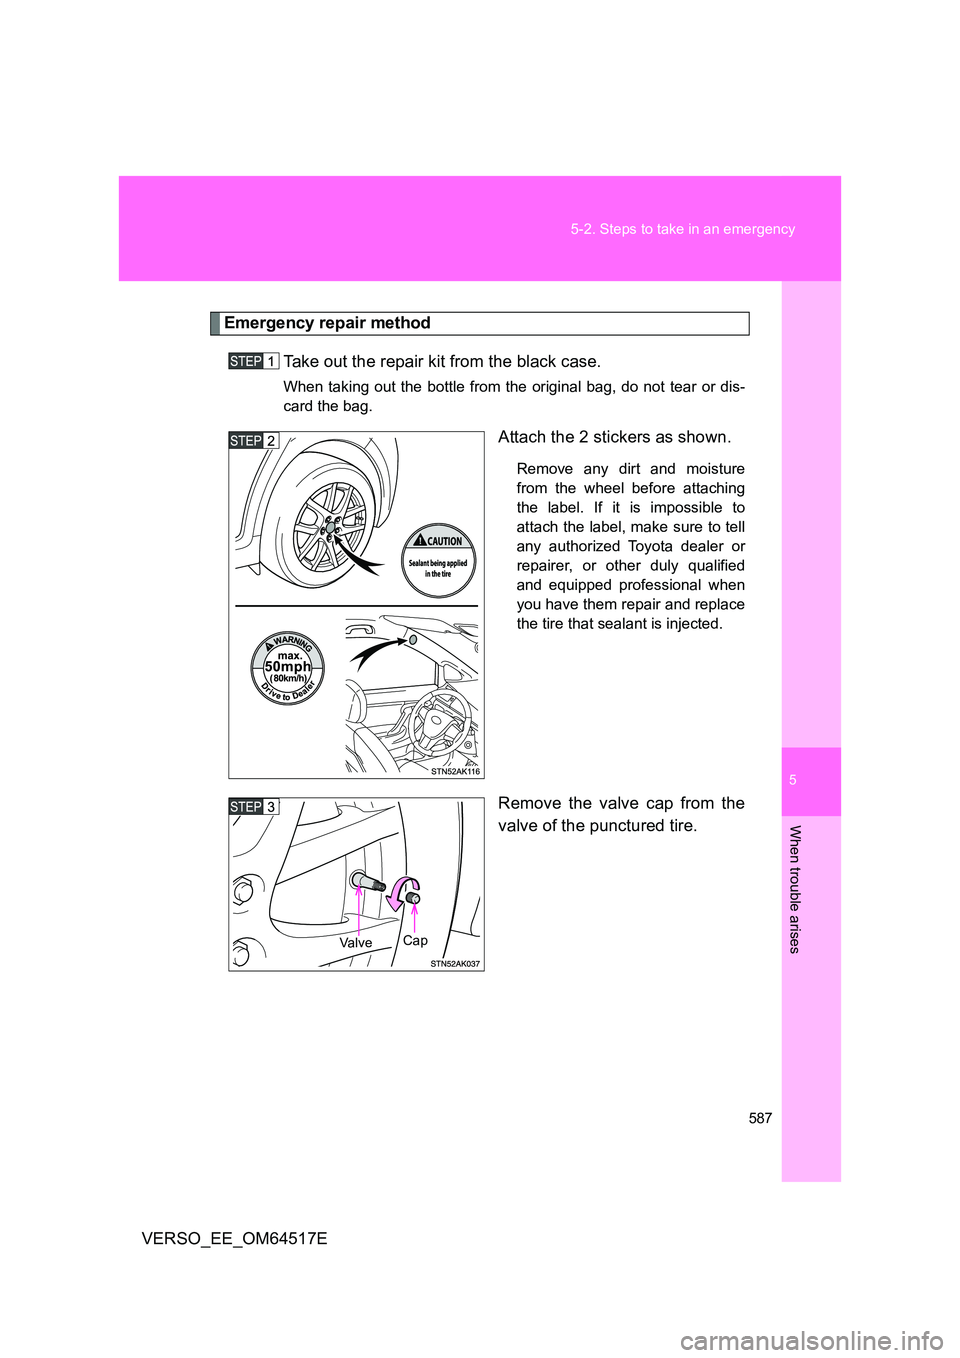
Emergency repair method
Take out the repair kit from the black case.
When taking out the bottle from the original bag, do not tear or dis-
card the bag.
Attach the 2 stickers as shown.
Remove any dirt and moisture
from the wheel before attaching
the label. If it is impossible to
attach the label, make sure to tell
any authorized Toyota dealer or
repairer, or other duly qualified
and equipped professional when
you have them repair and replace
the tire that sealant is injected.
Remove the valve cap from the
valve of the punctured tire.
Cap Va l v e
Page 588 of 668
588
5-2. Steps to take in an emergency
VERSO_EE_OM64517E
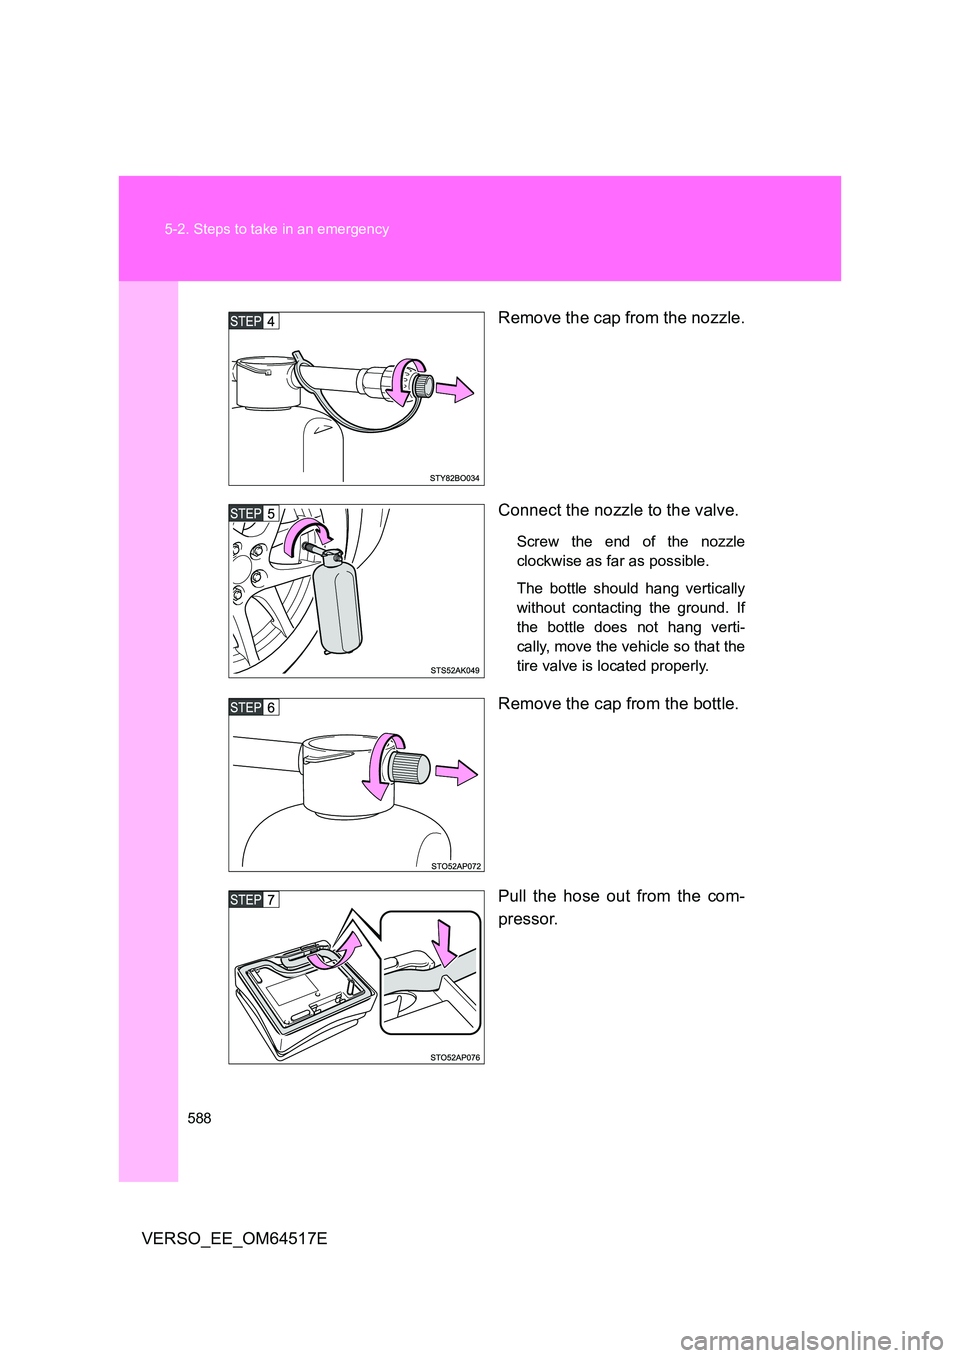
Remove the cap from the nozzle.
Connect the nozzle to the valve.
Screw the end of the nozzle
clockwise as far as possible.
The bottle should hang vertically
without contacting the ground. If
the bottle does not hang verti-
cally, move the vehicle so that the
tire valve is located properly.
Remove the cap from the bottle.
Pull the hose out from the com-
pressor.
Page 589 of 668
5
589
5-2. Steps to take in an emergency
When trouble arises
VERSO_EE_OM64517E
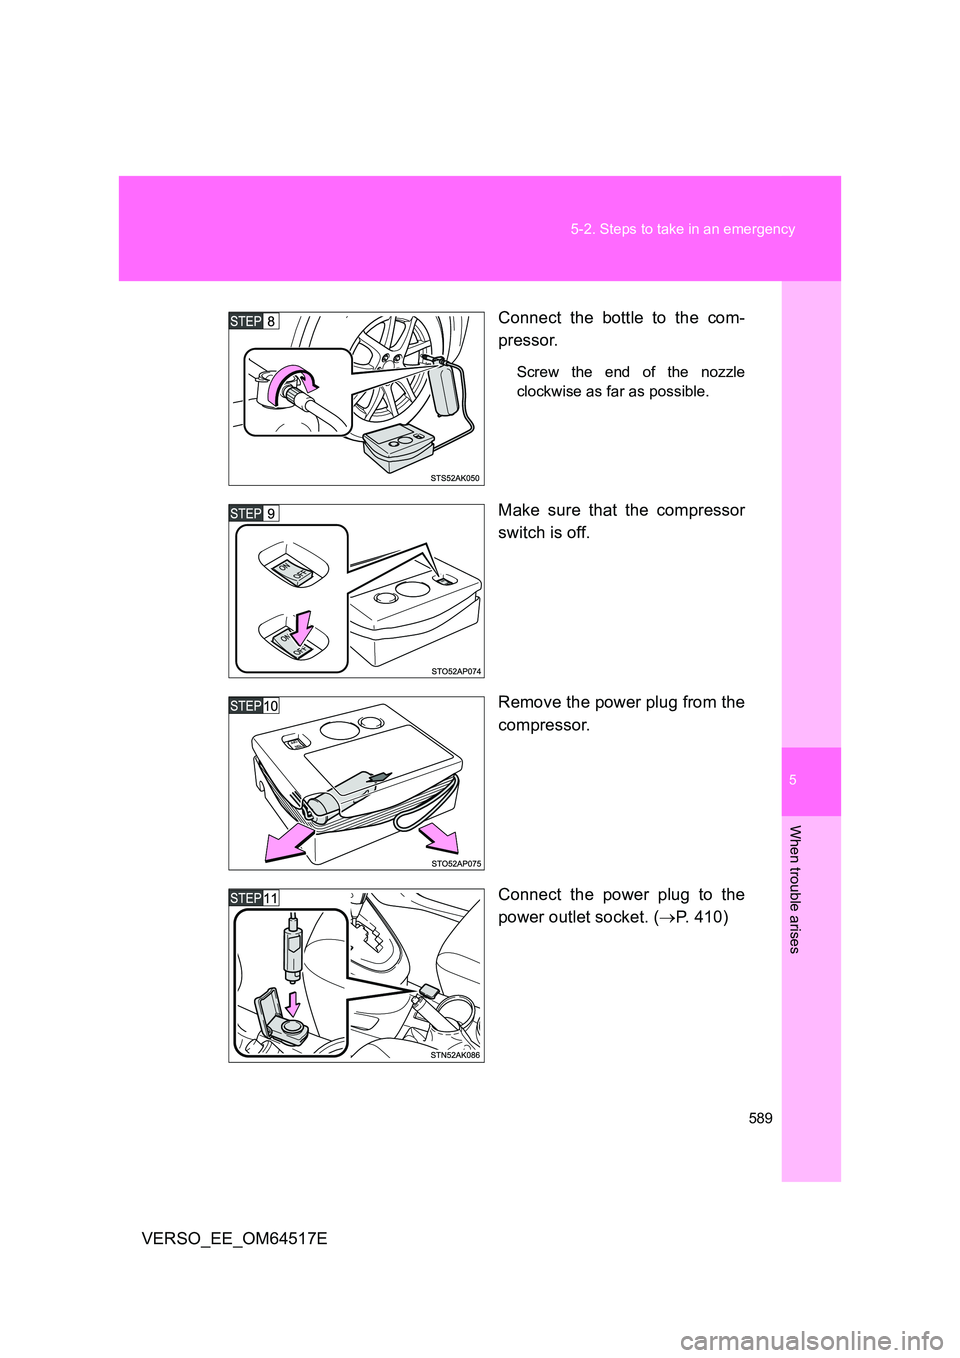
Connect the bottle to the com-
pressor.
Screw the end of the nozzle
clockwise as far as possible.
Make sure that the compressor
switch is off.
Remove the power plug from the
compressor.
Connect the power plug to the
power outlet socket. ( P. 410)
Page 590 of 668
590
5-2. Steps to take in an emergency
VERSO_EE_OM64517E
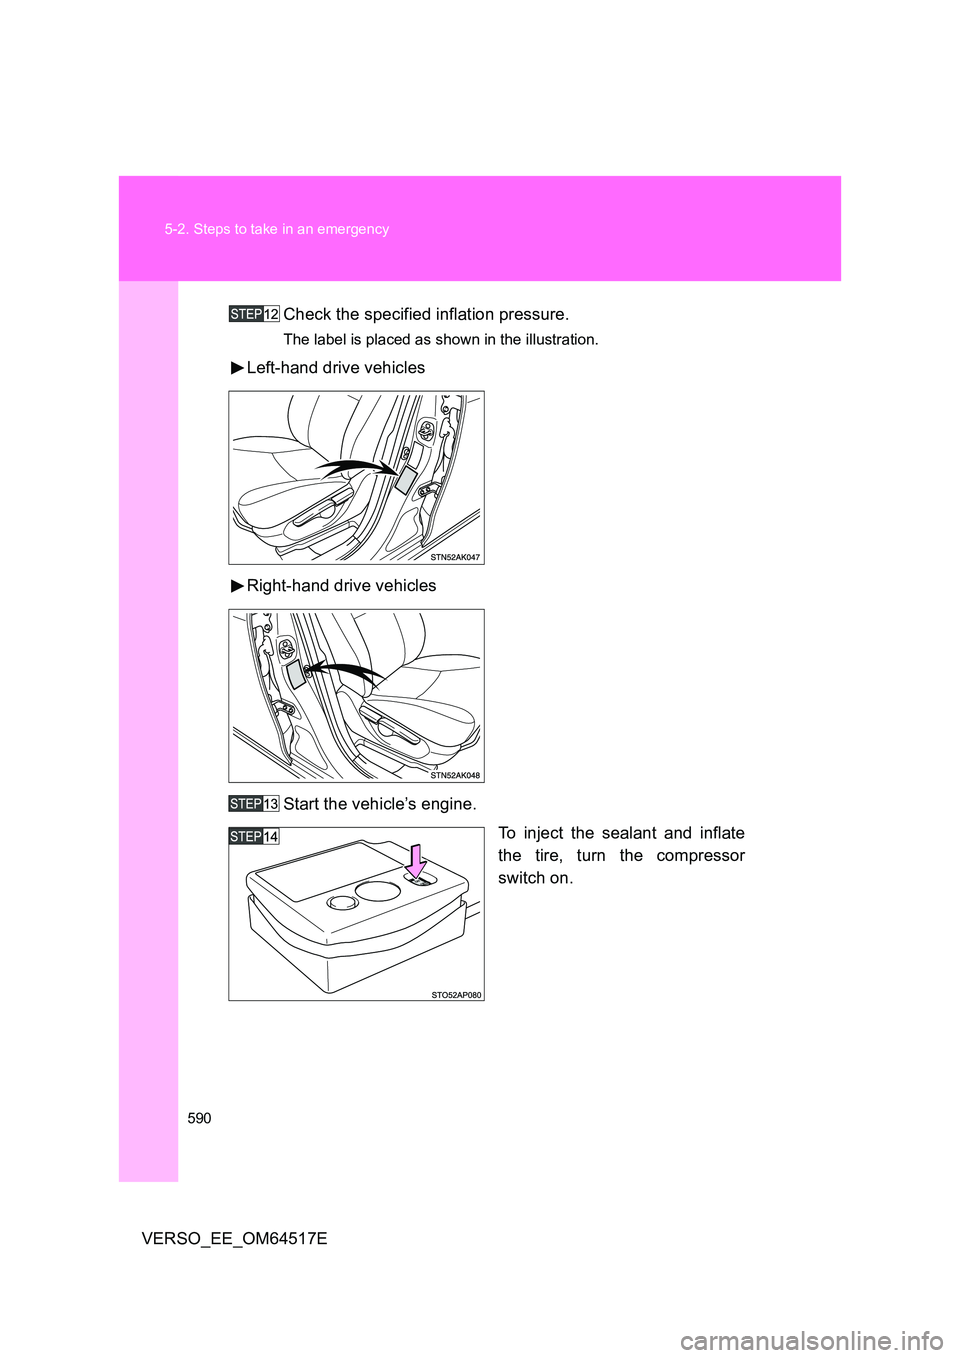
Check the specified inflation pressure.
The label is placed as shown in the illustration.
Left-hand drive vehicles
Right-hand drive vehicles
Start the vehicle’s engine.
To inject the sealant and inflate
the tire, turn the compressor
switch on.
Trending: oil capacity, immobilizer, ignition, lights, buttons, ground clearance, sport mode
