TOYOTA xD 2010 Accessories, Audio & Navigation (in English)
Manufacturer: TOYOTA, Model Year: 2010, Model line: xD, Model: TOYOTA xD 2010Pages: 52, PDF Size: 1.43 MB
Page 31 of 52
31
ALPINE MFTY802A 68-14470Z28-C (EN)
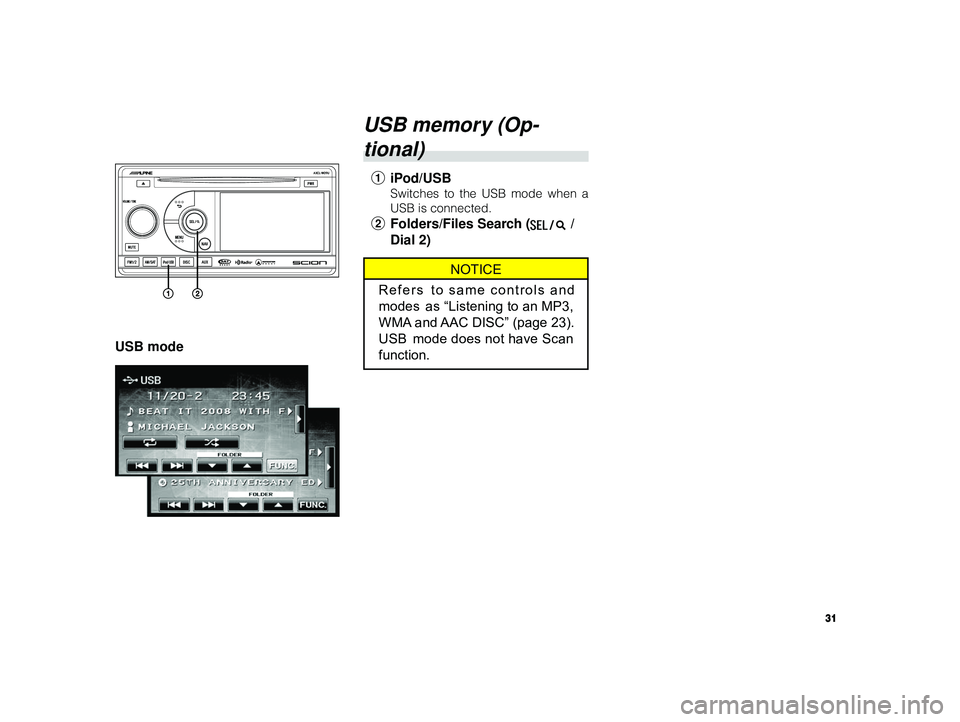
USB mode
USB memory (Op-
tional)
1 iPod/USB
Switches to the USB mode when a
USB is connected.
2Folders/Files Search ( /
Dial 2)
NOTICE
Refers to same controls and
modes as “Listening to an MP3,
WMA and AAC DISC” (page 23).
USB mode does not have Scan
function.
Page 32 of 52
32
ALPINE MFTY802A 68-14470Z28-C (EN)
NOTICE
An additional Genuine Toyota satel-
lite receiver and antenna must be
purchased and installed to listen to
Satellite Radio broadcast in your ve-
hicle. CAUTION
This equipment has been tested and found to comply with the limits for a class
B digital device, pursuant to Part 15 of the FCC Rules. These limits are de-
signed to provide reasonable protection against harmful interference in a resi-
dential installation. This equipment generates, uses and can radiate radio fre-
quency energy and, if not installed and used in accordance with the instruc-
tions, may cause harmful interference to radio communications. However, there
is no guarantee that interference will not occur in a particular installation.
• This XM tuner supports “Audio Services” (Music and Talk) of only XM Satel- lite Radio and *“Text Information” linked to the respective “Audio Service”.
*“Text Information” includes, Station Name, (Artist) Name, (Song) Title and Category Name.
• XM Satellite Radio Inc. is solely responsible for providing services over theair to XM receivers.
• This XM tuner is awarded a Type Approval Certificate from XM Satellite Ra- dio Inc. on “February 1st, 2005” as a proof of compliance for the services XM
Satellite Radio provides.
Page 33 of 52
33
ALPINE MFTY802A 68-14470Z28-C (EN)
How to Subscribe to
XM Satellite Radio
Page 34 of 52
34
ALPINE MFTY802A 68-14470Z28-C (EN)
Listening to a Satellite
Radio broadcast
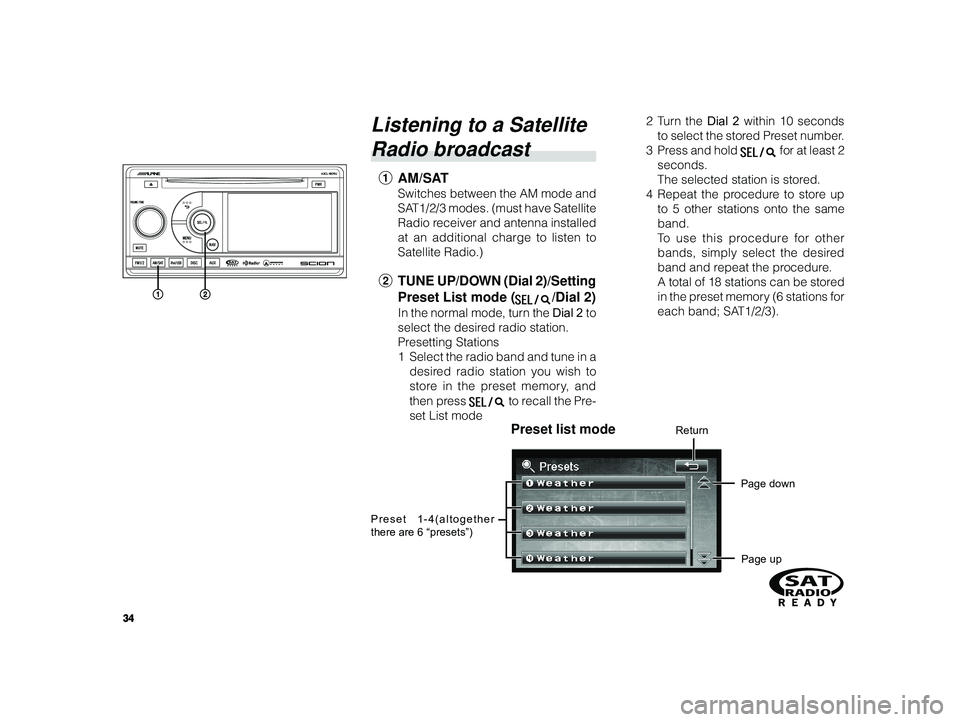
1 AM/SAT
Switches between the AM mode and
SAT1/2/3 modes. (must have Satellite
Radio receiver and antenna installed
at an additional charge to listen to
Satellite Radio.)
2TUNE UP/DOWN (Dial 2)/Setting
Preset List mode (
/Dial 2)
In the normal mode, turn the Dial 2 to
select the desired radio station.
Presetting Stations
1 Select the radio band and tune in a
desired radio station you wish to
store in the preset memory, and
then press
to recall the Pre-
set List mode 2T
urn the Dial 2 within 10 seconds
to select the stored Preset number.
3Pr ess and hold
for at least 2
seconds.
The selected station is stored.
4 Repeat the procedure to store up
to 5 other stations onto the same
band.
To use this procedure for other
bands, simply select the desired
band and repeat the procedure.
A total of 18 stations can be stored
in the preset memory (6 stations for
each band; SAT1/2/3).
Preset list modeReturn
Page down
Page up
Preset 1-4(altogether
there are 6 “presets”)
Page 35 of 52
35
ALPINE MFTY802A 68-14470Z28-C (EN)
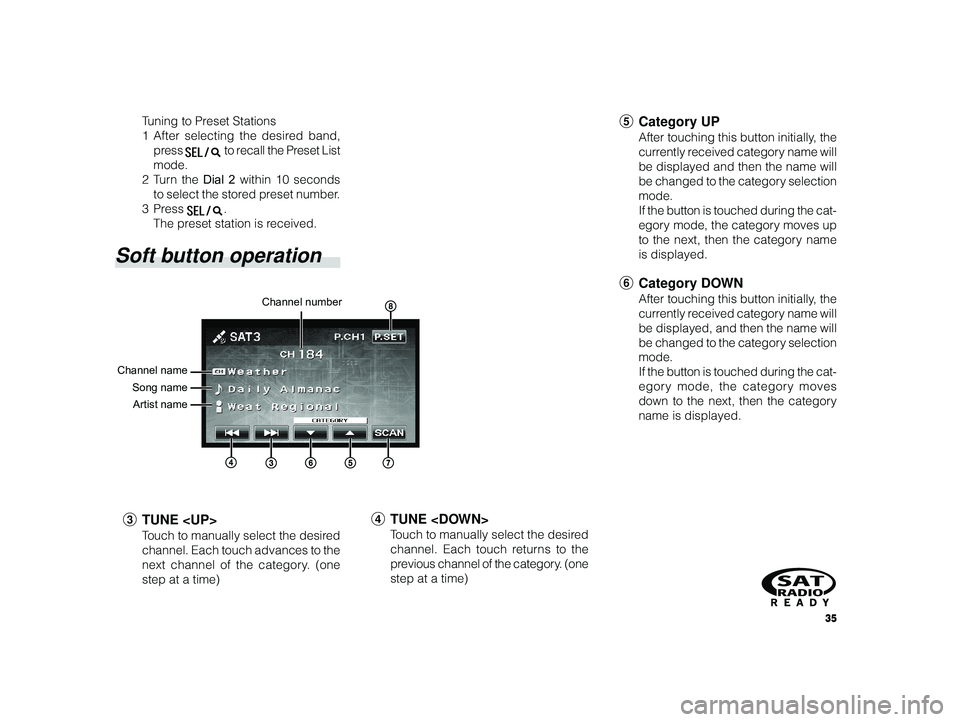
Channel number
Channel name Song nameArtist name
T uning to Preset Stations
1 After selecting the desired band,
press
to recall the Preset List
mode.
2T urn the Dial 2 within 10 seconds
to select the stored preset number.
3Pr ess
.
The preset station is received.
Soft button operation
3 TUNE
Touch to manually select the desired
channel. Each touch advances to the
next channel of the category. (one
step at a time)
4 TUNE
Touch to manually select the desired
channel. Each touch returns to the
previous channel of the category. (one
step at a time)
5 Category UP
After touching this button initially, the
currently received category name will
be displayed and then the name will
be changed to the category selection
mode.
If the button is touched during the cat-
egory mode, the category moves up
to the next, then the category name
is displayed.
6Category DOWN
After touching this button initially, the
currently received category name will
be displayed, and then the name will
be changed to the category selection
mode.
If the button is touched during the cat-
egory mode, the category moves
down to the next, then the category
name is displayed.
Page 36 of 52
36
ALPINE MFTY802A 68-14470Z28-C (EN)
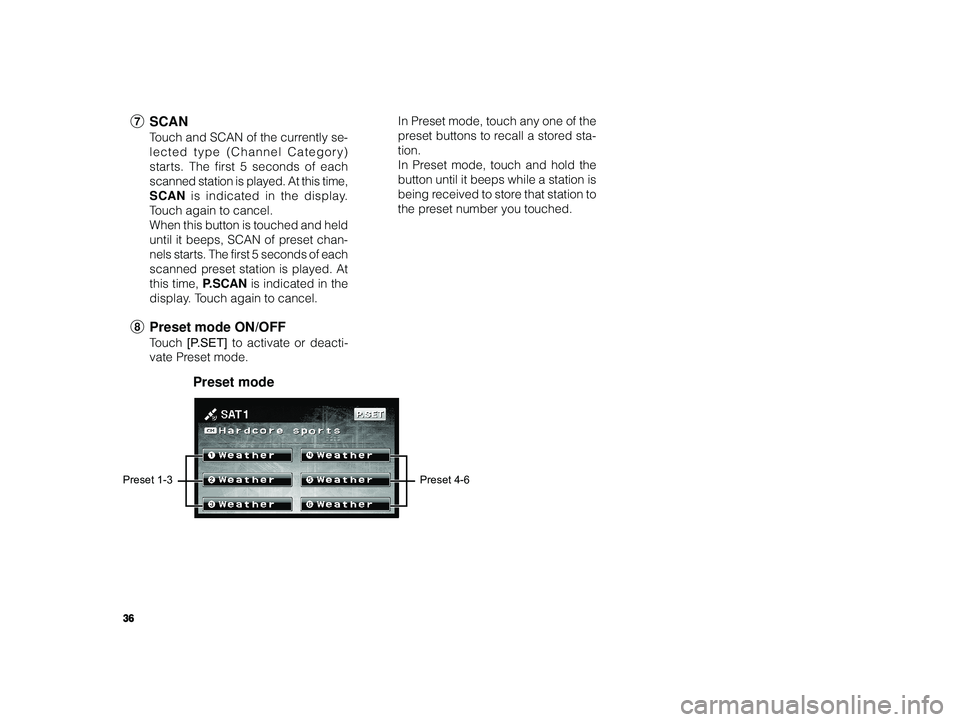
7 SCAN
Touch and SCAN of the currently se-
lected type (Channel Category)
starts. The first 5 seconds of each
scanned station is played. At this time,
SCAN is indicated in the display.
T ouch again to cancel.
When this button is touched and held
until it beeps, SCAN of preset chan-
nels starts. The first 5 seconds of each
scanned preset station is played. At
this time, P.SCAN is indicated in the
display. Touch again to cancel.
8 Preset mode ON/OFF
Touch [P.SET] to activate or deacti-
vate Preset mode. In Preset mode, touch any one of the
preset buttons to recall a stored sta-
tion.
In Preset mode, touch and hold the
button until it beeps while a station is
being received to store that station to
the preset number you touched.
Preset mode
Preset 1-3
Preset 4-6
Page 37 of 52
37
ALPINE MFTY802A 68-14470Z28-C (EN)
Displaying the RADIO
ID
A unique Radio ID number is required
to subscribe to SA T Radio program-
ming. Each third party XM radio comes
with this number.
This number is an 8 character alpha-
numeric number. It is printed on a la-
bel found on the SAT Receiver.
It can also be displayed on the screen
on this unit in the following way.
HOW to display RADIO ID
While receiving a SAT Radio band,
turn Dial 2 to select channel “0”
The ID number is displayed.
Record your ID number below.
ID NUMBER_ _ _ _ _ _ _ _
NOTICE
•T o cancel the ID number display ,
change the channel.
• The unit continually displays the ID
number while receiving channel
“0”.
•Y ou cannot use “O,” “S,” “ I,” or “F”
for the ID number.
Page 38 of 52
38
ALPINE MFTY802A 68-14470Z28-C (EN)
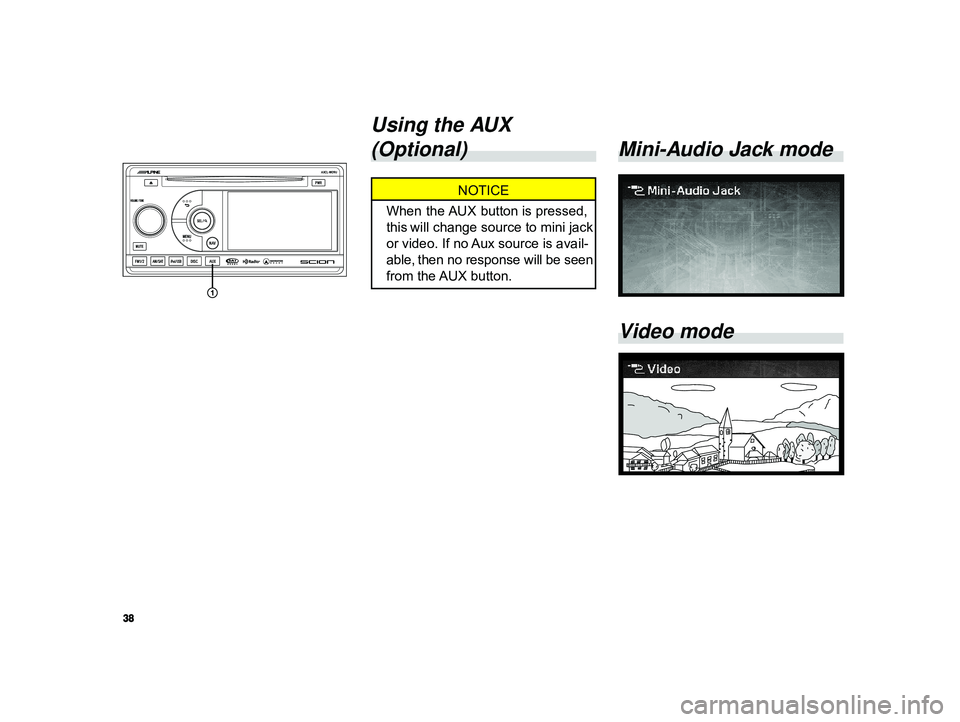
Mini-Audio Jack mode
Video mode
Using the AUX
(Optional)
NOTICE
When the AUX button is pressed,
this will change source to mini jack
or video. If no Aux source is avail-
able, then no response will be seen
from the AUX button.
Page 39 of 52

39
ALPINE MFTY802A 68-14470Z28-C (EN)
NOTICE
• If the mini plug of a commercially
available cable connected to a por-
table audio or other component is
not connected to the car AUX
adapter, the mode will not change
to the AUX mode even if you press
the AUX button.
•V olume level when playing a com-
ponent connected with a mini plug
differs to that when listening to the
built-in CD player or radio so please
make adjustments.
• If you install an audio system other
than a genuine audio system, you
will not be able to use the AUX
adapter.Using the Mini-Audio
Jack (Optional)
Y ou can listen to an iPod, portable
audio component or other auxiliary
component by connecting it to this
product.
1T o listen to a portable audio device,
connect the mini-jack output plug to the
AUX input jack in the vehicle.
2Pr ess the AUX button to switch to mini-
audio jack mode.
3 Mini-jack screen input only displays if
a mini-jack is actually plugged into the
mini-jack socket.
CAUTION
Do not use the car ’s cigarette
lighter adapter to power the exter-
nal device such as iPod, etc. Noise
may result.
Mini-Audio Jack mode
Page 40 of 52
40
ALPINE MFTY802A 68-14470Z28-C (EN)
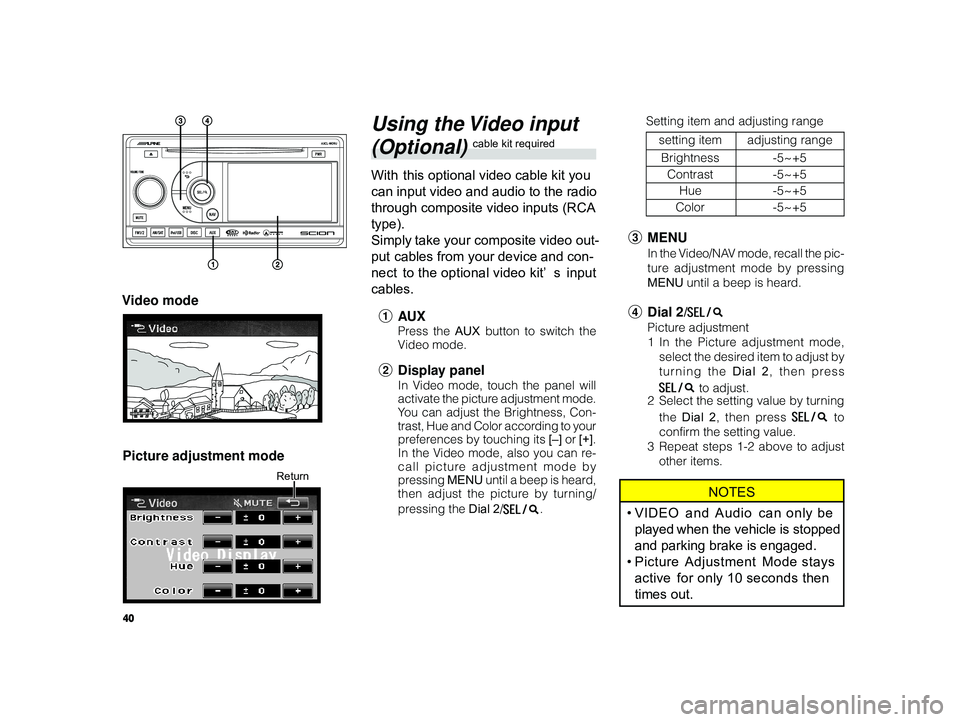
Using the Video input
(Optional) cable kit required
With this optional video cable kit you
can input video and audio to the radio
through composite video inputs (RCA
type).
Simply take your composite video out-
put cables from your device and con-
nect to the optional video kit’ s input
cables.
1 AU X
Press the AUX button to switch the
V ideo mode.
2 Display panel
In Video mode, touch the panel will
activate the picture adjustment mode.
You can adjust the Brightness, Con-
trast, Hue and Color according to your
preferences by touching its [–] or [+].
In the Video mode, also you can re-
call picture adjustment mode by
pressing MENU until a beep is heard,
then adjust the picture by turning/
pressing the Dial 2/
.
Video mode
Picture adjustment mode
Return
3 MENU
In the Video/NAV mode, recall the pic-
ture adjustment mode by pressing
MENU until a beep is heard.
4Dial 2/
Picture adjustment
1In the Picture adjustment mode,
select the desired item to adjust by
turning the Dial 2 , then press
to adjust.
2 Select the setting value by turning
the Dial 2 , then press
to
confirm the setting value.
3 Repeat steps 1-2 above to adjust
other items.
NOTES
•VIDEO and Audio can only be
played when the vehicle is stopped
and parking brake is engaged.
• Picture Adjustment Mode stays
active for only 10 seconds then
times out.
Setting item and adjusting range
setting item adjusting range
Brightness -5~+5
Contrast -5~+5
Hue -5~+5
Color -5~+5