TOYOTA YARIS CROSS 2023 Owners Manual
Manufacturer: TOYOTA, Model Year: 2023, Model line: YARIS CROSS, Model: TOYOTA YARIS CROSS 2023Pages: 698, PDF Size: 147.65 MB
Page 461 of 698
459
7
Owners Manual_Europe_M52N75_en
7-2. Steps to take in an emergency
When trouble arises
Stop the vehicle in a safe place
on a hard, flat surface.
Set the parking brake.
Shift the shift lever to P.
Stop the hybrid system.
Turn on the emergency flashers.
( P.426)
For vehicles with power back
door: Turn off the power back
door system. ( P.151)
NOTICE
●If fuel splatters on the repair kit, the repair kit may deteriorate. Take
care not to allow fuel to contact it.
●Place the repair kit in a storage to
prevent it from being exposed to dirt or water.
●Store the repair kit in the luggage compartment out of reach of chil-dren.
●Do not disassemble or modify the repair kit. Do not subject parts such
as the air pressure indicator to impacts. This may cause a malfunc-tion.
■To avoid damage to the tire pres-sure warning valves and trans-
mitters
When a tire is repaired with liquid sealants, the tire pressure warning
valve and transmitter may not operate properly. If a liquid sealant is used, contact any authorized Toyota retailer
or Toyota authorized repairer, or any reliable repairer or other qualified ser-vice shop as soon as possible. After
use of liquid sealant, make sure to replace the tire pressure warning valve and transmitter when repairing
or replacing the tire. ( P.394)
If you have a flat tire
(vehicles with a spare
tire)
Your vehicle is equipped with a
spare tire. The flat tire can be
replaced with the spare tire.
For details about tires: P. 3 9 0
WARNING
■If you have a flat tire
Do not continue driving with a flat tire. Driving even a short distance with a flat tire can damage the tire and the
wheel beyond repair, which could result in an accident.
Before jacking up the vehi-
cle
Page 462 of 698
460
Owners Manual_Europe_M52N75_en
7-2. Steps to take in an emergency
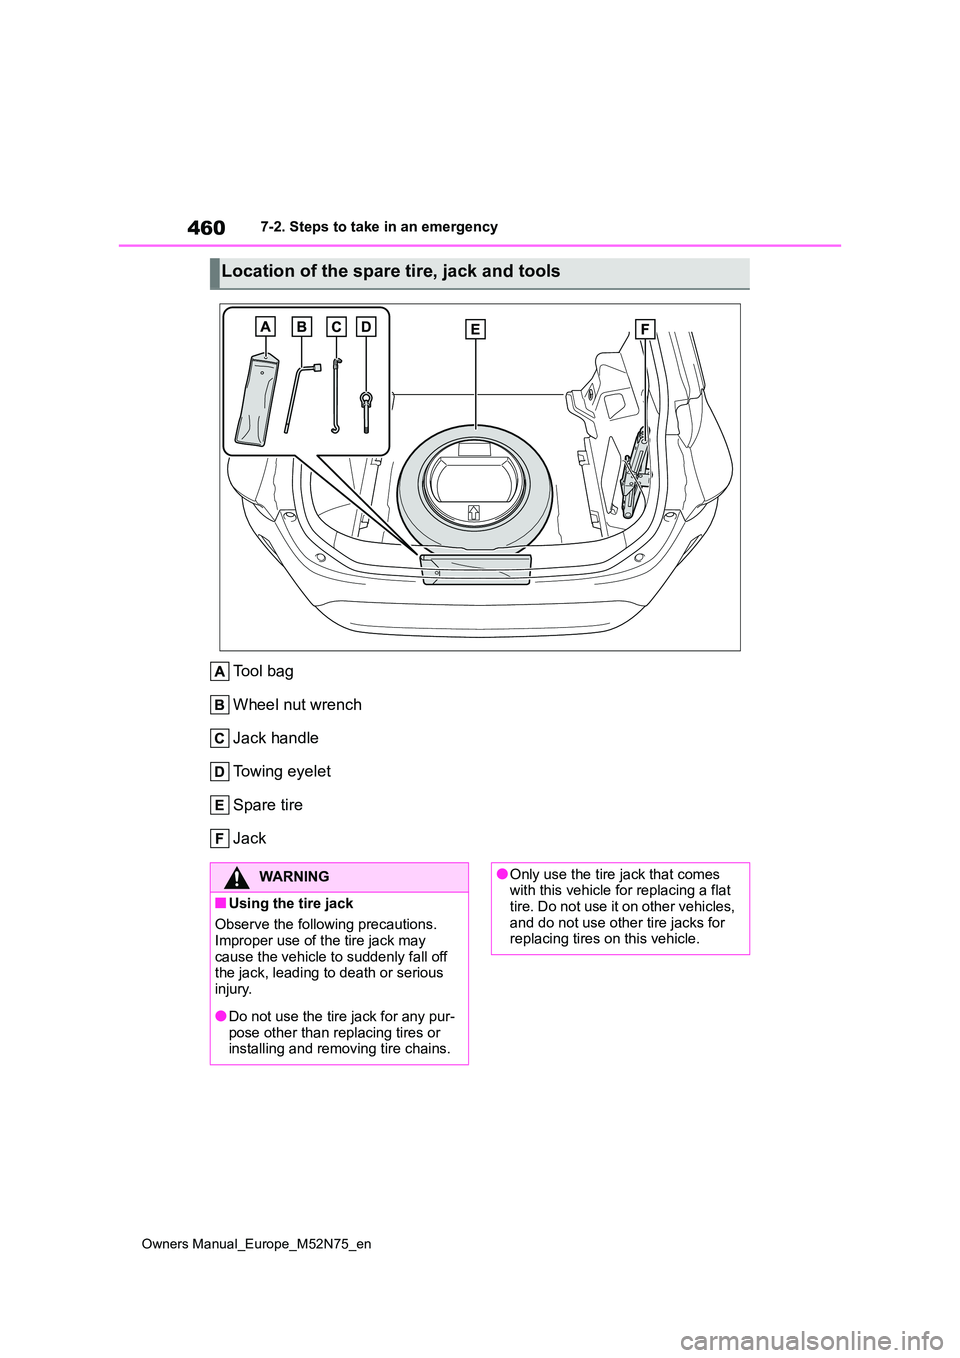
Tool bag
Wheel nut wrench
Jack handle
Towing eyelet
Spare tire
Jack
Location of the spare tire, jack and tools
WARNING
■Using the tire jack
Observe the following precautions.
Improper use of the tire jack may cause the vehicle to suddenly fall off the jack, leading to death or serious
injury.
●Do not use the tire jack for any pur-
pose other than replacing tires or installing and removing tire chains.
●Only use the tire jack that comes with this vehicle for replacing a flat tire. Do not use it on other vehicles,
and do not use other tire jacks for replacing tires on this vehicle.
Page 463 of 698
461
7
Owners Manual_Europe_M52N75_en
7-2. Steps to take in an emergency
When trouble arises
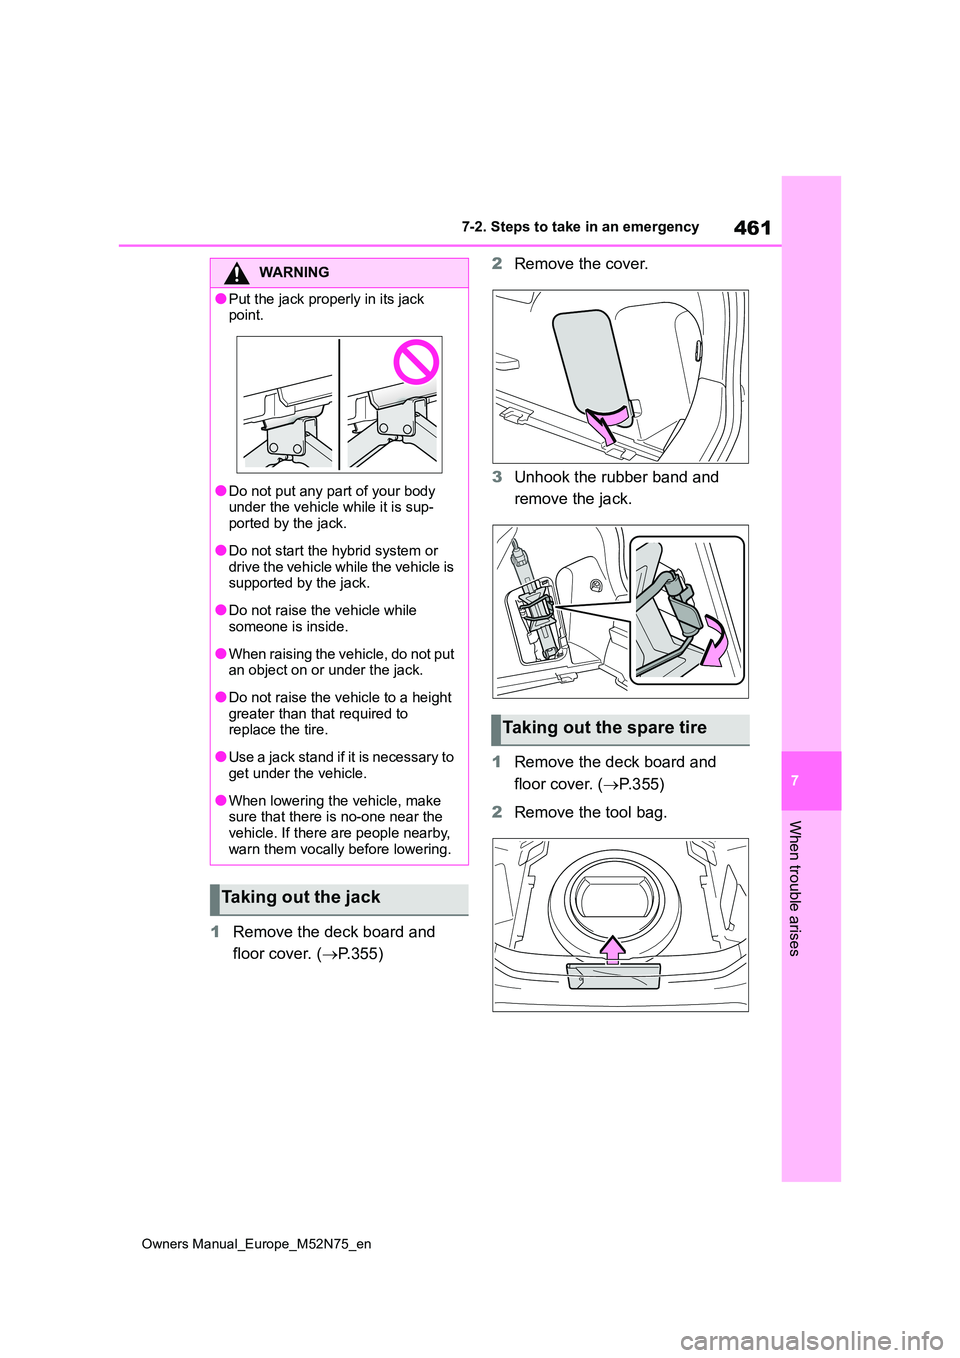
1Remove the deck board and
floor cover. ( P.355)
2 Remove the cover.
3 Unhook the rubber band and
remove the jack.
1 Remove the deck board and
floor cover. ( P.355)
2 Remove the tool bag.
WARNING
●Put the jack properly in its jack point.
●Do not put any part of your body under the vehicle while it is sup-
ported by the jack.
●Do not start the hybrid system or
drive the vehicle while the vehicle is supported by the jack.
●Do not raise the vehicle while someone is inside.
●When raising the vehicle, do not put an object on or under the jack.
●Do not raise the vehicle to a height greater than that required to replace the tire.
●Use a jack stand if it is necessary to get under the vehicle.
●When lowering the vehicle, make sure that there is no-one near the
vehicle. If there are people nearby, warn them vocally before lowering.
Taking out the jack
Taking out the spare tire
Page 464 of 698
462
Owners Manual_Europe_M52N75_en
7-2. Steps to take in an emergency
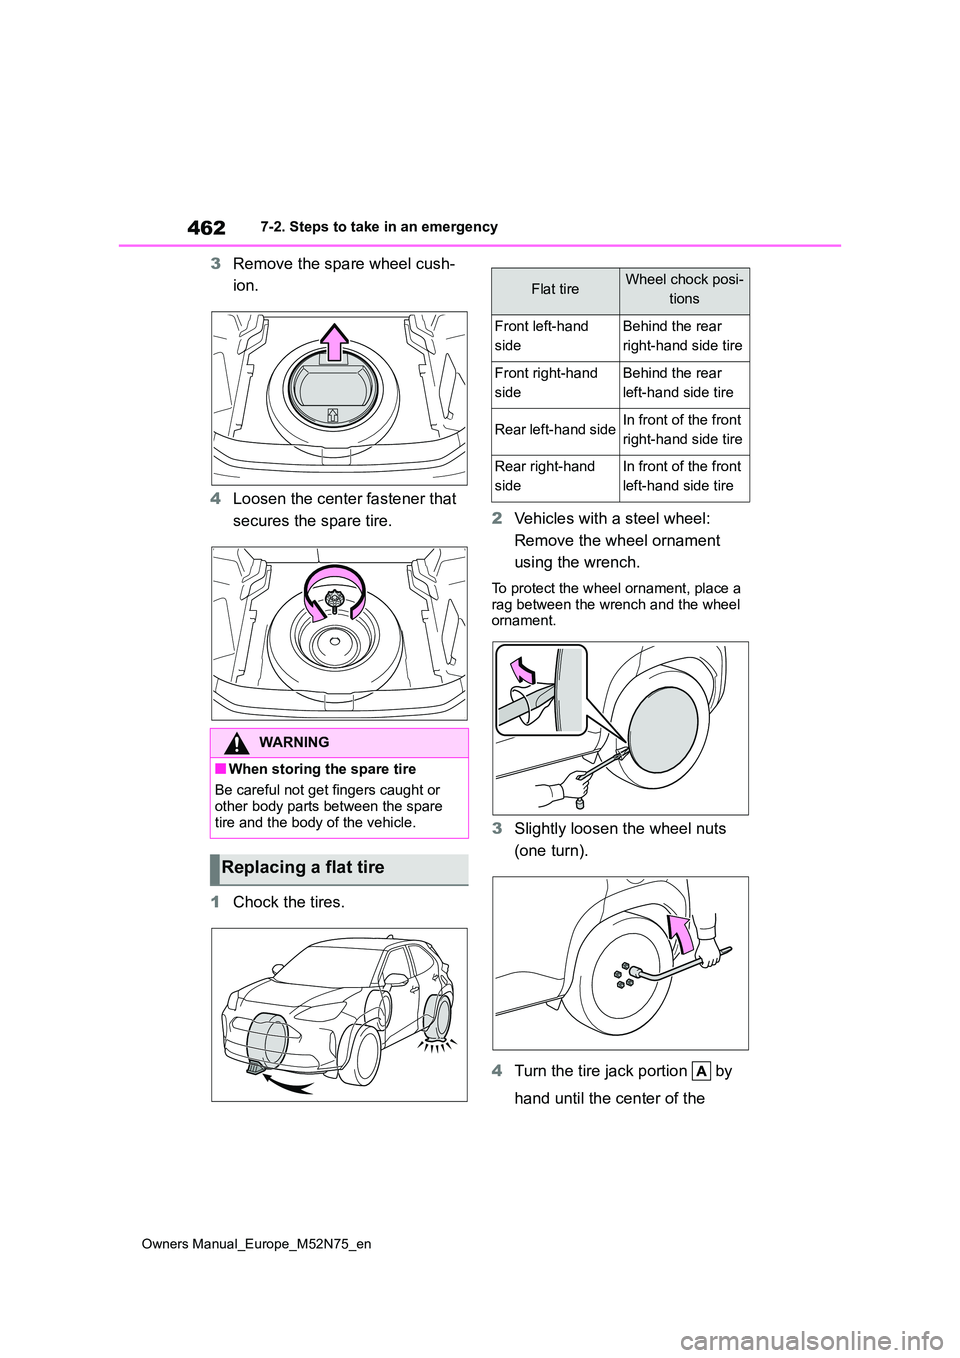
3Remove the spare wheel cush-
ion.
4 Loosen the center fastener that
secures the spare tire.
1 Chock the tires.
2 Vehicles with a steel wheel:
Remove the wheel ornament
using the wrench.
To protect the wheel ornament, place a
rag between the wrench and the wheel ornament.
3 Slightly loosen the wheel nuts
(one turn).
4 Turn the tire jack portion by
hand until the center of the
WARNING
■When storing the spare tire
Be careful not get fingers caught or other body parts between the spare
tire and the body of the vehicle.
Replacing a flat tire
Flat tireWheel chock posi-
tions
Front left-hand
side
Behind the rear
right-hand side tire
Front right-hand
side
Behind the rear
left-hand side tire
Rear left-hand sideIn front of the front
right-hand side tire
Rear right-hand
side
In front of the front
left-hand side tire
Page 465 of 698
463
7
Owners Manual_Europe_M52N75_en
7-2. Steps to take in an emergency
When trouble arises
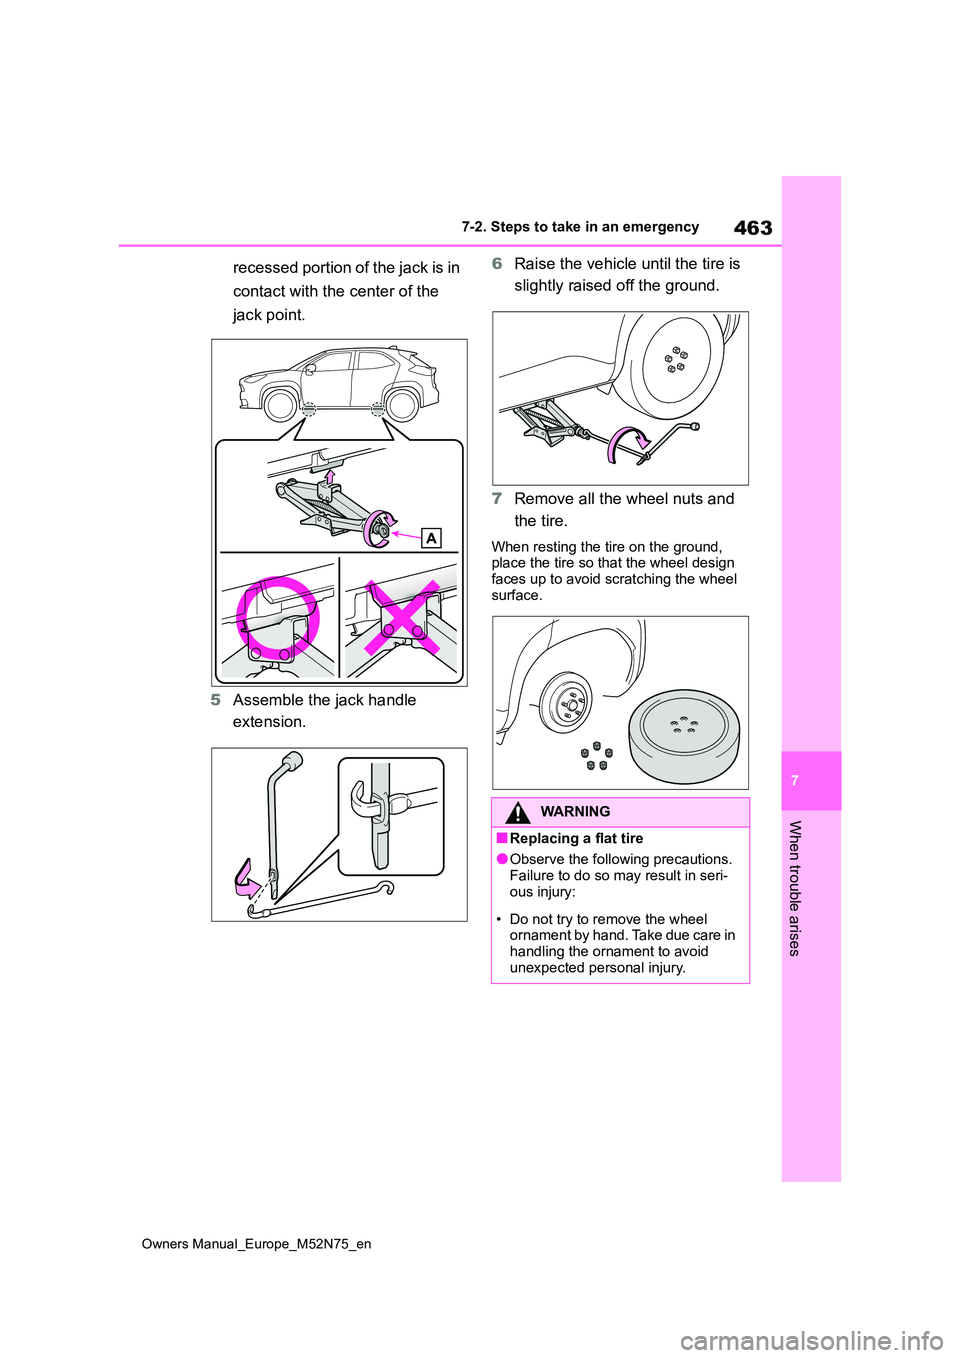
recessed portion of the jack is in
contact with the center of the
jack point.
5 Assemble the jack handle
extension.
6 Raise the vehicle until the tire is
slightly raised off the ground.
7 Remove all the wheel nuts and
the tire.
When resting the tire on the ground, place the tire so that the wheel design faces up to avoid scratching the wheel
surface.
WARNING
■Replacing a flat tire
●Observe the following precautions.
Failure to do so may result in seri- ous injury:
• Do not try to remove the wheel ornament by hand. Take due care in handling the ornament to avoid
unexpected personal injury.
Page 466 of 698
464
Owners Manual_Europe_M52N75_en
7-2. Steps to take in an emergency
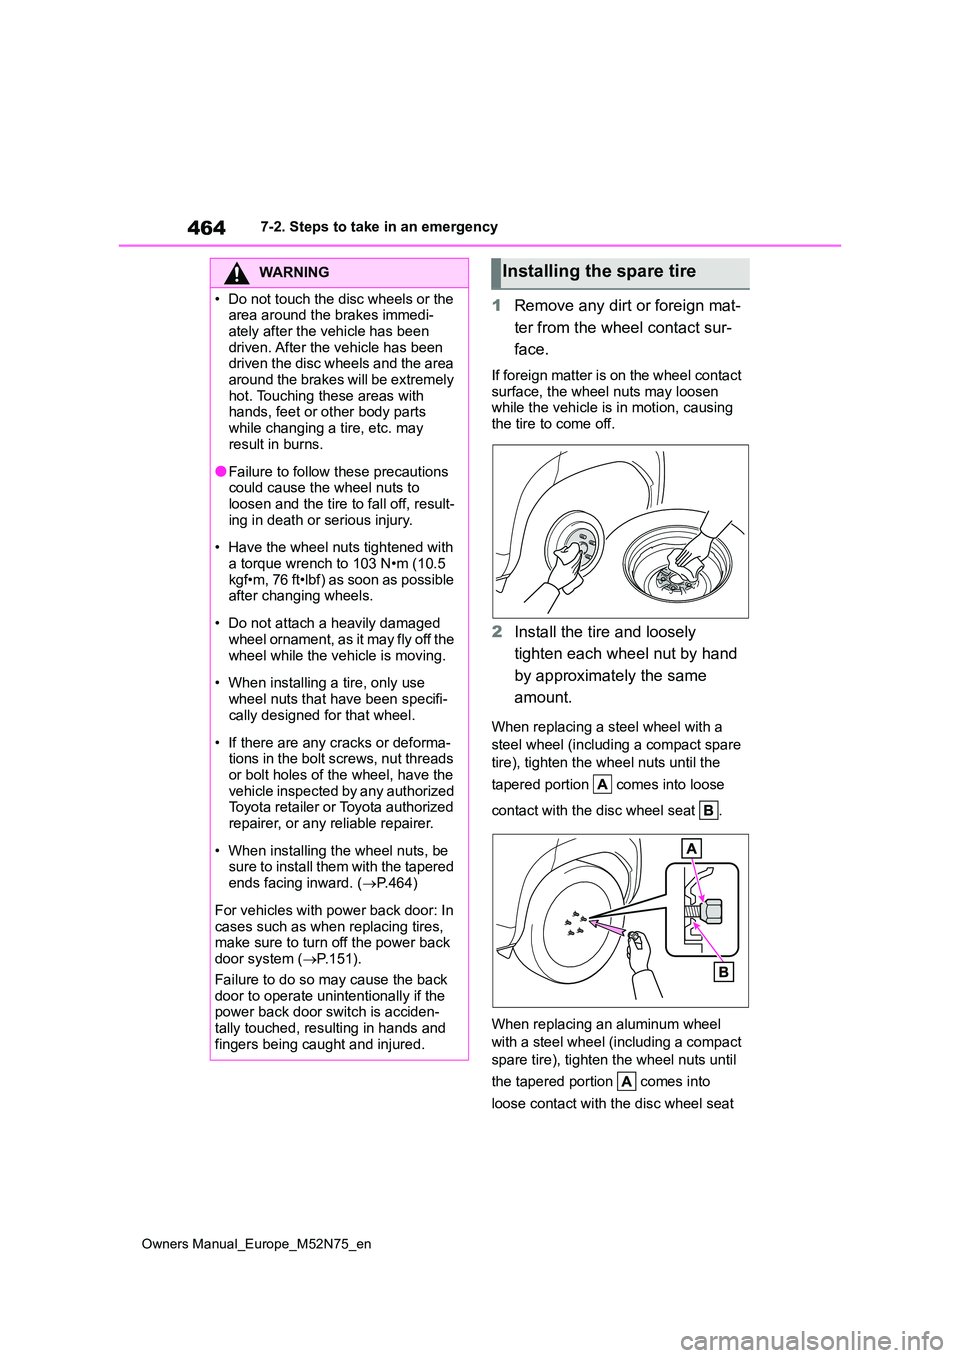
1Remove any dirt or foreign mat-
ter from the wheel contact sur-
face.
If foreign matter is on the wheel contact
surface, the wheel nuts may loosen while the vehicle is in motion, causing the tire to come off.
2 Install the tire and loosely
tighten each wheel nut by hand
by approximately the same
amount.
When replacing a steel wheel with a
steel wheel (including a compact spare
tire), tighten the wheel nuts until the
tapered portion comes into loose
contact with the disc wheel seat .
When replacing an aluminum wheel
with a steel wheel (including a compact
spare tire), tighten the wheel nuts until
the tapered portion comes into
loose contact with the disc wheel seat
WARNING
�
Page 467 of 698
465
7
Owners Manual_Europe_M52N75_en
7-2. Steps to take in an emergency
When trouble arises
.
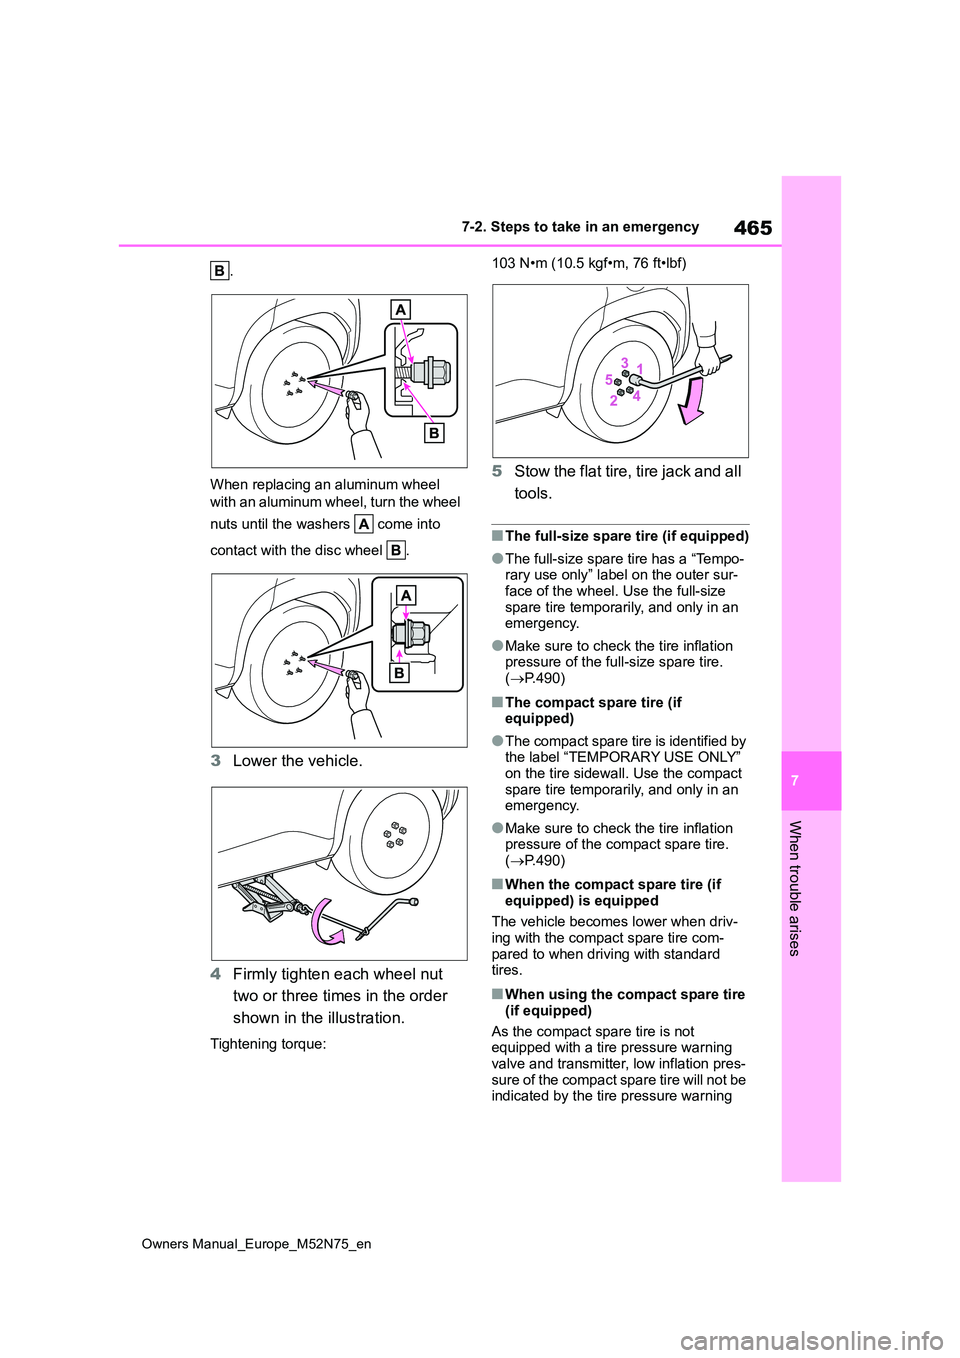
When replacing an aluminum wheel
with an aluminum wheel, turn the wheel
nuts until the washers come into
contact with the disc wheel .
3 Lower the vehicle.
4 Firmly tighten each wheel nut
two or three times in the order
shown in the illustration.
Tightening torque:
103 N•m (10.5 kgf•m, 76 ft•lbf)
5 Stow the flat tire, tire jack and all
tools.
■The full-size spare tire (if equipped)
●The full-size spare tire has a “Tempo- rary use only” label on the outer sur-
face of the wheel. Use the full-size spare tire temporarily, and only in an emergency.
●Make sure to check the tire inflation pressure of the full-size spare tire.
( P.490)
■The compact spare tire (if equipped)
●The compact spare tire is identified by the label “TEMPORARY USE ONLY” on the tire sidewall. Use the compact
spare tire temporarily, and only in an emergency.
●Make sure to check the tire inflation pressure of the compact spare tire. ( P.490)
■When the compact spare tire (if
equipped) is equipped
The vehicle becomes lower when driv- ing with the compact spare tire com-
pared to when driving with standard tires.
■When using the compact spare tire
(if equipped)
As the compact spare tire is not equipped with a tire pressure warning
valve and transmitter, low inflation pres- sure of the compact spare tire will not be indicated by the tire pressure warning
Page 468 of 698
466
Owners Manual_Europe_M52N75_en
7-2. Steps to take in an emergency
system. Also, if you replace the compact
spare tire after the tire pressure warning light comes on, the light remains on.
■If you have a flat rear tire (vehicles
with a compact spare tire in some
countries*)
Do not install the compact spare tire to rear axles.
Install the compact spare tire on one of the front wheels of the vehicle.
1 Replace a front tire with the compact spare tire.
2 Replace the flat rear tire with the tire
removed from the front of the vehi- cle.*: Guadelope, Martinique, F. Guiana,
Ceuta & Melilla, Ukraine, Turkey, New
Caledonia, Tahiti, Morocco
■If you have a flat front tire on a road covered with snow or ice (vehicles
with a compact spare tire)
Install the compact spare tire on one of the rear wheels of the vehicle. Perform
the following steps and fit tire chains to the front tires:
1 Replace a rear tire with the compact spare tire.
2 Replace the flat front tire with the tire
removed from the rear of the vehicle.
3 Fit tire chains to the front tires.
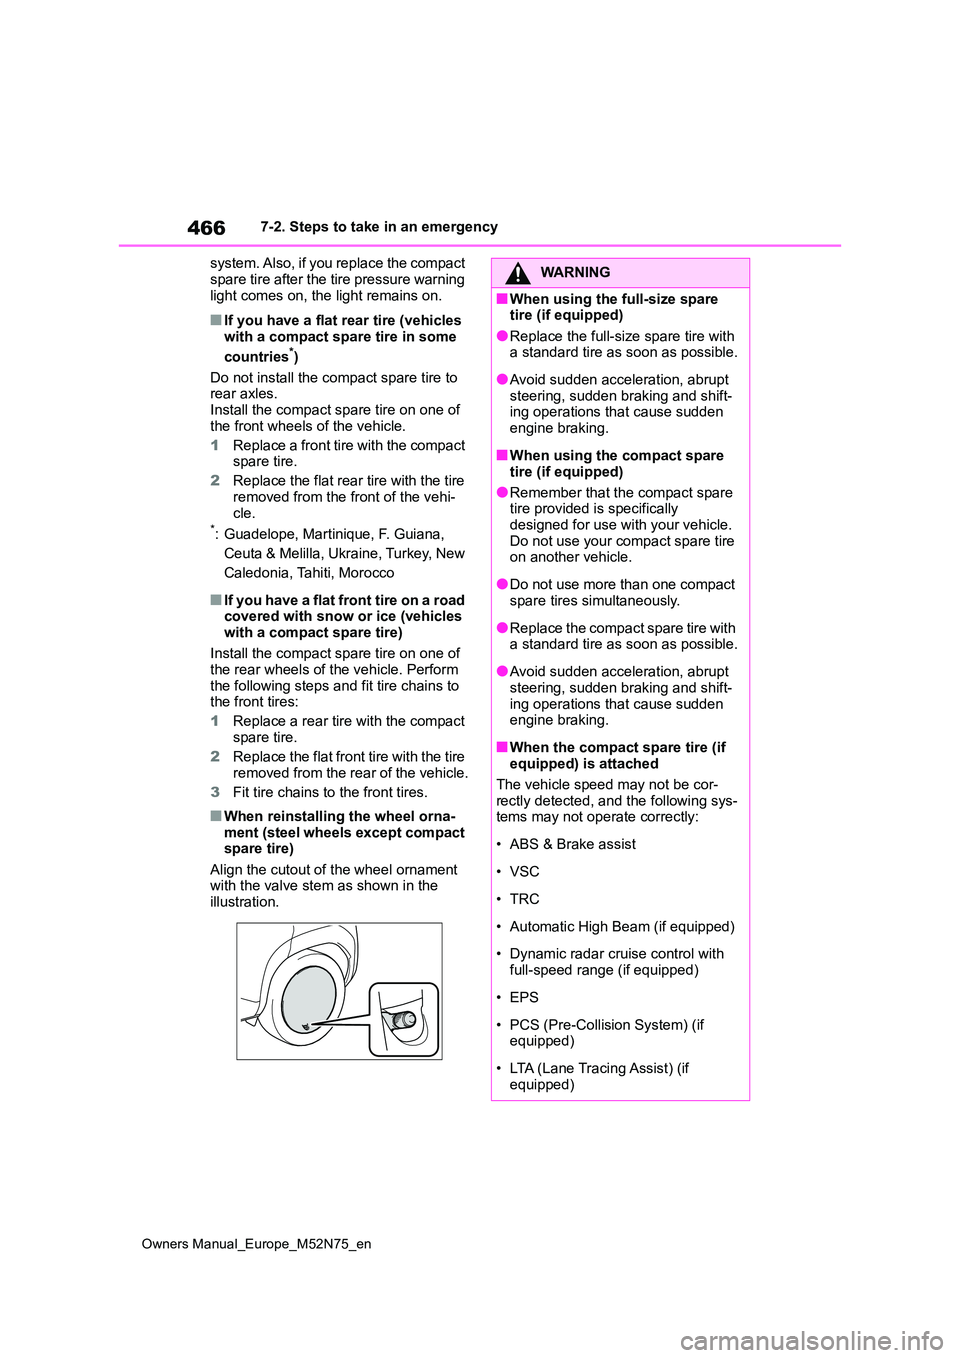
■When reinstalling the wheel orna- ment (steel wheels except compact spare tire)
Align the cutout of the wheel ornament with the valve stem as shown in the illustration.
WARNING
■When using the full-size spare tire (if equipped)
●Replace the full-size spare tire with a standard tire as soon as possible.
●Avoid sudden acceleration, abrupt steering, sudden braking and shift-ing operations that cause sudden
engine braking.
■When using the compact spare
tire (if equipped)
●Remember that the compact spare tire provided is specifically
designed for use with your vehicle. Do not use your compact spare tire on another vehicle.
●Do not use more than one compact spare tires simultaneously.
●Replace the compact spare tire with a standard tire as soon as possible.
●Avoid sudden acceleration, abrupt steering, sudden braking and shift-
ing operations that cause sudden engine braking.
■When the compact spare tire (if equipped) is attached
The vehicle speed may not be cor-
rectly detected, and the following sys- tems may not operate correctly:
• ABS & Brake assist
• VSC
•TRC
• Automatic High Beam (if equipped)
• Dynamic radar cruise control with
full-speed range (if equipped)
• EPS
• PCS (Pre-Collision System) (if equipped)
• LTA (Lane Tracing Assist) (if equipped)
Page 469 of 698
467
7
Owners Manual_Europe_M52N75_en
7-2. Steps to take in an emergency
When trouble arises
WARNING
�
Page 470 of 698
468
Owners Manual_Europe_M52N75_en
7-2. Steps to take in an emergency
One of the following may be the
cause of the problem:
Vehicles with a smart entry &
start system: The electronic key
may not be functioning properly.
( P.470)
There may not be sufficient fuel
in the vehicle’s tank. Refuel the
vehicle.
There may be a malfunction in
the immobilizer system. ( P.84)
Vehicles with a smart entry &
start system: There may be a
malfunction in the steering lock
system.
Vehicles with a smart entry &
start system: The hybrid system
may be malfunctioning due to an
electrical problem such as elec-
tronic key battery depletion or a
blown fuse. However, depend-
ing on the type of malfunction, an
interim measure is available to
start the hybrid system.
( P.469)
The temperature of the hybrid
battery (traction battery) may be
extremely low (below approxi-
mately -30°C [-22°F]). ( P.189,
191)
One of the following may be the
cause of the problem:
The 12-volt battery may be dis-
charged. ( P.472)
The 12-volt battery terminal con-
nections may be loose or cor-
roded. ( P.388)
One of the following may be the
cause of the problem:
The 12-volt battery may be dis-
charged. ( P.472)
One or both of the 12-volt battery
terminals may be disconnected.
( P.388)
Contact any authorized Toyota retailer
or Toyota authorized repairer, or any
reliable repairer if the problem cannot
be repaired, or if repair procedures are
unknown.
If the hybrid system will
not start
Reasons for the hybrid system
not starting vary depending on
the situation. Check the follow-
ing and perform the appropri-
ate procedure:
The hybrid system will not
start even though the cor-
rect starting procedure is
being followed. ( P.189,
191)
The interior lights and head-
lights are dim, or the horn
does not sound or sounds at
a low volume.
The interior lights and head-
lights do not turn on, or the
horn does not sound.