VOLKSWAGEN CORRADO 1993 Repair Manual
Manufacturer: VOLKSWAGEN, Model Year: 1993, Model line: CORRADO, Model: VOLKSWAGEN CORRADO 1993Pages: 920, PDF Size: 6.92 MB
Page 331 of 920

A/C COMPRESSOR OIL CHECKING
Article Text (p. 17)
1993 Volkswagen Corrado
For Volkswagen Technical Site: http://vw.belcom.ru
Copyright © 1998 Mitchell Repair Information Company, LLC
Wednesday, March 22, 2000 08:47PM
Add 2/3 ounce of refrigerant oil when replacing condenser.
Add 1 1/3 ounces when replacing evaporator. When replacing receiver-
drier or hoses, add 1/3 ounce per component replaced. If A/C system
line has broken (sudden discharge), add1 1/3 ounces of refrigerant
oil.
NOTE: On Mercedes-Benz vehicles with rear A/C, add 2/3 ounce of
refrigerant oil when replacing rear condenser. When
replacing rear A/C lines, add 1/3 ounce per line replaced.
Mitsubishi
1) On Eclipse, add 2/3 ounce of refrigerant oil when
replacing condenser. Add one ounce when replacing evaporator. When
replacing receiver-drier or hoses, add 1/3 ounce per component
replaced.
2) On Expo/Expo LRV and Montero, add one ounce of refrigerant
oil when replacing condenser. Add 2 ounces when replacing evaporator.
When replacing receiver-drier or hoses, add 1/3 ounce per component
replaced.
Volkswagen (Fox)
1) The use of refrigerant recovery/recycling is recommended
by manufacturer. After refrigerant recovery process is completed, the
amount of compressor oil removed must be measured and the same amount
added to A/C system.
2) Add 1 1/2 ounce of refrigerant oil when replacing
evaporator. When replacing condenser, add 1 1/3 ounce of refrigerant
oil. Add one ounce of refrigerant oil when replacing receiver-drier (1
1/2 ounces if relief valve on receiver-drier has burst).
PANASONIC
ROTARY VANE
Mazda
Add 1 1/3 ounce of refrigerant oil when replacing condenser
(1/2 ounce on MX-6 and 626). Add 2 ounces when replacing evaporator.
When replacing receiver-drier or hoses, add 1/3 ounce of refrigerant
oil.
SANDEN
SCROLL
Chrysler/Mitsubishi
1) On Colt, Galant, Mirage, Pickup, Ram-50 and Summit, add
1/2 ounce of refrigerant oil when replacing condenser. Add 1 1/2
ounces when replacing evaporator. When replacing receiver-drier or
hoses, add 1/3 ounce per component replaced.
2) On Stealth and 3000GT, add 1/2 ounce of refrigerant oil
when replacing condenser. Add 2 ounces when replacing evaporator. When
replacing receiver-drier or low-pressure hose, add 1/3 ounce per
Page 332 of 920

A/C COMPRESSOR OIL CHECKING
Article Text (p. 18)
1993 Volkswagen Corrado
For Volkswagen Technical Site: http://vw.belcom.ru
Copyright © 1998 Mitchell Repair Information Company, LLC
Wednesday, March 22, 2000 08:47PM
component replaced.
Honda
1) Discharge system. See SERVICING PRECAUTIONS. Remove
compressor from vehicle. Drain all oil from NEW compressor and fill
compressor with 4 ounces of clean refrigerant oil.
2) On Civic and Civic Del Sol, add 1 1/2 ounce of refrigerant
oil when replacing evaporator. Add 2/3 ounce when replacing condenser.
When replacing receiver-drier or hoses, add 1/3 ounce per component
replaced.
3) On Prelude, add one ounce of refrigerant oil when
replacing evaporator. When replacing other A/C components, add 1/3
ounce per component replaced (including hoses).
Hyundai
Add 1 1/2 ounces of refrigerant oil when replacing
evaporator. Add one ounce when replacing condenser. When replacing
receiver-drier, add 1/3 ounce of refrigerant oil.
5-CYLINDER
Mazda
Add one ounce of refrigerant oil when replacing condenser.
Add 1 2/3 ounce when replacing evaporator. When replacing receiver-
drier, add 1/2 ounce of refrigerant oil.
NOTE: Saab and Volvo (Sanden 5 or 7-cylinder) compressor oil
checking procedures are not available from manufacturer.
7-CYLINDER
Hyundai & Mitsubishi (Excel & Precis)
1) Before checking and adjusting oil level, operate
compressor at engine idle speed, and set controls at maximum cooling
and high blower motor speed for 20-30 minutes to return oil to
compressor.
2) Stop engine. Discharge refrigerant and remove compressor
from vehicle. See SERVICING PRECAUTIONS. Remove oil drain plug and
drain oil. Measure amount of oil drained. Install drain plug with new
"O" ring.
3) If amount drained is 2.3 ounces or more, fill compressor
with same amount using new oil. If amount drained is less than 2.3
ounces, fill with 2.3 ounces. Install filler plug. Install compressor
and recharge system.
COMPONENT REFRIGERANT OIL CAPACITIES (SANDEN 7-CYLINDER)ÄÄÄÄÄÄÄÄÄÄÄÄÄÄÄÄÄÄÄÄÄÄÄÄÄÄÄÄÄÄÄÄÄÄÄÄÄÄÄÄÄÄÄÄÄÄÄÄÄÄÄÄÄÄÄÄÄÄÄÄComponent Ounces
Condenser ............................................ 1.0
Evaporator ............................................. 3
Receiver-Drier ......................................... 1
Page 333 of 920
A/C COMPRESSOR OIL CHECKING
Article Text (p. 19)
1993 Volkswagen Corrado
For Volkswagen Technical Site: http://vw.belcom.ru
Copyright © 1998 Mitchell Repair Information Company, LLC
Wednesday, March 22, 2000 08:47PMÄÄÄÄÄÄÄÄÄÄÄÄÄÄÄÄÄÄÄÄÄÄÄÄÄÄÄÄÄÄÄÄÄÄÄÄÄÄÄÄÄÄÄÄÄÄÄÄÄÄÄÄÄÄÄÄÄÄÄÄ Jaguar (XJS)
1) Operate engine at idle speed for 10 minutes, to return
refrigerant oil to compressor. Stop engine. Discharge refrigerant. See
SERVICING PRECAUTIONS. Clean area around compressor filler plug and
remove plug slowly.
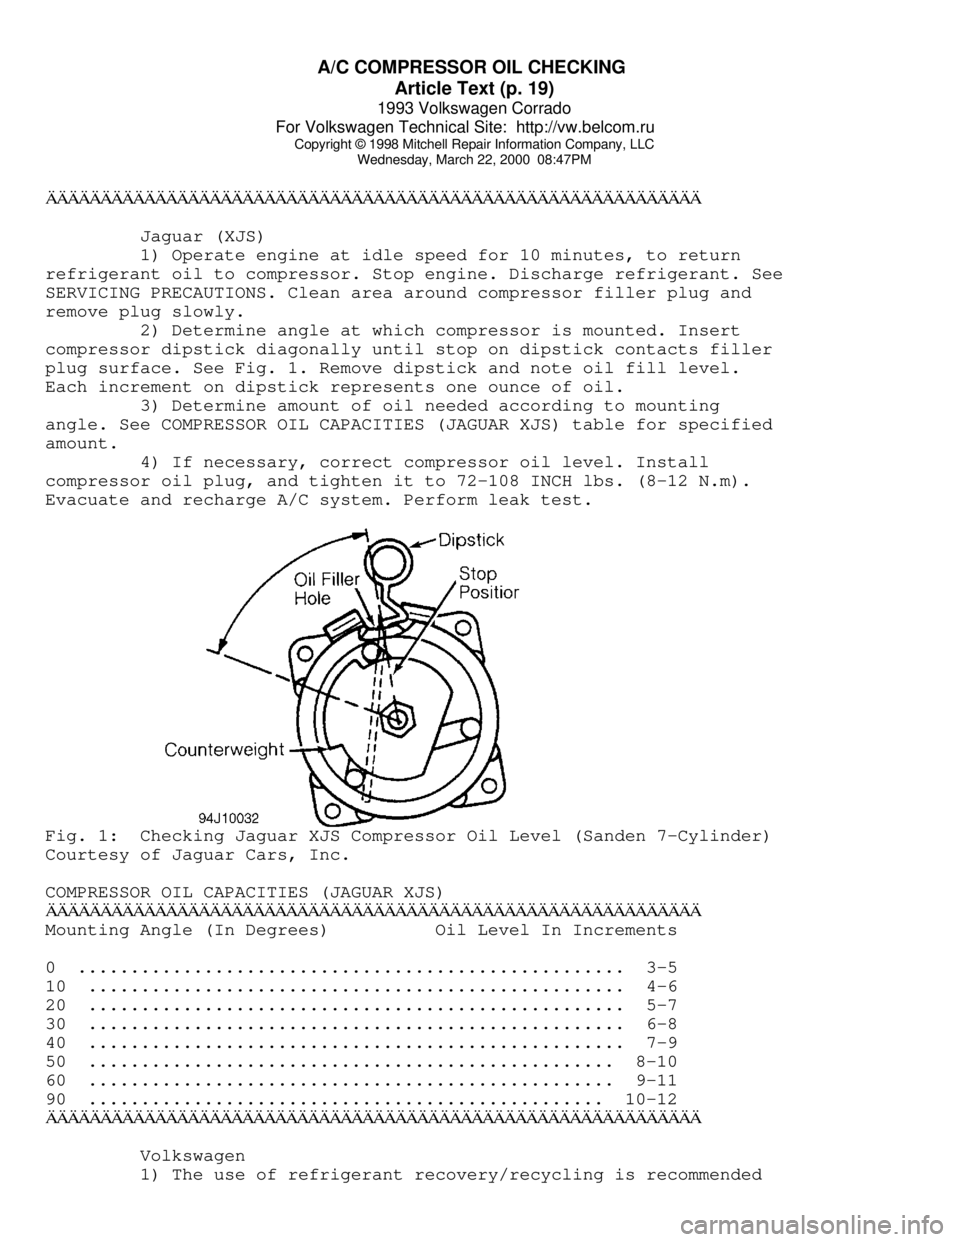
2) Determine angle at which compressor is mounted. Insert
compressor dipstick diagonally until stop on dipstick contacts filler
plug surface. See Fig. 1. Remove dipstick and note oil fill level.
Each increment on dipstick represents one ounce of oil.
3) Determine amount of oil needed according to mounting
angle. See COMPRESSOR OIL CAPACITIES (JAGUAR XJS) table for specified
amount.
4) If necessary, correct compressor oil level. Install
compressor oil plug, and tighten it to 72-108 INCH lbs. (8-12 N.m).
Evacuate and recharge A/C system. Perform leak test.Fig. 1: Checking Jaguar XJS Compressor Oil Level (Sanden 7-Cylinder)
Courtesy of Jaguar Cars, Inc.
COMPRESSOR OIL CAPACITIES (JAGUAR XJS)
ÄÄÄÄÄÄÄÄÄÄÄÄÄÄÄÄÄÄÄÄÄÄÄÄÄÄÄÄÄÄÄÄÄÄÄÄÄÄÄÄÄÄÄÄÄÄÄÄÄÄÄÄÄÄÄÄÄÄÄÄMounting Angle (In Degrees) Oil Level In Increments
0 .................................................... 3-5
10 ................................................... 4-6
20 ................................................... 5-7
30 ................................................... 6-8
40 ................................................... 7-9
50 .................................................. 8-10
60 .................................................. 9-11
90 ................................................. 10-12
ÄÄÄÄÄÄÄÄÄÄÄÄÄÄÄÄÄÄÄÄÄÄÄÄÄÄÄÄÄÄÄÄÄÄÄÄÄÄÄÄÄÄÄÄÄÄÄÄÄÄÄÄÄÄÄÄÄÄÄÄ Volkswagen
1) The use of refrigerant recovery/recycling is recommended
Page 334 of 920

A/C COMPRESSOR OIL CHECKING
Article Text (p. 20)
1993 Volkswagen Corrado
For Volkswagen Technical Site: http://vw.belcom.ru
Copyright © 1998 Mitchell Repair Information Company, LLC
Wednesday, March 22, 2000 08:47PM
by manufacturer. After refrigerant recovery process is completed, the
amount of compressor oil removed must be measured and the same amount
added to A/C system.
2) On Cabriolet, add 2/3 ounce of refrigerant oil when
replacing evaporator. When replacing condenser or receiver-drier, add
1/3 ounce of refrigerant oil per component replaced.
3) On Corrado SLC, Golf, GTI, Jetta and Passat, add 2/3 ounce
of refrigerant oil when replacing evaporator. When replacing condenser
or receiver-drier, add 1/3 ounce of refrigerant oil per component
replaced.
4) On EuroVan, add one ounce of refrigerant oil when
replacing evaporator. Add 1/2 ounce when replacing condenser (2/3
ounce on vehicles with rear A/C). When replacing receiver-drier, add
1/3 ounce (2/3 ounce on vehicles with rear A/C).
SEIKO-SEIKI
ROTARY VANE
Saab (9000)
The A/C system is filled with 6.6 ounces of compressor oil.
The compressor must be topped off with the specified amount. See
COMPONENT REFRIGERANT OIL CAPACITIES (SEIKO-SEIKI ROTARY VANE) table.
Topping off should be carried out on the high pressure side of the
compressor.
COMPONENT REFRIGERANT OIL CAPACITIES (SEIKO-SEIKI ROTARY VANE)ÄÄÄÄÄÄÄÄÄÄÄÄÄÄÄÄÄÄÄÄÄÄÄÄÄÄÄÄÄÄÄÄÄÄÄÄÄÄÄÄÄÄÄÄÄÄÄÄÄÄÄÄÄÄÄÄÄÄÄÄÄÄÄComponent Ounces
Compressor .......................................... (1) 2.3
Condenser ............................................... 1.3
Expansion Valve ......................................... 0.6
Evaporator .............................................. 1.3
Receiver-Drier .......................................... 1.3
Refrigerant Lines ....................................... 0.6
(1) - To avoid an excessive amount of oil in the A/C system, oil
must be drained from the compressor before it is installed.
ÄÄÄÄÄÄÄÄÄÄÄÄÄÄÄÄÄÄÄÄÄÄÄÄÄÄÄÄÄÄÄÄÄÄÄÄÄÄÄÄÄÄÄÄÄÄÄÄÄÄÄÄÄÄÄÄÄÄÄÄÄÄÄ ZEXEL
NOTE: Isuzu and Subaru compressor oil checking procedures are not
available from manufacturer.
ROTARY VANE
Nissan
1) Before checking and adjusting oil level, operate engine at
1200 RPM. Set controls at maximum cooling and high blower motor speed
for 10 minutes to return oil to compressor.
Page 335 of 920

A/C COMPRESSOR OIL CHECKING
Article Text (p. 21)
1993 Volkswagen Corrado
For Volkswagen Technical Site: http://vw.belcom.ru
Copyright © 1998 Mitchell Repair Information Company, LLC
Wednesday, March 22, 2000 08:47PM
2) Stop engine. Discharge refrigerant. See SERVICING
PRECAUTIONS. Measure the amount of oil drained/discharged into
refrigerant recovery/recycling equipment.
3) Remove compressor from vehicle. Drain compressor oil from
compressor drain plug and measure oil amount. Add this amount to
amount drained in step 2), to obtain total amount drained.
4) Fill compressor with total amount drained, using new oil.
If any major components of the system were also replaced, determine
the amount of additional oil needed. See COMPONENT REFRIGERANT OIL
CAPACITIES (ZEXEL ROTARY VANE & 6-CYLINDER) table for specified
amount.
COMPONENT REFRIGERANT OIL CAPACITIES (ZEXEL ROTARY VANE & 6-CYLINDER)ÄÄÄÄÄÄÄÄÄÄÄÄÄÄÄÄÄÄÄÄÄÄÄÄÄÄÄÄÄÄÄÄÄÄÄÄÄÄÄÄÄÄÄÄÄÄÄÄÄÄÄÄÄÄÄÄÄÄÄÄÄÄÄÄÄÄÄÄÄÄComponent Ounces
Condenser
Altima & Maxima ............................................... 2.5
NX, Pickup, Sentra & 300ZX ................................ 1.0-1.7
Evaporator
Altima & Maxima ............................................... 2.5
NX, Pickup, Sentra & 300ZX ................................ 1.5-2.5
Receiver-Drier
Altima & Maxima ............................................... 0.2
NX, Pickup, Sentra & 300ZX ................................ 0.5-0.8
Refrigerant Lines (1) .......................................... 1.0
(1) - Add only if a refrigerant oil leak is indicated.
ÄÄÄÄÄÄÄÄÄÄÄÄÄÄÄÄÄÄÄÄÄÄÄÄÄÄÄÄÄÄÄÄÄÄÄÄÄÄÄÄÄÄÄÄÄÄÄÄÄÄÄÄÄÄÄÄÄÄÄÄÄÄÄÄÄÄÄÄÄÄ 6-CYLINDER
Audi
1) The use of refrigerant recovery/recycling is recommended
by manufacturer. After refrigerant recovery process is completed, the
amount of compressor oil removed must be measured and the same amount
added to A/C system.
2) Add one ounce of refrigerant oil when replacing
accumulator. When replacing condenser, add amount drained from
condenser plus 1/3 ounce of refrigerant oil. When replacing
evaporator, add amount drained from evaporator plus 2/3 ounce of
refrigerant oil.
Nissan
1) Before checking and adjusting oil level, operate engine at
1200 RPM. Set controls at maximum cooling and high blower motor speed
for 10 minutes to return oil to compressor.
2) Stop engine. Discharge refrigerant. See SERVICING
PRECAUTIONS. Measure the amount of oil drained/discharged into
refrigerant recovery/recycling equipment.
3) Remove compressor from vehicle. Drain compressor oil from
compressor drain plug and measure oil amount. Add this amount to
Page 336 of 920

A/C COMPRESSOR OIL CHECKING
Article Text (p. 22)
1993 Volkswagen Corrado
For Volkswagen Technical Site: http://vw.belcom.ru
Copyright © 1998 Mitchell Repair Information Company, LLC
Wednesday, March 22, 2000 08:47PM
amount drained in step 2), to obtain total amount drained.
4) Fill compressor with total amount drained, using new oil.
If any major components of the system were also replaced, determine
the amount of additional oil needed. See COMPONENT REFRIGERANT OIL
CAPACITIES (ZEXEL ROTARY VANE & 6-CYLINDER) table for specified
amount.
Volvo (850)
1) Discharge refrigerant. See SERVICING PRECAUTIONS. Remove
compressor from vehicle. Drain compressor oil from compressor drain
plug and measure oil amount. Add the same amount of oil as was drained
from the old compressor.
2) Add 1 2/3 ounce of refrigerant oil when replacing
evaporator. When replacing condenser or hoses, add 2/3 ounce of
refrigerant oil per component replaced. Add 3 ounce of refrigerant oil
when replacing receiver-drier.
END OF ARTICLE
Page 337 of 920
A/C COMPRESSOR SERVICING
Article Text
1993 Volkswagen Corrado
For Volkswagen Technical Site: http://vw.belcom.ru
Copyright © 1998 Mitchell Repair Information Company, LLC
Wednesday, March 22, 2000 08:48PM
ARTICLE BEGINNING
1993 AIR CONDITIONING & HEAT
Compressor Servicing
READ THIS FIRST
NOTE: The purpose of this article is to provide GENERAL servicing
overview. For more specific information, refer to the AUTO
A/C-HEAT SYSTEM, MANUAL A/C-HEAT SYSTEM, or HEATER SYSTEM
articles in this section.
NOTE: Due to variety of clutch and shaft seal configurations,
obtain appropriate A/C compressor service tools for
compressor being serviced.
ATSUGI ROTARY VANE CLUTCH COIL R & I
Removal
When replacing compressor clutch, be careful not to scratch
shaft or bend pulley. When removing center bolt, hold clutch disc with
Clutch Holder (KV99231010). Using Hub Puller (KV998VR001), remove
clutch disc. When removing pulley, remove lock nut with Hub Socket
(KV99235160).
Installation
1) Tighten center bolt to 81-104 INCH lbs. (9.1-11.8 N.m).
Tighten lock nut to 21-29 ft. lbs. (29-39 N.m). Using feeler gauge,
ensure clearance between clutch disc and pulley is .012-.024" (.30-.60
mm).
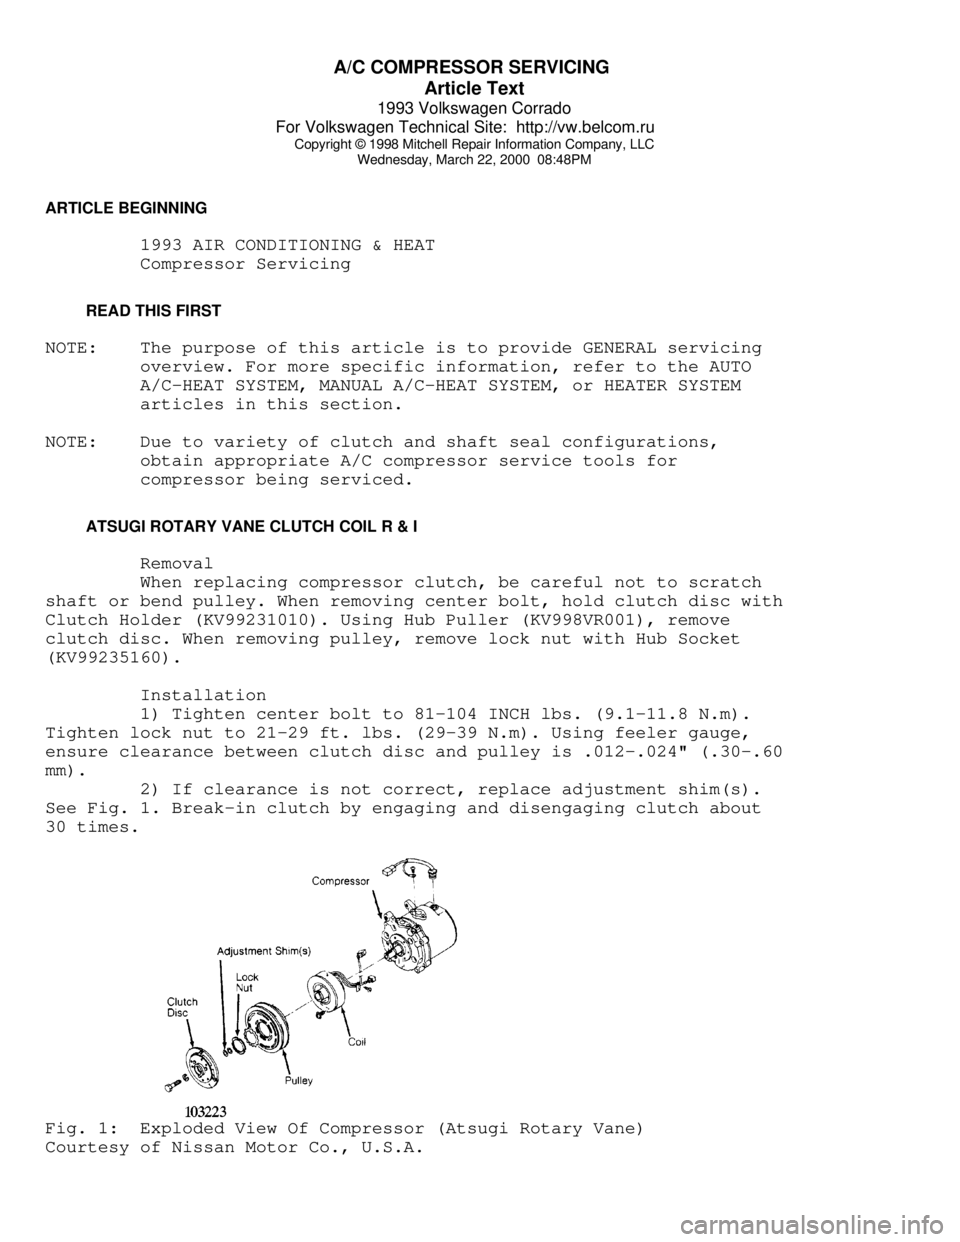
2) If clearance is not correct, replace adjustment shim(s).
See Fig. 1. Break-in clutch by engaging and disengaging clutch about
30 times.Fig. 1: Exploded View Of Compressor (Atsugi Rotary Vane)
Courtesy of Nissan Motor Co., U.S.A.
Page 338 of 920
A/C COMPRESSOR SERVICING
Article Text (p. 2)
1993 Volkswagen Corrado
For Volkswagen Technical Site: http://vw.belcom.ru
Copyright © 1998 Mitchell Repair Information Company, LLC
Wednesday, March 22, 2000 08:48PM
BOSCH 6-CYLINDER CLUTCH COIL R & I
Removal
1) Hold clutch plate and remove shaft nut. Using Clutch Plate
Remover (64 5 00), remove clutch plate. Using snap ring pliers, remove
circlip and remove pulley assembly.
2) If pulley bearing is being replaced, remove circlip at
rear of pulley. Press bearing and spacer from pulley. Press in new
bearing with spacer and replace circlip.
Installation
1) Clean all surfaces. Install pulley assembly on compressor
and install circlip. Ensure clutch plate shim is in place on shaft.
Install clutch plate and nut. Tighten nut to 13-15 ft. lbs. (18-20 N.
m).
2) Using a feeler gauge, check clutch plate-to-pulley
clearance. Clearance should be .028-.051" (.7-1.3 mm). If clearance is
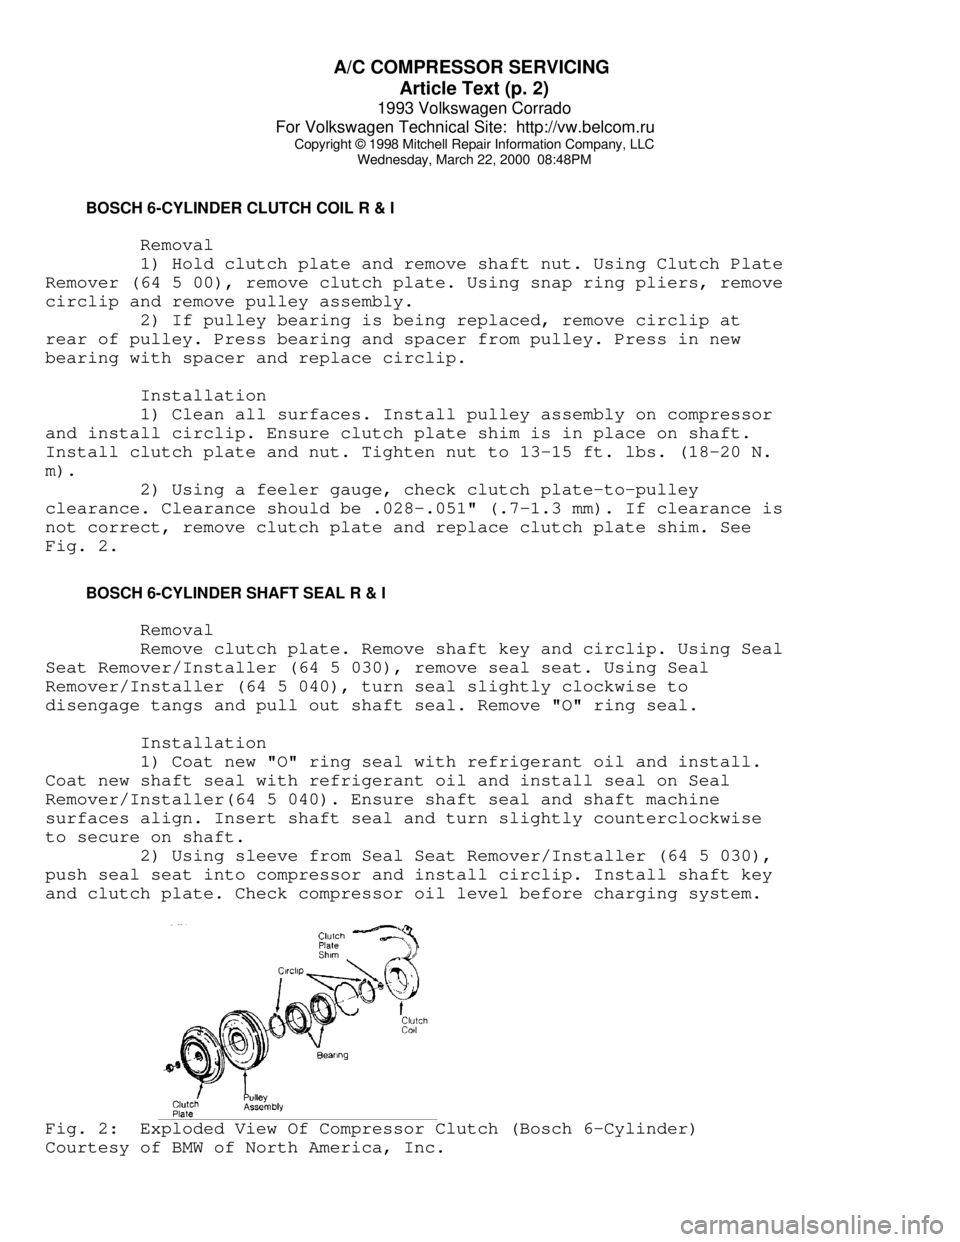
not correct, remove clutch plate and replace clutch plate shim. See
Fig. 2.
BOSCH 6-CYLINDER SHAFT SEAL R & I
Removal
Remove clutch plate. Remove shaft key and circlip. Using Seal
Seat Remover/Installer (64 5 030), remove seal seat. Using Seal
Remover/Installer (64 5 040), turn seal slightly clockwise to
disengage tangs and pull out shaft seal. Remove "O" ring seal.
Installation
1) Coat new "O" ring seal with refrigerant oil and install.
Coat new shaft seal with refrigerant oil and install seal on Seal
Remover/Installer(64 5 040). Ensure shaft seal and shaft machine
surfaces align. Insert shaft seal and turn slightly counterclockwise
to secure on shaft.
2) Using sleeve from Seal Seat Remover/Installer (64 5 030),
push seal seat into compressor and install circlip. Install shaft key
and clutch plate. Check compressor oil level before charging system.Fig. 2: Exploded View Of Compressor Clutch (Bosch 6-Cylinder)
Courtesy of BMW of North America, Inc.
Page 339 of 920
A/C COMPRESSOR SERVICING
Article Text (p. 3)
1993 Volkswagen Corrado
For Volkswagen Technical Site: http://vw.belcom.ru
Copyright © 1998 Mitchell Repair Information Company, LLC
Wednesday, March 22, 2000 08:48PM
CALSONIC V5 & V6 CLUTCH COIL R & I
NOTE: Calsonic V6 compressor servicing procedure is not available
from manufacturer.
Removal
1) Remove shaft nut while holding clutch plate with Clutch
Disc Wrench (J-39072). Install clutch disc Puller Set (J-39073-4, J-
33013-1, J-33013-3) and remove clutch plate.
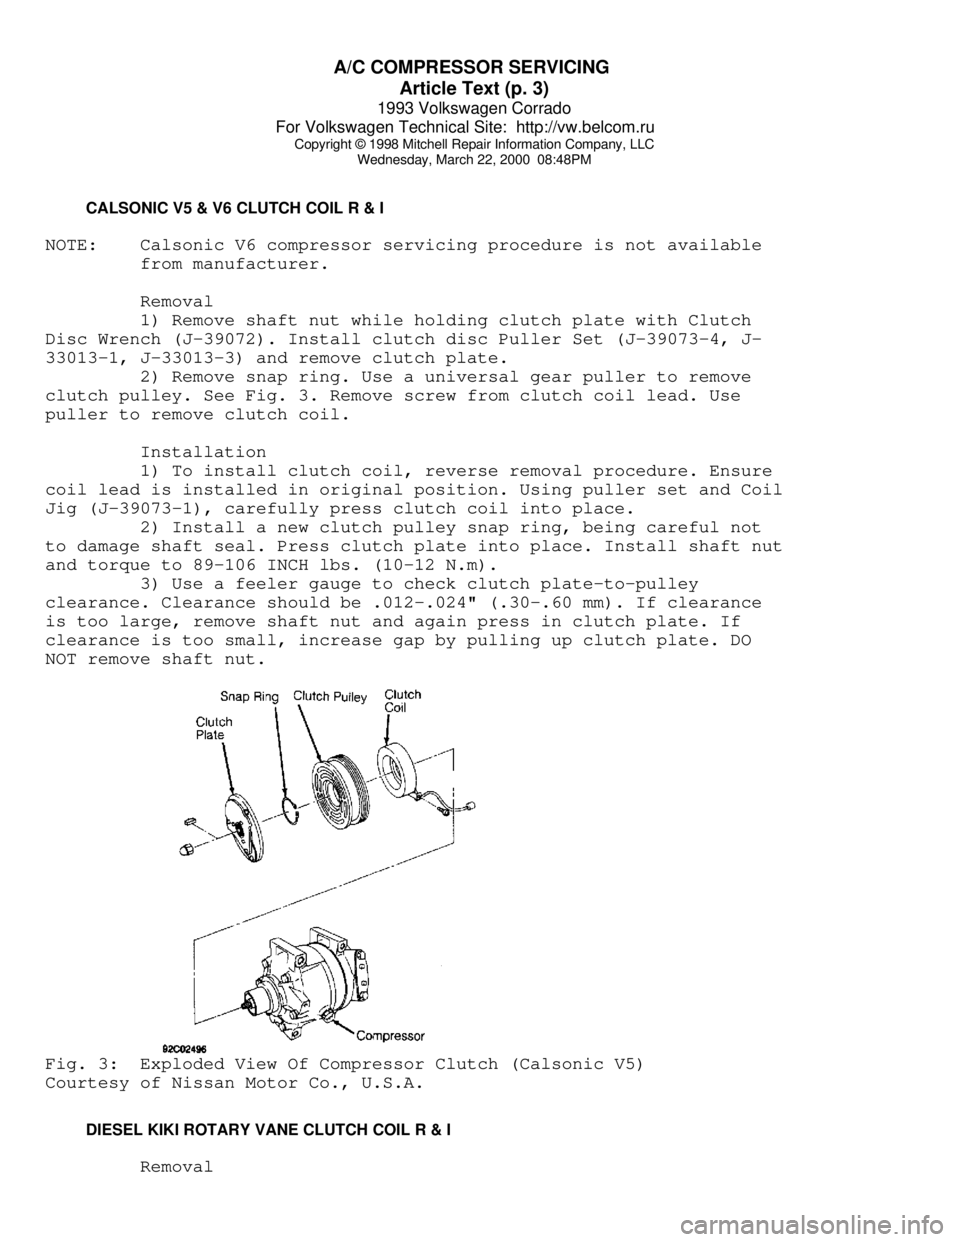
2) Remove snap ring. Use a universal gear puller to remove
clutch pulley. See Fig. 3. Remove screw from clutch coil lead. Use
puller to remove clutch coil.
Installation
1) To install clutch coil, reverse removal procedure. Ensure
coil lead is installed in original position. Using puller set and Coil
Jig (J-39073-1), carefully press clutch coil into place.
2) Install a new clutch pulley snap ring, being careful not
to damage shaft seal. Press clutch plate into place. Install shaft nut
and torque to 89-106 INCH lbs. (10-12 N.m).
3) Use a feeler gauge to check clutch plate-to-pulley
clearance. Clearance should be .012-.024" (.30-.60 mm). If clearance
is too large, remove shaft nut and again press in clutch plate. If
clearance is too small, increase gap by pulling up clutch plate. DO
NOT remove shaft nut.Fig. 3: Exploded View Of Compressor Clutch (Calsonic V5)
Courtesy of Nissan Motor Co., U.S.A.
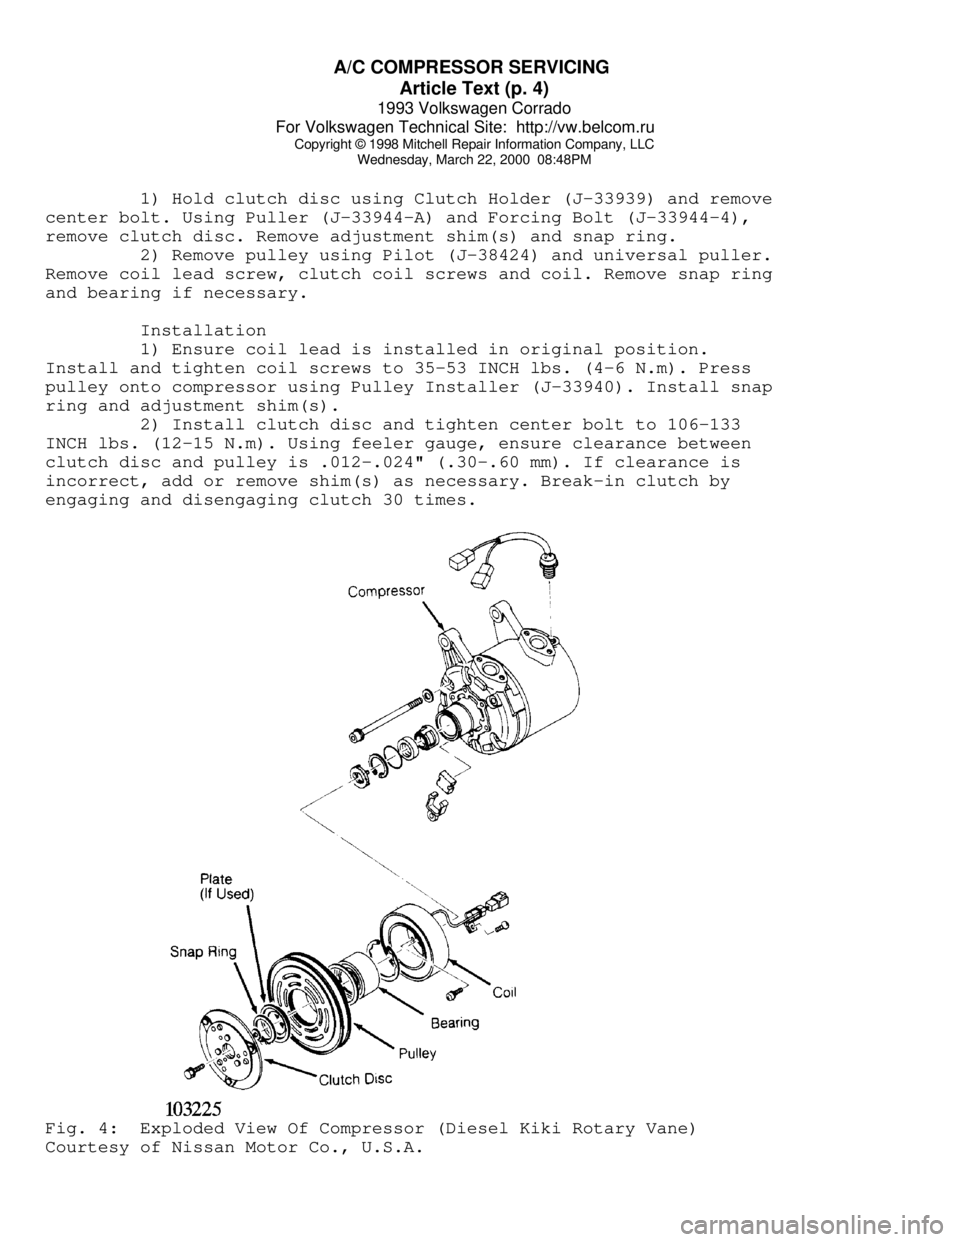
DIESEL KIKI ROTARY VANE CLUTCH COIL R & I
Removal
Page 340 of 920
A/C COMPRESSOR SERVICING
Article Text (p. 4)
1993 Volkswagen Corrado
For Volkswagen Technical Site: http://vw.belcom.ru
Copyright © 1998 Mitchell Repair Information Company, LLC
Wednesday, March 22, 2000 08:48PM
1) Hold clutch disc using Clutch Holder (J-33939) and remove
center bolt. Using Puller (J-33944-A) and Forcing Bolt (J-33944-4),
remove clutch disc. Remove adjustment shim(s) and snap ring.
2) Remove pulley using Pilot (J-38424) and universal puller.
Remove coil lead screw, clutch coil screws and coil. Remove snap ring
and bearing if necessary.
Installation
1) Ensure coil lead is installed in original position.
Install and tighten coil screws to 35-53 INCH lbs. (4-6 N.m). Press
pulley onto compressor using Pulley Installer (J-33940). Install snap
ring and adjustment shim(s).
2) Install clutch disc and tighten center bolt to 106-133
INCH lbs. (12-15 N.m). Using feeler gauge, ensure clearance between
clutch disc and pulley is .012-.024" (.30-.60 mm). If clearance is
incorrect, add or remove shim(s) as necessary. Break-in clutch by
engaging and disengaging clutch 30 times.Fig. 4: Exploded View Of Compressor (Diesel Kiki Rotary Vane)
Courtesy of Nissan Motor Co., U.S.A.